


 Loading...
READ THIS MANUAL CAREFULLY!
It contains important safety information.
OWNER’S/OPERATOR’S MANUAL
G23E
LIT-19626-01-18 |
JU6-F8199-10 |

INTRODUCTION
Congratulations on your purchase of a Yamaha utility vehicle. This manual contains information you will need for proper operation, maintenance, and care of your utility vehicle. A thorough understanding of these simple instructions will help you to obtain maximum enjoyment from your new Yamaha.
If you have any questions about the operation or maintenance of your utility vehicle, please consult a Yamaha dealer.
TECHNICAL SERVICE DEPT
YAMAHA GOLF-CAR COMPANY
G23E
OWNER’S/OPERATOR’S
MANUAL
© 2004 by Yamaha Golf-Car Company 2nd edition
All rights reserved. Any reprinting or unauthorized use without the written permission of
Yamaha Golf-Car Company is expressly prohibited.
Printed in U.S.A.
P/N LIT-19626-01-18
IMPORTANT MANUAL INFORMATION
Particularly important information is distinguished in this manual by the following notations:
The Safety Alert Symbol means ATTENTION! BE ALERT! YOUR
SAFETY IS INVOLVED!
WARNING |
Failure to follow WARNING instructions could result in severe |
|
injury or death to the utility vehicle occupants, a bystander, or a |
||
|
||
|
person inspecting or repairing the utility vehicle. |
|
CAUTION: |
This message describes special precautions that must be taken to |
|
avoid damage to the utility vehicle. |
||
|
NOTE: This message provides additional key information.
NOTE:
●Yamaha continually seeks advancements in product design and quality; therefore, while this manual contains the most current product information available at the time of printing, there may be minor discrepancies between your utility vehicle and this manual. If you have any questions concerning this manual, please consult your Yamaha dealer.
●This manual should be considered a permanent part of your utility vehicle and should remain with the car when resold.

 WARNING
Read and understand this manual completely before operating your utility vehicle.
YAMAHA GOLF-CAR COMPANY UTILITY VEHICLE LIMITED WARRANTY
Yamaha Golf-Car Company hereby warrants that any new Utility Vehicle purchased from an authorized Yamaha dealer in the United States, will be free from defects in material and workmanship for the period of time stated herein, subject to the stated limitations.
THE PERIOD OF WARRANTY for any Utility Vehicle will be one year from date of purchase for parts and labor.
The warranty shall cover the entire vehicle except for batteries, tires and rims, which are warranted by their respective manufacturers.
DURING THE PERIOD OF WARRANTY any authorized Yamaha Golf Car Dealer will, free of charge, repair or replace, at Yamaha’s option, any part adjudged defective by Yamaha due to faulty workmanship or material from the factory. Parts used in warranty repairs will be warranted for the balance of the machine’s warranty period. All parts replaced under warranty become property of Yamaha Golf-Car Company.
GENERAL EXCLUSIONS from this warranty shall include any failures caused by:
a.Abnormal strain, neglect, or abuse, including lack of proper maintenance, and use contrary to the Owner’s/Operator’s Manual instructions.
b.Accident or collision damage.
c.Installation of parts or accessories that are not original equipment.
d.Fading, rust, or deterioration due to exposure or ordinary wear and tear.
e.Modification or alteration that affects the Utility Vehicle’s condition, operation, performance, or durability.
f.Damage due to improper transportation.
g.Acts of God (i.e. lightning, hail damage, flooding, fire, etc.)
SPECIFIC EXCLUSIONS from this warranty shall include any parts replaced due to normal wear or routine maintenance, including oil, air filter elements, brake shoes, spark plugs, starter and clutch drive belts, and bed damage such as scratches, dents, or deformation. Any charges incurred in transporting a Utility Vehicle to and from an authorized Yamaha Golf Car Dealer for service or in performing field service is also excluded from this warranty.
THE CUSTOMER’S RESPONSIBILITY under this warranty shall be to:
1.Operate and maintain the Utility Vehicle as specified in the appropriate Owner’s/Operator’s Manual;
2.Give notice to an authorized Yamaha dealer of any and all apparent defects within ten (10) days after discovery, and make the machine available at that time for inspection and repairs by the dealer’s authorized representative.
WARRANTY TRANSFER: To transfer any remaining warranty from the original purchaser to any subsequent purchaser, it is imperative that the machine be inspected and registered for warranty by an authorized Yamaha Golf Car Dealer. In order for this warranty to remain in effect, this inspection and registration must take place within ten (10) days after transfer. An inspection and registration fee will be charged for this service.
YAMAHA GOLF-CAR COMPANY MAKES NO OTHER WARRANTY OF ANY KIND, EXPRESSED OR IMPLIED. ALL IMPLIED WARRANTIES OF MERCHANTABILITY AND FITNESS FOR A PARTICULAR PURPOSE WHICH EXCEED THE OBLIGATIONS AND TIME LIMITS STATED IN THIS WARRANTY ARE HEREBY DISCLAIMED BY YAMAHA GOLF-CAR COMPANY AND EXCLUDED FROM THIS WARRANTY.
SOME STATES DO NOT ALLOW LIMITATIONS ON HOW LONG AN IMPLIED WARRANTY LASTS, SO THE ABOVE LIMITATION MAY NOT APPLY TO YOU. ALSO EXCLUDED FROM THIS WARRANTY ARE ANY INCIDENTAL OR CONSEQUENTIAL DAMAGES INCLUDING LOSS OF USE. SOME STATES DO NOT ALLOW THE EXCLUSION OR LIMITATION OF INCIDENTAL OR CONSEQUENTIAL DAMAGES, SO THE ABOVE EXCLUSION MAY NOT APPLY TO YOU.
THIS WARRANTY GIVES YOU SPECIFIC LEGAL RIGHTS, AND YOU MAY ALSO HAVE OTHER RIGHTS WHICH VARY FROM STATE TO STATE.
YAMAHA GOLF-CAR COMPANY
Effective Date: 01/01/04

|
CONTENTS |
|
|
1 |
LOCATION OF THE WARNING |
|
|
AND SPECIFICATION LABELS |
1-1 |
||
|
|||
2 |
DESCRIPTION AND VEHICLE |
|
|
IDENTIFICATION |
2-1 |
||
|
|||
|
Features .......................................... |
2-1 |
|
|
Utility vehicle serial number............. |
2-2 |
|
|
Key identification number................ |
2-2 |
|
3 |
SAFETY INFORMATION.................. |
3-1 |
|
|
|
||
4 |
CONTROL FUNCTIONS .................. |
4-1 |
|
Main switch |
4-1 |
||
|
|||
|
Drive select switch........................... |
4-2 |
|
|
Accelerator pedal ............................ |
4-3 |
|
|
Brake pedal ..................................... |
4-3 |
|
|
Parking brake pedal ........................ |
4-4 |
|
|
Horn button...................................... |
4-4 |
|
|
Auxiliary DC jack ............................. |
4-5 |
|
|
Cargo bed........................................ |
4-6 |
|
|
Tow switch....................................... |
4-9 |
Trailer hitch bracket |
.........................4-9 |
Transmitter unit .............................. |
4-10 |
5 |
PRE-OPERATION CHECKS ............ |
5-1 |
|
Pre-operation check list |
5-2 |
||
|
|||
|
Brakes.............................................. |
5-3 |
|
|
Batteries ........................................... |
5-3 |
|
|
Transmission oil ............................... |
5-4 |
|
|
Accelerator pedal ............................. |
5-4 |
|
|
Steering............................................ |
5-5 |
|
|
Fittings and fasteners ...................... |
5-5 |
|
|
Lights................................................ |
5-5 |
|
|
Switches........................................... |
5-5 |
|
|
Tires ................................................. |
5-5 |
|
6 |
OPERATION ..................................... |
6-1 |
|
Starting |
6-1 |
||
|
|||
|
Stopping........................................... |
6-2 |
|
|
Accessories and loading.................. |
6-3 |
|
7 |
DRIVING YOUR VEHICLE ............... |
7-1 |
|
Getting to know your vehicle |
7-1 |
||
|
|||
|
Learning to operate your vehicle ..... |
7-3 |

Turning your vehicle........................ |
7-3 |
Braking ............................................ |
7-3 |
Going uphill ..................................... |
7-4 |
Going downhill................................. |
7-5 |
Rough terrain .................................. |
7-6 |
Riding in brush or wooded areas.... |
7-6 |
8 |
PERIODIC MAINTENANCE AND |
|
|
ADJUSTMENT |
8-1 |
||
|
|||
|
Owner’s/Operator’s Manual ............ |
8-1 |
|
|
Periodic maintenance/ |
|
|
|
lubrication...................................... |
8-2 |
|
|
Seat ................................................. |
8-3 |
|
|
Cargo bed ....................................... |
8-3 |
|
|
Batteries .......................................... |
8-5 |
|
|
Battery care..................................... |
8-5 |
|
|
Battery charging.............................. |
8-7 |
|
|
Battery installation........................... |
8-9 |
|
|
Fuse replacement ......................... |
8-11 |
|
|
Transmission oil ............................ |
8-12 |
|
|
Wheel removal .............................. |
8-13 |
|
|
Wheel installation.......................... |
8-14 |
|
|
Brake adjustment .......................... |
8-15 |
Brake pedal free play |
|
adjustment ................................... |
8-15 |
Replacing a headlight bulb ............ |
8-17 |
Adjusting a headlight beam........... |
8-18 |
Replacing a taillight bulb ............... |
8-19 |
9 |
CLEANING AND STORAGE |
............ 9-1 |
|
Chassis preparation |
9-1 |
||
|
|||
|
Battery storage care ........................ |
9-1 |
|
10 |
SPECIFICATIONS .......................... |
10-1 |
|
|
|
||
11 |
MAINTENANCE RECORD ............. |
11-1 |
|
|
|
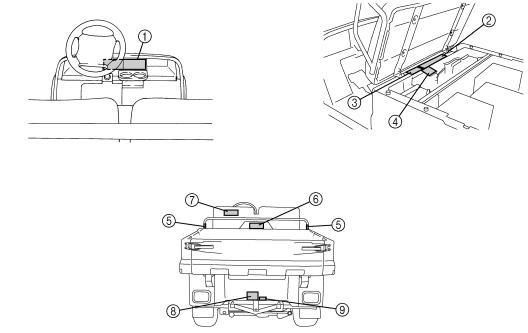
LOCATION OF THE WARNING AND
SPECIFICATION LABELS
1-1

Read and understand all of the labels on your
vehicle. They contain important information 1 for safe and proper operation of your vehicle.
Never remove any labels from your vehicle. If a label becomes difficult to read or comes off, a replacement label is available from your Yamaha dealer.
1
|
OFF |
FORWARD |
|
|
|
|
|
ON |
|
|
ON |
|
|
REVERSE |
YAMAHA |
|
JU6-K7761-00 |
! WARNING
Improper use can result in SEVERE INJURY or DEATH  Vehicle capacity: 1 operator and 1 passenger.
Remain seated and hold on while in motion.
This vehicle is recommended only for operators 16 and older with a valid motor vehicle license. Adults must supervise use by minors. Check state laws for minimum age requirements.
Drive slowly in turns.
Drive straight up and down hills-driving across the side of a hill increases the risk of overturn.
Keep entire body inside vehicle.
Passenger and cargo can affect vehicle handling.
Vehicle rated capacity (driver, passenger, cargo, trailer, and load) 1300lb. (590kg) on level surface.
LOCATE AND READ OWNER'S MANUAL. FOLLOW ALL INSTRUCTIONS AND WARNINGS.
ATTENTION
This vehicle was not manufactured for use on public streets and does not comply with federal motor vehicle safety standards applicable to passenger cars.
2 |
3 |
|
BATTERY INSTALLATION AND
WIRE LEAD CONNECTION
TO MOTOR |
TO RELAY |
CONTROL - |
|
YAMAHA |
JU6-K7765-00 |
1-2
4
5
|
WARNING |
|
Keep hands, body, other |
|
persons away when closing bed. |
|
Do not operate the vehicle |
|
with bed up. |
YAMAHA |
5UG-K7764-00 |
6
 WARNING
Severe INJURY or DEATH can result if you ignore the following:
Maximum Load in Cargo Bed: 800lb (363kg).
 Never carry passengers or fill fuel containers in cargo bed.
Cargo can affect handling and stability.Read Owner's Manual before loading or towing.
When loading with cargo or towing a trailer: Reduce speed and allow more room to stop. Avoid hills and rough terrain.
Be sure cargo is secured - a loose load could change handling unexpectedly. Keep weight in the cargo bed centered, and as low and far forward as possible. Top-heavy loads increase the risk of overturn.
YAMAHA |
JU5-K7766-01 |
7
|
WARNING |
|
|
|
Do not fill por table fuel container (gas can) in cargo bed . Static electr icity |
|
|
|
spar ks can ignite fuel vapor causing fire or explosion . |
|
|
|
Set fuel container on the ground and touch fuel nozzle to the unopened container |
|
|
|
before removing cap. Keep the fuel nozzle in contact with the container while |
|
|
|
refueling. Tighten cap before putting fuel container in cargo bed. |
|
|
|
YAMAHA |
JU7-K7767-00 |
|
|
|
||
|
|
|
|
8 |
|
|
|
|
WARNING |
|
|
Improperly loading a trailer and failure to use extra care when pulling trailer can cause an accident or injury. Never load more than 150 lbs (68kg) tongue weight on the towing bracket.
Do not tow more than 1000 lbs (454kg) rolling weight
(trailer plus cargo).
Allow for increased braking distance and use extreme caution when operating on inclines.
Read carefully the loading information and trailer hitch sections in the owner's manual.
YAMAHA |
JU5-K7768-00 |
9
1-3
DESCRIPTION AND VEHICLE IDENTIFICATION
2
FEATURES
1. Steering wheel
2. Seat
3. Batteries
4. Taillight
5. Rear tire
6. Receptacle
7. Transmitter unit
8. Front tire
9. Headlight
10. Accelerator pedal
11. Brake pedal
12. Parking brake pedal
13. Horn button
14. Auxiliary DC jack
15. Main switch
16. Drive select switch
2-1
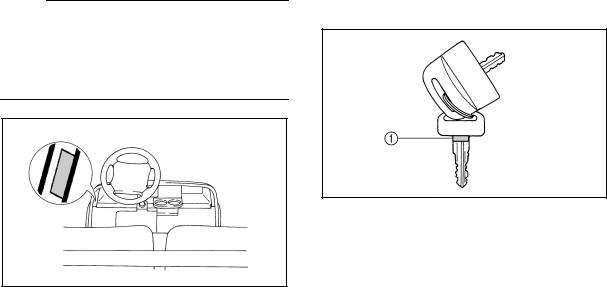
Utility vehicle serial number
The utility vehicle serial number is affixed in the location shown.
NOTE:
The first three digits of the serial number are for model identification; the remaining digits are the unit production number. Keep a record of these numbers for reference when ordering parts from a Yamaha dealer.
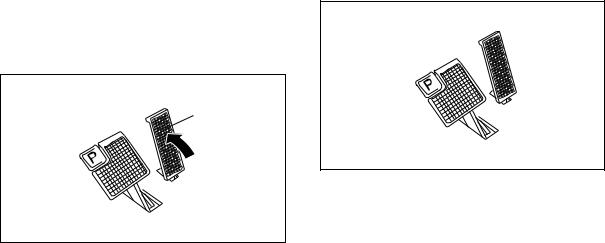
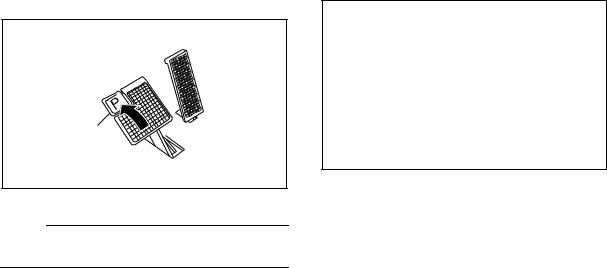
Key identification number
The key identification number is stamped on the key as shown in the following illustration. This number can be used for ordering a new key.
1. Key identification number
2-2

 SAFETY INFORMATION
SEVERE INJURY OR DEATH can result if you do not follow these instructions:
●Read this manual and all labels carefully and follow the operating procedures described.
●This vehicle is designed to carry the driver and one passenger. Never carry passengers in the cargo bed.
●Never give a ride to a passenger who is unable to put both feet firmly on the floorboard while seated with his or her back against the backrest. The passenger must hold on to the grab rail at all times while the vehicle is in motion.
●Never operate this vehicle on any public street, road, or highway, even a dirt or gravel one.
●Never consume alcohol or drugs before or while operating this vehicle.
● Never operate at speeds too fast for your skills or the conditions. Always go at a 3 speed that is proper for the terrain, visibility, and operating conditions, and your experience.
●Never attempt jumps or other stunts.
●Always inspect your vehicle each time you use it to be sure it is in safe operating condition. Always follow the inspection and maintenance procedures and schedules described in this manual.
●Always keep both hands, arms, feet, and legs inside the vehicle at all times during operation. Keep your feet on the floorboard.
●Always keep both hands on the steering wheel when driving.
3-1
●Always go slowly and be extra careful when operating on unfamiliar terrain. Always be alert to changing terrain conditions when driving the vehicle.
●Never operate on rough, slippery, or loose terrain.
●Never turn at excessive speed. Do not attempt turns on steep slopes.
●Never operate the vehicle on slopes that are too steep for it or for your abilities. Go straight up and down slopes.
●Never operate on slopes that are slippery or ones where you will not be able to see far enough ahead of you. Never go over the top of a slope at speed if you cannot see what is on the other side.
●Always check terrain carefully before going down slopes. Go as slowly as possible. Never go down a slope at high speed.
●Always check for obstacles before operating in a new area.
●Always be sure there are no obstacles or people behind you when you operate in reverse. When it is safe to proceed in reverse, go slowly. Do not brake abruptly when carrying loads in the cargo bed.
●Always use the size and type of tires specified in this manual.
●Always maintain proper tire pressure as described in this manual.
●Never exceed the stated load capacity. Cargo should be as far forward in the bed as possible, and distributed evenly from side to side. Be sure cargo is secured so that it cannot move around during operation. Reduce speed and follow instructions in this manual for carrying cargo or pulling a trailer. Allow greater distance for braking.
3-2
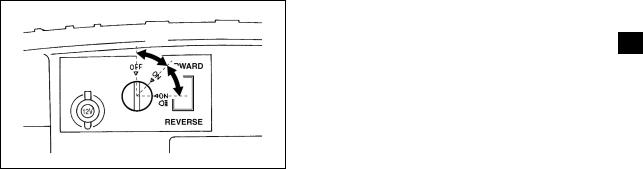
CONTROL FUNCTIONS
Main switch
The main switch positions are as follows:
OFF:
All electrical circuits are switched off. The key can be removed in this position only.
ON:
All electrical circuits (except for the headlights and taillights) are switched on.
The utility vehicle can be operated. ON  :
:
All electrical circuits are switched on. 4 The headlights and taillights come on.
The utility vehicle can be operated.
4-1
Drive select switch
The drive select switch is used for driving the utility vehicle either forward or in reverse. After coming to a complete stop, push the “FORWARD” or “REVERSE” side of the switch.
NOTE:
The back-up buzzer will sound when the drive select switch is set to “REVERSE.”
1. Drive select switch
4-2
Accelerator pedal
The accelerator pedal controls the utility vehicle’s speed.
Action |
Vehicle speed |
|
|
Depress pedal |
Increase |
|
|
Release pedal |
Decrease |
|
|
1
1. Accelerator pedal
Brake pedal
Press the brake pedal down to slow or stop the utility vehicle.
1

1. Brake pedal
4-3
Parking brake pedal
Press the parking brake pedal down whenever parking the utility vehicle.
1
1. Parking brake pedal
NOTE:
Release the parking brake by depressing the accelerator pedal.
Horn button
Step on the horn button to sound the horn.
1. Horn button
4-4

Auxiliary DC jack
The auxiliary DC jack is located in the front panel.
The auxiliary DC jack can be used for accessories such as lights, radios, etc.
The auxiliary DC jack should only be used for short periods if the utility vehicle is not being operated.
1.Set the main switch to “ON”.
2.Open the auxiliary DC jack cap, and then insert the accessory power plug into the jack.
1. Auxiliary DC jack
1. Auxiliary DC jack cap
Maximum rated capacity for the auxiliary DC jack:
DC 12 V, 120 W (10 A)
3.Close the auxiliary DC jack cap if the jack is not being used.
4-5

CAUTION:
●Do not use accessories requiring more than the maximum rated capacity for the auxiliary DC jack. This may overload the circuit and cause the fuse to blow.
●If accessories are used for extended periods when the utility vehicle is not being operated or with the main switch set to “ON  ”, the battery will lose its charge.
●Do not use an automotive cigarette lighter or other accessories with a plug that gets hot because the jack can be damaged.
Cargo bed
1. Cargo bed
4-6
Opening and closing the tailgate |
Lifting and lowering the cargo bed |
||
|
|
|
|
|
|
|
|
1. Tailgate |
2. Latch (× 2) |
1. Cargo bed release lever |
To open:
Unhook the latches, and then lower the tailgate.
To close:
Place the tailgate in its original position, and then hook the latches.
1. Prop rod
4-7
Loading...