


HRS 8540
User's Manual (English)

Safety Precaution
This STB has been designed and manufactured to satisfy the internatio nal safety
standards. Please read the following safety precautions carefully before operati ng
this receiver.
Main Supply:
Before operating, please check the units operating voltage is 200-240V AC 50/60Hz.
Overload:
Do not overload a wall outlet, extension cord or adapter, neither use damaged power
cord or touch it with wet hand as this may result in electric shock.
Liquid:
The receiver shall not be exposed to dripping or splashing water, and that no objects
filled with liquids, such as base, shall be placed on the apparatus.
Ventilation:
Keep the slots on top of the receiver uncover to allow sufficient airflow to the unit. Do
not put the receiver on soft furnishings or carpets. Do not expose the receiver to
direct light or do not place it near a heater or in humid conditions. Do not stack other
electronic equipments on top of the receiver.
Cleaning:
Plug out the receiver from the wall outlet before cleaning. Clean the receiver by a
soft cloth or mild solution of washing-up liquid (no solvents).
Connection:
Disconnect the receiver from the mains when you connect it to satellite LNB or
disconnect it from LNB. Failure would possibly cause damage to the LNB.
Location:
Put the receiver indoor in order to avoid lightening, raining or sunlight.
Uncover:
Do not remove the cover, to reduce the risk of electric shock. Contact qualified an d
licensed service personnel to repair the receiver, or contact your dealer.
1/31

1. Reference
1.1 General Features
DVB-S/DVB-S2 Satellite Compliant (MPEG-II/ MPEG-IV/ H.264)
SCPC & MCPC receivable from Ku and C band satellites
Universal, Single, Single S & C Band Wideband LNB
Sensitive Tuner
Unicable Supported
Blind Scan supported
PAL/NTSC Conversion
8 bits Color on screen display (OSD)
Storing memory: 64 satellite, 3000 transponders and 5000 channels
8 favorite groups
Parental lock supported
Multi-language menu supported
Multi-language audio supported
Multi-language DVB Subtitle output
Electronic Program Guide (EPG)
Teletext
USB 2.0 Interface
2/31
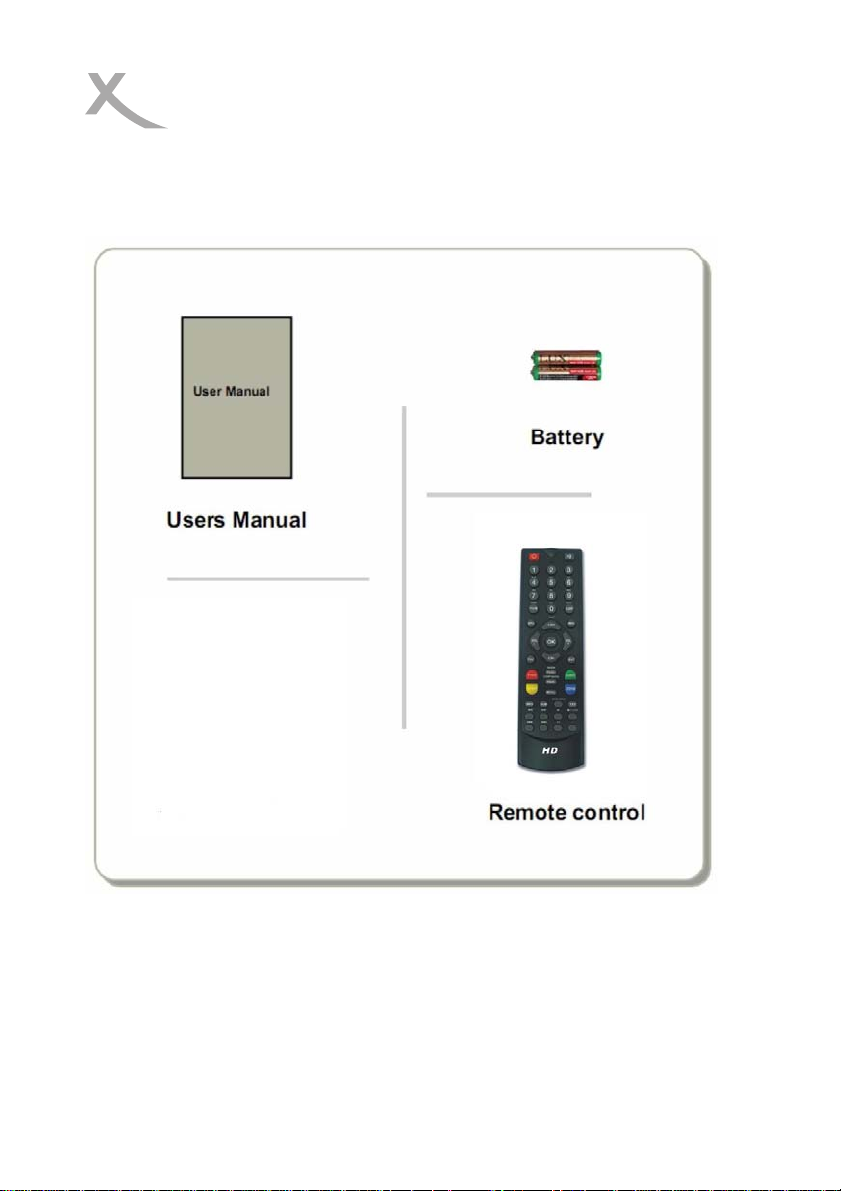
1.2 Accessories
1x Users manual
1x Remote Control Unit
Figure 1.Accessories
3/31

2. Product Overview
2.1 Front Panel
1. Power LED
Power indicator
2.
Power button
Switch between operation and standby modes.
2.2 Rear Panel
1. LNB IN
Connect the satellite antenna cable.
2. HDMI
Connect to the TV using an HDMI cable. (preferred)
3. SPDIF
Digital Audio output (Optical).
Figure 2. Front Panel
Figure 3. Rear Panel
4/31

4. USB2.0
One USB 2.0 Host Port.
5. TV SCART
Connect to the TV using a SCART cable.
2.3 Remote Control Unit (RCU)
1. Power button
2. Mute button
3. NUMERIC KEY (0~9): Enter a TV/radio channel
number or menu option number
4. TV/R: Switch between TV and RADIO
5. SLEEP: Set the sleep time
6. EPG (Electronic Program Guide): Display the
program guide
7. MENU: Activate main menu
8. CH▲ /CH▼: Changes program
9. VOL◄ /VOL►: Change volume in viewing mode.
10. OK: Confirm
11. FAV: Display favorite channel list
12. EXIT: Exit current menu step by step
13. FIND: Quickly find channels which you want
14. AUDIO: Display the audio list
15. DISP: Set the HDMI mode
16. ZOOM: Picture zooming function
17. P▲/▼ : Page up/down
18. MARK: Mark a position when play
5/31

19. JUMP MARK: Jump to the marked position
20. RECALL: Switch to the previous viewed channel
21. INFO: Display the program information
22. SUB: Display the subtitle language list
23. DVR INFO: Display the information of the video and the recording
24. TXT: Display the teletext
25. WW: Fast rewind
26. XX: Fast forward
27. X: Play
28. ■/USB: Enter USB menu or stop playing or recording
29. IWW: Previous
30. XXI : Next
31. I I : Pause/Step
32. ●: Record
6/31
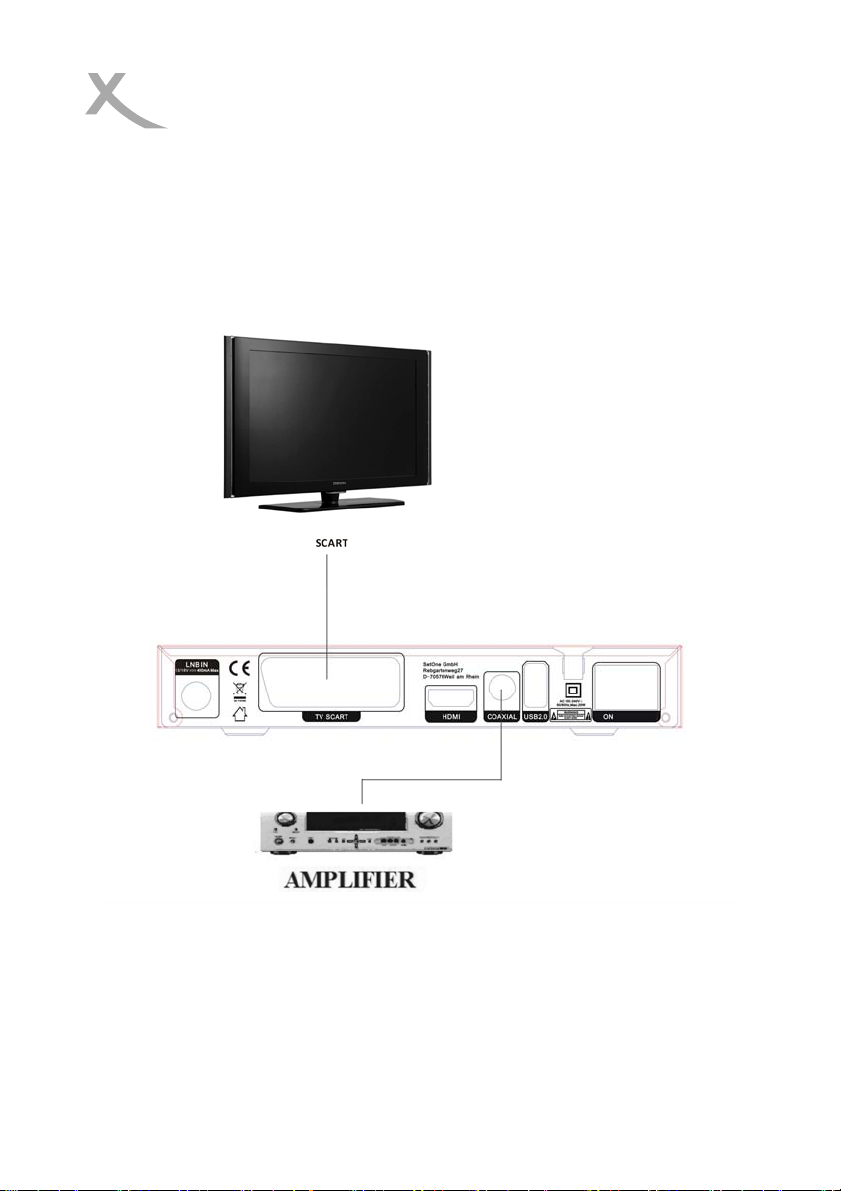
3. Connection with Other Device
The following diagram shows you the connections amon g receiver, TV, LNB and
other equipment.
3.1 Connecting to TV
Figure 5. Connecting to TV & VCR
7/31
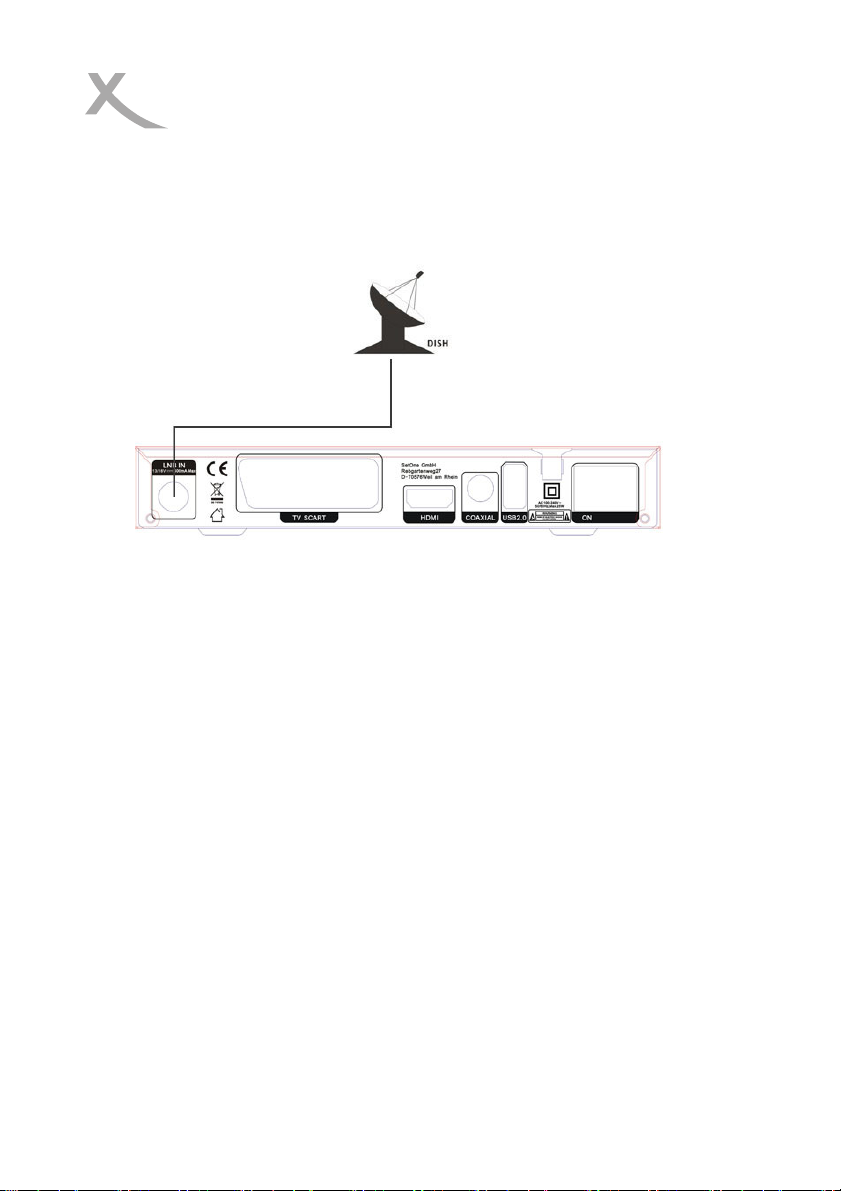
3.2 Connecting the Antenna
You can connect one fixed dish LNB directly to the LNB IN, or connect at least two
dishes LNB by DiSEqC Switch.
Figure6. Connecting to Dish LNB
8/31
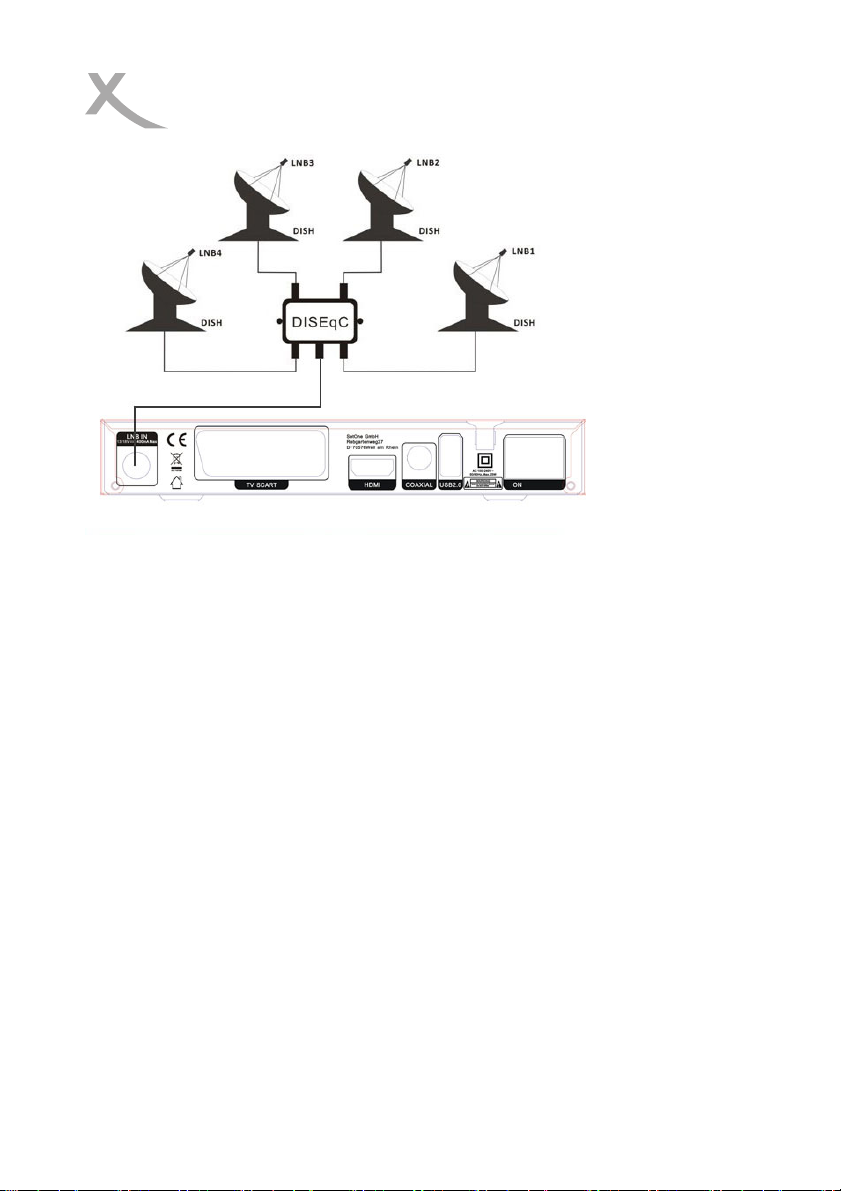
Figure7. Connecting to Dish LNB
9/31

4. Installation
Please connect all cable before powering on your product for the first time after
purchase.
Tip: The default password is 0000.
4.1 Powering On
1. Connect the power cord of the product to a wall outlet.
2. Ensure the ON/OFF switch at the rear of the product is switched to ON.
3. Power on by pressing the STANDBY button on the remote control or the
STANDBY button at the front of the product.
4.2 Antenna Connection
Antenna Connection allows you to configure the antenna using only one LNB or
Motor.
Menu->Installation->Antenna Connection
When select Motor Antenna here, you can set the DiSEqC1.2 or Motor in
Antenna Setup.
4.3 Antenna Setup
Antenna Setup allows you to configure the antenna setting parameters.
Menu->Installation->Antenna Settings
1. Satellite: Select the satellite you want to configure.
2. LNB Freq: Press the VOL+/VOLbutton to change the LNB
frequency.
3. Transponder(TP for short):
Press the VOL+/VOL- button to
change the TP.
4. DiSEqC 1.0: Press the
VOL+/VOL- button to select the
required DiSEqC1.0 input.
10/31

5. DiSEqC 1.1: Press the VOL+/VOL- button to select the required DiSEqC1.1
input.
6. 22kHz: Press the VOL+/VOL- button to select ON, OFF.
7. Polarity
Recommendation: Use the option Auto!
: Press the VOL+/VOL- button to select horizontal, vertical or auto.
4.3.1 Antenna Setup for DiSEqC 1.2
1. Select Motor Antenna in
Antenna Connection.
2. Enter Antenna Setup, navigate
with the arrow key DOWN to the
Motor Type option and select the
DiSEqC1.2 by VOL+/VOL- button.
3. Navigate with the arrow key
DOWN to the Motor Setting option
and press the OK button.
Motor Setting
Satellite/ Transponder
Select a Satellite and a Transponder.
Position No. & Save
Press the VOL+/VOL- button and
select one of the 64 settings (0 to
63). You also can press the numeric
keys directly to input the Position
No.
Go to x
Press the OK button and select one
of the 64 settings (0 to 63). Confirm your selection with the OK button and it appears
a message on the screen "Wait to move the position!”
Save
11/31

You can press VOL+/VOL- button to move the dish and when it move to the correct
position, you can press the OK button to save the position.
Recalculation
You can press OK button to recalculate.
4. Navigate with the arrow key DOWN to Delete All, press ok will delete all satellite
positions. This item is only valid in “DiSEqC1.2” mode.
5. Navigate with the arrow key DOWN to Limit Setup, press OK button.
Limit Setup
You can set the East/West limit.
Select the East Limit or West Limit
by the VOL+/VOL- button. Then
move the highlight to the Limit setup
item and move the dish to west or
east by pressing the VOL+/VOL-
button manually. When you are
moving to the target place, press OK button to limit.
4.3.2 Antenna Setup for USALS
The operations are almost same to DiSEqC 1.2, only the difference is you can set
local longitude and latitude, then the Motor will rotate to the correct angle
automatically.
4.4 Satellite List
Satellite List allows you to
Edit/Add/Delete/Select the
satellite.
12/31
Menu->Installation->Satellite List
Note: Must select a satellite here before doing search.
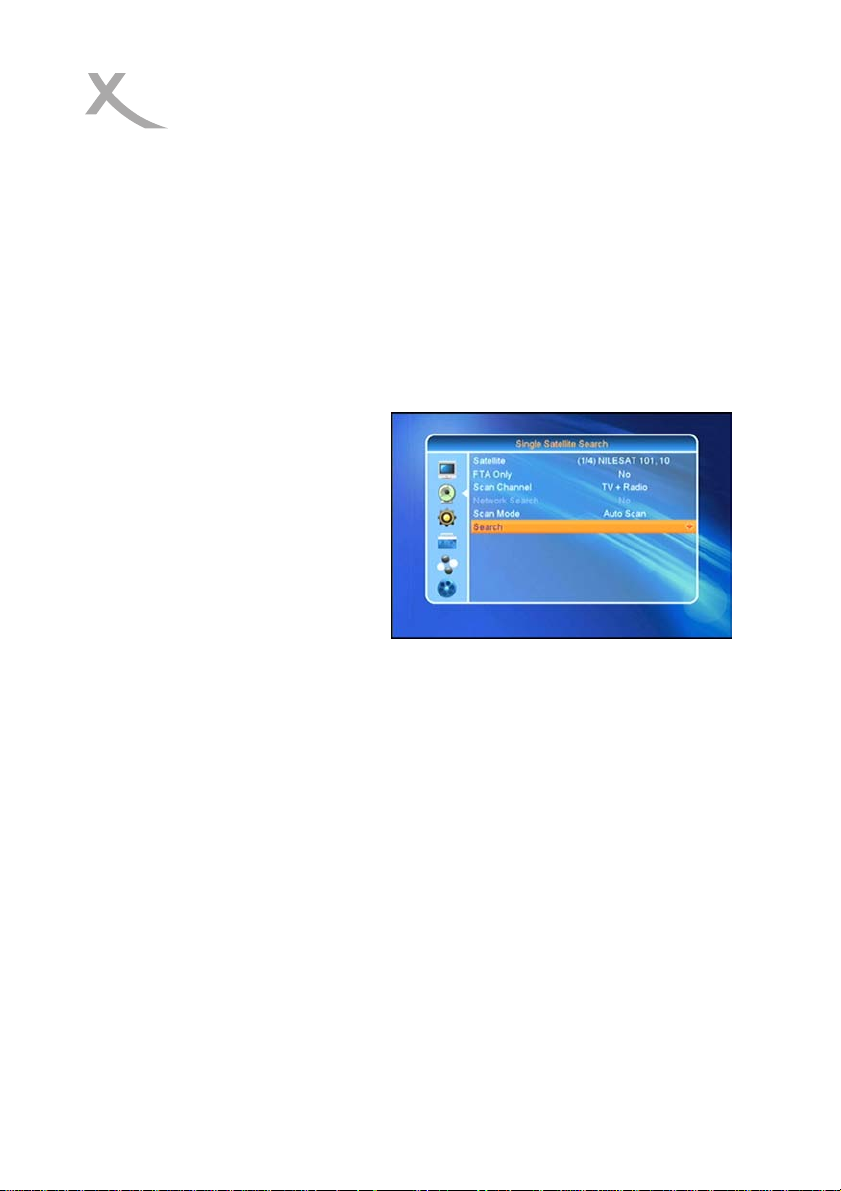
4.5 Single Satellite Search
Single Satellite Search allows you to do a searching on a satellite that is selected in
Satellite List.
Menu->Installation->Single Satellite Search
1. FTA Only: Press the VOL+/VOL- button to change the searched channels type,
only FTA channels or not.
2. Scan Channel: Press the
VOL+/VOL- button to only search
TV, radio or both.
3. Network Search: Press the
VOL+/VOL- button to change
network search mode.
4. Scan Mode: Press the
VOL+/VOL- button to change the
scan mode.
Auto scan is a fast blind scan
and may skip some transponder with weak signal.
Accurate Scan is a slow blind scan, but may get more transponders
Present Scan only search stored transponders.
4.6 Multi Satellite Search
Multi Satellite Search allows you to do a searching on multiple satellites that are
selected in Satellite List. The operations are almost same to Single Satellite Search,
please refer to 4.5.
Menu->Installation->Multi Satellite Search
4.7 TP List
TP List allows you to do a searching on a transponder of a satellite that’s selected in
Satellite List. Also you can Edit/Add/Delete TP here.
Menu->Installation->TP List
13/31

5. Edit Channel
5.1 TV Channel List
Menu->Edit Channel->TV Channel List
Edit Channels enables you to move, delete, sort, rename, lock/unlock, skip the
channels in the channel list conveniently, and set favorite.
Tip: Radio Channels operation similar to the TV Channels.
1. Switch Satellite
Press the VOL+/ VOL- button and
you can change the satellite
selection.
2. Lock/unlock Channels
Use the CH+/CH- keys to the
channels and press the RED button.
3. Skip Channels
Use the CH+/CH- keys to the channels and press the GREEN button.
4. Move Channels
Use the CH+/CH- keys to the channels and press the YELLOW button. Then you
can using the CH+/CH- keys to move the channel to the new location or using the
numeric keys input the number of the position that you want to move to, and press
the OK button.
5. Edit Channels
Press the BLUE button and you can edit the channels. The options are here:
Sort
Press the RED button and the sort menu is showed up. Then you can sort channels
by (Z-A, A-Z, FTA/Scramble and lock).
14/31

Delete
You can mark multiple channels with BLUE button. Then exit the edit window, you
will get a security message asking whether you want to save the operation or not.
Rename
Use the CH+/CH- keys to the channel and press the GREEN button.
6. Favourites
Use the CH+/CH- keys to select the
channel then press the FAV button
and use the CH+/CH- keys to select
a FAV group, then press OK button
to confirm.
5.2 Delete All
Menu->Edit Channel->Delete All
If you select this option, all the channels will be deleted.
6. System Setup
6.1 Language
Menu->System Setup->Language
Enter Language menu, you can set
the OSD Language, First Audio
Language, Second Audio Language
and Teletext Language.
15/31

6.2 TV System
Menu->System Setup->TV System
Enter TV System menu, you can set
the Video Resolution, Aspect Mode,
Video Out and Digital Audio Out.
1. Video Resolution
Here you define the resolution, which is output via the HDMI. The options are 480i /
480p, 576i / 576p, 720p_50 / 720p_60, 1080i_25 / 1080i_30, 1080p_50 / 1080p_60 /
1080p_25 / 1080p_30 / 1080p_24.
Note: Please use the native resolution of your TV. To do this, follow the
specifications of your TV equipment. E.g. 720p for HD-Ready TV sets or
1080i/1080p for FULL-HD TV sets.
2. Aspect Mode
With this menu you can change the aspect ratio to your TV television, AUTO, 4:3 PS,
4:3 LB, 16:9.
Note: In general, allows to 16:9 optimal output. This shows in the correct 4:3 aspect
ratio display.
3. Video Out
With this menu you can set to use RGB or CVBS for the video output.
4. Digital Audio Out
With this option you can define the nature of the digital audio output via coaxial audio
output.
BS Out Sound is in RAW mode to the coaxial audio output unchanged issued
LPCM Out Output is in PCM format
16/31

6.3 Display Setting
Menu->System Setup->Display Setting
The display settings can set Brightness, Contrast, Saturation. You can press the
VOL+/ VOL- button to adjust the value.
6.4 Local Time Setting
Menu->System Setup->Local Time Setting
The Local Time Setting contains option for Region, GMT Usage, GMT Offset,
Summer Time, Date, Time.
6.5 Timer Setting
Menu->System Setup->Timer
Setting
You can setup a View or Record
Timer here. Select a timer and press
OK button.
Timer Mode
Once: only one time.
Daily: Repeat every day.
Off: Close this timer.
Timer Service
Channel: Will switch to the channel when the timer is started.
Record: Only if there is a USB device, it will be recorded automatically when
the timer is started. And the recorded PVR will be saved in USB device.
Wakeup Channel
Select the Channel from Channel List.
Wakeup Date
Input start date of the timer.
On Time
Set Start time of the timer.
Duration
Set the timer duration.
17/31

6.6 Parental Lock
Menu->System Setup->Parent Lock
1. Menu Lock
Menu Lock determines that when users wish to enter “Edit
Channel/Installation/Tools” menu, whether have to input Password or not.
2. Channel Lock
Channel Lock determines that when users wish to play the lock channels, whether
have to input the password or not.
3. New Password
New Password is used for change the password. You can input the new password in
this item by using numeric keys directly.
4. Confirm Password
After you finished the New Password, the highlight will auto skip to Confirm
Password and ask you to input the new password again. If the password is correct,
the screen will show up a message of “Saving Data, Please wait…”. After finish
saving and back to “system Setup” menu, the password is changed.
6.7 OSD Setting
Menu->System Setup->OSD Setting
1. OSD Timeout
OSD Timeout can set the duration time of the information bar show up on the screen.
The range of the duration is “1 second~10 seconds”.
2. OSD Transparency
Press the VOL+/ VOL- button to change the OSD Transparency. There are 5 levels
of transparency, 10%, 20%, 30%, 40% and “Off”.
18/31

6.8 Favourite
Menu->System Setup->Favourite
You can rename the favourite group’s name in this menu.
6.9 Other
Menu->System Setup->Other
1. LNB Power
You can press the VOL+/ VOL- button to
switch the LNB Power On or Off.
Receiver will supply power to satellite
antenna or not.
3. Auto Standby
The Auto Standby with the default of 3 hours is part of the implementation of EuP.
7. Tools
7.1 Information
Menu->Tools->Information
Display version information such as
software or hardware.
19/31

7.2 Factory Setting
Menu->Tools->Factory Setting
You have the opportunity to make undo all the settings and changes by load the
default settings.
Note: All settings are reset. Then that they should also perform the search again.
7.3 USB Upgrade & Save
Menu->Tools->USB Upgrade &
Save
Let you install a new software
version on the device. This of
course must be connected to a
USB HDD or memory stick with
the update file in the root
directory.
1. Upgrade & Save
You can select “Upgrade” or “Save “.
Upgrade Upgrading a new software version
Save Saving the data of current software version
Check www.xoro.de for updated firmware.
20/31

7.4 USB
Menu->Tools->USB
It’s Media Player. It can play many kinds of media files, you also can record
channels and playback them and you can do various oper ations when us ing USB
HDD or USB disk.
1. Show Play List
Press YELLOW button to show up play list(only for pictures and music). Here you
can see all files in the play list, you also can play/delete/delete all files.
2. Setup
Press RED button to setup pictures view mode.
Slide Show Time: How long will each picture keep showing up.
Slide Show Repeat: Loop play pictures or not.
3. Repeat Mode
Press BLUE button to setup music play mode. Play all files once, loop, or random.
4. Sort
Press GREEN button to sort USB files.
5. FAV
Press FAV button to add highlighted file into play list.
OK: Play the selected file.
CH+/CH-: Change the highlighted item.
X: Play the file.
■ : Stop playing file.
IWW: Play the previous file/
Jump to forward as jump opti on in the PVR Setting menu
XXI: Play the next file/ Jump to backward as jump option in the PVR Setting menu.
WW: Fast rewind.
XX: Fast forward.
||: Pause/Step.
VOL+/VOL- : Adjust volume/Rotate when playing the picture/Jump a time interval
when playing the movie and recording.
EXIT: Exit playing state and return to file list menu.
21/31

7.5 Remove USB device safely
Menu->Tools->Remove USB device safely
You can use this item to remove USB device safely.
8. Games
You can play 2 games here, Othello and Sudoku.
9. REC
9.1 Record Manager
Menu->REC->Record Manager
You can see all recordings here,
and Lock/Delete/Rename these
files.
Additional function: When playing
the recording, you can press MARK
button to mark on current time when
info bar display. And press the
JUMP MARK button to jump to
mark.
22/31

9.2 Storage Information
Menu->REC->Storage Information
You can press VOL+/ VOL- button to see the selected partition information of USB
HDD or memory stick. Also can format the selected partition with YELLOW button,
and set it to be recording partition with BLUE button.
Option: this feature is available in some models only!
9.3 DVR Configuration
Menu->REC->DVR Configuration
1. Timeshift: Turn on timeshift or off.
2. Timeshift to Record: Add the auto timeshifted content into recorded file or not.
10. Basic Operation
10.1 Audio
You can select the language you prefer in Audio if the current program is available
in multiple audio languages.
1. Press the AUDIO button.
2. Press the OK button to select
the audio language you prefer.
3. Select audio direction (Left,
Right, Stereo) using the
VOL+/VOL- button.
4. Press the EXIT button to close.
23/31

10.2 Zoom In
You can zoom in the current video picture.
1. Press the ZOOM button.
2. Press the CH+/CH-/VOL+/VOL- button to move the icon to the position you
want to zoom in.
3. Press the OK button to display.
4. Press the EXIT button to close.
10.3 EPG
You can view the EPG information of all channels in time and date order.
1. Press the EPG button.
2. Press the CH+/CH- button to
change channel.
3. Press the VOL+/VOL- button
to change EPG event of the
highlighted channel.
4. Press the OK button to
display the detail information
of the highlighted EPG event.
5. Press the GREEN button to
enter Timer Setup menu.
After setup, press the OK
button can add the
highlighted EPG event to the
Timer.
6. Press the RED button to
browse EPG by time fast.
Go to the EPG of previous
hour
Go to the EPG
Go to the EPG
Go to the EPG
Go to the EPG
Go to the EPG
Go to the EPG
of next hour
of previous 2 hours
of next 2 hours
of previous day
of previous day
of current time
24/31

10.4 Subtitle
You can select the language for the subtitle if the program provides subtitle
information.
1. Press the SUB button.
2. Select the required subtitle language and press the OK button. The subtitle of
the selected language will be displayed at the bottom of the screen.
10.5 Teletext
You can view the teletext information of this program.
1. Press the TXT button.
2. Press the CH+/CH- button to
page up or page down.
3. Press the NUMERIC(0-9)
buttons can go to the designated
page directly.
10.6 Find channel
You can find the channels you want quickly just by pressing the FIND button directly.
10.7 Program Information
You can view the program information by pressing the INFO button while watching a
program.
1. General Information
You can press the INFO button to display the general information of the current
channel. And the info bar will disappear automatically after few seconds or you can
press the EXIT button to exit the info bar.
25/31

2. Detail Information
You can press the INFO button
twice to display the detail
information of the current channel.
It can display the channel name,
satellite, transponder, PID and
signal information. And you can
press the EXIT button or INFO
button to exit the info frame.
11. Channel List
This chapter will help you manipulate the channel list.
Tip: You can press the VOL+/VOL- button to choose different satellite when you are
operating on a channel list, then all the channels of this sat will be display in list.
11.1 OK List
1) Press the OK button to enter
the channel list while watching a
program.
2) Press the VOL+/VOL- button
to switch the satellite and FAV
group.
3) Press the CH+/CH- button to
move the highlighting, and
press OK button to watch the
highlighting channel.
26/31

4) Press the RED button to enter the Quick Find menu.
11.2 Favorite List
1) If you have set several favorite lists, press the FAV button can enter the favorite
list.
2) Press the CH+/CH- button to
change different favorite list
and press the OK button can
select a favorite group.
3) Press CH+/CH- button to
select the channel in the
current favorite list.
Note: If you selected a favorite
list, press the CH+/CH- button can only change the channels in this favorite list and
press the OK button can only display the channels in this favorite list.
12. USB Control
12.1 Recording and Timeshift
12.1.1 Recording
You can watch another channel from the same TP while recording. You can also do
many operations while recording.
1. Start Recording
1) You can press the ● button to start recording while watching program.
2) If you have set the timer, and set the Time Record on, it will start recording
automatically according to the start time of the timer.
2. Stop Recording
1) You can press the ■ button to stop recording. If you don’t press the ■ button, it
will stop recording according to the record duration.
2) If you have set the timer, it will stop recording automatically according to the stop
time of the timer.
3) If the free space on the USB HDD or USB disk is insufficient, recording will stop.
27/31

3. Watch the Other Program while Recording
At the same time, you can only watch the program from the same TP.
4. Other Operations while Recording
While the recording channel is current channel, press the INFO button can display
the channel information. And press the DVR INFO button can display the recording
time. And press the DVR INFO button twice can display all the previous recording
files. Press the ● button can set the record duration. Press the || button to pause the
program and press the X button to play the program. Press the WW/XX button can
fast rewind or fast forward in playback mode.
12.1.2 Timeshift
Timeshifte allows you to pause a live broadcast and return to it later and continue
where you left off.
In order to use the Time Shift function, you must: navigate to: Menu -> REC -> PVR
Setting-> Timeshift with the option “ON”. And the timeshift will start automatically
while play the program. While it is in timeshift mode, press the DVR INFO button can
display the recording information, press the || button can pause or play the program,
press the WW/XX button can fast rewind or fast forward. Press MARK button to
mark on current time when info bar display. And press the JUMP MARK button to
jump to mark.
12.2 Recording List
You can press the DVR INFO button to enter the recording list directly. Press the
CH+/CH- to highlight the PVR file you want to play, press the OK button to play.
And you can watch the PVR file while recording.
13. Additional Information
13.1 Trouble Shooting
Before contacting your local service centre, please read the tips below carefully. If
the problem persists after completing the following procedure, please contact your
local product distributor or service centre for further instructions.
28/31

1. The product will not switch on
• Check the main power cable and make sure it is plugged into a suitable power
outlet.
• Check that the mains supply is switched on.
• Connect the power cable to a different power outlet.
• Check that the power switch is on at the rear of the product.
2. No picture
• Make sure that the product is powered on and in operation mode. (Press the
STANDBY button)
• Make sure that the AV/HDMI/YUV cable is firmly connected to the TV.
• Make sure that the antenna cable is properly connected to the product.
• Be sure to activate channel search.
• Check the brightness level of the TV.
• Check if the channel is currently on air. Contact the broadcaster to ensure that the
channel is running.
3. Poor picture/sound quality
• Make sure there is no mobile phone or microwave oven near the product.
• [Satellite] Check that your dish alignment is correct.
• [Satellite] Change the satellite dish for a larger one as this will increase the signal
levels received.
• [Satellite] Replace the LNB with a lower noise factor in cases where the noise
factor is too high.
• [Satellite] Replace the LNB with a new one in case it is damaged or out of order.
• [Satellite] Check the signal levels and adjust your antenna if the level is too low.
The signal level may be affected by weather conditions.
• [Terrestrial] Adjust the antenna direction to get a better picture.
• [Terrestrial] Set the antenna power in menu to On, if you use the active antenna to
improve the reception.(where applicable)
4. No or poor sound
• Check that your AV/HDMI cable is connected correctly.
• Check the volume levels of your TV set and the product.
• Check if the product or TV is on mute.
• Check audio type or soundtrack option. (where applicable)
29/31

5. Remote control does not operate.
• To control the product, the top end of the remote control should point directly
towards the receiving part of the product.
• Remove and reinsert the batteries in the remote control.
• Replace the batteries in the remote control for a new set.
30/31

13.2 Technical Specification
Tuner
No. of Tuners 1
Frequency Range 950 MHz to 2150 MHz
Signal Level -25 to -65 dBm
LNB Power 13V/18V/14V/19VOFF, Imax = 300mA
LNB Tone Switch 22KHz+/-2KHz, 0.6Vpp+/-0.2V
MPEG
Transport Stream MPEG-2 ISO/IEC 13818Transport stream specification
Profile Level MPEG1,MPEG-2 MP@ML,H.264, and MPEG4
Input Rate 80 Mbps for MPEG Transport Stream and 25 Mbps for DV streams
Aspect Ratio 4:3, 16:9
Video Resolution 576i, 576p, 480i, 480p, 720p50, 720p60, 1080i.1080p
Audio Decoding MPEG-2 layer I and II (Music cam)
Audio Mode Single channel/Dual channel/Joint stereo/Stereo
Sampling 32, 44.1 and 48 KHz
Power Supply
Input Voltage AC 200 ~240V, 50/60Hz
Power Consumption Max. 25 W
Protection Separate internal fuse. Input shall have lightening Protection
Physical Specification
Operating Temp 0℃ to + 40℃
Storage Temp -40℃ to + 65℃
31/31

ENG:V1
FS: www
XORO by MAS Elektronik AG
Weidegrund 3
21614 Buxtehude
Deutschland
Tel: 040 77 11 09 17
xoro@mas.de
www.xoro.de
 Loading...