Ubiquiti US-48-500W, ES-8-150W User manual
Enterprise System Controller
Release Version: 4.8.7

UniFi Controller User Guide |
Table of Contents |
Table of Contents |
|
Chapter 1: Software Installation. . . . . . . . . . . . . . . . . . . . . . . . . . . . . . . . . . . . |
. 1 |
Introduction. . . . . . . . . . . . . . . . . . . . . . . . . . . . . . . . . . . . . . . . . . . . . . . . . . . . . . . . . . . . . . . . . . . |
. . . 1 |
System Requirements . . . . . . . . . . . . . . . . . . . . . . . . . . . . . . . . . . . . . . . . . . . . . . . . . . . . . . . . . . |
. . 1 |
Network Topology Requirements . . . . . . . . . . . . . . . . . . . . . . . . . . . . . . . . . . . . . . . . . . . . . . . |
. . 1 |
Software Installation. . . . . . . . . . . . . . . . . . . . . . . . . . . . . . . . . . . . . . . . . . . . . . . . . . . . . . . . . . . . . |
. 1 |
Chapter 2: UniFi Cloud. . . . . . . . . . . . . . . . . . . . . . . . . . . . . . . . . . . . . . . . . . . . . |
. 5 |
Introduction. . . . . . . . . . . . . . . . . . . . . . . . . . . . . . . . . . . . . . . . . . . . . . . . . . . . . . . . . . . . . . . . . . . . |
. . 5 |
UniFi Cloud Key . . . . . . . . . . . . . . . . . . . . . . . . . . . . . . . . . . . . . . . . . . . . . . . . . . . . . . . . . . . . . . . . |
. . 5 |
UniFi Cloud Account. . . . . . . . . . . . . . . . . . . . . . . . . . . . . . . . . . . . . . . . . . . . . . . . . . . . . . . . . . . . |
. 12 |
Chapter 3: Using the UniFi Controller Software . . . . . . . . . . . . . . . . . . . . |
. 17 |
Navigation Bar . . . . . . . . . . . . . . . . . . . . . . . . . . . . . . . . . . . . . . . . . . . . . . . . . . . . . . . . . . . . . . . . . |
.17 |
Common Interface Options . . . . . . . . . . . . . . . . . . . . . . . . . . . . . . . . . . . . . . . . . . . . . . . . . . . . . |
. 17 |
Chapter 4: Dashboard . . . . . . . . . . . . . . . . . . . . . . . . . . . . . . . . . . . . . . . . . . . . |
. 33 |
Internet . . . . . . . . . . . . . . . . . . . . . . . . . . . . . . . . . . . . . . . . . . . . . . . . . . . . . . . . . . . . . . . . . . . . . . . . |
.34 |
Gateway/Router . . . . . . . . . . . . . . . . . . . . . . . . . . . . . . . . . . . . . . . . . . . . . . . . . . . . . . . . . . . . . . . . |
. 34 |
Local Area Network. . . . . . . . . . . . . . . . . . . . . . . . . . . . . . . . . . . . . . . . . . . . . . . . . . . . . . . . . . . . . |
. 35 |
Wireless Local Area Network . . . . . . . . . . . . . . . . . . . . . . . . . . . . . . . . . . . . . . . . . . . . . . . . . . . . |
.35 |
Chapter 5: Map. . . . . . . . . . . . . . . . . . . . . . . . . . . . . . . . . . . . . . . . . . . . . . . . . . . |
. 37 |
Adding Custom Maps. . . . . . . . . . . . . . . . . . . . . . . . . . . . . . . . . . . . . . . . . . . . . . . . . . . . . . . . . . . |
.37 |
Adding a Google Map . . . . . . . . . . . . . . . . . . . . . . . . . . . . . . . . . . . . . . . . . . . . . . . . . . . . . . . . . . |
.38 |
Placing Devices on the Map..................................................... |
. 39 |
Map Display Options . . . . . . . . . . . . . . . . . . . . . . . . . . . . . . . . . . . . . . . . . . . . . . . . . . . . . . . . . . . |
.40 |
Setting the Map Scale . . . . . . . . . . . . . . . . . . . . . . . . . . . . . . . . . . . . . . . . . . . . . . . . . . . . . . . . . . |
.41 |
Chapter 6: Devices . . . . . . . . . . . . . . . . . . . . . . . . . . . . . . . . . . . . . . . . . . . . . . . |
. 43 |
All.............................................................................. |
. 43 |
Gateway/Switches. . . . . . . . . . . . . . . . . . . . . . . . . . . . . . . . . . . . . . . . . . . . . . . . . . . . . . . . . . . . . . |
. 44 |
APs . . . . . . . . . . . . . . . . . . . . . . . . . . . . . . . . . . . . . . . . . . . . . . . . . . . . . . . . . . . . . . . . . . . . . . . . . . . . |
.45 |
Phones. . . . . . . . . . . . . . . . . . . . . . . . . . . . . . . . . . . . . . . . . . . . . . . . . . . . . . . . . . . . . . . . . . . . . . . . . |
. 48 |
Properties . . . . . . . . . . . . . . . . . . . . . . . . . . . . . . . . . . . . . . . . . . . . . . . . . . . . . . . . . . . . . . . . . . . . . . |
. 48 |
Chapter 7: Clients . . . . . . . . . . . . . . . . . . . . . . . . . . . . . . . . . . . . . . . . . . . . . . . . |
. 51 |
All.............................................................................. |
. 51 |
Wireless . . . . . . . . . . . . . . . . . . . . . . . . . . . . . . . . . . . . . . . . . . . . . . . . . . . . . . . . . . . . . . . . . . . . . . . . |
. 52 |
Wired . . . . . . . . . . . . . . . . . . . . . . . . . . . . . . . . . . . . . . . . . . . . . . . . . . . . . . . . . . . . . . . . . . . . . . . . . . |
.53 |
Properties . . . . . . . . . . . . . . . . . . . . . . . . . . . . . . . . . . . . . . . . . . . . . . . . . . . . . . . . . . . . . . . . . . . . . . |
. 53 |
Ubiquiti Networks, Inc. |
i |
Table of Contents |
UniFi Controller User Guide |
Chapter 8: Statistics . . . . . . . . . . . . . . . . . . . . . . . . . . . . . . . . . . . . . . . . . . . . . . |
. 55 |
Clients (Total) . . . . . . . . . . . . . . . . . . . . . . . . . . . . . . . . . . . . . . . . . . . . . . . . . . . . . . . . . . . . . . . . . . |
.56 |
Quick Look . . . . . . . . . . . . . . . . . . . . . . . . . . . . . . . . . . . . . . . . . . . . . . . . . . . . . . . . . . . . . . . . . . . . . |
.56 |
Current Usage - Top Access Points . . . . . . . . . . . . . . . . . . . . . . . . . . . . . . . . . . . . . . . . . . . . . . |
.56 |
Recent Activities. . . . . . . . . . . . . . . . . . . . . . . . . . . . . . . . . . . . . . . . . . . . . . . . . . . . . . . . . . . . . . . . |
. 56 |
Filter . . . . . . . . . . . . . . . . . . . . . . . . . . . . . . . . . . . . . . . . . . . . . . . . . . . . . . . . . . . . . . . . . . . . . . . . . . . |
.57 |
Chapter 9: Insights . . . . . . . . . . . . . . . . . . . . . . . . . . . . . . . . . . . . . . . . . . . . . . . . |
59 |
Known Clients. . . . . . . . . . . . . . . . . . . . . . . . . . . . . . . . . . . . . . . . . . . . . . . . . . . . . . . . . . . . . . . . . . |
. 59 |
Rogue Access Points. . . . . . . . . . . . . . . . . . . . . . . . . . . . . . . . . . . . . . . . . . . . . . . . . . . . . . . . . . . . |
. 60 |
Past Connections . . . . . . . . . . . . . . . . . . . . . . . . . . . . . . . . . . . . . . . . . . . . . . . . . . . . . . . . . . . . . . . |
. 61 |
Past Guest Authorizations . . . . . . . . . . . . . . . . . . . . . . . . . . . . . . . . . . . . . . . . . . . . . . . . . . . . . . |
.61 |
Switch Stats . . . . . . . . . . . . . . . . . . . . . . . . . . . . . . . . . . . . . . . . . . . . . . . . . . . . . . . . . . . . . . . . . . . . |
.62 |
Remote User VPN. . . . . . . . . . . . . . . . . . . . . . . . . . . . . . . . . . . . . . . . . . . . . . . . . . . . . . . . . . . . . . . |
. 64 |
Dynamic DNS . . . . . . . . . . . . . . . . . . . . . . . . . . . . . . . . . . . . . . . . . . . . . . . . . . . . . . . . . . . . . . . . . . |
.64 |
Port Forward Stats. . . . . . . . . . . . . . . . . . . . . . . . . . . . . . . . . . . . . . . . . . . . . . . . . . . . . . . . . . . . . . |
. 64 |
Chapter 10: UniFi Security Gateway Details . . . . . . . . . . . . . . . . . . . . . . . . 67
Properties . . . . . . . . . . . . . . . . . . . . . . . . . . . . . . . . . . . . . . . . . . . . . . . . . . . . . . . . . . . . . . . . . . . . . . . 67
UniFi Security Gateway – Details . . . . . . . . . . . . . . . . . . . . . . . . . . . . . . . . . . . . . . . . . . . . . . . . .68
UniFi Security Gateway – Statistics . . . . . . . . . . . . . . . . . . . . . . . . . . . . . . . . . . . . . . . . . . . . . . .69
UniFi Security Gateway – Networks . . . . . . . . . . . . . . . . . . . . . . . . . . . . . . . . . . . . . . . . . . . . . .69
UniFi Security Gateway – Configuration . . . . . . . . . . . . . . . . . . . . . . . . . . . . . . . . . . . . . . . . . .70
Chapter 11: UniFi Switch Details . . . . . . . . . . . . . . . . . . . . . . . . . . . . . . . . . . |
. 75 |
Properties . . . . . . . . . . . . . . . . . . . . . . . . . . . . . . . . . . . . . . . . . . . . . . . . . . . . . . . . . . . . . . . . . . . . . . |
. 75 |
UniFi Switch – Details. . . . . . . . . . . . . . . . . . . . . . . . . . . . . . . . . . . . . . . . . . . . . . . . . . . . . . . . . . . |
. 76 |
UniFi Switch – Ports . . . . . . . . . . . . . . . . . . . . . . . . . . . . . . . . . . . . . . . . . . . . . . . . . . . . . . . . . . . . |
.77 |
UniFi Switch – Configuration. . . . . . . . . . . . . . . . . . . . . . . . . . . . . . . . . . . . . . . . . . . . . . . . . . . . |
. 79 |
Chapter 12: UniFi Access Point Details . . . . . . . . . . . . . . . . . . . . . . . . . . . . . |
83 |
Properties . . . . . . . . . . . . . . . . . . . . . . . . . . . . . . . . . . . . . . . . . . . . . . . . . . . . . . . . . . . . . . . . . . . . . . |
. 83 |
UniFi Access Point – Details . . . . . . . . . . . . . . . . . . . . . . . . . . . . . . . . . . . . . . . . . . . . . . . . . . . . . |
.84 |
UniFi Access Point – Users . . . . . . . . . . . . . . . . . . . . . . . . . . . . . . . . . . . . . . . . . . . . . . . . . . . . . . |
.87 |
UniFi Access Point – Guests . . . . . . . . . . . . . . . . . . . . . . . . . . . . . . . . . . . . . . . . . . . . . . . . . . . . . |
.88 |
UniFi Access Point – Configuration . . . . . . . . . . . . . . . . . . . . . . . . . . . . . . . . . . . . . . . . . . . . . . |
.88 |
Chapter 13: UniFi VoIP Phone Details . . . . . . . . . . . . . . . . . . . . . . . . . . . . . . |
95 |
Properties . . . . . . . . . . . . . . . . . . . . . . . . . . . . . . . . . . . . . . . . . . . . . . . . . . . . . . . . . . . . . . . . . . . . . . |
. 95 |
UniFi VoIP Phone – Details . . . . . . . . . . . . . . . . . . . . . . . . . . . . . . . . . . . . . . . . . . . . . . . . . . . . . . |
.95 |
UniFi VoIP Phone – Configuration . . . . . . . . . . . . . . . . . . . . . . . . . . . . . . . . . . . . . . . . . . . . . . . |
.96 |
ii |
Ubiquiti Networks, Inc. |
UniFi Controller User Guide |
Table of Contents |
Chapter 14: Client Details......................................... |
. 97 |
Properties . . . . . . . . . . . . . . . . . . . . . . . . . . . . . . . . . . . . . . . . . . . . . . . . . . . . . . . . . . . . . . . . . . . . . . |
. 97 |
Wireless Client – Details . . . . . . . . . . . . . . . . . . . . . . . . . . . . . . . . . . . . . . . . . . . . . . . . . . . . . . . |
. .97 |
Wireless Client – Statistics . . . . . . . . . . . . . . . . . . . . . . . . . . . . . . . . . . . . . . . . . . . . . . . . . . . . . |
. .98 |
Wireless Client – History . . . . . . . . . . . . . . . . . . . . . . . . . . . . . . . . . . . . . . . . . . . . . . . . . . . . . . . |
. .98 |
Wireless Client – Configuration . . . . . . . . . . . . . . . . . . . . . . . . . . . . . . . . . . . . . . . . . . . . . . . . |
. .99 |
Wired Client – Details . . . . . . . . . . . . . . . . . . . . . . . . . . . . . . . . . . . . . . . . . . . . . . . . . . . . . . . . . . |
100 |
Wired Client – Statistics . . . . . . . . . . . . . . . . . . . . . . . . . . . . . . . . . . . . . . . . . . . . . . . . . . . . . . . . |
100 |
Wired Client – History . . . . . . . . . . . . . . . . . . . . . . . . . . . . . . . . . . . . . . . . . . . . . . . . . . . . . . . . . |
101 |
Wired Client – Configuration. . . . . . . . . . . . . . . . . . . . . . . . . . . . . . . . . . . . . . . . . . . . . . . . . . . |
101 |
Chapter 15: Hotspot Manager . . . . . . . . . . . . . . . . . . . . . . . . . . . . . . . . . . . . |
103 |
Guests . . . . . . . . . . . . . . . . . . . . . . . . . . . . . . . . . . . . . . . . . . . . . . . . . . . . . . . . . . . . . . . . . . . . . . . . |
103 |
Payments and Transactions . . . . . . . . . . . . . . . . . . . . . . . . . . . . . . . . . . . . . . . . . . . . . . . . . . . . |
104 |
Vouchers . . . . . . . . . . . . . . . . . . . . . . . . . . . . . . . . . . . . . . . . . . . . . . . . . . . . . . . . . . . . . . . . . . . . . . |
104 |
Operator Accounts . . . . . . . . . . . . . . . . . . . . . . . . . . . . . . . . . . . . . . . . . . . . . . . . . . . . . . . . . . . . |
105 |
Appendix A: Portal Customization . . . . . . . . . . . . . . . . . . . . . . . . . . . . . . . . |
107 |
Overview...................................................................... |
107 |
Enabling Portal Customization . . . . . . . . . . . . . . . . . . . . . . . . . . . . . . . . . . . . . . . . . . . . . . . . . |
107 |
Viewing the Default Portal . . . . . . . . . . . . . . . . . . . . . . . . . . . . . . . . . . . . . . . . . . . . . . . . . . . . . |
107 |
Setup . . . . . . . . . . . . . . . . . . . . . . . . . . . . . . . . . . . . . . . . . . . . . . . . . . . . . . . . . . . . . . . . . . . . . . . . . |
108 |
Appendix B: UniFi Discovery Utility . . . . . . . . . . . . . . . . . . . . . . . . . . . . . . . |
111 |
Overview...................................................................... |
111 |
Launching the UniFi Discovery Utility . . . . . . . . . . . . . . . . . . . . . . . . . . . . . . . . . . . . . . . . . . |
111 |
UniFi Discovery Utility Interface. . . . . . . . . . . . . . . . . . . . . . . . . . . . . . . . . . . . . . . . . . . . . . . . |
111 |
Appendix C: Mobile Apps . . . . . . . . . . . . . . . . . . . . . . . . . . . . . . . . . . . . . . . . |
115 |
Overview...................................................................... |
115 |
UniFi EasySetup App . . . . . . . . . . . . . . . . . . . . . . . . . . . . . . . . . . . . . . . . . . . . . . . . . . . . . . . . . . |
115 |
UniFi EDU App . . . . . . . . . . . . . . . . . . . . . . . . . . . . . . . . . . . . . . . . . . . . . . . . . . . . . . . . . . . . . . . . |
117 |
Appendix D: Controller Scenarios. . . . . . . . . . . . . . . . . . . . . . . . . . . . . . . . . |
119 |
Overview...................................................................... |
119 |
Hosting Controller Software . . . . . . . . . . . . . . . . . . . . . . . . . . . . . . . . . . . . . . . . . . . . . . . . . . . |
119 |
Deployment Options . . . . . . . . . . . . . . . . . . . . . . . . . . . . . . . . . . . . . . . . . . . . . . . . . . . . . . . . . . |
119 |
Layer-3 Adoption. . . . . . . . . . . . . . . . . . . . . . . . . . . . . . . . . . . . . . . . . . . . . . . . . . . . . . . . . . . . . . |
122 |
Appendix E: Contact Information . . . . . . . . . . . . . . . . . . . . . . . . . . . . . . . . . 125
Ubiquiti Networks Support . . . . . . . . . . . . . . . . . . . . . . . . . . . . . . . . . . . . . . . . . . . . . . . . . . . . 125
Ubiquiti Networks, Inc. |
iii |
Table of Contents |
UniFi Controller User Guide |
iv |
Ubiquiti Networks, Inc. |
UniFi Controller User Guide
Chapter 1: Software
Installation
Introduction
Thank you for purchasing the Ubiquiti Networks® UniFi® Enterprise System. The UniFi devices are bundled with the UniFi Controller software, which allows you to manage your UniFi network using a web browser.
This User Guide is for use with version 4.8.7 or above of the UniFi Controller software.
System Requirements
•Linux, Mac OS X, or Microsoft Windows 7/8/10
•Java Runtime Environment 1.6 (1.8 or above recommended)
•Web Browser: Mozilla Firefox, Google Chrome, Microsoft Edge, or Microsoft Internet Explorer 10 (or above)
Network Topology Requirements
•A DHCP-enabled network (so any device can obtain an IP address)
•One of the following:
•UniFi Cloud Key
•A management station running the UniFi Controller software, located either on-site and connected to the same Layer-2 network, or off-site* in a cloud or NOC
•For the public address system capability of the UAP-AC-EDU: A compatible Android™ or iOS device located on the same Layer-2 network as the UniFi Controller and UniFi APs
Chapter 1: Software Installation
All UniFi devices support off-site management controllers.
Follow the instructions in this chapter after you install the hardware, which is described in the Quick Start Guide.
Software Installation
Download the latest version of the UniFi Controller software at downloads.ubnt.com/unifi
Follow the instructions for your specific computer or device type.
UniFi Cloud Key Users
If you have the UniFi Cloud Key, please refer to “UniFi Cloud Key” on page 5 for more information.
UniFi Cloud Users
If you have a UniFi cloud account, please refer to “UniFi Cloud Account” on page 12 for more information.
Linux Users
Please refer to the UniFi blog on our community site at: http://ubnt.link/UniFi-Blog
Mac Users
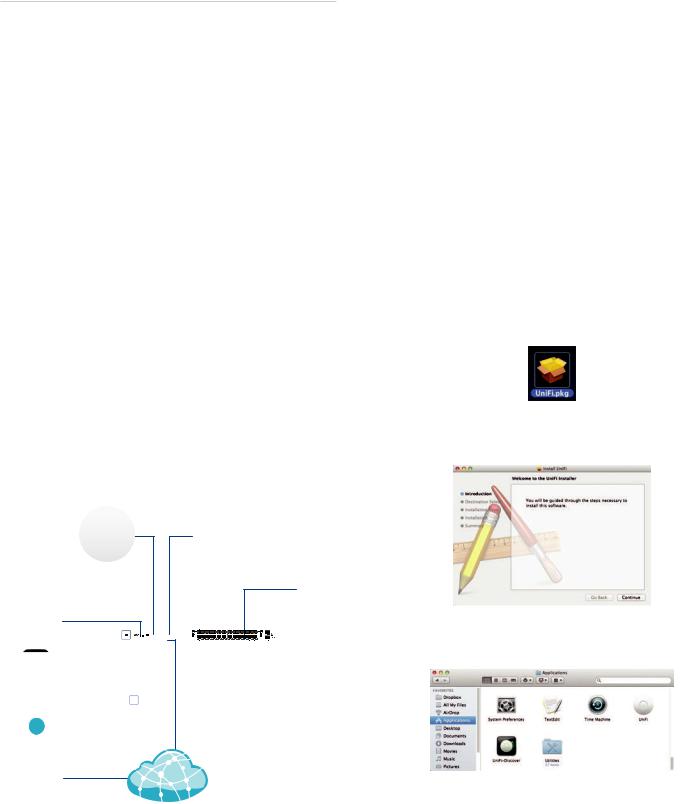
1. Launch UniFi.pkg.
2. Click Continue and follow the on-screen instructions to install the software.
UAP-AC-PRO |
|
UAP-AC-PRO |
|
|
|
UAP-AC-Outdoor |
|
|
|
|
3. Go to Go > Applications and double-click the UniFi |
|
|
UniFi Switch |
icon. |
On-Site |
|
|
|
Management |
LAN |
|
|
Station |
|
|
|
or |
WAN |
UniFi Security |
|
|
Gateway PRO |
|
|
|
|
|
|
O -Site |
|
|
Proceed to “Configuring the UniFi Controller Software” |
|
|
on page 2. |
|
Cloud/NOC |
Internet |
||
Sample Network Diagram
* Requires Layer-3 adoption. For details, refer to: http://ubnt.link/UniFi-Layer3-Adoption
Ubiquiti Networks, Inc. |
1 |

Chapter 1: Software Installation
PC Users
1. Launch UniFi-installer.exe.
2. Click Install.
3. If your computer doesn’t have Java 1.6 or above installed, you will be prompted to install it. Click Install to continue.
4. Click Next.
5. Ensure that the Start UniFi Controller after installation option is checked and click Finish.
Note: The UniFi Controller software can also be launched from Start > All Programs.
UniFi Controller User Guide
Configuring the UniFi Controller Software
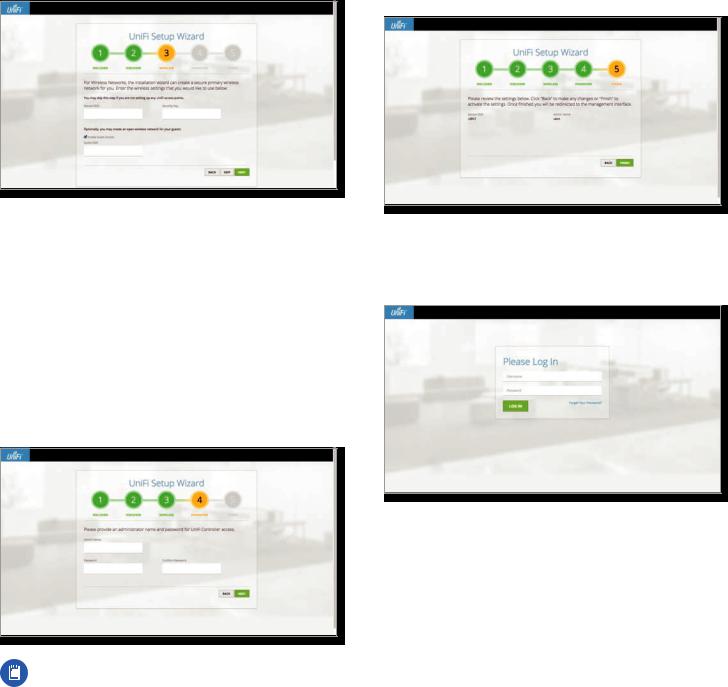
1. The UniFi Controller software startup will begin. Click
Launch a Browser to Manage Wireless Network.
2. Select your country and time zone. Alternatively, you can click restore from a previous backup to use a file that contains your backup settings. Click Next.
Note: U.S. product versions are locked to the U.S. Country Code to ensure compliance with FCC regulations.
3. Select the devices that you want to configure and click Next.
2 |
|
Ubiquiti Networks, Inc. |
|
||
|
||
|
UniFi Controller User Guide
4. The UniFi Setup Wizard will create a secure primary wireless network for your devices. Perform the following steps:
a. Enter the wireless network name (SSID) in the Secure SSID field.
b. Enter a passphrase to be used for your primary network in the Security Key field.
c. To enable guest access, select Enable Guest Access, and enter a guest network name in the Guest
SSIDfield. d. Click Next.
5. Enter an admin name in the Admin Name field and password in the Password field to use when accessing the management interface as a super admin. Confirm your password in the Confirm Password field. Click
Next.
Note: Only the super admin – not any site admin – can view devices that are Pending Approval and then adopt them on the UniFi Controller. Ensure that you save the super admin login information for future use.
Chapter 1: Software Installation
6. Review your settings. Click Finish to save your settings or click Back to make changes. Once the wizard
is finished, the browser will be redirected to the management interface.
Congratulations, your wireless network is now configured.
A login screen will appear for the UniFi Controller management interface. Enter the admin name and password that you created and click Login.
Proceed to “Using the UniFi Controller Software” on page 17 for information on using the UniFi Controller software.
Ubiquiti Networks, Inc. |
3 |
Chapter 1: Software Installation |
UniFi Controller User Guide |
4 |
Ubiquiti Networks, Inc. |
UniFi Controller User Guide
Chapter 2: UniFi Cloud
Introduction
You can access the UniFi Controller via the UniFi Cloud Key and/or the UniFi cloud account. This chapter describes the following:
•UniFi Cloud Key
•“UniFi Cloud Account” on page 12
UniFi Cloud Key
The UniFi Cloud Key includes the pre-installed UniFi Controller software.
System Requirement
Web Browser: Google Chrome, Mozilla Firefox, Microsoft Edge, or Microsoft Internet Explorer 10 (or above)
Network Topology Requirement
A DHCP-enabled network (for the UniFi Cloud Key to obtain an IP address)
UAP-AC-LR |
UAP-PRO |
UAP-AC Outdoor
|
|
UniFi Switch |
UniFi Cloud Key |
LAN |
|
|
|
|
|
WAN |
UniFi Security |
|
|
Gateway PRO |
Internet
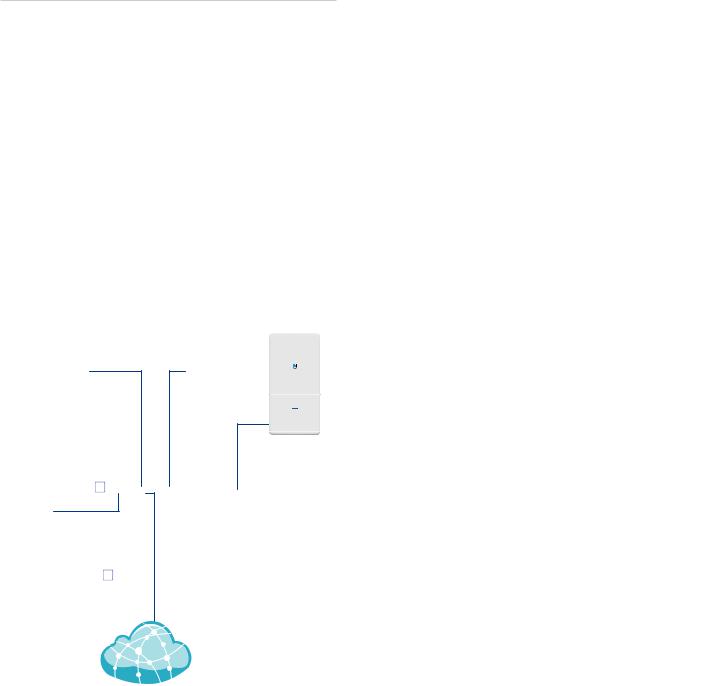
Sample Network Diagram
Software Installation
After you follow the hardware installation instructions in the UniFi Cloud Key Quick Start Guide, use one of the following methods to launch the software:
•If you are using Chrome, go to the Chrome Instructions section (recommended).
•If you are using a different web browser, go to
“Instructions for Other Web Browsers” on page 7.
Chapter 2: UniFi Cloud
Chrome Instructions
1. Ensure that your host system is on the same Layer-2 network as the UniFi Cloud Key.
2. Launch the Chrome web browser and type https://unifi.ubnt.com in the address field. Press enter
(PC) or return (Mac).
3. Enter the username and password for your UBNT account. Click Sign In.
4. Click Find Cloud Key.
Note: The default fallback IP address of the UniFi Cloud Key is 192.168.1.30.
5. If the Ubiquiti® Device Discovery Tool is already installed, proceed to step 7.
If the tool is not installed, you will be prompted to add it. Proceed to step 6.
Ubiquiti Networks, Inc. |
5 |
Chapter 2: UniFi Cloud
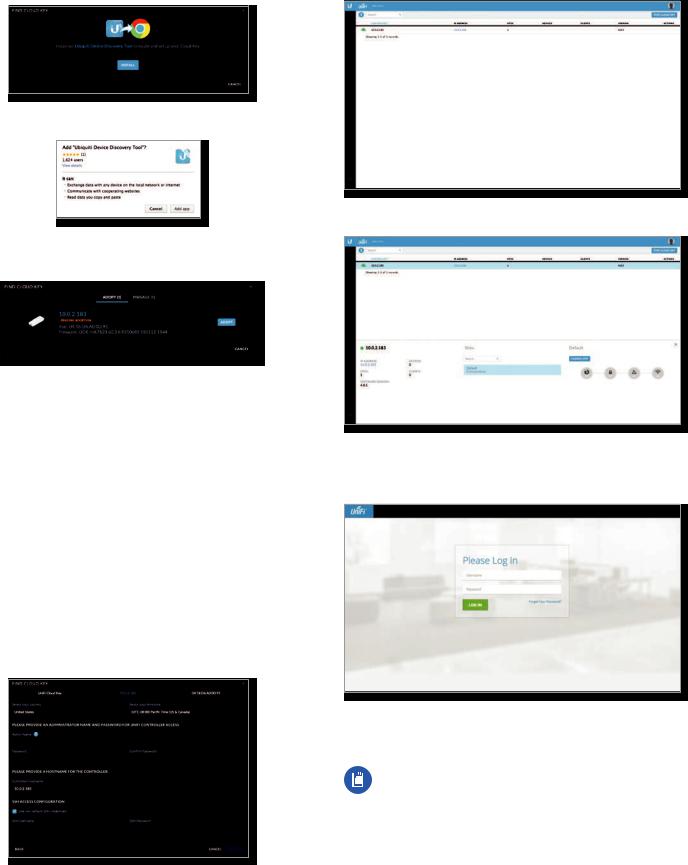
6. To install the tool: a. Click Install.
b. Click Add app to confirm.
7. The Ubiquiti Device Discovery Tool will search for the UniFi Cloud Key. Select it to continue.
8. Configure the UniFi Controller:
a. Select the appropriate country. b. Select the appropriate time zone.
c. Enter an admin name in the Admin Name field and a password in the Password field to use when accessing the management interface.
d. Confirm your password in the Confirm Password field.
e. Keep the IP address or enter a hostname in the
Controller Hostname field.
f. If you want to set up an SSH login for management access to the UniFi Cloud Key, then select Use non-default SSH credentials. Enter a username in the SSH Username field, and enter a password in the
SSH Password field.
g. Click Submit to save your changes.
UniFi Controller User Guide
9. Wait for the UniFi Controller to be adopted, and then select it.
10.Click Launch Site.
A login screen will appear for the UniFi Controller management interface. Enter the admin name and password that you created and click Login.
Proceed to “Using the UniFi Controller Software” on page 17 for information on using the UniFi Controller software.
Note: A future feature will enable backup of the UniFi Controller database and configuration on the included microSD card.
6 |
Ubiquiti Networks, Inc. |

UniFi Controller User Guide
Instructions for Other Web Browsers
1. Ensure that your host system is on the same Layer-2 network as the UniFi Cloud Key.
2. The UniFi Cloud Key is set to DHCP by default, so it will try to automatically obtain an IP address. Assign a specific IP address to the UniFi Cloud Key, or check the DHCP server for its IP address.
Note: The default fallback IP address of the UniFi Cloud Key is 192.168.1.30.
3. Launch the web browser. In the address field, type https:// followed by the appropriate IP address. Press enter (PC) or return (Mac).
4. Click Manage to run the UniFi Setup Wizard.
Note: You can click Configure to change the settings of the UniFi Cloud Key (refer to “UniFi Cloud Key Configuration” on page 8 for
more information). The default login is ubnt/ubnt or root/ubnt.
5. The UniFi Setup Wizard screen appears. Alternatively, you can click restore from a previous backup to use a file that contains your backup settings. Click Next.
Note: U.S. product versions are locked to the U.S. Country Code to ensure compliance with FCC regulations.
Chapter 2: UniFi Cloud
6. Select the devices that you want to configure and click Next.
7. The UniFi Setup Wizard will create a secure primary wireless network for your devices. Perform the following steps:
a. Enter the wireless network name (SSID) in the Secure SSID field.
b. Enter a passphrase to be used for your primary network in the Security Key field.
c. To enable guest access, select Enable Guest Access, and enter a guest network name in the Guest
SSIDfield. d. Click Next.
8. Enter an admin name in the Admin Name field and password in the Password field to use when accessing the management interface as a super admin. Confirm your password in the Confirm Password field. Click Next.
Ubiquiti Networks, Inc. |
7 |
Chapter 2: UniFi Cloud
Note: Only the super admin – not any site admin – can view devices that are Pending Approval and then adopt them on the UniFi Controller. Ensure that you save the super admin login information for future use.
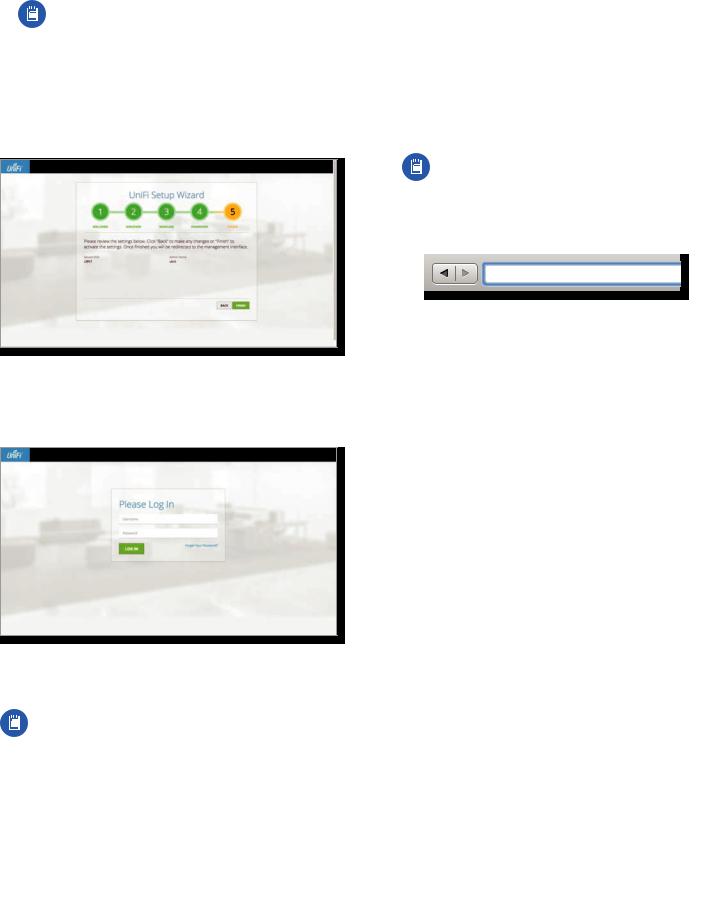
9. Review your settings. Click Finish to save your settings or click Back to make changes. Once the wizard
is finished, the browser will be redirected to the management interface.
Congratulations, your wireless network is now configured.
A login screen will appear for the UniFi Controller management interface. Enter the admin name and password that you created and click Login.
Proceed to “Using the UniFi Controller Software” on page 17 for information on using the UniFi Controller software.
Note: A future feature will enable backup of the UniFi Controller database and configuration on the included microSD card.
UniFi Controller User Guide
UniFi Cloud Key Configuration
Login Instructions
1. Ensure that your host system is on the same Layer-2 network as the UniFi Cloud Key.
2. The UniFi Cloud Key is set to DHCP by default, so it will try to automatically obtain an IP address. Assign a specific IP address to the UniFi Cloud Key, or check the DHCP server for its IP address.
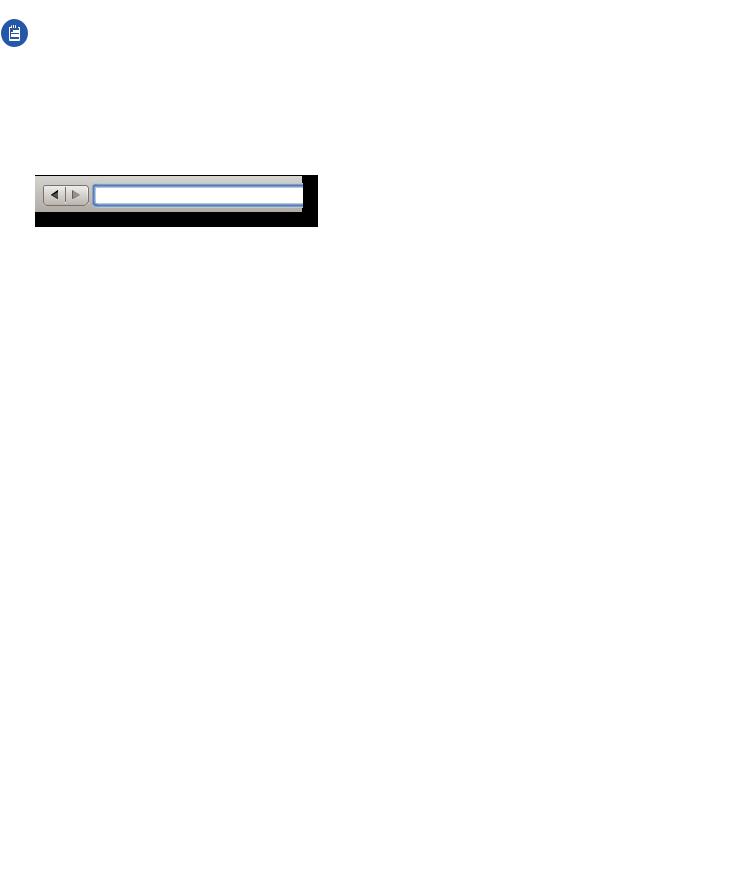
Note: The default fallback IP address of the UniFi Cloud Key is 192.168.1.30.
3. Launch the web browser. In the address field, type https:// followed by the appropriate IP address. Press enter (PC) or return (Mac).
4. You have two options:
•Manage Click Manage to access the UniFi Controller. Proceed to “Using the UniFi Controller Software” on page 17 for more information.
•Configure Click Configure to change the settings of the UniFi Cloud Key.
5. After you click Configure, enter the Username and
Password (the default login is ubnt/ubnt). Then click
Login.
The Main screen will appear.
8 |
Ubiquiti Networks, Inc. |

UniFi Controller User Guide
Navigation Bar
The UniFi Cloud Key configuration consists of three primary pages:
•“Main” on page 9
•“Configuration” on page 10
•“Maintenance” on page 10
Username
At the top right of each screen, click the Username to display the Change Password and Logout options:
Change password To change the password, click  . The Change Password screen will appear:
•Old password Enter the current password (the default is ubnt).
•New password Enter the new password.
•Confirm Password Enter the new password again.
•Submit Click Submit to apply changes.
•Cancel Click Cancel to discard changes.
Logout To manually sign out of the UniFi Cloud Key configuration, click  .
.
Chapter 2: UniFi Cloud
Main
The Main screen displays basic status information about the UniFi Cloud Key.
Status
Device Name Displays the hostname or alias of the UniFi Cloud Key.
MAC Address Displays the MAC address or hardware identifier of the UniFi Cloud Key.
Version Displays the version number of the UniFi Cloud Key firmware.
Uptime Displays the duration of time the UniFi Cloud Key has been running.
Date Displays the current date and time.
Disk Space
Available Displays the percentage of available disk space. Used Displays the amount of used disk space.
Free Displays the amount of available disk space. Total Displays the total amount of disk space.
Ubiquiti Networks, Inc. |
9 |

Chapter 2: UniFi Cloud
Configuration
The Configuration screen allows you to configure the basic and network settings of the UniFi Cloud Key.
Basic Settings
Device Name Enter a descriptive name or identifier for the UniFi Cloud Key. Also known as a host name.
Time Zone Select the appropriate time zone.
Reset Button Use of the hardware Reset button on the UniFi Cloud Key is enabled by default. To prevent an accidental reset to default settings, click to toggle Off.
Network Settings
Configuration Mode Select the Internet connection type for your service: Static or DHCP.
•Static The service provider assigns fixed network settings to your service for manual entry. Enter the following information:
-IP address Enter the Internet IP address of the UniFi Cloud Key.
-Netmask Enter the subnet mask of the UniFi Cloud Key.
-Gateway Enter the IP address of the network’s gateway router.
-Primary DNS Enter the IP address of the network’s primary DNS server.
-Secondary DNS Enter the IP address of the network’s secondary DNS server.
UniFi Controller User Guide
•DHCP The use of the Dynamic Host Configuration Protocol (DHCP) is the default. The UniFi Cloud Key automatically acquires network settings from the network’s DHCP server.
-Fallback IP Address Enter the IP address for the UniFi Cloud Key to use if an external DHCP server is not found.
-Fallback Netmask Enter the netmask for the UniFi Cloud Key to use if an external DHCP server is not found.
Apply Changes Click Apply Changes to save changes.
Discard Click Discard to cancel changes.
Maintenance
The Maintenance screen contains administrative options, so you can change the password, reboot the UniFi Cloud Key, power it off, reset it to factory defaults, upgrade the UniFi Cloud Key firmware, or upgrade the UniFi Controller software.
|
|
10 |
Ubiquiti Networks, Inc. |

UniFi Controller User Guide
Security
Password To change the password, click Change Password. The Change Password screen will appear:
•Old password Enter the current password (the default is ubnt).
•New password Enter the new password.
•Confirm Password Enter the new password again.
•Submit Click Submit to apply changes.
•Cancel Click Cancel to discard changes.
Maintenance
Reboot Click Reboot to powercycle the UniFi Cloud Key. Power Off Click Power Off to turn off the UniFi Cloud Key.
Reset to Defaults Click Reset to Defaults to reset the UniFi Cloud Key to its factory default settings. This option will reboot the UniFi Cloud Key, and all factory default settings will be restored.
Note: We recommend that you back up your UniFi Controller configuration (refer to “Backup” on page 31 for more information) before resetting the
UniFi Cloud Key to its defaults.
Firmware
Version Displays the version number of the UniFi Cloud Key firmware.
Check for Updates Click Check for Updates to see if there is a newer firmware version. If there is, then you can follow the on-screen instructions to upgrade now.
Update Manually Click Update Manually to update the firmware. The Please Confirm Update screen will appear.
Chapter 2: UniFi Cloud
You have two options:
•upload file If you have the firmware saved in a specific location, then click Select File to browse for the file.
•get file from URL If you know the URL of the firmware’s location, then enter it in the URL field.
•Update Click Update to proceed with the update.
•Cancel Click Cancel to skip the update.
Note: Updating the UniFi Cloud Key firmware will also update the UniFi Controller software. We recommend that you back up your UniFi Controller configuration (refer to “Backup” on page 31 for more information) before updating the UniFi Cloud Key firmware.
UniFi
Version Displays the version number of the UniFi Controller software.
Check for Updates Click Check for Updates to see if there is a newer software version. If there is, then you can follow the on-screen instructions to upgrade now.
Note: We recommend that you back up your UniFi Controller configuration (refer to “Backup” on page 31 for more information) before upgrading.
Ubiquiti Networks, Inc. |
11 |
Chapter 2: UniFi Cloud
UniFi Cloud Account
You must be a super admin for initial cloud management. Once cloud access is enabled by the super admin, then any other admin can also enable cloud access.
Note: The cloud account is also known as the Single Sign-On (SSO) account.
Login Instructions
1. Launch the Chrome web browser and type https:// followed by the appropriate Controller Hostname/IP address as specified in “Settings > Controller” on page 30. Press enter (PC) or return
(Mac).
2. Enter the username and password for your UBNT account. Click Sign In.
Note: If you do not have an account, click Register and follow the on-screen instructions.
A list of UniFi Controllers will appear.
# Displays the number of UniFi Controllers.
Search  Enter the text you want to search for. Simply begin typing; there is no need to press Enter.
You can click any of the column headers to change the list order.
UniFi Controller User Guide
(icon) Displays the icon corresponding to the device running the UniFi Controller. Green indicates an active UniFi Controller. Gray indicates an inactive UniFi Controller.
UniFi Cloud Key
Computer
Controller Displays the hostname, alias, or MAC address of the device running the UniFi Controller. You can click the name to get additional details at the bottom of the screen. (Go to “Additional Details” on page 13 for more information.)
IP Address Displays the IP address of the device running the UniFi Controller.
Sites Displays the total number of sites managed by the UniFi Controller.
Devices Displays the total number of devices managed by the UniFi Controller.
Clients Displays the total number of clients on the sites managed by the UniFi Controller.
Version Displays the software version number of your UniFi Controller.
Actions Click a button to perform the desired action:
•Remove Click  to remove the UniFi Controller from your cloud account.
Chat At the lower left of the screen, click  to open a window for online chat support.
Admin
At the top right of the screen, click  to display the My Account and Sign Out options:
My Account To change your account settings and/or password, click  . The Account Settings screen will appear:
12 |
Ubiquiti Networks, Inc. |

UniFi Controller User Guide
There are three pages available:
•Profile Access your account settings:
-First Name Enter your first name.
-Last Name Enter your last name.
-Username Enter your login username.
-Email Enter the email address of your cloud account.
-Update Settings Click to apply your changes.
•Security Change your account password:
-Create a New Password Enter a new password with at least eight characters.
-Update Settings Click to apply your changes.
•Beta Program Follow the on-screen instructions if you want to join the beta program.
Sign Out To manually sign out of the cloud account, click  .
.
Find Cloud Key
To add a UniFi Cloud Key, click Find Cloud Key at the top right of the screen. The Find Cloud Key screen will appear:
Adopt
IP address Displays the IP address of the UniFi Cloud Key.
(status) Displays the status information: Pending Adoption.
mac Displays the MAC address or hardware identifier of the UniFi Cloud Key.
firmware Displays the firmware version number of the UniFi Cloud Key.
Adopt Click to adopt the UniFi Cloud Key. Refer to step 8 of “Chrome Instructions” on page 5 for more information.
Cancel Click to exit this screen.
Chapter 2: UniFi Cloud
Manage
IP address Displays the IP address of the UniFi Cloud Key.
(status) Displays the status information: Adopted or
Pending Adoption.
mac Displays the MAC address or hardware identifier of the UniFi Cloud Key.
firmware Displays the firmware version number of the UniFi Cloud Key.
Manage Click to configure the UniFi Cloud Key. Refer to
“UniFi Cloud Key Configuration” on page 8 for more information.
Cancel Click to exit this screen.
Additional Details
Select a UniFi Controller to display more information at the bottom of the screen.
•(icon) Green indicates an active UniFi Controller. Gray indicates an inactive UniFi Controller.
•(controller_name) Displays the Controller Hostname/IP address as specified in “Settings > Controller” on page 30.
•IP Address Displays the IP address of the device running the UniFi Controller.
•Sites Displays the total number of sites managed by the UniFi Controller.
•Software Version Displays the software version number of your UniFi Controller.
•Devices Displays the total number of devices managed by the UniFi Controller.
•Clients Displays the total number of clients on the sites managed by the UniFi Controller.
Ubiquiti Networks, Inc. |
13 |
Chapter 2: UniFi Cloud
Sites
•Search  Enter the text you want to search for. Simply begin typing; there is no need to press Enter.
•(site_name) Displays the name of the site. You can click the name to get additional details on the right.
•(_ Unread Alerts) Displays the number of unread alerts.
(site_name)
•Launch Site Click Launch Site to access the UniFi Controller. Proceed to “Using the UniFi Controller Software” on page 17 for more information.
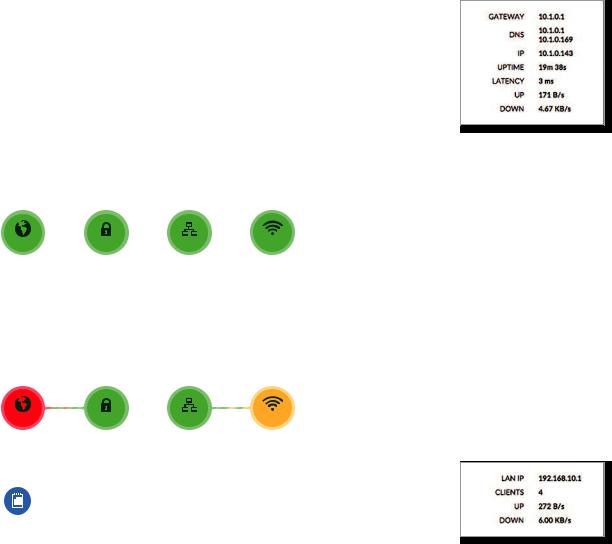
•(map) Displays a visual representation of your network’s status. The status of each dashboard node is indicated by color:
-Green Green indicates that the node is active and all devices are online.
www |
WAN |
LAN |
WLAN |
-Red Red indicates one of the following:
•WWW Internet connectivity is down.
•WAN The UniFi Security Gateway is offline.
•LAN One or more Switches are offline.
•WLAN More than half of the APs are offline.
www |
WAN |
LAN |
WLAN |
-Orange Orange indicates that half or fewer than half of the APs are offline.
Note: Orange is not applicable to the WWW,
WAN, and LAN nodes.
-Gray Gray indicates that there are no devices available for that node.
UniFi Controller User Guide
You can place the mouse over each node icon to display basic status information.
-WWW The basic details of the Internet connection are displayed.
•Gateway Displays the IP address of the service provider’s gateway.
•DNS Displays the IP addresses of the Domain Name System (DNS) servers.
•IP Displays the Internet IP address of the UniFi Security Gateway.
•Uptime Displays the length of time the Internet connection has been active.
•Latency Displays the amount of time it takes a packet to travel from the UniFi Security Gateway to the service provider’s gateway.
•Up Displays the upload rate of your Internet connection.
•Down Displays the download rate of your Internet connection.
-WAN The basic details of the UniFi Security Gateway connection are displayed.
•LAN IP Displays the local IP address of the UniFi Security Gateway.
•Clients Displays the total number of local clients.
•Up Displays the upload rate of the UniFi Security Gateway.
•Down Displays the download rate of the UniFi Security Gateway.
14 |
Ubiquiti Networks, Inc. |

UniFi Controller User Guide |
Chapter 2: UniFi Cloud |
-LAN The basic details of the wired network(s) are displayed.
•Gateway Displays the IP address of the service provider’s gateway.
•Users Displays the number of clients connected to the wired network.
•Guests Displays the number of clients connected to the guest wired network.
•Switches Displays the number of UniFi Switches connected to the wired network.
•Up Displays the upload rate of the wired network(s).
•Down Displays the download rate of the wired network(s).
-WLAN The basic details of the wireless network(s) are displayed.
•Users Displays the number of clients connected to the primary wireless network(s).
•Guests Displays the number of clients connected to the guest wireless network(s).
•APs Displays the number of APs in the primary wireless network(s) and the number of APs in the guest wireless network(s).
•Up Displays the upload rate of the wireless network(s).
•Down Displays the download rate of the wireless network(s).
Ubiquiti Networks, Inc. |
15 |
Chapter 2: UniFi Cloud |
UniFi Controller User Guide |
16 |
Ubiquiti Networks, Inc. |
UniFi Controller User Guide
Chapter 3: Using the UniFi
Controller Software
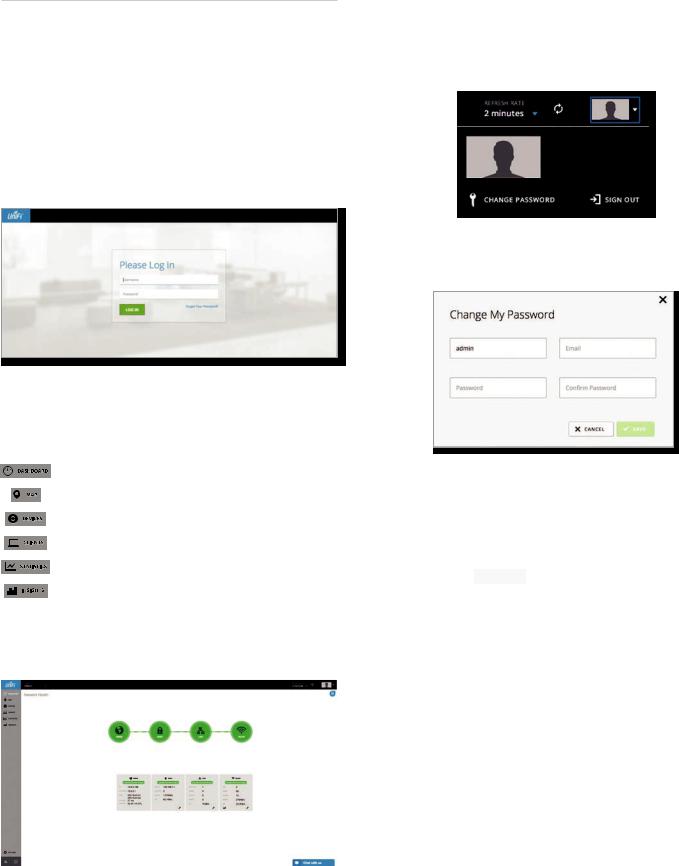
The UniFi Controller software has a browser-based interface for easy configuration and management.
To access the interface, perform the following steps:
1.Launch the UniFi Controller application if hasn’t already been started.
•Mac users: Go > Applications > UniFi
•Windows users: Start > All Programs >
Ubiquiti UniFi
2.The UniFi login screen will appear. Enter the username and password in the appropriate fields and click Log In.
Chapter 3: Using the UniFi Controller Software
Refresh
Click the refresh  icon to update the on-screen information. Select the refresh interval: 15 seconds,
1 minute, 2 minutes (default), 5 minutes, or Never.
Admin
At the top right of the screen, click 
 to display the
Change Password and Sign Out options:
Change Password To change the login name and/or password, click  . The Change My Password screen will appear:
Navigation Bar
The UniFi software consists of six primary pages. This User Guide covers each page with a chapter. For details on a specific page, refer to the appropriate chapter.
“Dashboard” on page 33
“Map” on page 37
“Devices” on page 43
“Clients” on page 51
“Statistics” on page 55
“Insights” on page 59
Common Interface Options
The common interface options are accessible from all tabs in the UniFi interface.
•Admin Enter the admin name.
•Email Enter the email address of the admin account.
•Password Enter the new password.
•Confirm Password Enter the new password again.
•Save Click  to apply changes.
•Cancel Click  CANCEL to discard changes.
Sign Out To manually sign out of the UniFi Configuration Interface, click  .
.
|
|
Ubiquiti Networks, Inc. |
17 |

Chapter 3: Using the UniFi Controller Software
Site
The UniFi Controller can manage multiple UniFi networks, which are called sites. Each site has its own configurations, maps, statistics, guest portals, and site administrator accounts. The multiple sites are logically separated, and the initial site is named Default.
Current Site To create a new site, click the drop-down  arrow to display the drop-down menu.
Click Add Site, and the Add Site screen will appear:
•Site Name Enter a name that describes the site. It will be used in the Current Site drop-down menu.
•Submit Click  SUBMIT to save changes.
Properties
The Properties tab is hidden by default. To display it, click the properties  icon.
icon.
Information about each selected device appears as a popup within this tab. The information varies depending on the device type. For more information, see the appropriate chapter:
•“UniFi Security Gateway Details” on page 67
•“UniFi Switch Details” on page 75
•“UniFi Access Point Details” on page 83
•“UniFi VoIP Phone Details” on page 95
•“Client Details” on page 97
Controls and Live Chat
At the bottom left of the screen, there are three controls:
•
• Alerts (see “Alerts” on page 32)
• Events (see “Events” on page 32)
At the bottom right of the screen, there is the live chat
tab. Click |
Chat with us |
to open a window for online chat |
|
|
|
support. |
|
|
18
UniFi Controller User Guide
Settings
The  tab displays a list of available sub-tabs:
•Site Site-related settings.
•Wireless Networks Wireless network and group setup, including Zero Handoff Roaming.
•Networks Wired network setup.
•Guest Control Guest portal and policies.
•Admins Admin accounts and privileges.
•User Groups User group settings.
•VoIP VoIP setup.
•Extensions VoIP extension, group, and conference options.
•Controller Identity, discovery, and email server settings.
•Cloud Access Cloud login credentials.
•Maintenance System configuration backup, system configuration restore, and support files.
Settings > Site
Configure the site-specific settings. To switch sites, select a different site from the Current Site drop-down menu at the top of any screen.
Site Configuration
Site Name Change the name of the site. Country Select the appropriate country. Time Zone Select the appropriate time zone.
Services
Automatic Upgrade When enabled, the following options will automatically upgrade your firmware when an update is available.
•Automatically upgrade AP firmware Select this option to automatically upgrade firmware on the APs.
•Automatically upgrade phone firmware Select this option to automatically upgrade firmware on the Phones.
LED When enabled, the LED on the UniFi device will light up. When disabled, the LED will turn off.
Ubiquiti Networks, Inc.
UniFi Controller User Guide
DPI (Beta) Deep Packet Inspection (DPI) is more advanced than conventional Stateful Packet Inspection (SPI) filtering for traffic analysis. Ubiquiti’s proprietary DPI engine includes the latest application identification signatures to track which applications (and IP addresses) are using the most bandwidth.
•Clear DPI Counters Click to delete all collected DPI data. Click Confirm or Cancel.
Alert Select this option to enable alert emails, which will be sent to the email addresses of the administrators.
Uplink Connectivity Monitor It monitors the uplinks of the managed APs, either wired or wireless, by checking to see if the gateway/custom IP can be reached. The monitor and wireless uplink capability are enabled by default.
•Default Gateway Enabled by default. All managed APs will use the gateway of the AP that is providing IP information, either by DHCP or Static designation.
•Custom IP Click to specify an IP address.
-Uplink IP Address All managed APs will use the IP address you enter.
SNMP Select this option to activate the SNMP (Simple Network Monitor Protocol) agent. SNMP is an application layer protocol that facilitates the exchange of management information between
network devices. Network administrators use SNMP to monitor network-attached devices for issues that warrant attention.
•Community String Specify the SNMP community string. It is required to authenticate access to MIB (Management Information Base) objects and functions as an embedded password. The device supports a read-only community string; authorized management stations have read access to all the objects in the MIB except the community strings, but do not have write access. The device supports SNMP v1. The default
is public.
Remote Logging Enable to define a remote syslog server.
•Remote IP Address Enter the IP address of the syslog server.
•Port Enter the port number of the syslog server. The default is 514.
Device Authentication This option protects SSH access to the UniFi devices. All devices in the same site share the same SSH username and password. You can also make changes:
•Username Enter the new username.
•Password Enter the new password. Apply Click  to save changes.
Ubiquiti Networks, Inc.
Chapter 3: Using the UniFi Controller Software
Settings > Wireless Networks
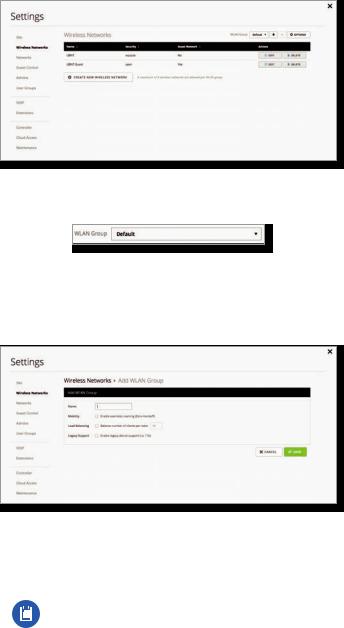
Configure the wireless networks for each site. You can have up to four wireless network names or SSIDs per
WLAN group.
WLAN Group The Default WLAN group is automatically created.
Add a New WLAN Group To add a new WLAN group, click the  button. Go to the Add or Edit a WLAN Group section.
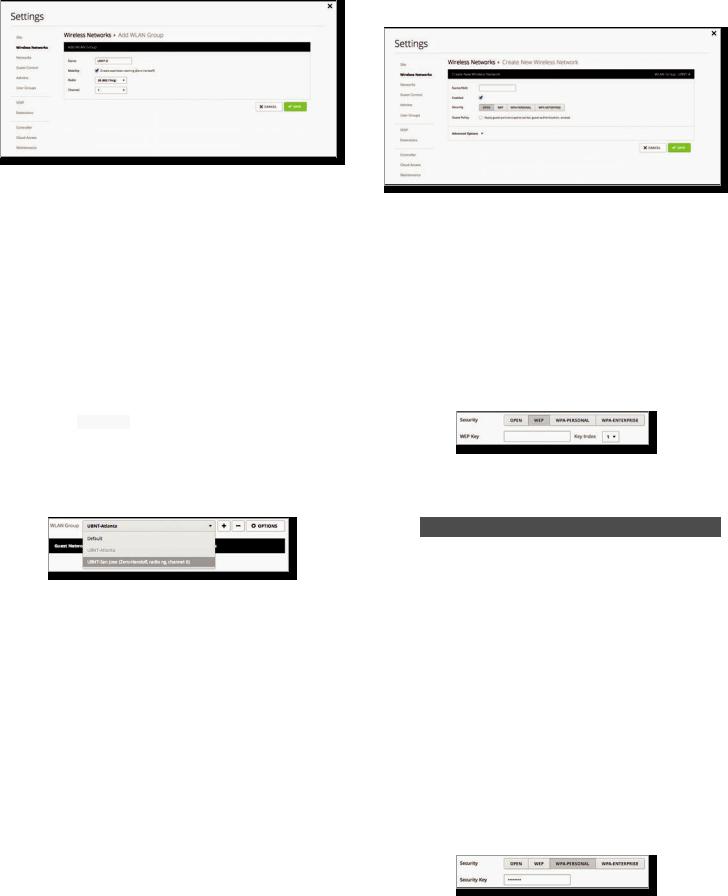
Add or Edit a WLAN Group
•Name Enter or edit a descriptive name for the WLAN group.
•Mobility To enable seamless roaming (Zero Handoff), select the checkbox.
Note: The UAP-AC, UAP-AC-Outdoor, UAP-AC-LITE, UAP-AC-LR, UAP-AC-PRO, and UAP-AC-EDU do not support Zero Handoff Roaming.
When you enable this option, multiple Access Points (APs) act as an AP cluster, appearing as a single AP. The wireless client detects only one AP, so it seamlessly roams from AP to AP – there is no need to re-negotiate. The APs determine which AP has the best connection and should serve the client. They use multicasting to communicate so they must be wired in the same Layer 2 domain.
Zero Handoff Roaming does not support wireless uplinks and can only be used on a secured network. It is also not meant for all scenarios. For example, if there is too much load or interference, then Zero Handoff Roaming may not be appropriate for your scenario.
19
Chapter 3: Using the UniFi Controller Software
Configure the following options:
-Radio Select the appropriate radio, 2G or 5G.
-Channel Select the channel that all of the APs will use for Zero Handoff Roaming.
Load Balancing (Not available if you enabled the Mobility option.) Select this option to balance the number of clients you specify per radio. Then enter the number of clients in the field provided.
Legacy Support (Not available if you enabled the Mobility option.) By default, legacy devices, such as 802.11b devices, are excluded. Select this option if you want to support legacy devices.
Save Click  to apply changes.
Cancel Click  CANCEL to discard changes.
For each WLAN group, you have the following:
•Remove a WLAN Group To remove a WLAN group, select it from the drop-down menu, and then click the  button.
•Options To make changes, select the WLAN group from the drop-down menu, and then click  . Go to “Add or Edit a WLAN Group” on page 19.
Wireless Networks
Name Displays the wireless network name or SSID.
Security Displays the type of security being used on your wireless network.
Guest Network Indicates whether or not the network is a guest network.
Actions Click a button to perform the desired action:
•Edit Click  to make changes to the wireless network settings. Go to the Create or Edit a Wireless Network section in the next column.
•Delete Click  to remove the wireless network.
Create Wireless Network Click  to add a wireless network. Go to the Create or Edit a Wireless Network section in the next column.
20
UniFi Controller User Guide
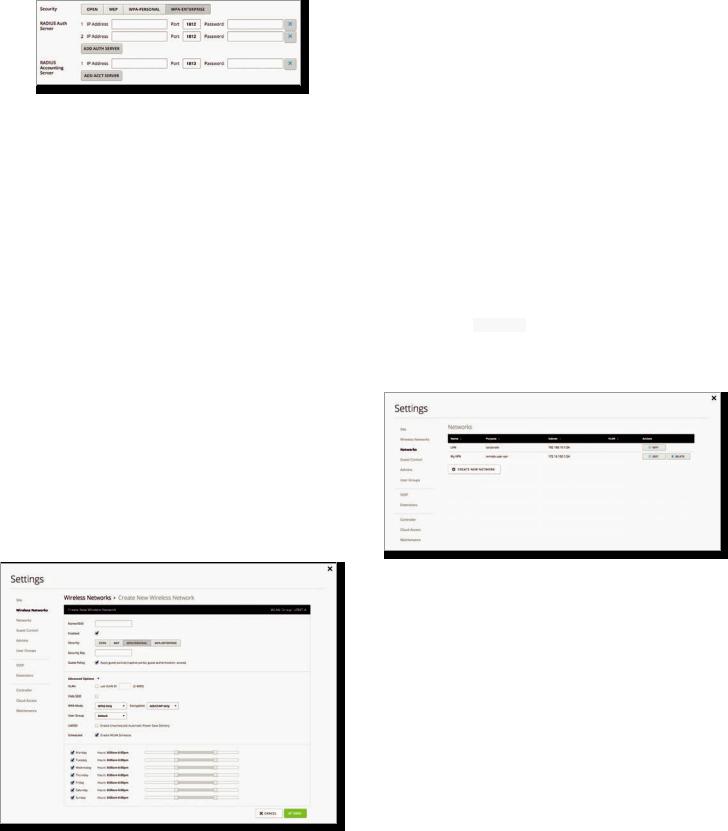
Create or Edit a Wireless Network
•Name/SSID Enter or edit the wireless network name or SSID.
•Enabled Select this option to make this network active.
•Security Select the type of security to use on your wireless network.
-Open This option is typically only used on the guest network. When enabled, wireless network access is open to anyone without requiring a password.
-WEP WEP (Wired Equivalent Privacy) is the oldest and least secure security algorithm. WPA™ security methods should be used when possible.
•WEP Key Enter a WEP encryption key in hexadecimal format. You can enter a 64-bit or 128-bit key:
Type |
Hex |
|
|
64-bit |
10 Hexadecimal Characters |
|
(0-9, A-F, or a-f) |
|
Example: 00112233AA |
|
Note: You can use 5 printable characters, |
|
which will be translated to the |
|
corresponding HEX code. |
|
|
128-bit |
26 Hexadecimal Characters |
|
(0-9, A-F, or a-f) |
|
Example: |
|
00112233445566778899AABBCC |
|
Note: You can use 13 printable |
|
characters, which will be translated to the |
|
corresponding HEX code. |
|
|
•Key Index Specify which Index of the WEP Key to use. Four different WEP keys can be configured at the same time, but only one is used. Select the effective key: 1, 2, 3, or 4.
-WPA-Personal WPA or Wi-Fi Protected Access was developed as an encryption method stronger than WEP. WPA-Personal requires a passphrase to connect to the wireless network.
•Security Key Enter the passphrase that users will use to connect to the wireless network.
Ubiquiti Networks, Inc.
UniFi Controller User Guide
-WPA-Enterprise WPA Enterprise uses a RADIUS server to authenticate users on the wireless network.
•RADIUS Auth Server Provide the following information about the RADIUS authentication server:
•IP Address Enter the IP address.
•Port Enter the port number. The default is 1812.
•Password Enter the password.
•Delete Click the delete  icon to remove this authentication server.
•Add Auth Server If you have another authentication server, click this option and complete the IP Address, Port, and Password fields.
•RADIUS Accounting Server Provide the following information about the RADIUS server:
•IP Address Enter the IP address.
•Port Enter the port number. The default is 1813.
•Password Enter the password.
•Delete Click the delete  icon to remove this accounting server.
•Add Acct Server If you have another accounting server, click this option and complete the IP Address, Port, and Password fields.
•Guest Policy Select this option to enable guest access policies on this wireless network.
Advanced Options
•VLAN To use a VLAN, select Use VLAN ID and enter the VLAN ID number.
Chapter 3: Using the UniFi Controller Software
•Hide SSID Select this option if you don’t want the wireless network name or SSID to be broadcast.
•WPA Mode (Available if WPA security is enabled.) Select the appropriate WPA method: Both, WPA1 Only, or WPA2 Only (default).
•Encryption Select the appropriate encryption method:
Auto, TKIP Only, or AES/CCMP Only (default).
•User Group Assign wireless users to a specific user group. For more information about user groups, see
“Settings > User Groups” on page 28.
•UAPSD Disabled by default. Unscheduled Automatic Power Save Delivery. Select this option to enable the power save mode of Wi-Fi devices.
•Scheduled Select Enable WLAN Schedule to restrict wireless access to the schedule you set.
-Monday-Sunday Select the days you want to schedule.
-Hours Use the sliders to select the start and end times of the day’s wireless access.
•Save Click  to apply changes.
•Cancel Click  CANCEL to discard changes.
Settings > Networks
Configure the networks for each site.
Networks
Name Displays the network name.
Purpose Displays a description of this network. Subnet Displays the IP address and prefix size. VLAN Displays the VLAN ID, if applicable.
Actions Click a button to perform the desired action:
•Edit Click  to make changes to the network settings. Go to “Create or Edit a Network” on page 22.
•Delete (Not available for the default network.) Click
 to remove the network.
Create New Network Click  to add a network. Go to “Create or Edit a Network” on page 22.
Ubiquiti Networks, Inc. |
21 |
Chapter 3: Using the UniFi Controller Software
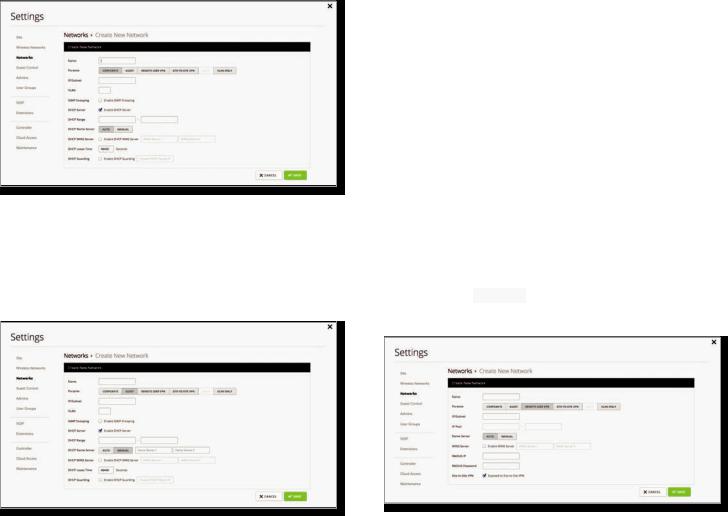
Create or Edit a Network
•Name Enter or edit the network name.
•Purpose Select the most appropriate description:
Corporate, Guest, Remote User VPN, Site-to-Site VPN,
Voice, or VLAN Only. Then follow the instructions for your selection:
Corporate or Guest Network
•IP/Subnet Enter the IP address and prefix size.
•VLAN (Not available for the default Corporate network, LAN.) Enter the VLAN ID.
•IGMP Snooping Select this option to monitor IGMP (Internet Group Management Protocol) traffic and thereby manage multicast traffic.
•DHCP Server Enabled by default. The local DHCP server assigns IP addresses to DHCP clients on the network.
•DHCP Range Enter the starting and ending IP addresses of the range in the fields provided.
•DHCP Name Server Configure the name or DNS (Domain Name System) server setting.
-Auto Enabled by default. Name servers are automatically assigned by the DHCP server.
-Manual Select this option to manually select name servers.
•Name Server 1/2 Enter the IP address of the name server in each field.
UniFi Controller User Guide
•DHCP WINS Server Select this option to designate WINS (Windows Internet Naming Service) server(s).
-WINS Server 1/2 Enter the IP address of the WINS server in each field.
•DHCP Lease Time The IP addresses assigned by the DHCP server are valid only for the duration specified by the lease time. Increasing the time ensures client operation without interruption, but could introduce potential conflicts. Decreasing the lease time avoids potential address conflicts, but might cause more slight interruptions to the client while it acquires a new IP address from the DHCP server. Enter the number of seconds.
•DHCP Guarding Disabled by default. Select this option to detect and block unauthorized DHCP servers.
-Trusted DHCP Server IP Enter the IP address of the trusted DHCP server.
•Save Click  to apply changes.
•Cancel Click  CANCEL to discard changes.
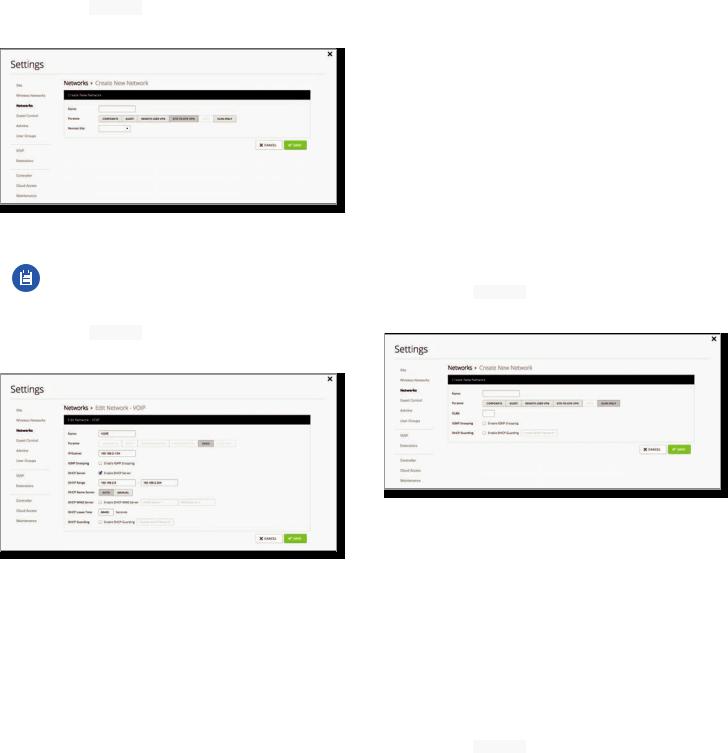
Remote User VPN
•IP/Subnet Enter the IP address and prefix size.
•IP Pool The starting and ending IP addresses of the pool automatically appear after you complete the IP/Subnet field.
•Name Server Configure the name or DNS (Domain Name System) server setting.
-Auto Enabled by default. Name servers are automatically assigned by the DHCP server.
-Manual Select this option to manually select name servers.
•Name Server 1/2 Enter the IP address of the name server in each field.
•WINS Server Select this option to designate WINS (Windows Internet Naming Service) server(s).
-WINS Server 1/2 Enter the IP address of the WINS server in each field.
•RADIUS IP Enter the IP address of the RADIUS server, which is used for authentication.
•RADIUS Password Enter the password of the RADIUS server.
22 |
Ubiquiti Networks, Inc. |
UniFi Controller User Guide
•Site-to-Site VPN Enabled by default. The remote user can access the site’s resources as well as the resources of any other VPNs connected to the site. If you disable this option, then the remote user can only access the site’s resources.
•Save Click  to apply changes.
•Cancel Click  CANCEL to discard changes.
Site-to-Site VPN
•Remote Site Select the appropriate site from the drop-down list.
Note: If you have admin privileges for the local and remote sites, then you can view and select sites.
•Save Click  to apply changes.
•Cancel Click  CANCEL to discard changes.
Voice
If you enable VoIP, then the UniFi Controller automatically creates a Voice network; otherwise this network option is not available.
•IP/Subnet Enter the IP address and prefix size.
•IGMP Snooping Select this option to monitor IGMP (Internet Group Management Protocol) traffic and thereby manage multicast traffic.
•DHCP Server Enabled by default. The local DHCP server assigns IP addresses to DHCP clients on the network.
•DHCP Range Enter the starting and ending IP addresses of the range in the fields provided.
•DHCP Name Server Configure the name or DNS (Domain Name System) server setting.
-Auto Enabled by default. Name servers are automatically assigned by the DHCP server.
Ubiquiti Networks, Inc.
Chapter 3: Using the UniFi Controller Software
-Manual Select this option to manually select name servers.
•Name Server 1/2 Enter the IP address of the name server in each field.
•DHCP WINS Server Select this option to designate WINS (Windows Internet Naming Service) server(s).
-WINS Server 1/2 Enter the IP address of the WINS server in each field.
•DHCP Lease Time The IP addresses assigned by the DHCP server are valid only for the duration specified by the lease time. Increasing the time ensures client operation without interruption, but could introduce potential conflicts. Decreasing the lease time avoids potential address conflicts, but might cause more slight interruptions to the client while it acquires a new IP address from the DHCP server. Enter the number of seconds.
•DHCP Guarding Select this option to detect and block unauthorized DHCP servers.
-Trusted DHCP Server IP Enter the IP address of the trusted DHCP server.
•Save Click  to apply changes.
•Cancel Click  CANCEL to discard changes.
VLAN Only
•VLAN Enter the ID number of the VLAN. Devices belonging to the same VLAN communicate as if they were attached to the same wire. Every VLAN ID
represents a different VLAN. The VLAN ID range is 2 to 4009.
•IGMP Snooping Select this option to monitor IGMP (Internet Group Management Protocol) traffic and thereby manage multicast traffic.
•DHCP Guarding Select this option to detect and block unauthorized DHCP servers.
-Trusted DHCP Server IP Enter the IP address of the trusted DHCP server.
•Save Click  to apply changes.
•Cancel Click  CANCEL to discard changes.
23
Chapter 3: Using the UniFi Controller Software
Settings > Guest Control
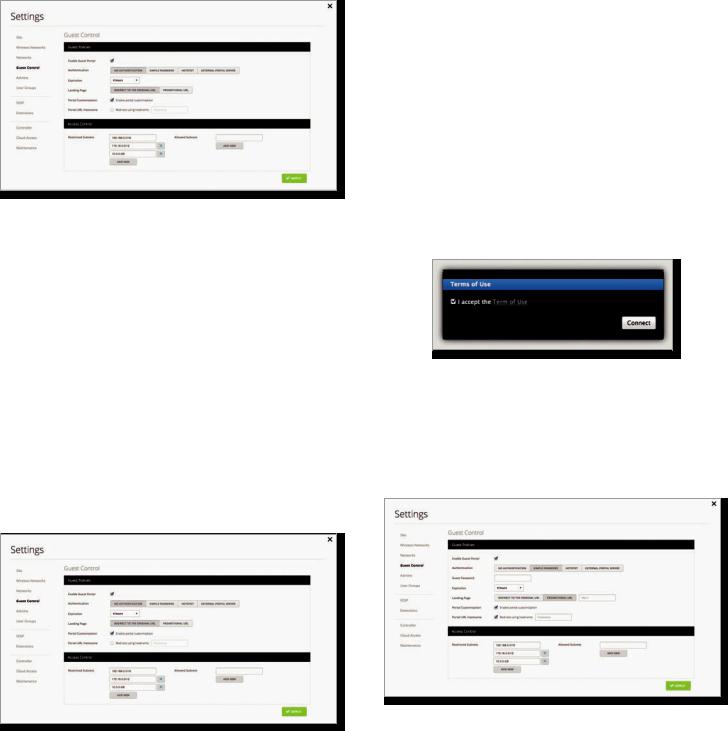
The Guest Control screen displays the following sections:
•Guest Policies (see below)
•“Hotspot” on page 25 (for Hotspot authentication)
•“Access Control” on page 27
Guest Policies
Enable Guest Portal Disabled by default. When disabled, guests can access the Internet without entering a password or accepting the Terms of Use. When this option is enabled, you can control the Guest Portal.
Authentication When the Guest Portal is enabled, the authentication options will appear:
•“Authentication > No Authentication” on page 24
•“Authentication > Simple Password” on page 24
•“Authentication > Hotspot” on page 25
•“Authentication > External Portal Server” on page 27 Authentication > No Authentication
Select this option if guests are not required to log in, but must accept the Terms of Use. You must also select Enable Guest Portal under Settings > Guest Control to enforce selection of the Terms of Use by the guest. See “Guest Policy” on page 21 for more information.
Expiration Specify the guest login expiration after a designated period of time: 8 hours, 24hours,2days,3days, 4 days, 7 days, or User-defined, which can be designated in minutes, hours, and days.
24
UniFi Controller User Guide
Landing Page After accepting the Terms of Use, guests are redirected to the landing page. Select one of the following options:
•Redirect to the original URL After accepting the Terms of Use, guests are directed to the URL they requested.
•Promotional URL After accepting the Terms of Use, guests are redirected to the URL that you specify. Ensure that the URL begins with http://.
Example: http://www.ubnt.com
Portal Customization Select this option to have customized portal pages appear in place of the default login pages. See “Portal Customization” on page 107 for details on setting up custom portal pages.
Portal URL Hostname Select this option to enter and use a hostname for the portal URL in place of the default IP address. Paired with an SSL certificate, this ensures that site certificates are displayed as trusted in the guest browser. Example: www.ubnt.com
When logging in with No authentication, guests will be required to accept the Terms of Use before gaining access to the Internet.
Authentication > Simple Password
Select this option if guests are required to enter a simple password and accept the Terms of Use. You must also select Enable Guest Portal under Settings > Guest Control to enforce password entry and selection of the Terms of Use by the guest. See “Guest Policy” on page 21 for more information.
Guest Password Enter a password that guests must enter before accepting the Terms of Use and connecting to the Internet.
Expiration Specify the guest login expiration after a designated period of time: 8 hours, 24hours,2days,3days, 4 days, 7 days, or User-defined, which can be designated in minutes, hours, and days.
Ubiquiti Networks, Inc.
 Loading...