TP-Link Easy Smart Configuration Utility Manual

User Guide
Easy Smart Configuration Utility
1910012911 REV5.2.0
October 2020
CONTENTS |
|
About This Guide |
|
Intended Readers................................................................................................................................................................. |
1 |
Conventions........................................................................................................................................................................... |
1 |
More Information.................................................................................................................................................................. |
1 |
Getting Started |
|
Introduction............................................................................................................................................................................ |
4 |
Installing the Configuration Utility.................................................................................................................................. |
5 |
Discovering Switches...................................................................................................................................................... |
10 |
Discovering the Switches in the Network................................................................................................................................. |
10 |
Configuring IP Setting for the Switch........................................................................................................................................... |
11 |
Logging Into the Switch....................................................................................................................................................................... |
12 |
Managing System |
|
System................................................................................................................................................................................... |
15 |
Overview....................................................................................................................................................................................................... |
15 |
Supported Features............................................................................................................................................................................... |
15 |
Configuring System Info................................................................................................................................................. |
16 |
Viewing the System Information..................................................................................................................................................... |
16 |
Specifying the Device Description................................................................................................................................................ |
17 |
Configuring IP..................................................................................................................................................................... |
18 |
Configuring LED (Only for Certain Devices)............................................................................................................ |
20 |
Managing User Account................................................................................................................................................. |
21 |
Backing Up and Restoring.............................................................................................................................................. |
22 |
Saving the Current Configuration.................................................................................................................................................. |
22 |
Restoring to the Previous Configuration................................................................................................................................... |
23 |
Rebooting System............................................................................................................................................................. |
26 |
Resetting the System....................................................................................................................................................... |
27 |
Upgrading the Firmware................................................................................................................................................. |
28 |
Switching |
|
Switching.............................................................................................................................................................................. |
31 |
Overview....................................................................................................................................................................................................... |
31 |
Supported Features............................................................................................................................................................................... |
31 |
Configuring Ports.............................................................................................................................................................. |
33 |
Configuring IGMP Snooping.......................................................................................................................................... |
35 |
Configuring LAG................................................................................................................................................................. |
36 |
Configuration Example.................................................................................................................................................... |
37 |
Example for Configuring IGMP Snooping.................................................................................................................................. |
37 |
Network Requirements........................................................................................................................................................... |
37 |
Configuration Scheme........................................................................................................................................................... |
37 |
Configuration Steps................................................................................................................................................................. |
38 |
Example for Configuring LAG........................................................................................................................................................... |
39 |
Network Requirements........................................................................................................................................................... |
39 |
Configuration Steps................................................................................................................................................................. |
40 |
Monitoring |
|
Monitoring............................................................................................................................................................................ |
42 |
Overview....................................................................................................................................................................................................... |
42 |
Supported Features............................................................................................................................................................................... |
42 |
Viewing Port Statistics.................................................................................................................................................... |
43 |
Configuring Port Mirror................................................................................................................................................... |
45 |
Testing the Cable.............................................................................................................................................................. |
47 |
Configuring Loop Prevention........................................................................................................................................ |
49 |
Configuring VLAN |
|
Overview............................................................................................................................................................................... |
51 |
Configuring MTU VLAN................................................................................................................................................... |
53 |
Configuring Port Based VLAN...................................................................................................................................... |
54 |
Configuring 802.1Q VLAN.............................................................................................................................................. |
56 |
Configuring the VLAN........................................................................................................................................................................... |
56 |
Configuring the PVID............................................................................................................................................................................. |
59 |
Configuration Example for 802.1Q VLAN................................................................................................................. |
60 |
Network Requirements........................................................................................................................................................................ |
60 |
Configuration Scheme......................................................................................................................................................................... |
60 |
Configuration Steps............................................................................................................................................................................... |
62 |
Configuring QoS |
|
QoS......................................................................................................................................................................................... |
65 |
Overview....................................................................................................................................................................................................... |
65 |
Supported Features............................................................................................................................................................................... |
65 |
Configuring Basic QoS.................................................................................................................................................... |
66 |
Configuring QoS in Port Based Mode......................................................................................................................................... |
67 |
Configuring QoS in 802.1P Based Mode................................................................................................................................... |
68 |
Configuring QoS in DSCP/802.1P Based Mode.................................................................................................................... |
68 |
Configuring Bandwidth Control.................................................................................................................................... |
69 |
Configuring Storm Control............................................................................................................................................ |
71 |
Configuration Example for Basic QoS....................................................................................................................... |
73 |
Network Requirements........................................................................................................................................................................ |
73 |
Configuration Scheme......................................................................................................................................................................... |
73 |
Configuration Steps............................................................................................................................................................................... |
74 |
Configuring PoE (Only for Certain Devices) |
|
Overview............................................................................................................................................................................... |
76 |
Configuring PoE................................................................................................................................................................. |
77 |
Configuring PoE Auto Recovery.................................................................................................................................. |
79 |
Configuring Extend Mode.............................................................................................................................................. |
81 |
Appendix: Default Parameters..................................................................................................................................... |
82 |
Searching Help |
|
Help......................................................................................................................................................................................... |
84 |
Overview....................................................................................................................................................................................................... |
84 |
Supported Features............................................................................................................................................................................... |
84 |
Searching Online Help..................................................................................................................................................... |
85 |
Viewing Information About the Utility........................................................................................................................ |
86 |
About This Guide |
Intended Readers |
About This Guide
This User Guide provides information for setup and guidance of the Easy Smart Configuration Utility. Read this guide carefully before operation.
Intended Readers
This Guide is intended for network managers familiar with IT concepts and network terminologies.
Conventions
When using this guide, notice that features available in Easy Smart Switch may vary by model and software version. The availability of Easy Smart Switch may also vary by region or ISP. All images, steps, and descriptions in this guide are only examples and may not reflect your actual experience. Throughout the guide, we will take TL-SG1016PE as the switch to be configured for example.
Some models featured in this guide may be unavailable in your country or region. For local sales information, visit https://www.tp-link.com.
The information in this document is subject to change without notice. Every effort has been made in the preparation of this document to ensure accuracy of the contents, but all statements, information, and recommendations in this document do not constitute the warranty of any kind, express or implied. Users must take full responsibility for their application of any products.
In this Guide, the following conventions are used:
PoE budget calculations are based on laboratory testing. Actual PoE power budget is not guaranteed and will vary as a result of client limitations and environmental factors.
The symbol  stands for Note. Notes contain suggestions or references that help you make better use of your device.
Menu Name > Submenu Name > Tab page indicates the menu structure. SYSTEM > System Info > System Summary means the System Summary page under the System Info menu option that is located under the SYSTEM menu.
Bold font indicates a button, a toolbar icon, menu or menu item.
More Information
■■ The latest software and documentations can be found at Download Center at https://www.tp-link.com/support.
■■ The Installation Guide (IG) can be found inside the package of the switch or at Download Center at https://www.tp-link.com/support.
User Guide 
 1
1
About This Guide |
More Information |
■■ The authentication information can be found where you find this guide.
■■ Specifications can be found at Download Center at https://www.tp-link.com/support.
■■ To ask questions, find answers, and communicate with TP-Link users or engineers, visit https://community.tp-link.com to join TP-Link Community.
■■ Our Technical Support contact information can be found on the Contact Technical Support page at https://www.tp-link.com/support.
User Guide 
 2
2
Part 1
Getting Started
CHAPTERS
1.Introduction
2.Installing the Configuration Utility
3.Discovering Switches
Getting Started |
Introduction |
1Introduction
The Easy Smart Configuration utility allows users to centrally configure the Easy Smart Switches in the entire network. In this part, we will introduce how to install the utility software and discover switches.
You can also configure Easy Smart Switches individually on their web management page. For more details, refer to the User Guide of the products at Download Center at https://www.tp-link.com/support.
User Guide 
 4
4
Getting Started |
Installing the Configuration Utility |
2Installing the Configuration Utility
Follow these steps to install the Easy Smart Configuration Utility:
1)Download the software installation packet of Easy Smart Configuration Utility onto your computer. You can find the packet on the product page of the switch at
https://www.tp-link.com.
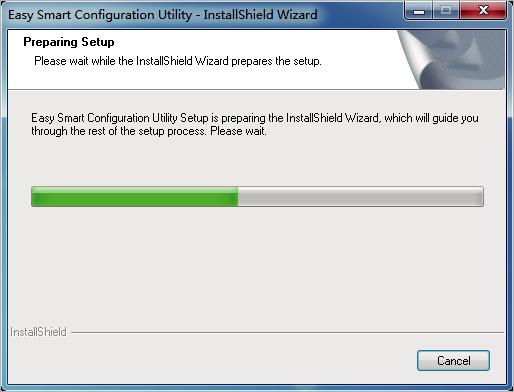
2)Decompress the packet and double click the executable file (with the file extension
.exe) to launch the InstallShield Wizard. The following page will be displayed.
Figure 2-1 Preparing Setup
User Guide 
 5
5

Getting Started |
Installing the Configuration Utility |
3) Wait a moment until the following page is displayed.
Figure 2-2 Launching the Installshield Wizard
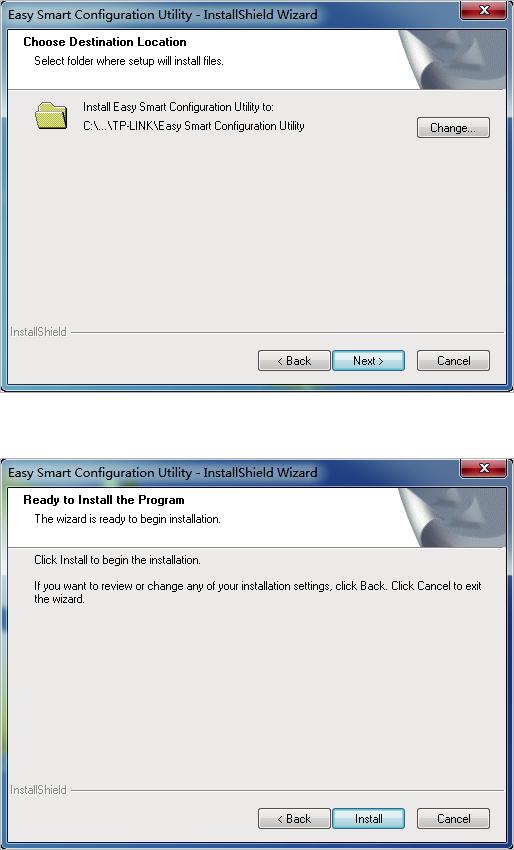
4)Click Next to load the following page. Choose the destination location for the installation files. By default, the installation files are saved in the Program Files folder of
User Guide 
 6
6
Getting Started |
Installing the Configuration Utility |
the system disk. You can lick Change to modify the destination location according to your needs.
Figure 2-3 Choosing the Deitination Location
5) Click Next to load the following page. The wizard is ready to begin the installation.
Figure 2-4 Getting Ready to Install the Software
User Guide 
 7
7
Getting Started |
Installing the Configuration Utility |
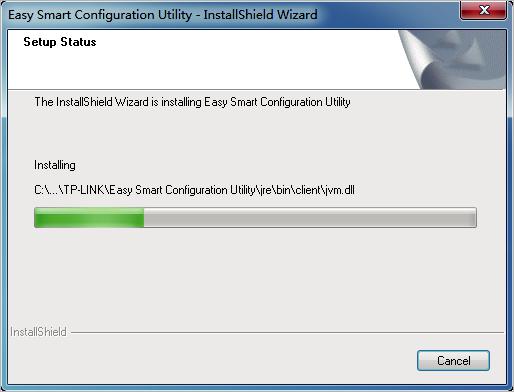
6)Click Install to load the following page. The wizard will install Easy Smart Configuration Utility.
Figure 2-5 Installing the Utility
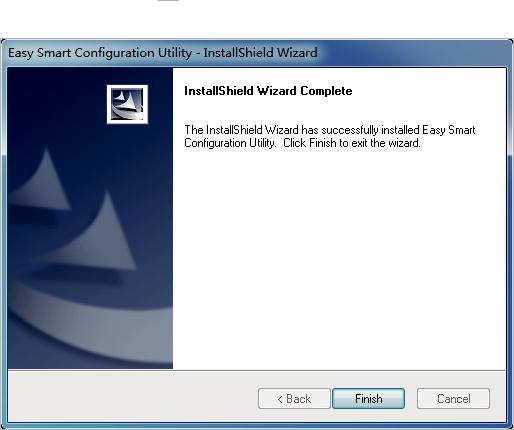
7)Wait a moment until the following page is displayed when the installation is completed. Click Finish to exit the wizard. By default, the installation process creates a TP-Link subdirectory under the \Program Files directory on your computer, copies the utility
User Guide 
 8
8
Getting Started |
Installing the Configuration Utility |
program into the \Program Files\TP-Link\Easy Smart Configuration Utility directory, and places a utility icon  on the computer desktop.
Figure 2-6 Finishing Installation
User Guide 
 9
9

Getting Started |
Discovering Switches |
3Discovering Switches
With the Switch Discovery fuction of the utility, you can: ■■ Discover the switches in the network.
■■ Configure IP setting for the switch. ■■ Log into the switch.
3.1Discovering the Switches in the Network
Double click |
to launch the Easy Smart Configuration Utility, it searches the network for |
|||
TP-Link Easy Smart switches automatically. The discovered switches are listed as below. |
||||
Figure 3-1 Discovering Switches |
||||
|
|
|
|
|
|
|
|
|
|
|
|
|
|
|
 Note:
Note:
●● The maximum number of the discovered switches is 30.
●● You can click Help in the left bottom to access the TP-Link support website for more help about the switches, if you have access to the internet.
●● Each time the network environment changes, it is recommended to click Refresh to restart the switch discovery process.
User Guide  10
10

Getting Started |
Discovering Switches |
3.2Configuring IP Setting for the Switch
Select the switch that you want to configure, and click 
 to load the following page.
Figure 3-2 Configuring IP Address
Follow these steps to configure IP setting for the switch.
1)Verify the information of the switch. You can view the MAC address, hardware version, and firmware version of the switch.
2)Enter a proper device description for the switch according to your needs to distinguish different devices in your network.
3)Configure IP address, subnet mask, and default gateway for the switch. You can either configure the parameters manually or use DHCP.
■■ Configuring the parameters manually
Select DHCP setting as Disable. Specify the IP address, subnet mask and default gateway for the switch.
IP Address |
Enter the IP address of the switch. You can use this IP address to access the |
|
switch. The default IP address of the switch is 192.168.0.1. |
User Guide  11
11
Getting Started |
Discovering Switches |
|||
|
|
|
|
|
|
|
Subnet Mask |
Enter the subnet mask of the switch. The default subnet mask of the switch is |
|
|
|
|
255.255.255.0. |
|
|
|
Default Gateway |
Enter the default gateway of the switch. |
|
■■ Using DHCP
Select DHCP setting as Enable.
4)Input the user name and password. The user name and password are both admin by default.
5)Click Apply.
 Note:
Note:
If you enable DHCP setting, the switch will try to obtain IP address, subnet mask, and default gateway from the DHCP server in the network. If the switch cannot get IP settings from the DHCP server, it will use the default IP address of 192.168.0.1 and subnet mask of
255.255.255.0.
3.3Logging Into the Switch
Select the switch which you want to log into, and click 
 to load the following page.
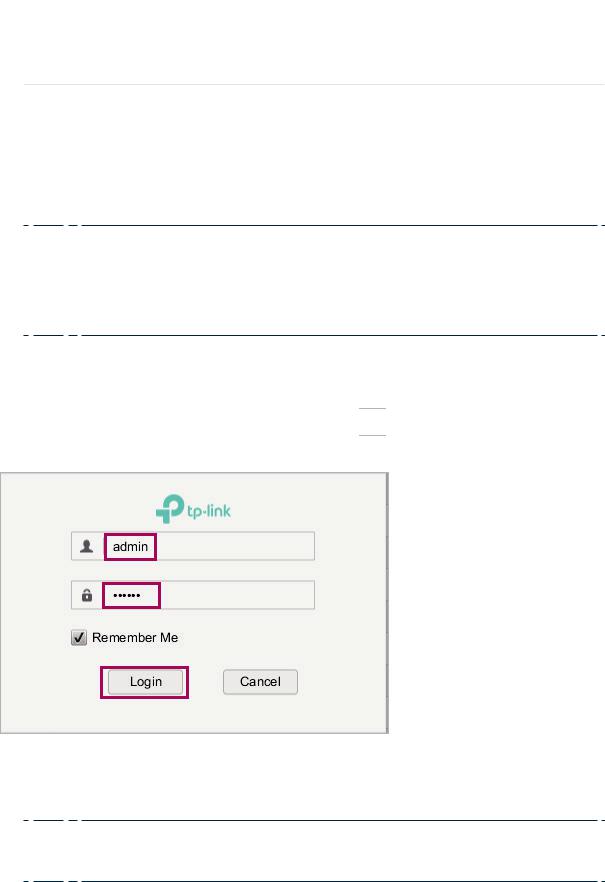
Figure 3-3 Logging Into the Switch
Follow these steps to log into the switch.
1)Input the user name and password. The user name and password are both admin by default.
 Note:
Note:
The first time you log in, change the password to better protect your network and devices.
2) (Optional) Check Remember Me to remember the user name and password.
User Guide 
 12
12
Getting Started |
Discovering Switches |
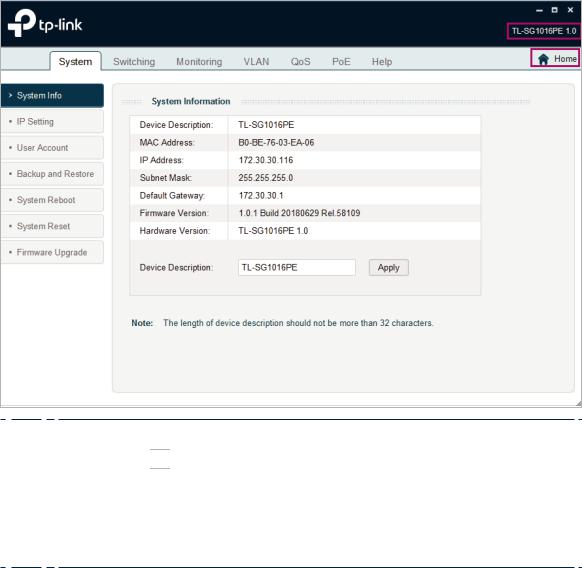
3)Click Login. The following page will be displayed and you can configure the switch on this page. The model and hardware version of the switch that you are configuring are shown in the top-right corner.
Figure 3-4 Launching the Configuration Interface
 Note:
Note:
●● You can click 

 to return to the switch discovery page.
●● When you make changes and click Apply, the switch will save the configurations immediately.
●● If you configure the switch after a long duration without operation (more than 600s), the utility will return to the Home page and refresh.
User Guide  13
13
Part 2
Managing System
CHAPTERS
1.System
2.Configuring System Info
3.Configuring IP
4.Configuring LED (Only for Certain Devices)
5.Managing User Account
6.Backing Up and Restoring
7.Rebooting System
8.Resetting the System
9.Upgrading the Firmware
Managing System |
System |
1System
1.1Overview
With the Managing System function, you can view the system information and configure the system parameters and features of the switch.
1.2Supported Features
System Info
The System Info is mainly used to view the system information and configure the device description.
IP Setting
Each device in the network possesses a unique IP address. You can access the switch using this IP address. You can set IP address of the switch manually or using DHCP.
User Account Management
User Account Management is mainly used to modify the username and password in order to refuse illegal users.
Backup and Restore
Backup and Restore is used to save the current configuration file in your computer, and upload a configuration file to restore your switch to the previous configuration.
System Reboot
System Reboot is used to reboot the switch.
System Reset
System Reset is used to reset the switch to the default setting.
Firmware Upgrade
To upgrade the firmware is to get more functions and better performance. Go to the website https://www.tp-link.com to download the updated firmware.
User Guide 
 15
15
Managing System |
Configuring System Info |
2Configuring System Info
With the System Info function, you can: ■■ View the system information
■■ Specify the device description
2.1Viewing the System Information
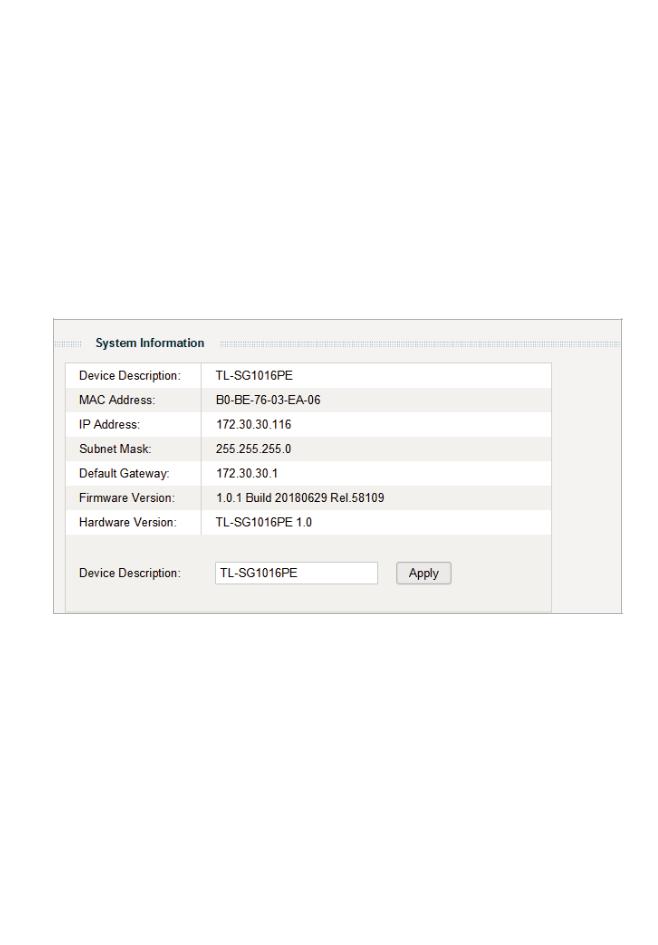
Choose the menu System > System Info to load the following page. You can view the basic system information of the switch.
Figure 2-1 Viewing the System Summary
User Guide 
 16
16
Managing System |
Configuring System Info |
2.2Specifying the Device Description
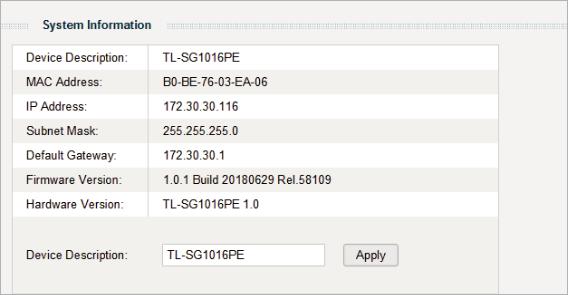
Choose the menu System > System Info to load the following page. Specify a new device description for the switch, and click Apply.
Figure 2-2 Specifying the Device Description
User Guide 
 17
17
Managing System |
Configuring IP |
3Configuring IP
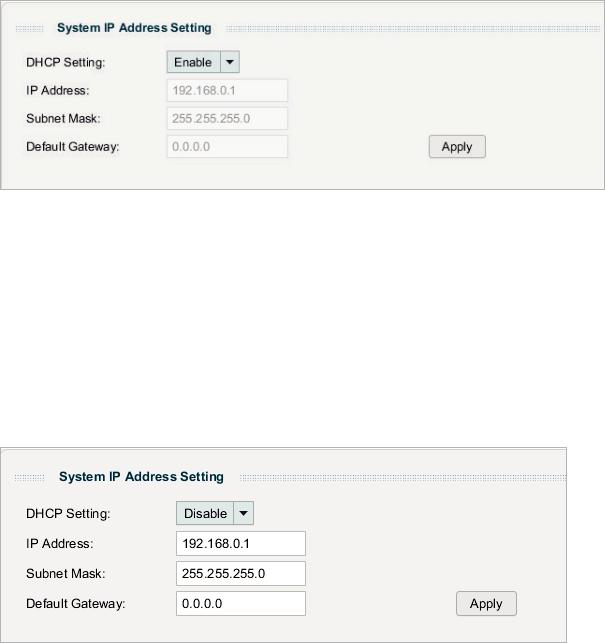
You can configure the system IP address in the following two ways: ■■ Configure the System IP Address Using DHCP
■■ Configure the System IP Address Manually
Configuring the System IP Address Using DHCP
Choose the menu System > IP Setting to load the following page.
Figure 3-1 Configuring System IP Address with DHCP Enabled
Follow these steps to configure the system IP address using DHCP:
1)Select DHCP setting as Enable from the drop-down list.
2)Click Apply. Then the switch will try to obtain IP address, subnet mask, and default gateway from the DHCP server in the network. If the switch cannot get IP settings from the DHCP server, it will use the default IP address of 192.168.0.1 and subnet mask of
255.255.255.0.
Configuring the System IP Address Manually
Choose the menu System > IP Setting to load the following page.
Figure 3-2 Configuring System IP Address Manually
User Guide 
 18
18

Managing System Configuring IP
Follow these steps to configure the system IP address manually:
1) |
Select DHCP setting as Disable from the drop-down list. |
|||
2) |
Specify the IP address, subnet mask and default gateway. |
|||
|
|
IP Address |
Enter the IP address of the switch. You can use this IP address to access |
|
|
|
|
the switch. The default IP address of the switch is 192.168.0.1 |
|
|
|
Subnet Mask |
Enter the subnet mask of the switch. The default subnet mask of the switch |
|
|
|
|
is 255.255.255.0. |
|
|
|
Default Gateway |
Enter the default gateway of the switch. |
|
3) |
|
|
|
|
Click Apply. |
|
|
||
User Guide 
 19
19
Managing System Configuring LED (Only for Certain Devices)
4Configuring LED (Only for Certain Devices)
Note:
LED configuration is only available on certain devices. To check whether your device supports this feature, refer to the actual web interface.
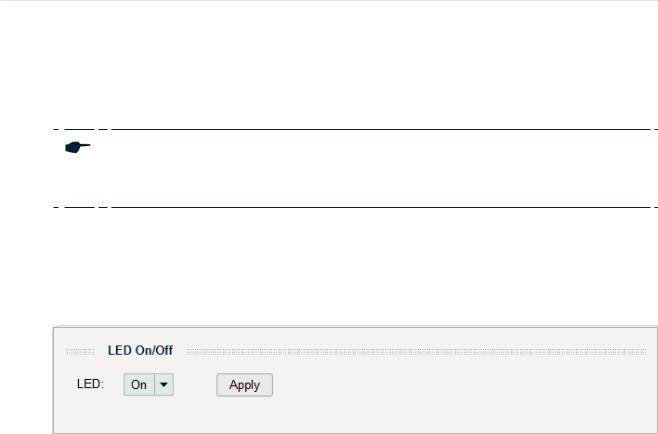
With this function, you can turn on/off the LED with one click.
Choose the menu System > LED On/Off to load the following page. Choose the LED status from the drop-down list and click Apply.
Figure 4-1 Configuring LED On/Off
User Guide 
 20
20
Managing System |
Managing User Account |
5Managing User Account
With user account management, you can modify the username and password to refuse illegal users.
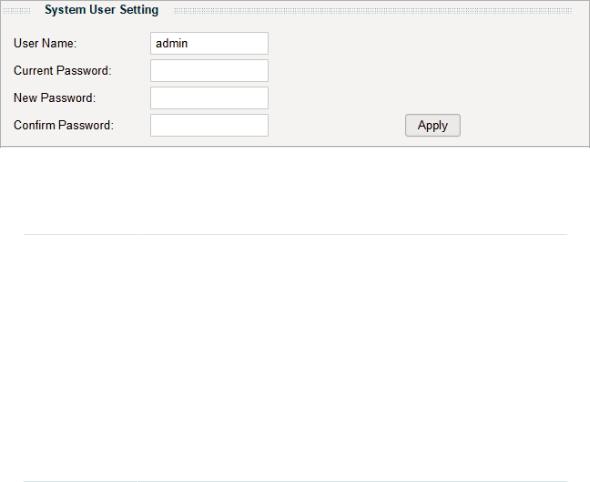
Choose the menu System > User Account to load the following page.
Figure 5-1 Managing the User Account
Follow these steps to configure the user account:
1)Specify the user name, enter the current password, specify a new password and confirm the new password.
User Name |
Create a user name for login. Requirement for the user name varies among |
|
different devices. If your user name fails to meet the requirement, check |
|
the prompt information. |
|
|
Current |
Enter the current password of the switch. By default, the password is |
Password |
admin. |
New Password |
Specify a new password for login. Requirement for the password varies |
|
among different devices. If your password fails to meet the requirement, |
|
check the prompt information. |
Confirm |
Retype the new password. |
Password |
|
2) Click Apply.
User Guide 
 21
21

Managing System |
Backing Up and Restoring |
6Backing Up and Restoring
With the Backup and Restore function, you can: ■■ Save the current configuration.
■■ Restore to the previous configuration.
6.1Saving the Current Configuration
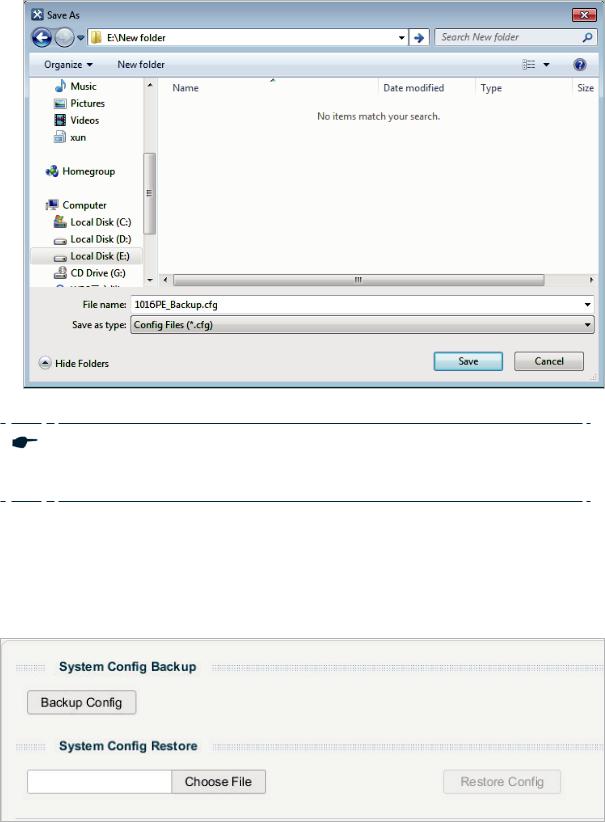
Choose the menu System > Backup and Restore to load the following page.
Figure 6-1 Backing Up System Config
User Guide 
 22
22
Managing System |
Backing Up and Restoring |
Follow these steps to save the current configuration:
1)In the System Config Backup section, click Backup Config to load the following page. Specify the file path and file name for the configuration file to save.
Figure 6-2 Saving the Configuration File
2) Click Save.
Note:
It will take a moment to save the configuration. Wait without any operation when saving the configuration file.
6.2Restoring to the Previous Configuration
Choose the menu System > Backup and Restore to load the following page.
Figure 6-1 Restoring System Config
User Guide  23
23
Managing System |
Backing Up and Restoring |
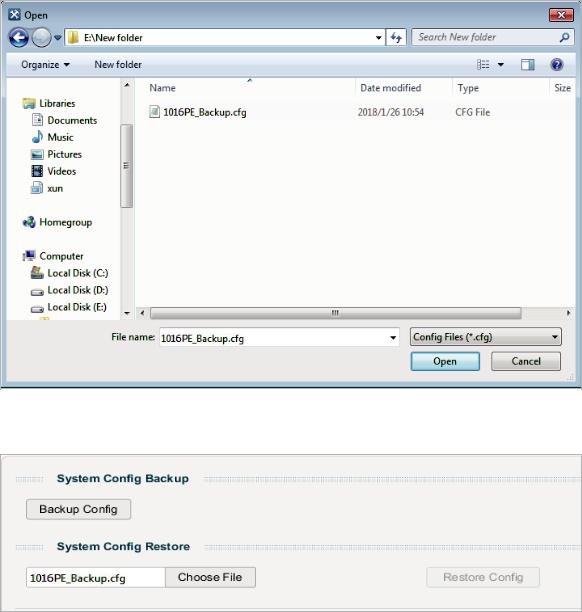
Follow these steps to restore the switch to the previous configuration:
1)In the System Config Restore section, click Choose File to load the following page. Specify the configuration file path and select the configuration file. Click Open.
Figure 6-2 Choosing the Configuration File
2) The following page will be displayed.
Figure 6-3 Choosing the Configuration File
User Guide 
 24
24
 Loading...