


 Loading...
1910100132 REV1.0.0
Contents
About this guide . . . . . . . . . . . . . . . . . . . . . . . . . . . . . . . . . . . . . . . . . . . . . . . . . . . i Chapter 1. Get started . . . . . . . . . . . . . . . . . . . . . . . . . . . . . . . . . . . . . . . . . . . . . 1
1. 1 Overview . . . . . . . . . . . . . . . . . . . . . . . . . . . . . . . . . . . . . . . . . . . . . . . . . . . . . . . . . . . . . . . . . . . 1 1. 2 Buttons. . . . . . . . . . . . . . . . . . . . . . . . . . . . . . . . . . . . . . . . . . . . . . . . . . . . . . . . . . . . . . . . . . . . . 1 1. 3 Put in the cards . . . . . . . . . . . . . . . . . . . . . . . . . . . . . . . . . . . . . . . . . . . . . . . . . . . . . . . . . . . . . 2 1. 4 Initial setup. . . . . . . . . . . . . . . . . . . . . . . . . . . . . . . . . . . . . . . . . . . . . . . . . . . . . . . . . . . . . . . . . 3 1. 5 Charge your phone . . . . . . . . . . . . . . . . . . . . . . . . . . . . . . . . . . . . . . . . . . . . . . . . . . . . . . . . . 4
Chapter 2. Basics . . . . . . . . . . . . . . . . . . . . . . . . . . . . . . . . . . . . . . . . . . . . . . . . . . 5
2. 1 Touchscreen gestures . . . . . . . . . . . . . . . . . . . . . . . . . . . . . . . . . . . . . . . . . . . . . . . . . . . . . . . 5 2. 2 Home screen . . . . . . . . . . . . . . . . . . . . . . . . . . . . . . . . . . . . . . . . . . . . . . . . . . . . . . . . . . . . . . . 8 2. 3 Status bar . . . . . . . . . . . . . . . . . . . . . . . . . . . . . . . . . . . . . . . . . . . . . . . . . . . . . . . . . . . . . . . . .10 2. 4 Quick Settings Panel . . . . . . . . . . . . . . . . . . . . . . . . . . . . . . . . . . . . . . . . . . . . . . . . . . . . . . .11 2. 5 Notification Panel. . . . . . . . . . . . . . . . . . . . . . . . . . . . . . . . . . . . . . . . . . . . . . . . . . . . . . . . . .12 2. 6 Type text . . . . . . . . . . . . . . . . . . . . . . . . . . . . . . . . . . . . . . . . . . . . . . . . . . . . . . . . . . . . . . . . . .13 2. 7 Take a screenshot . . . . . . . . . . . . . . . . . . . . . . . . . . . . . . . . . . . . . . . . . . . . . . . . . . . . . . . . . .13 2. 8 Configure your fingerprint . . . . . . . . . . . . . . . . . . . . . . . . . . . . . . . . . . . . . . . . . . . . . . . . .14 2. 9 Access applications . . . . . . . . . . . . . . . . . . . . . . . . . . . . . . . . . . . . . . . . . . . . . . . . . . . . . . . .15 2. 10 Split-screen mode . . . . . . . . . . . . . . . . . . . . . . . . . . . . . . . . . . . . . . . . . . . . . . . . . . . . . . . . .16
Chapter 3. Network and Share . . . . . . . . . . . . . . . . . . . . . . . . . . . . . . . . . . . .17
3. 1 WLAN . . . . . . . . . . . . . . . . . . . . . . . . . . . . . . . . . . . . . . . . . . . . . . . . . . . . . . . . . . . . . . . . . . . . .17 3. 2 Mobile data . . . . . . . . . . . . . . . . . . . . . . . . . . . . . . . . . . . . . . . . . . . . . . . . . . . . . . . . . . . . . . . 18 3. 3 Connect to computer . . . . . . . . . . . . . . . . . . . . . . . . . . . . . . . . . . . . . . . . . . . . . . . . . . . . . .18 3. 4 Bluetooth . . . . . . . . . . . . . . . . . . . . . . . . . . . . . . . . . . . . . . . . . . . . . . . . . . . . . . . . . . . . . . . . .18 3. 5 Share your mobile data with other devices. . . . . . . . . . . . . . . . . . . . . . . . . . . . . . . . . .19 3. 6 Smart WLAN . . . . . . . . . . . . . . . . . . . . . . . . . . . . . . . . . . . . . . . . . . . . . . . . . . . . . . . . . . . . . . .20
Chapter 4. Calls. . . . . . . . . . . . . . . . . . . . . . . . . . . . . . . . . . . . . . . . . . . . . . . . . . .22
4. 1 Make a call . . . . . . . . . . . . . . . . . . . . . . . . . . . . . . . . . . . . . . . . . . . . . . . . . . . . . . . . . . . . . . . .22 4. 2 Answer or reject a call. . . . . . . . . . . . . . . . . . . . . . . . . . . . . . . . . . . . . . . . . . . . . . . . . . . . . .23 4. 3 Options during a call. . . . . . . . . . . . . . . . . . . . . . . . . . . . . . . . . . . . . . . . . . . . . . . . . . . . . . .24 4. 4 Call log . . . . . . . . . . . . . . . . . . . . . . . . . . . . . . . . . . . . . . . . . . . . . . . . . . . . . . . . . . . . . . . . . . . .26
4. 5 Manage contacts . . . . . . . . . . . . . . . . . . . . . . . . . . . . . . . . . . . . . . . . . . . . . . . . . . . . . . . . . .27 4. 6 Harassment filter . . . . . . . . . . . . . . . . . . . . . . . . . . . . . . . . . . . . . . . . . . . . . . . . . . . . . . . . . .27 4. 7 Call settings . . . . . . . . . . . . . . . . . . . . . . . . . . . . . . . . . . . . . . . . . . . . . . . . . . . . . . . . . . . . . . .28 4. 8 Advance settings . . . . . . . . . . . . . . . . . . . . . . . . . . . . . . . . . . . . . . . . . . . . . . . . . . . . . . . . . .29
Chapter 5. Messages. . . . . . . . . . . . . . . . . . . . . . . . . . . . . . . . . . . . . . . . . . . . . .30
5. 1 Type of messages . . . . . . . . . . . . . . . . . . . . . . . . . . . . . . . . . . . . . . . . . . . . . . . . . . . . . . . . . .30 5. 2 Send messages . . . . . . . . . . . . . . . . . . . . . . . . . . . . . . . . . . . . . . . . . . . . . . . . . . . . . . . . . . . .30 5. 3 Reply to messages . . . . . . . . . . . . . . . . . . . . . . . . . . . . . . . . . . . . . . . . . . . . . . . . . . . . . . . . .31 5. 4 Search for messages . . . . . . . . . . . . . . . . . . . . . . . . . . . . . . . . . . . . . . . . . . . . . . . . . . . . . . .31 5. 5 Manage your messages . . . . . . . . . . . . . . . . . . . . . . . . . . . . . . . . . . . . . . . . . . . . . . . . . . . .31 5. 6 Message settings . . . . . . . . . . . . . . . . . . . . . . . . . . . . . . . . . . . . . . . . . . . . . . . . . . . . . . . . . .32
Chapter 6. Music and video . . . . . . . . . . . . . . . . . . . . . . . . . . . . . . . . . . . . . . .33
6. 1 Listen to music . . . . . . . . . . . . . . . . . . . . . . . . . . . . . . . . . . . . . . . . . . . . . . . . . . . . . . . . . . . .33 6. 2 Play Music playback screen. . . . . . . . . . . . . . . . . . . . . . . . . . . . . . . . . . . . . . . . . . . . . . . . .33 6. 3 Manage Play Music . . . . . . . . . . . . . . . . . . . . . . . . . . . . . . . . . . . . . . . . . . . . . . . . . . . . . . . .34 6. 4 Play a video. . . . . . . . . . . . . . . . . . . . . . . . . . . . . . . . . . . . . . . . . . . . . . . . . . . . . . . . . . . . . . . .34
Chapter 7. Camera and Photos . . . . . . . . . . . . . . . . . . . . . . . . . . . . . . . . . . . .36
7. 1 Camera at a glance . . . . . . . . . . . . . . . . . . . . . . . . . . . . . . . . . . . . . . . . . . . . . . . . . . . . . . . . 36 7. 2 Take a photo. . . . . . . . . . . . . . . . . . . . . . . . . . . . . . . . . . . . . . . . . . . . . . . . . . . . . . . . . . . . . . .37 7. 3 Record a video. . . . . . . . . . . . . . . . . . . . . . . . . . . . . . . . . . . . . . . . . . . . . . . . . . . . . . . . . . . . .37 7. 4 Shooting mode . . . . . . . . . . . . . . . . . . . . . . . . . . . . . . . . . . . . . . . . . . . . . . . . . . . . . . . . . . . .37 7. 5 Camera and video settings . . . . . . . . . . . . . . . . . . . . . . . . . . . . . . . . . . . . . . . . . . . . . . . . .39 7. 6 Photos . . . . . . . . . . . . . . . . . . . . . . . . . . . . . . . . . . . . . . . . . . . . . . . . . . . . . . . . . . . . . . . . . . . .40
Chapter 8. Themes . . . . . . . . . . . . . . . . . . . . . . . . . . . . . . . . . . . . . . . . . . . . . . .42
8. 1 Change the theme . . . . . . . . . . . . . . . . . . . . . . . . . . . . . . . . . . . . . . . . . . . . . . . . . . . . . . . . .42 8. 2 Change the wallpaper . . . . . . . . . . . . . . . . . . . . . . . . . . . . . . . . . . . . . . . . . . . . . . . . . . . . .42 8. 3 Change the icons . . . . . . . . . . . . . . . . . . . . . . . . . . . . . . . . . . . . . . . . . . . . . . . . . . . . . . . . . .43 8. 4 Change the sounds . . . . . . . . . . . . . . . . . . . . . . . . . . . . . . . . . . . . . . . . . . . . . . . . . . . . . . . .43
Chapter 9. Calendar . . . . . . . . . . . . . . . . . . . . . . . . . . . . . . . . . . . . . . . . . . . . . .44
9. 1 Use the calendar. . . . . . . . . . . . . . . . . . . . . . . . . . . . . . . . . . . . . . . . . . . . . . . . . . . . . . . . . . .44 9. 2 Calendar settings . . . . . . . . . . . . . . . . . . . . . . . . . . . . . . . . . . . . . . . . . . . . . . . . . . . . . . . . . .45
Chapter 10.Clock. . . . . . . . . . . . . . . . . . . . . . . . . . . . . . . . . . . . . . . . . . . . . . . . . .46
10. 1 Alarm . . . . . . . . . . . . . . . . . . . . . . . . . . . . . . . . . . . . . . . . . . . . . . . . . . . . . . . . . . . . . . . . . . . . .46
10. 2 Worldclock . . . . . . . . . . . . . . . . . . . . . . . . . . . . . . . . . . . . . . . . . . . . . . . . . . . . . . . . . . . . . . . .47
10. 3 Stopwatch. . . . . . . . . . . . . . . . . . . . . . . . . . . . . . . . . . . . . . . . . . . . . . . . . . . . . . . . . . . . . . . . .47
10. 4 Timer. . . . . . . . . . . . . . . . . . . . . . . . . . . . . . . . . . . . . . . . . . . . . . . . . . . . . . . . . . . . . . . . . . . . . .48
10. 5 Settings . . . . . . . . . . . . . . . . . . . . . . . . . . . . . . . . . . . . . . . . . . . . . . . . . . . . . . . . . . . . . . . . . . .48
Chapter 11.Browser . . . . . . . . . . . . . . . . . . . . . . . . . . . . . . . . . . . . . . . . . . . . . . .49
11. 1 Go to a webpage . . . . . . . . . . . . . . . . . . . . . . . . . . . . . . . . . . . . . . . . . . . . . . . . . . . . . . . . . .49 11. 2 Browser tabs. . . . . . . . . . . . . . . . . . . . . . . . . . . . . . . . . . . . . . . . . . . . . . . . . . . . . . . . . . . . . . .50 11. 3 Browser settings . . . . . . . . . . . . . . . . . . . . . . . . . . . . . . . . . . . . . . . . . . . . . . . . . . . . . . . . . . .50
Chapter 12.File Manager . . . . . . . . . . . . . . . . . . . . . . . . . . . . . . . . . . . . . . . . . . |
51 |
12. 1 Create a folder . . . . . . . . . . . . . . . . . . . . . . . . . . . . . . . . . . . . . . . . . . . . . . . . . . . . . . . . . . . . .51 12. 2 View files . . . . . . . . . . . . . . . . . . . . . . . . . . . . . . . . . . . . . . . . . . . . . . . . . . . . . . . . . . . . . . . . . .51 12. 3 Manage files . . . . . . . . . . . . . . . . . . . . . . . . . . . . . . . . . . . . . . . . . . . . . . . . . . . . . . . . . . . . . . .51 12. 4 File sharing . . . . . . . . . . . . . . . . . . . . . . . . . . . . . . . . . . . . . . . . . . . . . . . . . . . . . . . . . . . . . . . .52
Chapter 13.Weather . . . . . . . . . . . . . . . . . . . . . . . . . . . . . . . . . . . . . . . . . . . . . . .53
13. 1 Check the weather. . . . . . . . . . . . . . . . . . . . . . . . . . . . . . . . . . . . . . . . . . . . . . . . . . . . . . . . .53 13. 2 Weather settings. . . . . . . . . . . . . . . . . . . . . . . . . . . . . . . . . . . . . . . . . . . . . . . . . . . . . . . . . . .53
Chapter 14.Notes . . . . . . . . . . . . . . . . . . . . . . . . . . . . . . . . . . . . . . . . . . . . . . . . .54
14. 1 Compose a new note . . . . . . . . . . . . . . . . . . . . . . . . . . . . . . . . . . . . . . . . . . . . . . . . . . . . . .54 14. 2 Note options . . . . . . . . . . . . . . . . . . . . . . . . . . . . . . . . . . . . . . . . . . . . . . . . . . . . . . . . . . . . . .54 14. 3 Manage notes . . . . . . . . . . . . . . . . . . . . . . . . . . . . . . . . . . . . . . . . . . . . . . . . . . . . . . . . . . . . .55
Chapter 15.Google . . . . . . . . . . . . . . . . . . . . . . . . . . . . . . . . . . . . . . . . . . . . . . . .57
Chapter 16.Tools . . . . . . . . . . . . . . . . . . . . . . . . . . . . . . . . . . . . . . . . . . . . . . . . . .58
16. 1 Sound Recorder . . . . . . . . . . . . . . . . . . . . . . . . . . . . . . . . . . . . . . . . . . . . . . . . . . . . . . . . . . .58
16. 2 Contacts. . . . . . . . . . . . . . . . . . . . . . . . . . . . . . . . . . . . . . . . . . . . . . . . . . . . . . . . . . . . . . . . . . .59
16. 3 Compass . . . . . . . . . . . . . . . . . . . . . . . . . . . . . . . . . . . . . . . . . . . . . . . . . . . . . . . . . . . . . . . . . .61
16. 4 Downloads . . . . . . . . . . . . . . . . . . . . . . . . . . . . . . . . . . . . . . . . . . . . . . . . . . . . . . . . . . . . . . . .61
16. 5 SIM Toolkit. . . . . . . . . . . . . . . . . . . . . . . . . . . . . . . . . . . . . . . . . . . . . . . . . . . . . . . . . . . . . . . . .61
16. 6 Feedback . . . . . . . . . . . . . . . . . . . . . . . . . . . . . . . . . . . . . . . . . . . . . . . . . . . . . . . . . . . . . . . . . .61
16. 7 Calculator . . . . . . . . . . . . . . . . . . . . . . . . . . . . . . . . . . . . . . . . . . . . . . . . . . . . . . . . . . . . . . . . .62
16. 8 Kasa. . . . . . . . . . . . . . . . . . . . . . . . . . . . . . . . . . . . . . . . . . . . . . . . . . . . . . . . . . . . . . . . . . . . . . .62
16. 9 Tether . . . . . . . . . . . . . . . . . . . . . . . . . . . . . . . . . . . . . . . . . . . . . . . . . . . . . . . . . . . . . . . . . . . . .62
Chapter 17.Settings . . . . . . . . . . . . . . . . . . . . . . . . . . . . . . . . . . . . . . . . . . . . . . .63
17. 1 Search settings . . . . . . . . . . . . . . . . . . . . . . . . . . . . . . . . . . . . . . . . . . . . . . . . . . . . . . . . . . . .63 17. 2 Dual-SIM & network. . . . . . . . . . . . . . . . . . . . . . . . . . . . . . . . . . . . . . . . . . . . . . . . . . . . . . . .63 17. 3 Data usage . . . . . . . . . . . . . . . . . . . . . . . . . . . . . . . . . . . . . . . . . . . . . . . . . . . . . . . . . . . . . . . .64 17. 4 More connection settings . . . . . . . . . . . . . . . . . . . . . . . . . . . . . . . . . . . . . . . . . . . . . . . . . .65 17. 5 Sounds & vibration . . . . . . . . . . . . . . . . . . . . . . . . . . . . . . . . . . . . . . . . . . . . . . . . . . . . . . . . 65 17. 6 Notification manager . . . . . . . . . . . . . . . . . . . . . . . . . . . . . . . . . . . . . . . . . . . . . . . . . . . . . .66 17. 7 Do not disturb . . . . . . . . . . . . . . . . . . . . . . . . . . . . . . . . . . . . . . . . . . . . . . . . . . . . . . . . . . . . .66 17. 8 Display . . . . . . . . . . . . . . . . . . . . . . . . . . . . . . . . . . . . . . . . . . . . . . . . . . . . . . . . . . . . . . . . . . . .67 17. 9 Apps . . . . . . . . . . . . . . . . . . . . . . . . . . . . . . . . . . . . . . . . . . . . . . . . . . . . . . . . . . . . . . . . . . . . . .67 17. 10 Permissions. . . . . . . . . . . . . . . . . . . . . . . . . . . . . . . . . . . . . . . . . . . . . . . . . . . . . . . . . . . . . . . .68 17. 11 Storage. . . . . . . . . . . . . . . . . . . . . . . . . . . . . . . . . . . . . . . . . . . . . . . . . . . . . . . . . . . . . . . . . . . .68 17. 12 Battery . . . . . . . . . . . . . . . . . . . . . . . . . . . . . . . . . . . . . . . . . . . . . . . . . . . . . . . . . . . . . . . . . . . .68 17. 13 Smart settings . . . . . . . . . . . . . . . . . . . . . . . . . . . . . . . . . . . . . . . . . . . . . . . . . . . . . . . . . . . . .69 17. 14 Float button . . . . . . . . . . . . . . . . . . . . . . . . . . . . . . . . . . . . . . . . . . . . . . . . . . . . . . . . . . . . . . .69 17. 15 Accessibility . . . . . . . . . . . . . . . . . . . . . . . . . . . . . . . . . . . . . . . . . . . . . . . . . . . . . . . . . . . . . . .70 17. 16 Apps Cloner . . . . . . . . . . . . . . . . . . . . . . . . . . . . . . . . . . . . . . . . . . . . . . . . . . . . . . . . . . . . . . .71 17. 17 Screen lock, fingerprint & security . . . . . . . . . . . . . . . . . . . . . . . . . . . . . . . . . . . . . . . . . .71 17. 18 Location. . . . . . . . . . . . . . . . . . . . . . . . . . . . . . . . . . . . . . . . . . . . . . . . . . . . . . . . . . . . . . . . . . .72 17. 19 Google . . . . . . . . . . . . . . . . . . . . . . . . . . . . . . . . . . . . . . . . . . . . . . . . . . . . . . . . . . . . . . . . . . . .72 17. 20 Accounts . . . . . . . . . . . . . . . . . . . . . . . . . . . . . . . . . . . . . . . . . . . . . . . . . . . . . . . . . . . . . . . . . .73 17. 21 Language & input. . . . . . . . . . . . . . . . . . . . . . . . . . . . . . . . . . . . . . . . . . . . . . . . . . . . . . . . . .73 17. 22 Backup & reset. . . . . . . . . . . . . . . . . . . . . . . . . . . . . . . . . . . . . . . . . . . . . . . . . . . . . . . . . . . . .74 17. 23 Date & time. . . . . . . . . . . . . . . . . . . . . . . . . . . . . . . . . . . . . . . . . . . . . . . . . . . . . . . . . . . . . . . .74
17. 24 System update. . . . . . . . . . . . . . . . . . . . . . . . . . . . . . . . . . . . . . . . . . . . . . . . . . . . . . . . . . . . .74
17. 25 About phone . . . . . . . . . . . . . . . . . . . . . . . . . . . . . . . . . . . . . . . . . . . . . . . . . . . . . . . . . . . . . .75
Appendix A: Specifications. . . . . . . . . . . . . . . . . . . . . . . . . . . . . . . . . . . . . . . . .76 Appendix B: Technical Support. . . . . . . . . . . . . . . . . . . . . . . . . . . . . . . . . . . . .78 Appendix C: Explanation of the symbols on the product label . . . . . . .82

About this guide
This guide is a complement to Quick Start Guide. The Quick Start Guide provides instructions for quick setup, while this guide provides details of each function and shows how to configure the smart phone appropriate to your needs.
When using this guide, please notice that features of the device may vary slightly depending on the model and software version you have, and on your location, language, and Internet service provider. All screenshots, images, parameters and descriptions documented in this guide are used for demonstration only.
Conventions
In this guide, the following conventions are used:
Convention |
Description |
|
Smart phone/phone |
Stands for Neffos N1 without any explanation. |
|
Parameters |
Parameters provided in the screenshots are just references for configuring the smart phone, which may be |
|
different from the actual situation. You can set the parameters according to your demand. |
||
|
||
Underlined |
Italic and underlined words or phrases are hyperlinks. You can click to redirect to a specific section for more |
|
details. |
||
|
||
Screenshots |
The demonstrated screenshots may look a little different from the actual UI of your smart phone due to the |
|
various firmware versions. Please just configure your phone based on the actual UI. |
||
|
||
-> |
The menu structure which shows the path to enter the corresponding page. For example, Settings -> WLAN |
|
means the WLAN function page is under the Settings menu. |
||
|
||
|
|
|
Note: |
Ignoring the notes in the guide might result in a malfunction or damage to the device. |
|
|
1 |
Get started |
This chapter introduces the smart phone’s hardware information and guides you how to assemble your phone when you get started on using your new phone.
•Overview
•Buttons
•Put in the cards
•Initial setup
•Charge your phone
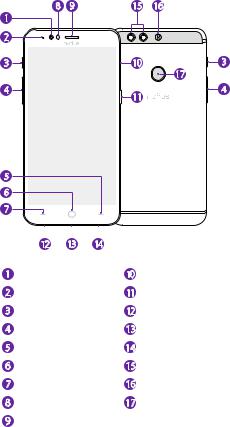
1. 1 Overview
8 |
9 |
15 |
16 |
1 |
|
|
|
2 |
|
|
|
3 |
|
10 |
3 |
|
|
|
17 |
4 |
|
11 |
4 |
|
|
|
5
6
7
|
|
|
|
|
|
|
|
|
|
12 |
13 |
14 |
|
|
|||
1 |
Front camera |
|
|
10 |
SIM/SD card tray |
|||
2 |
LED indicator |
|
|
11 |
Power button |
|||
3 |
Ring/silent switch |
12 |
Headphone jack |
|||||
4 |
Volume buttons |
|
|
13 |
Charging/data port |
|||
5 |
Back button |
|
|
14 |
Microphone |
|||
6 |
Home button |
|
|
15 |
Dual-lens camera |
|||
7 |
Recent apps button |
16 |
Two-tone flash |
|||||
8 |
Proximity sensor |
|
|
17 |
Fingerprint sensor |
|||
9 |
Earpiece |
|
|
|
|
|
|
|
1. 2 Buttons
The buttons you use with Neffos include virtual ones and physical ones.
Power button
•Lock Neffos: Locking your phone puts the display to sleep, saves the battery and prevents unmeant operations on the screen. You can still receive phone calls, text messages, alarms and notifications as well as listening to music and adjusting the volume.
Chapter 1 . Get started |
1 |

Press the Power button to manually lock the screen. If you enabled float button (see Float button), you can tap  -> Lock to lock your Neffos. Neffos locks the screen automatically in a given period of inactivity. To adjust the time, go to
  Settings -> Display -> Automatically lock.
Neffos can display your screen signature on the lock screen. To set the signature, go to Settings ->
Screen lock, fingerprint & security -> Lock screen message (For more information, see Lock screen message).
• Unlock Neffos: Press the Power button to wake the screen. For additional security, you can require a swipe, pattern, PIN, password or fingerprint to unlock you phone. Go to Settings -> Screen lock, fingerprint and security -> Screen lock to choose a safe way to unlock your phone (For more information, see Screen lock).
 Note:
Note:
You can turn on/turn off the screen by double-tapping the screen, if Double tap to wake/turn off the screen is enabled. To adjust the function, go to  Settings -> Smart settings -> Screen-off gestures.
•Turn Neffos on: Press and hold the Power button until your phone vibrates and the screen turns on.
 Note:
Note:
If your device displays the shut down notice after the screen turns on, the battery is empty. Connect your phone to a charger to charge the battery, otherwise your phone will shut down in 30 seconds.
•Turn Neffos off: Press and hold the Power button, then tap  Power off.
•Reboot Neffos: Press and hold the Power button, then tap  Reboot.
Volume button
You can adjust the audio volume when you’re on the phone or listening to songs, movies or other media.
You can also use Volume button to take a picture or record a video. Refer to Take a photo and Record a video to learn more.
Ring/silent switch
Switch ring/silent mode.
Home button
•Tap Home button to return to the default Home screen.
•Touch and hold Home button to open Google search.
Back button
Tap Back button to return to the previous screen or close an application. When entering text, tap Back button to close the onscreen keyboard.
Recent apps button
•Tap Recent apps button to display recently used applications.
•Double-tap Recent button to switch to the previous application.
 Note:
Note:
You can go to Settings -> Smart settings -> Buttons settings to set the Back button on the left or on the right of Home button.
1. 3 Put in the cards
Insert Nano SIM cards and microSD card (optional)
1.Eject the SIM card tray by inserting the SIM ejector pin provided into the hole on the tray.
2.Place the the card(s) into the tray with the gold contacts face down. The card tray can support two NanoSIM cards or a Nano-SIM card and a mircoSD card.
Chapter 1 . Get started |
2 |
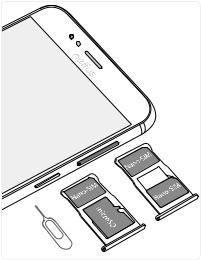
3.Insert the card tray back into your phone in the correct orientation.
 Note:
Note:
1.Your phone only supports nano-SIM cards. Contact your carrier for a new or replacement nano-SIM card. You can insert 2 nano-SIM cards, or 1 nano-SIM card and 1 micro-SD card. For more information, see Dual-SIM & network.
2.Ensure that the card is in the correct position and keep the card tray level when inserting it into your device.
3.Please exercise caution when using the SIM ejector pin to avoid hurting your fingers or damaging your phone.
4.The SIM eject pin should only be used to eject the SIM card tray. Inserting the SIM eject pin into other holes may damage your device.
5.Store your pin in a safe place out of the reach of children to prevent accidental swallowing or injury.
1. 4 Initial setup
It is recommended to insert your SIM card before you start the initial setup.
Press and hold the Power button to turn on your phone, and then follow the onscreen instructions to complete the initial setup.
1.Select your language, and then tap  .
.
2.If you don’t insert any SIM card, your device will proceed to Insert SIM cards screen. Read the tips and tap SKIP.
If you insert two SIM cards, your device will proceed to Set up SIM cards screen. Follow the onscreen
instructions to finish dual-SIM settings and tap NEXT. You can always adjust dual-SIM settings in 
Settings -> Dual-SIM & network.
If you insert only one SIM card, your device will skip this step automatically.
3.Proceed to Welcome to your Neffos N1 screen. You can configure your device in following two ways:
•Tap Copy your data and follow the onscreen instructions to restore a backup or copy from a device.
•Tap Set up as new to skip this step.
4.Proceed to Get connected screen. Your phone will automatically list available WLAN networks. Select the network you want to connect to (If you want to view more Wi-Fi networks, tap See all Wi-Fi networks), and then enter the password to access the Internet (This can take up to 2 minutes). If you have activated mobile data services with your carrier, you can tap Use cellular network for setup. Or you can tap Don’t use any network for setup -> CONTINUE to skip this step.
 Note:
Note:
Using cellular network for setup may result in additional fees. Contact your carrier for information about your cellular data plan rates.
Chapter 1 . Get started |
3 |

5.If you don’t connect to any networks, your device will proceed to Date & time screen. Set the data and time, then tap NEXT. You also can tap NEXT directly to skip this step.You can always adjust date and time in  Settings -> Date & time.
6.Proceed to Name screen. Add your name to allow your phone to personalize some apps. Your name will be saved as ME in Contacts. Then tap NEXT. Then tap NEXT after finishing. If you don’t want to set now, tap NEXT directly. You can always set your name in  Contacts -> Set up my profile.
7.Pcoceed to Protect your phone screen. Select a device protection feature and tap NEXT, then follow the onscreen instructions to complete. If you don’t want to set now, choose No, thanks and tap SKIP ->
SKIP ANYWAY. You can always set your device protection in  Settings -> Screen lock, fingerprint & security.
8.Proceed to Google services screen. Read the Google terms and conditions, then tap AGREE.
9.Pcoceed to Anything else screen. You can set up a few more things there, or you can just skip by tapping
ALL SET.
10.Proceed to Terms And Conditions screen. Carefully read the terms and conditions and then tap AGREE.
11.Setup completed. Tap START USING YOUR PHONE to start using your phone.
1. 5 Charge your phone
Your device displays a low battery warning when the battery is nearly empty. Charge your device immediately to prevent it from switching off automatically.
Your Neffos N1 uses USB Type-C interface which supports insertion with the cable either way up.
Use the charger to charge your device
Connect the device to a power outlet using the included USB cable and power adapter.
1.Connect the USB cable into the Charging port.
2.Connect the USB cable to the power adapter, then plug the power adapter into a power outlet.
3.When the battery is full, unplug the power adapter from the power outlet and remove the USB cable from your phone.
Use a USB port to charge your device
If you do not have access to a charger, you can charge your device by connecting it to a computer with a USB cable.
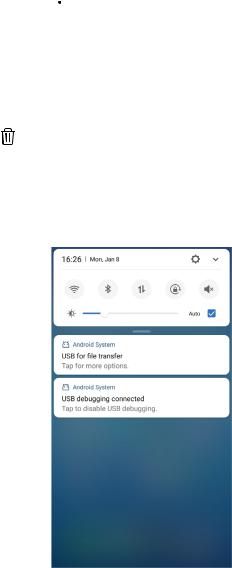
When you use a USB cable to connect your device to a computer or another device, Allow access to device data will be displayed in a popup dialog. Touch DENY.
If another USB connection mode has been selected, swipe down from the status bar to open the Notification Panel. Tap the notification of USB connection mode, and then select Charge this device.
 Note:
Note:
1.The battery is built into the phone and is not removable. Do not attempt to remove the battery yourself.
2.It is entirely normal that your phone may become warm after prolonged use or when exposed to high ambient temperatures. If your phone becomes hot to the touch, stop charging it and disable unnecessary features. Place your phone in a cool location and allow it to cool down to room temperature. Avoid prolonged contact with the surface of your phone if it becomes hot.
3.When charging your phone, only use genuine Neffos chargers and USB cables. Third-party accessories are a potential safety hazard and may impair your phone’s performance.
4.Avoid using your phone when it is charging. Do not cover your phone or the power adapter.
5.A low battery warning will be displayed when the battery level is low. Your phone will turn off automatically when the battery is nearly empty.
6.Charging times may vary depending on the ambient temperature and the remaining battery level.
Chapter 1 . Get started |
4 |
2 Basics
Learn about your smart phone’s basic feature.
•Touchscreen gestures
•Home screen
•Status bar
•Quick Settings Panel
•Notification Panel
•Type text
•Take a screenshot
•Configure your fingerprint
•Access applications
•Split-screen mode
2. 1 Touchscreen gestures
Use simple touchscreen gestures to perform a variety of tasks, such as open applications, scroll through lists, and zoom images.
Tap: Simply touch an item once. For example, tap to select an option or open an application.
Double-tap: Touch the target area of the screen twice in quick succession. For example, double-tap an image in full screen mode to zoom in or out.
Chapter 2 . Basics |
|
|
|
|
|
|
|
|
|
|
|
|
|
5 |
||||||
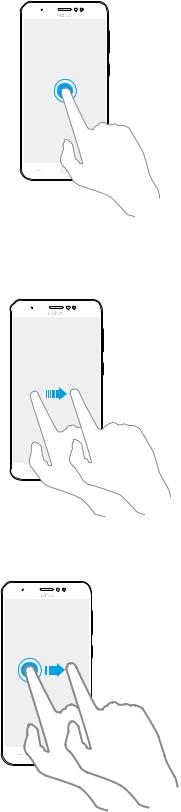
Touch and hold: Touch and leave your finger on the screen for 2 seconds or more to activate onscreen items. For example, touch and hold a widget on the Home screen to move it.
Swipe: Place your finger on the screen, and drag your finger to the direction you want. For example, in the Notifications Panel, swipe left or right on a notification to dismiss it. Swipe vertically or horizontally to go to other home screens, scroll through a document, and more.
Drag: Touch and hold an item and then move it to another position. For example, you can rearrange applications and widgets on the Home screen.
Pinch fingers together: Pinch two fingers together on the screen. For example, pinch two fingers together to zoom out on a picture.
Chapter 2 . Basics |
6 |

Spread fingers apart: Spread two fingers apart on the screen. For example, pinch two fingers out to zoom in on a picture.
Slide three fingers: Slide down three fingers on the screen to take a screenshot.
Chapter 2 . Basics |
|
|
|
|
|
|
|
|
|
|
|
|
|
|
|
|
|
|
|
|
|
|
|
|
|
|
|
|
|
|
|
|
|
|
|
7 |
||||||||

2. 2 Home screen
Your home screens are where you can find your self-contained widgets and all your applications.
 Status bar
 Widget
APP screen indicator
 Dock component bar
•Status bar: Displays notifications and status icons.
•Widget: Self-contained applications that run on the Home screen (not shortcuts).
•APP screen indicator: Indicates which screen is displayed.
•Dock component bar: Shortcuts to your frequently used applications.
Organize applications and widgets on the Home screen
•Add a widget to the Home screen
Add frequently used widgets to the Home screen for quick access.
1. On the Home screen, touch and hold a blank area (or pinch two fingers together) to open the Home screen editor.
2. Tap Widgets and select a widget. Tap the widget to add to the Home screen and drag it to a blank area you like. Or you can just touch and hold the widget to drag it to target area.
3. Tap a blank area on the Home screen (or tap Home Button/Back button) to quit the Home screen editor.
 Note:
Note:
You must have enough space on the Home screen to add widgets. If there is not enough space, add another Home screen (see Add a Home screen) or free up some space.
•Move a widget or icon
On the Home screen, touch and hold an application icon or widget and then drag them to the desired location.
•Batch moving icons
1. On the Home screen, touch and hold a blank area to open the Home screen editor.
2. Tap  Adjustment. Tap or drag the icons to put them in the adjustment at the bottom. 3. Swipe left or right to choose the target Home screen.
4. Tap or drag the icons in adjustment to add them to the target Home screen.
5. Tap a blank area on the Home screen (or tap Home Button/Back button) to quit the Home screen editor.
•Remove a widget
On the Home screen, touch and hold the widget you want to delete and then drag it to  Remove in the status bar.
Chapter 2 . Basics |
8 |

•Uninstall an application
On the Home screen, touch and hold the application you want to remove, then drag it to  Uninstall in the status bar.
 Note:
Note:
Some pre-installed system applications cannot be removed.
•Create a folder
Create Home screen folders to organize your applications as desired. For example, you can create a Camera folder that contains all of your camera applications.
1. On the Home screen, drag an icon on top of another icon to create a folder containing both applications. 2. To name the new folder, open the folder, tap Unnamed Folder and enter the folder name.
•Rename a folder
On the Home screen, open the folder and touch the folder name, then enter the new name.
•Add apps to a folder
On the Home screen, touch and hold the application you want to remove, then drag it to the folder you want to add it to.
•Remove apps from a folder
1. On the Home screen, open the folder.
2. Touch and hold the application you want to remove, then drag it to the desired location.
•Delete a folder
1. On the Home screen, open the folder.
2. Remove all the applications in it, then the folder will be automatically deleted.
Manage Home screen
•Add a Home screen
1. On the Home screen, touch and hold a blank area (or pinch two fingers together) to open the Home screen editor.
2. Swipe right and tap  on the rightest screen to add a new screen.
•Delete a Home screen
1. On the Home screen, touch and hold a blank area (or pinch two fingers together) to open the Home screen editor.
2. Tap on the Home screen to delete it.
 Note:
Note:
Only blank Home screen can be deleted.
•Adjust screen order
1. On the Home screen, touch and hold a blank area (or pinch two fingers together) to open the Home screen editor.
2. Touch and hold the screen you want to move and drag it to the desired location.
•Set the default home screen
1. On the Home screen, touch and hold a blank area (or pinch two fingers together) to open the Home screen editor.
2. Tap  at the top of a Home screen to set the chosen Home screen as default. On the default Home screen,
 will display at the top.
Set the Home screen wallpaper
1.On the Home screen, touch and hold a blank area to open the Home screen editor.
2.Tap Wallpapers, and follow the onscreen instructions to set the picture as the Home screen or lock screen wallpaper (or both). For more information, see Change the wallpaper.
Chapter 2 . Basics |
9 |

 Note:
Note:
You also can set Home screen wallpaper in following two ways.
1.On the Home screen, tap  Themes - >
  -> Wallpapers.
2.On the Home screen, tap  Settings - > Display -> Wallpaper.
2. 3 Status bar
Status icons
Status icons are displayed on the right-hand side of the status bar and tell you about your device’s status.
Status icons |
Indications |
|
Battery low |
|
Charging |
|
Battery full |
|
Battery save mode enabled |
|
Signal strength |
4G |
SIM 1 selected for cellular data |
4G |
SIM 2 selected for cellular data |
|
No signal |
E |
Connected over GPRS |
3G |
Connected over 3G |
4G |
Connected over LTE |
|
Headset inserted |
|
WLAN connected |
|
Mobile data enabled |
|
No SIM card installed |
|
Mute mode enabled |
|
Airplane mode enabled |
|
Data save enabled |
|
Bluetooth enabled |
|
Alarms enabled |
|
Do not disturb |
Notification icons
Notification icons are displayed on the left-hand side of the status bar when you receive a new message or other notifications.
Notification icons |
Indications |
Call in progress
Missed calls
New messages
Connected to a PC using USB cable
Hotspot enabled
Downloading status
Uploading data
Screenshots
More than three notifications
Chapter 2 . Basics |
10 |
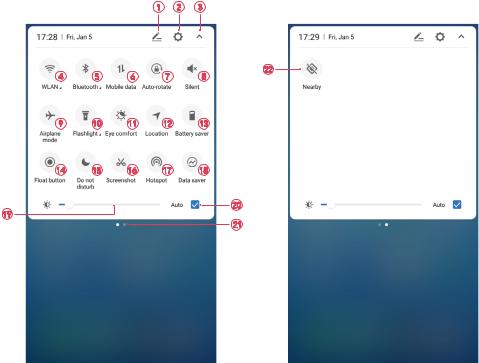
2. 4 Quick Settings Panel
Swipe down from the status bar to open the Quick Settings Panel.
Touch the shortcut switches on the Quick Settings Panel to enable or disable the functions.
 Note:
Note:
You can touch and hold the shortcut icon to enter the feature’s settings page.
1.Edit: Tap to enter the edit page. You can drag the shortcut switches on the edit page to/from Quick Settings Panel.
2.Settings: Tap to go to Settings.
3.Collapse/expand the panel: Tap to collapse the Quick Settings Panel.
4.WLAN: Tap to enable WLAN.
5.Bluetooth: Tap to enable Bluetooth.
6.Mobile data: Tap to enable mobile data.
7.Auto-rotate: Tap to open auto-rotate which can switch the touchscreen from portrait to landscape when you rotate your phone.
8.Silent: Tap to enable silent mode.
9.Airplane mode: Tap to enable airplane mode.
10.Flashlight: Tap to enable flashlight.
11.Eye comfort: Tap to enable eye comfort mode.
12.Location: Tap to enable location service.
13.Battery saver: Tap to enable battery saver.
14.Float button: Tap to enable float button.
15.Do not disturb: Tap to silence your phone.
16.Screenshot: Tap to make a full-screen shot.
17.Hotspot: Tap to enable hotspot.
18.Data saver: Turn on data saver to reduce data usage.
Chapter 2 . Basics |
11 |
19.Brightness slider: Use this slider to adjust the brightness of the screen.
20.Adaptive brightness: Tap to enable auto-brightness setting. Your device will optimize brightness level for available light.
21.Screen indicator: Tap to change to next screen to view other options.
22.Nearby: Tap to scan for links from things nearby (need to open Bluetooth and Location).
Adjust the position of shortcut switches
1.Swipe down twice from the status bar to to open the Quick Settings Panel.
2.Tap  to enter the edit page and you can:
•Rearrange shortcut switches: Touch and hold a shortcut switch and then drag the icon to a position of your choice.
•Add a shortcut switch: Touch and hold a shortcut switch, and drag it from the bottom section of the panel to the top section.
•Remove a shortcut switch: Touch and hold a shortcut switch, and drag it from the top section of the panel to the bottom section.
•Reset Quick Settings Panel: Tap  -> Reset to reset the Quick Seetings Panel to default settings.
2. 5 Notification Panel
Notification Panel collects all the notifications and alerts so that you can review them whenever you like.
•Open Notification Panel: Swipe down from the status bar to open the Notification Panel.
•View a notification: Tap an item to view the details. Or swipe the notification left or right to remove it from
the list. You can also tap to remove the details all at once. (New notifications, such as missed calls and messages are displayed on the Lock screen. Double-tap it to view the details).
•Quickly manage notification: Touch and hold the notification detail to open the quick settings screen. Choose
Notifications allowed or Show notifications without prompts and tap DONE. And you can tap MORE SETTINGS to go to the notification manage page. For more information, see Notification manager.
•Close Notification Panel: Swipe up, or press the Back button or Home button.
Chapter 2 . Basics |
12 |
2. 6 Type text
Enter text
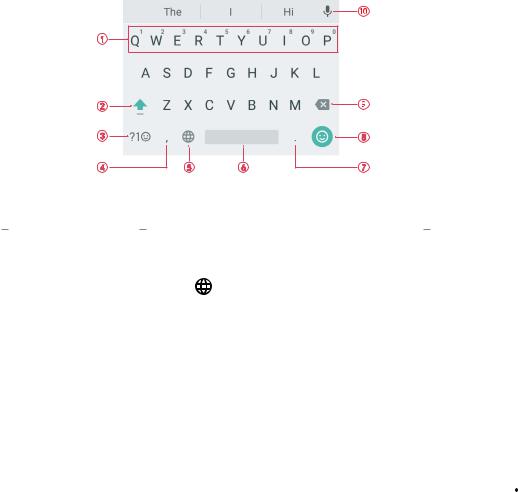
Use AndroidTM input method to enter text.
1.Touch and hold the letter to enter the number.
2.Tap  and tap a letter, or tap
  and slide to a letter to type uppercase. Double-tap
  for caps lock.
3.Enter numbers, punctuations and symbols.
4.Enter a comma. Touch and hold it to open the input options menu.
5. If you have several keyboards, you can tap |
to switch to the last one you used. You can also touch and |
hold it to choose the keyboard you need. |
|
6.Enter a space, or double-tap the space bar quickly to end a sentence with a period.
7.Enter a period. Touch and hold to enter a symbol.
8.Enter emoticon.
9.Delete the characters to the left of the cursor.
10.Use Google voice typing.
Edit text
•Revise text: Tap the text to position the insertion point  and start revising.
•Select text: Touch and hold the text field to display the selection options (SELECT ALL/CUT/COPY, and tap  to view more: PASTE/SEARCH/SHARE). Drag
 to select more or less text.
Spell checker
You can turn on the Spell checker feature to help you enter correct words.
Go to  Settings -> Language & input -> Spell checker, and turn on the switch.
Switch input method
On the Home screen, tap  Settings -> Language & input. Select an input method you need.
2. 7 Take a screenshot
You can capture the entire screen by following ways:
•Press the Power button and Volume-down button at the same time.
•Swipe down from the status bar to open the Quick Settings Panel, then tap  Screenshot.
•Slide down three fingers on the screen.
•If you enabled float button (see Float button), tap  ->
-> Screenshot.
Chapter 2 . Basics |
13 |

2. 8 Configure your fingerprint
Use the fingerprint sensor to unlock the screen, take photos and unlock apps.
Add a fingerprint for the first time
For added security and to ensure that you can still access your data if your phone fails to recognize your fingerprint, you will need to set a backup screen lock method when configuring fingerprint unlock.
1.Go to  Settings -> Screen lock, fingerprint & security -> Fingerprint management.
2.Select Pattern or PIN or Password, and then follow the onscreen instructions to set a screen lock password.
3.Once you have configured the password, tap Add fingerprint.
4.Place your fingertip on the fingerprint sensor. Press down lightly on the sensor until your phone vibrates. Repeat this step using different parts of your fingertip until your phone has successfully added your fingerprint.
5.Once you have added your fingerprint, tap DONE.
 Note:
Note:
1.When recording your fingerprint, make sure the fingerprint sensor and your fingers are dry and clean.
2.For more security settings, see Screen lock, fingerprint & security.
Add, delete or rename your fingerprint
Add multiple fingerprints to make it easier to unlock your phone. You can also delete or rename your fingerprints.
1.Go to  Settings -> Screen lock, fingerprint & security -> Fingerprint management.
2.Enter the screen lock pattern/password/PIN.
3.In the Fingerprint list section, you can:
•Add a fingerprint: Tap Add fingerprint to add a new fingerprint. You can add up to five in total.
•Rename/delete a fingerprint: Tap a previously added fingerprint to rename or tap  to delete it.
4.After you enter several fingerprint, there is a list showing all the recorded fingerprint. When you place your fingertip on the fingerprint sensor, the corresponding place turns grey, which helps you easily find the fingerprint.
Use fingerprint to take photos or record videos
When using the camera, touch the fingerprint sensor to take a picture or record a video. If you don’t want to use this function:
•Go to Settings -> Screen lock, fingerprint & security -> Press and hold your fingerprint to capture, and turn off the switch to disable the function.
•Go to  Camera, swipe right and tap
  , then switch off Press and hold your fingerprint to capture.
Use fingerprint to access locked applications
Use a Pattern, PIN, Password or fingerprint to lock the selected app(s) to ensure privacy.
1.Go to  Settings -> Screen lock, fingerprint & security -> App lock.
2.Use fingerprints or enter the password.
3.Turn on the switch to enable the app lock for the app you want to lock.
Chapter 2 . Basics |
14 |
2. 9 Access applications
Launch and switch between applications
•Launch an application from the Home screen: Tap an icon to launch the corresponding application.
•Launch an application from the Lock screen: Swipe  up to launch the camera application. Swipe
  up to open the toolkit.
Sound Recorder |
|
|
|
Clock |
||
|
|
|||||
Calculator |
|
|
|
|
Flashlight |
|
|
|
|
|
|
||
|
|
|
|
|
||
 Note:
Note:
If you have set the Pattern/PIN/Password, after tapping  , you can only go to Stopwatch and Timer.
•Switch to another application: Tap the Home button to return to the Home screen, and then tap the icon of the application you want to open. Or you can tap Recent apps button to view the recently used applications, then tap the application you want to open.
 Note:
Note:
Double-tap Recent apps button to switch to the previous application.
Viewing recently used applications
Tap Recent apps button to display the list of recently used applications.
•View more applications: Swipe up or down on the screen to view more recently used applications.
•Open an application: Tap a thumbnail to open the corresponding application.
•Close an application: Swipe left or right on a thumbnail to close the corresponding application, or you can tap  on a thumbnail to close it.
•Close all applications: Tap  to close all applications.
 Note:
Note:
Before tapping  , you can tap
  to lock the application you want to hold. The system will not close locked application when you tap
  .
.
Uninstall applications
Free up space on your phone and boost performance by removing unused applications.
On the Home screen, touch and hold the application you want to uninstall, then drag it to  Uninstall in the status bar. You can also go to
  Settings -> Apps, select the application you want to uninstall and tap
UNINSTALL.
 Note:
Note:
Some pre-installed system applications cannot be removed.
Chapter 2 . Basics |
15 |
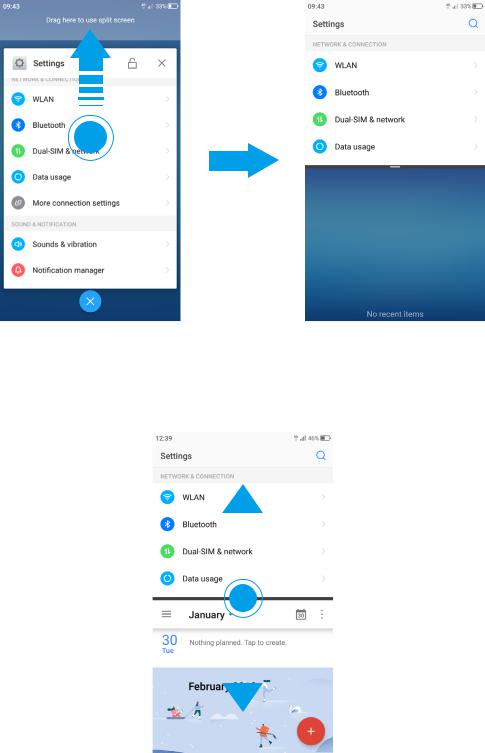
2. 10 Split-screen mode
Use split-screen mode to use two apps at the same time.
Enable spilt-screen mode
1.Open an app and tap Recent apps button to open recents apps list.
2.Touch and hold an app, then drag it up. Then you can open another app, and it will be displayed at the bottom of the screen.
 Note:
Note:
Split screen mode is not available for all apps. Some apps may not function properly in split screen mode.
Switch to full screen mode
Touch and hold |
|
swipe up or down to switch to full screen mode. |
||
|
||||
|
|
|
|
|
|
|
|
|
|
|
|
|
|
|
|
|
|
|
|
|
|
|
|
|
|
|
|
|
|
|
|
|
|
|
|
|
|
|
|
|
|
|
|
|
|
|
|
|
|
|
|
|
|
|
|
|
|
|
|
|
|
|
|
|
|
|
|
|
|
|
|
|
|
|
|
|
|
|
|
Chapter 2 . Basics |
16 |

3 |
Network and Share |
Connect to internet and computer, and share your phone’s network with others.
•WLAN
•Mobile data
•Connect to computer
•Bluetooth
•Share your mobile data with other devices
•Smart WLAN
3. 1 WLAN
Connect to a WLAN network to access the Internet and reduce mobile data usage.
 Note:
Note:
Your personal data and financial information may be at risk if you connect to insecure public WLAN networks.
Connect to a WLAN network
Enable WLAN to connect to the Internet using a WLAN access point or hotspot.
If  appears in the status bar, you are connected to a WLAN network. Neffos reconnects anytime you return to the same location.
1.Swipe down from the status bar to open the Quick Settings Panel.
2.Touch and hold  WLAN to open the WLAN settings screen.
3.Turn on the switch. A list of available WLAN networks will be displayed.
•Refresh the list: Tap  to refresh the available WLAN list.
•Add a WLAN network that is not shown in the list: Swipe down to the bottom of the list and tap Add network. Follow the onscreen instructions to configure the WLAN settings and password.
4.Select the WLAN network you want to connect to, and then enter the password if needed. (You can also turn WLAN on in Settings -> WLAN.) Your phone will remember WLAN networks that you have used before and reconnect to them automatically when you enable WLAN.
Connect to a WLAN network through WPS
Connecting to a WPS-enabled router over WPS allows you to quickly connect to the network without entering a password. Go to  Settings -> WLAN and you can connect to your router in following two ways:
•Tap  -> WPS push button and press the router’s WPS button.
•Tap  -> WPS pin entry to generate a PIN, and then enter the PIN on the router.
Advanced WLAN settings
Go to  Settings -> WLAN ->
  -> Advanced, you can configure these settings:
•Saved networks: Tap Saved networks to view the networks remembered by your device. Tap a network and tap FORGET to forget it.
•Network notification: Turn on the switch, and your phone will notify you when a public network is available.
•Keep WLAN on during sleep: There are three options:
1 ) Always: Always stay connected to Wi-Fi when the screen is off.
2 ) Only when plugged in: When the screen is off, only stay connected to Wi-Fi when your phone is charging.
Chapter 3 . Network and Share |
17 |

3 ) Never: Always switch to mobile data when the screen is off. (When Never is selected, your phone will disconnect from WLAN and switch to mobile data when the screen turns off.)
• Install certificates: Tap Install certificates and follow the onscreen instructions to install certificates.
3. 2 Mobile data
Before using mobile data, ensure that you have a data plan with your carrier to avoid incurring excessive data charges.
Connect to mobile data
You can connect to mobile data in following three ways:
•Swipe down from the status bar to open the Quick Settings Panel and tap  . When it lights up, mobile data is enabled.
•Swipe down from the status bar to open the Quick Settings Panel. Touch and hold  to enter the cellular data settings. Turn on the Cellular data switch.
•Go to Settings -> Dual-SIM & network and switch on Cellular data.
 Note:
Note:
1.If a WLAN connection to the Internet isn’t available, apps and services may transfer data over your carrier’s cellular network, which may result in additional fees. Contact your carrier for information about you cellular data plan rates.
2.When you don’t need to access the Internet, disable mobile data to save battery power and reduce data usage.
3.3 Connect to computer
Transfer the data on your phone to your computer or transfer the data on your computer to your phone.
When you use a USB cable to connect your phone with a computer or another device, Allow access to device data will be displayed in a popup dialog. Tap ALLOW to allow file transfer between your phone and the computer. Tap DENY to deny data conncection and charge only.
Select the USB connection mode
Swipe down from the status bar to open the Notification Panel, and then tap the USB connection notification. You can choose from the following USB connection modes:
•Charge this device: Charge your phone only.
•Transfer files: Transfer files between your phone and the computer.
•Transfer photos (PTP): Transfer images between your phone and the computer.
 Note:
Note:
PTP (picture transfer protocol) is an image transfer protocol.
•Use device as MIDI: Use your phone as a MIDI input device and play MIDI files on the computer.
 Note:
Note:
MIDI (Musical Instrument Digital Interface) is a music technology protocol that allows digital music instruments to communicate with each other.
3. 4 Bluetooth
You can share data on your phone with other devices using Bluetooth. And you can use Bluetooth to connect your phone to Bluetooth headsets and in-car Bluetooth to navigate or listen to music while you drive. You can also connect your phone to Bluetooth wearables to record and manage fitness data.
Chapter 3 . Network and Share |
18 |

Enable Bluetooth and pair your phone with another device
1.Swipe down from the status bar to open the Quick Settings Panel.
2.Touch and hold  Bluetooth to enter the Bluetooth settings. Tap the switch to turn it on. (You can also turn Bluetooth on in Settings -> Bluetooth). Your phone will automatically list available devices. If the device you want to pair with is not displayed, check whether the device is discoverable.
3.Select the device you want to pair with and follow the onscreen instructions.
Send and receive files using Bluetooth
Check that both devices are paired before attempting to transfer files.
•Send files: Tap the file you want to send and tap 
 >
>  Bluetooth. Your device will automatically search for nearby devices. Select the receiving device.
•Receive files: When another device tries to send you files using Bluetooth, select ACCEPT from the dialog box that appears. Open the Notification Panel to view file transfer progress. By default, received files are saved to
 File manager -> Internal storage -> bluetooth folder.
Unpair Bluetooth devices
1.Go to  Settings -> Bluetooth.
2.Tap the  icon next to the paired device, and then tap FORGET.
Rename your phone
1.On the Home screen, tap  Settings -> Bluetooth and turn on the switch.
2.Tap Device name.
3.Edit the device name and tap OK to complete the configuration.
3. 5 Share your mobile data with other devices
You can share your phone’s mobile Internet with other devices (such as phones, tablets, or computers). The following Internet sharing methods can be used:
Use WLAN hotspot
Set up a portable WLAN hotspot to share your phone’s mobile Internet with other devices. Compared with Bluetooth tethering, the portable WLAN hotspot feature offers quicker, longer range connections, but power consumption is higher.
1.On the Home screen, go to  Settings -> More connection settings -> Tethering & portable hotspot -> Portable WLAN hotspot.
2.Turn on the switch. After enabling your personal WLAN hotspot,  will be displayed in the status bar.
3.Tap Set up WLAN hotspot to configure following settings:
•Change the hotspot name: The Network name is the hotspot name. By default, this is the name of your phone model. You can manually change the name to something that is easier to remember. Tap Name to edit the name of your hotspot and tap SAVE.
•Change the security setting: Tap Security to configure security setting. Your phone uses WPA2 PSK encryption by default. Other devices will require a password to connect to the hotspot. If you choose None, devices will not require a password to connect to the hotspot.
•Configure a password that is easy to remember: The hotspot password is generated randomly by your phone. For security reasons, choose a password that is not easy to guess. Tap Password and enter the new password (the password must have at least 8 characters), then tap SAVE.
•Set the maximum connections: Tap Maximum connections and select the number of maximum connections.
Chapter 3 . Network and Share |
19 |

•Set the time for keeping hotspot on when idle: Tap Keep WLAN hotspot on to select Always/Turn off when idle for 5 min/Turn off when idle for 10 min.
 Note:
Note:
Your device can’t access the Internet using WLAN when your Portable WLAN hotspot is turned on.
Use USB tethering
Use a USB cable to share your phone’s mobile Internet with a computer. This is useful if your computer’s Internet connection stops working. To enable mobile data, see Connect to mobile data.
1.Connect your phone to a computer using a USB cable.
2.On the Home screen, go to Settings -> More connection settings -> Tethering & portable hotspot.
3. Switch on USB tethering. After enabling USB tethering, your phone will display the |
icon in the status |
bar. You can then use the computer to access the Internet. |
|
 Note:
Note:
Depending on your computer’s operating system, you may need to install phone drivers on the computer or establish a network connection in order to use USB tethering. Please read the instructions for your operating system.
Use Bluetooth tethering
Use Bluetooth tethering to turn your phone into a wireless router and share your mobile Internet with other devices. Compared with a portable hotspot, Bluetooth tethering offers a slower Internet connection, but consumes less power.
1.Establish a Bluetooth connection between two devices and check that they are paired. For more information, see Enable Bluetooth and pair your phone with another device.
2.On the Home screen, go to  Settings -> More connection settings -> Tethering & portable hotspot.
3.Switch on Bluetooth tethering to share your mobile Internet.
4.Go to Settings ->Bluetooth and tap the device you want to connect. Other devices can now connect and use your mobile data.
3. 6 Smart WLAN
Use smart WLAN to share WLAN password, connect to router and extend WLAN.
Share WLAN password
When connected to WLAN, you can share the password with other devices.
On the Home screen, tap Smart WLAN -> 
 Share WLAN password to proceed to QR code screen (You can also tap the connected WLAN in the WLAN networks list to proceed to QR code screen). You can share the password in following two ways:
•Show the QR code. For the other device, see Connect to WLAN by scanning the QR code.
•Touch and hold Password and choose Copy or Share to share the password.
 Note:
Note:
This feature is currently only supported on Neffos and in some third-party apps.
Connect to WLAN by scanning the QR code
1.On the Home screen, go to  Smart WLAN->
 Scan.
Scan.
2.Align the QR code within the frame, or tap  to select a photo to scan. Then your device will connect to the shared WLAN automatically.
 Note:
Note:
When ambient light is not enough, you can tap  to turn on light.
Chapter 3 . Network and Share |
20 |

Connect to router through WPS
WPS allows your phone to connect to a WPS-enabled router without having to remember a password. On the Home screen, tap  Smart WLAN->
  WPS and press the router’s WPS button.
Settings -> WLAN to connect. For more information, see Connect to a WLAN network
•Extend the WLAN
Before using this feature, ensure that you have connected to the WLAN.
On the Home screen, tap Smart WLAN->  WLAN Extender and turn on the switch. When WLAN Extender is open,
  will appear in the status bar.
•Set WLAN Extender
On the Home screen, tap Smart WLAN->  WLAN Extender -> Set WLAN Extender. You can configure following settings:
1) Change the netword name: Tap Name to set netword name, and then tap SAVE. The Network name is the WLAN Extender name. By default, this is the name of your phone model. You can manually change the name to something that is easier to remember.
2) Security: Your phone uses WPA2 PSK encryption by default.
3) Configure a password that is easy to remember: The network password is generated randomly by your phone. For security reasons, choose a password that is not easy to guess.
4) Select AP Band: Tap Select AP Band to choose 2.4 GHz Band or 5 GHz Band.
5) Set Maximum connections: Tap Maximum connection to choose the maximum connections.
6) Set duration of WLAN Extender: Set the time for keeping WLAN extender on when idle. Tap Keep WLAN extender on to choose the duration.
•Manage the users
On the Home screen, go to SmartWLAN->  WLAN Extender -> SetWLAN Extender. The connected and blocked devices will be displayed on the list.
1) View the details of the connected device: Tap a connected device to view the MAC address and IP address.
2) Block a device: Tap the connected device you want to block and tap BLOCK. The blocked device can’t search your WLAN extender singals.
3) Unblock a devide: Tap the blocked device you want to unblock and tap UNBLOCK.
Chapter 3 . Network and Share |
21 |

4 Calls
Make calls with your phone to contact one quickly.
•Make a call
•Answer or reject a call
•Options during a call
•Call log
•Manage contacts
•Harassment filter
•Call settings
•Advance settings
4. 1 Make a call
Dial directly from the dialer
1.On the Home screen, tap  Phone ->
  .
.
2.Enter the number of a contact in the dialer. Your phone will search your contacts and call log and list the results above the dialer.
3.Select the contact you want to call (Or tap  after entering the complete number). If you have inserted two SIM cards, and haven’t set the default SIM for calls (or set Ask every time), select SIM1 or SIM2 to dial (Or tap / after entering the complete number).
 Note:
Note:
Check Always use this for calls and tap SIM1/SIM2 to make SIM1 or SIM 2 as the default SIM card to make calls. If you want to change the default SIM card, or if you want to deactivate one of them, go to Settings -> Dual-SIM & network to configure. For more information, see Dual-SIM & network.
Dial a recent number from the Recent calls
All incoming , outgoing and missed call are in Recent calls.
1.On the Home screen, tap  Phone -> Recent calls, a list of recent calls will be displayed.
2.Tap the number or contact to call.
Dial from contact list
1.On the Home screen, tap  Phone -> Contacts.
2.Tap a contact and then tap the number to dial.
Dial from contact list and call log search results
1.On the Home screen, tap  Phone.
2.Tap  and enter the name, initials, or number of a contact in the dialera contact.
3.Tap the contact or number to dial.
 Note:
Note:
If no results appear, you can tap  Call to dial directly, or tap
  Send SMS to send a message to the number.
Make an international call
Before making a long-distance call, contact your carrier to activate international calling or roaming services.
Chapter 4 . Calls |
22 |
1.On the Home screen, tap  Phone ->
  .
.
2.Touch and hold 0 to enter +, then enter the country or region code, area code, and phone number in sequence.
3.Tap  .
.
Make an emergency call
In the event of an emergency, you can make emergency calls from your device, even without a SIM card.
•Make an emergency call from unlock screen:
1.On the Home screen, tap  Phone ->
  .
.
2.Enter the emergency number for your location in the dialer and tap  .
.
•Make an emergency call from lock screen:
If you enabled the device protection (fingerprint, pattern, PIN or password), you can make an emergency from lock screen by following way:
1.Wake up the screen and swipe up on the screen.
2.Tap EMERGENCY.
3.Enter the emergency number of your location in the dialer and tap  .
.
 Note:
Note:
1.You must be in an area with cellular coverage, when you have to make an emergency call.
2.The ability to make emergency calls depends on local regulations and carriers in your area.
3.Poor network coverage or environmental interference may prevent your call from being connected. Never rely solely on your device for essential communication during emergencies.
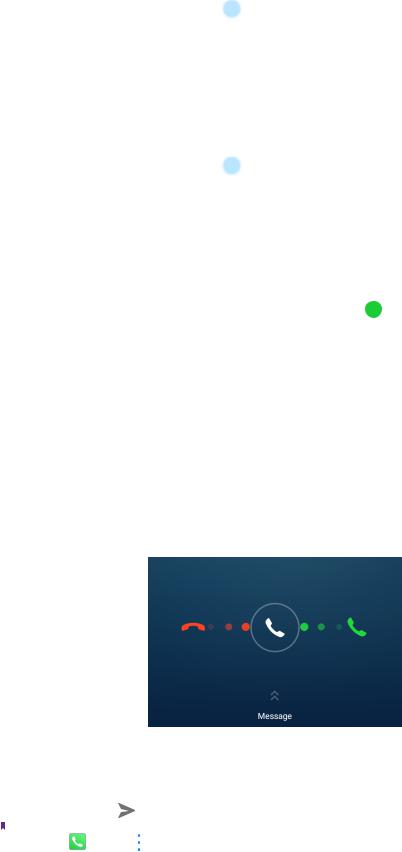
4.2 Answer or reject a call
On the incoming call screen:
When a call comes in, you can press the Volume button (or Power button ) to mute the ringtone.
When the screen is locked
•Drag  right to
  to answer the call.
•Drag  left to
  to reject the call.
•Slide up Message to to reject the call and send SMS. You can choose a quick response or tap  to edit a
new message and tap |
to send out. |
|
Note: |
|
-> Advance settings -> Quick responses to edit the predefined text messages. |
You can go to |
Phone -> |
|
Chapter 4 . Calls |
23 |
Loading...