


 Loading...
User Guide
4G LTE Mobile Wi-Fi
M7350
REV6.20.0 1910012869
Contents
About This Guide . . . . . . . . . . . . . . . . . . . . . . . . . . . . . . . . . . . . . . . . . . . . . . . . 1
Chapter 1. Get to Know About Your Mobile Wi-Fi . . . . . . . . . . . . . . . . . 2
1. 1. Product Overview. . . . . . . . . . . . . . . . . . . . . . . . . . . . . . . . . . . . . . . . . . . . . . . . . . . . . 3 1. 2. Physical Description . . . . . . . . . . . . . . . . . . . . . . . . . . . . . . . . . . . . . . . . . . . . . . . . . . 4 1. 2. 1.The Exterior . . . . . . . . . . . . . . . . . . . . . . . . . . . . . . . . . . . . . . . . . . . . . . . . . . . . 4 1. 2. 2.The Interior. . . . . . . . . . . . . . . . . . . . . . . . . . . . . . . . . . . . . . . . . . . . . . . . . . . . . 6
Chapter 2. Set Up Internet Connection . . . . . . . . . . . . . . . . . . . . . . . . . . 7
2. 1. Install the SIM Card and Battery . . . . . . . . . . . . . . . . . . . . . . . . . . . . . . . . . . . . . . . 8 2. 2. Power On the Mobile Wi-Fi . . . . . . . . . . . . . . . . . . . . . . . . . . . . . . . . . . . . . . . . . . . . 9 2. 3. Connect to the Internet . . . . . . . . . . . . . . . . . . . . . . . . . . . . . . . . . . . . . . . . . . . . . . 10
Chapter 3. Log In . . . . . . . . . . . . . . . . . . . . . . . . . . . . . . . . . . . . . . . . . . . . . . .15
3. 1. |
Via Phone Login Entry . . . . . . . . . . . . . . . . . . . . . . . . . . . . . . . . . . . . . . . . . . . . . . . |
17 |
3. 2. |
Via PC Login Entry . . . . . . . . . . . . . . . . . . . . . . . . . . . . . . . . . . . . . . . . . . . . . . . . . . . |
17 |
3. 3. |
Via tpMiFi App . . . . . . . . . . . . . . . . . . . . . . . . . . . . . . . . . . . . . . . . . . . . . . . . . . . . . |
18 |
Chapter 4. Manage Your Data Usage . . . . . . . . . . . . . . . . . . . . . . . . . . .20
4. 1. Track Data Usage . . . . . . . . . . . . . . . . . . . . . . . . . . . . . . . . . . . . . . . . . . . . . . . . . . . . 21 4. 1. 1.Check Data Usage on Screen. . . . . . . . . . . . . . . . . . . . . . . . . . . . . . . . . . 21 4. 1. 2.Check Data Usage on the Web Management Page . . . . . . . . . . . . . 21 4. 1. 3.Check Data Usage via SMS . . . . . . . . . . . . . . . . . . . . . . . . . . . . . . . . . . . . 22 4. 1. 4.Revise Data Usage . . . . . . . . . . . . . . . . . . . . . . . . . . . . . . . . . . . . . . . . . . . . 23
4. 2. Limit Data Usage. . . . . . . . . . . . . . . . . . . . . . . . . . . . . . . . . . . . . . . . . . . . . . . . . . . . . 24 4. 2. 1.Limit Data Package . . . . . . . . . . . . . . . . . . . . . . . . . . . . . . . . . . . . . . . . . . . . 24 4. 2. 2.Limit Monthly Data Usage . . . . . . . . . . . . . . . . . . . . . . . . . . . . . . . . . . . . . 25
4. 3. Set Up Free Data Period. . . . . . . . . . . . . . . . . . . . . . . . . . . . . . . . . . . . . . . . . . . . . . 26 4. 4. Enable Mobile Data . . . . . . . . . . . . . . . . . . . . . . . . . . . . . . . . . . . . . . . . . . . . . . . . . . 27 4. 5. Enable Data Roaming . . . . . . . . . . . . . . . . . . . . . . . . . . . . . . . . . . . . . . . . . . . . . . . . 28
Chapter 5. Secure Your Network . . . . . . . . . . . . . . . . . . . . . . . . . . . . . . .29
5. 1. Secure Wireless Network . . . . . . . . . . . . . . . . . . . . . . . . . . . . . . . . . . . . . . . . . . . . 30
5. 2. Block Unwelcome Devices . . . . . . . . . . . . . . . . . . . . . . . . . . . . . . . . . . . . . . . . . . . 31
5. 3. Lock SIM Card . . . . . . . . . . . . . . . . . . . . . . . . . . . . . . . . . . . . . . . . . . . . . . . . . . . . . . . 32
Chapter 6. Share Files on SD Card . . . . . . . . . . . . . . . . . . . . . . . . . . . . . .35
6. 1. Access via Wi-Fi Mode . . . . . . . . . . . . . . . . . . . . . . . . . . . . . . . . . . . . . . . . . . . . . . . 36 6. 2. Access via USB Mode. . . . . . . . . . . . . . . . . . . . . . . . . . . . . . . . . . . . . . . . . . . . . . . . 41
Chapter 7. Customize Your Network . . . . . . . . . . . . . . . . . . . . . . . . . . . .43
7. 1. Specify Network Mode. . . . . . . . . . . . . . . . . . . . . . . . . . . . . . . . . . . . . . . . . . . . . . . 44
7. 2. Configure Dial-up . . . . . . . . . . . . . . . . . . . . . . . . . . . . . . . . . . . . . . . . . . . . . . . . . . . . 45
7. 2. 1.Configure Dial-up Settings . . . . . . . . . . . . . . . . . . . . . . . . . . . . . . . . . . . . 45
7. 2. 2.Configure Network Search . . . . . . . . . . . . . . . . . . . . . . . . . . . . . . . . . . . . 46
7. 3. Configure DHCP Server. . . . . . . . . . . . . . . . . . . . . . . . . . . . . . . . . . . . . . . . . . . . . . 46
Chapter 8. Manage Your Mobile Wi-Fi . . . . . . . . . . . . . . . . . . . . . . . . . .48
8. 1. Save the Mobile Wi-Fi’s Power . . . . . . . . . . . . . . . . . . . . . . . . . . . . . . . . . . . . . . . 49 8. 2. Change Admin Account . . . . . . . . . . . . . . . . . . . . . . . . . . . . . . . . . . . . . . . . . . . . . . 50 8. 3. Set Up System Time . . . . . . . . . . . . . . . . . . . . . . . . . . . . . . . . . . . . . . . . . . . . . . . . . 51 8. 4. Restore Configuration Settings . . . . . . . . . . . . . . . . . . . . . . . . . . . . . . . . . . . . . . 51 8. 5. Update the Firmware . . . . . . . . . . . . . . . . . . . . . . . . . . . . . . . . . . . . . . . . . . . . . . . . 52 8. 6. Update ISP Parameters . . . . . . . . . . . . . . . . . . . . . . . . . . . . . . . . . . . . . . . . . . . . . . 53 8. 7. System Log. . . . . . . . . . . . . . . . . . . . . . . . . . . . . . . . . . . . . . . . . . . . . . . . . . . . . . . . . . 54
FAQ . . . . . . . . . . . . . . . . . . . . . . . . . . . . . . . . . . . . . . . . . . . . . . . . . . . . . . . . . . . .56

About This Guide
This guide is a complement of Quick Installation Guide. The Quick Installation Guide provides instructions for quick internet setup, while this guide contains details of each function and demonstrates how to configure them.
Features available in the Mobile Wi-Fi may vary by model and software version. Mobile Wi-Fi availability may also vary by region or ISP. All images, steps, and descriptions in this guide are only examples and may not reflect your actual Mobile Wi-Fi experience.
Conventions
In this guide the following conventions are used:
Convention |
Description |
|
Underlined |
Underlined words or phrases are hyperlinks. You can click to redirect to a website or a |
|
specific section. |
||
|
||
Teal |
Contents to be emphasized and texts on the web page are in teal, including the menus, |
|
items, buttons and so on. |
||
|
The menu structures to show the path to load the corresponding page. For example,
>Advanced > Wireless > Black List means the Black List page is under the Wireless menu that is located in the Advanced tab.
|
|
|
Note: |
Ignoring this type of note might result in a malfunction or damage to the device. |
|
|
|
|
|||
|
|
|
|
|
|
|
|
|
|
Tips: |
Indicates important information that helps you make better use of your device. |
|
|
|
|
||
|
|
|
|
||
*Maximum wireless signal rates are the physical rates derived from IEEE Standard 802.11 specifications. Actual wireless data throughput and wireless coverage are not guaranteed and will vary as a result of 1) environmental factors, including building materials, physical objects, and obstacles, 2) network conditions, including local interference, volume and density of traffic, product location, network complexity, and network overhead, and 3) client limitations, including rated performance, location, connection, quality, and client condition.
*Battery life estimates obtained through testing in a laboratory setting.
More Info
The latest software, management app and utility are available at the Download Center at www.tp-link.com/support.
The Quick Installation Guide can be found in the same place you found this guide or inside the package of the Mobile Wi-Fi.
Specifications can be found on the product page at https://www.tp-link.com.
TP-Link Community is provided for you to discuss our products and share knowledge at https://community.tp-link.com.
Our Technical Support contact information can be found at Contact Technical Support page at www.tp-link.com/support.
1

Chapter 1
Get to Know About Your Mobile Wi-Fi
This chapter introduces what the Mobile Wi-Fi can do and its appearance. It contains the following sections:
•Product Overview
•Physical Description
Chapter 1 |
Get to Know About Your Mobile Wi-Fi |
1. 1. Product Overview
The Faster Connections, The More You Can Do
Just insert a 4G SIM card to create your reliable personal Wi-Fi hotspot and share instant 4G/3G connectivity with friends. The Mobile Wi-Fi, supporting the latest generation 4G LTE network, can reach a faster download speed so that users can enjoy HD movies without interruption, download files in seconds, and hold a video chat without dropouts.
Artful Little Gadget and Built-in Battery for Life on the Go
TheTP-LinkMobileWi-Fifeaturesacompact,elegantdesignandbuilt-inpowerful battery very suitable for travel, business trips and outdoor activities. With added flexibility, the device can be charged via a micro USB cable connected to an adapter, laptop or portable charger for endless hours of 4G sharing.
Easy Management with the tpMiFi App
With the tpMiFi App, you can conveniently access and manage the Mobile Wi-Fi right on your iOS/Android devices. The tpMiFi app allows you to set data limits, control which devices can access your Wi-Fi, send messages, and share media files to/from a removable micro SD card.
3

Chapter 1 |
Get to Know About Your Mobile Wi-Fi |
1. 2. Physical Description
1. 2. 1. The Exterior
Menu Button
560 |
|
Screen |
5. |
|
|
|
|
|
Carrier Name |
|
|
|
|
|
Button Explanation |
|
Power Button |
|
||
|
|
|
Button |
|
Description |
• Press this button to enter the Menu Screen from the Home Screen. Menu Button • Press this button to switch the icons or options.
•Press this button to light on the screen.
•Press and hold this button to power on or off the Mobile Wi-Fi.
Power Button • Press this button to light on or off the screen.
• Press this button to select the icon or option.
4

Chapter 1 |
Get to Know About Your Mobile Wi-Fi |
Screen Display
 Note: Images are for demonstration only.
Home Screen |
Displayed Item |
Indication |
|
|
|
|
Indicates the signal strength of the current network. |
|
|
|
|
|
|
|
|
|
4G/3G/2G |
Indicates successful network connection and the current network |
|
|
type: 4G, 3G or 2G. |
||
|
|
|
|
|
|
|
Indicates you are in roaming service. |
|
|
|
Indicates that there is un-read message(s) and the number of un- |
|
|
|
read messages. |
|
|
|
Displays the Wi-Fi status and the number of current wireless clients. |
|
|
|
|
|
|
|
Displays the remaining battery power. |
|
|
|
|
|
|
|
|
|
560MB |
Indicates the total data used. It will be cleared after the Mobile Wi-Fi |
|
|
is reset. |
||
|
|
|
|
|
5.0 M/S ↓ |
Indicates the download speed of current data transmission. |
|
Menu Screen |
Menu |
Description |
|
Home |
Displays the information of data, signal strength, battery life and so |
|
on. |
|
|
Device Info |
Displays the SSID (network name), password and login address of |
|
the Mobile Wi-Fi. |
|
|
|
To turn on or off the power saving mode. If enabled, the Wi-Fi will |
|
|
be shut down if no clients are connected to the Mobile Wi-Fi for a |
|
Power Saving |
period of time (10 minutes by default). You can also save power by |
|
|
changing the Wi-Fi range on Advanced > Power Saving of the web |
|
|
management page. |
|
|
To enable the WPS function. Enable this function and immediately |
|
WPS |
press the WPS button on your client device. A success message will |
|
|
appear on the screen, indicating successful WPS connection. |
|
Network Mode |
To change the network mode to 4G preferred, 4G only or 3G only as |
|
needed. |
|
|
|
To enable or disable the Data Roaming function as needed. We |
|
Data Roaming |
recommend you to enable it on when you are out of the carrier |
|
|
service area. |
|
App Download |
Displays the QR code of the TP-Link tpMiFi app that helps you |
|
manage your Mobile Wi-Fi. Scan it to download the app. |
5

Chapter 1 |
Get to Know About Your Mobile Wi-Fi |
1. 2. 2. The Interior
Reset Button (Hole) |
SIM Card Slot |
|
|
|
Micro SD Card Slot |
|
Micro USB Input Port |
Item |
Description |
|
SIM Card Slot |
Insert the SIM card into the slot. A nano or micro SIM card must be converted using the |
|
provided SIM card adapter. |
||
|
||
Micro SD Card Slot |
Slide and lift up the slot cover, insert the SD card and slide the cover back to lock. The |
|
inserted SD card can be used for storage and media sharing. |
||
|
||
Micro USB Input Port |
Plug in the USB cable to this port to charge your Mobile Wi-Fi or share SD card contents. |
|
Reset Button (Hole) |
With the Mobile Wi-Fi powered on, use a pin to press and hold this button (hole) until |
|
“Power Off” appears on the screen to reset the Mobile Wi-Fi. |
||
|
6

Chapter 2
Set Up Internet
Connection
This chapter introduces how to install the hardware and set up the internet connection of your Mobile Wi-Fi.
It contains the following sections:
•Install the SIM Card and Battery
•Power On the Mobile Wi-Fi
•Connect to the Internet
Chapter 2 |
Set Up Internet Connection |
2. 1. Install the SIM Card and Battery
1. Remove the cover.
2. Insert the SIM card.
 Note:
Note:
•A nano or micro SIM card must be converted using the provided SIM card adapter.
•The SIM card is not provided by TP-Link.
3.Install the SD card if any. Slide and lift up the slot cover, insert the SD card and slide the cover back to lock. The inserted SD card can be used for storage and media sharing.
 Note:
Note:
• The SD card is not provided by TP-Link.
4. Install the provided battery.
8

Chapter 2 |
Set Up Internet Connection |
 2
2
1
5. Replace the cover.
2. 2. Power On the Mobile Wi-Fi
1. Press and hold  (power button) until the welcome screen appears.
 Note:
Note:
To power off, press and hold  (power button) until “Power Off” appears on the screen.
2. The following screen will come up.
9

Chapter 2 |
|
|
Set Up Internet Connection |
||||
|
|
|
|
4G |
100% |
|
|
|
|
|
|
|
|
||
0MB
0.0 K/S 
Carrier Name
 Note: If other messages appear on the screen, please refer to FAQ > Q2.
2. 3. Connect to the Internet
Method One: Using the SSID and Wireless Password
1.Find the default SSID (network name) and wireless password from the screen or on the Wi-Fi info label.
•On the screen:
1) Press MENU (menu button) to enter the menu page and switch to the Device Info menu.
Device Info
2 ) Press  (power button) to enter the Device Info page.
 Device Info
SSID: TP-Link_XXXX
Password: 121345678
Login Address:
http://tplinkmifi.net
10

Chapter 2 |
Set Up Internet Connection |
•On the Wi-Fi info label:
Remove the cover, note down the default SSID and password, then replace the cover.
SSID: |
|
TP- |
XXXX |
Wireless |
|
Link_ |
|
XXXXXXXX |
Password: |
SSID:
TP-Link_XXXX
Wireless Password:
XXXXXXXX
2. On your device, select the SSID and enter the wireless password.
 Note: If you use a computer to connect to the Mobile Wi-Fi, please set it to obtain an IP address automatically.
Method Two: Via WPS (Wi-Fi Protected Setup)
If you have a WPS-supported device (such as Android phones or tablets), you can connect to the Mobile Wi-Fi more easily using WPS button or PIN.
 Note:
Note:
The WPS function takes effect only when the SSID Broadcast function and wireless function are enabled.
•Via the WPS button
1) Press MENU (menu button) to enter the menu page and switch to the WPS menu.


 4G R
4G R 

 1 2 100%


WPS
2 ) Press  (power button) to enter the WPS page.
11

Chapter 2 |
Set Up Internet Connection |
 WPS
WPS
3 ) Press MENU (menu button) and  (power button) to enable the WPS function, and then the Mobile Wi-Fi starts to scan WPS-supported devices.
 WPS
WPS
Connecting
4 ) On your WPS-supported device, go to Settings, turn on Wi-Fi, and enable WPS within 2 minutes.
 Note:
Note:
The entry to the WPS function may differ form the example below and has different names on different devices.
5 ) The status of WPS will change from Connecting to Succeeded after your WPS-supported device is successfully connected to the Mobile Wi-Fi.
12

Chapter 2 |
Set Up Internet Connection |
 WPS
WPS
Succeeded
•Via the PIN
1) On your WPS-supported device, go to Settings, turn on Wi-Fi, enable WPS PIN connection and get the PIN.
 Note:
Note:
The entry to the WPS function may differ from the example below and has different names on different devices.
2 ) On another device already connected to the Mobile Wi-Fi, visit http://tplinkmifi.net, and log in with the default password: admin.
13
Chapter 2 |
Set Up Internet Connection |
|
|
|
|
|
|
|
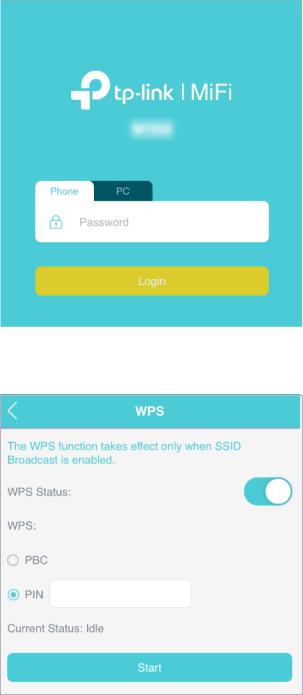
3 ) Go to Device > Advanced > WPS, check the PIN box and enter the PIN of your WPS-supported device in the field.
4 ) Click Start to start the WPS process, and the Current Status will change from Idle to Succeed after your WPS-supported device is successfully connected to the Mobile Wi-Fi.
14

Chapter 3
Log In
This chapter introduces how to log in to the web management page of the Mobile Wi-Fi using different interfaces. This User Guide presents the features of the Mobile Wi-Fi on the phone web management interface. Instructions for some features have been taken from the PC web management interface as they are only available on that platform.
It contains the following sections:
•Via Phone Login Entry
•Via PC Login Entry
•Via tpMiFi App
Chapter 3 |
Log In |
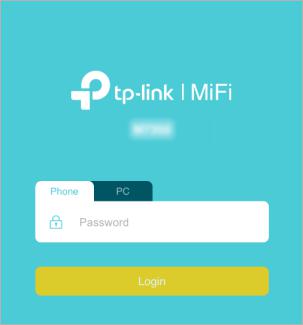
3. 1. Via Phone Login Entry
1. Visit http://tplinkmifi.net, and log in with the default password: admin.
2.Create a new login password for security purposes and use it for future logins.
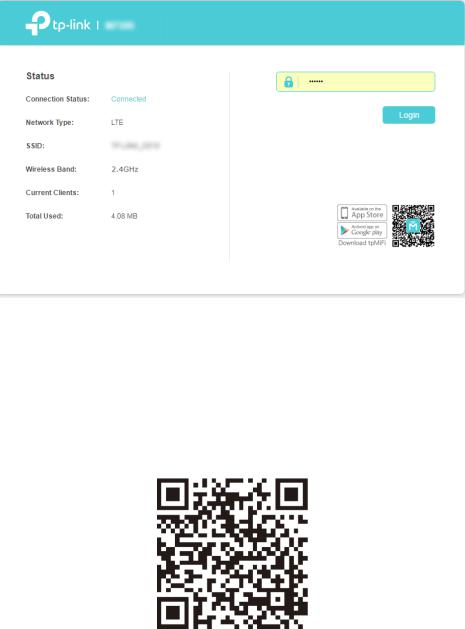
3.2. Via PC Login Entry
The PC web management interface displays all features of the Mobile Wi-Fi. If you want to use a feature (such as Configure DHCP Server) the Phone web management interface or tpMiFi app does not have, please log in via the PC entry. Computer or tablet is recommended.
1. Visit http://tplinkmifi.net, and log in with the default password: admin.
17
Chapter 3 |
Log In |
2.Go to Wizard, create a new login password for security purposes and use it for future logins.
3.3. Via tpMiFi App
1.Search “tpMiFi“ at the App Store or Google Play Store or simply scan the QR code to download the tpMifi app.
2.Connect your device to the Mobile Wi-Fi.
3.Launch the tpMiFi app, and log in with the default password: admin.
18
Loading...