


User Guide
EAP Controller Software
1910012227 REV 2.5.3
November 2017
|
CONTENTS |
|
1 Quick Start........................................................................................................................ |
1 |
|
1.1 |
Determine the Network Topology.......................................................................................................................... |
2 |
|
1.1.1 Management in the Same Subnet.................................................................................................................. |
2 |
|
1.1.2 Management in Different Subnets................................................................................................................. |
3 |
1.2 |
Install the EAP Controller........................................................................................................................................... |
3 |
|
1.2.1 Installation on Windows Host.......................................................................................................................... |
3 |
|
1.2.2 Installation on Linux Host.................................................................................................................................. |
4 |
1.3 |
Inform the EAPs of the Controller Host's Address........................................................................................... |
5 |
1.4 |
Start and Log in to the EAP Controller.................................................................................................................. |
6 |
|
1.4.1 Launch the EAP Controller............................................................................................................................... |
6 |
|
1.4.2 Do the Basic Configurations............................................................................................................................ |
7 |
|
1.4.3 Log in to the Management Interface............................................................................................................. |
9 |
1.5 |
Create Sites and Adopt EAPs................................................................................................................................... |
9 |
|
1.5.1 Create Sites............................................................................................................................................................ |
9 |
|
1.5.2 Adopt the EAPs.................................................................................................................................................. |
10 |
1.6 |
Monitor and Manage the EAPs.............................................................................................................................. |
11 |
2 Monitor and Manage the Network......................................................................... |
12 |
|
2.1 |
Monitor the Network with the Map...................................................................................................................... |
13 |
|
2.1.1 Add a Map............................................................................................................................................................ |
13 |
|
2.1.2 Monitor the EAPs on the Map....................................................................................................................... |
15 |
2.2 |
View the Statistics of the Network...................................................................................................................... |
16 |
|
2.2.1 View the Client Distribution on SSID.......................................................................................................... |
16 |
|
2.2.2 Have a Quick Look at EAPs and Clients.................................................................................................... |
16 |
|
2.2.3 View Current Usage-Top EAPs.................................................................................................................... |
17 |
|
2.2.4 View Recent Activities..................................................................................................................................... |
17 |
2.3 |
Monitor and Manage the EAPs.............................................................................................................................. |
18 |
|
2.3.1 Manage the EAPs in Different Status........................................................................................................ |
18 |
|
2.3.2 View the Detailed Information of EAPs..................................................................................................... |
19 |
|
2.3.3 Manage the EAPs in the Action Column................................................................................................... |
19 |
2.4 |
Monitor and Manage Clients.................................................................................................................................. |
20 |
|
2.4.1 View the Current Information of Clients................................................................................................... |
20 |
|
2.4.2 Manage Clients in the Action Column....................................................................................................... |
20 |
2.5 |
View Clients Statistics During the Specified Period .................................................................................... |
21 |
|
2.5.1 Select a Specified Period............................................................................................................................... |
21 |
|
2.5.2 View the History Information of Clients.................................................................................................... |
21 |
|
2.5.3 Manage Clients in the Action Column....................................................................................................... |
22 |
2.6 |
Manage the Rogue APs List................................................................................................................................... |
22 |
|
2.6.1 Manage the Untrusted Rogue APs List..................................................................................................... |
22 |
|
2.6.2 Manage the Trusted Rogue APs List......................................................................................................... |
23 |
2.7 |
View Past Guest Authorization............................................................................................................................. |
24 |
2.8 |
View Logs..................................................................................................................................................................... |
24 |
2.9 |
View Alerts................................................................................................................................................................... |
25 |
3 Configure the EAPs Globally.................................................................................... |
26 |
|
3.1 |
Wireless Network...................................................................................................................................................... |
27 |
|
3.1.1 Add Wireless Networks................................................................................................................................... |
27 |
|
3.1.2 Configure Advanced Wireless Parameters............................................................................................. |
32 |
|
3.1.3 Configure Band Steering................................................................................................................................ |
33 |
3.2 |
Access Control........................................................................................................................................................... |
34 |
3.3 |
Portal Authentication............................................................................................................................................... |
35 |
|
3.3.1 No Authentication............................................................................................................................................. |
36 |
|
3.3.2 Simple Password............................................................................................................................................... |
40 |
|
3.3.3 Local User............................................................................................................................................................ |
43 |
|
3.3.4 Voucher................................................................................................................................................................. |
50 |
|
3.3.5 SMS........................................................................................................................................................................ |
57 |
|
3.3.6 Facebook.............................................................................................................................................................. |
61 |
|
3.3.7 External RADIUS Server.................................................................................................................................. |
62 |
|
3.3.8 External Portal Server...................................................................................................................................... |
66 |
3.4 |
Free Authentication Policy..................................................................................................................................... |
67 |
3.5 |
MAC Filter..................................................................................................................................................................... |
67 |
3.6 |
Scheduler..................................................................................................................................................................... |
69 |
3.7 |
QoS................................................................................................................................................................................. |
71 |
3.8 |
System........................................................................................................................................................................... |
74 |
|
3.8.1 Reboot Schedule............................................................................................................................................... |
74 |
|
3.8.2 Log Setting.......................................................................................................................................................... |
74 |
|
3.8.3 Device Account.................................................................................................................................................. |
76 |
|
3.8.4 LED.......................................................................................................................................................................... |
76 |
|
3.8.5 SSH......................................................................................................................................................................... |
77 |
|
3.8.6 Management VLAN.......................................................................................................................................... |
77 |
|
3.8.7 Backup&Restore................................................................................................................................................ |
78 |
|
3.8.8 Batch Upgrade................................................................................................................................................... |
78 |
4 Configure the EAPs Separately.............................................................................. |
79 |
|
4.1 |
View the Information of the EAP.......................................................................................................................... |
80 |
|
4.1.1 Overview............................................................................................................................................................... |
80 |
|
4.1.2 LAN......................................................................................................................................................................... |
80 |
|
4.1.3 Radio...................................................................................................................................................................... |
81 |
4.2 |
View Clients Connecting to the EAP................................................................................................................... |
81 |
|
4.2.1 User........................................................................................................................................................................ |
81 |
|
4.2.2 Guest...................................................................................................................................................................... |
82 |
4.3 |
Configure the EAP..................................................................................................................................................... |
82 |
|
4.3.1 Basic Config........................................................................................................................................................ |
82 |
|
4.3.2 IP Setting.............................................................................................................................................................. |
83 |
|
4.3.3 Radio...................................................................................................................................................................... |
83 |
|
4.3.4 Load Balance...................................................................................................................................................... |
85 |
|
4.3.5 WLANs................................................................................................................................................................... |
85 |
|
4.3.6 Trunk Settings.................................................................................................................................................... |
86 |
|
4.3.7 Rouge AP Detection......................................................................................................................................... |
86 |
|
4.3.8 Forget this AP..................................................................................................................................................... |
87 |
|
4.3.9 Local LAN Port VLAN Settings..................................................................................................................... |
87 |
5 Manage the EAP Controller...................................................................................... |
88 |
|
5.1 |
Information About the Software.......................................................................................................................... |
89 |
5.2 |
User Account............................................................................................................................................................... |
89 |
5.3 |
Controller Settings.................................................................................................................................................... |
90 |
|
5.3.1 Configure Controller Hostname/IP............................................................................................................. |
90 |
|
5.3.2 Configure Mail Server...................................................................................................................................... |
90 |
6 Application Example................................................................................................... |
92 |
|
6.1 |
Basic Configuration.................................................................................................................................................. |
93 |
6.2 |
Advanced Settings.................................................................................................................................................... |
93 |
|
6.2.1 Monitor the EAPs with Map........................................................................................................................... |
93 |
|
6.2.2 Configure Portal Authentication.................................................................................................................. |
94 |
|
6.2.3 Create a SSID for the Employees................................................................................................................ |
95 |
|
6.2.4 Configure Scheduler........................................................................................................................................ |
96 |

1 Quick Start
The EAP Controller is a management software for the TP-Link EAP devices. It allows you to centrally manage your EAP devices using a web browser. You can configure EAPs in batches and conduct real-time monitoring of each EAP in the network.
Follow the steps below to complete the basic settings of the EAP Controller.
1.Determine the Network Topology
2.Install the EAP Controller
3.Inform the EAPs of the Controller Host's Address
4.Start and Log in to the EAP Controller
5.Create Sites and Adopt the EAPs
6.Monitor and Manage the EAPs
1

1.1 Determine the Network Topology
There are two kinds of network topologies to centrally manage EAPs via the EAP Controller:
·The EAP Controller and EAPs are in the same subnet.
·The EAP Controller and EAPs are in different subnets.
Determine your management method according to your need and refer to the following introductions to build your network toplogy.
1.1.1 Management in the Same Subnet
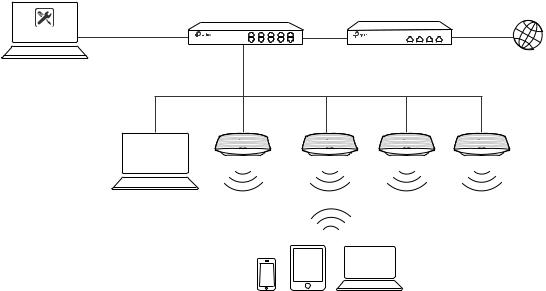
If your EAP Controller and EAPs are in the same subnet, refer to the following network topology.
A router acts as a DHCP server to assign IP addresses to EAPs and clients. EAP Controller should be installed on one host, which is called as Controller Host. The other hosts in the same LAN can access the Controller Host to manage the network. Taking the following topology as an example, you can enter “192.168.0.100:8043“ in a web browser on Host B to visit the EAP Controller interface on Host A. It's recommended to set a static IP address to the Controller Host for the convenient login to the EAP Controller interface.
Host A (Controller Host) |
|
|
|
|
|
|
|
|
|
|
|
|
||||||
IP: 192.168.0.100/24 |
|
Router (DHCP Server) |
|
|
|
|||||||||||||
|
|
|
|
|
|
|
|
|
Internet |
|||||||||
|
|
Layer 2 Switch |
|
LAN IP:192.168.0.1/24 |
||||||||||||||
EAP Controller |
|
|
|
|
|
|
|
|
|
|
|
|
|
|
|
|
|
|
|
|
|
|
|
|
|
|
|
|
|
|
|
|
|
|
|
|
|
|
|
|
|
|
|
|
|
|
|
|
|
|
|
|
|
|
|
|
|
|
|
|
|
|
|
|
|
|
|
|
|
|
|
|
|
|
|
|
|
|
|
|
|
|
|
|
|
|
|
|
|
|
|
|
|
|
|
|
|
|
|
|
|
|
|
|
|
|
|
|
|
|
|
|
|
|
|
|
|
|
|
|
|
|
|
|
|
|
|
|
|
|
|
|
EAPs
Host B
IP: 192.168.0.200/24
Clients
Note
··The EAP Controller must be running all the time when you manage the network.
··The EAP Controller can be running on only one host in a LAN. When other users in the LAN try to launch EAP Controller on their own hosts, they will be redirected to the host that is already running EAP Controller.
2
1.1.2 Management in Different Subnets
If your EAP Controller and EAPs are in different subnets, refer to the following topology.
A router acts as the gateway of the network. A layer 3 switch acts as a DHCP server to assign IP addresses to EAPs and clients. The Controller Host and the EAPs are connected to the switch's different network segments. To help the EAPs find the Controller Host, EAP Discover Utility should be installed on Host B which is in the same subnet with the EAPs. For how to use EAP Discovery Utility, refer to 1.3 Inform the EAPs the Controller Host's Address for detailed instructions.
Host A (Controller Host) |
Layer 3 Switch |
|
|
|
IP: 192.168.1.100/24 |
|
Router |
Internet |
|
|
(DHCP Server) |
|||
|
|
|||
EAP Controller |
192.168.1.0/24 |
LAN |
WAN |
|
|
|
192.168.2.0/24 |
|
|
EAPs
EAP
Discovery Utility
Host B
IP: 192.168.2.100/24
Clients
1.2 Install the EAP Controller
We provide EAP Controller for both Windows and Linux operating systems. Determine your operation system and follow the introductions below to install EAP Controller.
1.2.1 Installation on Windows Host
Make sure your PC meets the following system requirements and then properly install the EAP Controller software.
System Requirements
Operating System: Microsoft Windows XP/Vista/7/8/10.
Web Browser: Mozilla Firefox 32 (or above), Google Chrome 37 (or above), Opera 24 (or above), or Microsoft Internet Explorer 11 (or above).
3
Note
We recommend that you deploy the EAP controller on a 64-bit operating system to guarantee the software stability.
Install the EAP Controller
Download the installation file of EAP Controller from the website http://www.tp-link.com/en/ download/EAP-Controller.html. Then follow the instructions to properly install the EAP Controller software. After successful installation, a shortcut icon  of the EAP Controller will be created on your desktop.
1.2.2 Installation on Linux Host
Make sure your PC meets the following system requirements and then install the EAP Controller software.
System Requirements
Operating System: 64-bit Linux operating system, including Ubuntu 14.04/16.04/17.04, CentOS 6.x/7.x and Fedora 20 (or above).
Web Browser: Mozilla Firefox 32 (or above), Google Chrome 37 (or above), Opera 24 (or above), or Microsoft Internet Explorer 11 (or above).
Install the EAP Controller
Download the installation file of EAP Controller from our website http://www.tp-link.com/en/ download/EAP-Controller.html.
Follow the steps below to install EAP Controller on your Linux PC:
1. Make sure your PC is runnning in root mode. You can use this command to enter root mode: sudo
2. Extract the tar.gz file using the command:
tar zxvf EAP_Controller_v2.5.3_linux_x64.tar.gz
3. Install EAP Controller using the command: sudo ./install.sh
Tips
··To uninstall EAP Controller, go to the insatllation path: /opt/tplink/EAPController, and run the command: sudo ./uninstall.sh.
··During uninstallation, you can choose whether to backup the database.The backup folder is /opt/tplink/eap_ db_backup.
··During installation, you will be asked whether to restore the database if there is any backup database in the folder /opt/tplink/eap_db_backup.
4
1.3 Inform the EAPs of the Controller Host's Address
If your Controller Host and EAPs are in the same network segment, you can skip this section.
If your Controller Host and EAPs are in different subnets, you need to install EAP Discovery Utility on a host that is in the same network segment with the EAPs. EAP Discovery Utility can help the EAPs find the Controller Host.
System Requirements
WinXP/Vista/7/8/8.1/10/Server2008/Server2012
Mac OS X 10.7/10.8/10.9/10.10/10.11
Install and Use EAP Discovery Utility
Follow the steps below to install EAP Discovery Utility and use it to inform the EAPs of the Controller host's IP address:
1. Download the installation file from our website http://www.tp-link.com/en/download/EAP- Controller.html#EAP_Discovery_Tool. Then follow the instructions to properly install EAP Discovery Utility.
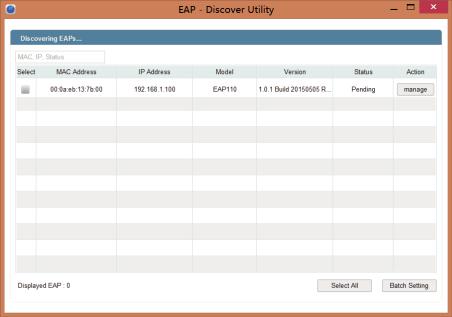
2. Open the EAP Discovery Utility and the following window will pop up. This window shows the information of all EAPs in the same LAN.
3. Click manage in the Action column or select multiple EAPs and click Batch Setting.
5
4. Enter the hostname or IP address of the Controller Host.
5. Enter the EAP’s username and password (both are admin by default).
6. Click Apply to inform the EAP of the Controller's hostname or IP address. And then the connection can be established between the EAP and the Controller Host.
1.4 Start and Log in to the EAP Controller
Launch the software on the Controller Host and follow the instructions to complete the basic configurations, and then you can log in to the management interface.
1.4.1 Launch the EAP Controller
Launch EAP Controller on Windows Host
To launch EAP Controller on a Windows host, double click the icon  and the following window will pop up. You can click Hide to hide this window but do not close it. After a while, your web browser will automatically open.
6
Note
··If your browser does not open automatically, click Launch a Browser to Manage Wireless Network. You can also launch a web browser and enter http://127.0.0.1:8088 in the address bar.
··If your web browser opens but prompts a problem with the website's security certificate, click Continue.
Launch EAP Controller on Linux Host
To launch EAP Controller on a Linux host, follow the steps below:
1. Start the EAP Controller service using the command: tpeap start.
2. Launch a web browser and enter http://127.0.0.1:8088 in the address bar to visit the web page of
EAP Controller.
Tips
You can also use the following commands to stop the service or view the service status: ··To stop the service: tpeap stop
··To view the service status: tpeap status
1.4.2 Do the Basic Configurations
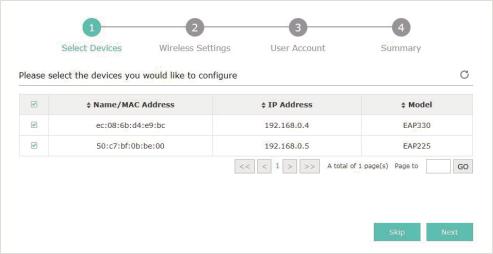
In the web browser you can see the configuration page. Follow the setup wizard to complete the basic settings for EAP Controller.
1. The EAP Controller displays all the detected EAPs in the network. Select the one or more EAPs to be managed and click Next.
2. Set the SSID name (wireless network name) and password for the EAPs to be managed. The EAP Controller will create two wireless networks, a 2.4GHz one and a 5GHz one both encrypted in the WPA2-PSK mode. Click Next.
7
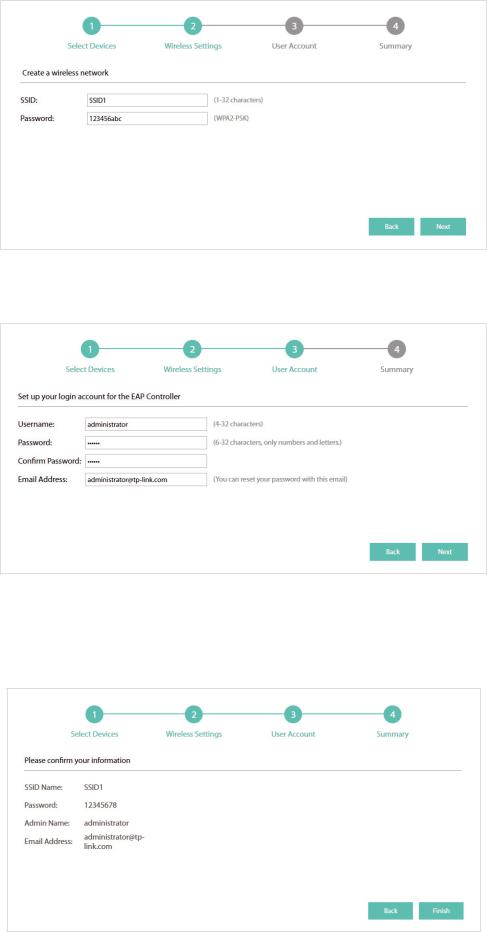
3. Specify a username and a password to create an administrator account. Specify the email address to receive the notification emails and reset your password if necessary. Click Next.
Note
After logging into the EAP Controller, please set a mail server so that you can receive the notification emails and reset your password in case that you forget the password. Please refer to Configure Mail Server.
4. Review your settings and click Finish.
8
1.4.3 Log in to the Management Interface
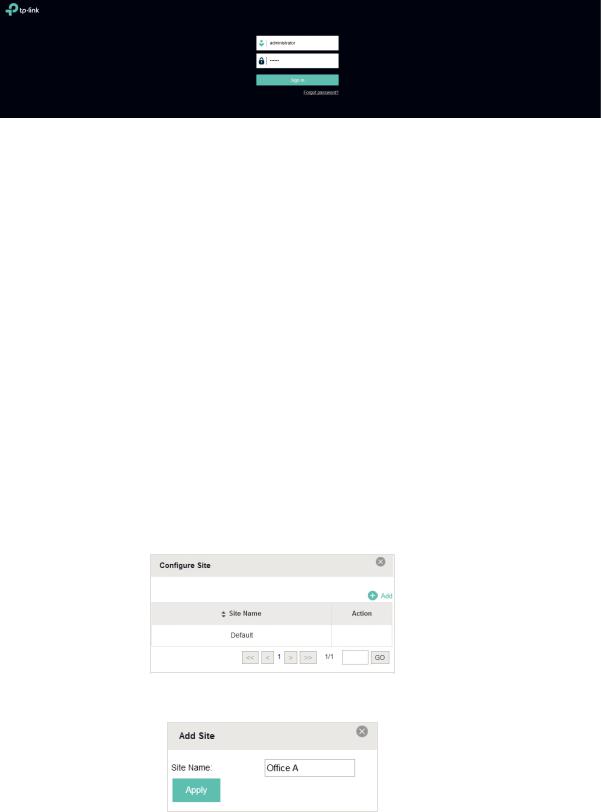
Once the basic configuration is finished, the browser will be redirected to the following page. Log in to the management interface of EAP Controller with the username and password you have set in the basic configuration.
Note:
In addition to the Controller Host, other hosts in the same LAN can also manage EAP devices via remote access to the Controller Host. For example, when the IP address of the Controller Host is 192.168.0.100 and the EAP Controller is running normally on this host, you can enter https://192.168.0.100:8043/login, or https://192.168.0.100:8043, or http://192.168.0.100:8088 in the web browser of other hosts in the same LAN
to log into the management interface and manage EAP devices.
1.5 Create Sites and Adopt EAPs
The EAP Controller can manage multiple EAP networks, which are called sites. Multiple sites are logically separated, and each site has its own configurations. There is an initial site named Default. If you have no need to manage EAPs with different sites, you can use the default site and skip the Create Sites section. However, Adopt the EAPs is a necessary step to manage the EAPs.
1.5.1 Create Sites
Follow the steps below to add sites.
1. Click  in the top left corner of the page and select
  , and then the following window will pop up.
2. Click and set a name for the site.
9
3. Click Apply to create the site.
1.5.2 Adopt the EAPs
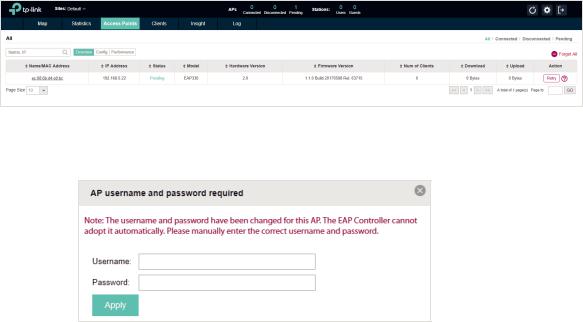
The EAP Controller can discover all EAP devices currently connected in the network and display their connection statuses. All the EAPs are in Pending status when first discovered by the EAP Controller. To manage the EAPs, you need to adopt them. In the quick setup process, the EAP Controller will automatically adopt the selected EAPs using the default username and password (both are admin). However, if you have changed the username or password of your EAPs before, the EAP Controller cannot automatically adopt the them.
To ensure that all EAPs are adopted, follow the steps below:
1. Select a site and go to Access Points > Pending. The table displays all the EAPs that have not been adopted.
2. Click the Retry button in the Action column and enter the current username and password of the EAP. Click Apply.
Tips
··If you have a new discovered EAP, you can click the Adopt button in the Action column to adopt the EAP. The EAP Controller will automatically adopt the EAP using the default username and password (both are admin).
··If you have multiple new discovered EAPs, and all of them have the default username and password (both are admin), you can click the Batch Adopt button to adopt them all at once. But if there are any EAPs with the Retry button, it means that the username and password of these EAPs have been changed. You need to first adopt them before batch adopt the rest EAPs.
3. Wait for a moment, the EAPs will be adopted and the status will change to Connected. All the EAPs’ username and password will become the same as those of the Controller's administrator account you created in the Basic Configuration.
Tips
If you want to change the EAPs' username and password, please refer to Device Account.
10
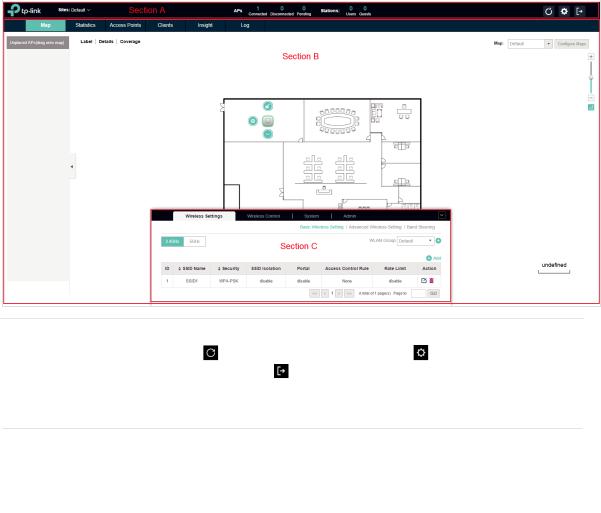
1.6 Monitor and Manage the EAPs
When all the configurations above are finished, you can centrally monitor and manage the EAPs via the EAP Controller's management interface. The management interface is mainly divided into three sections as the following screen.
Section A |
In Section A, you can check the status of EAPs and clients in the network. Also, |
|||
|
you can click |
to refresh the current page, click |
to globally configure the |
|
|
wireless network, and click |
to sign out from the management interface. |
||
Furthermore, the Sites allows you to group your EAPs and manage them in batches. To configure sites, refer to Create Sites.
|
Section B |
In Section B, you can centrally monitor and manage the EAPs and clients. |
|
|
|
|
|
|
Section C |
In Section C, you can globally configure the wireless network. The global |
|
|
|
configurations will take effect on all the adopted EAPs. |
|
11

2 Monitor and Manage the Network
With the EAP Controller you can monitor the EAP devices and centrally manage your wireless network. This chapter includes the following sections:
·Monitor the Network with the Map
·View the Statistics of the Network
·Monitor and Manage the EAPs
·Monitor and Manage Clients
·View Clients Statistics during the Specified Period
·Manage the Rogue APs List
·View Past Guest Authorization
·View Logs
·View Alerts
12
2.1 Monitor the Network with the Map
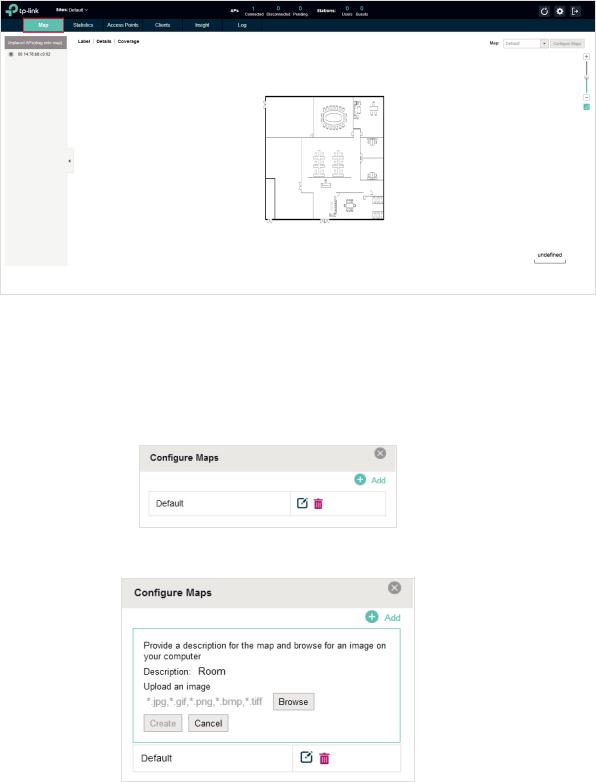
You can upload your local map images and monitor the status and coverage range of each EAP with the map. When you initially launch the EAP Controller, a default map is displayed as the following figure shows. Follow the instructions below to add your own map and manage the EAPs via the map.
2.1.1 Add a Map
Prepare a map image in .jpg, .gif, or .png format. And then follow the steps below to add the map to the EAP Controller.
1. Click Configure Maps on the upper right corner of map and click Add.
2. Enter the map description, select your map image, and click Create.
3. Select your local map from the drop-down list on the upper right corner of map area.
13
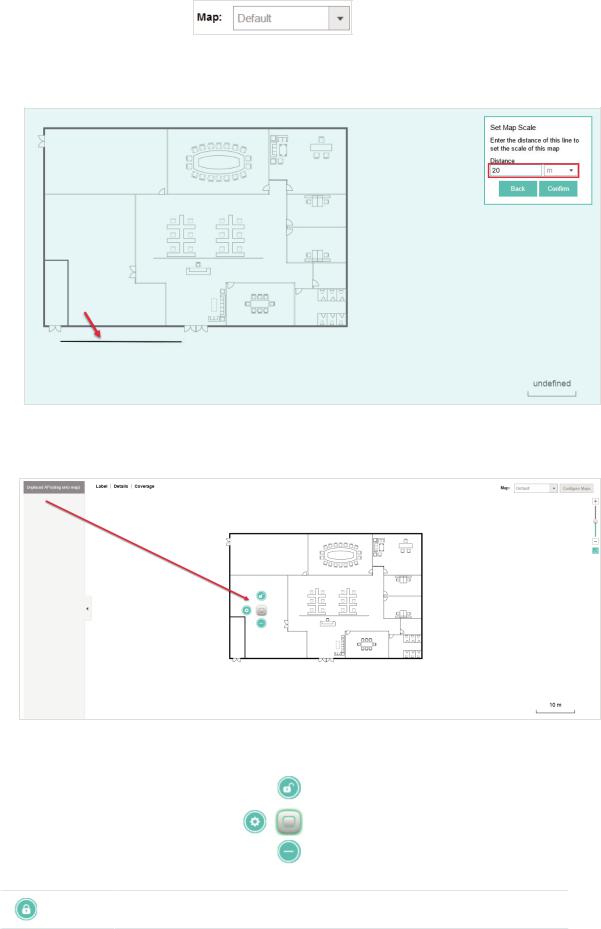
4. Click . Draw a line on the map and enter the distance the line represents. Then the EAP Controller will compute and generate the map scale automatically based on your configuration.
5. Drag the EAPs from the Unplaced APs list to the appropriate locations on the map according to their actual locations.
You can click  to reveal additional options:
Lock the selected EAP in the current location on the map.
14
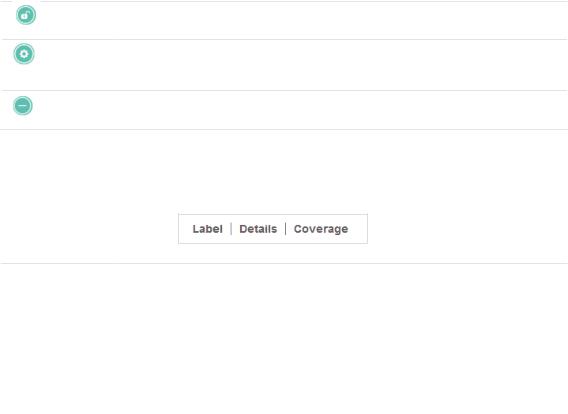
Unlock the selected EAP and you can drag it to another location.
Display the EAP's details and configure the wireless parameters. Refer to
Configure the EAPs Separately.
Remove the selected EAP back into the Unplaced APs list.
2.1.2 Monitor the EAPs on the Map
Click any of the following options to display EAP Label, Details, and Coverage on the map.
|
Label |
Display the EAP’s name. The default name is the MAC address of the EAP. |
|
|
|
|
|
|
Details |
Display the EAP’s name, MAC address, IP address, transmitting/receiving |
|
|
|
channel, number of connected users, and number of connected guests. |
|
|
Coverage |
Display a visual representation of the wireless range covered by EAPs. The |
|
|
|
actual signal coverage may be smaller than the visual coverage on the map |
|
|
|
because the obstacles around the EAPs will weaken the signal. |
|
15
2.2 View the Statistics of the Network
The EAP Controller collects all statistics of the managed EAPs and displays the statistical information via graphs, pie charts and tables, providing an overview of your wireless network.
2.2.1 View the Client Distribution on SSID
A visual pie chart represents the client distribution on each SSID. For example, the ssid_211 has one client, which occupies 50% of all the clients.
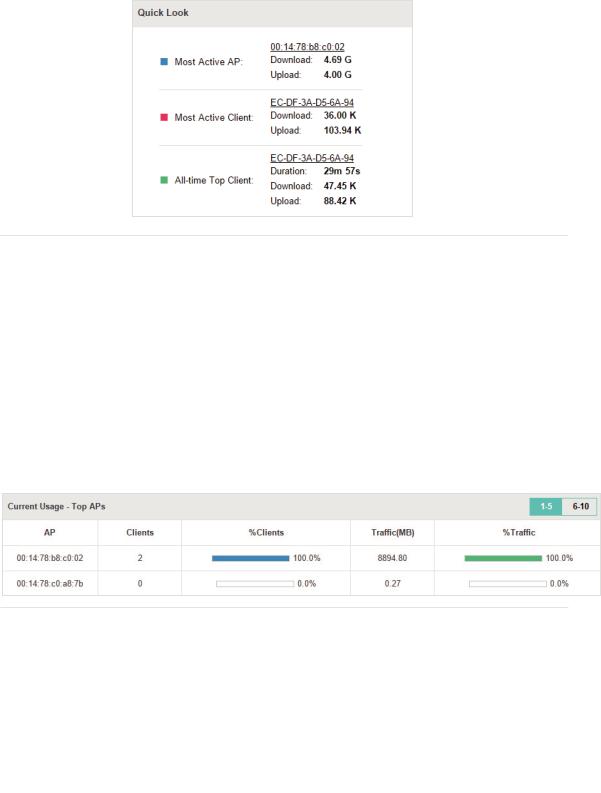
2.2.2 Have a Quick Look at EAPs and Clients
This tab displays the Most Active AP, the Most Active Clients and the All-Time Top Client. You can click the MAC address of the EAP or the client to see more details.
16
|
Most Active AP |
The current connected AP with the maximum traffic. |
|
|
|
|
|
|
Most Active |
The current connected client with the maximum traffic. |
|
|
Client |
|
|
|
All-time Top |
The client with the maximum traffic among all the clients that have ever |
|
|
Client |
accessed the EAP network. |
|
2.2.3 View Current Usage-Top EAPs
This tab lists the hostname, the number of connected clients and the data traffic condition of the ten APs with the most traffic currently.
|
Clients |
The amount of clients connected to this EAP. |
|
|
|
|
|
|
%Clients |
The proportion of current connected clients to the Top EAPs' total client |
|
|
|
amount. |
|
|
Traffic |
The total amount of data transmitted by this EAP, which equals the sum of the |
|
|
|
transmission traffic of all the current clients that connect to the AP. |
|
|
%Traffic |
The proportion of the EAP's current data transmission amount to the Top EAPs' |
|
|
|
total transmission amount. |
|
2.2.4 View Recent Activities
The Recent Activities statistics can be toggled between a view for the past specific 24 hours and one for the past specific 30 days.
17

The left ordinate axis indicates the traffic and the right one represents the number of the clients. The abscissa axis shows the selected time period. Traffic indicates a visual graph of the network traffic during the selected time period. Client indicates a visual graph of the number of the connected clients during the selected time period. For example, the statistics information at 10:00 indicates the traffic size and client number from 9:00 to 10:00. In the following figure, at 10 o’clock, the traffic is about 8 and there is 1 client connected to the AP.
2.3 Monitor and Manage the EAPs
The EAP Controller can discover all the EAP devices currently connected to the network and display the information about them on the Access Points page.
2.3.1 Manage the EAPs in Different Status
According to their connection status, all the EAPs are divided into three categories: connected, disconnected and pending. You can view the EAPs in different status on different pages:
|
All |
Displays the information of all the EAPs in different status. |
|
|
|
|
|
|
Pending |
Displays the pending EAPs. |
|
|
|
All the EAPs are in pending state by default when first discovered by the EAP |
|
|
|
Controller, and only after they are adopted and connected, you can monitor and |
|
|
|
manage them. To adopt pending EAPs, please refer to Adopt EAPs. |
|
18
|
Connected |
Displays the connected EAPs. |
|
|
|
Only connected EAPs can be managed. After you adopt a pending EAP, its status will |
|
|
|
become provisioning and then connected. A connected EAP will turn into a pending |
|
|
|
one after you forget this EAP. You can refer to Forget this AP to forget a EAP or click |
|
|
|
Forget All on the page to forget all the connected EAPs. |
|
|
Disconnected |
Displays the disconnected EAPs. |
|
|
|
If a connected or pending EAP powers off, it will be disconnected. When a |
|
|
|
disconnected EAP is reset to factory default settings or you forget it, it will turn into a |
|
|
|
pending one again. You can refer to Forget this AP to forget a EAP or click Forget All |
|
|
|
on the page to forget all the disconnected EAPs. |
|
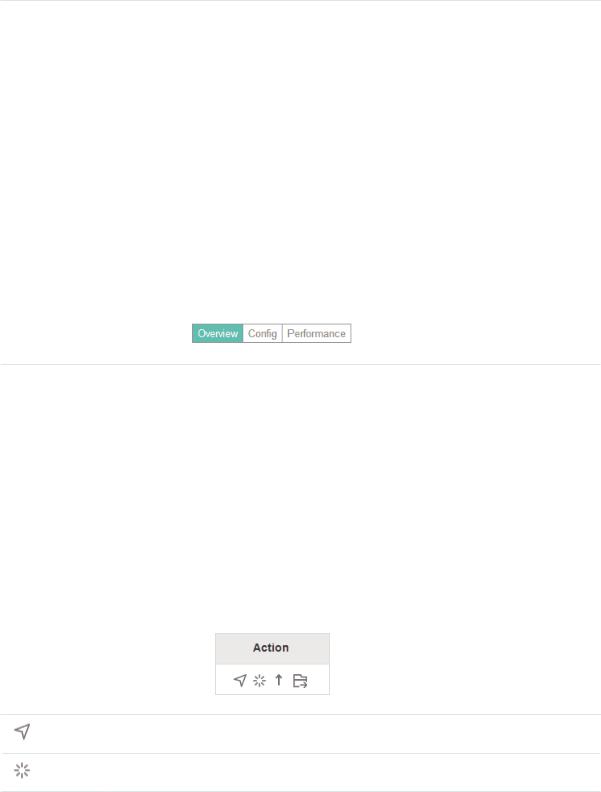
2.3.2 View the Detailed Information of EAPs
You can click Overview, Config, and Performance tab to view different detailed information of EAPs.
|
Overview |
Overview displays the EAP's name/MAC address, IP address, status, model, software |
|
|
|
version, number of connected clients and download/upload bytes. |
|
|
Config |
Config displays the EAP's name/MAC address, IP address, status, model, software |
|
|
|
version, WLAN Group bounded with the 2G and 5G of the EAP, and radio of the 2G and |
|
|
|
5G. |
|
|
Performance |
Performance displays the EAP's name/MAC address, IP address, status, model, |
|
|
|
software version, number of connected 2G clients and 5G clients, TX(Downloaded |
|
|
|
Traffic), RX(Uploaded Traffic), TX 2G and TX 5G. |
|
2.3.3 Manage the EAPs in the Action Column
You can execute the corresponding operation to the EAP by clicking an icon in the Action column.
Locate the EAP in the map.
Reboot the EAP.
19
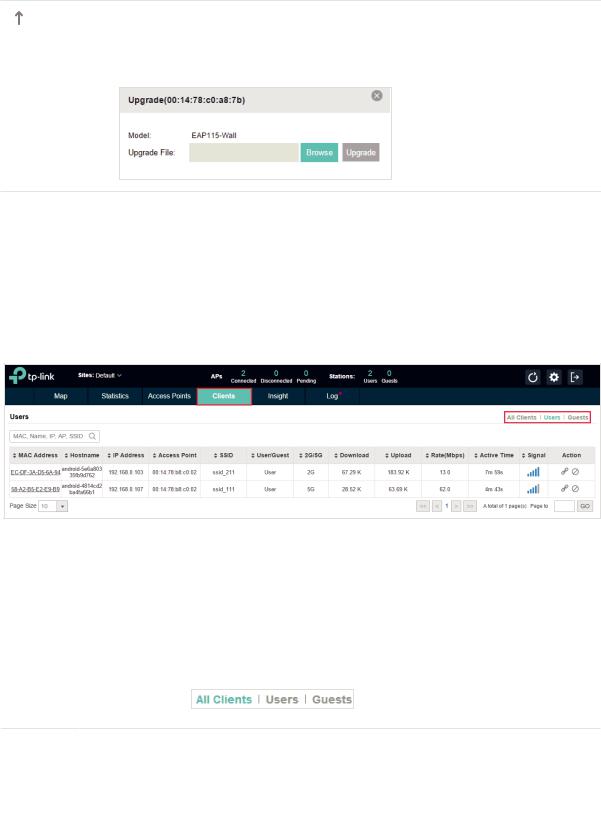
Upgrade the EAP.
Click Browse to locate and choose the upgrade file in your computer, then click Upgrade to install the latest EAP firmware. The Status will appear as Upgrading until the process is complete and the EAP reconnects to the EAP Controller.
Note
··Only managed EAPs can be rebooted or upgraded.
··If you want to login to the EAP's own management interface, you need to forget the EAP before that.
2.4 Monitor and Manage Clients
The Clients tab displays the clients connected to the EAP network.
2.4.1 View the Current Information of Clients
The clients are divided into two types: User and Guest. Users are the clients connected to the EAP wireless network without the Portal Authentication. Guests are the clients connected to the EAP wireless network with the Portal Authentication.
You can click the following tabs to respectively view the detailed information of users and guests.
|
All Clients |
The page will display the information of all clients including users and guests. |
|
|
|
|
|
|
Users |
The page will display the information of Users. |
|
|
|
|
|
|
Guests |
The page will display the information of Guests. |
|
|
|
|
|
2.4.2 Manage Clients in the Action Column
You can execute the corresponding operation to the EAP by clicking an icon in the Action column:
20
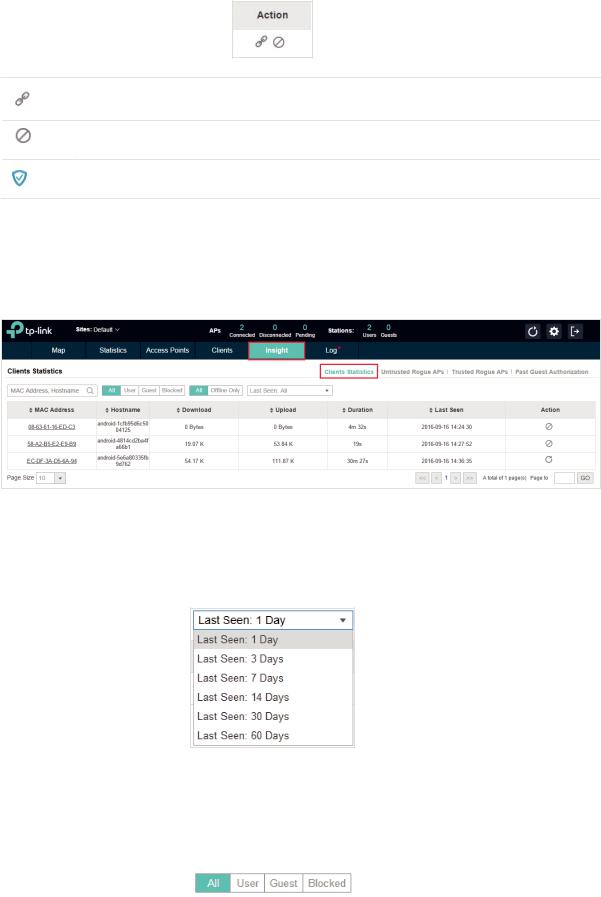
Reconnect the client to the network.
Restrict the client's access to the network.
If the client is Guest, you can click this icon to cancel the authorization for it.
2.5 View Clients Statistics During the Specified Period
The Clients Statistics page under the Insight tab displays the information of clients that have connected to the EAPs network during a specified period.
2.5.1 Select a Specified Period
Select a period from the drop-down menu. Then the page will display clients that have connected to the EAPs network during the period.
2.5.2 View the History Information of Clients
You can click the client's MAC address to get its connection history or click the following tabs to view the information of different types of clients:
21

|
All |
The page will display the history information of all the clients. |
|
|
|
|
|
|
User |
The page will display the history information of Users. |
|
|
|
Users are the clients connected to the EAP wireless network without the Portal |
|
|
|
Authentication. |
|
|
Guest |
The page will display the history information of Guests. |
|
|
|
Guests are the clients connected to the EAP wireless network with the Portal Authentication. |
|
|
|
|
|
|
Blocked |
The page will display the clients that have been blocked. |
|
|
|
|
|
|
All |
The page will display the history information of all clients. |
|
|
|
|
|
|
Offline Only |
The page will display the history information of the offline clients. |
|
|
|
|
|
2.5.3 Manage Clients in the Action Column
You can execute the corresponding operation to the EAP by clicking an icon in the Action column:
Block the client's access to the network.
Resume the client's access.
2.6 Manage the Rogue APs List
A Rogue AP is an access point that has been installed on a secure network without explicit authorization from a system administrator. The EAP Controller can scan all channels to detect all nearby EAPs. If rogue APs are detected, they will be shown on the Untrusted Rogue APs list. Besides, you can move the untrusted rogue APs to the Trusted Rogue APs list.
2.6.1 Manage the Untrusted Rogue APs List
The Untrusted Rogue APs page displays the detailed information of untrusted rogue APs.
22

You can execute the corresponding operation to the EAP by clicking an icon in the Action column:
Move the untrusted rogue AP to the Trusted Rogue APs list.
Delete this record.
Delete all records.
2.6.2 Manage the Trusted Rogue APs List
The Trusted Rogue APs page displays the detailed information of trusted rogue APs.
You can execute the corresponding operation to the EAP by clicking an icon in the Action column:
Move the trusted rogue AP to the Untrusted Rogue APs list.
Export and download the current Trusted Rogue APs list and save it on your PC.
23

Import a saved Trusted Rogue APs list. If the MAC address of an AP appears in list, it will not be detected as a rogue AP.
Please follow the steps below:
1. Select Replace (replace the current Trusted Rogue APs list with the one you import) or Merge (add the APs in the file to the current Trusted Rogue APs list).
2. Click Browse to locate the file and choose it. 3. Click Import to import the Trusted Rogue APs list.
2.7 View Past Guest Authorization
The Past Guest Authorization page displays the details about all the clients that accessed the network during a certain time period. You can select a period in the drop-down list.
2.8 View Logs
The logs of the EAP Controller can effectively record, classify and manage the system information of the managed EAPs, providing powerful support for network administrator to monitor network operation and diagnose malfunctions. The Logs page displays EAP's MAC address, level, occurred time and content.
24
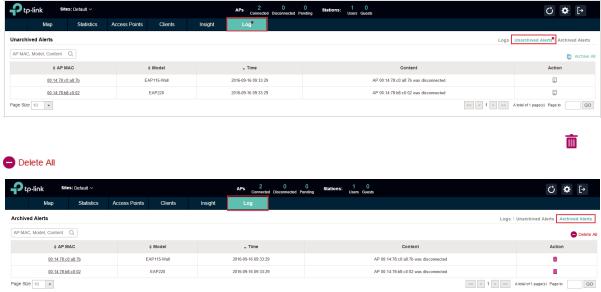
2.9 View Alerts
You can see the status change of your EAPs on the Unarchived Alerts page. You can click  or
or  to move unarchived alerts to the Archived Alerts page.
As follows, the Archived Alerts page displays the alerts archived by you. You can click |
or |
|
|
to delete the records. |
|
|
|
|
25
 Loading...