


User Guide
For TP-Link Omada Access Points
1910012768 REV4.6.0
June 2020
|
CONTENTS |
|
About This User Guide........................................................................................................ |
1 |
|
Overview.................................................................................................................................. |
3 |
|
1 Quick Start........................................................................................................................ |
4 |
|
1.1 |
Determine the Management Method.................................................................................................. |
5 |
1.2 |
Build the Network Topology................................................................................................................... |
6 |
1.3 |
Log In to the EAP......................................................................................................................................... |
7 |
|
1.3.1 Log In via a Wireless Connection................................................................................................ |
7 |
|
1.3.2 Log In via a Wired Connection....................................................................................................... |
9 |
1.4 |
Do the Basic Configurations................................................................................................................. |
11 |
1.5 |
Configure and Manage the EAP........................................................................................................... |
13 |
2 Configure the Network.............................................................................................. |
14 |
|
2.1 |
Configure the Wireless Parameters.................................................................................................. |
15 |
|
2.1.1 Configure SSIDs............................................................................................................................... |
16 |
|
2.1.2 Configure Wireless Advanced Settings.................................................................................. |
22 |
|
Radio Setting.................................................................................................................................... |
22 |
|
Load Balance.................................................................................................................................... |
24 |
|
Airtime Fairness............................................................................................................................... |
24 |
|
More Settings................................................................................................................................... |
25 |
2.2 |
Configure Portal Authentication......................................................................................................... |
26 |
|
Configure Portal............................................................................................................................................ |
27 |
|
Configure Free Authentication Policy................................................................................................... |
33 |
2.3 |
Configure VLAN........................................................................................................................................ |
35 |
2.4 |
Configure MAC Filtering......................................................................................................................... |
36 |
2.5 |
Configure Scheduler............................................................................................................................... |
38 |
2.6 |
Configure Band Steering....................................................................................................................... |
41 |
2.7 |
Configure QoS........................................................................................................................................... |
43 |
I
2.8 |
Configure Rogue AP Detection........................................................................................................... |
47 |
|
Detect Rogue APs and Move the Rogue APs to the Trusted AP List....................................... |
48 |
|
Manage the Trusted AP List..................................................................................................................... |
50 |
3 Monitor the Network................................................................................................... |
52 |
|
3.1 |
Monitor the EAP........................................................................................................................................ |
53 |
3.2 |
Monitor the Wireless Parameters....................................................................................................... |
54 |
|
Monitor the SSIDs......................................................................................................................................... |
55 |
|
Monitor the Radio Settings....................................................................................................................... |
56 |
|
Monitor Radio Traffic................................................................................................................................... |
56 |
|
Monitor LAN Traffic...................................................................................................................................... |
57 |
3.3 |
Monitor the Clients................................................................................................................................... |
58 |
|
View Client Information.............................................................................................................................. |
59 |
|
View Block Client Information.................................................................................................................. |
60 |
4 Manage the EAP........................................................................................................... |
61 |
|
4.1 |
Manage the IP Address of the EAP..................................................................................................... |
62 |
4.2 |
Manage System Logs.............................................................................................................................. |
64 |
|
View System Logs........................................................................................................................................ |
65 |
|
Configure the Way of Receiving Logs.................................................................................................. |
65 |
4.3 |
Configure Web Server............................................................................................................................ |
67 |
4.4 |
Configure Management Access.......................................................................................................... |
68 |
|
Configure Access MAC Management.................................................................................................. |
68 |
|
Configure Management VLAN................................................................................................................. |
69 |
4.5 |
Configure LED............................................................................................................................................ |
70 |
4.6 |
Configure Wi-Fi Control (Only for Certain Devices).................................................................... |
70 |
4.7 |
Configure PoE Out (Only for Certain Devices)............................................................................... |
71 |
4.8 |
Configure SSH........................................................................................................................................... |
72 |
4.9 |
Configure SNMP........................................................................................................................................ |
73 |
5 Configure the System................................................................................................ |
75 |
|
II
5.1 |
Configure the User Account................................................................................................................. |
76 |
5.2 |
Controller Settings................................................................................................................................... |
77 |
|
Enabling Cloud-Based Controller Management............................................................................... |
77 |
|
Configuring Controller Inform URL........................................................................................................ |
78 |
5.3 |
Configure the System Time.................................................................................................................. |
78 |
|
Configure the System Time...................................................................................................................... |
79 |
|
Configure Daylight Saving Time.............................................................................................................. |
81 |
5.4 |
Reboot and Reset the EAP.................................................................................................................... |
83 |
5.5 |
Backup and Restore the Configuration............................................................................................ |
84 |
5.6 |
Update the Firmware............................................................................................................................... |
84 |
6 Application Example................................................................................................... |
86 |
|
6.1 |
Determine the Network Requirements............................................................................................. |
87 |
6.2 |
Build the Network Topology................................................................................................................. |
87 |
6.3 |
Log in to the EAP....................................................................................................................................... |
88 |
6.4 |
Configure the EAP.................................................................................................................................... |
89 |
|
Configure SSIDs............................................................................................................................................ |
89 |
|
Configure Portal Authentication............................................................................................................. |
90 |
|
Configure Scheduler................................................................................................................................... |
92 |
6.5 |
Test the Network...................................................................................................................................... |
93 |
Appendix: Omada App.................................................................................................. |
96 |
|
1 |
Install Omada App on the Mobile Device......................................................................................... |
97 |
2 |
Manage and Monitor your EAP Device............................................................................................. |
97 |
III
About This User Guide
When using this guide, notice that features available in the EAP may vary by model and software version. Availability of the EAP may also vary by region or ISP. All images, steps, and descriptions in this guide are only examples and may not reflect your actual experience.
Some models featured in this guide may be unavailable in your country or region. For local sales information, visithttps://www.tp-link.com.
The information in this document is subject to change without notice. Every effort has been made in the preparation of this document to ensure the accuracy of the contents, but all statements, information, and recommendations in this document do not constitute the warranty of any kind, express or implied. Users must take full responsibility for their application of any product.
Conventions
Unless otherwise noted, the introduction in this guide takes EAP245 as an example.
Wireless Speed, Range and Connected Devices Disclaimer
Maximum wireless transmission rates are the physical rates derived from IEEE Standard 802.11 specifications. Range and coverage specifications along with the number of connected devices were defined according to test results under normal usage conditions. Actual wireless transmission rate, wireless coverage, and number of connected devices are not guaranteed, and will vary as a result of 1) environmental factors, including building materials, physical objects and obstacles, 2) network conditions, including local interference, volume and density of traffic, product location, network complexity, and network overhead and 3) client limitations, including rated performance, location, connection quality, and client condition.
MU-MIMO Disclaimer (for EAPs that support MU-MIMO)
MU-MIMO capability requires client devices that also support MU-MIMO.
Seamless Roaming Disclaimer (for EAPs that support Seamless Roaming)
Seamless roaming requires both the access point and client devices to support 802.11k and 802.11v protocols.
Lightning and Electro-Static Discharge Protection Disclaimer (for Outdoor EAPs)
Protection against lightning and electro-static discharge may be achieved through proper product setup, grounding and cable shielding. Refer to the instruction manual and consult an IT professional to assist with setting up this product.
1
More Info
Some models featured in this guide may be unavailable in your country or region. For local sales information, visithttps://www.tp-link.com.
For technical support, latest software, and management app, visithttps://www.tp-link.com/support.
The Quick Installation Guide can be found where you find this guide or inside the package of the
EAP.
The authentication information can be found where you find this guide.
Specifications can be found on the product page athttps://www.tp-link.com.
To ask questions, find answers, and communicate with TP-Link users or engineers, please visit https://community.tp-link.com to join TP-Link Community.
If you have any suggestions or needs on the product guides, welcome to email techwriter@tp-link.com.cn.
2
Overview
Omada series products provide wireless coverage solutions for small-medium business and households. They can either work independently as standalone APs or be centrally managed by Omada Software Controller, Omada Hardware Controller (OC200/OC300), or Omada Cloud-Based Controller, providing a flexible, richly-functional but easily configured wireless network for smallmedium business and households.
3

1 Quick Start
This chapter introduces how to build a wireless network using the EAPs and how to complete the basic settings. Follow the steps below:
1.Determine the Management Method
2.Build the Network Topology
3.Log In to the EAP
4.Configure and Manage the EAP
4
1.1 Determine the Management Method
Before building your network, choose a proper method to manage your EAP based on your actual network situation. The EAP can support two configuration options: Standalone Mode or Controller Mode.
■■Controller Mode
If you want to configure and manage a large-scale network centrally, which consists of mass devices such as access points, switches, and gateways, Controller Mode is recommended. In Controller Mode, the EAP can be centrally configured and monitored via Omada SDN Controller.
To prepare the EAP for Omada SDN Controller Management, refer toController Settings. For detailed instructions about the network topology in such situations and how to use Omada SDN Controller, refer to the User Guide of Omada SDN Controller. The guide can be found on the download center of our official website: https://www.tp-link.com/support/download/
■■Standalone Mode
If you have a relatively small-sized network and only one or just a small number of devices need to be managed, Standalone Mode is recommended. In Standalone Mode, the EAP can be singly configured and monitored via the GUI (Graphical User Interface, also called web interface in this text).
This User Guide introduces how to configure and monitor the EAP in Standalone Mode.
Note
The GUI is inaccessible while the EAP is managed by a controller. To turn the EAP back to Standalone Mode and access its GUI, you can forget the EAP on the controller or reset the EAP.
5

1.2 Build the Network Topology
To manage the EAPs in Standalone mode, refer to the following topology.
|
|
|
|
|
Switch |
Router (DHCP Server) |
|
|||||||||
|
|
|
|
|
LAN: 192.168.0.1 |
Internet |
||||||||||
|
|
|
|
|
|
|
|
|
|
|
|
|||||
|
|
|
|
|
|
|
|
|
|
|
|
|
||||
|
|
|
|
|
|
|
|
|
|
|
|
|
|
|
|
|
|
|
|
|
|
|
|
|
|
|
|
|
|
|
|
|
|
|
|
|
|
|
|
|
|
|
|
|
|
|
|
|
|
|
|
|
|
|
|
|
|
|
|
|
|
|
|
|
|
|
|
|
|
|
|
|
|
|
|
|
|
|
|
|
|
|
|
|
PC |
EAP |
EAP |
IP: 192.168.0.100 |
|
|
Clients
•The router is the gateway of the network, and devices in the LAN surf the internet via the router. At the same time, the router acts as a DHCP server to assign dynamic IP addresses to the EAPs and clients.
•The Layer 2 switch is connected to the LAN interface of the router.
•The PC and the EAPs are all connected to the Layer 2 switch. Since the PC and the EAPs are in the same network segment, the PC can log in to the web pages of the EAPs and manage them.
6
1.3 Log In to the EAP
The following sections introduce how to log in to the EAP via a wireless connection and a wired connection.
1.3.1 Log In via a Wireless Connection
To access the management web page via a wireless connection, you can use either the domain name or the IP address of the EAP. We recommend you to log in using the domain name for a wireless connection. In this method, you needn’t know the IP address of the EAP, but you need to prepare a wireless client device, such as a wireless laptop. Follow the steps below to log in to the EAP via domain name:
1. Set the wireless client device to get IP settings assigned automatically.
2. Search the default SSID (Network name) using your wireless client device and connect to the wireless network of the EAP. The default SSID of the EAP is printed on the product label at the bottom of the device. The dual-band EAP has two default SSIDs named TP-Link_2.4GHz_XXXXXX and TP-Link_5GHz_XXXXXX on the 2.4GHz band and 5GHz band, and the single-band EAP has a default SSID named TP-Link_2.4GHz_ XXXXXX on the 2.4GHz band.
7

3. Make sure that the wireless client has been assigned the IP address and has got the IP address of the DNS server and the gateway.
4. Launch a web browser on the client device and enter http://tplinkeap.net in the address bar to load the login page of the EAP. Use admin for both of the username and password to log in.
Tips
To facilitate access to the EAP via a wired device, you can set a static IP address for the EAP and remember it well or write it down. But make sure that this IP address is not being used in the same
LAN. For detailed instructions about how to set a static IP address for the EAP, refer toManage the IP Address of the EAP.
8

1.3.2 Log In via a Wired Connection
For a wired connection, you can only log in to the EAP via its IP address. In this method, you need to know the IP address of the EAP first. Follow the steps below to log in via the IP address of the EAP with a wired client. The method of log in via the IP address wirelessly is similar.
1. Get the IP address of the EAP. There are two methods.
•Log in to the router which acts as the DHCP server. In the DHCP client list, find the IP address of your EAP according to its MAC address. The MAC address can be found at the bottom of the EAP.
•Go to https://www.tp-link.com/download/EAP-Controller.html#EAP_Discovery_Tool to download EAP Discovery Utility. EAP Discovery Utility is a software that can scan all EAPs in the same network segment. Install and launch EAP Discovery Utility on the PC, and find the IP address of the EAP. In the following figure, the IP address of the
EAP is 192.168.0.5.
9
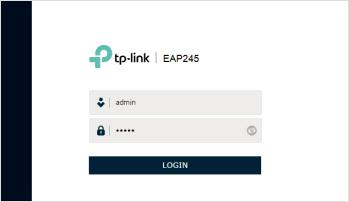
2. Launch a web browser and enter 192.168.0.5 in the address bar to load the login page of the EAP. Use admin for both of the username and password to log in.
Tips
••Some EAP models only works with certain software version of Discovery Utility. If your Discovery Utility can’t discover your EAP anyway, try a different software version.
••To facilitate access to the EAP via a wired device, you can set a static IP address for the EAP and remember it well or write it down. But make sure that this IP address is not being used in the same LAN. For detailed instructions about how to set a static IP address for the EAP, refer to Manage the IP Address of the EAP.
••The DHCP fallback IP address is 192.168.0.254 by default, which you can use to log in to its web management page when the DHCP server is not available in your network. Follow the steps below:
1.Connect the EAP to your computer with an Ethernet Cable.
2.Assign a static IP address 192.168.0.X (X ranges between 2 and 253) together with the subnet mask 255.255.255.0 to your computer.
3.Open a web browser and enter 192.168.0.254 in the address bar to load the login page of the
EAP.
10
1.4 Do the Basic Configurations
After Logging in to EAP, follow the step-by-step instructions to complete the basic configurations.
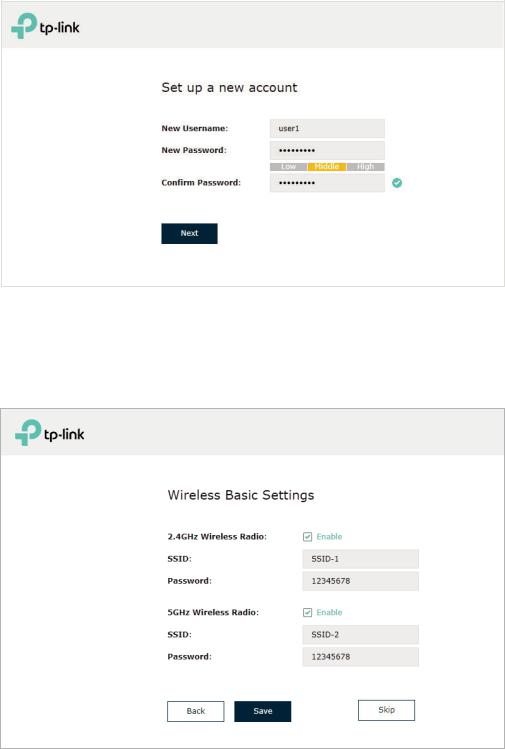
1. In the pop-up window, configure a new username and a new password for your user account, then click Next.
2. For the dual-band EAP, select at least one radio band between 2.4GHz and 5GHz to configure the SSID and password. For the single-band EAP, configure the SSID and password on the 2.4GHz band. Click Save. You can also skip this step and configure wireless settings later on the management page.
11

3. The following page will appear. Make sure that your device has connected to the new wireless network and tick the checkbox. Then click Finish.
Tips
If needed, you can also create more new SSIDs. For detailed instructions about how to create new SSIDs, refer toConfigure SSIDs.
12

1.5 Configure and Manage the EAP
After all the steps above are completed, the legal wireless clients can enjoy the internet via the EAP. Additionally, you can configure the advanced functions of the EAP according to your need, and manage it conveniently on the web page.
On the top of the page, you can click  to log out and click
  to open the technical support website.
There are four tabs: Status, Wireless, Management and System. The following table introduces what you can configure under each tab.
|
Status |
You can view the information of the EAP, wireless traffic and clients. |
|
|
|
|
|
|
Wireless |
You can configure the wireless parameters and the advanced features, such |
|
|
|
as Portal, VLAN, MAC Filtering, Scheduler, Band Steering, QoS and Rogue AP |
|
|
|
Detection. |
|
|
Management |
You can manage the EAP using the management features, such as System |
|
|
|
Logs, Web Server, Management Access, LED Control, SSH and SNMP. |
|
|
System |
You can configure the system parameters, including the login account and |
|
|
|
the system time. In addition, you can reboot and reset the EAP, backup and |
|
|
|
restore the configuration, and upgrade the EAP using the new firmware file. |
|
13

2 Configure the Network
This chapter introduces how to configure the network parameters and the advanced features of the EAP, including:
••Configure the Wireless Parameters
••Configure Portal Authentication
••Configure VLAN
••Configure MAC Filtering
••Configure Scheduler
••Configure Band Steering
••Configure QoS
••Configure Rogue AP Detection
14

2.1 Configure the Wireless Parameters
To configure the wireless parameters, go to the Wireless > Wireless Settings page.
For a dual-band EAP, there are two bands: 2.4GHz and 5GHz. The wireless parameters are separately set on each band. You can click  to select a band and configure the wireless parameters on this band.
15

Before configuring the wireless parameters on each band, check the box to enable 2.4GHz or 5GHz Wireless Radio. Only when this option is enabled will the wireless radio on 2.4GHz or 5GHz band works.
Demonstrated with 2.4GHz, the following sections introduce these contents: Configure SSIDs and Configure Wireless Advanced Settings.
2.1.1 Configure SSIDs
SSID (Service Set Identifier) is used as an identifier for a wireless LAN, and is commonly called as the “network name“. Clients can find and access the wireless network through the SSID. For one EAP, you can build up to eight SSIDs per frequency band.
16
Follow the steps below to create an SSID on the EAP: |
|
|
1. If your EAP is a dual-band device, click |
to choose a frequency band on |
|
which the new SSID will be created. |
|
|
2. Click |
to add a new SSID on the chosen band. |
|
Tips |
|
|
You can also click to edit the specific SSID which already exists in the list. And you can click to delete the SSID in the list.
3. Configure the following required parameters for this SSID:
SSID |
Specify a name for the wireless network. |
SSID Broadcast |
With the option enabled, EAP will broadcast the SSID to the nearby |
|
hosts, so that those hosts can find the wireless network identified by |
|
this SSID. If this option is disabled, users must enter the SSID manually |
|
to connect to the EAP. |
Security Mode |
Select the security mode of the wireless network. There are four |
|
options: |
|
None: Clients can access the wireless network without authentication. |
|
WEP/WPA-Enterprise/WPA-Personal: Clients need to pass the |
|
authentication before accessing the wireless network. For network |
|
security, we recommend that you encrypt your wireless network. The |
|
following sections will introduce how to configure these security modes. |
Guest Network |
With this option enabled, guest network will block clients from reaching |
|
any private IP subnet. |
Rate Limit |
With this option enabled, the download and upload rate of each client |
|
which connects to the SSID will be limited to balance bandwidth usage. |
|
You can limit the download and upload rate for some specific clients by |
|
configuring rate limit in client list, refer to View Client Information to get |
|
more details. |
|
Note that the download and upload rate will be limited to the smaller |
|
value if you set the limit value both in SSID and client configuration. |
4. Click OK to create the SSID.
Following is the detailed instructions about how to configure WEP, WPA-Enterprise and
WPA-Personal.
••WEP
WEP (Wired Equivalent Privacy) is a traditional encryption method. It has been proved that WEP has security flaws and can easily be cracked, so WEP cannot provide effective
17

protection for wireless networks. Since WPA-Personal and WPA-Enterprise are much safer than WEP, we recommend that you choose WPA-Personal or WPA-Enterprise if your clients also support them.
Note
WEP is not supported in 802.11n mode or 802.11ac mode. If WEP is applied in 802.11n, 802.11 ac or 802.11n/ac mixed mode, the clients may not be able to access the wireless network. If WEP is applied in 802.11b/g/n mode (2.4GHz) or 802.11a/n (5GHz), the EAP may work at a low transmission rate.
The following table detailedly introduces how to configure each item:
|
Type |
Select the authentication type for WEP. |
|
|
|
Auto: The EAP can select Open System or Shared Key automatically based |
|
|
|
on the wireless capability and request of the clients. |
|
|
|
Open System: Clients can pass the authentication and associate with |
|
|
|
the wireless network without password. However, correct password is |
|
|
|
necessary for data transmission. |
|
|
|
Shared Key: Clients have to input the correct password to pass the |
|
|
|
authentication, otherwise the clients cannot associate with the wireless |
|
|
|
network or transmit data. |
|
|
Key Selected |
Select one key to specify. You can configure four keys at most. |
|
|
|
|
|
|
WEP Key Format |
Select ASCII or Hexadecimal as the WEP key format. |
|
|
|
ASCII: With this format selected, the WEP key can be any combination of |
|
|
|
keyboard characters of the specified length. |
|
|
|
Hexadecimal: With this format selected, the WEP key can be any |
|
|
|
combination of hexadecimal digits (0-9, a-f, A-F) with the specified length. |
|
|
Key Type |
Select the WEP key length for encryption. |
|
|
|
64Bit: Enter 10 hexadecimal digits or 5 ASCII characters. |
|
|
|
128Bit: Enter 26 hexadecimal digits or 13 ASCII characters. |
|
|
|
152Bit: Enter 32 hexadecimal digits or 16 ASCII characters. |
|
18
Key Value |
Enter the WEP keys. The length and valid characters are determined by the |
|
key format and key type. |
••WPA-Enterprise
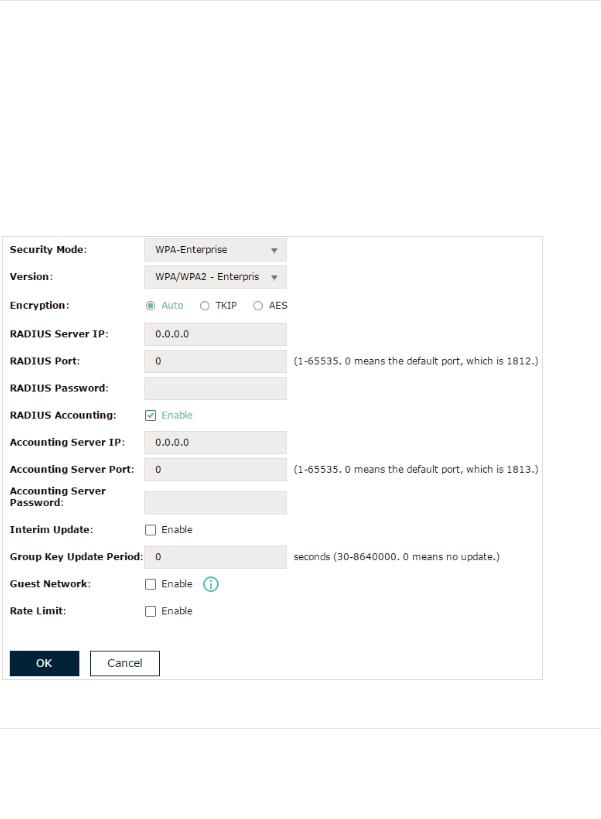
WPA-Enterprise (Wi-Fi Protected Access-Enterprise) is a safer encryption method compared with WEP and WPA-Personal. It requires a RADIUS server to authenticate the clients via 802.1X and EAP (Extensible Authentication Protocol). WPA-Enterprise can generate different passwords for different clients, which ensures higher network security. But it also costs more to maintain the network, so it is more suitable for business networks.
The following table introduces how to configure each item:
Version |
Select the version of WPA-Enterprise according to your needs. If you |
|
select WPA/WPA2-Enterprise, the EAP automatically decides whether |
|
to use WPA-Enterprise or WPA2-Enterprise during the authentication |
|
process. |
19

|
Encryption |
Select the Encryption type. Note that some encryption type is only |
|
|
|
available under certain circumstances. |
|
|
|
Auto: The default setting is Auto and the EAP will select TKIP or AES |
|
|
|
automatically based on the client device’s request. |
|
|
|
TKIP: Temporal Key Integrity Protocol. TKIP is not supported in |
|
|
|
802.11n mode, 802.11ac mode or 802.11n/ac mixed mode. If TKIP is |
|
|
|
applied in 802.11n, 802.11 ac or 802.11n/ac mixed mode, the clients |
|
|
|
may not be able to access the wireless network. If TKIP is applied in |
|
|
|
11b/g/n mode (2.4GHz) or 11a/n mode(5GHz), the device may work at |
|
|
|
a low transmission rate. |
|
|
|
AES: Advanced Encryption Standard. It is securer than TKIP. |
|
|
RADIUS Server IP |
Enter the IP address of the RADIUS Server. |
|
|
RADIUS Port |
Enter the port number of the RADIUS Server. |
|
|
RADIUS Password |
Enter the shared secret key of the RADIUS server. |
|
|
RADIUS Accounting |
Enable or disable RADIUS accounting feature. |
|
|
Accounting Server IP |
Enter the IP address of the accounting server. |
|
|
Accounting Server |
Enter the port number of the accounting server. |
|
|
Port |
|
|
|
Accounting Server |
Enter the shared secret key of the accounting server. |
|
|
Password |
|
|
|
Interim Update |
With this option enabled, you can specify the duration between |
|
|
|
accounting information updates. By default, the function is disabled. |
|
|
|
Enter the appropriate duration between updates for EAPs in Interim |
|
|
|
Update Interval. |
|
|
Interim Update |
With Interim Update enabled, specify the appropriate duration |
|
|
Interval |
between updates for EAPs. The default duration is 600 seconds. |
|
|
Group Key Update |
Specify an update period of the encryption key. The update period |
|
|
Period |
instructs how often the EAP should change the encryption key. 0 |
|
|
|
means that the encryption key does not change at anytime. |
|
20

••WPA-Personal
WPA-Personal is based on a pre-shared key. It is characterized by high safety and simple settings, so it is mostly used by common households and small businesses.
The following table introduces how to configure each item:
|
Version |
Select the version of WPA-Personal according to your needs. If you select |
|
|
|
WPA/WPA2-PSK, the EAP automatically decides whether to use WPA-PSK |
|
|
|
or WPA2-PSK during the authentication process. |
|
|
Encryption |
Select the Encryption type. Note that some encryption type is only available |
|
|
|
under certain circumstances. |
|
|
|
Auto: The default setting is Auto and the EAP will select TKIP or AES |
|
|
|
automatically based on the client device’s request. |
|
|
|
TKIP: Temporal Key Integrity Protocol. TKIP is not supported in 802.11n |
|
|
|
mode, 802.11ac mode or 802.11n/ac mixed mode. If TKIP is applied in |
|
|
|
802.11n, 802.11 ac or 802.11n/ac mixed mode, the clients may not be able |
|
|
|
to access the wireless network. If TKIP is applied in 11b/g/n mode (2.4GHz) |
|
|
|
or 11a/n mode(5GHz), the device may work at a low transmission rate. |
|
|
|
AES: Advanced Encryption Standard. It is securer than TKIP. |
|
|
Wireless |
Configure the wireless password with ASCII or Hexadecimal characters. |
|
|
Password |
••For ASCII, the length should be between 8 and 63 and the valid characters |
|
|
|
|
|
|
|
contain numbers, letters (case-sensitive) and common punctuations. |
|
|
|
••For Hexadecimal, the length should be between 8 and 64, and the valid |
|
|
|
characters contain: 0-9, a-f, A-F. |
|
|
Group Key |
Specify an update period of the encryption key. The update period instructs |
|
|
Update Period |
how often the EAP should change the encryption key. 0 means that the |
|
|
|
encryption key does not change at anytime. |
|
21

2.1.2 Configure Wireless Advanced Settings
Proper wireless parameters can improve the performance of your wireless network. This section introduces how to configure the advanced wireless parameters of the EAP, includingRadio Setting,Load Balance,Airtime Fairness and More Settings.
Radio Setting
Radio settings directly control the behavior of the radio in the EAP and its interaction with the physical medium; that is, how and what type of signal the EAP emits.
Select the frequency band (2.4GHz/5GHz) and configure the following parameters.
Wireless Mode |
Select the IEEE 802.11 mode the radio uses. |
|
••For 2.4GHz: |
|
802.11b/g/n/ax mixed: All of 802.11b, 802.11g, 802.11n, and 802.11ax |
|
clients operating in the 2.4GHz frequency can connect to the EAP. Note |
|
that 802.11ax is only available for certain devices. |
|
802.11b/g/n mixed: All of 802.11b, 802.11g, and 802.11n clients operating |
|
in the 2.4GHz frequency can connect to the EAP. |
|
802.11b/g mixed: Both 802.11b and 802.11g clients can connect to the |
|
EAP. |
|
802.11n only: Only 802.11n clients can connect to the EAP. |
|
••For 5GHz: |
|
802.11a/n/ac/ax mixed: All of 802.11a, 802.11n, 802.11ac, and 802.11ax |
|
clients operating in the 5GHz frequency can connect to the EAP. Note that |
|
802.11ax is only available for certain devices. |
|
802.11a/n/ac mixed: All of 802.11a, 802.11n, and 802.11ac clients |
|
operating in the 5GHz frequency can connect to the EAP. |
|
802.11n/ac mixed: Both 802.11n clients and 802.11ac clients operating in |
|
the 5GHz frequency can connect to the EAP. |
|
802.11ac only: Only 802.11ac clients can connect to the EAP. |
|
|
22

|
Channel Width |
Select the channel width of the EAP. The available options differ among |
|
|
|
different EAPs. |
|
|
|
For some EAPs, available options include 20MHz, 40MHz and 20/40MHz. |
|
|
|
For other EAPs, available options include 20MHz, 40MHz, 80MHz and |
|
|
|
20/40/80MHz. |
|
|
|
When the radio mode includes 802.11n, we recommend you set the channel |
|
|
|
bandwidth to 20/40 MHz or 20/40/80MHz to improve the transmission |
|
|
|
speed. However, you may choose a lower bandwidth due to the following |
|
|
|
reasons: |
|
|
|
••To increase the available number of channels within the limited total |
|
|
|
bandwidth. |
|
|
|
••To avoid interference from overlapping channels occupied by other |
|
|
|
devices in the environment. |
|
|
|
••Lower bandwidth can concentrate higher transmit power, increasing |
|
|
|
stability of wireless links over long distances. |
|
|
Channel Limit |
Check the box to enable the Channel Limit function. With this function |
|
|
|
enabled, the wireless frequency 5150MHz~5350MHz will be disabled. This |
|
|
|
function can influence the available options in Channel. |
|
|
|
This feature is only available on certain devices. To check whether your |
|
|
|
device supports this feature, refer to the actual web interface. |
|
|
Channel |
Select the channel used by the EAP. For example, 1/2412MHz means that |
|
|
|
the channel is 1 and the frequency is 2412MHz. |
|
|
|
By default, the channel is automatically selected, and we recommend that |
|
|
|
you keep the default setting. |
|
23
Tx Power (EIRP) |
Specify the transmit power value. |
|
If this value is set to be larger than the maximum transmit power that is |
|
allowed by the local regulation, the regulated maximum transmit power will |
|
be applied in the actual situation. |
|
Note: In most cases, it is unnecessary to use the maximum transmit power. |
|
Specifying a larger transmit power than needed may cause interference to |
|
the neighborhood. Also it consumes more power and reduces longevity of |
|
the device. |
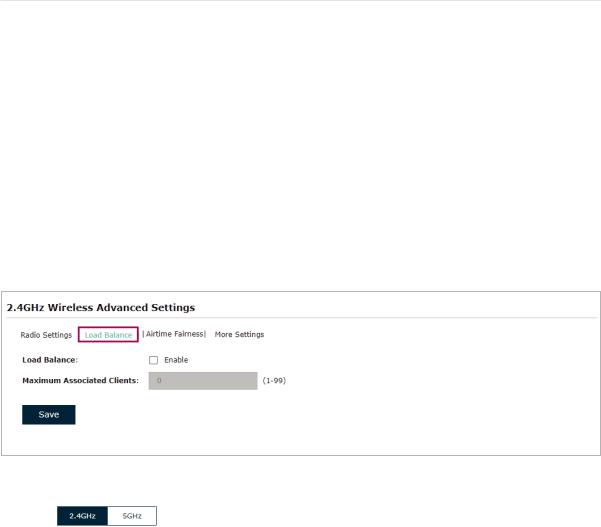
Load Balance
With the Load Balance feature, you can limit the maximum number of clients who can access the EAP. In this way, you can achieve rational use of network resources.
Follow the steps below to configure Load Balance:
1. Click |
to choose a frequency band on which the load balance feature will |
take effect. |
|
2. Check the box to enable Load Balance.
3. Specify the maximum number of clients who can connect to the EAP at the same time. While the number of connected clients has reached the limit and there are more clients requesting to access the network, the EAP will disconnect those with weaker signals.
4. Click Save.
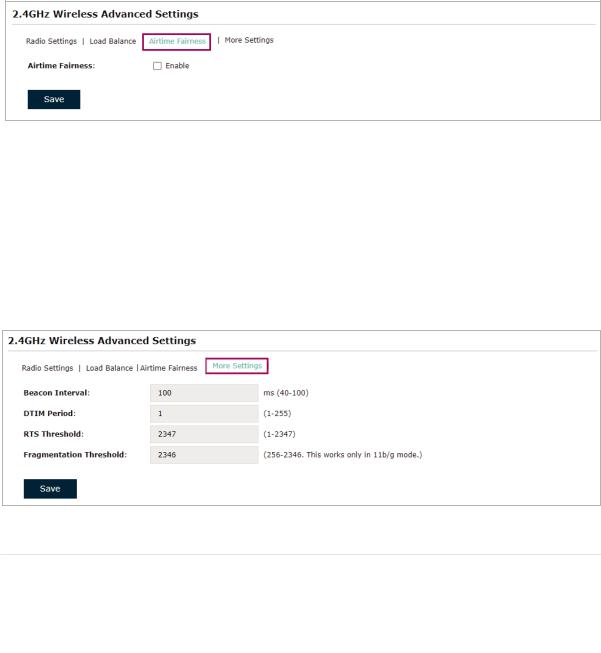
Airtime Fairness
Note
Airtime Fairness is only available on certain devices. To check whether your device supports this feature, refer to the actual web interface.
With Airtime Fairness enabled, each client connected to the EAP can get the same amount of time to transmit data, avoiding low-data-rate clients to occupy too much network bandwidth.
24
Compared with the relatively new client devices, some legacy client devices support slower wireless rate. If they communicate with the same EAP, the slower clients take more time to transmit and receive data compared with the faster clients. As a result, the overall wireless throughput of the network decreases.
Therefore we recommend you check the box to enable this function under multirate wireless networks. In this way, the faster clients can get more time for the data transmission and the network overall throughput can be improved.
Note
With Airtime Fairness enabled, 50 wireless clients at most can connect to the EAP in 2.4GHz band.
More Settings
Proper wireless parameters can improve the network’s stability, reliability and communication efficiency. The advanced wireless parameters consist of Beacon Interval, DTIM Period, RTS Threshold, and Fragmentation Threshold.
The following table introduces how to configure each item:
Beacon Interval |
Beacons are transmitted periodically by the EAP to announce the presence |
|
of a wireless network for the clients. Beacon Interval determines the time |
|
interval of the beacons sent by the EAP. |
|
You can specify a value between 40 and 100ms. The default is 100ms. |
|
|
25

|
DTIM Period |
The DTIM (Delivery Traffic Indication Message) is contained in some |
|
|
|
Beacon frames. It indicates whether the EAP has buffered data for client |
|
|
|
devices. The DTIM Period indicates how often the clients served by this |
|
|
|
EAP should check for buffered data still on the EAP awaiting pickup. |
|
|
|
You can specify the value between 1-255 Beacon Intervals. The default |
|
|
|
value is 1, indicating that clients check for buffered data at every beacon. |
|
|
|
An excessive DTIM interval may reduce the performance of multicast |
|
|
|
applications, so we recommend you keep the default value. |
|
|
RTS Threshold |
RTS/CTS (Request to Send/Clear to Send) is used to improve the data |
|
|
|
transmission efficiency of the network with hidden nodes, especially when |
|
|
|
there are lots of large packets to be transmitted. |
|
|
|
When the size of a data packet is larger than the RTS Threshold, the RTS/ |
|
|
|
CTS mechanism will be activated. With this mechanism activated, before |
|
|
|
sending a data packet, the client will send an RTS packet to the EAP to |
|
|
|
request data transmitting. And then the EAP will send CTS packet to inform |
|
|
|
other clients to delay their data transmitting. In this way, packet collisions |
|
|
|
can be avoided. |
|
|
|
For a busy network with hidden nodes, a low threshold value will help |
|
|
|
reduce interference and packet collisions. But for a not-so-busy network, a |
|
|
|
too low threshold value will cause bandwidth wasting and reduce the data |
|
|
|
throughput. The recommended and default value is 2347 bytes. |
|
|
Fragmentation |
The fragmentation function can limit the size of packets transmitted over |
|
|
Threshold |
the network. If the size of a packet exceeds the Fragmentation Threshold, |
|
|
|
the fragmentation function is activated and the packet will be fragmented |
|
|
|
into several packets. |
|
|
|
Fragmentation helps improve network performance if properly configured. |
|
|
|
However, a too low fragmentation threshold may result in poor wireless |
|
|
|
performance caused by the extra work of dividing up and reassembling |
|
|
|
of frames and increased message traffic. The recommended and default |
|
|
|
value is 2346 bytes. |
|
2.2 Configure Portal Authentication
Portal authentication provides authentication service to the clients that only need temporary access to the wireless network, such as the customers in a restaurant or in a supermarket. To access the network, these clients need to enter the authentication login page and use the correct login information to pass the authentication. In addition, you can customize the authentication login page and specify a URL which the authenticated clients will be redirected to.
In this module, you can also configure Free Authentication Policy, which allows the specific clients to access the specific network resources without authentication.
26
 Loading...