


 Loading...
Solid-State Memory
Camcorder
Operating Guide
4-745-818-11(1)
Table of Contents
Getting Started
Recording
Playback
Editing
Using the Menu
Troubleshooting
Additional Information
HXR-NX200
Read this first
Before operating this unit, please read this manual thoroughly, and retain it for future reference.
Precautions when using the camcorder
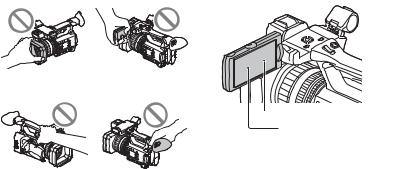
•Do not hold the camcorder by the following parts, and also do not hold the camcorder by the jack covers.
addition, over a long period of use, because of the physical characteristics of the liquid crystal display, such “stuck” pixels may appear spontaneously. These problems are not a malfunction. Note that any such problems have no effect on recorded data.
Lens hood |
LCD screen |
Microphone (sold |
Viewfinder |
separately) or |
|
Microphone holder |
|
b Notes
•The camcorder is not dustproof, dripproof or waterproof. See “About handling of your camcorder” (p. 112).
•When connecting the camcorder to another device with communication cables, be sure to insert the connector plug in the correct way. Pushing the plug forcibly into the terminal will damage the terminal and may result in a malfunction of the camcorder.
•Use the camcorder in accordance with the regulations of the place where you use it.
On the LCD screen and lens
•A menu item that is grayed out is not available under the current recording or playback conditions.
•The LCD panel fitted to this unit is manufactured with high precision technology, giving a functioning pixel ratio of at least 99.99%. Thus a very small proportion of pixels may be “stuck”, either always off (black), always on (red, green, or blue), or flashing. In
White, red, blue or green point
Black point
On sunlight
•Do not record the sun or leave the camcorder under the sun for a long time. The internal parts of the camcorder may be damaged. If sunlight is focused on a nearby object, it may cause a fire.
•Do not expose your camcorder’s viewfinder, lens, or LCD screen to the sun or strong light source for extended periods. Doing so may cause a malfunction of the camcorder.
•Do not attempt to record the sun directly. Doing so may cause a malfunction of the camcorder.
•Do not expose the lens to beams, such as laser beams.
That may damage the image sensor and cause the camera to malfunction.
On the temperature of your camcorder and battery pack
Your camcorder has a protective function that disables recording or playback if the temperature of your camcorder or battery pack is beyond the safely operable range. In this case, a message appears on the LCD screen or in the viewfinder (p. 102).
2
On recording
•In order to stabilize memory card operation, it is recommended that you format the memory card when you use it with your camcorder for the first time. All data recorded on the memory card will be erased by formatting, and cannot be recovered. Save important data on the memory card on other media, such as a computer, before formatting the memory card.
•Before starting to record, test the recording function to make sure the picture and sound are recorded without any problems.
•Compensation for the loss of the content of recordings or the loss of recording opportunities cannot be provided, even if recording or playback is not possible due to a malfunction of the camcorder, storage media, etc., or even if images or sounds are distorted due to the limits of the capabilities of the camcorder.
•TV color systems differ depending on the countries/regions. To view your recordings on a TV, a TV of the appropriate color system for the country/region is required.
•Television programs, films, video tapes, and other materials may be copyrighted. Unauthorized recording of such materials may be contrary to the copyright laws.
•Because of the way that the image device (CMOS sensor) reads out image signals, the following phenomena may occur.
–The subjects passing by the frame rapidly might appear crooked depending on the recording conditions. (This phenomenon may be notable in displays having high motion resolution.)
–Horizontal lines appear on the LCD screen during recording under fluorescent lights, sodium lamps or mercury lamps. The phenomena can be reduced by adjusting the shutter speed (p. 39).
Save all your recorded image data
•To prevent your image data from being lost, save all your recorded images periodically.
To handle the recorded images on your computer
Download “Catalyst Browse” software (p. 18).
Format the recording media using [MEDIA FORMAT] if images are not recorded or played back properly
If you continue recording and deleting images on recording media for a long period of time, the files on that recording media may be fragmented. As a result, you may not be able to record and save images properly. If this happens, save images on a PC, then format the recording media (p. 70).
About the operation of the camcorder
You can operate the camcorder using the V/v/B/ b/SET buttons (p. 72).
About this manual
•The on-screen displays in each local language are used for illustrating the operating procedures. Change the screen language before using your camcorder if necessary (p. 91).
•Design and specifications of recording media and other accessories are subject to change without notice.
3
Identifying Parts and Controls
Body
The numbers in ( ) are reference pages.
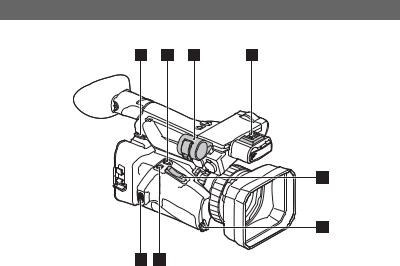
AHook for shoulder strap
BASSIGN4/LAST SCENE button (p. 56)
CMicrophone holder
DMulti-interface shoe (p. 44, 79)
EPower zoom lever (p. 32)
FGrip belt attachment
GASSIGN5/FOCUS MAG button (p. 33, 58)
HGrip belt attachment
4
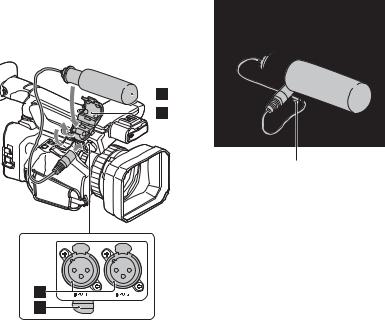
Attaching the microphone (sold separately)
This section explains how to connect an external microphone (sold separately).
Put the cable in the outer cable holder.
1Place the microphone Ainto the microphone holder B.
2Connect the plug of the microphone to the INPUT1 jack or INPUT2 jack C.
3Place the microphone cable into the cable holder D.
Continued , 5

Identifying Parts and Controls (Continued)
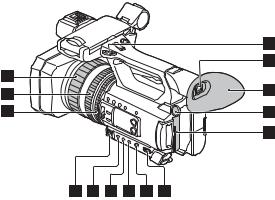
ALens (G lens)
BLens hood
CInternal microphone
DRemote control sensor (p. 91)
ERecording lamp (p. 91)
Flashes when remaining capacity of the memory card or battery becomes low.
FNIGHTSHOT light (p. 46)
GASSIGN1/WB SET button (p. 41, 58)
HASSIGN2/STATUS button (p. 58, 64)
IASSIGN3/LOW LUX button (p. 46, 58)
JDISPLAY button (p. 63)
KSLOT SEL button (p. 27)
LINPUT1 (LINE/MIC/MIC+48V) switch (p. 42)
MCH-1 (INT MIC/EXT/MI SHOE) switch (p. 42)
NAUTO/MAN (CH-1) switch (p. 43)
OAUDIO LEVEL (CH-1) dial (p. 43)
PAUDIO LEVEL (CH-2) dial (p. 43)
QAUTO/MAN (CH-2) switch (p. 43)
RCH-2 (INT MIC/EXT/MI SHOE) switch (p. 42)
SINPUT2 (LINE/MIC/MIC+48V) switch (p. 42)
TIRIS AUTO/MAN button (p. 38)
UFOCUS AUTO/MAN button (p. 33)
VND FILTER switch (p. 40)
6

Attaching the lens hood
Align the marks on the lens hood to those on the camcorder, and turn the lens hood in the direction of the arrow 2until it is locked.
z Tip
•If you attach or remove a 62 mm (2 1/2 in.) PL filter or MC protector, remove the lens hood.
Continued , 7

Identifying Parts and Controls (Continued)
AVIDEO OUT jack/AUDIO OUT jack (p. 65, 81)
BHDMI OUT jack (p. 65)
CMulti/Micro USB jack (p. 91)
DDC IN jack (p. 19)
ECable clamper/loop clamper
FHandle zoom lever (p. 32)
GHandle record button (p. 28)
HINPUT1 jack (p. 42)
IINPUT2 jack (p. 42)
JGrip belt
KTripod receptacles (1/4 inch, 3/8 inch) Supports 1/4-20UNC and 3/8-16UNC screws.
For mounting on a tripod (sold separately, screw length 5.5 mm or shorter)
The tripod may not be able to mount in some orientations, depending on the tripod specifications.
LSTART/STOP button (p. 28)
MPOWER/CHG lamp
About the cable clamper/loop clamper
Attaching the power cord, HDMI cable, and other cables, inserted in the corresponding connectors, in the cable clamper helps prevent the cords from being disconnected. However, not all HDMI cables are supported.
Attach any cables that are not in the cable clamper to the loop clamper at the bottom of the clamper using a cable tie or similar object.
8

 Cable clamper
Loop clamper
b Note
Do not use the cable clamper/loop clamper for any purpose other than securing cables (for example, attaching a strap for carrying the camcorder).
Continued , 9
Identifying Parts and Controls (Continued)
AFocus ring (p. 33)
BZoom ring (p. 32)
CIris ring (p. 38)
DHook for shoulder strap
EViewfinder (p. 24)
FLarge eyecup (p. 24)
GBATT RELEASE button (p. 20)
HBattery pack (p. 19)
ION/STANDBY switch (p. 22)
JFULL AUTO button (p. 45)
KSHUTTER button (p. 39)
LWHT BAL button (p. 41)
MGAIN button (p. 39)
NManual lever (p. 39, 41)
10
ALCD screen (p. 24)
BMENU button (p. 72)
CV/v/B/b/SET buttons (p. 72)
DTHUMBNAIL button (p. 60)
EMemory card slot A/Memory card access lamp (p. 26)
FMemory card slot B/Memory card access lamp (p. 26)
Gi (headphones) jack
HREMOTE jack (p. 91)
The REMOTE jack connects to a video deck or other devices used to control playback.
Continued , 11
Identifying Parts and Controls (Continued)
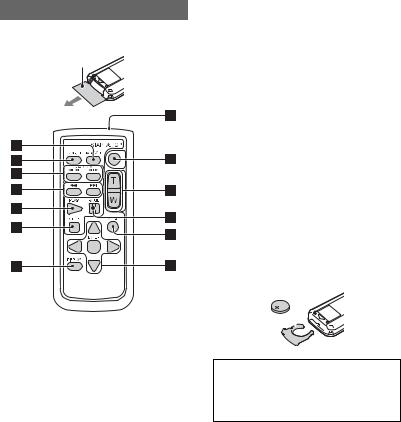
Wireless Remote Commander
Remove the insulation sheet before using the Wireless Remote Commander.
Insulation sheet
ADATA CODE button (p. 63)
BTC RESET button (p. 54)
CSCAN/SLOW buttons (p. 60)
D. > (PREV/NEXT) buttons (p. 60)
EPLAY button (p. 60)
FSTOP button (p. 60)
GDISPLAY button (p. 63)
HTransmitter
ISTART/STOP button (p. 28)
JPower zoom lever
KPAUSE button (p. 60)
LMODE button
Mb/B/v/V/ENTER buttons
b Notes
•Aim the Wireless Remote Commander towards the remote sensor to operate your camcorder.
•Point the remote sensor away from strong light sources such as direct sunlight or overhead lighting. Otherwise, the Wireless Remote Commander may not function properly.
•When you are operating with the Wireless Remote Commander supplied with your camcorder, your video device may also operate. In that case, select a commander mode other than DVD2 for your video device, or cover the sensor of your video device with black paper.
To change the battery of the Wireless Remote Commander
1While pressing on the tab, inset your fingernail into the slit to pull out the battery case.
2Place a new battery with the + side facing up.
3Insert the battery case until it clicks into place.
Tab 


WARNING
Battery may explode if mistreated. Do not recharge, disassemble or dispose of in fire.
•When the lithium battery becomes weak, the operating distance of the Wireless Remote Commander may shorten, or the Wireless Remote Commander may not function properly. In this case, replace the battery with a Sony CR2025 lithium battery. Use of another battery may present a risk of fire or explosion.
12
Screen Indicators
|
Center |
Upper left |
Upper right |
Bottom
Upper left
Indicator |
|
|
|
Meaning |
|||
100% |
|
Remaining battery |
|||||
|
|
|
|
|
|
|
|
|
|
|
|
. |
|
INTELLIGENT AUTO |
|
|
|
|
|
|
(face detection/scene |
||
|
|
|
|
|
|
|
|
|
|
|
|
|
|
|
detection/camera-shake |
|
|
|
|
|
|
|
detection) (p. 45) |
|
|
|
|
|
|
|
|
|
|
|
|
|
|
|
SCENE SELECTION |
|
|
|
|
|
|
|
(p. 45) |
|
|
|
|
|
|
|
|
|
|
|
|
|
|
|
REC FORMAT (p. 36) |
|
|
|
|
|
|
|
|
|
|
|
|
|
|
|
|
|
|
|
|
|
|
|
|
|
|
|
|
|
|
|
|
|
|
|
|
|
|
|
|
|
|
|
|
|
|
|
|
|
|
|
|
|
|
|
WIDE REC (p. 80) |
|
|
|
|
|
|
|
|
|
|
|
|
|
|
|
Optical zoom |
|
|
|
|
|
|
|
|
|
|
|
|
|
|
|
|
Z99 |
×1.2 |
|
Clear image zoom |
||||
Z99 |
×2.3 |
Digital zoom |
|||||
|
|
|
|
|
|
|
|
|
|
|
|
|
|
|
SIMUL/RELAY REC |
|
|
|
|
|
|
|
|
100-0001 |
|
|
Playback folder of |
||||
CLI_0001 |
memory card |
||||||
|
|
|
|
|
|
|
|
Center |
|
|
|
|
|||
|
|
|
|
|
|
|
|
Indicator |
|
|
|
Meaning |
|||
|
|
|
|
|
|
|
Recording media |
|
|
|
|
|
|
|
|
REC STBY |
Recording standby |
||||||
|
|
|
|
|
|
|
|
E |
|
|
|
Warning (p. 102) |
|||
NPlayback indicator (p. 60)
Processing
Relay recording
HDMI REC CONTROL
Upper right
Indicator Meaning
0min
Estimated remaining recording time
Recording/playback media
00:00:00:00
Time code (hour:minute:second:frame)
Bottom
Indicator |
|
|
Meaning |
|||||||||
|
|
|
|
|
|
|
|
Face detection [ON] |
||||
|
|
|
|
|
|
|
|
|
|
|
|
|
|
|
|
|
|
|
|
|
PEAKING (p. 85) |
||||
|
|
|
|
|
|
|
|
|
|
|
|
|
|
|
|
|
|
|
|
|
ZEBRA (p. 85) |
||||
|
|
|
|
|
|
|
|
|||||
|
|
|
|
|
|
|
|
|
|
|
|
|
|
|
|
|
|
|
|
|
|
|
|
|
STEADYSHOT |
|
|
|
|
|
|
|
|
|
|
|
|
|
|
|
|
|
|
|
|
|
(p. 79) |
||||
|
|
|
|
|
|
|
|
|
|
|
|
|
9 |
|
|
|
|
Manual focus (p. 33) |
|||||||
|
|
|
|
|
|
|
|
|
|
|
|
|
|
|
|
|
to |
|
|
PICTURE PROFILE |
|||||
|
|
|
|
|
|
(p. 47) |
||||||
|
|
|
|
|
|
|
|
|||||
|
|
|
|
|
|
|
|
|
|
|
|
|
F5.6 |
|
|
Iris (p. 38) |
|||||||||
|
|
|
|
|
|
|
|
|
|
|
|
|
9dB |
|
|
Gain (p. 39) |
|||||||||
|
|
|
|
|
|
|
|
|
|
|
|
|
100 180° |
|
|
Shutter speed (p. 39) |
|||||||||
|
|
|
|
|
|
|
|
AVCHD AUDIO |
||||
|
|
|
|
|
|
|
|
FORMAT (p. 82) |
||||
|
|
|
|
|
|
|
|
|||||
|
|
|
|
|
|
|
|
|
|
|
|
|
-2.0EV |
|
|
AE SHIFT (p. 78) |
|||||||||
|
|
|
|
|
|
|
|
|
|
|
|
|
|
|
|
|
|
|
|
|
Auto setting (p. 38) |
||||
|
|
|
|
|
|
|
|
|
|
|
|
|
|
|
|
|
n |
A |
White balance (p. 41) |
||||||
|
|
|
|
B |
|
|
||||||
|
|
|
|
|
|
|
|
|
|
|
||
|
|
|
|
|
|
|
|
|
|
|
|
|
|
|
|
|
|
|
|
|
HISTOGRAM (p. 84) |
||||
|
|
|
|
|
|
|
|
|||||
|
|
|
|
|
|
|
|
|
|
|
|
|
|
|
|
|
|
|
|
|
|
|
|
|
|
LOW LUX (p. 46)
AUDIO LEVEL
DISPLAY (p. 87)
Digital extender (p. 78)
NIGHTSHOT (p. 46)
ND filter (p. 40)
Continued , 13

Screen Indicators (Continued)
Indicator Meaning
Multi Interface Shoe video light (p. 79)
Manual volume adjustment (p. 44)
z Tip
•Indicators may look different or appear at different positions.
Data during recording
The recording date, time and condition are recorded automatically on the recording media.
They are not displayed while recording. However, you can check them by selecting
 (DISPLAY SET) t [DATA CODE] and choosing the data that you want to display, or by pressing the ASSIGN button to which the DATA CODE function is assigned, during playback.
14

Table of Contents
Read this first ........................................................................................... |
2 |
Identifying Parts and Controls .................................................................. |
4 |
Body ..................................................................................................... |
4 |
Wireless Remote Commander ........................................................... |
12 |
Screen Indicators ................................................................................... |
13 |
Getting Started |
|
Step 1: Checking supplied accessories .................................................. |
18 |
Step 2: Charging the battery pack .......................................................... |
19 |
Step 3: Turning on the camcorder and setting the date and time .......... |
22 |
Turning on the camcorder ................................................................. |
22 |
Setting the date and time ................................................................... |
22 |
Step 4: Adjusting the LCD screen and viewfinder .................................. |
24 |
Using the LCD screen ........................................................................ |
24 |
Using the viewfinder .......................................................................... |
24 |
Adjusting the viewfinder ..................................................................... |
24 |
Step 5: Preparing the recording media ................................................... |
26 |
Contents of Table
Recording |
|
Recording ............................................................................................... |
28 |
Recording movies .............................................................................. |
28 |
Continuous recording on the memory cards (Relay recording) ........ |
30 |
Recording movies using both the memory card A and B |
|
(Simultaneous recording) ................................................................... |
31 |
Changing the setting of the START/STOP button and handle record |
|
button ................................................................................................. |
31 |
Adjusting the zoom ............................................................................ |
32 |
Adjusting the focus ................................................................................. |
33 |
Using the focus magnifier .................................................................. |
33 |
Focusing on a detected face (Face detection) .................................. |
34 |
Changing the recording setting .............................................................. |
36 |
Selecting the file format and recording format ................................... |
36 |
Setting the output destination when recording in 4K mode ............... |
36 |
Setting DV MODE (DV mode) ............................................................ |
37 |
Adjusting the brightness ......................................................................... |
38 |
Adjusting the iris ................................................................................ |
38 |
Adjusting the gain .............................................................................. |
39 |
Adjusting the shutter speed ............................................................... |
39 |
Adjusting the volume of light (ND filter) ............................................. |
40 |
Adjusting the color tone .......................................................................... |
41 |
Adjusting the white balance ............................................................... |
41 |
Continued , 15 |
|

Table of Contents (Continued) |
|
Audio setup ............................................................................................ |
42 |
Recording sound from the internal microphone ................................. |
43 |
Recording sound from an external audio device ............................... |
43 |
Recording sound from a Multi Interface Shoe compatible microphone |
|
(sold separately) ................................................................................. |
44 |
Adjusting the recording level ............................................................. |
44 |
Useful functions ..................................................................................... |
45 |
Selecting suitable settings automatically (auto mode setting) ........... |
45 |
Shooting in dimly lit locations (LOW LUX) .......................................... |
46 |
Shooting in dark conditions (NIGHTSHOT) ........................................ |
46 |
Customizing the picture quality (Picture profile) ................................ |
47 |
Setting time data ................................................................................ |
54 |
Recording with the Slow & Quick Motion function ............................. |
55 |
Reviewing the most recently recorded scene (Last Scene |
|
Review) ............................................................................................... |
56 |
Assigning functions to the ASSIGN buttons ........................................... |
58 |
Playback |
|
Playback ................................................................................................ |
60 |
Playing back movies .......................................................................... |
60 |
Changing/checking the settings in your camcorder ............................... |
63 |
Changing the screen display ............................................................. |
63 |
Displaying recording data (Data code) .............................................. |
63 |
Checking the settings in your camcorder (Status check) .................. |
64 |
Connecting to a monitor or a TV ............................................................ |
65 |
Editing |
|
Protecting movies (Protect) .................................................................... |
68 |
Dividing a movie ..................................................................................... |
68 |
Deleting movies ..................................................................................... |
69 |
Formatting recording media ................................................................... |
70 |
Deleting all data from the memory card completely ............................... |
70 |
Repairing the image database file ......................................................... |
71 |
16

Using the Menu |
|
Operating the menu ................................................................................ |
72 |
Menu items ............................................................................................. |
74 |
(CAMERA SET) menu .................................................................... |
77 |
Settings to adjust your camcorder to the recording conditions |
|
( STEADYSHOT, etc.) |
|
(REC/OUT SET) menu ................................................................... |
80 |
Recording settings, input and output settings (REC SET/VIDEO OUT, etc.)
(AUDIO SET) menu .......................................................................... |
82 |
Settings for the audio recording (AVCHD AUDIO FORMAT, etc.)
(DISPLAY SET) menu ..................................................................... |
84 |
Display settings (MARKER/DISPLAY OUTPUT, etc.) |
|
(TC/UB SET) menu ......................................................................... |
88 |
Time code settings (TC PRESET/UB PRESET, etc.) |
|
(OTHERS) menu ............................................................................. |
90 |
Settings while recording or other basic settings (AREA SET/BEEP, etc.)
Troubleshooting |
|
Troubleshooting ...................................................................................... |
93 |
Warning indicators and messages ....................................................... |
102 |
Additional Information |
|
Recording time of movies ..................................................................... |
105 |
Using your camcorder abroad .............................................................. |
107 |
File/folder structure on the recording media ......................................... |
108 |
Maintenance and precautions .............................................................. |
109 |
About the XAVC S format ................................................................. |
109 |
About the AVCHD format ................................................................. |
109 |
About memory cards ....................................................................... |
109 |
About the “InfoLITHIUM” battery pack ............................................ |
110 |
About consumable parts .................................................................. |
112 |
About handling of your camcorder .................................................. |
112 |
Specifications ....................................................................................... |
115 |
Index ..................................................................................................... |
118 |
Contents of Table
17
Getting Started
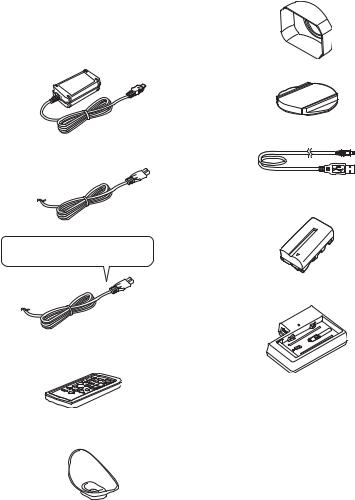
Step 1: Checking supplied accessories
Make sure that you have following items supplied with your camcorder. If, for any reason, there is something missing, contact your Sony dealer.
• Recording media are sold separately.
AC Adaptor (p. 19)
Power cord (mains lead) (p. 19)
IS1293 power cord for India.
Not supplied in some countries.
Wireless Remote Commander (RMT-845) (p. 12)
A button-type lithium battery is already installed.
Large eyecup (p. 24)
Lens hood (p. 7)
Lens cap (p. 28)
USB cable
Rechargeable battery pack (NP-F570)
Battery charger (BC-L1)
CD-ROM “Manuals for Solid-State Memory Camcorder”
Before Using This Unit
Software Downloads
When the unit is used with a PC connection, download any device drivers, plug-ins, and application software you require from the following websites.
18
Sony Professional products website:
U.S.A. |
http://pro.sony.com |
Canada |
http://www.sonybiz.ca |
Latin America |
http://sonypro-latin.com |
Europe, Middle East, and Africa http://www.pro.sony.eu http://www.sonybsc.com http://pro.sony-asia.com http://bp.sony.co.kr http://pro.sony.com.cn
Although the data regarding recorded materials are stored over multiple files and folders, you can easily handle the clips without considering its data and directory structure, by using the dedicated application software.
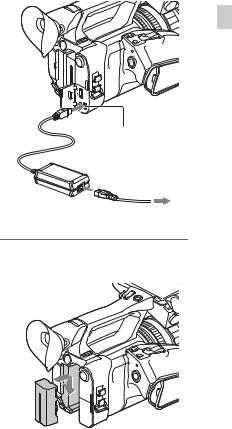
Step 2: Charging the battery pack
You can charge the “InfoLITHIUM” battery pack (L series) with the supplied AC Adaptor.
b Note
•You can use a large capacity battery pack, NPF970 (sold separately), with your camcorder.
Started Getting
DC plug |
DC IN jack
Power cord
AC Adaptor
To power outlet
1 Push the battery in and slide it down into position.
Continued , 19

Step 2: Charging the battery pack (Continued)
2 Connect the DC plug to the DC IN jack of the camcorder.
3 Connect the power cord (mains lead) to the AC Adaptor and the wall outlet (wall socket).
4 Turn the ON/STANDBY switch to STANDBY (1).
The CHG lamp lights up and charging starts.
When charging ends
The CHG lamp turns off when the battery is fully charged.
b Note
Even if the CHG lamp is not lit, the battery charger is not disconnected from the AC power source (mains) as long as it is connected to the wall outlet (wall socket).
Disconnect the AC Adaptor from the DC IN jack.
z Tip
•You can check the remaining battery life with the status check function (p. 64).
To remove the battery pack
Turn the ON/STANDBY switch to STANDBY (1). Press and hold the BATT RELEASE button, and slide the battery up and out.
BATT RELEASE button
To store the battery pack
If the battery pack is not in use for a while, run down the battery and store it (p. 111).
Charging time
Approximate time (minutes) required when you charge a fully discharged battery pack.
Battery pack |
Full charge time |
NP-F570 |
260 minutes |
|
|
20
Battery pack |
Full charge time |
NP-F970 (sold |
520 minutes |
separately) |
|
|
|
On the battery pack
•Always turn the ON/STANDBY switch to STANDBY (1) before changing the battery pack.
•The CHG lamp flashes during charging, or the Battery Info will not be correctly displayed under the following conditions.
–The battery pack is not attached correctly.
–The battery pack is damaged.
–The battery pack is worn-out.
Using a power outlet
You can use the AC Adaptor to obtain the AC power. While you are using the AC Adaptor, the battery pack will not lose its charge even when it is attached to your camcorder.
Perform the procedure up to step 3 of “Step 2: Charging the battery pack” (p. 19).
On the AC Adaptor
•Do not short-circuit the DC plug of the AC Adaptor or battery terminal with any metallic objects. This may cause a malfunction.
To charge the battery pack using the supplied battery charger (BC-L1)
DC plug
To power outlet
CHG lamp
Power cord
1 Connect the DC plug to the DC IN jack of the battery charger.
2 Connect the power cord (mains lead) to the AC Adaptor and the wall outlet (wall socket).
3 Push the battery in and slide it in the direction of the arrow in the diagram.
The CHG lamp lights up and charging starts.
When charging ends, the CHG lamp turns off.
Slide the battery pack out in the opposite direction and remove it from the battery charger.
b Note
Even if the CHG lamp is not lit, the battery charger is not disconnected from the AC power source (mains) as long as it is connected to the wall outlet (wall socket).
Started Getting
21
Step 3: Turning on the camcorder and setting the date and time
Turning on the camcorder
Turn the ON/STANDBY switch to ON ( ).
When you use your camcorder for the first time, the [CLOCK SET] screen appears.
To turn off the power
Turn the ON/STANDBY switch to STANDBY (1).
b Note
•If a warning message is displayed, follow the instructions.
Setting the date and time
Set the date and time when you use your camcorder for the first time.
z Tip
•If you do not use your camcorder for about 3 months, the built-in rechargeable battery gets discharged and the date and time settings may be cleared from the memory. In that case, charge the rechargeable battery and then set the date and time again (p. 113).
MENU button
V/v/B/b/SET buttons
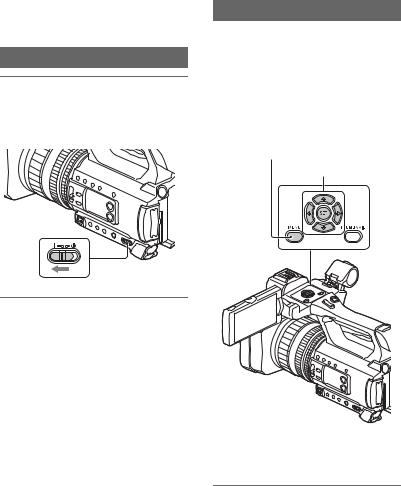
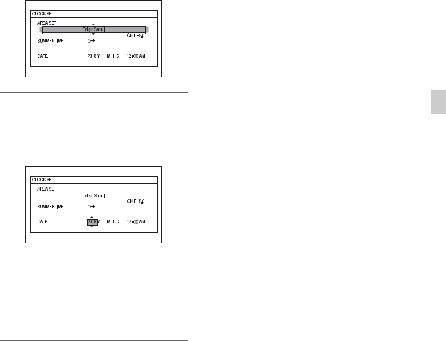
To set the date and time again, press the MENU button, and select  (OTHERS) t [CLOCK SET].
1 Select your area using the V/v/B/ b/SET button, then press the button.
22
2 Set [SUMMERTIME], [Y] (year), [M] (month), [D] (day), hour and minute, using the V/v/B/b/SET button, then press the button.
The clock starts.
•Set [SUMMERTIME] to [ON] to move the time forward 1 hour.
•You can set any year up to the year 2037.
•Midnight is indicated as 12:00 AM, and noon as 12:00 PM.
z Tip
•The date and time are automatically recorded on the selected recording media, and can be displayed during playback (p. 87).
Started Getting
23
Step 4: Adjusting the LCD screen and viewfinder
Using the LCD screen
The LCD screen can be rotated in the range as illustrated below, allowing a person other than the camera operator to see the image.
1 Open 180°
2 90° (max.)
2 180° (max.)
Using the viewfinder
Closing the LCD screen switches the display to the viewfinder.
You can adjust the angle of the viewfinder to suit your shooting style.
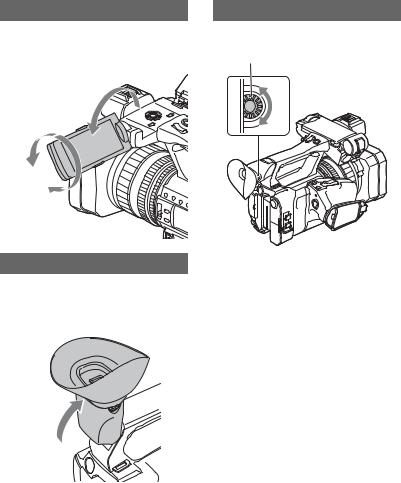
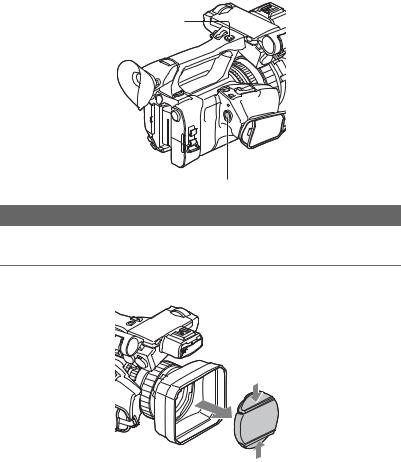
Adjusting the viewfinder
Diopter adjustment dial
Move it until the picture becomes clear.
b Note
•Some primary colors may become visible in the viewfinder if you change your line of sight, but this is not a malfunction.
These colors are not recorded onto the memory cards.
When the picture in the viewfinder is hard to see
If you cannot see the picture in the viewfinder clearly under bright circumstances, use the supplied large eyecup. To attach the large eyecup, stretch it slightly and fit it over the groove of the eyecup attached to the camcorder. You can attach the large eyecup facing either the right or left side.
b Note
The LCD screen and the viewfinder do not operate at the same time.
24
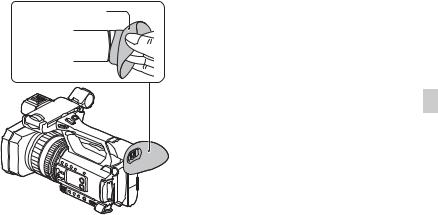
Large eyecup (supplied) 
Started Getting
b Note
•Do not remove the eyecup pre-attached to the camcorder.
25
Step 5: Preparing the recording media
SD card
File format |
Supported memory cards |
||
|
|
SD/SDHC/SDXC memory cards |
|
AVCHD |
|
(Class 4 or U1 or faster) |
|
|
|
||
S&Q MOTION |
SDHC/SDXC memory cards |
||
|
|||
|
|
(Class 10 or U1 or faster) |
|
|
|
|
|
XAVC S HD |
SDXC memory cards |
||
(Class 10 or U1 or faster) |
|||
|
|
||
|
|
|
|
|
60Mbps or slower |
SDXC memory cards |
|
|
(Class 10 or U1 or faster) |
||
XAVC S 4K |
|||
|
100Mbps |
SDXC memory cards (U3) |
|
|
|
||
DV |
SD/SDHC/SDXC memory cards |
||
|
|
(Class 6 or faster) |
|
|
|
||
“Memory Stick” media |
|
||
|
|
|
|
File format |
Supported memory cards |
||
AVCHD |
Memory Stick PRO Duo (Mark2), Memory |
||
Stick PRO-HG Duo |
|||
|
|
||
|
|
||
DV |
Memory Stick PRO-HG Duo |
||
|
|
|
|
b Notes
•Operation with all memory cards is not assured.
•Only “Memory Stick PRO Duo” media, which is half the size of standard “Memory Stick” media, or standard size SD cards can be used with this camcorder.
•See page 105 for the recording time of memory cards.
•Movies recorded on SDXC memory cards can be imported to or played back on other equipment, such as a computer or A/V device, by connecting the camcorder to the equipment with the USB cable. However, the equipment must support the exFAT file system used for SDXC memory cards. Confirm in advance that the connecting equipment is supporting the exFAT file system. If you connect equipment not supporting the exFAT file system and the format screen appears, do not perform the format. All the data recorded will be lost.
•If unsupported media is used, you may be able to record without an error message being displayed on the screen, but the recorded data is not guaranteed.
26
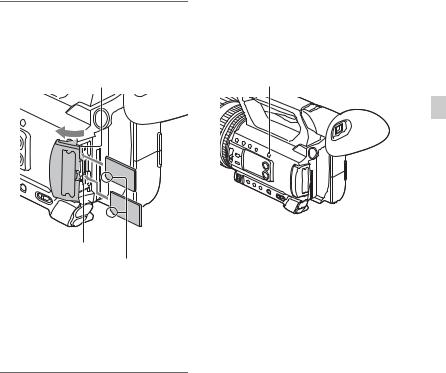
Open the cover, and insert the memory card with the notched corner in the direction as illustrated until it clicks into place.
Memory card slot A
Memory card slot B
Note the direction of the notched corner.
•If you insert a memory card into the slot in the wrong direction, the memory card, the memory card slot, or image data may be damaged.
•Memory card slot A accepts either “Memory Stick PRO Duo” media or an SD card. Memory card slot B accepts an SD card only.
To eject a memory card
Lightly push the memory card once.
b Notes
•If “The image database file is corrupted. The media must be restored to use again.” appears, format the memory card (p. 70).
•When inserting or ejecting the memory card, be careful of the memory card popping out and dropping.
Selecting the memory card slot to be used for recording
Press the SLOT SEL button to change which slot is selected for recording. You can confirm the selected slot on the screen.
SLOT SEL button
Started Getting
b Notes
•You can only select a slot that already has a memory card inserted.
•While movies are being recorded on the memory card, you cannot switch the slot even if you press the SLOT SEL button.
z Tip
•When only one slot has a memory card inserted, the slot that has the memory card is selected automatically.
If a repair memory card prompt screen appears
There may have been a problem recording to the memory card during the most-recent recording. Select [OK] to repair the card to the extent possible. Select [CANCEL] to continue without repairing.
b Notes
•Correct repair may not be possible, even when repair is executed.
•Repair is not supported if an error occurs when recording in XAVC S format.
27
Recording
Recording
Handle record button 
START/STOP button
Recording movies
Your camcorder records movies on a memory card. The factory setting for recording movies is AVCHD. Do the following steps to record movies.
1 Press the latches on both sides of the lens cap and remove it.
28
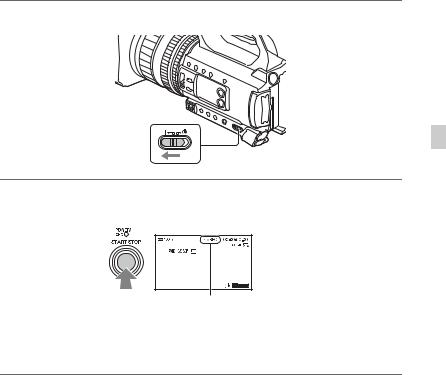
2 Turn the ON/STANDBY switch to ON ( ).
3 Press the START/STOP button (or the handle record button) to start recording.
Recording
[STBY] t [REC]
The recording lamps light up during recording.
To stop the movie recording, press the START/STOP button or the handle record button again.
b Notes
•When the access lamp is lit or flashing in red, your camcorder is reading or writing data on recording media. Do not shake or apply strong force to your camcorder, do not turn the power off, and do not remove the recording media, battery pack or the AC Adaptor. The image data may be destroyed.
•See page 105 about the recording time of movies.
•If a movie file size exceeds 2 GB while recording in DV or AVCHD format, the camcorder automatically divides the file and creates a new one.
•If a movie file size exceeds 6 hours duration while recording in XAVC S (HD) format, the camcorder automatically divides the file and creates a new one.
•The menu settings, picture profile settings, and settings made using the AUTO/MAN switch are saved when you turn the camcorder off by setting the ON/STANDBY switch to STANDBY (1). The POWER/ CHG lamp flashes while the settings are being stored.
Continued , 29
Recording (Continued)
z Tips
•When recording with a setting other than DV, the aspect ratio is fixed to 16:9. When recording in DV mode, you can switch the aspect ratio to 4:3 ([ WIDE REC], p. 80).
•For details about changing the screen display during recording, see page 63.
•For details about screen display during recording, see page 13.
•The recording lamps can be set to stay off ([REC LAMP], p. 91).
Continuous recording on the memory cards (Relay recording)
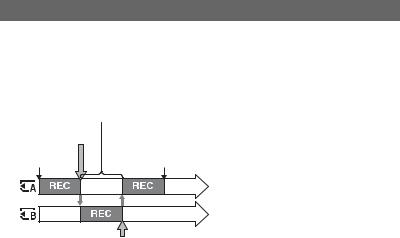
Insert memory cards each in both slots A and B, so the camcorder switches memory card A (or B) just before space on the other one runs out, and continues recording on the next memory card automatically.
Do the following setting before recording.
Press MENU t select  (REC/OUT SET) t [REC SET] t [SIMUL/RELAY REC] t [RELAY REC] with the V/v/B/b/SET button.
Exchange the recordable memory card
Small space |
|
REC start |
REC end |
REC: Recording
Small space
b Notes
•Do not eject the memory card that is currently being used for recording. When replacing a memory card while recording, replace only the one in the slot whose access lamp is off.
•Even if you press the SLOT SEL button, while recording movies, you cannot switch the slot currently being used.
•When the remaining recording time of the memory card being used is less than 1 minute and the other slot has a recordable memory card inserted, [ 

 ] or [

 ] appears on the camcorder screen. The indicator turns off when the memory card is switched.
•If you start recording on a memory card with the remaining recording time of less than 1 minute, the camcorder may not be able to relay-record. To relay-record without failing, make sure that the memory card has more than 1 minute when you start recording.
•Seamless playback of relay-recorded movies with this camcorder is not possible.
•You can re-combine relay-recorded movies using the “Catalyst Browse” application software.
•The maximum continuous recording time is 6 hours for XAVC S 4K, and 13 hours for XAVC S HD. (Files are split after approximately 6 hours).
When recording in AVCHD and DV, the maximum continuous recording time is approximately 13 hours.
30
Loading...