


MODEL
AR-M256
AR-M316
DIGITAL MULTIFUNCTIONAL SYSTEM
OPERATION MANUAL (for network scanner)
INTRODUCTION |
Page |
1 |
|
BEFORE USING THE NETWORK |
|
SCANNER FUNCTION |
3 |
HOW TO USE THE NETWORK |
|
SCANNER FUNCTION |
20 |
TROUBLESHOOTING |
32 |
METADATA DELIVERY |
37 |
SPECIFICATIONS |
42 |
Warranty
While every effort has been made to make this operation manual as accurate and helpful as possible, SHARP Corporation makes no warranty of any kind with regard to its content. All information included herein is subject to change without notice. SHARP is not responsible for any loss or damages, direct or indirect, arising from or related to the use of this operation manual.

INTRODUCTION
The network scanner expansion Kit enables the machine to be used as a network scanner.
•To enable the network scanner function of this machine, a product key (password) must be entered using a key operator program. This is only required once. Use the "PRODUCT KEY" program to enter the product key. If you do not know your product key, please ask your dealer. (For information on using key operator programs, refer to key operator's guide.)
•The printer expansion kit (AR-P27) and at least 128 MB of memory* are required to use the network scanner function.
•For the procedures for using the software programs, see the user's guides on the CD-ROM.
*Memory can be added by installing a commercially available 128 MB or 256 MB memory module (144-pin SDRAM SODIMM). For more information, consult your dealer.
●This manual only explains features that can be used when the Network Scanner Expansion Kit is installed. For information on loading paper, replacing toner cartridges, clearing paper misfeeds, handling peripheral devices, and other copier-related information, please refer to your operation manual for copier.
●The explanations in this manual assume that the person who will install the product and the users of the product have a working knowledge of Microsoft Windows.
●In this manual, American spellings are used.
●For information on the operating system, please refer to your operating system manual or the online Help function.
●The explanations of screens and procedures in this manual are for Windows XP. The screens may vary depending on your Windows version and settings.
●This manual refers to the Reversing single pass feeder as the "RSPF".
1

CONTENTS |
|
|
INTRODUCTION ............................................... |
1 |
|
1 |
BEFORE USING THE NETWORK SCANNER FUNCTION |
|
ABOUT THE NETWORK SCANNER FUNCTION.... |
3 |
|
SETTINGS AND PROGRAMMING REQUIRED |
|
|
FOR THE NETWORK SCANNER FEATURE........ |
4 |
|
● SETTINGS REQUIRED FOR THE NETWORK |
||
|
SCANNER FUNCTION.................................... |
4 |
● ACCESSING WEB PAGES ............................. |
4 |
|
● ABOUT THE WEB PAGE ................................ |
5 |
|
● BASIC SETTINGS FOR NETWORK SCANNING ... |
6 |
|
● SMTP SERVER AND DNS SERVER SETTINGS..... |
7 |
|
● CONFIGURING LDAP SERVER SETTINGS |
|
|
|
(WHEN USING AN LDAP SERVER) ............... |
8 |
● PROGRAMMING CUSTOM INDEX NAMES... |
9 |
|
● SETTING UP DESTINATION INFORMATION ..... |
10 |
|
● STORING THE SENDER INFORMATION |
|
|
|
(Scan to E-mail) ............................................. |
15 |
●PROTECTING INFORMATION PROGRAMMED IN THE WEB PAGE
|
("Passwords") ................................................ |
16 |
● RESTRICTING USE OF THE NETWORK |
|
|
|
SCANNER FUNCTION (USER |
|
|
AUTHENTICATION) ...................................... |
17 |
INITIAL SCREEN OF SCANNER MODE ....... |
18 |
|
2 |
HOW TO USE THE NETWORK SCANNER FUNCTION |
|
SENDING AN IMAGE ..................................... |
20 |
|
● BASIC TRANSMISSION METHOD ............... |
20 |
|
● TRANSMISSION METHODS FOR SCAN TO E-MAIL ....... |
22 |
|
●SCANNING AND TRANSMITTING A TWO-SIDED ORIGINAL (when an RSPF is
installed)......................................................... |
24 |
● SCANNING A LARGE NUMBER OF |
|
ORIGINALS (when an RSPF is installed) ...... |
25 |
SCANNING SETTINGS (ORIGINAL SIZE, |
|
QUALITY, RESOLUTION, FILE FORMAT, AND |
|
SEND SETTING)............................................. |
26 |
● MANUALLY SETTING THE SCANNING SIZE....... |
26 |
● SELECTING THE QUALITY .......................... |
27 |
● SELECTING THE RESOLUTION .................. |
28 |
● SELECTING THE FILE FORMAT.................. |
29 |
● CHANGING THE SEND SETTINGS ............. |
30 |
CANCELING AN E-MAIL/FTP TRANSMISSION ....... |
31 |
3 |
TROUBLESHOOTING |
|
TROUBLESHOOTING..................................... |
32 |
|
● DISPLAY MESSAGES.................................. |
33 |
|
● IF YOUR E-MAIL IS RETURNED ................. |
34 |
|
● IMPORTANT POINTS WHEN USING SCAN TO |
||
|
E-MAIL .......................................................... |
35 |
CHECKING THE IP ADDRESS ....................... |
36 |
|
4 |
METADATA DELIVERY |
|
METADATA DELIVERY (DATA ENTRY)........ |
37 |
|
PREPARATIONS FOR METADATA |
|
|
TRANSMISSION.............................................. |
38 |
|
● SETTINGS REQUIRED IN THE WEB PAGES............... |
38 |
|
● METADATA TRANSMISSION FOR SCAN TO |
|
|
|
DESKTOP................................................................ |
38 |
TRANSMITTING METADATA ......................... |
39 |
|
● METADATA FIELDS....................................... |
41 |
|
5 |
SPECIFICATIONS |
|
2
1 |
Chapter 1 |
BEFORE USING THE NETWORK SCANNER FUNCTION |
ABOUT THE NETWORK SCANNER FUNCTION
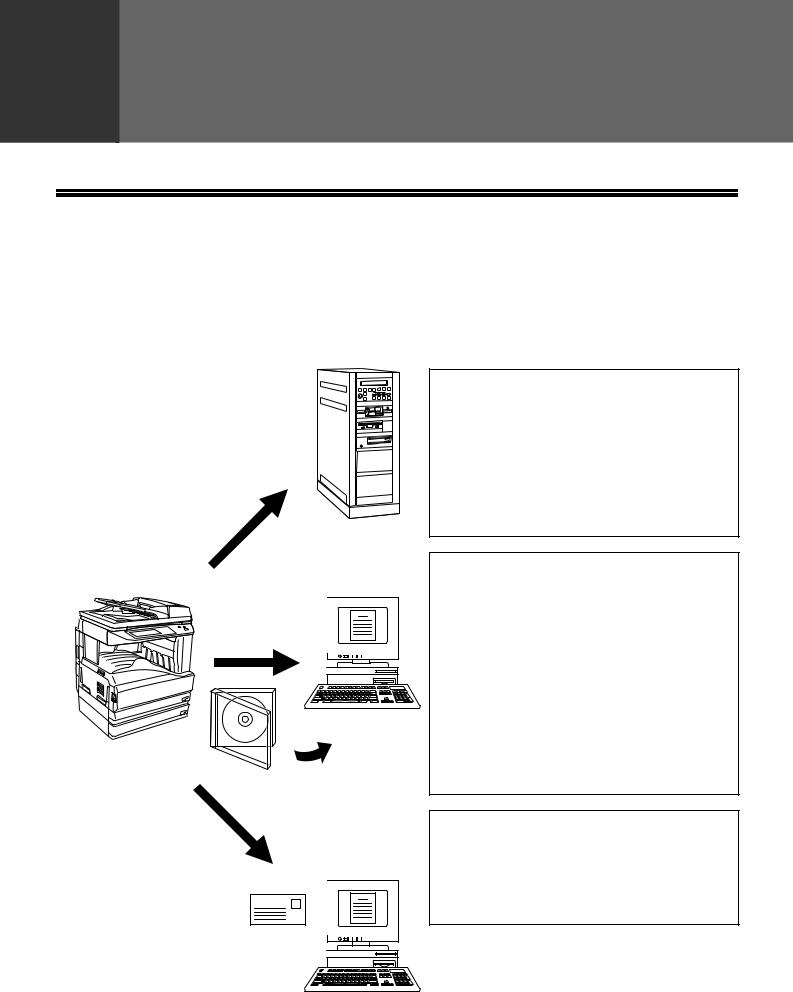
When the network scanner function is added to the machine, a document or photo can be scanned into an image file and sent over a network or the Internet to a file server, e-mail destination, or your own computer. The scanned image can be sent to the following types of destinations:
1. The scanned image can be sent to a memory storage device on a network (a designated directory on an FTP server). (This is called "Scan to FTP" in this manual.)
When sending scanned image to an FTP server, an e-mail message can also be sent to a preset e-mail address to inform the recipient of the location of the scanned image data. (This is called "Scan to FTP (Hyperlink)" in this manual.)
2. A scanned image can be sent to a computer connected to the same network as the machine. (This is called "Scan to Desktop" in this manual.)
* Before Scan to Desktop can be performed, the "Network Scanner Tool" software in the CD-ROM that accompanied the Network Scanner Expansion Kit (MX-NSX1) must be installed. For information on Scan to Desktop system requirements, installing the Network Scanner Tool, and storing the destination, see the Users Guide for the Network Scanner Tool on the CD-ROM that accompanies the network scanner expansion kit.
3. The scanned image can be sent to an e-mail recipient. (This is called "Scan to E-mail" in this manual.)
* A limit is set in the Web page for the size of image files that can be sent using Scan to E-mail (p.6).
3
SETTINGS AND PROGRAMMING REQUIRED FOR THE NETWORK SCANNER FEATURE
To use the Network Scanner feature, settings for the SMTP server, DNS server, and destination addresses must be established.
To establish the settings, use a computer that is connected to the same network as the machine to access the machine's Web page. The Web page can be displayed with your Web browser (Internet Explorer 6.0 or later, Netscape Navigator 7.0 or later, or Safari 1.2 or later).
SETTINGS REQUIRED FOR THE NETWORK SCANNER FUNCTION
To use transmit images using the network scanner function, configure the settings in the Web pages as follows:
Scan to FTP |
|
Scan to FTP (Hyperlink) |
|
Scan to E-mail |
|
Scan to Desktop |
|
|
|
|
|
|
|
Access the Web pages (see below)
Configure basic settings for network scanning (p.6)
Configure your SMTP and DNS server settings (p.7)
Configure LDAP server settings (when using an LDAP server) (p.8)
Store destination information (p.10 to 13)
Store your sender information (p.15)
The following settings can also be configured to enable convenient use of the network scanner function:
•Programming custom index names. (p.9)
•Setting passwords. (p.16)
ACCESSING WEB PAGES
Use the following procedure to access the Web pages.
1 Open the Web browser on your computer.
Supported browsers: Internet Explorer 6.0 or later (Windows)
Netscape Navigator 7.0 or later
Safari 1.2 or later (Macintosh)
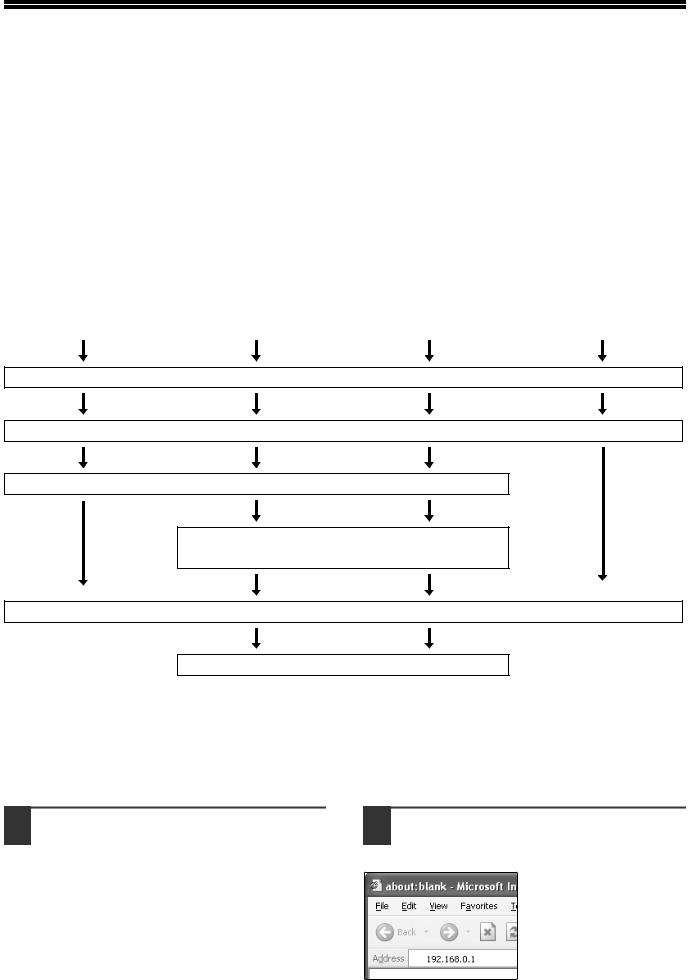
2 In the "Address" field of your Web browser, enter the IP address of the machine as a URL.
Enter the IP address that has been programmed in the machine.
If you do not know the IP address, see page 36.
When the connection is completed, the Web page will appear in your Web browser. (p.5)
4
BEFORE USING THE NETWORK SCANNER FUNCTION
ABOUT THE WEB PAGE
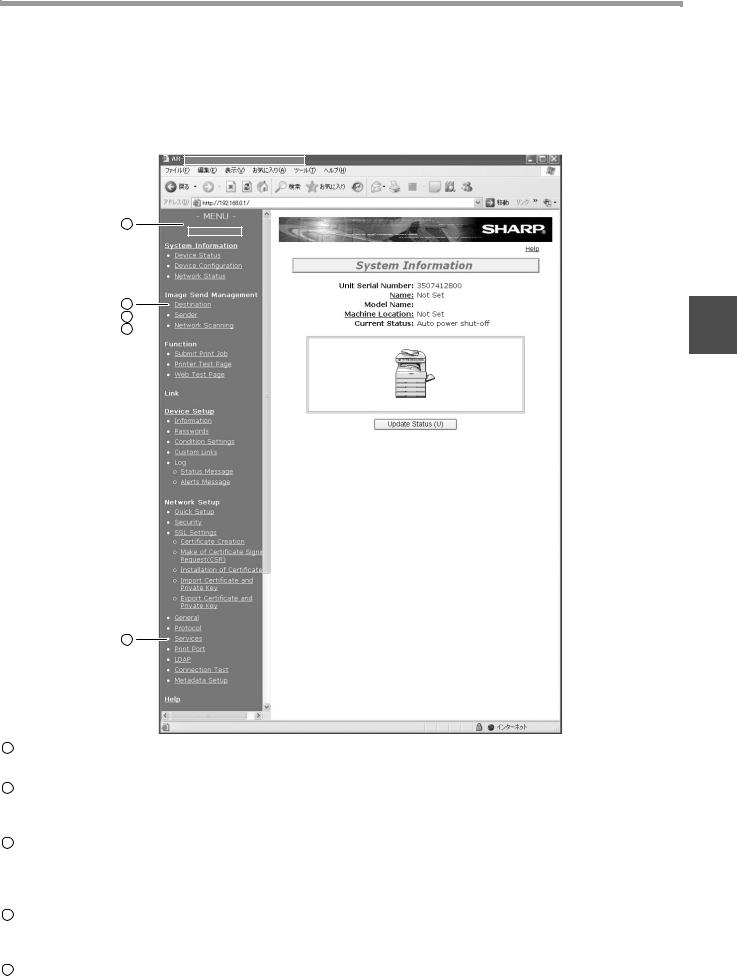
When you access the Web page in the machine, the following page will appear in your browser.
A menu frame appears on the left side of the page. When you click an item in the menu, a screen appears in the right frame that allows you to establish settings for that item.
For detailed explanations of the procedures for establishing settings, click "Help" in the menu frame.
1
2
4
3  1
1
5
1Menu frame
Click the menu items displayed here to configure the corresponding settings.
2Destination (p.10)
Set up destinations for Scan to FTP, Scan to FTP (Hyperlink), Scan to Desktop, and Scan to E-mail. You can also edit or delete previously set destination information.
3Sender (p.15)
Enter the sender's information that appears in the recipient's e-mail program (sender name and e-mail address) when you send an image using Scan to E-mail.
If user authentication is being used, enter the login name.
4Network Scanning (p.6)
This lets you select transmission methods for the network scanner function, configure settings for Scan to E-mail, and program group indexes.
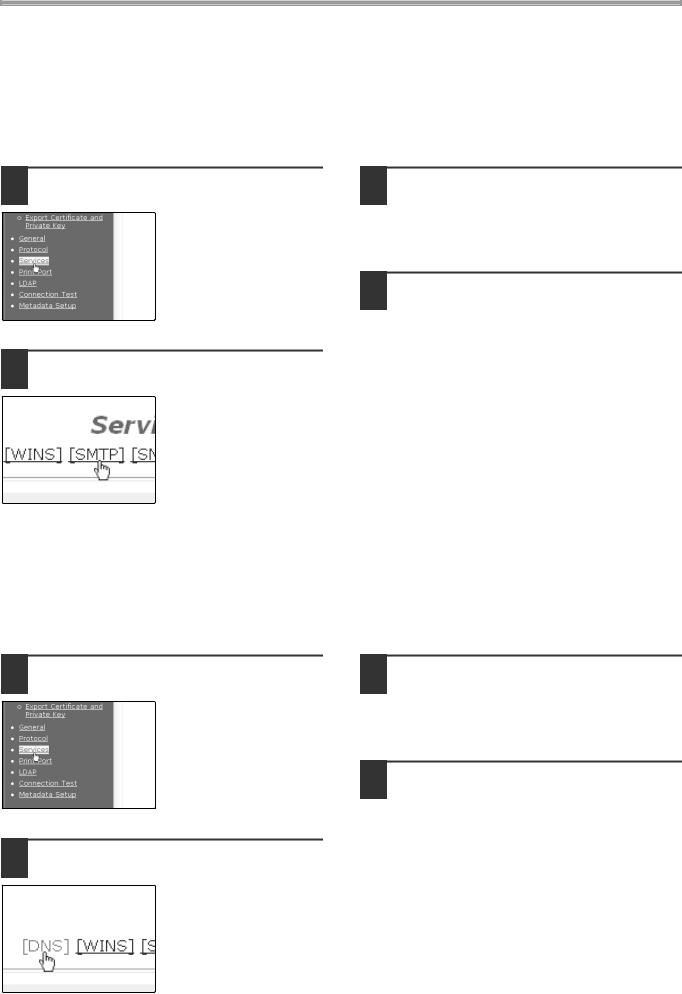
5Services (p.7)
This lets you establish SMTP server settings, DNS server settings, and WINS server settings for Scan to E-mail and Scan to FTP (Hyperlink), and for entering a host name instead of an IP address when storing a transmission destination. Configure LDAP server settings if an LDAP server is used.
5
BEFORE USING THE NETWORK SCANNER FUNCTION
BASIC SETTINGS FOR NETWORK SCANNING
Click "Network Scanning" in the menu frame, and then establish the required settings. These settings should only be established by the network administrator.
For detailed explanations of the procedures for establishing settings, click "Help" in the menu frame.
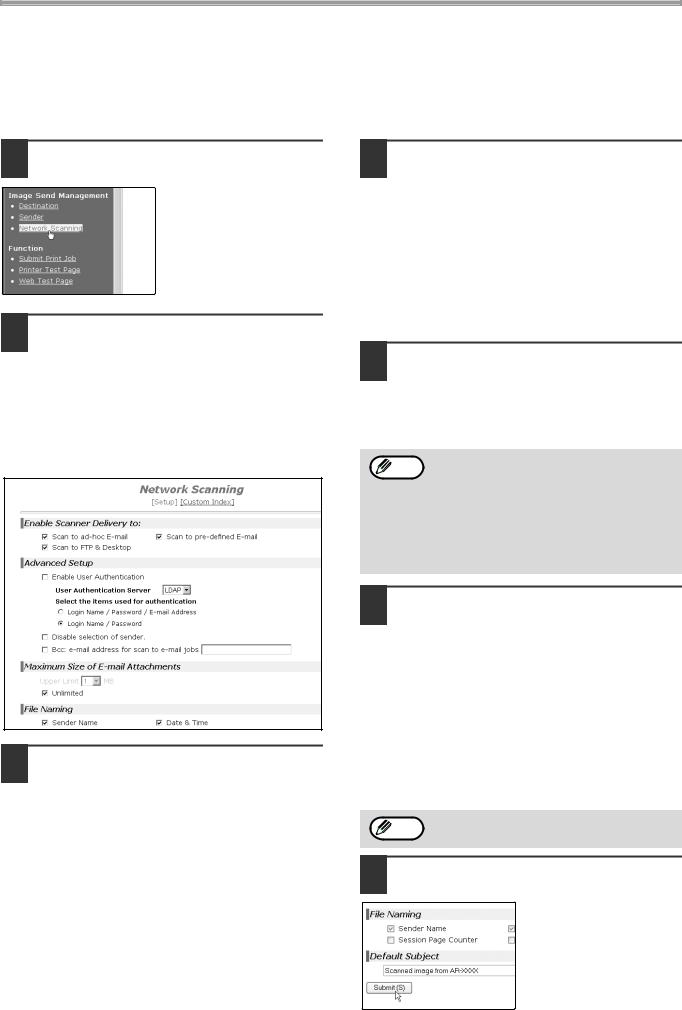
1 Click "Network Scanning" in the menu frame.
The Network Scanning Setup page appears.
2 Select the transmission methods that you wish to use.
Select the scanner delivery methods that you want to use. In the "Enable Scanner Delivery to:" field, click the checkbox next to each method that you want to use so that a checkmark appears in the checkbox.
All transmission methods are initially selected (factory default settings).
3 Configure the Advanced Setup settings.
Select advanced functions that can be used for Scan to E-mail.
Select the checkboxes of the functions that you wish to use.
•The "Enable User Authentication" checkbox can be selected to restrict use of the network scanner function to authorized users. (p.17)
•To allow a sender to be selected when sending an image by Scan to E-mail, make sure that "Disable selection of sender from Sender List" is not selected. (p.30)
•If you wish to Bcc a copy of a Scan to E-mail transmission to an e-mail address, select the "Bcc:" checkbox and enter the e-mail address.
4 Set a limit for the size of image files.
A limit can be set for the size of image files sent by Scan to E-mail to prevent excessively large files from being sent.
If the image file created from the scanned image is larger than the set limit, the image file is discarded. The limit can be set from 1 MB to 10 MB in increments of 1 MB.
The factory default setting is "Unlimited". If you wish to set a limit, remove the checkmark from the "Unlimited" checkbox and enter the desired limit in "Upper Limit".
5 Select the method for assigning a file name to a scanned image.
Select the method for assigning a file name to a scanned image. In "File Naming", click the items that you wish to use in the file name. "Destination Name" and "Date & Time" are initially selected.
• If you are going to send images to the same Note recipient more than once, we recommend that
you also select "Session Page Counter" or "Unique Identifier" to prevent sending multiple files with the same name, which would result in each successive file overwriting the previous file.
•If a file name is entered at the time of transmission, the file name entered here will be disregarded.
6 Selecting an e-mail subject (only used for Scan to E-mail).
The setting is used to enter the subject that appears in the recipient's e-mail program when you perform Scan to E-mail. (This setting is not necessary if you will not be using Scan to E-mail.) The subject can be up to 80 characters long. Only one subject can be entered. If nothing is entered, "Scanned image from <Device Name>" will appear.
*The name that appears in <Device Name> is the name stored in "Name" in the screen that appears when you click "System Information" in the menu frame. If a name has not been stored, the product name will appear.
Note |
If a subject is entered at the time of transmission, |
|
the subject entered here will be disregarded. |
||
|
7 Click "Submit".
After entering the settings, be sure to click "Submit" to store them.
6
BEFORE USING THE NETWORK SCANNER FUNCTION
SMTP SERVER AND DNS SERVER SETTINGS
SMTP is used to transmit e-mail that is sent using Scan to E-mail or Scan to FTP (Hyperlink). To use these transmission methods, your SMTP server settings must be configured.
Configuring SMTP server settings
1 Click "Services" in the menu frame.
3 Enter the required information in "SMTP Setup".
For detailed explanations of the procedures for establishing settings, click "Help" in the menu frame.
4 When you have completed all of the
entries, click "Submit". |
1 |
|
The entries will be stored. |
||
|
||
|
|
2 Click "SMTP".
Configuring DNS server settings
If you entered a host name in "Primary SMTP Server" or "Secondary SMTP Server" of "SMTP Setup", you must also configure your DNS server settings.
You will also need to configure your DNS server settings if host names will be entered in "Hostname or IP Address" when storing destinations for Scan to FTP (Scan to FTP (Hyperlink)) or Scan to Desktop.
1 Click "Services" in the menu frame.
3 Enter the required information in "DNS Setup".
For detailed explanations of the procedures for establishing settings, click "Help" in the menu frame.
4 When you have completed all of the entries, click "Submit".
The entries will be stored.
2 Click "DNS".
7
BEFORE USING THE NETWORK SCANNER FUNCTION
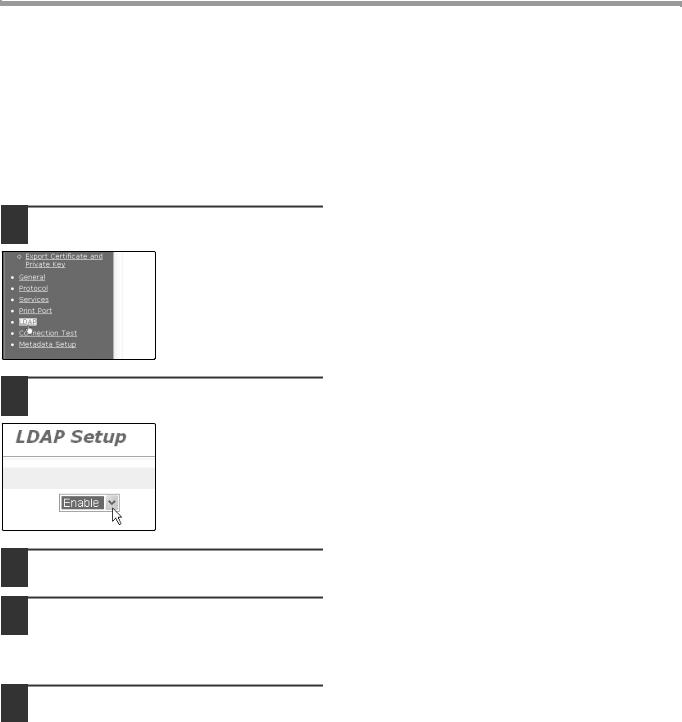
CONFIGURING LDAP SERVER SETTINGS (WHEN USING AN LDAP SERVER)
If mail addresses are managed on your network by an LDAP server, the e-mail addresses stored in the LDAP server can be used for Scan to E-mail.
In addition, user authentication can be enabled to restrict use of the network scanner function by means of user passwords stored in the LDAP server. (p.17)
To allow the machine to use the e-mail addresses in the LDAP server, the LDAP server settings must be configured in the Web page.
1 Click "LDAP" in the menu frame.
2 Select "Enable" in the "LDAP Setup" menu.
3 Click "Submit".
4 Configure the settings in "Global Address Books List".
For detailed explanations of the procedures for establishing settings, click "Help" in the menu frame.
5 When you have completed all of the entries, click "Submit".
The entries will be stored.
8
BEFORE USING THE NETWORK SCANNER FUNCTION
PROGRAMMING CUSTOM INDEX NAMES
Stored destinations appear as one-touch keys in the Address book screen of the touch panel (p.19). Each stored destination appears in the ABC (alphabetical) index, and can also be included in one of the six custom indexes (note that these are called "group indexes" in the touch panel). To program names for the custom indexes, follow the steps below.
Note |
• |
To change a previously programmed custom index name, simply overwrite the old name. |
|
• |
To switch between the ABC index and the custom indexes in the Address book screen, see page 19. |
||
|
|||
|
|
|
1 Click "Network Scanning" in the menu frame.
1
2 Click "Custom Index".
3 Enter names for groups 1 to 6.
Six group indexes are available, and a name up to six characters long can be assigned to each. The names "USER 1" to "USER 6" are initially entered. Change the names as needed.
4 When you have completed all of the entries, click "Submit".
The entries will be stored.
9

BEFORE USING THE NETWORK SCANNER FUNCTION
SETTING UP DESTINATION INFORMATION
To store the name and address of a destination in a one-touch key, click "Destination" in the Web page menu frame. "Destination" can also be used to edit or clear stored destinations. (p.14)
A total of 200 destinations can be stored, including E-mail, FTP, Desktop, and Group destinations. Stored destinations can be selected in the machine's touch panel when transmission is performed.
*Multiple e-mail addresses (up to 100) can be stored as a group. Note that this may reduce the maximum number of destinations (normally 200) that can be stored.
|
|
|
|
E-mail: |
See below |
|
|
|
|
FTP: |
Refer to page 11. |
Click here. |
|
|
|
Desktop: |
Refer to page 12. |
|
|
|
|||
|
|
|
|
Group: |
Refer to page 13. |
|
|
|
|
|
|
 Note Make sure that the address book screen (p.19) does not appear in the machine's touch panel when you store, edit, or delete destinations. Destinations cannot be edited or deleted when the address book screen appears.
Storing destinations for Scan to E-mail
1 Click "Destination" in the menu frame. 3 Enter the destination information.
For detailed explanations of the procedures for establishing settings, click "Help" in the menu frame.
2 Click "E-mail".
If user authentication is enabled and you wish Note to allow login using the above stored
information, select the "It adds also to the Sender List." checkbox and enter the "Login Name" (maximum of 32 characters). The login name must be the same as the login name stored in the LDAP server.
4 When you have completed all of the entries, click "Submit".
The entries will be stored.
 Note To perform Scan to E-mail, the SMTP server settings must first be established. Click "Application" in the Web page, click "SMTP" in the screen that appears, and then enter the settings under "SMTP Setup" (p.7).
10
BEFORE USING THE NETWORK SCANNER FUNCTION
Storing destinations for Scan to FTP
1 Click "Destination" in the menu frame.
If you select the "Enable Hyperlink to FTP Note server to be e-mailed" checkbox and select
a previously stored recipient (p.10) from "E-mail Destination", an e-mail will be sent to the recipient informing them of the file format and location of the scanned image data. A hyperlink to the file server to which the scanned image data was sent appears in the e-mail, and the recipient can click the hyperlink to go directly to the location where the image data is stored.
2 Click "FTP".
3 Enter the destination information.
For detailed explanations of the procedures for establishing settings, click "Help" in the menu frame.
4 When you have completed all of the
entries, click "Submit". |
1 |
|
The entries will be stored. |
||
|
If you entered a host name in "Hostname or IP Address", you will need to enter the DNS server or WINS server Note settings. Click "Application" in the menu frame and then click "DNS" or "WINS" in the page that appears to
configure the corresponding settings.
To perform Scan to FTP (Hyperlink), you must also click "SMTP" and then enter the settings under "SMTP Setup" for the SMTP server (p.7).
11
BEFORE USING THE NETWORK SCANNER FUNCTION
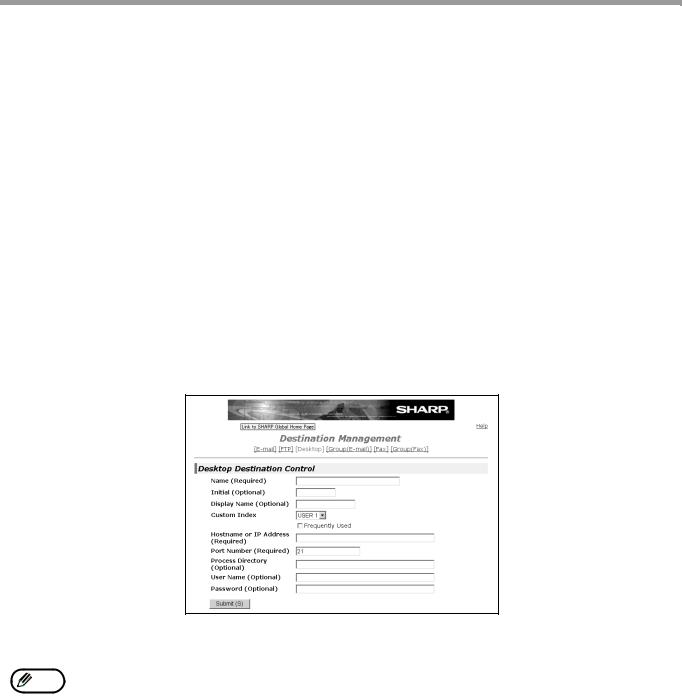
Storing destinations for Scan to Desktop
The destination for Scan to Desktop is stored by the Sharp Network Scanner Tool Setup Wizard when "Network Scanner Tool" is installed in your computer. For this reason, there is no need to store the Scan to Desktop destination in the Web page. (The Network Scanner Tool is on the CD-ROM that accompanied the Network Scanner Expansion Kit .)
For information on Scan to Desktop system requirements, installing the Network Scanner Tool, and storing the destination, see the Users Guide for the Network Scanner Tool on the CD-ROM that accompanies the network scanner expansion kit.
Normally your computer is stored as the destination by the method indicated above.
The following page for storing Scan to Desktop destination information appears when "Destination" is selected in the menu frame, followed by "Desktop". This page is used by mainly by the system administrator in the following circumstance.
•When another machine with the network scanner function has been added to the same network, and you wish to perform Scan to Desktop from the added machine to a destination programmed in the previously existing machine.
Refer to "Editing and deleting programmed transmission destinations" (p.14), and select the Scan to Desktop destination information that you wish to transfer to the new machine. Enter the displayed information in the same setting screen of the new machine. (When all information has been entered, click "Submit".)
If there are additional destinations that you want to transfer to the new machine, repeat this procedure for each destination.
Note that if there are any discrepancies between the newly programmed information and the information in the host computer, transmission and reception may not be possible.
Note |
• |
For detailed explanations of the procedures for establishing settings, click "Help" in the menu frame. |
• |
If you entered a host name in "Hostname or IP Address", you will need to enter the DNS server or WINS server |
|
|
|
settings. Click "Application" in the menu frame and then click "DNS" or "WINS" in the page that appears to |
|
|
configure the corresponding settings. |
|
|
|
12

BEFORE USING THE NETWORK SCANNER FUNCTION
Storing Groups (Scan to E-mail)
If you are using Scan to E-mail, a scanned image can be sent to multiple destinations in a single operation.
 Note Up to 100 destinations can be stored in one group.
1 Click "Destination" in the menu frame.
1
2 Click "Group".
3 Enter the destination information.
For detailed explanations of the procedures for establishing settings, click "Help" in the menu frame.
4 When you have completed all of the entries, click "Submit".
The entries will be stored.
13
 Loading...