


ENGLISH/ESPAÑOL

NOTE/NOTAS
En |
function without a battery. |
•Use one 3V lithium battery(CR-123A or DL-123A).
•The lens cap automatically opens when the Power button is turned on.
•Do not open the lens cap with your fingers.
The shutter does not operate in the following circumstances:
•When the camera has no battery or when the battery is almost drained.
•When the Power is turned off.(When the lens cap is closed.)
•When the zoom button is operating or when the film is winding or rewinding. (Rewinding will stop when the shutter button is pressed during rewinding.)
•When the film remains in the camera after rewinding.
•When the flash is being charged.
 This camera is controlled electronically by a built-in microcomputer. Although unlikely, it may fail to operate under certain circumstances in which there is a strong electromagnetic field (near a TV, microwave etc.). If this occurs, please remove the lithium battery and replace after 2~3 minutes.
2

Es
•Utilice una pila de litio de 3 V. (CR-123A o DL-123A)
•La tapa del objetivo se abrirá automáticamente cuando se conecte la cámara.
•No abra la tapa del objetivo con los dedos.
El disparador no se accionará en las siguientes circunstancias:
•Cuando la cámara no tenga pila o cuando esté casi agotada.
•Cuando la cámara esté desconectada (cuando esté cerrada la tapa del objetivo).
•Cuando el botón del zoom esté en funcionamiento o cuando la pelÌcula esté avanzando o rebobinándose. (Si presiona el Disparador durante el rebobinado, éste se detendrá).
•Cuando la película permanezca en la cámara después de haber sido rebobinada.
•Cuando se esté cargando el flash.
 Esta cámara está controlada electrónicamente por un microordenador incorporado. Aunque es improbable, puede dejar de funcionar en determinadas circunstancias en las que exista un intenso campo electromagnético (cerca de un televisor, un microondas, etc.). Si esto ocurriera, por favor extraiga la pila de litio y vuélvala a colocar transcurridos 2~3 minutos.
3

CONTENTS/ÍNDICE
En |
|
|
|
|
|
the SAMSUNG camera. |
|
|
|
|
|
|
|
||
using your camera. |
4x zoom camera that will give you excellent performance. Please read this manual before |
||||||||||||||
|
|
|
|
|
|
|
|
|
|
||||||
OF CONTENTS |
|
|
|
Bulb shooting (B Shutter) |
......................................................... |
||||||||||
PREPARATION |
|
|
|
|
|
|
|
|
38 |
||||||
|
|
|
|
|
|
|
|
................................................................................. |
|||||||
................................................................................ |
|
Step zoom |
|
|
|
|
39 |
||||||||
Part Names...................................................................................6 |
|
Continuous shooting ................................................................. |
|
40 |
|||||||||||
LCD panel |
|
|
|
|
|
......................................................... 9 |
|
Auto Red-eye Reduction .......................................................... |
|
41 |
|||||
Viewfinder and Indicators |
|
|
11 |
|
Flash off ..................................................................................... |
|
|
|
|
42 |
|||||
|
|
|
.................................................................... |
|
|
|
|
|
|||||||
Attaching the strap |
...................................................................11 |
|
Fill-in flash |
................................................................................. |
|
|
|
43 |
|||||||
Loading the battery |
|
.................................................................13 |
|
Fill-in flash and Back-light control ............................................ |
44 |
||||||||||
Checking the battery |
|
|
|
|
15 |
|
Fill-in flash and Red-eye Reduction ......................................... |
45 |
|||||||
|
|
......................................................................... |
|
||||||||||||
Loading the film |
.......................................................................16 |
|
Self-timer ................................................................................... |
|
|
|
|
46 |
|||||||
Using the camera |
|
..................................................................18 |
|
Double self-timer ....................................................................... |
|
|
47 |
||||||||
Holding the camera |
|
|
|
|
19 |
|
2 second delayed shutter release ............................................ |
48 |
|||||||
|
|
.......................................................................... |
|
||||||||||||
Taking pictures |
|
|
.................................................................20 |
|
Interval shooting ........................................................................ |
|
|
49 |
|||||||
Adjusting the diopter |
|
|
|
|
22 |
|
Spot shooting ............................................................................ |
...........................................................................50 |
|||||||
TAKING PHOTOS |
|
|
|
|
|
|
|
Snap shooting |
|
...................................................................51 |
|||||
|
|
|
|
.................................................................. |
|
Macro photography |
|
|
52 |
||||||
Using the focus lock....................................................................23 |
|
Panorama photography ............................................................ |
|
53 |
|||||||||||
Rewinding the film |
|
|
|
|
.........................................25 |
|
Landscape mode(Infinity) |
......................................................... |
54 |
||||||
Date and caption (Q.D. model only) |
|
......................27 |
|
Remote control shooting(Optional) .......................................... |
55 |
||||||||||
Clock/Calendar function (Non Q.D. model only) |
30 |
|
Replacing the battery of the remote control (Optional) ........... |
56 |
|||||||||||
Using the Shooting mode |
......................................................... |
|
|||||||||||||
|
|
32 |
|
IMPORTANT NOTES |
|
|
|||||||||
Using the Flash mode |
|
|
|
33 |
|
|
|
||||||||
|
|
|
|
|
............................................................... |
|
|
|
|
|
|
|
|||
Using the Self mode |
.................................................................. |
|
|
|
34 |
|
|
|
....................................................................... |
||||||
................................................................ |
|
|
|
|
Care and storage........................................................................57 |
||||||||||
Using the focus mode |
|
|
|
35 |
|
Trouble shooting |
|
|
59 |
||||||
Sports shooting |
......................................................................... |
|
|
|
|
|
|
|
|||||||
|
|
|
|
|
|
36 |
|
SPECIFICATIONS |
|
|
|
||||
Portrait zoom |
............................................................................. |
|
|
|
|
||||||||||
|
|
|
|
|
|
|
37 |
|
|
|
|
||||
4

Es
proporcionará unos excelentes resultados. Por favor, lea este
manual de instrucciones antes de utilizar su cámara.
ÍNDICE |
|
|
|
|
|
|
|
|
|
|
|
|
|
|
|
.................................................... |
|||
PREPARATIVOS |
|
|
|
|
|
|
|
|
|
Posición B (exposición larga) |
|
|
.............................38 |
||||||
|
.............................................................................. |
|
Modo zoom a diferentes longitudes focales |
|
39 |
||||||||||||||
Nomenclatura |
|
|
.................................................................6 |
|
Fotos en serie ............................................................................ |
|
|
|
|
|
40 |
||||||||
Panel informativo LCD |
|
|
|
|
|
|
9 |
|
Reducción de ojos rojos automática ........................................ |
|
41 |
||||||||
|
|
|
................................................................... |
|
|
||||||||||||||
Visor e Indicadores |
|
.............................................................11 |
|
Flash desconectado ................................................................. |
|
|
|
|
42 |
||||||||||
Colocación de la correa |
|
|
|
|
|
|
11 |
|
Flash de relleno ......................................................................... |
|
|
|
|
|
43 |
||||
|
|
|
.................................................................. |
|
|
|
|
|
|
||||||||||
Colocación de la pila |
|
............................................................13 |
|
Flash de relleno y control de contraluz..................................... |
|
44 |
|||||||||||||
Comprobación de la pila ..........................................................15 |
|
Flash de relleno y reducción de ojos rojos............................... |
|
45 |
|||||||||||||||
Colocación de la película |
|
|
|
|
16 |
|
Autodisparador........................................................................... |
|
|
|
|
|
46 |
||||||
|
|
|
|
............................................................. |
|
|
|
|
|
|
|||||||||
Cómo utilizar la cámara |
|
............................................................18 |
|
Autodisparador doble ................................................................ |
|
|
|
|
47 |
||||||||||
Cómo sujetar la cámara |
|
|
|
|
|
19 |
|
Autodisparador con 2 segundos de retardo |
............................ |
48 |
|||||||||
Cómo fotografiar |
........................................................................ |
|
|
||||||||||||||||
|
|
|
|
|
|
|
|
20 |
|
Fotografía a intervalos............................................................... |
|
|
|
|
49 |
||||
|
........................................................................... |
|
|
|
|
|
|||||||||||||
Ajuste dióptrico |
|
|
|
|
|
|
|
|
22 |
|
Fotografía con enfoque puntual |
................................................ |
|
50 |
|||||
CÓMO TOMAR FOTOGRAFÍAS |
|
|
|
|
.............................................................................. |
||||||||||||||
|
|
|
Instantáneas |
|
.......................................................................51 |
||||||||||||||
Utilización del bloqueo del enfoque |
......................................... |
|
Fotomacrografía |
|
|
|
|
|
52 |
||||||||||
|
|
23 |
|
Fotografía panorámica .............................................................. |
|
|
|
|
53 |
||||||||||
Cómo rebobinar la película |
...................................................... |
|
|
|
|
|
|||||||||||||
|
|
|
|
25 |
|
Modo paisajes (Infinito) ............................................................. |
|
|
|
|
54 |
||||||||
|
|
|
|
|
|
|
............................................ |
|
|
|
|
|
|||||||
Fecha y título (sólo modelo Q.D.) |
|
|
|
......................27 |
|
Exposición con mando a distancia (opcional) ......................... |
55 |
||||||||||||
Función reloj/calendario (sólo modelo sin Q.D.) |
30 |
|
Cómo cambiar la pila del mando a distancia (opcional).......... |
56 |
|||||||||||||||
|
|
|
|
|
|
|
........................................... |
|
|||||||||||
Utilización del modo de exposición |
|
|
32 |
|
NOTAS IMPORTANTES |
|
|
|
|
||||||||||
Utilización de los modos del flash |
|
|
|
33 |
|
|
|
|
|
||||||||||
|
|
|
|
|
|
|
............................................. |
|
|
|
|
|
|
|
|
|
|||
Utilización del modo SELF........................................................ |
|
|
|
|
34 |
|
Cuidados y almacenamiento |
................................................ |
|||||||||||
|
|
|
|
|
|
|
57 |
||||||||||||
Utilización del modo de autofoco.............................................. |
|
|
.................................35 |
|
Problemas y soluciones |
......................................................... |
|||||||||||||
|
|
|
|
|
|
|
59 |
||||||||||||
Utilización del autofoco con haz m˙ltiple |
|
36 |
|
ESPECIFICACIONES |
|
|
|
|
|
||||||||||
Fotografía deportiva |
................................................................... |
|
|
|
|
|
|
||||||||||||
|
|
|
|
|
|
|
37 |
|
|
|
|
|
|
||||||
5
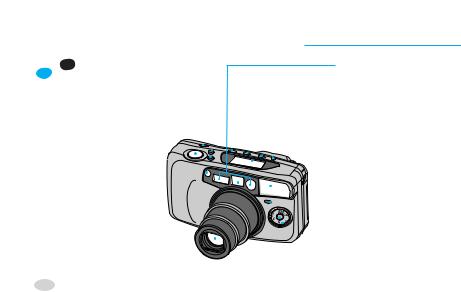
PART NAMES / NOMENCLATURA
 Front / Top
  De frente/Parte superior
|
|
En Zoom button (WIDE) |
|
|
|
|
|
|
|
|
|
|
|||||||||||
PREPARATIONPREPARATIVOS |
|
|
|
|
|
|
|
|
|||||||||||||||
|
Es |
|
|
|
|
|
|
|
|
|
|
|
|
|
|
||||||||
|
|
|
|
|
|
|
|
|
|
|
|||||||||||||
|
|
|
|
|
|
|
|
|
|
|
|
|
|
|
|
|
|
|
|
|
|
|
|
|
|
Botón del zoom (TELE) |
|
|
|
|
|
|
|
|
|
|
|
|
|
||||||||
|
|
Exposure sensor |
|
|
|
|
|
|
|
|
|
|
|
|
|
|
|
|
|
|
|
||
|
|
Sensor de exposición |
|
|
|
|
|
|
|
|
|
|
|
|
|
|
|||||||
|
|
Power button |
|
|
|
|
|
|
|
|
|
|
|
|
|
|
|
|
|
|
|
||
|
|
de conexión/desconexión |
|
|
|
|
|
|
|
|
|
|
|
|
|
|
|
||||||
|
|
Shutter button |
|
|
|
|
|
|
|
|
|
|
|
|
|
|
|
|
|
|
|
||
|
|
Disparador |
|
|
|
|
|
|
|
|
|
|
|
|
|
|
|
|
|
||||
|
|
Lens |
|
|
|
|
|
|
|
|
|
|
|
|
|
|
|
|
|
|
|
||
|
|
|
|
|
|
|
|
|
|
|
|
|
|
|
|
|
|
|
|
|
|||
|
|
|
|
|
|
|
|
|
|
|
|
|
|
|
|
|
|
|
|
|
|||
|
|
|
|
|
|
|
|
|
|
|
|
|
|
|
|
|
|
|
|
|
|||
|
|
|
|
|
|
|
|
|
|
|
|
|
|
|
|
|
|
|
|
|
|||
|
|
|
|
|
|
|
|
|
|
|
|
|
|
|
|
|
|
|
|
|
|||
|
|
|
|
|
|
|
|
|
|
|
|
|
|
|
|
|
|
|
|
|
|||
|
|
|
|
|
|
|
|
|
|
|
|
|
|
|
|
|
|
|
|
|
|||
|
|
|
|
|
|
|
|
|
|
|
|
|
|
|
|
|
|
|
|
|
|||
|
|
|
|
|
|
|
|
|
|
|
|
|
|
|
|
|
|
|
|
||||
|
|
|
|
|
|
|
|
|
|
|
|
|
|
|
|
|
|
|
|
||||
|
|
Objetivo |
|
|
|
|
|
|
|
|
|||||||||||||
Autofocus window Ventanillas del autofoco
Flash button (Flash mode selection button)
Botón del flash (botón de selección del modo de flash)
Self mode button(Self mode and Interval mode selection button) Botón del modo SELF (botón de selección de los modos de intervalos y SELF)
LCD panel Ecran LCD Spot/Snap button
Botón de Spot/Snap (instant·neas/enfoque puntual) DATE or TIME button (Date and Caption selection button)
Botón FECHA y HORA (botón de selección de fecha y título)
Flash
Flash Self-timer lamp
L·mpara del autodisparador Landscape mode button Botón del modo de paisajes
Shooting mode dial
Dial del modo de exposición
Viewfinder
Visor

 Rear / Bottom
  Parte posterior/inferior
En Autofocus indicator(Green LED)
Indicador del flash (diodo rojo)
Viewfinder
Visor
Diopter adjustment dial
Dial de ajuste dióptrico
Tripod socket
Rosca para el trípode
Panorama switch
Interruptor de panorámica
Film check window
Ventanilla de comprobación de la película
Back cover release button Botón de apertura del respaldo
 Strap eyelet
Enganche de la correae
Mid-roll rewind button
Botón de rebobinado a mitad de rollo
7

Interior |
Interior |
En |
|
Back cover |
|
|
Rerpaido |
Es |
|
Film pressure plate |
|
|
Placa de presión de la película |
|
|
Film pressure roller |
|
|
Rodillo de presión de la película |
|
|
Spool |
|
|
Bobina |
|
|
Film sensor |
|
|
Sensor de la película |
|
8 |
DX contacts |
|
Contactos DX |
|
|

LCD PANEL/PANEL INFORMATIVO LCD
En |
Portrait zoom( |
/P.37).1 |
15.Remote control shooting( |
/P.55) |
|||
|
Spot shooting( |
/P.50).2 |
16.Step zoom(STEP /P.39) |
|
|||
Snap shooting(SNAP /P.51).3 |
17.Self-timer( |
/P.46) |
|
|
|||
18.2 sec. delayed shutter release( |
/P.48) |
||||||
|
|
Month.4 |
|||||
|
|
19.Double self-timer( |
/P.47) |
||||
Bulb shooting(B Shutter)(BULB /P.38).5 |
|||||||
20.Battery condition indicator(P.15) |
|||||||
|
|
Year.6 |
|||||
|
|
21.Macro Photography( |
/P.52) |
||||
Interval shooting( |
/P.49).7 |
||||||
22.Slow shutter sync( |
/P.43) |
|
|||||
Continuous shooting( |
/P.40).8 |
23.Red-eye reduction( |
/P.41) |
||||
Focal length unit (mm) / Minutes(m).9 |
Seconds(s).10 |
Date or caption print mark.11 |
a. Focal length.12 |
b. Exposure counter.13 |
c. Date (Year, Month, Date, Time).14
NOTE
 24.Back-light control(
  /P.44) 25.Film present indicator 26.Exposure unit(EX)
27.Film rewinding indicator 28.Back-cover open indicator
29.Film loading failure warning indicator(E) 30.Film loading indicator
For more information regarding the mark, refer to the pages in ( ).
 When the back-light control function is selected, the flash will operate regardless of ambient lighting conditions.
9

Es |
|
|
|
16 |
|
Modo zoom a diferentes longitudes focales |
|
|
|
|
|||||
|
|
|
|
|
|
||
|
|
|
Fotografía con enfoque puntual |
|
17 |
|
Autodisparador |
|
|
|
Instantáneas |
|
18 |
|
Autodisparador con 2 segundos de retardo |
|
|
|
Mes |
|
19 |
|
Autodisparador doble |
|
|
|
Posición B (exposición larga) |
|
20 |
|
Indicador de película cargada |
|
|
|
Año |
|
21 |
|
Indicador de la carga de la pila |
|
|
|
Fotografía a intervalos |
|
22 |
|
Fotomacrografía |
|
|
|
Fotografías en serie |
|
23 |
|
Sincronización lenta |
|
|
|
Longitud focal (mm) / Minutos(m) |
|
24 |
|
Reducción de ojos rojos |
|
|
|
Segundos(s) |
|
25 |
|
Control de contraluz |
|
|
|
Marca de impresión de fecha o título |
|
26 |
|
Unidad de exposición (EX) |
|
|
|
a. Longitud focal |
|
27 |
|
Indicador de rebobinado de la película |
|
|
|
b. Contador de exposiciones |
|
28 |
|
Indicador de apertura del respaldo |
|
|
|
c. Fecha (año, mes, fecha, hora) |
|
29 |
|
Indicador de aviso de fallo en la carga de la película (E) |
|
|
|
Fotografía con mando a distancia |
|
30 |
|
Indicador de carga de la película |
 Para más información relativa a la marca, consulte las páginas ( ).
Cuando seleccione la función de control de contraluz, el flash se activará independientemente de las condiciones de luminosidad del ambiente
10
VIEWFINDER AND INDICATORS / VISOR E INDICADORES
Viewfinder/Visor
En |
Macro picture area |
|
Recuadro para tomas macro |
En |
Picture area frame |
|
Recuadro de la imagen |
En |
Autofocus frame (Focus on the subject with this frame) |
|
Recuadro del autofoco (enfoque el sujeto con este recuadro) |
ATTACHING THE STRAP/COLOCACIÓN DE LA CORREA
|
1 |
2 |
3 |
En |
Refer to the illustrations above. |
|
|
11

Indicators/Indicadores
|
|
|
|
|
|
|
|
|
En 1. Autofocus Indicator (Green LED) |
|
|
|
Green/Verde |
|
When illuminated this confirms that conditions are suitable for picture |
||||
|
|
|
|
|
|
|
|
|
taking. |
|
|
|
|
|
|
|
|
|
When the subject is too close, (within 0.68m (2.2ft), the LED will blink |
|
|
|
|
|
|
AF |
rapidly and the shutter will lock. |
||
|
|
|
|
|
|
|
|
|
|
|
|
|
|
|
|
|
|
|
The Auto Macro mode will be selected when the subject is within the range |
|
|
|
|
|
|
|
|
|
|
|
|
|
|
|
|
|
|
|
(0.68m ~ 1.0m). At this point the LED will blink slowly. |
|
|
|
|
|
|
|
|
|
2. Flash Indicator (Red LED) |
|
|
|
Red/Rojo |
|
|
Illuminates when the flash is fully charged. (In low light conditions) |
|||
|
|
|
|
|
|||||
|
|
|
|
|
|
|
|
|
Blinks rapidly when the flash is being charged. (Shutter will be locked) |
|
|
|
|
|
|
|
|
|
Blinks slowly to indicate that the camera requires steady support (preferably |
Es |
shake. |
||||||||
|
|
|
|
|
|
|
|
|
adecuadas para tomar fotografías. |
 Cuando el sujeto esté a corta distancia (inferior a 0.68 m (2.2 pies)), el diodo parpadeará rápidamente y se bloqueará el disparador.
 Se seleccionará el modo macro automático cuando el sujeto esté dentro de la escala de distancia (0.68 m - 1.0 m). En ese momento, el diodo parpadeará lentamente.
2. Indicador del flash (diodo rojo)
 Se ilumina cuando el flash está totalmente cargado (en condiciones de escasa luminosidad).
 Parpadea rápidamente cuando se está cargando el flash (se bloqueará el disparador).
Parpadea lentamente para indicar que la cámara debe apoyarse en un soporte firme (preferiblemente en un trípode) para evitar la trepidación de la misma.
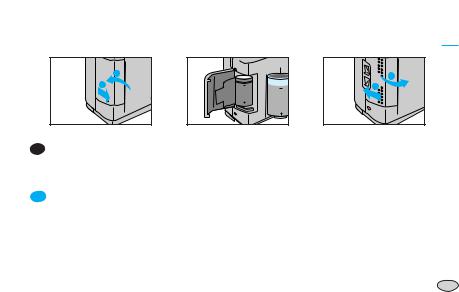
LOADING THE BATTERY/COLOCACIÓN DE LA PILA
1
 2
2
 1
1
2 |
3 |
|
1 |
|
2 |
En 1. Open the chamber cover by sliding the battery chamber cover.
2.Insert a new battery and ensure it is placed in the correct position.
3.Close the chamber cover.
compartimento de la pila deslizando su tapa.
2.Inserte una nueva pila y compruebe que esté colocada en la posición correcta.
3.Cierre la tapa del compartimento de la pila.
13

En NOTE
 Use one CR-123A or DL-123A battery.
The camera will automatically turn the power off when not used after 3 minutes.
Remove the battery from the camera when the camera is not used for an extended period. Be sure to check the date and shooting mode when you load a new battery.
 If the date or time is incorrect, please refer to page (27) and adjust accordingly.
 La cámara se desconecta automáticamente si no se usa durante 3 minutos. Extraiga la pila de la cámara cuando no la vaya a usar durante un largo periodo de tiempo.
 Compruebe la fecha y el modo de exposición cuando cargue una pila nueva.
 Si la fecha o la hora son incorrectas, por favor consulte la página (27) y ajústelas convenientemente.
14

CHECKING THE BATTERY/COMPROBACIÓN DE LA PILA
 You can check the battery life on the LCD panel.
 Es posible comprobar la carga de la pila en el panel informativo LCD.
|
En |
|
Es |
1. Normal operation |
1. Funcionamiento normal |
||
|
- The battery condition indicator does not appear. |
|
- No aparece el indicador de carga de la pila. |
2. |
The indicator appears half way. |
2. |
El indicador aparece por la mitad. |
|
- The battery life is low and you should ensure that a |
|
- La carga de la pila está baja y debe comprobar que |
|
replacement battery is available. |
|
dispone de una pila de repuesto. |
3. |
The indicator blinks. |
3. |
El indicador parpadea. |
|
- The battery is exhausted. Load a new battery. |
|
- La pila está agotada, cargue una pila nueva. |
|
|
|
|
En NOTE
Do not remove the battery while the camera is operating, because it may cause the camera to malfunction.
Battery performance is reduced in low temperatures (under -10 (14 ));Try to keep the camera warm between shots. (The battery will operate normally again when the temperature returns to normal).
Please dispose of the exhausted battery with care.
 Some local authorities may require batteries to be disposed of separately from other refuse.
pila mientras esté utilizando la cámara, ya que puede provocar un mal funcionamiento.
El rendimiento de la pila se reduce a bajas temperaturas (por debajo de -10 (14 )) ; trate de mantener la cámara a temperatura normal entre disparos. La pila volverá a funcionar normalmente cuando la temperatura vuelva a estabilizarse. Por favor, deseche las pilas gastadas con precaución.
En algunas casos la normativa vigente exige desechar las pilas en contenedores dedicados exclusivamente a ellas y separadas de
otros desechos. |
15 |
|
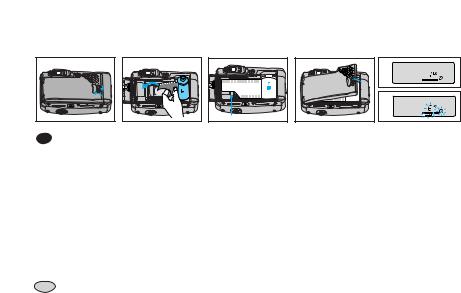
LOADING THE FILM/COLOCACIÓN DE LA PELÍCULA
1 |
En |
2 |
3 |
Film sensor |
4 |
5 |
|
6 |
the release knob as shown above.
. Do not force the film into position.
3.The film should lie flat.
4.Close the back cover. It will close with a “click”.
5.The film will automatically advance until the film counter reads “1”.
6.If a film is loaded incorrectly, the LCD panel will display an “E” warning signal. Reload the film following the steps shown above.
NOTE
 The camera automatically adjusts for ISO 50-3200 DX film.
 When you use non-DX film, the camera will set the film speed at ISO 100.
 Load the film in subdued lighting.
16

Es |
abrirlo tal y como se muestra en el dibujo sobre estas líneas. |
|
de la película. No fuerce la película al introducirla. |
3.La película deberá permanecer plana, tal y como aparece en los dibujos de más abajo.
4.Cierre el respaldo. Se cerrará con un “clic”.
5.La película avanzará automáticamente hasta que aparezca “1” en el contador.
6.Si la película se ha cargado incorrectamente, aparecerá la señal de advertencia “E” en el panel informativo LCD. Vuelva a cargar la película siguiendo los pasos mostrados anteriormente.
NOTAS
 La cámara ajusta automáticamente la sensibilidad de la película en películas con códigos DX entre 50 y 3200 ISO.
 Cuando utilice película sin códigos DX, la cámara ajustará automáticamente la sensibilidad de la película a 100 ISO.
  Cargue la película en condiciones de luz suave.
17
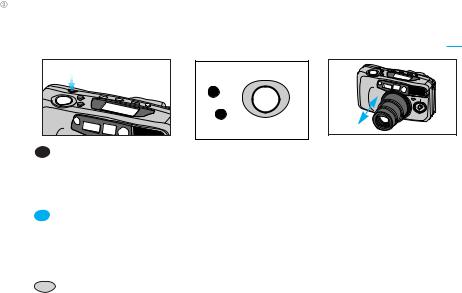
USING THE CAMERA/CÓMO UTILIZAR LA CÁMARA
T 
En
105, 120, 130, 140 mm.
W 
power on. The indicators will appear on the LCD panel. minutes, the power will be turned off automatically.
aim the camera at the subject and operate the zoom buttons.
the lens out  and press the
  (Wide) button to move the lens in
  . panel shows the focal lengths in the following sequence : 38, 45, 55, 70, 80, 90,
Pulse el botón de conexión/desconexión para conectar la cámara. Se activará el panel informativo LCD. Si no utiliza la cámara durante 3 minutos, ésta se desconectará automáticamente.
Mientras mira por el visor, apunte la cámara al sujeto y haga funcionar los botones del zoom.
Pulse el botón (Tele) para aumentar la longitud focal y así acercar los sujetos alejados, o pulse el botón (Angular) para disminuir la longitud focal y ampliar la cobertura de la imagen.
Durante esta operación, el panel informativo LCD mostrará las longitudes focales en el siguiente orden : 38, 45, 55, 70, 80, 90, 105, 120, 130, 140 mm.
18

HOLDING THE CAMERA/CÓMO SUJETAR LA CÁMARA
En |
shake, hold the camera steady, especially when using |
|
(Tele). |
|
Place the camera strap over your wrist. |
|
Both elbows (horizontal picture) or one elbow (vertical picture) should be held |
|
close to your body. |
|
Keep your eye close to the viewfinder when using the camera. This ensures |
|
correct framing. Ensure you can see all four sides of the viewing frame when |
NOTE |
composing your shot. |
|
Avoid obstructing the lens when you take a picture. Pictures can be spoiled when a finger, hair or camera strap falls in front of the Lens, Exposure Sensor or Auto-focus Windows.
When you take vertical pictures with flash, the flash should be above the lens.
Es |
longitudes focales largas (Tele). |
Apoye los dos codos (para hacer una fotografía horizontal) o uno solo (para hacer una fotografía vertical) contra su cuerpo. Mantenga el ojo pegado al visor cuando utilice la cámara. Así se asegurará un encuadre correcto. Asegúrese de poder ver los cuatro lados del encuadre cuando componga su imagen.
NOTAS
Evite obstruir el objetivo cuando realice una fotografía. Las imágenes pueden estropearse si un dedo, el pelo o la correa de la cámara cuelgan delante del objetivo, el sensor de exposición o las ventanillas del autofoco.
Cuando realice fotografías en posición vertical y utilice el flash, éste deberá quedar siempre por encima del objetivo.
19

TAKING PICTURES/CÓMO FOTOGRAFIAR
|
En Aim the Autofocus frame at a subject.(Refer to page 12) |
|
|
Press the Shutter button half way down. The lens is focused when the |
|
|
green lamp turns on. |
|
|
If a subject is between 0.68m (2.2ft) and 1m (3.28ft), the green lamp |
|
|
blinks slowly and Macro mode is set automatically. (Refer to page 52) |
|
|
If a subject is within 0.68m (2.2ft), the green lamp blinks quickly to indicate |
|
|
that the subject is too close and the shutter is locked. Ensure that the |
|
|
camera/subject distance is 0.68cm or more. |
|
|
Press the Shutter button all the way down to take a picture. |
|
|
The film will automatically advance after shooting and the frame counter will |
|
|
advance. |
|
|
Sitúe el recuadro del autofoco sobre el sujeto (consulte la página 12). |
|
|
Pulse el disparador hasta la mitad. Cuando el motivo se encuentre |
|
|
correctamente enfocado, la lámpara verde se iluminará. |
|
|
Si el sujeto se encuentra a una distancia de entre 0.68m (2.2 pies) y 1 m |
|
|
(3.28 pies), la lámpara verde parpadeará despacio y se ajustará |
|
|
automáticamente el modo macro (consulte la página 52). |
|
|
Si el tema se encuentra a una distancia de 0.68 m (2.2 pies) o inferior, |
|
|
parpadeará la lámpara verde para indicar que el tema está demasiado |
|
|
cerca y se bloquearé el obturador. Asegúrese de que la distancia de |
|
|
cámara a tema es de 0.68 cm o superior. |
|
|
Presione el disparador hasta el fondo para tomar la fotografía. |
|
20 |
La película avanzará automáticamente después de realizar la fotografía y |
|
avanzará el contador de exposiciones. |
||
|
 Loading...