


 Loading...
Philips TCD138/GS, TCD138/SDAEATMP, TCD138/LUAHAAAP, TCD138/SUAHAA4P, TCD138/WUAHAAAP User Manual
...Mobile phone
User manual

I |
|
|
QUICK GUIDE |
||
I |
|
|
|||
|
|
|
|
||
I |
SWITCH ON |
ADD A NAME |
ACCESS TO MENU |
||
I |
|||||
|
|
|
|
||
I |
Press |
Network |
|
Enter or exit |
|
I |
|
|
the menus. |
||
and hold. |
|
|
|
||
I |
|
Enter phone |
NAVIGATION |
||
I |
Enter PIN: |
number. |
|
|
|
I |
|
|
|
||
_ |
|
|
OK |
||
I |
01234_ |
|
|
||
|
|
Move Up |
|||
I |
|
|
|
||
Enter your |
|
|
or |
||
I |
PIN code. |
|
|
Back. |
|
I |
|
OK |
|
Move Right. |
|
I |
|
|
|
||
|
01234 |
|
|
||
I |
OK |
|
Move Left. |
||
|
Store no. |
|
|||
I |
MAKE A CALL |
|
|
||
|
|
|
|||
I |
Enter |
|
|
Move Down |
|
I |
phone |
OK |
|
or |
|
I |
number. |
|
|
Forward |
|
|
Name: |
OK |
or |
||
|
|
||||
I |
Call the |
_ |
|
Validate. |
|
|
|
||||
I |
number. |
|
|
|
|
I |
(e.g.: 112 for emer- |
Enter name. |
SWITCH OFF |
||
I |
gency see p. 9) |
|
|||
|
|
|
|
||
I |
ANSWER A CALL |
|
|
Press |
|
I |
|
OK |
|
and hold. |
|
|
|
|
|||
I |
12345678 |
|
|
|
|
|
Number: |
|
When your |
||
I |
|
|
|||
|
01234_ |
|
phone is |
||
I |
|
|
switched off, you |
||
Accept. |
|
|
|||
I |
If number is |
|
cannot receive |
||
|
|
||||
|
OK. |
|
calls. |
||
I |
END A CALL |
OK |
|
|
|
|
|
|
|||
I |
|
Stored |
|
|
|
I |
End. |
|
|
||
|
|
|
|||
I |
|
|
|
|
|

|
|
|
|
|
|
|
M |
|
|
MENU |
|
|
|
||
|
|
|
|
|
ENU |
||
|
|
|
|
|
|
|
|
FORWARDING MESSAGES |
|
NAMES |
|
CALLS |
EXTRA |
SETTINGS SECURITY |
|
|
|
|
|||||
|
|
|
|
|
|
|
|
|
|
|
|
|
|
|
|
|
|
|
|
|
|
|
|
|
|
|
|
|
|
|
|
M |
|
|
|
|
|
|
MESSAGES |
|
|
|
|
|
|
|
AP |
||
|
|
|
|
|
|
|
|
|
|
|
|
|
|
|||
|
|
|
|
|
|
|
|
|
|
|
|
|
|
|
||
Centre no. |
Archive |
|
|
|
New |
|
Send |
Usual msg. |
|
|
|
|
||||
|
|
|
|
|
|
|
|
|
|
|
|
|
|
|
|
|
|
|
|
|
|
|
|
|
|
|
|
|
|
|
|
|
|
|
|
|
|
|
|
|
|
|
|
|
|
NAMES |
|
|
|
|
|
|
|
|
|
|
|
|
|
|
|
|
|
|
|
|
|
|
|
CALLS |
|
|
|
|
|
|
|
Search |
View |
Add |
Own number |
|
||
|
|
|
|
|
|
|
|
|
|
|
|
|
|
|
|
|
|
|
|
|
|
|
|
|
|
|
|
|
|
|
|
|
|
Delete all |
|
View |
|
|
|
Meters |
|
|
|
|
|
|
|
|
|
|
|
|
|
|
|
|
|
|
|
|
|
|
|
|
|
|
|
|
|
|
|
|
|
|
|
|
|
|
|
|
|
|
|
|
|
|
|
|
|
|
|
|
|
|
|
|
|
|
|||
|
|
|
|
|
EXTRA |
|
|
|
|
|
|
|
|
|||
Stopwatch |
Clock |
|
Alarm clock |
Calculator |
BioCalendar |
Converter |
|
|
|
|||||||
|
|
|
|
|
|
|
|
|
|
|
|
|
|
|
|
|
|
|
|
|
|
|
|
|
|
|
|
|
|
|
|
|
|
|
|
|
|
|
|
|
|
|
|
|
|
|
|
|
|
|
|
|
|
|
SETTINGS |
|
|
|
|
|
|
|
|
||||
Register |
Key tones |
|
|
|
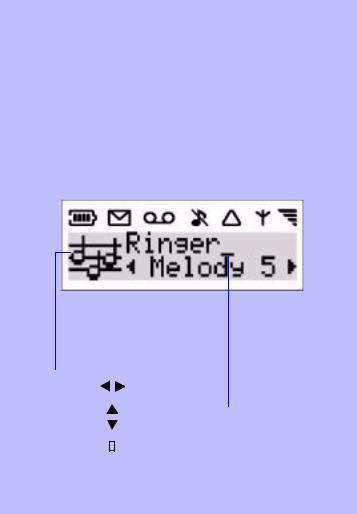
Ringer |
|
Voicemail |
Box number |
Broadcast |
|
|
|
||||
|
|
|
|
|
|
|
|
|
|
|
|
|
|
|
|
|
|
|
|
|
|
|
|
|
|
|
|
|
|
|
|
|
|
|
|
|
|
|
|
|
|
|
|
|
|
|
|
|
|
|
|
|
|
|
|
|
|
|
|
|
|
|
SECURITY |
|
|
|
|
|
|
|
|
|
|
|
|
|
|
|
|
|||||
|
|
|
|
Change PIN2 |
Change PIN |
|
PIN code |
Fixed names |
|
|
|
|||||
|
|
|
|
|
|
|
|
|
|
|
|
|
|
|
|
|
|
|
|
|
|
|
|
|
|
|
|
|
|
|
|
|
|
I I I I I I I I I I I I I I I I I I I I I I I I I I I I I I I I I
TABLE OF CONTENTS
Table of contents |
1 |
Special functions |
10 |
|
Before you start |
2 |
Answer a second call |
10 |
|
The micro-SIM card |
2 |
Automatic redial |
10 |
|
The battery |
2 |
Scratchpad |
10 |
|
Remove the battery cover |
2 |
Touchtones (DTMF) |
11 |
|
|
|
|
||
Remove the battery |
2 |
Hide your identity |
11 |
|
|
|
|
||
Insert the micro-SIM card |
3 |
Menus |
12 |
|
Insert the battery |
3 |
Discover the Compass key |
12 |
|
Replace the battery cover |
3 |
Names |
13 |
|
Charge the battery |
3 |
Setting up Flash Dial |
15 |
|
Discover your phone |
4 |
Messages |
15 |
|
Display |
5 |
Calls |
19 |
|
Settings |
21 |
|
||
Entering text |
6 |
|
||
Security |
24 |
|
||
Basic functions |
7 |
|
||
Extra |
25 |
|
||
Switch ON/OFF |
7 |
Call forwarding |
28 |
|
Make a call |
7 |
Philips Authentic Accessories 30 |
||
Answer or reject a call |
8 |
Troubleshooting |
32 |
|
Earpiece volume |
8 |
|
||
Safety Precautions |
33 |
|
||
Consult last calls |
8 |
|
||
Index |
35 |
|
||
Adjust ringer volume |
8 |
|
||
|
|
|
||
Emergency call |
9 |
|
|
|
Change language |
9 |
|
|
|
International call |
9 |
|
|
|
Keypad lock/unlock |
9 |
|
|
|
|
|
|
|
|
1
BEFORE YOU START
|
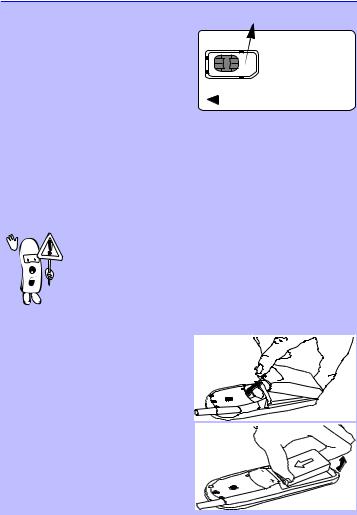
From your card, remove |
The micro-SIM card |
the micro-SIM card |
|
To use your phone, you must insert a valid micro-SIM card supplied by your GSM network operator. When you switch the phone on, it may ask for the PIN code. The PIN code is the
secret code of the micro-SIM card.
The micro-SIM card contains your subscription number and phone number. It also contains a memory in which you can store phone numbers and messages. If you use your micro-SIM card on another phone, you still retain the same phone number, stored numbers, and messages.
The battery
Your phone is powered by a rechargeable battery.
•After you plug in the battery, please wait a few seconds
before pressing the On/Off button to switch the phone on.
• A battery only reaches its maximum capacity after being totally discharged and recharged 2 or 3 times.
• A battery lasts longer if you allow it to fully discharge from time to time.
•If you do not use your phone for several days, it is better to remove the battery.
Remove the battery cover
Press on the latch on the back of the phone and lift off the battery cover.
Remove the battery (if necessary)
Lift up on the bottom of the battery and remove from the phone.
PHILIPS
2

BEFORE YOU START
Insert the micro-SIM card
First, place the micro-SIM card into the appropriate slot in the battery compartment (the clipped corner should be at the top left). Then, slide the card with your finger until it stops.
Insert the battery
1.Keep the battery - and + on the top facing the - and + of the telephone.
2.Slide the battery onto the contacts points and press.
Replace the battery cover
Hook the battery cover onto the hinges on bottom of phone and press forward until the latch catches.
Charge the battery
With the battery inserted in the phone, plug the connector into the right socket at the base of the phone. Next, plug the transformer unit into an AC power socket.
The only way to turn off the charger is to unplug it, so use an easily accessible AC power socket.
PHILIPS
The battery icon on your phone’s display indicates the state of the charge process:
•Bars moving = battery is charging.
•Bars steady = battery is fully charged.
•Battery outline flashing (see Troubleshooting p. 32)
You can switch the phone on and use it during charging.
The first time you charge the battery and later, if it is completely discharged, the battery icon will only appear 2 to 3 minutes after you connect the charger.
3

DISCOVER YOUR PHONE
"Compass Key" use this key to
navigate the menus, the OK key is used to validate information
Green "CALL" key press this key to call the number or name on the display or use it to answer a call
"CLEAR" key  to delete numbers and letters on the display
Keypad to enter
numbers and text
Earpiece
Antenna
listen here
Display |
see next page |
Red "POWER/ END" key
a long press on this key switches the phone on/off, a short press ends a call
Menu key
to enter and exit the menus
 Microphone
speak here
If you encounter the

 symbol in this manual, it means that you have to press and hold the key to activate the function.
4
|
|
|
|
|
|
|
|
|
DISPLAY |
||
New text message(s) |
|
|
Silent mode |
Network |
|||||||
if on: you received new messages |
if on: phone will not |
if on: your phone is |
|||||||||
if flashing: the memory is full, you |
ring or beep (except |
registered to a network |
|||||||||
need to delete old messages |
for the alarm clock) |
if flashing: registration is |
|||||||||
before you can receive new ones |
|
|
|
in progress |
|||||||
|
|
|
|||||||||
Battery level |
New voicemail |
Roaming |
|
Reception quality |
|||||||
the bars indicate the |
If on: there are |
your phone |
|
the more bars |
|||||||
battery level (4 bars |
new messages |
is registered |
shown the better |
||||||||
means full, no bars |
waiting in your |
to a foreign |
|
the reception |
|||||||
means recharging is |
voicemailbox (*) |
network |
|
|
|
|
|||||
|
|
|
|
||||||||
needed) |
|
|
|
|
|
|
|
|
|
|
|
|
|
|
|
|
|
|
|
|
|
|
|
|
|
|
|
|
|
|
|
|
|
|
|
|
|
|
|
|
|
|
|
|
|
|
|
|
|
|
|
|
|
|
|
|
|
|
|
|
|
|
|
|
|
|
|
|
|
|
|
|
|
|
|
|
|
|
|
|
|
|
|
|
Arrows |
||
|
indicate in which directions |
||
|
you can go |
||
Graphics area |
|
|
|
displays the clock |
|
|
Left/Right |
and guides you |
|
|
and |
through the menu |
|
|
|
|
|
Back/Forward |
|
|
|
|
|
|
|
|
or |
|
|
|
End of menu |
|
|
|
|
2 text lines
to enter numbers and text or to read text messages
Cursor
indicates that you can enter numbers or text
(*) Depending on the network.
5

ENTERING TEXT
Each key corresponds to several characters.
Example: |
TO OBTAIN |
Space |
|
D |
ñ |
@ |
|
|
|
|
|
|
|
|
|
|
|
PRESS |
|
|
|
|
|
|
|
|
Once |
|
Once |
Five times |
Five times |
|
|
|
|
|
|
quickly |
quickly |
|
|
|
|
|
|
|
|
|
Key |
Characters |
|
|
|
||
|
|
|
|
|
|
||
|
|
space 1 ( ) & £ $ ¥ |
|
|
|||
|
|
|
|
|
|
|
|
|
|
a b c 2 à ä å æ |
ç |
|
|
||
d e f 3 é è Φ
g h i 4 Γ ì
j k l 5 Λ
m n o 6 ñ ò ö ø
p q r s 7 ß ∏ Θ Σ
t u v 8 ü ù
w x y z 9 Ω Ξ Ψ
. 0 ’’ ’ ? ! , : ; ¡ ¿
* + - / %
# = < > @
 While you enter text your phone changes between upper-case and
  lower-case automatically.
6

BASIC FUNCTIONS
S W I T C H O N / O F F . ..
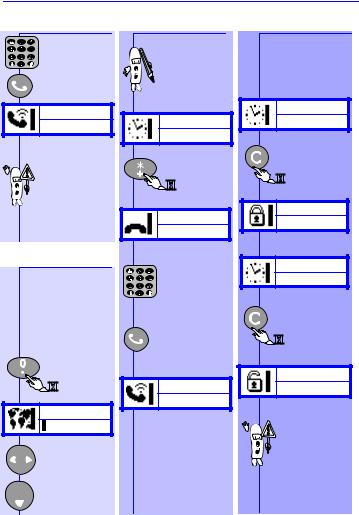
SWITCH ON
Press and hold.
Enter PIN:
_
Sometimes entering the PIN code is not necessary (depends on your subscription and on your PIN request settings - see page 24).
Enter your
PIN code.
The digits entered are replaced by big dots.
OK
If you enter a wrong code 3 times your card will be
blocked. If this happens, contact your operator.
PIN correct
...
If this is the phone’s initial use or if the battery has been removed since the last use, you will need to re-set the clock
(see p. 26).
Registering
Network
SWITCH OFF
Press and hold.
Goodbye
MA K E A C A L L
Network
Enter phone number.
01456_
Call the number.
Calling
0145678901
Black Jack
00:02
Display shows a call cost if sent by your network.
The name will be displayed only if the name is stored in your phone’s Names list .
END CALL
7
BASIC FUNCTIONS
AN S W E R O R R E J E C T A C A L L
0123456789
The caller number is displayed only if your subscription supports caller line identification.
If the number is in your Names list, the name will appear instead.
Accept the call
or
Reject the call.
E A R P I E C E V O L U M E
While on a call you can adjust the earpiece volume.
Helen
17:24
Raise earpiece volume.
OR
Helen
17:24
Lower ear-
piece volume.
OK
Helen
17:24
AD J U S T R I N G E R
CO N S U L T L A S T C A L L S V O L U M E
Your phone automatically stores a list of the last 10 calls you dialled and the last 10 callers who dialled you (including missed calls).
Network
Display the last call made, received or missed.
Calls
Florence 
To view other calls.
To call.
For information on viewing the last 20 calls you placed or received, see
"Calls Section" p. 19.
You can adjust and turn off the ringer volume.
Network
Display ringer volume selection.
Volume
Medium

 Silent
 Low
Low Medium
 High
High 

Select the volume.
Volume
Silent
Validate volume
OK selection.
Set
8
BASIC FUNCTIONS
E M E R G E N C Y C A L L |
|
|
Enter 112 |
|
Calling |
e |
112 |
Depending on your network operator, the emergency number 112 can be dialled without the micro-SIM card inserted.
CH A N G E L A N G U A G E
Normally your phone automatically selects the right language for your country, but in case you want to change it:
Press and hold.
Language
English 
Select language.
OK
IN T E R N A T I O N A L C A L L KE Y PA D L O C K /U N L O C K |
||
To make an |
Avoid undesired |
|
international |
keystrokes when the |
|
call, you can |
phone is in your |
|
use "+" as the |
pocket or purse. |
|
international |
|
|
prefix. |
|
|
|
Network |
|
Network |
|
|
|
Press |
|
Press |
and hold |
|
to lock |
||
and hold. |
||
keypad. |
||
|
||
+_
Dial the number (international country code and local number).
Call the number.
Calling
+831234567
Keypad is
locked
Network
Press and hold to unlock keypad.
Keypad is
unlocked
When the keypad is locked, it is possible to dial the emergency number and to receive calls.
9
Loading...