


 Loading...
Register your product and get support at
PhotoAlbum
SPH8408
SPH8428
SPH8528
EN |
User manual |

Contents
1 Important |
3 |
Safety |
3 |
Safety precautions and maintenance |
3 |
Notice |
3 |
Respect copyrights |
3 |
Recycling |
3 |
North Europe Information |
|
(Nordic Countries) |
4 |
Class II statement |
4 |
2 Your PhotoAlbum |
5 |
Introduction |
5 |
What’s in the box |
5 |
Overview of your PhotoAlbum |
6 |
3 Get started |
7 |
Charge the built-in battery |
7 |
Overview of the battery/status display |
|
icons |
8 |
Turn on the PhotoAlbum |
8 |
Turn off the PhotoAlbum |
9 |
Transfer your media |
9 |
Transfer your media with a storage |
|
device |
9 |
Transfer your media with PC |
11 |
Quick menu |
11 |
Know these keypad icons |
12 |
4 Play |
13 |
Display photos |
13 |
Manage slideshow and photos |
13 |
Zoom and crop a photo |
14 |
Play videos (SPH8528) |
15 |
Manage videos (SPH8528) |
15 |
Play background music (SPH8528) |
16 |
5 Browse |
17 |
Browse and manage albums and media |
17 |
Add media to the favorite album |
18 |
Create an album |
18 |
Copy media |
19 |
Move media |
19 |
|
Delete media |
19 |
|
Group media |
19 |
|
Rename an album |
19 |
|
Select multiple media to manage |
19 |
|
Rotate photos |
19 |
|
|
|
6 |
Clock |
20 |
|
Display the clock |
20 |
|
Clock menu |
20 |
|
Select a clock/calendar style |
20 |
|
|
|
7 |
Event reminder |
21 |
|
Create an event reminder |
21 |
|
Enter the name of event reminder |
22 |
|
Edit an event reminder |
22 |
|
View an event reminder |
25 |
|
|
|
8 |
Settings |
26 |
|
Select an on-screen language |
26 |
|
Adjust brightness |
26 |
|
Set time/date |
27 |
|
Set time/date format |
27 |
|
Set SmartPower timer |
28 |
|
Hibernate the PhotoAlbum |
28 |
|
Set auto orientation |
29 |
|
Turn button sound on/off |
29 |
|
Protect/Unprotect content on a storage |
|
|
device |
30 |
|
Set demo on/off |
30 |
|
Slideshow setting |
31 |
|
Select slideshow interval |
31 |
|
Select slideshow sequence |
31 |
|
Select view mode for slideshow |
32 |
|
Select file type for slideshow |
|
|
display(SPH8528) |
32 |
|
Select a transition effect |
33 |
|
Select background color |
33 |
|
Power meter |
34 |
|
Unlock the touch panel |
35 |
|
View information of the PhotoAlbum |
36 |
|
Reset all settings to factory default |
36 |
|
|
|
9 |
Upgrade the PhotoAlbum |
37 |
|
|
|
10 |
Product information |
38 |
English
EN 1

11 |
Frequently asked questions |
40 |
|
|
|
12 |
Glossary |
42 |
Need help?
Please visit www.philips.com/welcome where you can access a full set of supporting materials such as user manual, the latest software updates and answers to frequently asked questions.
2EN

1 Important
Safety
Safety precautions and maintenance
•Never touch, push, rub or strike the screen with hard objects as this may damage the screen permanently.
•When the product is not used for long periods, unplug it.
•Before you clean the screen, turn off and unplug the power cord. Only clean the screen with a soft, water-damp cloth. Never use substances such as alcohol, chemicals or household cleaners to clean the product.
•Never place the product near naked flames or other heat sources, including direct sunlight.
•Never expose the product to rain or water. Never place liquid containers, such as vases, near the product.
•Never drop the product. When you drop the product, it will be damaged.
•Ensure that you install and use services or software only from trustworthy sources free of virus or harmful software.
•This product is designed for indoor use only.
•Only use the supplied power adaptor for
the product.
Before you store the PhotoAlbum in to the carrying pouch, turn off the PhotoAlbum.
Notice
English
This product is in compliance with the essential requirements and other relevant provisions of Directives 2006/95/EC (Low Voltage), 2004/108/EC (EMC).
Respect copyrights
The making of unauthorized copies of copyprotected material, including computer programs, files, broadcasts and sound recordings, may be an infringement of copyrights and constitute a criminal offence. This equipment should not be used for such purposes.
Recycling
Your product is designed and manufactured with high quality materials and components, which can be recycled and reused.
When you see the crossed-out wheel bin symbol attached to a product, it means the product is covered by the European Directive 2002/96/EC:
Never dispose of your product with other household waste. Please inform yourself about the local rules on the separate collection of electrical and electronic products. The correct disposal of your old product helps prevent potentially negative consequences on the environment and human health.
Your product contains a built-in rechargeable battery covered by the European Directive 2006/66/EC, which cannot be disposed of with normal household waste.
EN 3

To safeguard the functionality and safety of your product, take your product to an official collection point or service center where
a professional can remove or replace the battery.
Please inform yourself about the local rules on separate collection of batteries. The correct disposal of batteries helps prevent potentially negative consequences on the environment and human health.
 Caution
•RISK OF EXPLOSION IF BATTERY IS REPLACED BY AN INCORRECT TYPE.
•DISPOSE OF USED BATTERIES ACCORDING TO THE INSTRUCTIONS.
•Never remove the built-in battery except for disposal of the product.
Always bring your product to a professional to remove the built-in battery.
 a
a
b
North Europe Information
(Nordic Countries)
VARNING:
FÖRSÄKRA DIG OM ATT HUVUDBRYTARE OCH UTTAG ÄR LÄTÅTKOMLIGA, NÄR DU STÄLLER DIN UTRUSTNING PÅPLATS. Placering/Ventilation
ADVARSEL:
SØRG VED PLACERINGEN FOR, AT NETLEDNINGENS STIK OG STIKKONTAKT ER NEMT TILGÆNGELIGE. Paikka/Ilmankierto
VAROITUS:
SIJOITA LAITE SITEN, ETTÄ VERKKOJOHTO VOIDAAN TARVITTAESSA HELPOSTI IRROTTAA PISTORASIASTA. Plassering/Ventilasjon
ADVARSEL:
NÅR DETTE UTSTYRET PLASSERES, MÅ DU PASSE PÅ AT KONTAKTENE FOR STØMTILFØRSEL ER LETTE Å NÅ.
Class II statement
Class II equipment symbol:
This symbol indicates that this product has a double insulation system.
c
d 
4EN
2 Your |
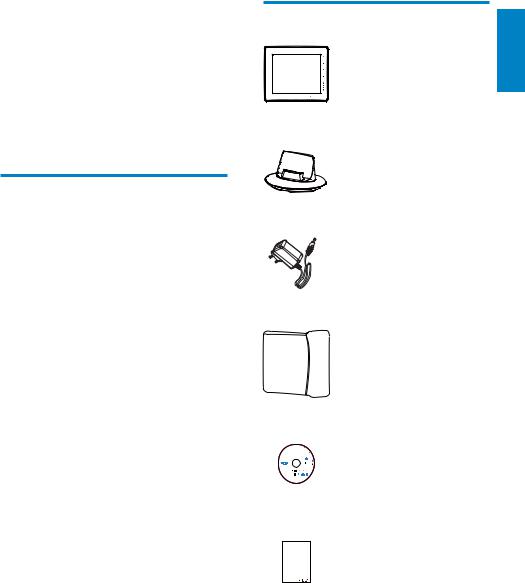
What’s in the box |
PhotoAlbum |
|
Congratulations on your purchase, and |
|
welcome to Philips!To fully benefit from the |
|
support that Philips offers, register your product |
• Philips Digital PhotoAlbum |
at www.philips.com/welcome. |
|
Introduction
This is a Philips Digital PhotoAlbum with built-in rechargeable battery.
With Philips Digital PhotoAlbum SPH8408/ SPH8428, you can use the PhotoAlbum to:
•Display JPEG photos
•Create event reminders for special cases
With Philips Digital PhotoAlbum SPH8528, you can use the PhotoAlbum to:
•Display JPEG photos
•Play camera video clips
•Play background music
•Create event reminders for special cases
•Charging dock
•AC-DC power adaptor
•Carrying pouch (for SPH8528 only)
PhotoAlbum 
•CD-ROM with User manual
PhotoAlbum
Quick Start Guide
•Quick start guide
English
EN 5

Overview of your PhotoAlbum
a b
c
d


 e
e 


 f
f
g h
i
j
k |
l |
m |
n |
a
•Hold to go to the home screen
•Tap to return to the upper-level menu
bMENU
• Tap to access/exit the option menu
cZoom buttons
•
•Tap to zoom in
•Tap to switch modes (wave mode -> album mode -> slideshow mode -> zoom in twice -> zoom in 4 times)
•
•Tap to zoom out
•Tap to switch modes (wave mode <- album mode <- slideshow mode <- zoom out twice <- zoom out 4 times)
dUp-down slider
•
•Tap to scroll up or to increase the volume
•
•Tap to scroll down or to decrease the volume
eOK
•Tap to play/pause slideshow/video
•Tap to confirm a selection
fLeft-right slider
•Swipe the left-right slider from left to right to unlock the touch panel
•
•Tap to scroll left/Swipe to skip left
•
•Tap to scroll right/Swipe to skip right
g  Mini USB jack
h  USB jack (for SPH8528 only)
i  SD/MMC/xD/MS/MS Pro card slot
j
•Press to turn on the PhotoAlbum
•Press and hold to turn off the PhotoAlbum
•Press to switch modes (between slideshow and clock/calendar; or, between wave view and album view)
k Speaker
l Charging dock connector
m RESET
n  Kensington lock
6EN

3 Get started
 Caution
•Use the controls only as stated in this user manual.
Always follow the instructions in this chapter in sequence.
If you contact Philips, you will be asked for the model and serial number of this apparatus.The model number and serial number are on the back of the apparatus.Write the numbers here: Model No. __________________________
Serial No. ___________________________
Charge the built-in battery
 Note
Note
•Charge the built-in battery before using the PhotoAlbum for the first time. The fully charged built-in battery lets you operate the PhotoAlbum for up to 1 hour for SPH8408/ SPH8428 or 2 hours for SPH8528.
Mode |
Charging time |
On |
- 2.5 hours (SPH8408/ |
|
SPH8428) |
|
- 4 hours (SPH8528) |
Off |
2.5 hours |
1Connect the DC plug of the supplied power cord to the DC jack of the supplied charging dock.
2Feed the cord through the cord channel.
English
3Connect the AC plug of the power cord to a power supply socket.
4Connect the PhotoAlbum to the charging dock.
EN 7

»If the PhotoAlbum is powered off, the LED indicators under the left-right slider and the OK button blink during the charging process.When the builtin battery is fully charged, the LED indicators stop blinking.
 Tip
Tip
•The lifespan of the battery varies with use.
•To maximize the lifespan of the battery, keep the PhotoAlbum connected to the power supply socket.
Overview of the battery/status display icons
The display indicates the approximate level of the built-in battery and the power supply status of the PhotoAlbum:
Icon |
Status |
|
|
|
Battery level 0%~5% |
|
|
Battery level 5%~20% |
|
|
|
|
|
|
|
|
Battery level 20%~40% |
|
|
|
|
|
|
|
|
Battery level 40%~60% |
|
|
|
|
|
|
|
|
Battery level 60%~80% |
|
|
|
|
|
|
|
|
Battery level 80%~100% |
|
|
|
|
|
|
|
|
PhotoAlbum in charging |
|
|
|
|
|
PhotoAlbum in dock, AC- |
|
|
powered, not charging |
Turn on the PhotoAlbum
 Note
Note
•When you connect the PhotoAlbum to a power supply, the PhotoAlbum turns on automatically.
1 When the PhotoAlbum is turned off and connected to the power supply, press  to turn on the PhotoAlbum.
For the first time you turn on the PhotoAlbum:
•The screen prompts you to select a language.
•Select a language, and then tap OK to confirm.
8EN

•The screen prompts you to set time and date.
•Tap  /
/ /
/ /
/ to set time and date, and then tap OK to confirm.
»The home screen is displayed.
If the demo function is activated:
»When the power cable is connected to the power socket, the PhotoAlbum on the charging dock turns on automatically.
• Set time and date if applicable.
»The PhotoAlbum starts demo slideshow.
Turn off the PhotoAlbum
 Note
Note
•You can only turn off the PhotoAlbum after all copy and save actions are complete.
•To turn off the PhotoAlbum, press and hold  for about 2 seconds.
Transfer your media
Transfer your media with a storage device
 Caution
•Do not disconnect the storage device from the PhotoAlbum during media transfer.
The PhotoAlbum supports most types of the following storage devices:
•Secure Digital (SD)
•Secure Digital High Capacity (SDHC)
•Multimedia Card (MMC)
•Multimedia Card Plus (MMC Plus)
•xD card (xD)
•Memory Stick (MS)
•Memory Stick Pro (MS Pro)
•USB flash drive (SPH8528 only)
English
EN 9

1Open the cover on the side of the PhotoAlbum.
2Insert a storage device into the PhotoAlbum.
SPH8408/SPH8428
SPH8528
» An option menu is displayed.
•[Play Photos] (SPH8408/SPH8428)
•[Play Inserted Content] (SPH8528): Select it to play media on the device
•[Browse]: Select it to browse media on the device
•[Copy to PhotoAlbum]: Select it to start transfer operation
3Select [Copy to PhotoAlbum], and then
tap OK.
» A confirmation message is displayed.
10 EN

To select all media:
1Select [Yes], and then tap OK.
2Select an album on the PhotoAlbum to store the media, and then tap OK.
To select a specific medium:
1Select [No], and then tap OK.
2Select a folder, and then tap  .
.
3Tap  /
/  /
/  /
/  and then OK to select/ deselect a medium.
4Tap MENU to continue the transfer operation.
5Select an album on the PhotoAlbum to store the photos/videos/music, and then tap OK.
•To remove a storage device, pull it out of the PhotoAlbum.
Transfer your media with PC
 Caution
•Do not disconnect the PhotoAlbum from the computer during media transfer.
1 Connect a USB cable to the PhotoAlbum and to the computer.
SPH8408/SPH8428
SPH8528
English
»You can drag and drop the media from the computer to an album on the PhotoAlbum.
2When the transfer is complete, disconnect the USB cable from the computer and the PhotoAlbum.
 Tip
Tip
•You can transfer media from the PhotoAlbum to a computer.
•The transfer speed depends the operating system and the software configuration of the computer.
Quick menu
1In the home screen, tap MENU. » The quick menu is displayed.
EN 11
2Select an option, and then tap OK.
3Follow the on screen instructions to adjust the brightness or view the status of
the PhotoAlbum.
•To exit the quick menu, tap MENU again.
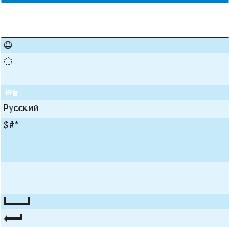
Know these keypad icons
|
|
|
Input in English |
|
|
|
Input in supported |
|
|
|
European languages |
|
|
|
Input in Simplified Chinese |
|
|
|
|
|
|
|
|
|
|
|
Input in Russian |
|
|
/ ABC |
Switch to select symbols, |
|
|
|
punctuations, alphabet or |
|
|
|
numbers |
aA |
Switch between upper and |
||
|
|
|
lower case |
|
|
|
Enter a blank space |
|
|
|
Enter a line break |
12 EN

4 Play
Display photos
 Note
Note
•You can display JPEG photos in slideshow mode on the PhotoAlbum.
1 In the home screen, select [Play] and then tap OK.
»(SPH8408/SPH8428) Photos are displayed in slideshow mode.
»(SPH8528) Photos/video clips are displayed in slideshow mode. If there are music files available, photos are played with background music by default.
In slideshow mode:
•To select the previous/next photo, tap  /
/ .
.
•To pause the slideshow, tap OK.
•To resume the slideshow, tap OK again.
•To view photos/videos in album mode, tap  .
.
•To view photos/videos in wave mode, tap  twice.
•To view photos in filmstrip mode, fast swipe the left-right slider from left to right.
In filmstrip mode: |
|
|
• |
Tap / to view the previous/next |
English |
• |
To return to slideshow mode, tap |
|
|
photo or video. |
|
OK.
 Tip
Tip
•If no button is activated for approximately 15 seconds, the filmstrip disappears and the slideshow resumes.
Manage slideshow and photos
You can take the following steps to manage the photo in slideshow mode or the slideshow settings:
1Tap MENU.
» An option menu is displayed.
2 Select an option, and then tap OK.
•[View Mode]: Select the view mode
•[Add to Favorites]: Add the media to the [Favorites] album on the PhotoAlbum
•[Slideshow Settings]
•[Interval]: Set the interval in slideshow
•[Shuffle]: Play media randomly or not
•[Color Tone]: Select the color for the photo
•[File Type] (SPH8528): Select the type of file shown in slideshow
•[Transition Effect]: Select the transition effect
EN 13
Loading...