


External hard disk |
|
|
|
|
SPE2000 |
|
|
|
|
|
|
SPE2005 |
|
EN User manual |
3 |
|
|
|
SPE2010 |
|
|
|
|
|
|
SPE2015 |
|
|
|
|
|
|
||
|
|
|
|
|
SPE2020 |
|
|
|
|
|
|
|
|
|
|
|
|
|
|
|
2

Contents |
EN |
|
Important note
When the computer does not recognize the hard disk (some computers provide insufficient bus power), we advise you to use the USB power cable supplied together with this product. For instructions and more information,
see page 5.
How to find warranty information?
Browse to the Philips warranty folder on the hard disk or look on www.philips.com/welcome
3

EN |
What’s in the box? |
|
A: External hard disk |
B: Mini USB cable |
EN |
External hard disk |
SPE2000 |
FR |
Disque dur externe |
SPE2005 |
SPE2010 |
||
|
|
SPE2015 |
|
|
SPE2020 |
Welcome/Bienvenue
Quick Start Guide
Guide de démarrage
1 Connect
Connexion
2 Enjoy
Apprécier
|
|
|
|
C: Quick Start Guide |
D: USB power cable |
||
4
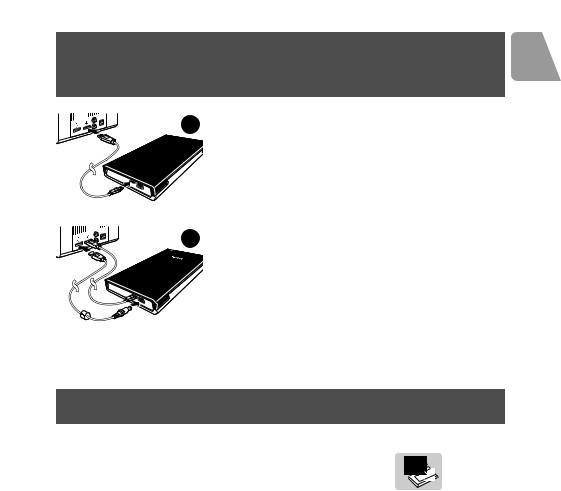
How to connect this external hard disk |
EN |
on your system? |
|
1 Connect the USB cable to the hard disk, and to an 

 empty USB port of the computer.
A drive icon, Philips External Hard Disk, appears in Windows Explorer and the blue light should light up. (The computer sometimes needs to be restarted, before you can use the new hardware).
2 When Windows does not recognize the hard disk (some PCs or laptops provide insufficient bus power on one USB port), plug the additional USB power cable (D) into an empty USB port of your computer.
How to safely disconnect?
1 Double-click the Safely Remove Hardware icon
in the system tray in the lower right part of the screen.
2In the window that appears, select the name of the device that is to be removed, then click the Stop button.
3When the Stop a hardware device screen appears, check that the correct information is displayed, and then click the OK button.
4When the message Safe to remove hardware appears, remove the drive from the computer’s USB port.
5
 Loading...