


 Loading...
Clock Radio |
User manual |
|
|
|
|
7000 Series |
|
|
|
R7705 |
|
|
|
Register your product and get support at
www.philips.com/support

Contents
Contents |
1 |
|
|
|
|
1 |
Important |
2 |
|
Safety |
2 |
|
|
|
2 |
Your clock radio |
3 |
|
Introduction |
3 |
|
What's in the box |
3 |
|
Overview of the clock radio |
3 |
|
|
|
3 |
Get started |
4 |
|
Install batteries |
4 |
|
Connect power |
4 |
|
Set time |
4 |
|
Turn on |
4 |
|
|
|
4 |
Listen to DAB+ radio |
5 |
|
Tune to DAB+ radio stations |
5 |
|
Store DAB+ radio stations automatically |
5 |
|
Store DAB+ radio stations manually |
5 |
|
Select a preset DAB+ radio station |
5 |
|
Show DAB+ information |
5 |
|
Use DAB+ menu |
6 |
|
|
|
5 |
Listen to FM radio |
6 |
|
Tune to FM radio stations |
6 |
|
Store FM radio stations automatically |
6 |
|
Store FM radio stations manually |
7 |
|
Select a preset radio station |
7 |
|
Show RDS information |
7 |
|
Use FM menu |
7 |
|
|
|
6 |
Bluetooth |
8 |
|
Play from Bluetooth enabled devices |
8 |
7 |
Other features |
8 |
|
Set alarm time |
8 |
|
Set sleep timer |
9 |
|
Adjust volume |
9 |
|
Adjust display brightness |
9 |
|
Wirelessly charge your smartphone |
9 |
|
Charge through USB port |
9 |
|
|
|
8 |
Product information |
10 |
|
|
|
9 |
Troubleshooting |
11 |
|
|
|
10 |
Notice |
12 |
1 EN

1 Important
Safety
 Warning
•Never remove the casing of this clock radio.
•Never lubricate any part of this clock radio.
•Never place this clock radio on other electrical equipment.
•Keep this clock radio away from direct sunlight, naked flames or heat.
•Make sure that you always have easy access to the power cord, plug or adaptor to disconnect the clock radio from the power.
•Read these instructions.
•Heed all warnings.
•Follow all instructions.
•Do not block any ventilation openings. Install in accordance with the manufacturer’s instructions.
•Do not install near any heat sources such as radiators, heat registers, stoves, or other apparatus
(including amplifiers) that produce heat.
•Protect the power cord from being walked on or pinched, particularly at plugs, convenience receptacles, and the point where they exit from the clock radio.
•Only use attachments/accessories specified by the manufacturer.
•Unplug this apparatus during lightning storms or when unused for long periods of time.
•Refer all servicing to qualified service personnel. Servicing is required when the apparatus has been damaged in any way, such as power-supply cord or plug is damaged, liquid has been spilled or objects have fallen into the apparatus, the apparatus has been exposed to rain or moisture, does not operate normally, or has been dropped.
•Battery usage CAUTION -To prevent battery leakage which may result in bodily injury, property damage, or damage to the clock radio:
•Install all batteries correctly, + and - as marked on the unit.
•Remove batteries when the unit is not used for a long time.
•The battery shall not be exposed to excessive heat such as sunshine, fire or the like.
•This clock radio shall not be exposed to dripping or splashing.
•Do not place any sources of danger on the clock radio (e.g. liquid filled objects, lighted candles).
•Where the plug of the Direct Plug-in Adapter is used as the disconnect device, the disconnect device shall remain readily operable.
2 EN
2 Your clock radio
Congratulations on your purchase, and welcome to Philips!To fully benefit from the support that Philips offers, register your product at www.philips.com/support.
Introduction
With this clock radio, you can
•listen to both FM and Digital Audio
Broadcasting (DAB+) radio;
•play audio from Bluetooth-enabled devices;
•set two alarms to ring at different times;
•charge your mobile device with the wireless phone charger or USB.
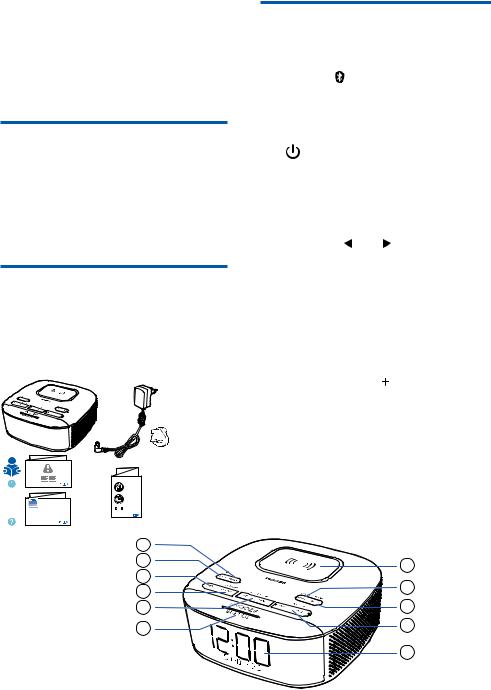
What's in the box
Check and identify the contents of your package:
•Main unit
•AC power adaptor
•Quick start guide
•Safety andWarranty leaflet
Quick start guide |
Overview of the clock radio
a.SLEEP
•Set the sleep timer. b.SOURCE 
•Press to select FM, DAB+, or Bluetooth mode.
•In Bluetooth mode, press and hold for more than 2 seconds to enter pairing mode.
c.
•Turn on or switch to standby. d.PRESET / SET TIME
•Store radio stations in memory.
•Select a preset FM station or DAB station.
•Set time.
e.HR / MIN / TUN
•Tune to radio stations.
•Set hour and minute.
•Skip to the previous/next track.
f.SNOOZE / BRIGHTNESS
•Snooze alarm.
•Adjust display brightness.
g.Display panel
•Display current status. h.AL1 / AL2 / VOL
VOL
•Set alarm.
•Adjust volume.
i.MENU / INFO
•Enter the DAB+ menu.
•Display DAB+/RDS station information.
j.SCAN / SELECT
•Scan/store radio stations automatcially.
•Confirm a selection.
k.Wireless charging pad
1 |
|
|
2 |
11 |
|
3 |
||
10 |
||
4 |
||
9 |
||
5 |
||
6 |
8 |
|
|
7 |
3 EN

3 Get started
Always follow the instructions in this chapter in sequence.
Install batteries
The batteries can only back up clock and alarm settings.
 Caution
••Risk of explosion! Keep the batteries away from heat, sunshine or fire. Never discard batteries in fire.
••Batteries contain chemical substances, so they should be disposed of properly.
Insert 2 AAA batteries (not provided) with correct polarity (+/-) as illustrated.
Connect power
 Caution
••Risk of product damage! Make sure that the power voltage corresponds to the voltage printed on the back or underside of the clock radio..
••Risk of electrical shock! When you unplug the power adapter, always pull the plug from the socket. Never pull the cord.
••Use only the AC power adapter specified in the manufacturer or sold with this unit.
Note
•• The type plate is located at the bottom of the clock radio.
4 EN
Set time
 Note
Note
••You can only set time in standby mode.
1In standby mode, press and hold SET TIME for more than 2 seconds.
2Press  TUN
TUN  to select <24 HR> or <12 HR> hour format, then press SET TIME to confirm.
3Press HR to set hour and MIN to set minute, then press SET TIME to confirm.
4Press  TUN
TUN  to set date, month and year [DD-MM-YY], then press SET TIME to confirm.
5Press  TUN
TUN  to select <UPDATE FROM RADIO> or <NO UPDATE>, then press SET TIME to confirm.
»»[SAVED] is displayed and the time is set.
Turn on
Press  to turn on the clock radio.
»»The unit switches to the last selected source.
To switch to standby mode, press  again. »»The real-time clock is displayed.
 Note
Note
••This product will switch to standby mode after 15 minutes of inactivity.
Loading...