


ENGLISH........................................................... |
2 |
FRANÇAIS........................................................ |
13 |
DEUTSCH.......................................................... |
24 |
ESPAÑOL.......................................................... |
35 |
NEDERLANDS ................................................ |
46 |
ITALIANO ......................................................... |
57 |
1
ENGLISH
LC700 17" CRT
COLOUR MONITOR
|
USER’S GUIDE |
|
CONTENTS |
|
|
1. |
Introduction ........................................................................... |
3 |
2. |
Safety Information ................................................................. |
3 |
3. |
Installing the monitor ............................................................ |
4 |
4. |
Adjusting the picture ............................................................. |
6 |
5. |
Display power management .................................................. |
9 |
6. |
Troubleshooting...................................................................... |
10 |
7. |
Specifications ......................................................................... |
12 |
2
1. INTRODUCTION
This manual contains instructions for installing and operating the LC700 Monitor. LC700 Monitor features:
•17” diagonal (16” viewable) 0.236 mm horizontal dot pitch CDT
•Supports high screen refresh rates and full scan flicker-free picture quality
•Includes On Screen Display menus for user control
•100-240V AC input voltage
•VESA DPMS (Display Power Management Signalling)
•VESA DDC1/2B compatibility
2. SAFETY INFORMATION
When you set up and use your display unit, follow the safety instructions below.
Do not use the display unit in humid environments like bathrooms, damp cellars, swimming pools, etc.
This equipment must be connected to an earthed outlet close to the display unit and accessible in case you need to disconnect the display.
Never insert objects into the openings on the outside of the device as you can come into contact with live electrical components. This can cause fire or give strong electrical shocks.
Slots in the cabinet are provided for ventilation. Do not block the ventilation slots in the display unit cabinet.
Do not under any circumstances open the display unit cabinet.
Cleaning and Maintenance
•To avoid risk of electric shock, do not disassemble the display unit cabinet.The unit is not user-serviceable. Remember to unplug the display unit from thepower outlet before cleaning.
•Do not use alcohol (methyl, ethyl or isopropyl) or any strong solvent. Do notuse thinner or benzene, abrasive cleaners or compressed air.
•Do not wipe the screen with a cloth or sponge that could scratch the surface.
•To clean your antistatic screen, use water and a special micro fibre screencleaning tissue used in optical lens cleaning, or lightly dampen a soft, cleancloth with water or a mild detergent.
•To clean display unit cabinet, use a cloth lightly dampened with a milddetergent.
•For transportation of the monitor, the swivel base must be removed.
NGLISHE
3

ENGLISH
3. INSTALLING THE MONITOR
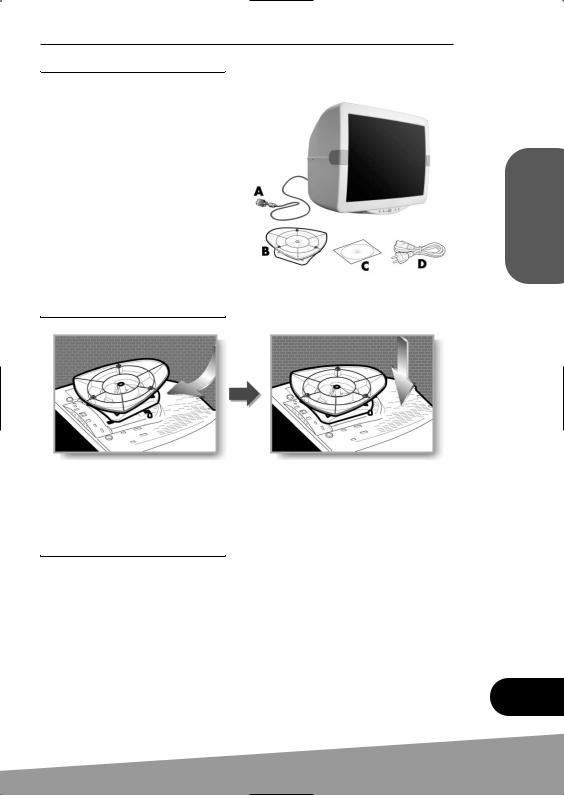
3-1. Packing List
The following items should be found in the packaging.
A:Attached signal cable
B:Tilt and swivel stand
C:Compact disk*
D:Power cord
*Optional
3-2. Connecting the swivel and tilt base
•Place the base against the bottom of the monitor so that the base connecters are aligned with the corresponding slots.
•Push the base towards the front of the monitor until the latch locks into position.
3-3. Selecting a suitable location
•30cm from other electrical or heat-emitting equipment and allow at least 10cm on each side for ventilation.
•Place the monitor in a position where no light shines directly onto or is reflected on the screen.
•To reduce eyestrain, avoid installing the display unit against a bright background such as a window.
•Position the monitor so that the top of the screen is no higher than eye level.
•Position the monitor directly in front of you at a comfortable reading distance (45 to 90cm approx).
4
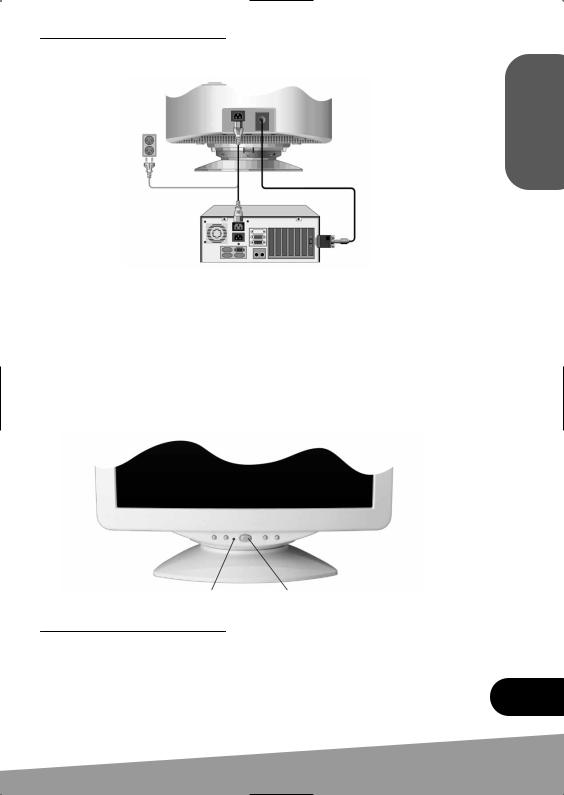
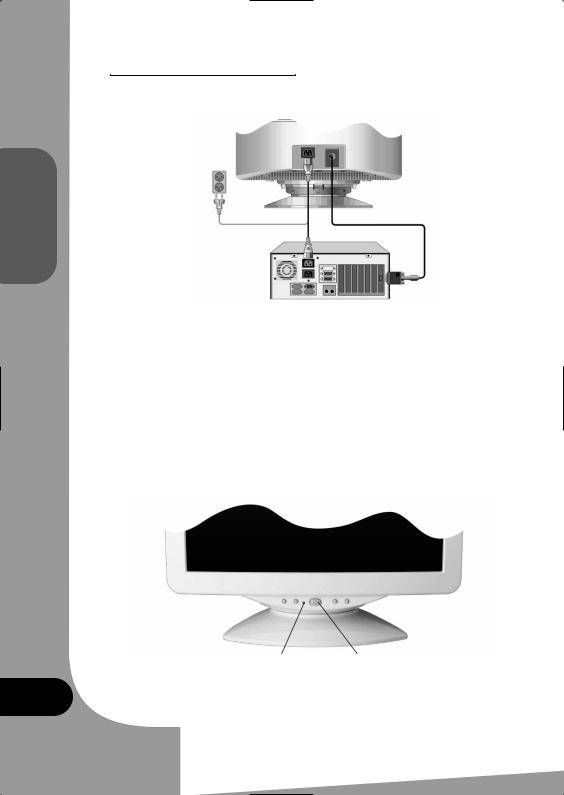
3-4. Connecting the monitor
Before you start cabling your monitor, check that the power is off on all units. To avoid any possibility of electric shock, always connect your equipment to properly earthed outlets.
NGLISHE
1.Insert the 15-pin signal cable connector to the VGA connection on your computer and screw it down.
2.Plug the display unit’s power cable first to the back of the display unit.
3.Then plug the power cable to a 100V - 240V earthed electrical outlet or to the system unit, if it has an outlet for the display power cable.
4.Turn on the display unit using the Power switch and check that the power LED is on. If not, repeat steps 2, 3 and 4 or refer to the Troubleshooting section of this guide.
5.Turn on the power to the computer. The picture will appear within about 15 seconds. Adjust the picture to obtain optimum picture quality. See the section Adjusting the picture in this guide for more information.
Power LED |
Power Switch |
3-5. Setting the refresh rate
Follow the instructions below to set your refresh rate in Windows 98/ME/XP/2000.
1.Go to the configuration window (Start-Settings-Configuration window).
2.Double click on the “Display” icon.
5
ENGLISH
3.Click on the “Settings” tab.
4.Click on the “Advanced” button.
5.Click on “Adapter” and select 85Hz from the list.
6.Click on “Apply” to accept the selected value.
The recommended setting is a resolution of 1024x768 and a refresh rate of 85Hz.
Preset Timing Table
No. |
Resolution |
Horizontal |
Refresh Rate |
|
Frequency |
||||
|
|
|
||
1 |
720 x 400 |
31.5 KHz |
70 Hz |
|
|
|
|
|
|
2 |
640 x 480 |
43.3 KHz |
85 Hz |
|
|
|
|
|
|
3 |
640 x 480 |
50.6 KHz |
100 Hz |
|
|
|
|
|
|
4 |
800 x 600 |
46.9 KHz |
75 Hz |
|
|
|
|
|
|
5 |
800 x 600* |
53.7 KHz |
85 Hz |
|
|
|
|
|
|
6 |
800 x 600 |
63.9 KHz |
100 Hz |
|
|
|
|
|
|
7 |
1024 x 768 |
60.0 KHz |
75 Hz |
|
|
|
|
|
|
8 |
1024 x 768* |
68.7 KHz |
85 Hz |
|
|
|
|
|
* Recommended primary mode.
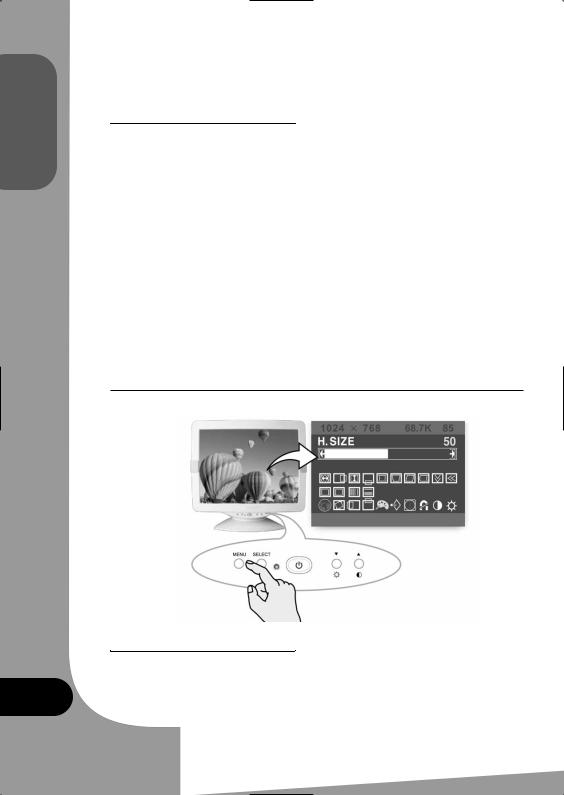
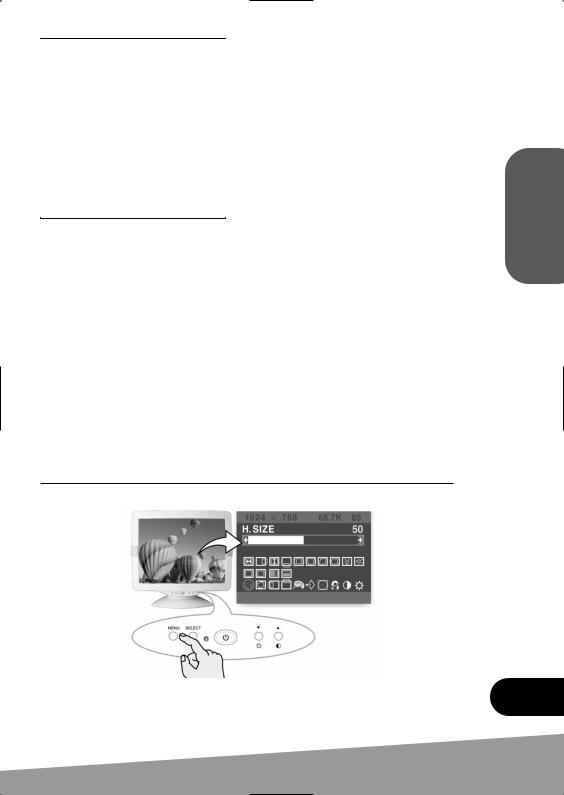
4. ADJUSTING THE PICTURE
You can adjust the screen display by using the buttons located below the screen.
4-1. Using the On Screen Display
1.Push the MENU button to open the OSD. The resolution and frequency are displayed at the top of the menu box for your information.
6
2.Push the  or
or  button to choose the item you want to adjust. The selected item is highlighted.
3.Push the SELECT button to adjust the highlighted item.
4.Use the  or
or  button to adjust the selection.
5.Push the MENU button to return to the previous menu if you are in a submenu.
6.The display unit automatically saves the new settings in 1 second after your last adjustments and the menu disappears. You can also push the MENU button to make the menu disappear.
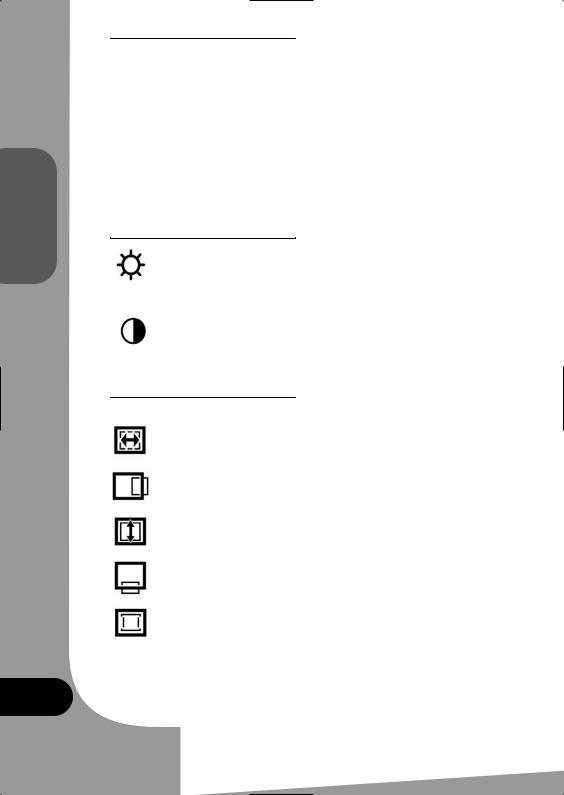
4-2. Direct access buttons
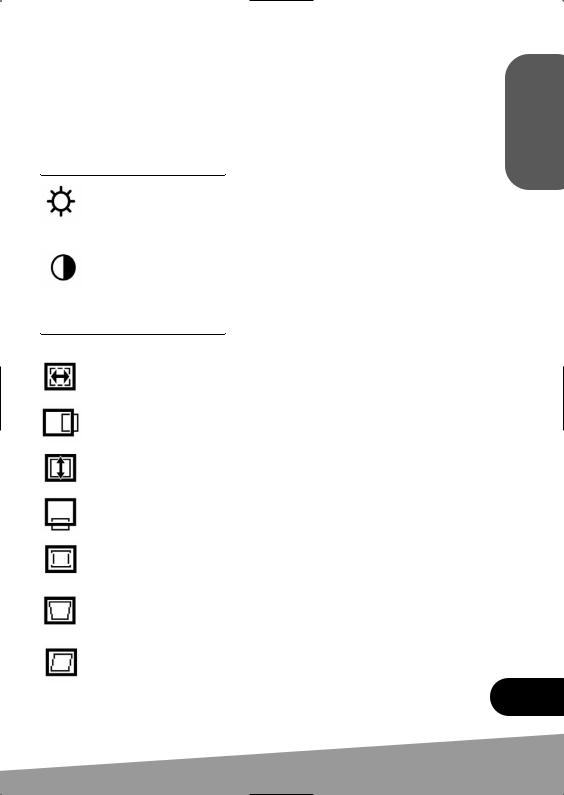
BRIGHTNESS
Use the  button to select the brightness adjustment.
Adjust with the  or
or  button.
CONTRAST
Use the  button to select the contrast adjustment.
Adjust with the  or
or  button.
4-3. OSD Adjustments
The OSD adjustments available are listed below.
H. SIZE
Adjusts the horizontal size of the entire screen image.
H. POSITION
Adjusts the horizontal position of the entire screen image.
V. SIZE
Adjusts the vertical size of the entire screen image
V. POSITION
Adjusts the vertical position of the entire screen image.
PINCUSHION
If the vertical sides of the picture curve in or bulge out, you can correct the pincushion distortion by using this adjustment.
TRAPEZOID
If the picture is wider at the top or at the bottom, you can correct the trapezoid distortion by using this adjustment.
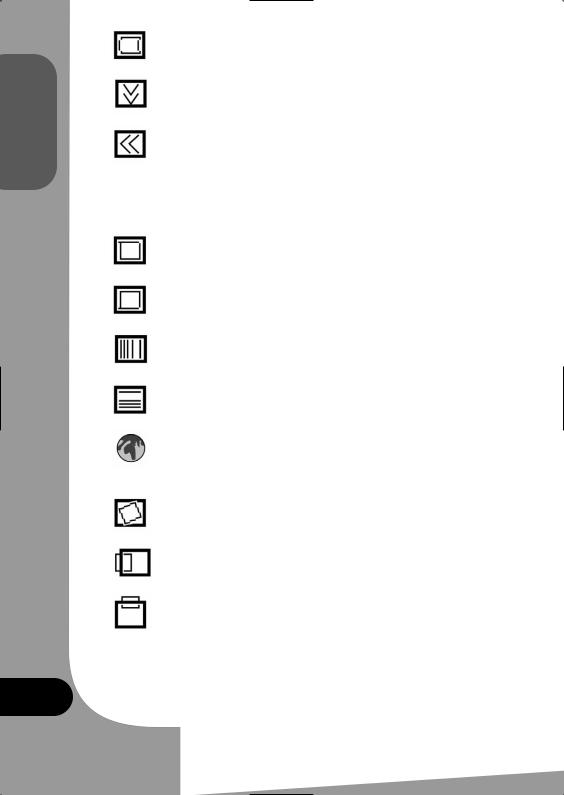
PARALLEL
If the sides of the screen image are tilted, you can correct the parallel distortion by using this adjustment.
NGLISHE
7
ENGLISH
PIN BALANCE
If the sides of the picture are bowed to the right or to the left, you can correct the pincushion balance by using this adjustment.
V. MOIRE
Clears vertical moire if a series of concentric circles or arcs appear on your screen.
H. MOIRE
Clears horizontal moire if a series of concentric circles or arcs appear on your screen.
Moire is an interference pattern that makes the screen seem to have faint lines. A picture that is rasterised or consists of (small) repeating figures is sensitive to moire interference. Strong colours are also liable to intensify moire.
The moire pattern on the screen does not affect the printout of the image.
TOP CORNER
If the top corner sides of the picture curve in or bulge out, you can correct the top corner distortion by using this adjustment.
BOTTOM CORNER
If the bottom corner sides of the picture curve in or bulge out, you can correct the bottom corner distortion by using this adjustment.
H. LINEARITY
If either left or right side of the picture is out of proportion to the other, you can correct horizontal linearity by using this adjustment.
V. LINEARITY
If top and bottom side of the picture is out of proportion to the centre area, you can correct vertical linearity by using this adjustment.
LANGUAGE
You can select the language in which adjustment menus are displayed.
The following languages are available: English, French, German, Italian, Spanish, Swedish, Finnish, Danish, Portuguese and Dutch.
ROTATION
If the entire screen image is tilted, you can correct the distortion by using this adjustment.
OSD H. POSITION
Adjusts the OSD menu’s horizontal position on the screen.
OSD V. POSITION
Adjusts the OSD menu’s vertical position on the screen.
8
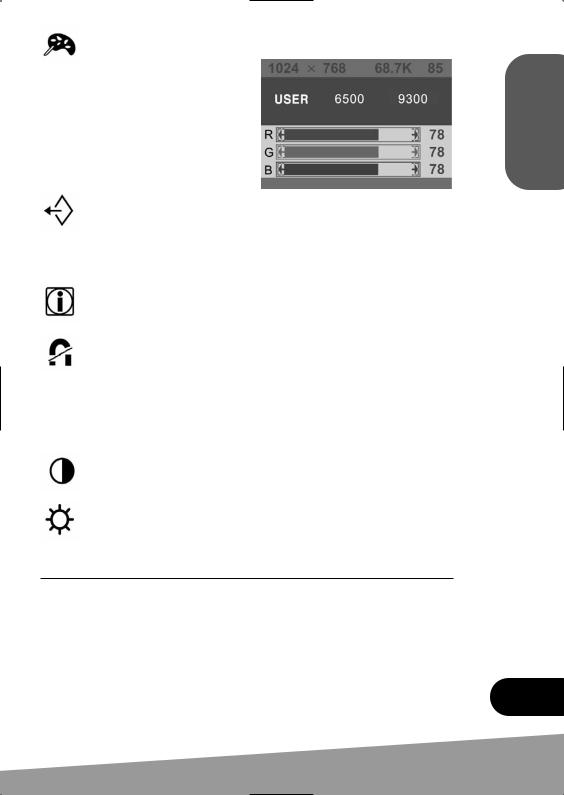
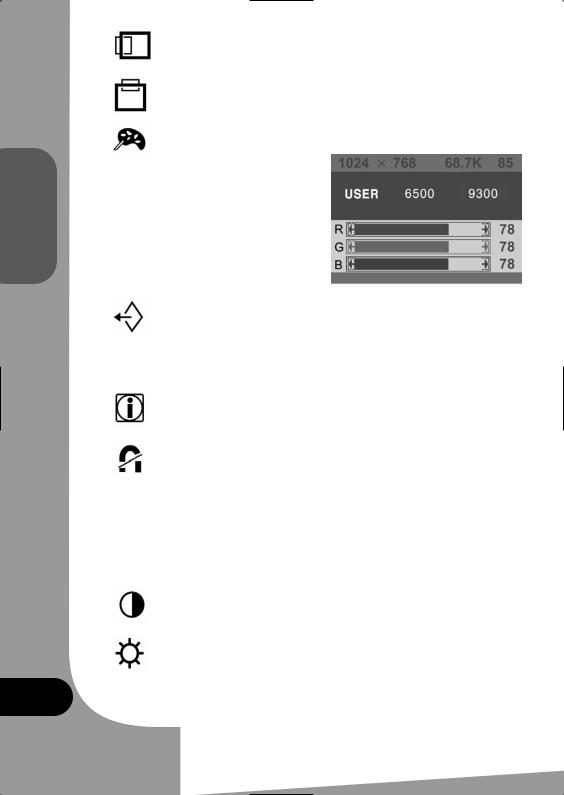
COLOR CONTROL
Colour temperature affects the tint of the image. With lower colour temperatures the image turns reddish and with higher temperatures bluish.
There are three colour settings available: 9300K, 6500K or USER. With the USER setting you can set individual values for red, green and blue.
RECALL
If you operate your display unit in a factory preset mode, this function deletes adjustments you made for size, position and shape, and restores the properties, which have been set in the factory. If you operate your display unit in a user mode, this function has no effect except that the contrast will be reset to the maximum value and the brightness to the cut-off level.
INFORMATION
Information shows horizontal and vertical sync polarity of current timing set.
DEGAUSS
External magnetic fields may cause distortion or discoloration in the picture. Demagnetising takes place automatically when the display unit is switched on, and the unit normally maintains faultless colour purity during operation. If you have tilted, swivelled or moved the display unit, you can perform a demagnetisation. During this process the picture is distorted for a few seconds. After demagnetising, the colour impurities have disappeared if caused by stray magnetic fields. Do not use the degauss feature more than once every half hour.
CONTRAST
Adjusts the contrast of the screen.
BRIGHTNESS
Adjusts the brightness of the screen.
5. DISPLAY POWER MANAGEMENT
If the power management function of your computer is enabled, your monitor turns on and off automatically. You can control power management features from your computer.
Reducing power Consumption
Your computer may have power management features that enable the computer or monitor to enter a power saving mode when the system is idle. You can reactivate the system by pressing any key or moving the mouse.
NGLISHE
9
ENGLISH
Mode |
LED |
Power |
||
Consumption |
||||
|
|
|||
Stage 1 (Normal) |
Green |
70 W (Typ.) |
||
|
|
|
|
|
Stage 2 |
Orange |
≤ |
5 W |
|
|
|
|
|
|
Power Switch off |
Not illuminated |
≤ |
1 W |
|
|
|
|
|
|
Unplugged |
Not illuminated |
|
0W |
|
|
|
|
|
|
The power button does not disconnect the display unit from the mains. The only way to isolate the display unit completely from the mains supply is to unplug the mains cable.
6. TROUBLESHOOTING
If your monitor does not function properly, you may be able to solve the problem by reading the following.
10
Problem |
Possible solution |
|
|
If the power LED is not lit, push the power switch |
|
|
to turn the monitor on. If the display unit is powe- |
|
|
red through the computer, check that the computer |
|
|
is switched on. |
|
Blank screen |
The display unit might be in standby mode. Push |
|
|
one of the keyboard keys. Check that the keyboard |
|
|
is properly connected to the computer. |
|
|
Check that the power cable is correctly connected |
|
|
to the display unit and to the power outlet. |
|
|
|
|
Error message: |
The graphics adapter refresh rate or line frequency |
|
is set too high. Select another display mode with |
||
OUT OF RANGE |
||
lower frequencies. |
||
|
||
|
|
|
|
This message indicates that the signal is missing or |
|
Self diagnostics message: |
faulty. Check that the signal cable connector is pro- |
|
perly connected and that the connection pins are |
||
NO SIGNAL |
||
not bent or damaged. If the connector is loose, |
||
|
||
|
tighten the connector's screws. |
|
|
|
|
|
The video signal from the computer does not com- |
|
The display does not enter |
ply with the VESA DPMS standard. Either the |
|
power management mode |
computer or the graphics adapter is not using the |
|
|
VESA DPMS power management function. |
|
|
|
|
|
The screen may seem to flicker when the refresh |
|
Screen flickers |
rate is less than 75Hz. See the list of recommended |
|
|
modes in the section Preset timing table. |
|
|
|
|
|
If your colour is not uniform, demagnetise the |
|
|
display unit as described in the Degauss section |
|
|
under OSD adjustments, and make sure that the |
|
|
display unit is at least 30cm from any other elec- |
|
Colour defects |
trical equipment. |
|
Check that the signal cable connector is properly |
||
|
||
|
connected and that the connection pins are not |
|
|
bent or damaged. Try another colour temperature. |
|
|
If the picture has strong colour defects, switch off the |
|
|
display unit and the computer. |
|
|
|
|
|
Make sure that other electrical devices are at least |
|
Size, position, shape |
30cm away. |
|
or quality unsatisfactory |
Adjust the picture characteristics as described in |
|
|
the Adjusting the picture section. |
|
|
|
|
Duplicated images |
A problem with your graphics adapter or display |
|
unit. Contact a service representative. |
||
|
||
|
|
NGLISHE
11

ENGLISH
7. SPECIFICATIONS
|
17"(viewable size: 16") |
|
|
Picture tube |
Horizontal dot pitch 0.236 mm |
||
Anti-Static, anti-glare, TCO treatment |
|||
|
|||
|
coated. |
|
|
|
|
||
Display area |
Factory preset area: 305X229 mm |
||
Number of colour |
Infinite |
|
|
Input signals |
R.G.B Analogue, 15 pin D-sub |
|
|
|
|
|
|
Frequency rate |
Horizontal: 30 to 70kHz, |
|
|
Vertical: 50 to 150Hz |
|
||
|
|
||
|
|
|
|
Maximum bandwidth |
108 MHz |
|
|
Maximum resolution |
1280X1024@60Hz |
|
|
|
|
|
|
Input voltage |
100 - 240 VAC, 1.5 A |
|
|
|
|
|
|
Power consumption |
70 W (Typ.) |
|
|
|
|
|
|
Power Management |
VESA DPMS |
|
|
|
|
||
Plug & Play |
Lower than EPA recommendation |
||
VESA DDC 1/2B |
|
||
|
|
||
|
H/V SIZE, H/V POSITION, PINCUS- |
||
|
HION, TRAPEZOID, PARALLEL,PIN |
||
|
BALANCE, H/V- MOIRE, TOP CORNER, |
||
OSD menu |
BOTTOM CORNER,H/V |
LINEARITY, |
|
LANGUAGES, ROTATION, |
OSD H/V |
||
|
|||
|
POSITION,COLOR CONTROL, RECALL, |
||
|
INFORMATION, DEGAUSS, BRIGHT- |
||
|
NESS, CONTRAST |
|
|
|
|
|
|
Ergonomics, |
TCO |
|
|
FCC Class B, CE, cULus, TÜV-GS, DHHS, |
|||
Safety and EMC |
|||
SEMKO |
|
||
|
|
||
Operating Temperature |
0 ~ 350°C |
|
|
Weight |
13.5Kg unpacked, 15.5Kg packed |
||
Dimensions (W X H X D mm) |
380 X 372 X 415 mm |
|
|
|
|
|
|
• Specifications are subject to change without notice.
Copyright © 2003 NEC Computers International BV. All rights reserved.
12

MONITEUR COULEUR CRT
17" LC700
|
GUIDE DE L'UTILISATEUR |
|
SOMMAIRE |
|
|
1. |
Introduction ........................................................................... |
14 |
2. |
Consignes de sécurité ........................................................... |
14 |
3. |
Installation du moniteur ........................................................ |
15 |
4. |
Réglage de l'image ................................................................. |
17 |
5. |
Gestion de l'alimentation de l'affichage ................................. |
21 |
6. |
Dépannage ............................................................................. |
21 |
7. |
Spécifications ......................................................................... |
23 |
RANÇAISF
13

FRANÇAIS
1. INTRODUCTION
Ce manuel contient les instructions d'installation et d'utilisation du moniteur LC700. Ce dernier présente les caractéristiques suivantes :
•17" en diagonale (surface d’affichage de 16"), pas de masque horizontal de 0,236 mm, CDT
•Prise en charge des fréquences de rafraîchissement élevées et images sans scintillements avec balayage complet
•Menus OSD intégrés au profit de l'utilisateur
•Tension en entrée de 100-240 Vca
•VESA DPMS (Display Power Management Signalling)
•Compatibilité avec le standard VESA DDC1/2B
2. CONSIGNES DE SÉCURITÉ
Lorsque vous installez et utilisez l'unité d'affichage, conformez-vous aux consignes de sécurité ci-dessous.
N'utilisez pas l'unité d'affichage dans des environnements humides (une salle de bain, une cave humide, une piscine, etc.).
Cet équipement doit être installé près d'une prise de terre et y être branché. Cette dernière doit en outre être accessible de sorte que vous puissiez débrancher l'unité d'affichage en cas de nécessité.
N'insérez jamais d'objets dans les orifices externes du périphérique. Vous risqueriez d'entrer en contact avec des composants électriques sous tension et de provoquer du même coup un incendie ou de vous électrocuter.
Les orifices pratiqués dans le boîtier permettant d'assurer la ventilation de l'unité d'affichage, ne les couvrez pas.
Vous ne devez en aucun cas ouvrir le boîtier de l'unité d'affichage.
Nettoyage et maintenance
•Pour éviter tout risque d'électrocution, ne démontez pas le boîtier du moniteur. Il ne contient aucune pièce remplaçable par l'utilisateur. N’oubliez pas de débrancher le moniteur de la prise de courant avant de le nettoyer.
N’utilisez pas d’alcools (méthyle, éthyle ou isopropanol) ou de solvants agressifs. Ne vous servez pas de diluants ou de benzène, de nettoyants abrasifs ou d’air comprimé.
•N’essuyez pas l’écran avec un chiffon ou une éponge susceptible de rayer sa surface.
•Pour nettoyer l’écran antistatique, optez pour de l’eau et un chiffon de nettoyage spécial en microfibres tel que ceux utilisés pour nettoyer les lentilles optiques ou un chiffon doux et propre légèrement imbibé d’eau ou d’un détergent neutre.
•Pour nettoyer le boîtier de l'unité d'affichage, utilisez un chiffon légèrement imbibé d’un détergent neutre.
•Si vous souhaitez transporter le moniteur, sachez que vous pouvez retirer son socle orientable.
14
3. INSTALLATION DU MONITEUR
3-1. Contenu de l'emballage
Les éléments suivants doivent figurer dans l'emballage.
A:Câble de transmission des signaux fixé
B:Socle orientable
C:CD*
D:Cordon d'alimentation
RANÇAISF
*En option
3-2. Fixation du socle orientable
•Placez le socle contre la base du moniteur de sorte que les fixations du socle soient alignées avec les orifices correspondants pratiqués dans la base.
•Poussez le socle vers l'avant du moniteur jusqu'à ce que la languette soit en place.
3-3. Sélection d'un emplacement approprié
•Une distance d'au moins 30 cm doit séparer le moniteur de tout autre appareil électrique ou équipement générant de la chaleur. De plus, vous devez laisser 10 cm minimum de chaque côté du moniteur pour assurer sa ventilation.
•Positionnez le moniteur de sorte qu'aucune lumière ne soit directement orientée vers l'é- cran ou ne s'y reflète.
•Pour limiter la fatigue oculaire, évitez d'installer l'unité d'affichage contre une source de lumière telle une fenêtre.
•Positionnez le moniteur de sorte que le haut de l'écran soit au niveau de votre regard, voire en dessous.
15
•Placez le moniteur en face de vous, une distance suffisamment confortable pour que vous puissiez lire le contenu de l'écran (entre 45 et 90 cm) devant vous séparer de ce dernier.
3-4. Branchement du moniteur
Avant de brancher le moniteur, vérifiez qu'aucune unité n'est alimentée. Pour éviter tout risque d'électrocution, branchez systématiquement l'équipement dans des prises de terre.
FRANÇAIS
1.Insérez le connecteur 15 broches du câble de transmission des signaux dans le connecteur VGA de votre ordinateur et vissez-le.
2.Branchez le câble d'alimentation de l'unité d'affichage au dos de cette dernière.
3.Vous devez ensuite brancher le câble d'alimentation dans une prise de terre de 100-240 V ou le raccorder au système, sous réserve qu'il soit équipé d'une prise destinée au câble d'alimentation de l'unité d'affichage.
4.Allumez l'unité d'affichage au moyen du bouton d'alimentation et assurez-vous que le témoin d'alimentation s'allume. Dans le cas contraire, répétez les étapes 2, 3 et 4 ou consultez la section Dépannage de ce guide.
5.Mettez votre ordinateur sous tension. Une image s'affiche dans les 15 secondes qui suivent. Réglez-la afin de bénéficier d'une qualité d'image optimale. Consultez la section Réglage de l'image de ce guide pour de plus amples informations.
Témoin d'alimentation |
Bouton d'alimentation |
16
3-5. Réglage de la fréquence de rafraîchissement
Procédez comme suit pour définir la fréquence de rafraîchissement du moniteur sous Windows 98/ME/XP/2000.
1.Ouvrez la fenêtre de configuration (Démarrer-Paramètres-Panneau de configuration).
2.Cliquez deux fois sur l'icône “Affichage”.
3.Cliquez sur l'onglet “Paramètres”.
4.Cliquez sur le bouton “Avancé”.
5.Cliquez sur “Carte” et sélectionnez 85 Hz dans la liste fournie.
6.Cliquez sur “Appliquer” pour valider la valeur sélectionnée.
Les paramètres conseillés pour la résolution et la fréquence de rafraîchissement sont 1 024 x 768 et 85 Hz respectivement.
Preset Timing Table
N° |
Résolution |
Fréquence |
Fréquence de |
|
horizontale |
rafraîchissement |
|||
|
|
|||
1 |
720 x 400 |
31.5 KHz |
70 Hz |
|
|
|
|
|
|
2 |
640 x 480 |
43.3 KHz |
85 Hz |
|
|
|
|
|
|
3 |
640 x 480 |
50.6 KHz |
100 Hz |
|
|
|
|
|
|
4 |
800 x 600 |
46.9 KHz |
75 Hz |
|
|
|
|
|
|
5 |
800 x 600* |
53.7 KHz |
85 Hz |
|
|
|
|
|
|
6 |
800 x 600 |
63.9 KHz |
100 Hz |
|
|
|
|
|
|
7 |
1024 x 768 |
60.0 KHz |
75 Hz |
|
|
|
|
|
|
8 |
1024 x 768* |
68.7 KHz |
85 Hz |
|
|
|
|
|
* Mode primaire recommandé.
4. RÉGLAGE DE L'IMAGE
Vous pouvez régler l'affichage au moyen des boutons situés sous l'écran.
RANÇAISF
17
FRANÇAIS
4-1. Utilisation de l'OSD
1.Appuyez sur le bouton MENU pour ouvrir l'OSD. Pour votre information, la résolution et la fréquence sont indiquées en haut du menu.
2.Appuyez sur les boutons  ou
ou  pour sélectionner l'élément que vous souhaitez ajuster. L'élément sélectionné est mis en surbrillance.
3.Appuyez sur le bouton SELECT pour ajuster l'élément mis en surbrillance.
4.Utilisez les boutons  ou
ou  pour ajuster la sélection.
5.Si vous êtes dans un sous-menu, appuyez sur le bouton MENU pour retourner au menu précédent.
6.L'unité d'affichage enregistre automatiquement les nouveaux paramètres dans la seconde qui suit les derniers réglages et le menu disparaît. Vous pouvez également appuyer sur le bouton MENU pour fermer le menu.
4-2. Boutons d'accès direct
LUMINOSITÉ
Utilisez le bouton  pour sélectionner l'option de réglage de la luminosité. Ajustez-la au moyen des boutons
  ou
ou  .
.
CONTRASTE
Utilisez le bouton  pour sélectionner l'option de réglage du contraste. Ajustez-le au moyen des boutons
  ou
ou  .
.
4-3. Réglages OSD
Les réglages OSD disponibles sont répertoriés ci-dessous.
TAILLE H.
Vous permet de régler la taille horizontale de l'image.
POSITION H.
Vous permet de régler la position horizontale de l’image.
TAILLE V.
Vous permet de régler la taille verticale de l'image.
POSITION V.
Vous permet de régler la position verticale de l’image.
COUSSIN
Si les bords verticaux de l'image sont concaves ou convexes, vous pouvez corriger l'effet coussin au moyen de cette option de réglage.
18
TRAPÈZE
Si l'image est plus large dans la partie supérieure ou inférieure de l'écran, vous pouvez corriger la distorsion trapézoïdale au moyen de cette option de réglage.
PARALLÉLOGRAMME
Si les extrémités latérales de l'image sont inclinées, vous pouvez corriger la distorsion du parallèlogramme au moyen de cette option de réglage.
RÉGLAGE COUSSIN
Si les extrémités latérales de l'image ont une forme concave ou convexe, vous pouvez corriger l'effet coussin au moyen de cette option de réglage.
MOIRÉ V.
Supprimez le moiré vertical si plusieurs cercles ou arcs concentriques apparaissent sur l'écran.
MOIRÉ H.
Supprimez le moiré horizontal si plusieurs cercles ou arcs concentriques apparaissent sur l'écran.
Le moiré est une interférence provoquant l’apparition de lignes floues sur l’écran. Les images converties en images point par point ou constituées d’éléments petits et répétitifs sont sujettes au moiré. Les couleurs vives peuvent également intensifier le moiré.
Cependant, cette interférence n’affecte pas l’impression.
ANGLE SUPERIEUR
Si les angles supérieurs de l'image sont concaves ou convexes, vous pouvez corriger cette distorsion au moyen de cette option de réglage.
ANGLE INFERIEUR
Si les angles inférieurs de l'image sont concaves ou convexes, vous pouvez corriger cette distorsion au moyen de cette option de réglage.
LINÉARITÉ H.
Si le côté gauche ou droit de l’image n’est pas correctement proportionné, vous pouvez corriger la linéarité horizontale au moyen de cette option de réglage.
LINÉARITÉ V.
Si les parties supérieure et inférieure de l’image ne sont pas correctement proportionnées par rapport au centre de cette dernière, vous pouvez corriger la linéarité verticale au moyen de cette option de réglage.
LANGUE
Vous pouvez sélectionner la langue d'affichage des menus de réglage.
Les langues suivantes sont disponibles : anglais, français, allemand, italien, espagnol, suédois, finnois, danois, portugais et néerlandais.
ROTATION
Si toute l'image est inclinée, vous pouvez corriger cette distorsion au moyen de cette option de réglage.
RANÇAISF
19
FRANÇAIS
POSITION H. OSD
Vous permet de régler la position horizontale du menu OSD.
POSITION V. OSD
Vous permet de régler la position verticale du menu OSD.
CONTRÔLE COULEUR
La température des couleurs affecte les couleurs de l’image qui vire au rouge lorsque les températures sont trop basses et au bleu lorsqu’elles sont trop élevées.
Trois paramètres vous sont proposés : 9300K, 6500K ou UTILISATEUR, ce dernier vous permettant de paramétrer vous-même les valeurs du rouge, du vert et du bleu.
RAPPEL
Si vous utilisez l'unité d'affichage dans un mode prédéfini en usine, cette fonction supprime les réglages effectués en termes de taille, de position et de forme et restaure les propriétés définies en usine. Si vous optez pour un mode utilisateur, cette fonction n'a aucun impact, excepté sur le contraste et la luminosité dont elle restaure respectivement la valeur maximale et le cut-off level.
INFORMATION
Vous permet d'afficher la polarité sync. horizontale et verticale de la synchronisation courante prédéfinie.
DÉMAGNÉTISATION
Les champs magnétiques externes peuvent provoquer la distorsion ou la décoloration de l’image. La démagnétisation a lieu automatiquement lorsque l'unité d'affichage est allumée de sorte que les couleurs restent pures chaque fois qu’elle est utilisée. Si vous avez incliné, fait pivoter ou déplacé l'unité d'affichage, démagnétisez-la. Lors de cette procédure, l’image subit des distorsions pendant quelques secondes. Une fois la démagnétisation terminée, les impuretés au niveau des couleurs disparaissent, sous réserve qu’elles aient été provoquées par des champs magnétiques parasites. N’utilisez pas la fonction de démagnétisation plus d’une fois par demi-heure.
CONTRASTE
Vous permet de régler le contraste de l'image.
LUMINOSITÉ
Vous permet de régler la luminosité de l'image.
20
5. GESTION DE L'ALIMENTATION DE L'AFFICHAGE
Si les fonctions de gestion de l'alimentation de votre ordinateur sont activées, le moniteur s'allume et s'éteint automatiquement. Vous pouvez contrôler les fonctions de gestion de l'alimentation depuis votre ordinateur.
Réduction de la consommation électrique
Votre ordinateur peut intégrer des fonctions de gestion de l'alimentation lui permettant, ainsi qu'au moniteur, de passer en mode d'économie d'énergie lorsqu'il est inactif. Vous pouvez réactiver votre système en appuyant sur n'importe quelle touche de votre clavier ou en déplaçant votre souris.
Mode |
Témoin |
Consommation |
|
électrique |
|||
|
|
||
Phase 1 (normal) |
Vert |
70 W (type) |
|
|
|
|
|
Phase 2 |
Orange |
= 5 W |
|
|
|
|
|
Bouton d’alimentation |
Éteint |
= 1 W |
|
en position Arrêt |
|||
|
|
||
|
|
|
|
Débranché |
Éteint |
0W |
|
|
|
|
Le bouton d'alimentation ne permet pas de déconnecter l'unité d'affichage du secteur. Le seul moyen d'isoler complètement l'unité d'affichage du secteur est de débrancher son câble d'alimentation.
6. DÉPANNAGE
Si le moniteur ne fonctionne pas correctement, vous pourrez peut-être résoudre le problème en lisant les suggestions ci-dessous :
RANÇAISF
21
 Loading...