


 Loading...
ENTJ75 / ENTJ76 / ENTJ77 / ENTJ78
SERVICEGUIDE
Revision History
Please refer to the table below for the updates made on the ENTJ75 / ENTJ76 / ENTJ77 / ENTJ78 service guide.
Date |
Chapter |
Updates |
|
|
|
|
|
|
|
|
|
|
|
|
Service guide files and updates are available on the ACER/CSD web. For more information, refer to http://csd.acer.com.tw
Copyright
© 2009 Packard Bell is a registered trademark of Packard Bell BV. All rights reserved. All other brands and product names are trademarks or registered trademarks of their respective companies.
PRINTED IN TAIWAN
Contents
Chapter 1: System specifications . . . . . . . . . . . . . . . . . . . . . . . . . . . . . . . . . .1
Preface . . . . . . . . . . . . . . . . . . . . . . . . . . . . . . . . . . . . . . . . . . . . . . . . . . . . 2 Conventions . . . . . . . . . . . . . . . . . . . . . . . . . . . . . . . . . . . . . . . . . . 2 General information . . . . . . . . . . . . . . . . . . . . . . . . . . . . . . . . . . . 2 Features . . . . . . . . . . . . . . . . . . . . . . . . . . . . . . . . . . . . . . . . . . . . . . . . . . . 3 System block diagram . . . . . . . . . . . . . . . . . . . . . . . . . . . . . . . . . . . . . . . . 6 Hardware specifications and configurations . . . . . . . . . . . . . . . . . . . . . . . 7 CPU . . . . . . . . . . . . . . . . . . . . . . . . . . . . . . . . . . . . . . . . . . . . . . . . 7 Controllers . . . . . . . . . . . . . . . . . . . . . . . . . . . . . . . . . . . . . . . . . . . 7 BIOS . . . . . . . . . . . . . . . . . . . . . . . . . . . . . . . . . . . . . . . . . . . . . . . 7 Memory . . . . . . . . . . . . . . . . . . . . . . . . . . . . . . . . . . . . . . . . . . . . . 8 Hard disk drive . . . . . . . . . . . . . . . . . . . . . . . . . . . . . . . . . . . . . . . 9 Optical drive . . . . . . . . . . . . . . . . . . . . . . . . . . . . . . . . . . . . . . . . . 9 LCD . . . . . . . . . . . . . . . . . . . . . . . . . . . . . . . . . . . . . . . . . . . . . . . 10 Keyboard . . . . . . . . . . . . . . . . . . . . . . . . . . . . . . . . . . . . . . . . . . . 11 Pointing device . . . . . . . . . . . . . . . . . . . . . . . . . . . . . . . . . . . . . . 11 Memory card reader . . . . . . . . . . . . . . . . . . . . . . . . . . . . . . . . . . 11 Audio . . . . . . . . . . . . . . . . . . . . . . . . . . . . . . . . . . . . . . . . . . . . . . 12 Wired LAN . . . . . . . . . . . . . . . . . . . . . . . . . . . . . . . . . . . . . . . . . 12 Bluetooth . . . . . . . . . . . . . . . . . . . . . . . . . . . . . . . . . . . . . . . . . . . 12 Wireless LAN . . . . . . . . . . . . . . . . . . . . . . . . . . . . . . . . . . . . . . . 13 USB . . . . . . . . . . . . . . . . . . . . . . . . . . . . . . . . . . . . . . . . . . . . . . . 13 Buttons/Indicators/Ports . . . . . . . . . . . . . . . . . . . . . . . . . . . . . . . 13 Camera . . . . . . . . . . . . . . . . . . . . . . . . . . . . . . . . . . . . . . . . . . . . . 14 Fans . . . . . . . . . . . . . . . . . . . . . . . . . . . . . . . . . . . . . . . . . . . . . . . 14 Battery . . . . . . . . . . . . . . . . . . . . . . . . . . . . . . . . . . . . . . . . . . . . . 14 Power supply . . . . . . . . . . . . . . . . . . . . . . . . . . . . . . . . . . . . . . . . 15 Power savings . . . . . . . . . . . . . . . . . . . . . . . . . . . . . . . . . . . . . . . 15
Notebook product tour . . . . . . . . . . . . . . . . . . . . . . . . . . . . . . . . . . . . . . 16 Front View . . . . . . . . . . . . . . . . . . . . . . . . . . . . . . . . . . . . . . . . . 16 Left View . . . . . . . . . . . . . . . . . . . . . . . . . . . . . . . . . . . . . . . . . . 16 Right View . . . . . . . . . . . . . . . . . . . . . . . . . . . . . . . . . . . . . . . . . 17 Rear View . . . . . . . . . . . . . . . . . . . . . . . . . . . . . . . . . . . . . . . . . . 18 Bottom View . . . . . . . . . . . . . . . . . . . . . . . . . . . . . . . . . . . . . . . . 18 Keyboard area . . . . . . . . . . . . . . . . . . . . . . . . . . . . . . . . . . . . . . . 19 LCD panel . . . . . . . . . . . . . . . . . . . . . . . . . . . . . . . . . . . . . . . . . . 20 Using the status indicators . . . . . . . . . . . . . . . . . . . . . . . . . . . . . 21 Using the keyboard . . . . . . . . . . . . . . . . . . . . . . . . . . . . . . . . . . . 21 Using the capacitive touch keys . . . . . . . . . . . . . . . . . . . . . . . . . 24 Using the touchpad . . . . . . . . . . . . . . . . . . . . . . . . . . . . . . . . . . . 25 Using the webcam . . . . . . . . . . . . . . . . . . . . . . . . . . . . . . . . . . . . 26
Chapter 2: System utilities . . . . . . . . . . . . . . . . . . . . . . . . . . . . . . . . . . . . . .27
BIOS setup utility . . . . . . . . . . . . . . . . . . . . . . . . . . . . . . . . . . . . . . . . . . 28
i
Contents
Navigating the BIOS setup utility . . . . . . . . . . . . . . . . . . . . . . . 29 BIOS setup utility menus . . . . . . . . . . . . . . . . . . . . . . . . . . . . . . 29 BIOS recovery . . . . . . . . . . . . . . . . . . . . . . . . . . . . . . . . . . . . . . . . . . . . . 38 Creating the Crisis Recovery disk . . . . . . . . . . . . . . . . . . . . . . . 38 Performing a BIOS recovery . . . . . . . . . . . . . . . . . . . . . . . . . . . 38 Running the Flash utility: . . . . . . . . . . . . . . . . . . . . . . . . . . . . . . 39
Clearing a BIOS password . . . . . . . . . . . . . . . . . . . . . . . . . . . . . . . . . . . 40 Unlocking the hard drive . . . . . . . . . . . . . . . . . . . . . . . . . . . . . . . . . . . . 41
Chapter 3: Replacing notebook components . . . . . . . . . . . . . . . . . . . . . . . . 43
Preventing static electricity discharge . . . . . . . . . . . . . . . . . . . . . . . . . . 44 Tape . . . . . . . . . . . . . . . . . . . . . . . . . . . . . . . . . . . . . . . . . . . . . . . 44 Preparing the work space . . . . . . . . . . . . . . . . . . . . . . . . . . . . . . . . . . . . 45 Required tools . . . . . . . . . . . . . . . . . . . . . . . . . . . . . . . . . . . . . . . . . . . . . 46 Preparing the notebook . . . . . . . . . . . . . . . . . . . . . . . . . . . . . . . . . . . . . . 47 Removing the battery . . . . . . . . . . . . . . . . . . . . . . . . . . . . . . . . . . . . . . . 48 Removing the bay cover . . . . . . . . . . . . . . . . . . . . . . . . . . . . . . . . . . . . . 49 Adding or replacing memory modules . . . . . . . . . . . . . . . . . . . . . . . . . . 50 Replacing the wireless card . . . . . . . . . . . . . . . . . . . . . . . . . . . . . . . . . . 52 Replacing the hard drive . . . . . . . . . . . . . . . . . . . . . . . . . . . . . . . . . . . . . 54 Replacing the optical drive . . . . . . . . . . . . . . . . . . . . . . . . . . . . . . . . . . . 56 Replacing the keyboard cover . . . . . . . . . . . . . . . . . . . . . . . . . . . . . . . . . 58 Replacing the multimedia board . . . . . . . . . . . . . . . . . . . . . . . . . . . . . . . 60 Replacing the keyboard . . . . . . . . . . . . . . . . . . . . . . . . . . . . . . . . . . . . . . 62 Replacing the LCD panel assembly . . . . . . . . . . . . . . . . . . . . . . . . . . . . 64 Replacing the palm rest . . . . . . . . . . . . . . . . . . . . . . . . . . . . . . . . . . . . . . 68 Replacing the speakers . . . . . . . . . . . . . . . . . . . . . . . . . . . . . . . . . . . . . . 72 Replacing the touchpad board . . . . . . . . . . . . . . . . . . . . . . . . . . . . . . . . . 74 Replacing the modem board . . . . . . . . . . . . . . . . . . . . . . . . . . . . . . . . . . 77 Replacing the USB board . . . . . . . . . . . . . . . . . . . . . . . . . . . . . . . . . . . . 80 Replacing the Bluetooth module . . . . . . . . . . . . . . . . . . . . . . . . . . . . . . . 83 Replacing the system board . . . . . . . . . . . . . . . . . . . . . . . . . . . . . . . . . . 86 Replacing the cooling assembly . . . . . . . . . . . . . . . . . . . . . . . . . . . . . . . 89 Replacing the processor . . . . . . . . . . . . . . . . . . . . . . . . . . . . . . . . . . . . . 92 Replacing the LCD front panel . . . . . . . . . . . . . . . . . . . . . . . . . . . . . . . . 95 Replacing the webcam . . . . . . . . . . . . . . . . . . . . . . . . . . . . . . . . . . . . . . 98 Replacing the LCD . . . . . . . . . . . . . . . . . . . . . . . . . . . . . . . . . . . . . . . . 100 Replacing the LCD panel hinge brackets . . . . . . . . . . . . . . . . . . . . . . . 103 Replacing the power button board . . . . . . . . . . . . . . . . . . . . . . . . . . . . 105 Replacing the Kensington lock cap . . . . . . . . . . . . . . . . . . . . . . . . . . . 107 Replacing the microphone . . . . . . . . . . . . . . . . . . . . . . . . . . . . . . . . . . . 109 Replacing the antennas . . . . . . . . . . . . . . . . . . . . . . . . . . . . . . . . . . . . . 111 Replacing the LCD assembly lid . . . . . . . . . . . . . . . . . . . . . . . . . . . . . 113
ii
www.packardbell.com
Chapter 4: Troubleshooting . . . . . . . . . . . . . . . . . . . . . . . . . . . . . . . . . . . .115
Diagnosing problems . . . . . . . . . . . . . . . . . . . . . . . . . . . . . . . . . . . . . . 116 System test procedures . . . . . . . . . . . . . . . . . . . . . . . . . . . . . . . . . . . . . 117 Testing the optical drive . . . . . . . . . . . . . . . . . . . . . . . . . . . . . . 117 Testing the keyboard or auxiliary input device . . . . . . . . . . . . 117 Testing the memory . . . . . . . . . . . . . . . . . . . . . . . . . . . . . . . . . 118 Testing the power system . . . . . . . . . . . . . . . . . . . . . . . . . . . . . 118 Testing the touchpad . . . . . . . . . . . . . . . . . . . . . . . . . . . . . . . . . 119 Power-On Self-Test (POST) error message . . . . . . . . . . . . . . . . . . . . . 120 Index of error messages . . . . . . . . . . . . . . . . . . . . . . . . . . . . . . . . . . . . 121 Error codes . . . . . . . . . . . . . . . . . . . . . . . . . . . . . . . . . . . . . . . . 121 Error messages . . . . . . . . . . . . . . . . . . . . . . . . . . . . . . . . . . . . . 121 No-beep error messages . . . . . . . . . . . . . . . . . . . . . . . . . . . . . . 123
Phoenix BIOS beep codes . . . . . . . . . . . . . . . . . . . . . . . . . . . . . . . . . . 124 Symptom-to-FRU error messages . . . . . . . . . . . . . . . . . . . . . . . . . . . . 129 LCD . . . . . . . . . . . . . . . . . . . . . . . . . . . . . . . . . . . . . . . . . . . . . . 129 Power . . . . . . . . . . . . . . . . . . . . . . . . . . . . . . . . . . . . . . . . . . . . . 129 Memory . . . . . . . . . . . . . . . . . . . . . . . . . . . . . . . . . . . . . . . . . . . 130 Sound . . . . . . . . . . . . . . . . . . . . . . . . . . . . . . . . . . . . . . . . . . . . . 130 Power management . . . . . . . . . . . . . . . . . . . . . . . . . . . . . . . . . . 130 Devices . . . . . . . . . . . . . . . . . . . . . . . . . . . . . . . . . . . . . . . . . . . 131 Keyboard and touchpad . . . . . . . . . . . . . . . . . . . . . . . . . . . . . . 131 Intermittent problems . . . . . . . . . . . . . . . . . . . . . . . . . . . . . . . . . . . . . . 132 Undetermined problems . . . . . . . . . . . . . . . . . . . . . . . . . . . . . . . . . . . . 133
Chapter 5: Connector locations . . . . . . . . . . . . . . . . . . . . . . . . . . . . . . . . .135
System board layout . . . . . . . . . . . . . . . . . . . . . . . . . . . . . . . . . . . . . . . |
136 |
Top view . . . . . . . . . . . . . . . . . . . . . . . . . . . . . . . . . . . . . . . . . . |
136 |
Bottom view – Discrete model . . . . . . . . . . . . . . . . . . . . . . . . |
137 |
Bottom view – UMA model . . . . . . . . . . . . . . . . . . . . . . . . . . |
138 |
Chapter 6: FRU (Field-Replaceable Unit) list . . . . . . . . . . . . . . . . . . . . . .139
Introduction . . . . . . . . . . . . . . . . . . . . . . . . . . . . . . . . . . . . . . . . . . . . . . |
140 |
Exploded diagram . . . . . . . . . . . . . . . . . . . . . . . . . . . . . . . . . . . . . . . . . |
140 |
FRU list . . . . . . . . . . . . . . . . . . . . . . . . . . . . . . . . . . . . . . . . . . . . . . . . |
142 |
Appendix A: Test compatible components . . . . . . . . . . . . . . . . . . . . . . . 147
Introduction . . . . . . . . . . . . . . . . . . . . . . . . . . . . . . . . . . . . . . . . . . . . . . 148 Microsoft® Windows 7® Compatibility Test . . . . . . . . . . . . . . . . . . . 148
Appendix B: Online support information. . . . . . . . . . . . . . . . . . . . . . . . . 151
iii
Contents
iv
CHAPTER1
System specifications
•Preface
•Features
•System block diagram
•Hardware specifications and configurations
•Notebook product tour

CHAPTER 1: System specifications
Preface
Conventions
The following conventions are used in this manual:
Warning
Indicates a potential for personal injury.
Caution
Indicates a potential loss of data or damage to equipment.
Important
Indicates information that is important to know for the proper completion of a procedure, choice of an option, or completing a task.
General information
Before using this information and the product it supports, read the following general information.
This service guide provides you with all technical information relating to the basic configuration decided for Acer’s global product offering. To better fit local market requirements and enhance product competitiveness, your regional office may have decided to extend the functionality of a machine (such as add-on cards, modems, or extra memory capabilities). These localized features are not covered in this generic service guide. In such cases, contact your regional offices or the responsible personnel/channel to provide you with further technical details.
When ordering FRU parts: Check the most up-to-date information available on your regional web or channel. If, for whatever reason, a part number change is made, it may not be noted in this printed service guide.
Acer-authorized Service Providers: Your Acer office may have a different part number code to those given in the FRU list of this printed service guide. You must use the list provided by your regional Acer office to order FRU parts for repair and service of customer machines.
2
www.packardbell.com
Features
Platform
•Processor
•Intel Core i3 Processors: 330M (2.13 GHz), M620 (2.5 GHz), 350M (2.26 GHz)
•Intel Core i5 Processors: 430M (2.26 GHz), 520M (2.4 GHz), 540M (2.53 GHz)
•Intel Core i7 Processors: 620M (2.66 GHz)
•Core logic: Mobile Intel HM55 Express Chipset
•Wireless: Intel WiFi Link 5300/5100, Atheros b/g/n
System memory
•DDR3 SO-DIMM
•Data rate supported: 800/1066/1333 MT/s
•Maximum memory: 4 GB (using two SO-DIMM modules)
Display and graphics
•15.6" WXGA TFT LCD display panel
•VGA controller:
•Discrete model: ATI Madison Pro / Park XT with DDR3-800 1 GB VRAM
•UMA model: Integrated in the Mobile Intel HM55 Express Chipset
•Dual independent display support
•16.7 million colors
•MPEG-2/DVD hardware-assisted capability (acceleration)
•MPEG-2/DVD decoding (for selected models)
•WMV9 (VC-1) support (acceleration)
•WMV9 (VC-1) and H.264 (AVC) decoding (for selected models)
•HDMI™ (High-Definition Multimedia Interface) with HDCP (High-bandwidth Digital Content Protection) support
Storage subsystem
•Industry standard 2.5” 160–640 GB hard disk drive
•Optical drive options:
•Blu-ray Disc™/DVD-Super Multi double-layer drive
•DVD-Super Multi double-layer drive
•5-in-1 card reader, supporting Secure Digital™ (SD), MultiMediaCard (MMC), Memory Stick® (MS), Memory Stick PRO™ (MS PRO), xD-Picture Card™ (xD)
3
CHAPTER 1: System specifications
Input devices
•99-, 100-, or 103-key keyboard, 2.5 mm (minimum) key travel
•Twelve function keys, four cursor keys, two Windows® keys
•Touchpad pointing device
•Capacitive touch keys
Audio
•Two built-in stereo speakers
•Built-in microphone on webcam
•Realtek ALC272 codec
•Supports Dolby Advanced Audio technology
•MS-Sound compatible
Communication
•Integrated webcam
•WLAN: Intel® WiFi Link 5300/5100 a/b/g/n, Atheros b/g/n
•WPAN: Bluetooth® 2.0+EDR (Enhanced Data Rate)
•LAN: 10/100/1000 Ethernet
I/O ports
•USB (four)
•External display (VGA) port
•Ethernet (RJ45)
•Modem (RJ11)
•Headphone/SPDIF Audio Out
•Microphone in
•DC in jack for AC adapter
•5-in-1 card reader (SD™, MMC, MS, MS PRO, xD)
•HDMI™ port with HDCP support
Security
•Kensington lock slot
•BIOS-based user, supervisor, and HDD passwords
4
www.packardbell.com
Physical specifications
•Dimensions: 372 × 259 × 26 / 37 mm (14.65 × 10.2 × 1.02 / 1.46 in)
•Weight: 3.1 kg (6.83 lb)
Environmental specifications
•Temperature
•Operating: 32 °F to 90 °F (0 °C to 35 °C)
•Non-operating: -4 °F to 140 °F (-20 °C to 60 °C)
•Humidity (non-condensing)
•Operating: 10% to 90%
•Non-operating: 5% to 95%
5

CHAPTER 1: System specifications
System block diagram
6
www.packardbell.com
Hardware specifications and configurations
CPU
Item |
Specification |
|
|
|
|
CPU type |
n |
Intel Core i3 Processors: 330M (2.13 GHz), M620 (2.5 GHz), 350M (2.26 GHz) |
|
n |
Intel Core i5 Processors: 430M (2.26 GHz), 520M (2.4 GHz), 540M (2.53 GHz) |
|
Intel Core i7 Processors: 620M (2.66 GHz) |
|
|
n |
|
|
|
|
Core logic |
Mobile Intel HM55 Express Chipset |
|
|
|
|
Socket type |
LGA 1156 (Socket H) |
|
|
|
|
Controllers
Item |
Controller |
|
|
|
|
Core logic |
Mobile Intel HM55 Express Chipset |
|
|
|
|
VGA |
n |
Discrete model: ATI Madison Pro / Park XT with DDR3-800 1 GB VRAM |
|
n |
UMA model: Integrated in the Mobile Intel HM55 Express Chipset |
|
|
|
|
|
|
LAN |
Broadcom BCM57780 |
|
|
|
|
USB 2.0 |
Mobile Intel HM55 Express Chipset |
|
|
|
|
Bluetooth |
Broadcom BCM2046 |
|
|
|
|
Wireless 802.11 |
n |
Intel WiFi Link 5100 |
|
n |
Intel WiFi Link 5300 |
|
n |
Atheros AR5B91/HB93 b/g/n |
|
Atheros XB63 b/g |
|
|
n |
|
|
|
|
|
|
|
Memory card reader |
Alcor AU6433 |
|
|
|
|
Audio codec |
Realtek ALC272 |
|
|
|
|
BIOS
Item |
Specification |
|
|
BIOS vendor |
Phoenix |
|
|
BIOS version |
v1.06 |
|
|
7

CHAPTER 1: System specifications
Item |
Specification |
|
|
Supported protocols
n n n n n n n n n n n n n n n n n n n n
ACPI 1.0b/2.0/3.0 compliance PCI 2.2
System/HDD password Security Control
INT 13H Extensions
PnP BIOS 1.0a SMBIOS 2.4 BIOS Boot Specification Simple Boot Flag 1.0
Boot block
PCI Bus Power Management Interface Specification USB Specification 1.1/2.0
IEEE 1394 1.0
USB/1394 CD-ROM Boot Up support
PC Card Standard 1995 (PCMCIA 3.0 Compliant Device) IrDA 1.0
Intel AC97 CNR Specification WfM 2.0
PXE 2.1
Boot Integrity Service Application Program Interface (BIS) 1.0 PC99a and Mobile PC2001 Compliant
BIOS password control |
Manually set |
|
|
Memory |
|
|
|
Item |
Specification |
|
|
Memory controller |
Built-in |
|
|
Memory size |
0 MB (no on-board memory) |
|
|
SO-DIMM socket number |
2 sockets |
|
|
Supports maximum |
4 GB |
memory size |
|
|
|
Supports SO-DIMM type |
DDR3 |
|
|
Supports data rate |
800/1066/1333 MT/s |
|
|
Supports SO-DIMM |
204-pin SO-DIMM |
package |
|
Memory module |
You can install memory modules in any combination as long as they match the above |
combinations |
specifications. |
|
|
8

www.packardbell.com
Hard disk drive
Item
Models |
Seagate |
Seagate |
Seagate |
Seagate |
WD |
|
ST9160314AS |
ST9250315AS |
ST9320325AS |
ST9500325AS |
WD6400BEVT-22A |
|
Toshiba |
Toshiba |
Toshiba |
Toshiba |
0RT0 |
|
MK1655GSX |
MK2555GSX |
MK3263GSX |
MK5055GSX |
|
|
HGST |
HGST |
HGST |
HGST |
|
|
HTS545016B9A |
HTS545025B9A |
HTS545032B9A |
HTS545050B9A |
|
|
300 |
300 |
300 |
300 |
|
|
WD |
WD |
WD |
WD |
|
|
WD1600BEVT- |
WD2500BEVT-22Z |
WD3200BEVT-22Z |
WD5000BEVT-22Z |
|
|
22ZCTO |
CT0 |
CT0 |
AT0 |
|
|
|
|
|
|
|
Capacity (MB) |
160000 |
250000 |
320000 |
500000 |
640000 |
|
|
|
|
|
|
Bytes per sector |
512 |
512 |
512 |
512 |
|
|
|
|
|
|
|
Data heads |
3/4 |
4 |
4 |
4 |
|
|
|
|
|
|
|
Drive Format |
|
|
|
|
|
|
|
|
|
|
|
Disks |
2 |
2 |
2 |
2 |
|
|
|
|
|
|
|
Spindle speed |
5400 RPM |
5400 RPM |
5400 RPM |
5400 RPM |
5400 RPM |
(RPM) |
|
|
|
|
|
|
|
|
|
|
|
Performance Specifications |
|
|
|
|
|
|
|
|
|
|
|
Buffer size |
8 MB |
8 MB |
8 MB |
8 MB |
8 MB |
|
|
|
|
|
|
Interface |
SATA |
SATA |
SATA |
SATA |
SATA |
|
|
|
|
|
|
Max. media |
540 |
540 |
850 |
3.0 GB/s (Max.) |
3.0 GB/s |
transfer rate |
|
|
|
Buffer to Host |
|
(disk-buffer, |
|
|
|
|
|
Mbytes/s) |
|
|
|
|
|
|
|
|
|
|
|
DC Power Requirements |
|
|
|
|
|
|
|
|
|
|
|
Voltage |
5V (DC) +/- 5% |
5V (DC) +/- 5% |
5V (DC) +/- 5% |
5V (DC) +/- 5% |
5V (DC) +/- 5% |
tolerance |
|
|
|
|
|
|
|
|
|
|
|
Optical drive
Item |
Specification |
|
|
|
|
|
|
||
Models |
HLDS Super-Multi Drive GT30N |
HLDS BD Combo 1CT21N |
||
|
PLDS Super-Multi Drive DS-8A4SH |
PLDS BD Combo DS-4E1S |
||
|
Sony Super-Multi Drive AD-7585H |
Pioneer BD Combo BDC-TD01RS |
||
|
Toshiba Super-Multi Drive TS-L633C |
Sony BD Combo 4X BC-5500H |
||
Performance Specification |
|
|
||
|
|
|
||
Transfer rate |
Sustained: |
Sustained: |
||
(KB/sec) |
n |
with CD: Max 3.6Mbytes/sec |
n |
with CD: Max 3.6Mbytes/sec |
|
n |
with DVD: Max 10.08Mbytes/sec |
n |
with DVD: Max 10.8Mbytes/sec |
|
|
|
||
n |
with BD: Max 11Mbytes/sec |
|
Buffer Memory |
2MB |
n
n
for CD/DVD: 2MB for BD: 4.5MB
Interface SATA
9

|
CHAPTER 1: System specifications |
|
|
|
|
Item |
Specification |
|
|
|
|
Applicable disc |
CD: CD-DA, CD-ROM, CD-ROM XA, Photo CD (multi-session), Video CD, Cd-Extra (CD+), CD-text |
|
format |
DVD: DVD-VIDEO, DVD-ROM, DVD-R (3.9GB, 4.7GB) DVD-R DL, DVD-RW, DVD-RAM, DVD+R, |
|
|
DVD+R DL, DVD+RW |
|
|
CD: |
|
|
CD-DA (Red Book) - Standard Audio CD & CD-TEXT |
|
|
CD-ROM (Yellow Book Mode1 & 2) - Standard Data |
|
|
CD-ROM XA (Mode2 Form1 & 2) - Photo CD, Multi-Session |
|
|
CD-I (Green Book, Mode2 Form1 & 2, Ready, Bridge) |
|
|
CD-Extra/ CD-Plus (Blue Book) - Audio & Text/Video |
|
|
Video-CD (White Book) - MPEG1 Video |
|
|
CD-R (Orange Book Part) |
|
|
CD-RW & HSRW (Orange Book Part Volume1 & Volume 2 |
|
|
Super Audio CD (SACD) Hybrid type |
|
|
US & US+ RW |
|
|
DVD: |
|
|
DVD-ROM (Book 1.02), DVD-Dual |
|
|
DVD-Video (Book 1.1) |
|
|
DVD-R (Book 1.0, 3.9G) |
|
|
DVD-R (Book 2.0, 4.7G) - General & Authoring |
|
|
DVD+R (Version 1.0) |
|
|
DVD+RW |
|
|
DVD-RW (Non CPRM & CPRM) |
|
|
DVD°”R Dual |
|
|
|
|
|
|
Blu-Ray: |
|
|
BD-R, BD-R DL, BD-RE, BD-RE DL |
Loading |
Load: Manual |
|
mechanism |
Release: (a) Electrical (Release Button), (b) ATAPI command, (c) Emergency |
|
|
|
|
Power Requirement |
|
|
|
|
|
Input Voltage |
5 V +/- 5% (Operating) |
5 V +/- 5% (Operating) |
|
|
|
LCD
Item |
Specification |
|
|
Vendor
n
n
n
n
n
AUO
CMO
Innolux LG Samsung
Screen diagonal (mm) |
15.6 inches |
Resolution support (pixels)
n
n
n
n
n
n
800×600
1024×768
1280×720
1280*768
1360×768
1366×768
Pixel pitch |
0.204 x 0.204 |
|
|
Pixel arrangement |
R.G.B. Vertical Stripe |
|
|
Display mode |
Normally white |
|
|
Typical white luminance |
200 or 220 nits |
(brightness) |
|
Luminance uniformity |
1.25 max. |
|
|
Contrast ratio |
400:1, 500:1 or 650:1 |
|
|
10

|
|
www.packardbell.com |
|
|
|
|
|
|
Item |
Specification |
|
|
|
|
|
|
Response time (msec) |
8 |
|
|
|
|
|
|
Nominal input voltage VDD |
+3.3V |
|
|
|
|
|
|
Viewing angle (degree) |
45/45 |
|
|
Horizontal: Right/Left |
|
|
|
Vertical: Upper/Lower |
15/35 |
|
|
|
|
|
|
Temperature range( ° C) |
0 to +50 |
|
|
Operating |
||
|
Storage (shipping) |
-40 to +60 |
|
|
Keyboard |
|
|
|
|
|
|
|
Item |
Specification |
|
|
|
|
|
|
Keyboard controller |
Winbond WPC773 |
|
|
|
|
|
|
Total number of keypads |
99/100/103-key |
|
|
|
|
|
|
Windows logo key |
Yes |
|
|
|
|
|
|
Internal & external |
Plug USB keyboard to the USB port directly |
|
|
keyboard work |
|
|
|
simultaneously |
|
|
|
|
|
|
|
Pointing device |
|
|
|
|
|
|
|
Item |
Specification |
|
|
|
|
|
Type
n
n
Synaptics TM00540-001 Touchpad
ALPS KGDFF0031A Touchpad
Buttons Left/Right
Memory card reader
Item |
Specification |
|
|
|
|
Controller |
Alcor AU6433 |
|
|
|
|
Cards supported |
Support 5-in-1 card reader (MMC, MS, MS-pro, SD, and xD) |
|
|
|
|
Compliancy |
n |
Complies to SDIO Host Interface Specification Rev 1.0 |
|
|
|
n |
Supports MMC, MMCplus, SD Memory, and SDIO cards |
|
n |
SDIO Version 1.10 compliant with High-Speed Mode |
|
SD Host Interface Specification v1.0 |
||
n |
||
SD Host Interface Specification v2.0 |
||
n |
||
n |
SD HC (High Capacity SD memory card) |
|
Supports SD memory card, with CPRM security |
||
n |
||
Complies to MultiMediaCard™ Version 4.0 |
||
n |
||
n |
Supports Memory Stick™ and MS PRO media cards |
|
Supports xD-Picture™ card and SmartMedia™ cards |
||
n |
||
|
||
|
|
11
|
|
CHAPTER 1: System specifications |
Audio |
|
|
|
|
|
Item |
Specification |
|
|
|
|
Audio codec |
Realtek ALC272 |
|
|
|
|
Audio onboard or optional |
Built-in |
|
|
|
|
Mono or stereo |
Stereo |
|
|
|
|
Resolution |
24-bit DAC and ADC |
|
|
|
|
Compatibility |
HD Audio |
|
|
|
|
Sampling rate |
192 kHz maximum sample rate |
|
|
|
|
Internal microphone |
With webcam |
|
|
|
|
Internal speaker/quantity |
2 speakers |
|
|
|
|
Wired LAN |
|
|
|
|
|
Item |
Specification |
|
|
|
|
LAN chipset |
Broadcom BCM57780 |
|
|
|
|
Supports LAN protocol |
10/100/1000 Mbps |
|
|
|
|
LAN connector type |
RJ45 |
|
|
|
|
LAN connector location |
Left side |
|
|
|
|
Features |
n |
Integrated 10/10/1000 BASE-T transceiver |
|
n |
PCI v2.2 compliant |
|
Wake on LAN support meeting ACPI requirements |
|
|
n |
|
|
|
|
Bluetooth |
|
|
|
|
|
Item |
Specification |
|
|
|
|
Chipset |
Broadcom BCM2046 |
|
|
|
|
Data throughput |
2.1 Mbit/s |
|
|
|
|
Protocol |
Bluetooth 2.1 |
|
|
|
|
Interface |
USB (board level) |
|
|
|
|
Connector type |
Wireless via Bluetooth protocols |
|
|
|
|
12

|
|
www.packardbell.com |
Wireless LAN |
|
|
|
|
|
Item |
Specification |
|
|
|
|
Chipset |
n |
Intel WiFi Link 5100 |
|
n |
Intel WiFi Link 5300 |
|
Atheros AR5B91/HB93 b/g/n |
|
|
n |
|
|
Atheros XB63 b/g |
|
|
n |
|
|
n |
WNC WiMAX |
|
|
|
|
|
|
Data throughput |
11~54 Mbps, up to 270 Mbps for Draft-N |
|
|
|
|
Protocol |
n |
IEEE 802.11a |
|
n |
IEEE 802.11b |
|
IEEE 802.11g |
|
|
n |
|
|
n |
IEEE 802.11 Draft-N |
|
IEEE 802.16e |
|
|
n |
|
|
|
|
|
|
|
Interface |
PCI bus (mini PCI socket for wireless module) |
|
|
|
|
USB |
|
|
|
|
|
Item |
Specification |
|
|
|
|
Chipset |
Mobile Intel HM55 Express Chipset |
|
|
|
|
USB compliancy level |
2.0 |
|
|
|
|
OHCI |
USB 1.1 and USB 2.0 host controller |
|
|
|
|
Number of USB ports |
4 |
|
Location
n
n
Two on the left side Two on the right side
Buttons/Indicators/Ports
Item |
Specification |
|
|
Buttons
n n
Power button Capacitive touch keys
Indicators
n n n n n n
Bluetooth Hard drive Num lock Caps lock Battery charge Power
Ports |
n |
USB (four) |
|
n |
External display (VGA) port |
|
n |
Ethernet (RJ45) |
|
n |
Modem (RJ11) |
|
n |
Headphone/SPDIF Audio Out |
|
n |
Microphone in |
|
n |
DC in jack for AC adapter |
|
n |
5-in-1 card reader (SD™, MMC, MS, MS PRO, xD) |
|
n |
HDMI™ port with HDCP support |
|
|
|
|
|
|
13

|
CHAPTER 1: System specifications |
|
Camera |
|
|
|
|
|
Item |
Specification |
|
|
|
|
Model |
Chicony 0.3M DV Calla / Camellia |
|
|
|
|
Interface |
USB 2.0 |
|
|
|
|
Resolution |
0.3 M pixels (640x480) |
|
|
|
|
Signal to noise ratio |
42 dB |
|
|
|
|
Sensor |
CMOS 1/4 |
|
|
|
|
Power |
5 V |
|
|
|
|
Built-in microphone |
Yes |
|
|
|
|
LED |
No |
|
|
|
|
Fans |
|
|
|
|
|
CPU temperature (° C) |
Fan speed (rpm) |
Acoustic level (dBA) |
|
|
|
45-50 |
0-3000 |
29 |
|
|
|
55-66 |
0-3300 |
33 |
|
|
|
68-74 |
3300-3800 |
38 |
|
|
|
78-83 |
3800-4100 |
40 |
|
|
|
86-91 |
4100-4800 |
40 |
|
|
|
Throttling 50%: % is controlled by operating system. Temperature point is 95 °C. OS shut down at 100 °C; H/W shut down at 105 °C
Battery
Item |
Specification |
|
|
Vendor
n
n
n
n
n
Panasonic
Samsung
Sanyo
Sony
Simplo
type |
Li-ion |
|
|
Pack capacity |
4400mAH–5800mAH |
|
|
Number of battery cell |
6 |
|
|
Package configuration |
3 cells in series, 2 series in parallel |
|
|
Normal voltage |
11.1V |
|
|
Charge voltage |
12.6V (max) |
|
|
14
www.packardbell.com
Power supply
Item |
Specification |
|
|
|
|
Vendor |
n |
Delta |
|
n |
Liteon |
|
Hipro |
|
|
n |
|
|
|
|
|
|
|
Input rating |
90V AC to 264V AC, 47Hz to 63Hz |
|
|
|
|
Maximum input AC current |
1.7A (max) |
|
|
|
|
Output rating |
19V DC, 3.42A, 65W |
|
|
|
|
Power savings
ACPI mode |
Power Management |
|
|
Mech. Off (G3) |
All devices in the notebook are turned off completely. |
|
|
Soft Off (G2/S5) |
OS initiated shutdown. All devices in the notebook are turned off completely. |
|
|
Working (G0/S0) |
Individual devices such as the CPU and hard disc may be power managed in this state. |
|
|
Suspend to RAM (S3)
n
n
n
n
n
n
n
CPU set power down VGA suspend PCMCIA suspend Audio power down Hard drive power down
Optical drive power down Super I/O low power mode
Save to Disk (S4) |
Also called Hibernation mode. System saves all system states and data onto the disc prior |
|
to powering off the whole system. |
|
|
15
CHAPTER 1: System specifications
Notebook product tour
Important
Case color may vary from that shown in the pictures.
Front View
Ventilation fan
Component |
Icon |
Description |
|
|
|
Ventilation fan |
|
Helps cool internal components. |
|
|
Warning: Do not work with the notebook resting on your lap. If |
|
|
the air vents are blocked, the notebook may become hot enough |
|
|
to harm your skin. |
|
|
Caution: Do not block or insert objects into these slots. If these |
|
|
slots are blocked, your notebook may overheat resulting in |
|
|
unexpected shutdown or permanent damage to the notebook. |
|
|
Caution: Provide adequate space around your notebook so air |
|
|
vents are not obstructed. Do not use the notebook on a bed, sofa, |
|
|
rug, or other similar surface. |
|
|
|
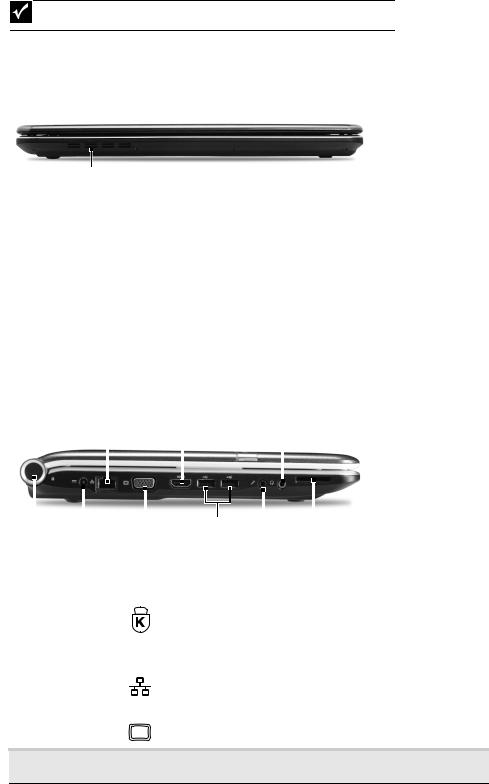
Left View
Ethernet |
HDMI out |
Headphone |
jack |
jack |
jack |
|
|
|
|
|
|
|
|
|
|
|
|
|
|
|
|
|
|
|
|
|
|
|
|
|
|
|
|
|
|
|
|
|
Kensington |
Power |
Monitor |
USB |
Microphone |
Memory card |
|||||
lock slot |
connector |
port |
port |
jack |
reader |
|||||
Component |
Icon |
Description |
|||||
|
|
|
|
|
|
|
|
Kensington™ |
|
|
|
|
|
|
Secure your notebook to an object by connecting a Kensington |
|
|
|
|
|
|
||
lock slot |
|
|
|
|
|
|
cable lock to this slot. |
|
|
|
|
|
|
|
|
|
|
|
|
|
|
|
|
Power connector |
|
|
|
|
|
|
Plug the AC adapter cable into this connector. |
|
|
|
|
|
|
||
|
|
|
|
|
|
|
|
Ethernet jack |
|
|
|
|
|
|
Plug an Ethernet network cable into this jack. Plug the other end |
|
|
|
|
|
|
||
|
|
|
|
|
|
|
of the cable into a cable modem, DSL modem, or an Ethernet |
|
|
|
|
|
|
|
network jack. |
|
|
|
|
|
|
|
|
Monitor port |
|
|
|
|
|
|
Plug an analog VGA monitor or projector into this port. |
HDMI out jack
HDMI
Plug an HDMI device, such as a high definition television, into this optional jack.
16

www.packardbell.com
Component |
Icon |
|
|
Description |
|||
|
|
|
|
|
|
|
|
USB port |
|
|
|
|
|
|
Plug USB devices (such as a diskette drive, flash drive, printer, |
|
|
|
|
|
|
|
scanner, camera, keyboard, or mouse) into these ports. |
|
|
|
|
|
|||
|
|
|
|
|
|
|
|
Microphone jack |
|
|
|
|
|
|
Plug a microphone into this jack. |
|
|
|
|
|
|
||
|
|
|
|
|
|
|
|
|
|
|
|
|
|
|
|
Headphone jack |
|
|
|
|
|
|
Plug amplified speakers or headphones into this jack. The built-in |
|
|
|
|
|
|
|
speakers are turned off when speakers or headphones are |
|
|
|
|
|
|
|
plugged into this jack. |
|
|
|
|
|
|
|
Headphone with SPDIF support |
|
|
|
|
|
|
|
|
Memory card |
|
|
|
|
|
|
Insert a memory card from a digital camera, MP3 player, PDA, |
reader |
|
|
|
|
|
|
or cellular telephone into the memory card reader. The memory |
|
|
|
|
|
|
|
card reader supports Memory Stick®, Memory Stick Pro®, |
|
|
|
|
|
|
|
MultiMediaCard™, Secure Digital™, and xD-Picture Card™cards. |
|
|
|
|
|
|
|
|
|
|
|
|
|
|
|
|
Right View
|
|
USB port |
|
|
Modem |
|
|
|
|
|
|
|
|
||
DVD drive |
|
Power |
|||||
|
|
|
|
|
jack |
button |
|
Component |
Icon |
Description |
||||||||
|
|
|
|
|
|
|
|
|
|
|
USB port |
|
|
|
|
|
|
|
|
|
Plug a USB device (such as a diskette drive, flash drive, printer, |
|
|
|
|
|
|
|
|
|
||
|
|
|
|
|
|
|
|
|
|
scanner, camera, keyboard, or mouse) into this port. |
|
|
|
|
|
|
|
|
|
|
|
|
|
|
|
|
|
|
|
|
|
|
DVD drive |
|
|
|
|
|
|
|
|
|
Insert CDs or DVDs into this drive. |
|
|
|
|
|
|
|
|
|
|
|
Modem jack |
|
|
|
|
|
|
|
|
|
Plug a dial-up modem cable into this optional jack. |
|
|
|
|
|
|
|
|
|
|
|
|
|
|
|
|
|
|
|
|
|
|
Power button |
|
|
|
|
|
|
|
|
|
Press to turn the power on or off. You can also configure the |
|
|
|
|
|
|
|
|
|
|
power button for Sleep/Resume mode. |
|
|
|
|
|
|
|
|
|
|
|
|
|
|
|
|
|
|
|
|
|
|
17
CHAPTER 1: System specifications
Rear View
|
|
Ventilation fan |
|
|
|
Component |
Icon |
Description |
|
|
|
Ventilation fan |
|
Helps cool internal components. |
|
|
Warning: Do not work with the notebook resting on your lap. If |
|
|
the air vents are blocked, the notebook may become hot enough |
|
|
to harm your skin. |
|
|
Caution: Do not block or insert objects into these slots. If these |
|
|
slots are blocked, your notebook may overheat resulting in |
|
|
unexpected shutdown or permanent damage to the notebook. |
|
|
Caution: Provide adequate space around your notebook so air |
|
|
vents are not obstructed. Do not use the notebook on a bed, sofa, |
|
|
rug, or other similar surface. |
|
|
|
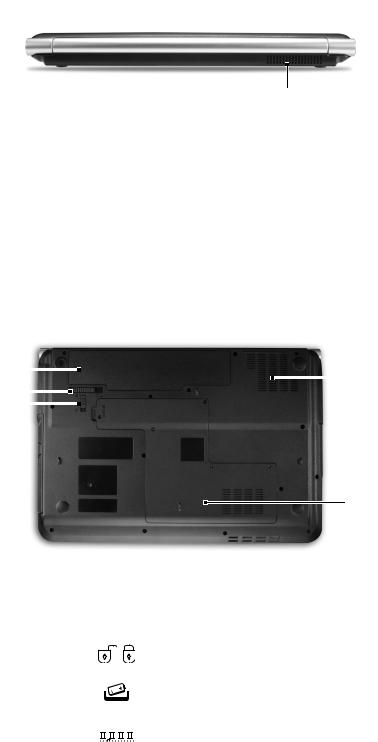
Bottom View
Battery |
|
|
|
|
Ventilation |
Battery latch |
|
|
|
|
slots and |
|
|
|
|
||
|
|
|
|
cooling fan |
|
|
|
|
|
|
|
Battery |
|
|
|
|
|
lock |
|
|
|
|
|
Memory/ Hard drive bay
Component |
Icon |
Description |
||
|
|
|
|
|
Battery |
|
|
|
Provides power when the notebook is not plugged into AC power. |
|
|
|
|
|
Battery lock |
|
|
|
Slide to unlock the battery. |
|
|
|
|
|
Battery latch |
|
|
|
Slide to release the battery. |
|
|
|
||
|
|
|
|
|
|
|
|
|
|
Memory bay |
|
|
|
Memory modules are located in this bay. |
|
|
|
||
|
|
|
|
|
|
|
|
|
|
18
|
|
|
www.packardbell.com |
|
|
|
|
Component |
Icon |
Description |
|
|
|
|
|
Hard drive |
|
|
The hard drive is located in this bay. |
|
|
||
bay |
|
|
|
|
|
|
|
Ventilation |
|
|
Helps cool internal components. |
slots and |
|
|
Warning: Do not work with the notebook resting on your lap. If the air |
cooling fan |
|
|
vents are blocked, the notebook may become hot enough to harm your |
|
|
|
skin. |
|
|
|
Caution: Do not block or insert objects into these slots. If these slots |
|
|
|
are blocked, your notebook may overheat resulting in unexpected |
|
|
|
shutdown or permanent damage to the notebook. |
|
|
|
Caution: Provide adequate space around your notebook so air vents |
|
|
|
are not obstructed. Do not use the notebook on a bed, sofa, rug, or |
|
|
|
other similar surface. |
|
|
|
|
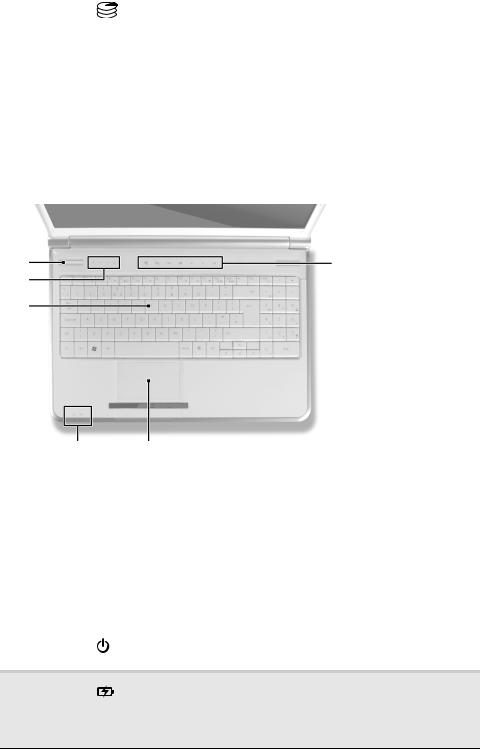
Keyboard area
Speakers |
Capacitive |
Status |
touch keys |
|
|
indicators |
|
Keyboard |
|
Power/Battery Touchpad
indicators
Component |
Icon |
Description |
|
|
|
Speakers |
|
Left and right speakers deliver stereo audio output. |
|
|
|
Capacitive |
|
Inform you when there is media activity or when a button has been |
hotkeys / |
|
pressed that affects how the keyboard is used. When a function is |
status |
|
enabled, the touch key is lit up. For more information, see “Using the |
indicators |
|
status indicators” on page 21 and “Using the capacitive touch keys” on |
|
|
page 24. |
|
|
|
Keyboard |
|
Provides all the features of a full-sized, computer keyboard. For more |
|
|
information, see “Using the keyboard” on page 21. |
|
|
|
Power indicator
n n n
LED on - Notebook is on.
LED blinking - Notebook is in Sleep or Hybrid Sleep mode. LED off - Notebook is off.
Battery charge |
|
n |
LED orange - Battery is fully charged. |
indicator |
|
n |
LED blinking orange - Battery is charging. |
|
|
|
|
|
|
n |
LED blinking red - Battery charge is very low. |
|
|
||
|
|
n |
LED solid red - Battery is malfunctioning. |
Important: This LED only lights up when your notebook is connected to
AC power or the battery charge is very low.
19

CHAPTER 1: System specifications
Component |
Icon |
Description |
|
|
|
Touchpad |
|
Provides all the functionality of a mouse. For more information, see |
|
|
“Using the touchpad” on page 25. |
|
|
|
Capacitive |
|
Press to access capacitive touch key function. For more information, see |
touch keys |
|
“Using the capacitive touch keys” on page 24. |
|
|
|
LCD panel
Microphone Webcam
Component |
Icon |
Description |
|
|
|
Webcam |
|
Use to let others see who they are communicating with when making |
|
|
VoIP calls. For more information, see “Using the webcam” on page 26. |
Microphone |
|
Use to talk through when making Voice over Internet Protocol (VoIP) |
|
|
calls. |
|
|
|
20

www.packardbell.com
Using the status indicators
Important
If none of the indicators are on, you may need to press FN+F1 to toggle the status indicators on.
Status indicators inform you when a drive is being used or when a button has been pressed that affects how the keyboard is used. The status indicators are located below the screen.
|
|
|
|
|
|
|
|
|
|
Power |
|
HDD |
Num lock |
|
|||
|
|
Battery |
|
Caps |
lock |
Bluetooth |
||
|
|
|
|
|
|
|
|
|
Indicator |
|
Icon |
|
|
Description |
|||
|
|
|
|
|
|
|
|
|
Power indicator
n n
n
LED on - Notebook is on.
LED blinking - Notebook is in Sleep or Hybrid Sleep mode.
LED off - Notebook is off.
Battery charge |
n |
LED blue - Battery is fully charged. |
|
|
|
indicator |
n |
LED red - Battery is charging. |
Important: This LED only lights up when your notebook is connected to AC power.
Caps lock
n n
LED on - Caps lock is turned on. LED off - Caps lock is turned off.
Num lock
n n
LED on - Num lock is turned on. LED off - Num lock is turned off.
Hard drive
n n
LED blinking - The drive is being accessed. LED off - The drive is not being accessed.
Bluetooth
n n
LED on - Bluetooth communication is turned on. LED off - Bluetooth communication is turned off.
Using the keyboard
Your notebook features a full-size keyboard that functions the same as a desktop computer keyboard. Many of the keys have been assigned alternate functions, including shortcut keys for Windows and function keys for specific system operations.
Function keys/ System keys
Numeric keypad/ Navigation keys
FN key Windows key |
Application key |
Arrow keys |
21

CHAPTER 1: System specifications
Key types
The keyboard has several different types of keys. Some keys perform specific actions when pressed alone and other actions when pressed in combination with another key.
Key type |
Icon |
Description |
|||
|
|
|
|
|
|
Function keys |
|
|
|
|
Press these keys labeled F1 to F12 to perform actions in programs. |
|
|
|
|
|
For example, pressing F1 may open help. |
|
|
|
|
|
Each program uses different function keys for different purposes. |
|
|
|
|
|
See the program documentation to find out more about the |
|
|
|
|
|
function key actions. |
System keys |
|
|
|
|
Press these colored keys in combination with the FN key to |
|
|
|
|
|
perform specific actions. For more information, see “System key |
|
|
|
|
|
combinations” on page 22. |
|
|
|
|
|
|
Navigation keys |
|
|
|
|
Press these keys to move the cursor to the beginning of a line, |
|
|
|
|
|
to the end of a line, up the page, down the page, to the beginning |
|
|
|
|
|
of a document, or to the end of a document. |
FN key |
|
|
|
|
Press the FN key in combination with a colored system key to |
|
|
|
|
|
perform a specific action. |
|
|
|
|
|
|
Windows key |
|
|
|
|
Press this key to open the Windows Start menu. This key can also |
|
|
|
|
||
|
|
|
|
|
be used in combination with other keys to open utilities like |
|
|
|
|
|
|
|
|
|
|
|
F (Search utility), R (Run utility), and E (Computer window). |
|
|
|
|
|
|
|
|
|
|
|
|
Application key |
|
|
|
|
Press this key for quick access to shortcut menus and help |
|
|
|
|
|
assistants in Windows. |
|
|
|
|
|
|
|
|
|
|
|
|
|
|
|
|
|
|
|
|
|
|
|
|
|
|
|
|
|
|
|
|
|
|
|
|
Arrow keys |
|
|
|
|
Press these keys to move the cursor up, down, right, or left. |
|
|
|
|
|
|
System key combinations
When you press the FN key and a system key at the same time, your notebook performs the action identified by the text or icon on the key.
Press and hold FN, |
To... |
||||
then press this |
|
||||
system key... |
|
||||
|
|
|
|
|
Turn the capacitive touch key LEDs on or off. For more information, see |
|
|
|
|
|
|
|
|
|
|
|
“Using the status indicators” on page 21. |
|
|
|
|
|
|
|
|
|
|
|
|
|
|
|
|
|
|
|
|
|
|
|
Enter Sleep mode or Hybrid Sleep mode. Press the power button to |
|
|
|
|
|
leave Sleep mode. |
Toggle the notebook display in the following order: n The LCD
nAn external monitor or projector (a monitor or projector must be plugged into the monitor port or HDMI port on your notebook)
n |
Both displays at the same time |
|
|
22

www.packardbell.com
Press and hold FN, |
To... |
||||
then press this |
|
||||
system key... |
|
||||
6 |
|
Turn the optional Bluetooth radio on or off. |
|||
|
Warning: Radio frequency wireless communication can interfere with |
||||
|
|
|
|
|
equipment on commercial aircraft. Current aviation regulations require |
|
|
|
|
|
wireless devices to be turned off while traveling in an airplane. Bluetooth |
|
|
|
|
|
communication devices are examples of devices that provide wireless |
|
|
|
|
|
communication. |
|
|
|
|
|
Important: The wireless network switch must be in the ON position for |
|
|
|
|
|
this button to work. For more information, see “Left View” on page 16. |
|
|
|
|
|
|
|
|
|
|
|
Mute the sound. Press the key combination again to restore the sound. |
|
F7 |
|
|||
|
|
|
|||
|
|
|
|
|
|
|
|
|
|
|
|
|
F8 |
Turns the display screen backlight off to save power. Press any key to |
|||
|
return. |
||||
|
|
|
|
|
|
|
|
|
|
|
Play/ Pause—Plays or pauses the CD or DVD. |
|
|
|
|
|
|
|
|
|
|
|
|
|
|
|
|
|
|
|
|
|
|
|
|
|
|
|
|
|
|
|
|
|
|
|
Stop—Stops playing the CD or DVD. |
|
|
|
|
|
|
|
|
|
|
|
|
|
|
|
|
|
|
|
|
|
|
|
Previous—Skips back one CD track or DVD chapter. |
|
|
|
|
|
|
|
|
|
|
|
|
|
|
|
|
|
|
|
|
|
|
|
|
|
|
|
|
|
|
|
|
|
|
|
Next—Skips ahead one CD track or DVD chapter. |
|
|
|
|
|
|
|
|
|
|
|
|
|
|
|
|
|
|
23

CHAPTER 1: System specifications
Using the capacitive touch keys
PowerSave |
|
|
|
|
|
|
|
|
|
|
|
MyBackup |
Wireless |
Touchpad |
Mute |
Decrease |
Increase |
||||||
|
|
switch |
toggle |
|
|
volume |
volume |
||||
(only for certain models)
Programmable |
|
|
|
|
|
|
|
|
|
|
|
|
|
MyBackup |
Wireless |
Touchpad |
Mute |
DecreaseIncrease |
|||||||
key |
|
|
switch |
toggle |
|
|
volume volume |
|||||
(only for certain models)
Button Description
PowerSave key—Press to put the notebook into power-saving mode. The button lights up red when this happens. Press this key again to return to your previous settings.
Programmable key—The programmable key will run the Launch Manager, you can assign an application as your needed. (only for certain models)
MyBackup key—Press to create a data backup in three easy steps: select source, select destination, and backup schedule (manual or automatic). The button lights up red during the backup process.
Wireless switch—Turn the optional IEEE 802.11 wireless network radio on or off. For more information, see “Wireless Ethernet Networking” in your online User
Guide.
Warning: Radio frequency wireless communication can interfere with equipment on commercial aircraft. Current aviation regulations require wireless devices to be turned off while traveling in an airplane. IEEE 802.11 communication devices are examples of devices that provide wireless communication.
Touchpad toggle—turn the internal touchpad on and off.
Mute—mutes the sound. Press again to restore the sound.
Decrease volume—press to decrease volume.
Increase volume—press to increase volume.
24
Loading...