


PA C K A R D BE L L EA S Y HDD RE C O R D E R
ENGLISH . . . . . . . . . . . . . . . . . 2 FRANÇAIS . . . . . . . . . . . . . . 29 DEUTSCH . . . . . . . . . . . . . . . 59 NEDERLANDS . . . . . . . . . . . . 89 NORSK . . . . . . . . . . . . . . . . 117 SVENSKA . . . . . . . . . . . . . . 145
-

EN G L I S H
PACKARD BELL EASY HDD RECORDER USER'S GUIDE
Copyright © 2005 Packard Bell B.V. All Rights Reserved. No part of this manual may be reproduced or transmitted, in any form or by any means, whether electronic, chemical, manual or otherwise, including but not limited to photocopying, recording, or information storage and retrieval systems, for any purpose without prior written permission of Packard Bell B.V.
Disclaimer
Packard Bell B.V. specifically disclaims all warranties, either express or implied, including, but not limited to, implied warranties of merchantability and fitness for a particular purpose with respect to this product and documentation. Updates to hardware components are made regularly. Therefore some of the instructions, specifications and pictures in this documentation may differ slightly from your particular situation. All items described in this guide are for illustration purposes only and may not apply to your particular situation. No legal rights or entitlements may be obtained from descriptions made in this manual.
Packard Bell B.V. reserves the right to revise or make changes or improvements to this product or documentation at any time without obligation to notify any person of such revisions or improvements. In no event shall Packard Bell B.V. be liable for any consequential or incidental damages, including but not limited to loss of business profits or any other commercial damages, arising out of the use of this product.
Trademarks
Packard Bell is a registered trademark of Packard Bell B.V. All other company or product names are trademarks, registered trademarks or service marks of their respective owners.
Warning
To prevent fire or shock hazard, do not use the plug with an extension cord, receptacle or other outlet unless the plug can be fully inserted, to prevent fire or shock hazard. Do not expose this appliance to rain or moisture.
The lightning flash with arrowhead symbol within an equilateral triangle is intended to alert the user to the presence of uninsulated dangerous voltage within the product's enclosure that may be of sufficient magnitude to constitute
a risk of electric shock to persons.
WARNING: TO REDUCE THE RISK OF ELECTRIC SHOCK, DO NOT REMOVE THE COVER (OR BACK). NO USER SERVICEABLE PARTS INSIDE, REFER SERVICING TO QUALIFIED SERVICE PERSONNEL.
Important Safety Precautions
•Read these instructions.
•Keep these instructions.
•Heed all warnings.
•Follow all instructions.
•Do not use this apparatus near water.
•Clean only with a dry cloth.
•Do not block any ventilation openings. Install in accordance with the manufacturer's instructions.
• Do not install near any heat sources such as radiators, heat regis- |
SH |
|
ters, stoves or other apparatus (including amplifiers) that produce |
I |
|
heat. |
GL |
|
• Do not defeat the safety purpose of the polarised or grounding-type |
N |
|
E |
||
plug. A polarised plug has two blades with one wider than the oth- |
||
|
||
er. A grounding type plug has two blades and a third grounding |
|
|
prong. The wide blade or the third prong is provided for your safe- |
|
|
ty. If the provided plug does not fit into your outlet, consult an elec- |
|
|
trician for replacement of the obsolete outlet. |
|
|
• Protect the power cord from being walked on and from pinching. |
|
|
• Only use attachments/ accessories specified by the manufacturer. |
|
|
• Unplug this apparatus during lightning storms or when unused for |
|
|
long periods of time. Please note that the product warranty does |
|
|
not apply if damage to the product is the result of a lightning strike. |
|
|
• Refer all servicing to qualified service personnel. Servicing is re- |
|
|
quired when the apparatus has been damaged in any way, has been |
|
|
exposed to rain or moisture, does not operate normally or has been |
|
|
dropped. |
|
|
• You must unplug the power supply cord to disconnect the appara- |
|
|
tus from the power supply. With this in mind, the socket-outlet |
|
|
should be located close to the apparatus and should also be readily |
|
|
accessible. |
|
|
Product Disposal |
|
|
The Waste Electrical and Electronic Equipment |
|
|
(WEEE) Directive requires that the used electrical and |
|
|
electronic products must be disposed of separately |
|
|
from normal households waste in order to promote |
|
|
reuse, recycling and other forms of recovery and to |
|
|
reduce the quantity of waste to be eliminated with a |
|
|
view to reducing landfill. This includes accessories |
|
|
such as a remote control, power cords, etc. When you dispose of such |
|
|
products, please follow the guidance of your municipal authority and/ |
|
|
or ask your retailer when purchasing a new product. |
|
- 2

CONTENTS |
|
Introduction...................................................................................... |
4 |
Main Features ......................................................................................... |
4 |
Box Contents .......................................................................................... |
4 |
Playable and Unplayable discs .................................................................. |
5 |
Recordable Discs ..................................................................................... |
5 |
Getting Started - Controls .................................................................. |
6 |
Prepare the Remote Control .................................................................... |
6 |
General Remote Control Buttons ............................................................. |
6 |
Remote Control Button List ..................................................................... |
8 |
Front panel controls and features ............................................................. |
9 |
Rear panel diagram .................................................................................. |
9 |
Getting Started - Installation ............................................................ |
10 |
Connect to a Television (Basic configuration) ......................................... |
10 |
Connect to a Television (Alternative configuration) ................................ |
10 |
Connect To An External Audio System .................................................. |
11 |
Connect USB devices ............................................................................ |
12 |
Playback ......................................................................................... |
13 |
Play a DVD or CD with MP3, JPEG or/and DivX files ............................ |
14 |
Play content from a USB device ............................................................. |
14 |
HDD Title List ...................................................................................... |
15 |
Time Shifting .................................................................................. |
16 |
Recording / Time Shifting mode ............................................................ |
16 |
Set Recording Quality ............................................................................ |
18 |
Record To DVD .................................................................................... |
18 |
Record to HDD ..................................................................................... |
18 |
Timer Recording ................................................................................... |
19 |
Editing and Dubbing ....................................................................... |
20 |
DVD Editing ......................................................................................... |
20 |
HDD Editing ......................................................................................... |
21 |
Dubbing (Copy from HDD to DVD) ....................................................... |
23 |
System Setup .................................................................................. |
24 |
Troubleshooting .............................................................................. |
27 |
Specifications .................................................................................. |
28 |
3 -
INTRODUCTION
The Packard Bell Easy HDD Recorder can encode TV signals and AV signals from external devices or digital signals from IEEE 1394 devices and can record* on DVD+RW, DVD+R, DVD-RW or DVD-R discs for the facility of storage. The Easy HDD Recorder also functions as a DVD player.
*Record to 8X DVD-Rs not supported.
Please visit www.packardbell.com for all the latest support information and downloads for your product.
MAIN FEATURES
•The internal HDD (Hard Disk Drive) record functions include Time Shifting and Direct Digital Dub.
•Plays pre-recorded Movie DVDs and Audio CDs.
•MP3 support.
•DivX codec support (short for DivX compression/decompression).
•Dolby Digital sound for a total of 6 (‘5.1’) separate audio channels (front-left, front-middle, front-right, rear-left, rear-right and subwoofer).
Time Shifting
Simultaneous video recording and playback.
•Pause and later resume live TV broadcasts. Fast forward, fast rewind and jump to any point in the recording.
•Instant replay of up to 3 hours.
•Play a previously recorded programme while another programme is being simultaneously recorded.
DVD/CD Player
•16:9 and 4:3 TV screen aspect ratio support.
•Playback functions including Program, Repeat, Fast Forward/ Reverse, Zoom, etc.
•Supports 34 audio languages, subtitle languages and disc menu languages. Supports 9 viewing angles, as well as other normal DVD playback features.
•Compatible with DVD, Super VCD, VCD, CD, CD-R discs, can play MP3, JPEG and Picture CD.
•Copy protection technology from Macrovision.
Program Recording
•Record from TV tuner or analogue AV input in MPEG-2 format.
•Play a previously recorded programme from the HDD while recording another programme.
•Programmable timer for recording a single or recurring TV programme.
•Set up to 20 time-recording events with three options: "Once", "Daily" and "Weekly".
•OTR quick-record; record TV at the press of a button.
|
DVD Archiving (‘dubbing’) |
|
H |
|
• Archive recordings on the HDD (Hard Disk Drive) to DVD+RW, |
LIS |
|||
G |
||||
|
DVD+R, DVD-RW or DVD-R discs. |
|
||
|
|
EN |
||
• DVDs recorded using the Easy HDD Recorder can be played on |
||||
|
||||
|
most current and future DVD players. |
|
|
|
|
Personal Video Archiving |
|
|
|
• Transfer videos from a VCR, analog camcorder or digital (DV) |
|
|||
|
camcorder to DVD with Direct Digital Dub™. |
|
|
|
|
Connectors |
|
|
|
• Digital input (DV) connector for digital video cameras; audio and |
|
|||
|
video signals are transmitted via the same cable. |
|
|
|
• Standard video out (CVBS), S-video out, SCART IN/OUT con- |
|
|||
|
nectors, and component video out (Y, Cb/Pb, Cr/Pr) out con- |
|
||
|
nectors. |
|
|
|
• Coaxial digital audio out connector. |
|
|
||
• Connects with USB flash drives, USB memory card readers and |
|
|||
|
USB cameras (The mass storage device must be FAT32 format- |
|
||
|
ted). |
|
|
|
• Signal pass-through with SCART and TV aerial connectors. |
|
|
||
|
Additional Features |
|
|
|
• Diamond Copy image processing technology, providing |
excel- |
|
||
|
lent image quality. |
|
|
|
• Parental Lock Level control system. |
|
|
||
• Screensaver program for screen protection. |
|
|
||
• |
Intelligent software update. |
|
|
|
• Progressive Scan creates a picture with twice the scan lines of |
|
|||
|
traditional Component Video. This results in reduced picture |
|
||
|
flickering and motion artifacts as well as a sharper image on large |
|
||
|
screens. |
|
|
|
|
The wrong setting for the output mode can cause a blank |
|
||
|
screen or bad quality. If you are experiencing problems with |
|
||
|
the quality of your display or have a blank screen, please |
|
||
|
press the progressive scan button to change output mode. |
|
||
|
This product contains copy protection tech- |
|
||
|
nology, which is protected by US Patent |
|
||
|
and other intellectual property rights. Use |
|
||
of this copy protection technology from Macrovision Corporation |
|
|||
requires the approval of Macrovision. It is intended exclusively for |
|
|||
home use and other limited pay-per-view applications, unless Macro- |
|
|||
vision approves some other use in writing. Modifications to the |
|
|||
equipment, removal of components and reverse engineering are |
|
|||
prohibited. |
|
|
||
BOX CONTENTS |
|
|
||
• |
Easy HDD Recorder |
|
|
|
• |
Power Cord |
|
|
|
• |
Remote Control |
|
|
|
Introduction - 4

•Batteries
•User’s Guide and Warranty Guide
•Coaxial aerial cable
•SCART cable
DISC TYPES
DVDs
DVD discs are divided into one or more titles. Each title may be further divided into several chapters. Sometimes a chapter may contain index points dividing the chapter into several parts.
Multi-Angle
You can view scenes from different camera angles when watching movies or other media containing multiple playback angles.
Multiple Audio Languages
You can select the language when watching movies or discs that have multiple languages and/or audio soundtracks recorded on them.
Multi-Language Subtitles
You can select the subtitle language or turn subtitles off when watching movies or discs that have multi-language subtitles recorded on them.
SVCD/VCD/AUDIO CDs
SVCD/VCD/AUDIO CD are divided into tracks. A track can sometimes contain a number of index points.
MP3 /JPEG/DivX (Audio/Image/Video files)
MP3 is a compressed audio file format that uses the file extension “mp3” or “.MP3”. JPEG is a compressed image file format that uses the file extension “.jpg” or “.JPG”. DivX is a compressed video file format that uses the file extension “.avi” or “.AVI”.
The Easy HDD Recorder may take some time to display the list of disc contents, especially if the disc contains a lot of data.
PLAYABLE AND UNPLAYABLE DISCS
Playable Discs
CD Audio and CD EXTRA CD-ROM (Mode 1)
CD-ROM XA (Mode 2, Form 1 and Form 2),
CD-I (Mode 2, Form 1 and Form 2) and CD-I Ready Photo CD (Single and Multi session)
Video CD
CD-TEXT
Single-sided single layer DVD-ROM (SS-SL)
Single-sided dual layer OPPOSITE DVD-ROM (SS-DL-OPT) Single-sided dual layer PARALLEL DVD-ROM (SS-DL-PTP) Double-sided single layer DVD-ROM (DS-SL)
Double-sided double layer DVD-ROM (DS-DL)
Double-sided double layer OPPOSITE DVD-ROM (DS-DL-OPT) Double-sided double layer PARALLEL DVD-ROM (DS-DL-PTP)
Single-sided single layer DVD±R
Single-sided single layer DVD±RW
Unplayable Disc Types
Unfinalised discs from other DVD/CD recorders.
Not all CD-R, CD-RW, DVD-R, DVD-RW, DVD+R, DVD+RW discs are supported due to the type of disc or the condition of the recording.
RECORDABLE DISCS
DVD±RW (rewritable DVD discs)
DVD±RW is an erasable format. DVD±RW discs can be rewritten more than 1,000 times.
*DVD±R (write-once DVD discs)
DVD±R (write-once DVD discs) DVD±R discs can only be written once. Several recordings can be made on the same disc as long as the disc is not finalised or full.
If the disc is finalised, you can not edit or record on the disc, even though unused capacity may still be available. If you want to play a DVD±R created with your Easy HDD Recorder on another player, please make sure it has been
finalised. Likewise, you must use the "make compatible" option if you want to play a DVD±RW disc on another player.
*Record to 8X DVD-Rs not supported.
5 - Introduction
GETTING STARTED - CONTROLS
PREPARE THE REMOTE CONTROL
The remote control and batteries are individually packed. Before you can use the remote control please insert the batteries:
1.Remove the battery cover on the remote control, insert the batteries (with the correct orientation) and replace the cover. The remote control has an effective range of about 5 to 10 metres.
When operating the Easy HDD Recorder, remember to point the remote control directly at the Recorder and not the TV set!
GENERAL REMOTE CONTROL BUTTONS
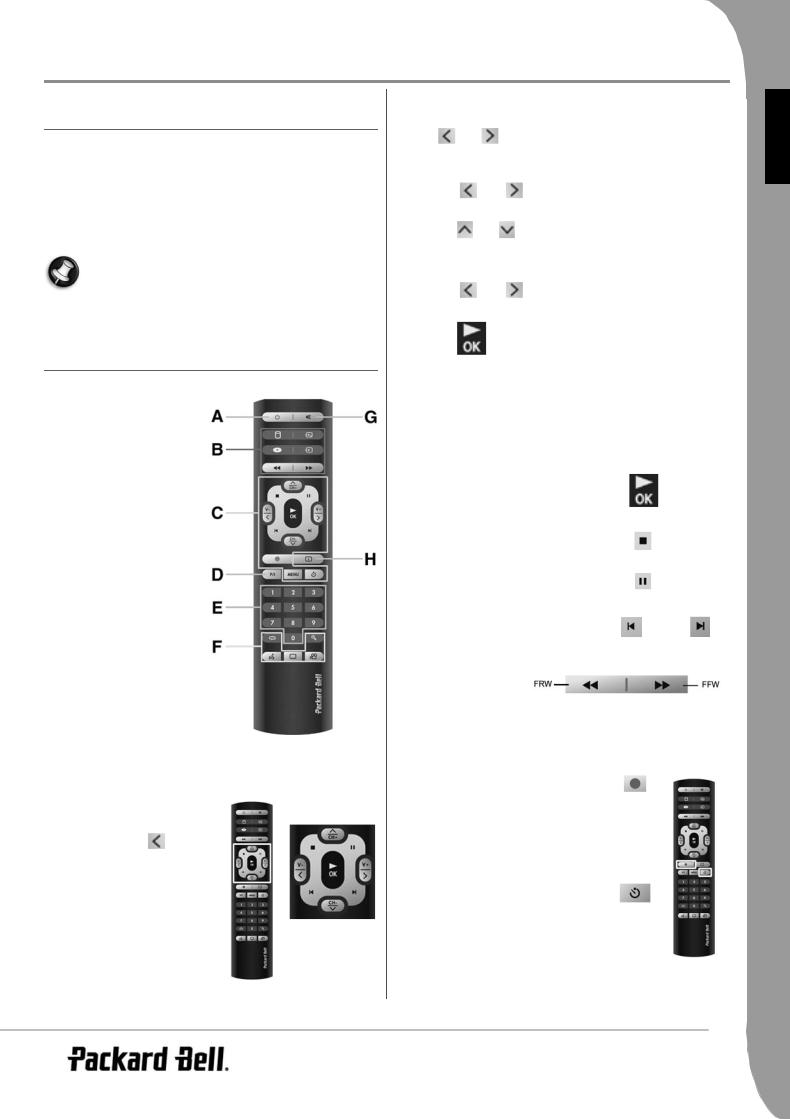
General Overview
A.Power On/Off
B.Source/Media selection
C.Menu Navigation Record/ Playback controls
D.Progressive Scan/Interlaced
E.Numeric Pad
F.Playback Features
G.Mute On/Off
H.On-screen display
Navigation Buttons
In DVD, HDD and system menus:
• Use the Left |
, Right |
 , Up
, Up  and Down
buttons to navigate in menus.
•Use the Play/OK  button to make a selection.
|
During playback: |
|
|
H |
||
Use the |
and |
buttons to adjust the volume (from 0 to 20). |
LIS |
|||
EN G |
||||||
|
During TV playback: |
|
||||
• |
Use the |
and |
buttons to adjust the volume (from 0 to |
|
||
|
20). |
|
|
|
|
|
• |
Use the |
and |
buttons to change TV channels. |
|
|
|
|
During DVD playback: |
|
|
|||
• |
Use the |
and |
buttons to adjust the volume (from 0 to |
|
||
|
20). |
|
|
|
|
|
• |
Use the |
button to display playback information. |
|
|
||
|
Playback controls |
|
|
|||
|
During DVD/HDD playback and Time Shifting mode: |
|
||||
• Use the Play button to start playback. |
|
|
||||
• Use the Stop button to stop playback. |
|
|
||||
• Use the Pause button to pause playback. |
|
|
||||
Use the PREVIOUS / NEXT |
|
|
||||
buttons to skip to the |
|
|
||||
previous /next chapter. |
Previous |
Next |
|
|||
Use the FRW / FFW buttons |
|
|
||||
to activate fast rewind / fast |
|
|
||||
forward. |
|
|
|
|
||
|
Recording Controls |
|
|
|||
In time shifting and recording modes: |
|
|
||||
• Use the Record button to start record- |
|
|
||||
|
ing. |
|
|
|
|
|
Anytime: |
|
|
|
|
||
• |
Use the |
Timer button to access the |
|
|
||
|
timer menu. |
|
|
|
||
Getting Started - Controls - 6
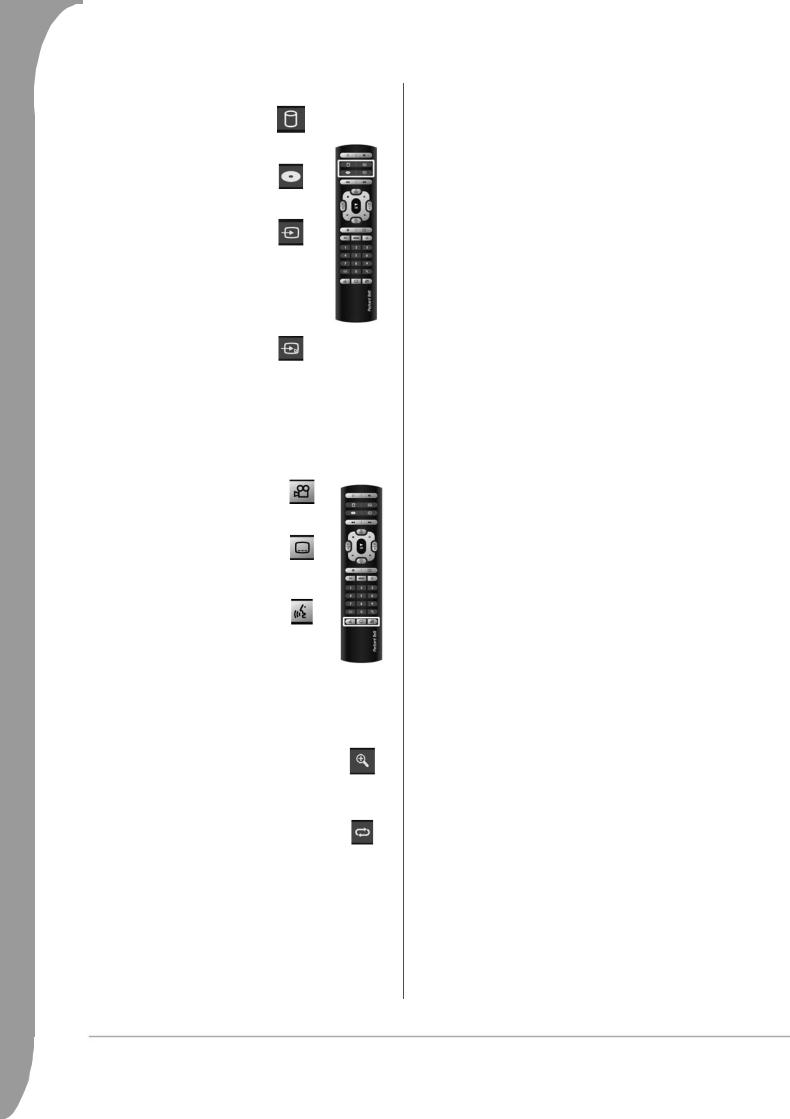
Source/Media selection
•Press the HDD button to select HDD mode or to display the HDD titles list.
•Press the DVD button to select DVD mode or to display the DVD menu.
•Use the Analogue Source button to cycle between the following analogue sources:
>SCART2
>CHXX (TV Tuner)
>F-COMP (Front Composite Video)
>F-SV (Front S-Video)
•Use the Digital Source button to switch between USB and DV.
Playback Features Buttons
During DVD-Video playback:
•Use the Angle button to select from the different available angles (if the feature is available on the DVD-Video).
•Use the Subtitle button to select from the different available language subtitles (if the feature is available on the DVD-Video).
•Use the Language button to select from the different available audio tracks (if the feature is available on the DVDVideo).
During DVD/HDD playback:
•Use the Zoom button to zoom the image. Press Zoom several times to change the zoom factor.
Then use the  ,
,  ,
,  and
and  buttons to move the image position.
•Use the Repeat button to turn on/off the repeat function.
7 - Getting Started - Controls

REMOTE CONTROL BUTTON LIST
1.Standby, switch on/off the Easy HDD Recorder.
2.Mute, turn on/off audio output.
3.HDD, show/hide HDD title list.
4.Digital (DV) Source, press to view video contents from a digital video camera and to swap between digital sources (DV or USB).
5.DVD, press to view or play optical disc content. While in DVD playback, pressing DVD will bring up the DVD menu.
6.Analogue Source, select external analogue signal source.
7.Fast reverse, there are three modes: 4X, 8X, 32X.
8.Fast forward, there are three modes: 4X, 8X, 32X.
9.CH+/CH-, change TV channel.
10.Pause
11.Stop/Return, press once to stop playback/recording, press again to return to root menu (only for VCD discs).
12.V+/V-, adjust the audio output volume.
13.Play/OK, confirm selection or Play.
14.Next title or chapter.
15.Previous title or chapter.
16.Display, press once to show playback information, press again for help.
17.Record/OTR, record a TV programme or an AV signal from an external source.
•When recording in OTR mode, each press of this button will add 30 minutes to the recording time to a maximum of 3 hours. Time Shifting Mode must be activated for this to work.
18.Timer, set or change a schedule for recordings.
19.P/I, Progressive Scan/Interlaced
20.Menu, access system setup menu or disc menu.
21.0---9, number buttons.
22.Zoom
23.Repeat/Shuffle
24.Angle
25.Audio Language
26.Subtitles
EN G L IS H |
Getting Started - Controls - 8

FRONT PANEL CONTROLS AND FEATURES
|
|
|
|
|
|
|
|
|
|
|
|
|
|
|
|
|
|
|
|
|
|
|
|
|
|
|
|
1. |
Power button |
6. |
Source button |
|||
2. |
DVD disc holder |
7. |
Record button |
|||
3. |
Open/Close button |
8. |
Display |
|||
4. |
Play/Pause button |
9. |
Front Panel Connectors |
|||
5. |
Stop button |
|
|
|
||
Front Panel Connectors (open flap for access)
1.S-Video: S-Video input connector, use to connect an appropriate video device.
2.Composite Video: Video input connector, use to connect an appropriate video device.
3.Composite Audio L/R: Audio input connectors, use to connect audio from devices connected to the S-Video or Composite ports.
4.DV IN: DV input connector (i-Link/IEEE 1394), use to connect a digital video camera.
5.USB: USB input connector, use to connect a USB Mass Storage Device.
REAR PANEL DIAGRAM
1.AC IN Power cord connector to mains supply.
2.SCART In (SCART 2) Use to connect to digital AV equipment with SCART Output capability.
3.SCART Out (SCART 1) Use to connect to TV set or other equipment with a SCART in connector.
4.Audio output L/R Analog audio output (left and right).
5.Coaxial Digital Audio Out Use to output digital audio by connecting to an amplifier or receiver with digital audio input capability.
6.YUV (Y Cb/Pb Cr/Pr) Use to connect to TV set with YUV (Y Cb/ Pb Cr/Pr) input connectors. The output mode can be set as progressive or interlaced.
7.CVBS Video Out Use to connect to TV set with video CVBS input connector.
8.Optical Digital Audio Use to output digital audio recorded on discs by connecting to the optical digital audio input connector on an AV amplifier or receiver with digital audio input capability.
9.S-Video Out Use to connect to TV set with S-VIDEO input connector.
10.Aerial In Use to connect to aerial/cable TV.
11.Aerial Out Use to output TV signal to TV set.
Display Window Indicators
1. |
PAL |
12. |
Audio Channel |
2. |
NTSC |
13. |
Time/Mode (h:mm:ss) |
3. |
Channel |
14. |
Source/Chapter |
4. |
DTS |
15. |
Pause |
5. |
Dolby |
16. |
PBC |
6. |
Timer |
17. |
Play |
7. |
Record |
18. |
DVD |
8. |
Multiple Angle |
19. |
VCD/SVCD |
9. |
Program |
20. |
MP3 |
10. |
Random |
21. |
Repeat |
11. |
Day |
|
|
9 - Getting Started - Controls
GETTING STARTED - INSTALLATION
CONNECT TO A TELEVISION (BASIC CONFIGURATION)
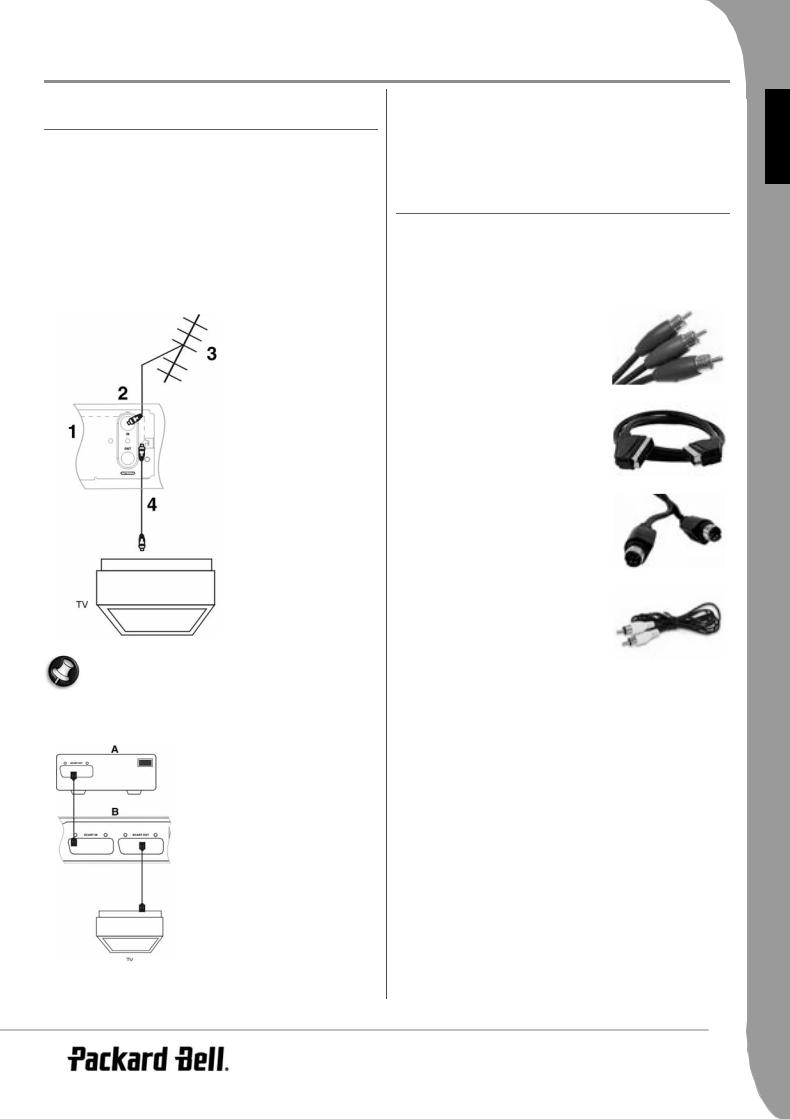
Step 1: Connect the antenna
1.Turn off your TV.
2.Unplug the antenna cable from the back of your TV and plug it into the ANTENNA IN connector on the back of the recorder.
3.Connect a coaxial aerial cable from the ANTENNA OUT connector on the back of the recorder to the ANTENNA IN plug on the back of your TV.
1.Easy HDD Recorder back panel
2.Antenna in
3.Aerial (or cable TV)
4.Antenna out, can be used to output TV signal to another TV set's RF signal input connector.
The TV signal output connector (antenna out) is only a loop-through of the input signal.
Step 2: Connect to TV using SCART
1.Connect a SCART cable from the SCART OUT plug on the back of the RECORDER to the SCART IN plug on the back of your TV.
2.Select SCART IN source on the TV.
|
EN G L IS H |
CONNECT TO A TELEVISION (ALTERNATIVE |
|
CONFIGURATION) |
|
If you wish to use a connection other than the SCART cable, you can |
|
use one of the following configurations starting with the best (in |
|
terms of quality) in descending order: |
|
Component Video (Progressive Scan) |
|
Component Video (Interlace) |
|
SCART (RGB) |
|
S-Video |
|
Composite Video |
|
|
A - Connect to TV using composite video |
1. |
Connect a video cable from the CVBS out plug (yellow) on the |
|
back of the Recorder to the Video-in plug (yellow) on the TV. |
2. |
Connect audio cables (cinch) from the Audio L/R out plugs |
|
(white/red) on the back of the Recorder to the Audio L/R in |
|
plugs (white/red) on the TV. |
3. |
Select VIDEO in or CVBS in source on the TV |
|
B - Connect to TV using S-Video |
1. |
Connect an s-video cable from the S-VIDEO out plug (black) on |
|
the back of the Recorder to the S-VIDEO in plug (black) on the |
|
TV. |
2. |
Connect audio cables (cinch) from the Audio L/R out plugs |
|
(white/red) on the back of the Recorder to the Audio L/R IN |
|
plugs (white/red) on the TV. |
3. |
Select S-VIDEO in source on the TV |
Getting Started - Installation - 10
C - Connect to TV using video component (YUV or YCbCr)
Video component gives by far the best image quality for LCD and plasma TVs. In order to use video component connection, the RECORDER must already be connected to the TV using one of the previous connections (however, SCART is recommended).
1.Power on the TV and select the source corresponding to the RECORDER.
2.Power on the RECORDER.
3.Connect the 3 component video cables (red, green, blue) from the COMPONENT VIDEO OUT plugs (red, green, blue) on the back of the RECORDER to the COMPONENT VIDEO IN plug (red, green, blue) on the TV.
4.Connect audio cables from the AUDIO L/R OUT on the back of the RECORDER to the AUDIO L/R IN on the TV.
5.Press MENU on the remote control.
6.Using the Navigation buttons, go to the GENERAL menu section.
7.Using the Navigation buttons and the OK button, change the SCART Output setting to YCbCr. Change the Video output format setting to Progressive if the TV supports Progressive Scan.
8.Select YUV or YCbCr source on the TV.
9.The SCART cable can be unplugged.
CONNECT TO AN EXTERNAL AUDIO SYSTEM
Analogue connection to an amplifier
Connect the audio cables (cinch) from the AUDIO L/R OUT (white/ red) connectors on the back of the recorder to the AUDIO L/R IN (white/red) connectors on the back of the amplifier.
The following devices can be connected:
•Amplifier with Dolby Surround Pro Logic decoder
•Stereo amplifier
A - To audio out connectors.
B - To audio in connectors.
Digital connection to an amplifier
Connect an optical cable from the OPTICAL OUT on the back of the recorder to the OPTICAL IN on the back of the amplifier.
or
Connect a coaxial cable from the COAXIAL OUT on the back of the recorder to the COAXIAL IN on the back of the amplifier.
Coaxial
OR
Optical
A.AMPLIFIER with DOLBY DIGITAL or DTS decoder
B.FRONT LEFT
C.CENTER
D.SUBWOOFER
E.FRONT RIGHT
F.SURROUND RIGHT
G.SURROUND LEFT
The following devices can be connected:
•Amplifier with Dolby Digital decoder
•Amplifier with DTS decoder
CONNECT AN AV OR DV SIGNAL VIA THE FRONT
PANEL
Flip down the door as indicated by the OPEN label at the right hand corner.
1.USB connector
2.Use S-Video jack or composite video connector
3.Audio input connector
4.IEEE 1394 connector
11 - Getting Started - Installation

5.External AV Signal
6.Select the correct AV signal input by pressing the Analogue Source button on the remote control. If the signal source is connected to the S- Video jack, press the Analogue Source button to select Front S-Video. If the signal source is connected via DV jack, press the Digital Source button to select DV Input. The picture will appear on your TV screen. You may start your recording.
Refer to the manual of the connected system.
CONNECTING AN AV SIGNAL VIA THE SCART IN
CONNECTOR
1.External AV signal source (e.g. DVD)
2.Easy HDD Recorder
The SCART IN and SCART OUT ports remain active even when the Easy HDD Recorder is in Standby mode.
You can record a signal from the SCART IN connector, e.g.: The AV signal from a DVD player using SCART out connector. Press the Analogue Source button on the remote control to switch to the appropriate mode according to the connection type.
CONNECT USB DEVICES
The Easy HDD Recorder can interface with USB flash drives, USB memory card readers and USB cameras that are compatible with the Mass Storage Class.
You can view one or many JPEG pictures in sequence. MP3 files can be played during the picture slide show.
Once the USB device is connected to the USB port, press the Digital Source button twice to switch to USB mode. This will bring up the file selection menu. You can browse the content of the USB device using the Navigation buttons. Press the Play/OK button to select the highlighted files for playback.
It may take a few seconds for a USB device to be recognised.
The mass storage device must be FAT32 formatted.
EN G L IS H |
Getting Started - Installation - 12
PLAYBACK
PLAY A DVD-VIDEO, SVCD OR VCD
1.Press the Open/Close button on the front panel of the unit to open the tray.
2.Place the disc on the tray.
3.Press the Open/Close button to close the tray.
4.The playback should start automatically. If not, press DVD.
5.Use the Navigation buttons to navigate in the menu and press Play/OK to make selection.
Playback Options
1.Press the DVD button to display the DVD Menu.
2.Press the Display button  to display or hide on-screen information.
Play
Press the Play/OK button on the remote control or Play button on the front panel to start playback.
Pause
Press the Pause button on the remote control to pause.
Fast forward and fast reverse
Press the >> (Fast Forward) button to activate fast forward, press << (Fast Reverse) button to activate fast reverse. Press repeatedly to toggle through 4 different playback speeds.
Skip
Press the Next button to skip to the next title/chapter, press the Previous button to skip to the previous title/chapter.
Controlling Playback with the Playback Menu
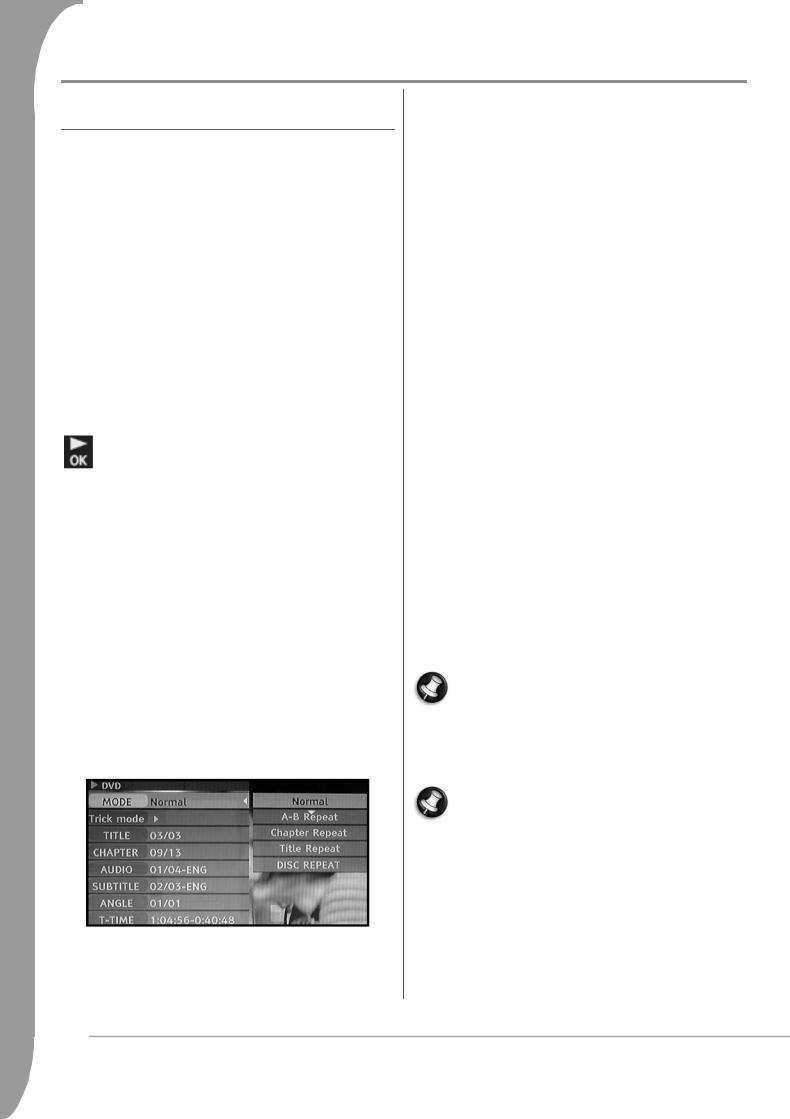
1.Press the Play/OK button twice to show the control menu and select a submenu:
MODE: Set the playback mode, e.g.: Normal, A-B Repeat, Chapter Repeat, etc.
TRICK: Set the playback status, e.g.: Stop, F.F., F.R., S.F., etc.
TITLE: Press Play/OK then enter the desired title number to jump to a title.
CHAPTER: Enter the desired chapter number to jump to the chapter.
AUDIO: Select the audio language you want to use, e.g.: FRE (French), ENG (English), etc.
SUBTITLE: Select the subtitle language.
ANGLE: Select the camera angle (must be supported by the disc). T-TIME: Display the elapsed time and remain time.
2. Press  button to exit the control menu.
Repeat
1. A-B Repeat
•Press the Play/OK button twice to access the setup menu during playback.
•Use the  and
and  buttons to highlight the Mode submenu, and press the Play/OK button.
•Use the  and
and  buttons to highlight the A-B REPEAT item, press the Play/OK button to mark the start point (A); press the Play/OK button again to display the A-B REPEAT item and then press the Play/OK button for the third time to mark the end point (B). Then the section between the start point and end point will be repeatedly played.
•Press  button to exit the SETUP MENU
2.Title/chapter/disc repeat - Repeatedly press the Repeat button during playback to repeat title/chapter/disc.
3.Repeatedly press the Repeat button until normal playback resumes.
Audio language
Press AUDIO repeatedly to toggle between up to 8 audio languages or sound when the disc is recorded with multi-languages.
For Karaoke discs, press AUDIO button to switch between the accompanying music and vocal.
Only for DVD/SVCD discs.
Subtitle language
Press SUBTITLE repeatedly to toggle between up to 32 subtitle languages when the disc is recorded with multi-subtitles.
Only for DVD/SVCD discs.
Viewing Angle (DVD only)
Press ANGLE repeatedly to toggle between up to 9 viewing angles when scenes recorded in the disc was shot with multiple cameras from different angles.
13 - Playback
PLAY A DVD OR CD WITH MP3, JPEG OR/AND DIVX
FILES
1.Press the Open/Close button on the front panel of the unit to open the tray.
2.Place the disc on the tray.
3.Press again the Open/Close button to close the tray.
4.The content menu should appear automatically. If not, press DVD.
5.Use the Navigation buttons to highlight the desired file.
6.Press Play/OK to play the file.
If a disc contains JPEG and MP3 contents, the user can enjoy the pictures and music at the same time:
1.For a JPEG/MP3 Simultaneous Slideshow, select the MP3 file then select the JPEG file. The MP3 and JPEG files will playback in the order selected.
2.Press the Stop button to stop playback. For JPEG/MP3 Simultaneous Slideshow, press the Stop button twice.
PLAY A TITLE ON THE HDD
1. Press the HDD button until the HDD title list appears.
2. Use the  and
and  buttons to highlight the desired title.
You can press Angle to sort the list by title name or date and Previous and Next to go to the previous/next page.
3. Press Play/OK to play the highlighted title.
|
EN G L IS H |
During playback: |
|
Use the Next, Previous, FFW and RWD buttons for time navigation |
|
inside the title. |
|
Press the Display button to display or hide On-Screen Display (OSD). |
|
PLAY CONTENT FROM A USB DEVICE |
|
1. |
Connect the USB device to the front USB input. |
2. |
Press the Digital Source button until the USB menu appears (it |
|
can take a few seconds for the USB device to be recognised by |
|
the recorder). |
3. |
Use the Navigation buttons to highlight the desired file. |
4. |
Press Play/OK to play the file. |
PLAY A DIVX OR XVID FILE WITH SUBTITLES |
|
1. |
From the DVD or USB file menu, use the Navigation buttons to |
|
highlight the subtitle file (*.SRT, *.SUB and *.SMI are accepted). |
2. |
Press Play/OK to select the subtitle file. |
3. |
Use the Navigation buttons to highlight the movie file. |
4. |
Press Play/OK to play the movie. |
Playback - 14
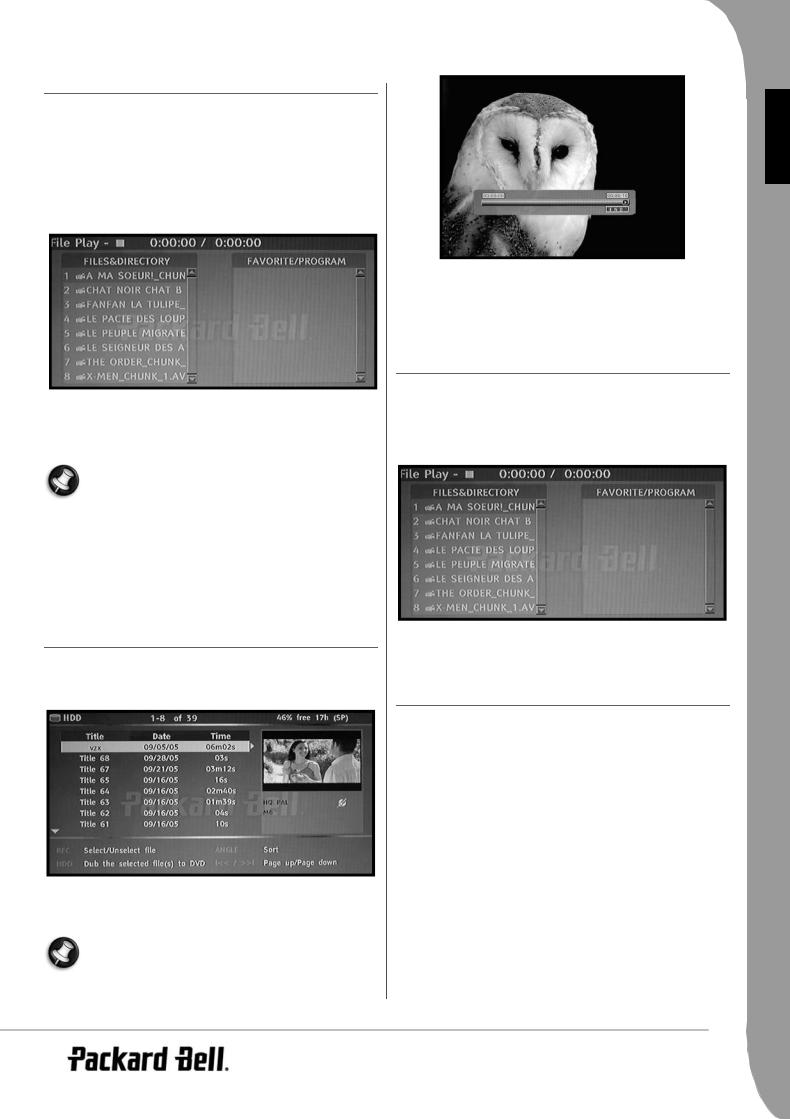
CREATE A PLAYLIST
1.From the DVD or USB file menu, use the Navigation buttons to highlight the title or chapter you want to program. Press Record/ OTR to add the title or chapter name to the right panel. Add as many of your favourite titles or chapters as you wish.
2.(Press STOP to stop any files that may be playing.) Press the  button to move the cursor into the right panel, press the Record/ OTR button to remove title or chapter from the list.
3.Press the Play/OK button to start title playback.
4.To exit title playback, press the Stop button, or press the Play/ OK button to access the playback control menu and select Normal.
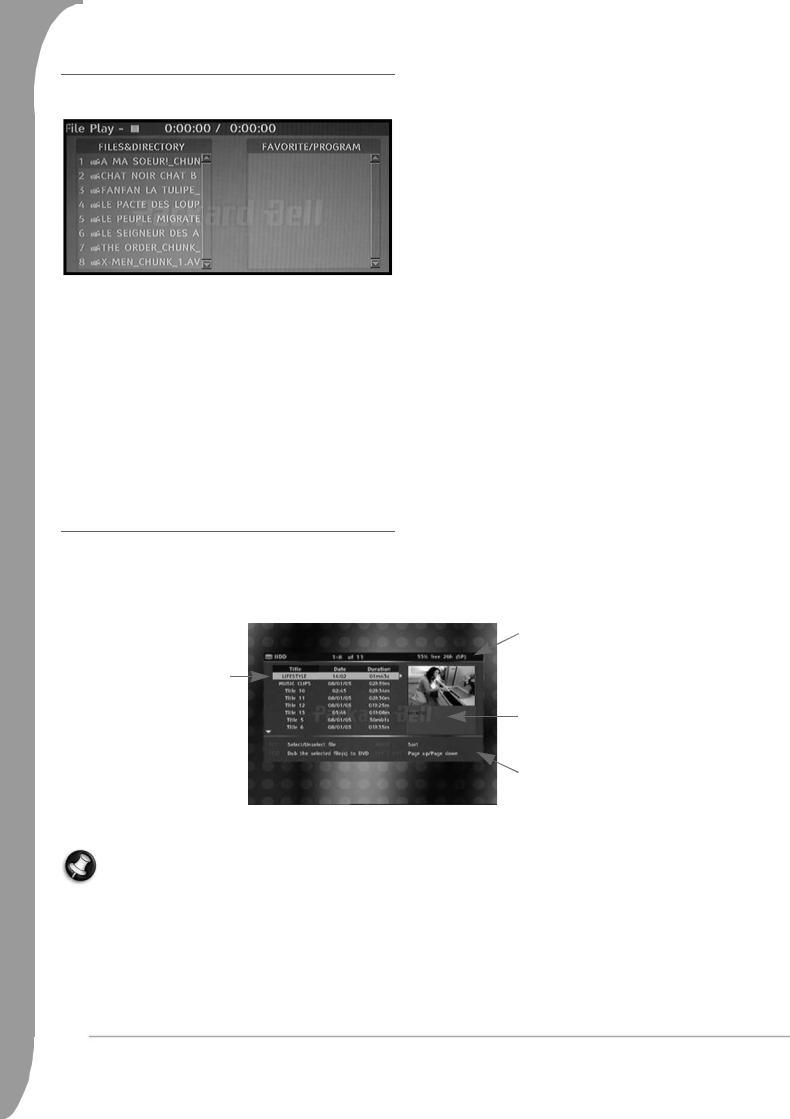
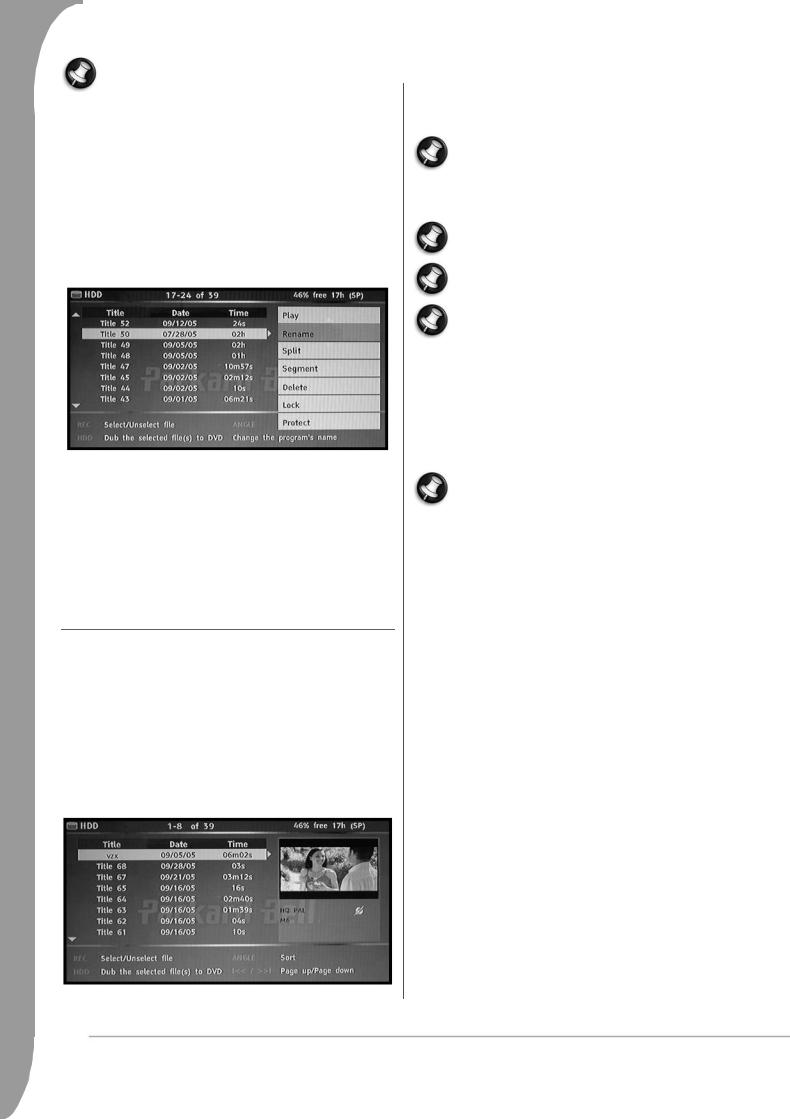
HDD TITLE LIST
Press the HDD button to show the HDD title list.
Currently hightlighted title
The HDD list presents a list of all the titles you have saved on the HDD. The list includes the duration, a thumbnail picture and the recording mode (HQ, SP etc.) for each title. The list also shows if a title is protected or locked.
Remaining space on HDD
 Currently highlighted title
Currently highlighted title recording information
On-screen help
15 - Playback
TIME SHIFTING
RECORDING / TIME SHIFTING MODE
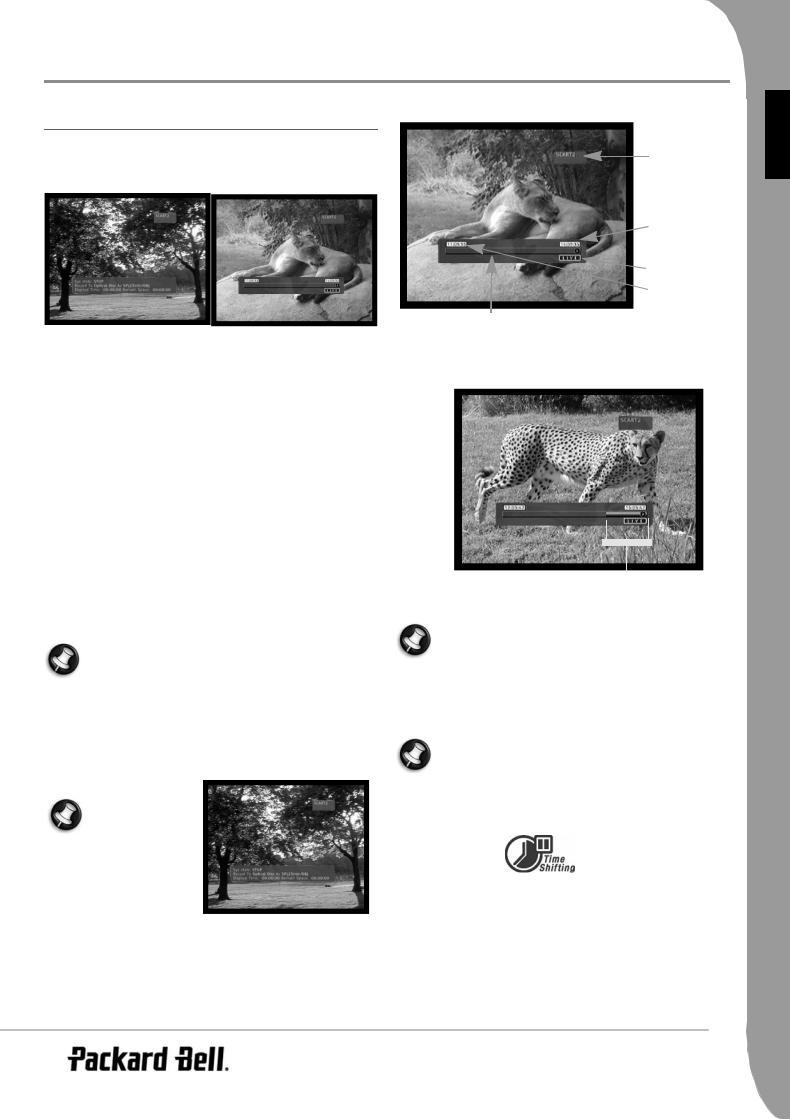
There are two modes when displaying the TV tuner or any external analogue sources: Recording Mode and Time Shifting mode.
Recording mode |
Time Shifting mode |
• Recording mode
In Recording mode, analogue sources and DV input can be recorded. Recordings can be made on the HDD or on a DVD.
• Time Shifting mode
In Time Shifting mode, only analogue sources can be recorded. Recordings are made only on the HDD.
The Time Shifting mode enables the user to "pause and control live TV". From the moment the Easy HDD Recorder is on the Time Shifting mode, it will continuously record the analogue source (TV for example) into its 3 hours buffer. This gives the possibility for the user to review and record the last 3 hours that have been previously broadcasted.
Activate the Time Shifting mode
1.Repeatedly press the Analogue Source button until the desired source is selected. The source status is displayed on the top right of the screen.
The available analogue video sources are the following:
>SCART2
>CHXX (TV Tuner)
>F-COMP (Front Composite Video)
>F-SV (Front S-Video)
If the screen looks like the following picture, the Easy HDD Recorder is in
Recording mode. Press Pause twice to switch to Time Shifting mode.
2. The screen will then show the time progression bar.
Current source |
NG LI S H |
|
E |
||
|
||
Live time |
|
|
Playback time |
|
|
3 hours before |
|
|
live time |
|
|
Time progression bar |
|
|
3. As the time progresses, the time bar will show the buffer progres- |
|
|
sion. |
|
|
Available buffer for reviewing |
|
|
During Time Shifting, a Timer recording may be displayed. |
|
|
As you cannot watch one programme in Time Shifting and |
|
|
record another channel, the recorder will prompt you to |
|
|
confirm if you want to keep the current channel or proceed |
|
|
with Timer recording. If there is no response, the recorder assumes |
|
|
Timer recording should be started. The message will appear 2 minutes |
|
|
before the Timer recording is due. |
|
|
Time shifting is stored in a buffer that contains 3 hours of |
|
|
recording. After the recording time limit has been reached, |
|
|
the buffer will be progressively overwritten. If you need to |
|
|
keep the video contained in this buffer for future usage, you |
|
|
can save all or part of the buffer (see Past Capture section). |
|
|
Pause Live TV |
|
|
1. Switch to Time Shifting mode (see previous section). |
|
|
2. Press Pause to pause live TV (or the selected analogue source). |
|
|
3. Press Play/OK to resume. |
|
Time Shifting - 16

The Easy HDD Recorder will continue to record what is broadcasted live while you are watching previously broadcasted programmes.
Review Time Shifting buffer (play back live TV moments)
1.Switch to Time Shifting mode.
2.The Time Shifting buffer is available for reviewing.
Use the Next, Previous, FFW and RWD buttons to navigate through the Time Shifting buffer and press Play/OK to play.
Available buffer for reviewing
Live time
Playback time
Save a title from the Time Shifting buffer (Past Capture)
1.Switch to Time Shifting mode.
2.The Time Shifting buffer is available for saving on HDD.
Use the Next, Previous, FFW and RWD buttons to navigate through the Time Shifting buffer and go to the beginning of the title that you want to save on the HDD.
3.Press Record.
4.Use Next, Previous, FFW and RWD buttons to navigate through the Time Shifting buffer and to the end of the title that you want to save on the HDD.
5.Press Stop.
The title is saved on the HDD.
The title saved and all earlier data will be erased from the Time Shifting buffer.
Available buffer for recording
Section that will be saved on HDD
Section that will be erased from the buffer
Save The Entire Time Shifting Buffer
Onto The HDD
1.Switch to Time Shifting mode.
2.Press the Angle button to save the entire Time Shifting buffer onto the HDD.
17 - Time Shifting
RECORDING |
|
|
|
|
|
|
|
|
||||
SET RECORDING QUALITY |
|
|
|
|
|
|
SH |
|||||
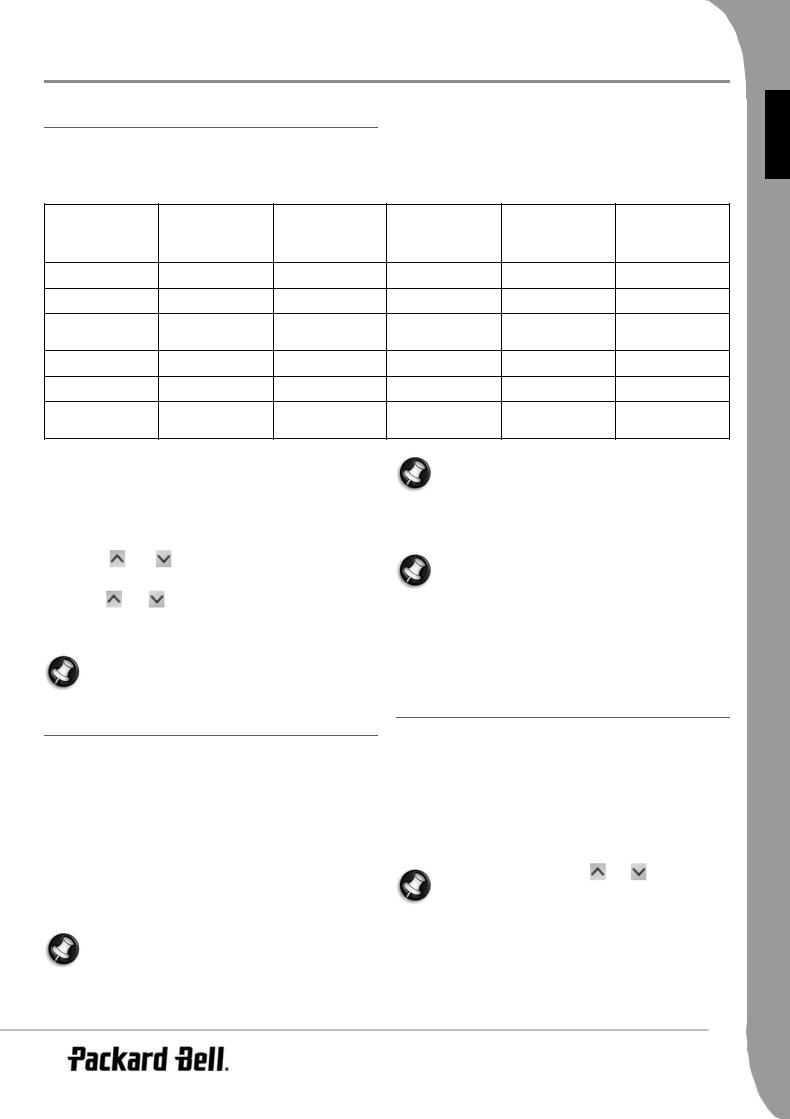
Six different record qualities can be set for recording. Higher quality |
|
|
|
|
|
NG LI |
||||||
|
|
|
|
|
E |
|||||||
will consume more space on HDD or DVD disc, reducing the overall |
|
|
|
|
|
|||||||
|
|
|
|
|
|
|||||||
time that can be recorded. |
|
|
|
|
|
|
|
|||||
|
|
Record Quality |
Recording |
Recording |
|
Recording |
Recording |
|
Recording |
|||
|
|
|
|
|
Time (4.7GB, |
Time (80GB, |
|
Time (160GB, |
Time (250GB, |
|
Time (400GB, |
|
|
|
|
|
|
DVD) |
HDD) |
|
HDD) |
HDD) |
|
HDD) |
|
HQ (High Quality) |
1 hour |
17 hours |
35 hours |
53 hours |
85 hours |
|||||||
SP (Standard Play) |
2 hour |
34 hours |
68 hours |
106 hours |
170 hours |
|||||||
SP+ |
(Standard |
Play |
3 hour |
51 hours |
102 hours |
159 hours |
255 hours |
|||||
+) |
|
|
|
|||||||||
|
|
|
|
|
|
|
|
|
|
|
||
EP (Extended Play) |
4 hour |
68 hours |
136 hours |
212 hours |
340 hours |
|||||||
LP (Long Play) |
|
5 hour |
85 hours |
170 hours |
265 hours |
425 hours |
||||||
SLP |
(Super |
Long |
6 hour |
96 hours |
192 hours |
300 hours |
480 hours |
|||||
Play) |
|
|
||||||||||
|
|
|
|
|
|
|
|
|
|
|||
To set the recording quality please carry out the following: |
|
|
When recording from a DVD in this manner, the recorder |
|||||||||
|
|
|
|
|
|
|
|
|
will stop any recording to the HDD. Once the DVD record- |
|||
1. |
|
Press the MENU button on the remote control to access the |
|
|
ing is finished, press the HDD button to restart the Time |
|||||||
|
|
SETUP MENU |
|
|
|
|
Shifting mechanism. |
|
|
|||
2. Use the Navigation buttons to highlight the Recording icon, and |
|
|
|
|
|
|
||||||
|
|
press the Play/OK button. |
|
|
|
|
|
|
|
|||
3. |
|
Use the |
and |
buttons to highlight the Record Quality |
|
|
The recorder will continue to record until the disc is full or |
|||||
|
|
item and press the Play/OK button. |
|
|
|
when the Stop button is pressed. To set the recorder to |
||||||
|
|
|
|
|
record for 30 minutes only, press the Record/OTR button |
|||||||
4. |
|
Use the |
and |
buttons to highlight the quality setting you |
|
|
||||||
|
|
|
after recording has started. Each time the Record/OTR but- |
|||||||||
|
|
want and press the Play/OK button to confirm. |
ton is pressed, an additional 30 minutes will be added to the record |
|||||||||
|
|
|
|
|
|
|
time. To pause the recording, press the Pause button on the remote |
|||||
|
|
|
Choose the record quality carefully to ensure that there will |
control, press the Play/OK button again to resume recording. |
||||||||
|
|
|
|
|
|
|
|
|
||||
|
|
|
be enough space available for your recording on the HDD or |
|
|
|
|
|
|
|||
|
|
|
DVD. |
|
|
|
RECORD TO HDD |
|
|
|
||
RECORD TO DVD |
|
|
|
|
|
|||||||
|
|
|
|
|
|
|
|
|||||
|
|
|
|
|
|
|
1. |
Press the Analogue Source button until the desired source is |
||||
1. Insert a recordable DVD into the unit and switch to DVD mode |
|
selected. |
|
|
|
|||||||
• The following video sources are available: |
|
|||||||||||
|
|
by pressing the DVD button. |
|
|
||||||||
2. |
Press the Analogue Source or Digital Source button to the select |
|
> |
SCART |
|
|
|
|||||
|
|
signal source for recording. |
|
|
> |
Front CVBS |
|
|
|
|||
3. |
Press the Record/OTR button to start recording, a status bar is |
|
> |
Front S-Video |
|
|
|
|||||
|
|
displayed at the bottom of the screen to show the current record- |
|
> |
Tuner |
|
|
|
||||
|
|
ing status. |
|
|
|
|
|
If TV tuner is selected, use the |
and |
buttons to select |
||
4. Press Stop to stop the recording. |
|
|
|
|||||||||
|
|
|
the desired channel. |
|
|
|||||||
5. |
Press the DVD button to switch to DVD mode to find the seg- |
|
|
|
|
|||||||
|
|
|
|
|
|
|||||||
|
|
ment just recorded. |
|
|
|
|
|
|
|
|
||
|
|
|
It may take a few seconds to completely stop the recording |
2. If you are in Time Shifting mode, press Record. |
||||||||
|
|
|
process, please wait until Stop is displayed on the status bar |
|||||||||
|
|
|
3. |
If you are in Recording mode, make sure Hard Disc (see on- |
||||||||
|
|
|
to switch to DVD mode. |
|
||||||||
|
|
|
|
|
screen status bar) is selected. |
|
|
|||||
|
|
|
|
|
|
|
|
|
|
|||
|
|
|
|
|
|
|
4. If not, press the HDD button to select the HDD and press Record. |
|||||
|
|
|
|
|
|
|
5. Press Stop to stop recording. |
|
|
|||
Time Shifting - 18
In Time Shifting mode, the Easy HDD Recorder will split the recording into several 3-hours titles if the recording is longer than 3 hours.
In Time Shifting mode, during the recording you can press the Record/OTR button repeatedly to increase the length of the title you are saving by 30 minutes up to a maximum of 3 hours.
Time Shifting cannot be used with a DV (Digital Video) source. If you want to record your DV material onto the HDD, press the Digital Source button, the recorder will switch to DV mode and the remote control can control the
DV camera. You can issue FF, FR, Pause, Play commands for the camera using the Easy HDD Recorder remote control.
You cannot change the channel or the source if a recording is active (if the end of the recording segment has not been entered, or in the case of long recording, it has not been reached). If you attempt to change the channel or source,
the Easy HDD Recorder will prompt you to stop recording. The segment will be saved on HDD and then the channel or source will be changed.
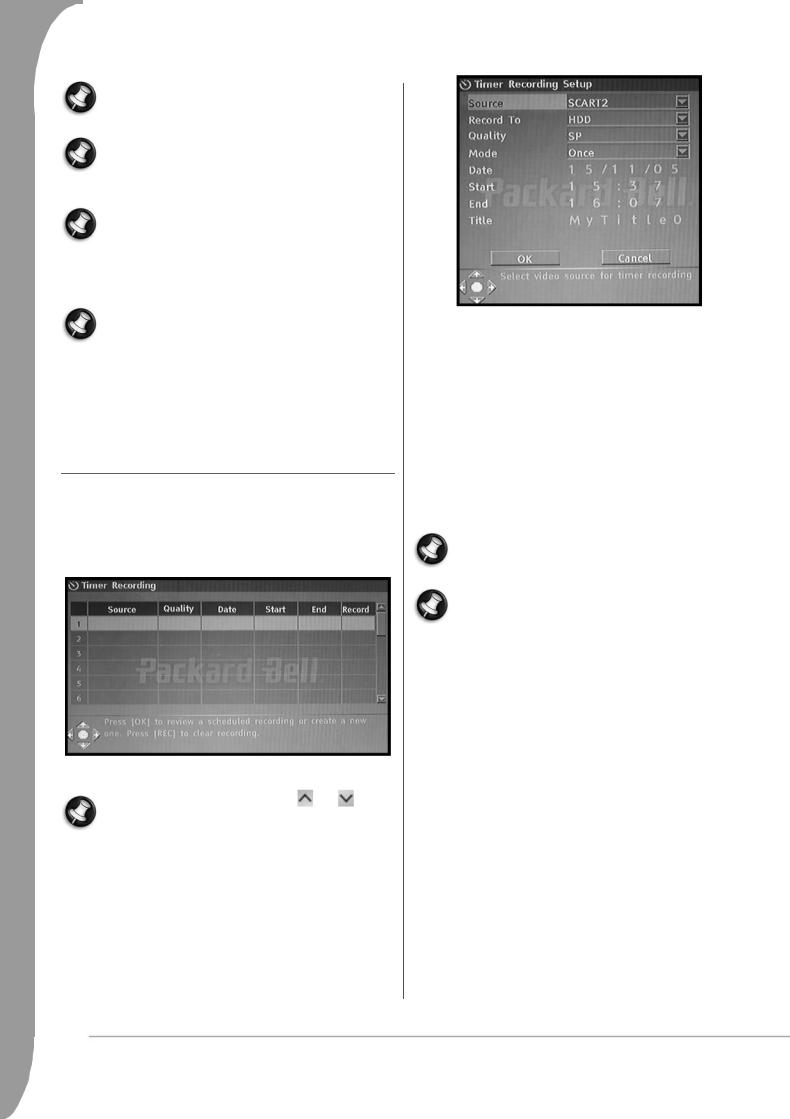
TIMER RECORDING
1.Make sure the clock is set accurately to your local time. See the Setting the Clock section later in this guide.
2.Press the Timer button to display the record scheduler.
To delete a programmed event, use the |
and |
buttons |
to highlight it and press the Record/OTR button. |
|
|
3.Use the  and
and  buttons to highlight an event and press Play/OK. The Item Editor dialogue box appears.
4. The following are descriptions of the items in the dialogue box:
Source: Select your input source.
Record To: Select the location for the recording. Quality: Select the record quality.
Mode: Select the record mode (once, daily or weekly). Start: Select the start time of time recording event. End: Select the end time of time recording event. Title: Enter a title for the recording.
5.Move cursor to the OK button and press Play/OK to save your settings.
6.Several minutes before the time recording event begins, a dialogue box will appear on your TV screen prompting you to confirm or cancel the event. If you do not make any selection, the timer recording will proceed as scheduled.
If the recorder is in standby status, it will automatically power on two minutes before the start of the time recording event.
A recordable DVD disc can record 360 minutes of programs (SLP quality). These programs can be divided into 48 titles.
19 - Time Shifting
EDITING AND DUBBING
DVD EDITING
Editing DVD±RW Titles
The following instructions are only for DVD±RW discs. Because DVD±R discs cannot be repeatedly recorded or edited, the operations mentioned below do not work on these discs.
1.Insert a DVD+RW or DVD-RW disc with recorded contents into the disc tray. The DVD Index Screen appears (if the screen does not appear, press the DVD button.)
2.Use  and
and  buttons to highlight the title you want to edit. If
there are more than 3 titles, press the  button to view the other titles.
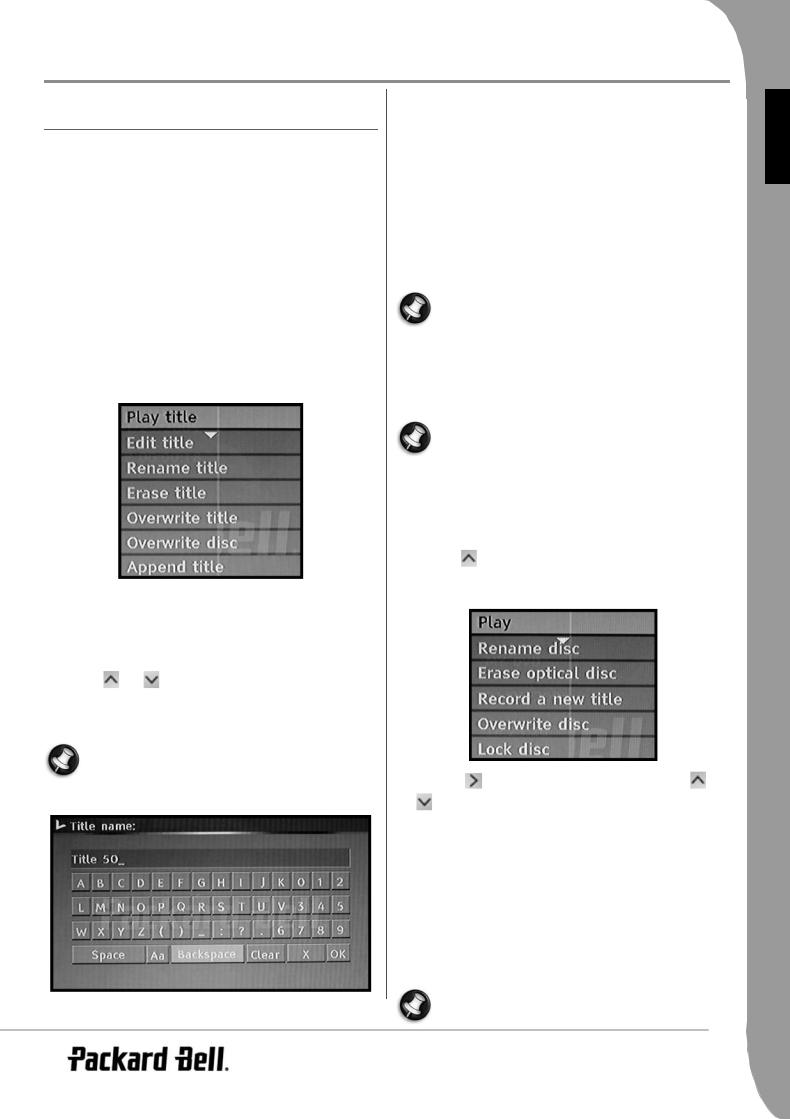
3.Press the  button to show the disc menu. Use the
  and
and
 buttons to highlight one of the items shown below (Play title, Edit title, etc.) and press Play/OK.
Play title - Play current title.
Edit title - Edit current title. e.g. add chapter markers, hide or unhide a chapter, replace the index picture of a title, or split one title into two titles, etc.
Rename title - Rename current title. Press Play/OK on this item, a virtual keyboard appears on your TV screen.
Use the and buttons to highlight the letter or character you want to input, and press Play/OK to confirm it.
Select OK and press Play/OK button to save the name.
The maximum length of a title name is 12 characters.
|
Overwrite title - To replace a previously dubbed session with newly |
H |
||
|
recorded contents, overwriting the session. If the new session is |
IS |
||
|
L |
|||
|
shorter than the original session, the remainder of the |
original |
||
|
G |
|||
|
session will remain on the disk, as a new title. If the length of the |
|||
|
EN |
|||
|
new session is longer than the original title, the recording process |
|||
|
will automatically stop when it reaches the end of the original title. |
|
||
|
Erase title - Erase current title. |
|
|
|
|
Overwrite disc - The newly recorded contents will overwrite the |
|
||
|
whole disc, erasing all titles. |
|
|
|
|
Append title - (This item only appears if you are editing the last title |
|
||
|
on the disc) Add a new title after the last title on the disc. |
|
|
|
|
When you select Overwrite title/Append title/Overwrite |
|
||
|
disc, and press the Play/OK button to confirm, the signal |
|
||
|
source will be automatically return to the signal source used |
|
||
|
before starting the disc editing operation was started. Use |
|
||
the Analogue Source or Digital Source button to change to other signal |
|
|||
source. You can use the Analogue Source or Digital Source buttons to |
|
|||
select the signal source, and press the Play/OK button to directly go |
|
|||
to DVD disc title menu. |
|
|
||
|
The recording process will not start after you have selected |
|
||
|
Overwrite title/Append title/Overwrite disc item, you have |
|
||
|
to press the Record/OTR button on the front panel or the |
|
||
|
remote control to start recording. |
|
|
|
|
Editing DVD±RW Discs |
|
|
|
1. |
Insert a DVD±RW disc into the disc tray. |
|
|
|
2. |
Use the |
button to highlight the top of the disc recording |
|
|
|
information bar. |
|
|
|
3. |
Press the |
button to show the disc menu. Use the |
and |
|
|
buttons to highlight one of the items shown above (Play, |
|
||
|
Rename disc, Erase disc, Record a new title, etc.) and press Play/ |
|
||
|
OK. |
|
|
|
Operations: |
|
|
|
|
• |
Play: Play recorded titles in sequence. |
|
|
|
• |
Rename disc: Rename the disc. Please refer to Rename title |
|
||
|
(above). |
|
|
|
• |
Erase optical disc: Erase all contents on the disc. |
|
|
|
• |
Record a new title: Record new contents in a new title. |
|
|
|
• |
Overwrite disc: Overwrite the whole disc from the start with |
|
||
|
new contents to be recorded. |
|
|
|
|
Refer to ‘Editing DVD+RW or DVD-RW Titles’ for New title |
|
||
|
and Overwrite disc operations. |
|
|
|
Editing and Dubbing - 20
•Lock disc: Lock the current disc to protect the data on it. The locked disc cannot be erased or recorded till it is unlocked.
Edit DVD±R Discs
1.Insert a DVD±R disc into the disc tray.
2.Press the  button to display the disc editing menu.
Operations:
•Play: Play recorded titles in sequence.
•Rename disc: Rename the disc. Please refer to Rename title (above).
•Record a new title: Record new contents in a new title. This title will be the last title on the disc.
•Finalise disc: Finalise a DVD+R or DVD-R disc. Before a disc can be played in other DVD players, it must be finalised in the Easy HDD Recorder. Once this process is completed, no further recordings can be added.
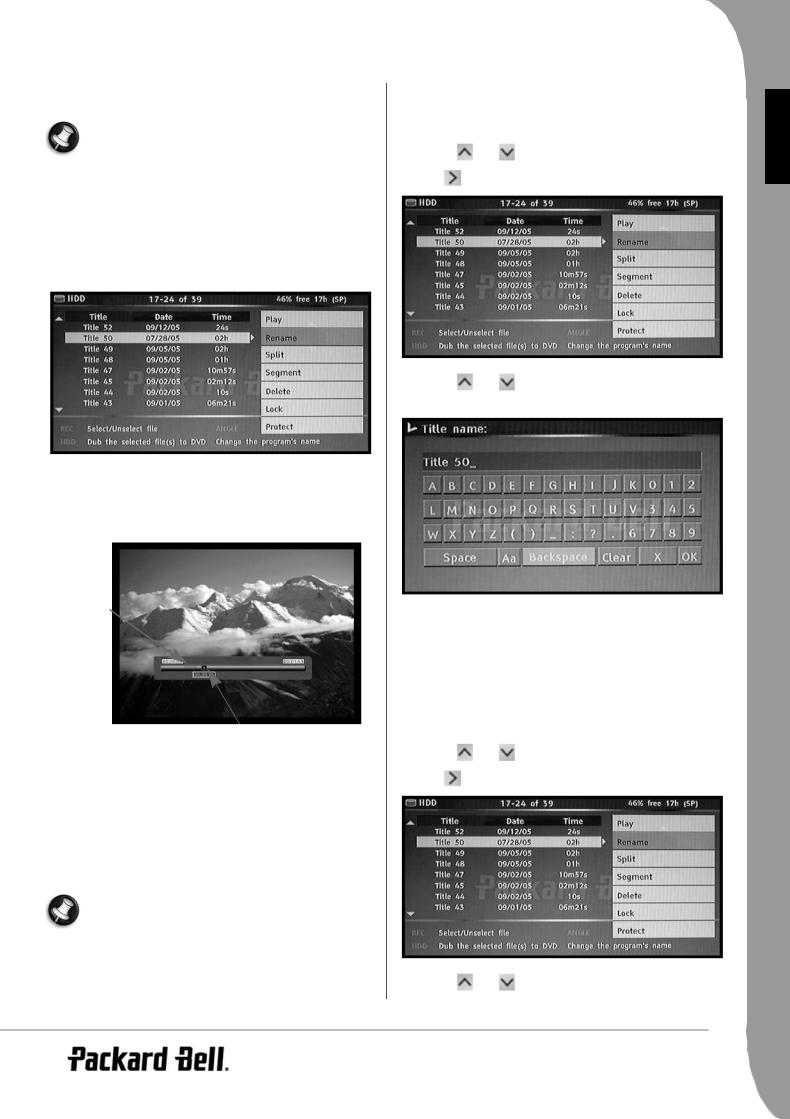
HDD EDITING
Delete a Title from the HDD
1. Press the HDD button until the HDD title list appears.
2. Use the  and
and  buttons to highlight the desired title.
3. Press  to display the editing menu.
4.Press Play/OK to select Delete.
5.A confirmation window will pop up. Use the  and
and  buttons to highlight Yes. Press Play/OK to confirm.
Protected and locked titles can not be deleted.
Split a Title on the HDD
1.Press the HDD button until the HDD title list appears.
2.Use the  and
and  buttons to highlight the desired title.
3.Press  to display the editing menu.
4.Use the  and
and  buttons to highlight Split.
5.Press Play/OK to select Split.
6.Use the Next, Previous, FFW and RWD buttons to locate the position where the title has to be split.
Splitting position
7. Press Record when the cursor is at the desired splitting position.
21 - Editing and Dubbing
8.A confirmation window will pop up. Use the  and
and  buttons to highlight Yes. Press Play/OK to confirm.
Protected and locked titles can not be split.
Hide Segments (Ads For Example) Of A Title
1. Press the HDD button until the HDD title list appears.
2. Use the  and
and  buttons to highlight the desired title. 3. Press
  to display the editing menu.
4.Use the  and
and  buttons to highlight Segment.
5.Press Play/OK to select Segment.
6.Use the Next, Previous, FFW and RWD buttons to locate the beginning of the segment you want to hide.
Hidden segment
Cursor position
7.Press Record when the cursor is at the desired position.
8.Use the Next, Previous, FFW and RWD buttons to locate the end of the segment you want to hide.
9.Press Record when the cursor is at the desired position.
10.Repeat 6 to 9 for each segment you want to hide.
11.Press Stop or HDD to return to the HDD list.
Protected and locked titles can not be segmented.
|
Rename a Title on the HDD |
|
||
1. |
Press the HDD button until the HDD title list appears. |
LIS H |
||
2. |
Use the |
and |
buttons to highlight the desired title. |
NG |
|
|
|
|
E |
3. |
Press |
to display the editing menu. |
|
|
4. |
Use the |
and |
buttons to highlight Rename. |
|
5. |
Press Play/OK to select Rename. |
|
||
6. |
Enter the new name using the Navigation buttons and the Play/ |
|
||
|
OK button. |
|
|
|
7. |
Select OK to exit. |
|
|
|
|
Lock A Title (Prevent From Viewing, Editing And |
|
||
|
Erasing) |
|
|
|
1. |
Press the HDD button until the HDD title list appears. |
|
||
2. |
Use the |
and |
buttons to highlight the desired title. |
|
3. |
Press |
to display the editing menu. |
|
|
4. |
Use the |
and |
buttons to highlight Lock. |
|
5. |
Press Play/OK to select Lock. |
|
||
Editing and Dubbing - 22
A small icon under the preview window indicates that the title is now locked (no viewing/editing/erasing). Before playing a locked title, you will be prompt to enter the password. The default password is 0000. Go to the setup menu
to change the password.
To unlock a locked title, repeat steps 1 to 5.
Protect A Title (Prevent From Editing)
1.Press the HDD button until the HDD title list appears.
2.Use the  and
and  buttons to highlight the desired title.
3.Press  to display the editing menu.
4.Use the  and
and  buttons to highlight Protect.
5.Press Play/OK to select Protect.
A small icon under the preview window indicates that the title is now protected (no editing/erasing).
To edit or delete a protected title, unprotect it by repeating step 1 to 5.
DUBBING (COPY FROM HDD TO DVD)
1.Before selecting titles for dubbing, insert a recordable disc into the disc tray.
•If this is the first time the disc has been used the Easy HDD Recorder may take a few seconds to format the disc, determine compatibility and free recordable space. During this time you will see the Loading logo.
•The percentage of available disc space is displayed in the lower right corner of the HDD title list screen.
2. Press the HDD button until the HDD title list appears.
3.Use the  and
and  buttons to highlight the title or titles you wish to copy to the DVD and press Record/OTR to select the highlighted title for dubbing. Once a title is selected for dubbing, an icon will appear next to the title name.
You can press the Record/OTR button again to remove the selection. As you select or deselect titles, the disc capacity information will be updated. If the title you selected is larger than the space available on the disc, the recorder will display
a warning message.
If the recording is too big to place on the DVD it can be split into smaller parts (see Split function earlier in this guide).
If the disc is replaced or removed prior to dubbing, all dubbing selections will be cleared.
Locked titles cannot be dubbed to DVD.
4.Press the HDD button to start dubbing. Dubbing will copy the title(s) selected to the recordable DVD, including properties such as title name, duration, index picture or chapter marks. Once dubbing starts the recorder returns to Time Shifting mode. It is possible to press the HDD button and play any title on the HDD while dubbing is in progress., however editing is not possible until the dubbing has finished.
If the writing to DVD fails at any point during this operation, a warning message will appear and the HDD title list will be reset.
23 - Editing and Dubbing
SYSTEM SETUP
System Menu
1.Press the Menu button when playback is stopped to show the system menu.
2.Use the Navigation buttons to select your desired item, press the Play/OK button to confirm your selection.
3.Press the Menu button again to exit the menu.
System Language Selection
To change the system language please carry out the following:
1.Press the MENU button on the remote control to access the
SETUP MENU
2.Press the  button to highlight the System Language item, and press the Play/OK button.
3.Use the  and
and  buttons to highlight the language you want from the list and press the Play/OK button to confirm.
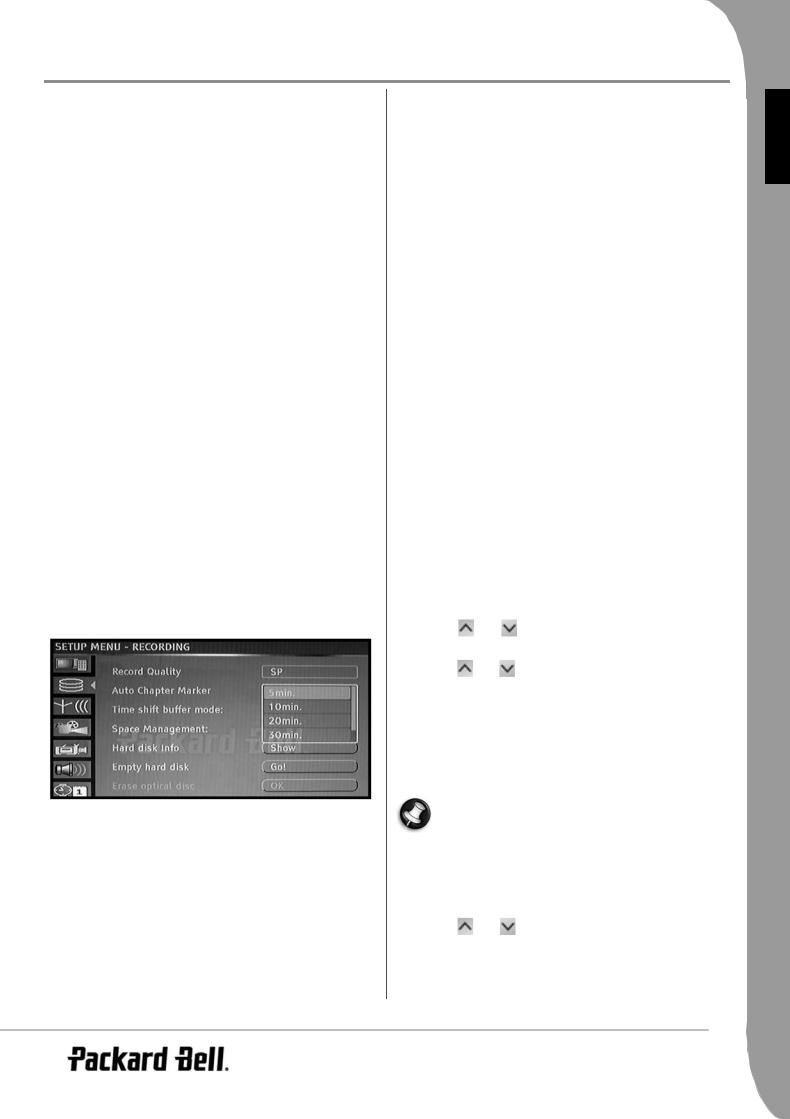
Chapter Markers
You can set up the recorder to automatically insert chapter markers into each program recording to allow faster navigation during playback. This feature automatically inserts markers at 10 minute intervals during recording. The interval can be changed in the Setup menu: OFF (no marker), 5 min., 10 min.(default), 20 min. or 30 min.
1.Press the Menu button on the remote control.
2.Highlight the Recording menu and press the Play/OK button.
3.Highlight Auto Chapter Marker item and press the Play/OK button.
4.Select an item in the list and press the Play/OK button.
Time Shift Buffer
1.Press the Menu button on the remote control.
2.Highlight the Recording menu and press the Play/OK button.
3.Highlight the Time shift buffer mode item and press the Play/OK button.
4.Select Refresh or Preserve from the list:
•If you use the Refresh setting and change Channels, the Time Shifting buffer data will be lost. No message will be provided prior to doing so.
• |
If you use the Preserve setting and change channels, the Time |
H |
||
|
Shifting buffer data will be maintained. |
LIS |
||
|
Space Management |
EN G |
||
|
|
|||
Choose to manually or automatically manage the HDD storage space. |
|
|||
1. |
Press the Menu button on the remote control. |
|
||
2. |
Highlight the Recording menu and press the Play/OK button. |
|
||
3. |
Highlight the Space Management item and press the Play/OK |
|
||
|
button. |
|
|
|
4. |
Select Automatically or Manually from the list: |
|
||
• |
Automatically: If no more space is available on the HDD before a |
|
||
|
recording is stopped, the Easy HDD Recorder will erase the old- |
|
||
|
est (un-protected) titles on the HDD. It will not erase titles that |
|
||
|
are selected to be copied to DVD. If, despite this procedure, |
|
||
|
there is still no space on the HDD to record, the recorder will |
|
||
|
stop recording and display a prompt to erase some titles and |
|
||
|
make more room on the HDD. |
|
||
• |
Manually: If no more space is available on the HDD before a |
|
||
|
recording is stopped, the recorder will stop recording and dis- |
|
||
|
play a prompt to erase some titles and make more room on the |
|
||
|
HDD. |
|
|
|
|
Country Selection |
|
|
|
To change the country selection please carry out the following: |
|
|||
1. |
Press the MENU button on the remote control to access the |
|
||
|
SETUP MENU. |
|
|
|
2. |
Use the Navigation buttons to highlight the TV TUNER icon, and |
|
||
|
press the Play/OK button. |
|
||
3. |
Use the |
and |
buttons to highlight the Country Selection |
|
|
item and press the Play/OK button. |
|
||
4. |
Use the |
and |
buttons to highlight your country and press |
|
|
the Play/OK button to confirm. |
|
||
|
Autoscan for TV channels |
|
||
To |
watch or record TV programs, you must first perform a TV |
|
||
channel scan: |
|
|
|
|
|
Before scanning for TV channels ensure that there is a TV |
|
||
|
antenna connected to the Easy HDD Recorder. See the Con- |
|
||
|
necting to a Television section for details. |
|
||
1. |
Press the MENU button on the remote control to access the |
|
||
|
SETUP MENU. |
|
|
|
2. |
Use the Navigation buttons to highlight the TV TUNER icon, and |
|
||
|
press the Play/OK button. |
|
||
3. |
Use the |
and |
buttons to highlight the Autoscan item and |
|
|
press the Play/OK button to start scanning. |
|
||
|
Program Table |
|
|
|
|
The Program Table menu allows you to sort the TV channels. |
|
||
System Setup - 24

1.Press the MENU button to access the SETUP MENU.
2.Use the Navigation buttons to highlight the TV TUNER icon, and press the Play/OK button.
3.Use the  and
and  buttons to highlight the Program Table item and press the Play/OK button.
4.Use the  and
and  buttons to highlight the channel you want
to move and press the  button to move it to the panel outside the list.
5.Use the  and
and  buttons to move the channel along the list to where you want to insert it.
6.Press the  button to re-insert the channel into the list.
Modify Channel Information
You can edit the information details for each channel via the Modify Channel Information menu.
1.Press the MENU button on the remote control to access the
SETUP MENU.
2.Use the Navigation buttons to highlight the TV TUNER icon, and press the Play/OK button.
3.Use the  and
and  buttons to highlight the Modify Channel item and press the Play/OK button.
4.Use the Navigation buttons to edit the following information.
Program Number: The number of the current channel, this item can not be modified.
Name: Use the Navigation buttons to select and edit the channel name.
Standard: The transmission standard of the current channel. You should choose the correct standard according to the local TV signal.
Search type: Select the type of scan to be used when performing a scan for TV channels. There are two modes: Frequency and Channel.
Band (Not applicable in Frequency mode): The type of band for this channel. You can select Standard or Cable.
Channel or Frequency:
•Option 1: With this item selected, press the  or
or  , button to perform a scan for the next available TV channel.
•Option 2: Press the Play/OK button and use the Navigation buttons to manually enter the Channel or Frequency number.
Fine tuning: Use the |
or |
, buttons to fine tune current |
channel. |
|
|
Delete: To delete the current channel from the channel list. OK: Confirm the settings for the current channel and save. Cancel: Discard current settings and exit the menu.
Parental Lock
Parental lock is a password protecting system. It enables the user to prohibit the Easy HDD Recorder from playing some discs according to the information the disc carries.
To set parental lock:
1.Press the Stop button twice during playback.
2.Press the Menu button to access the system SETUP MENU
3.Press the  and
and  buttons to highlight the Playback item. Press the Play/OK button to confirm the selection.
4.Press the  and
and  buttons to highlight the Parental Level item and press the Play/OK button.
5.Press number buttons to enter the password (the master password is 0000 or 3308) and press the Play/OK button.
6.Press the Play/OK button on the remote control to display the level list.
7.Use the  and
and  buttons to highlight the desired control level and press the Play/OK button.
8.Press the Menu button to exit.
Change the password
1.Repeat steps 1 to 5 as described above.
2.Use the  and
and  buttons to select New and press the Play/ OK button on the remote control.
3.Enter new password in the first block; and then enter the password again in the confirming block. Press the Play/OK button to save the new password.
4.Press the Menu button to exit the SETUP MENU
Audio, Subtitle and Disc Menu Language Selection
To change the Audio, Subtitle and Disc Menu languages please carry out the following:
1.Press the MENU button on the remote control to access the
SETUP MENU.
2.Use the Navigation buttons to highlight the PLAYBACK icon, and press the Play/OK button.
3.Use the  and
and  buttons to highlight either the Audio, Subtitle or Disc Menu items and press the Play/OK button.
4.Use the  and
and  buttons to highlight the desired language and press the Play/OK button to confirm.
5.Repeat steps 1-4 for each language item.
Setting the clock
1.Press the Menu button to access the SETUP MENU
2.Use Navigation buttons to highlight the DATE/TIME icon, and press the Play/OK button.
25 - System Setup
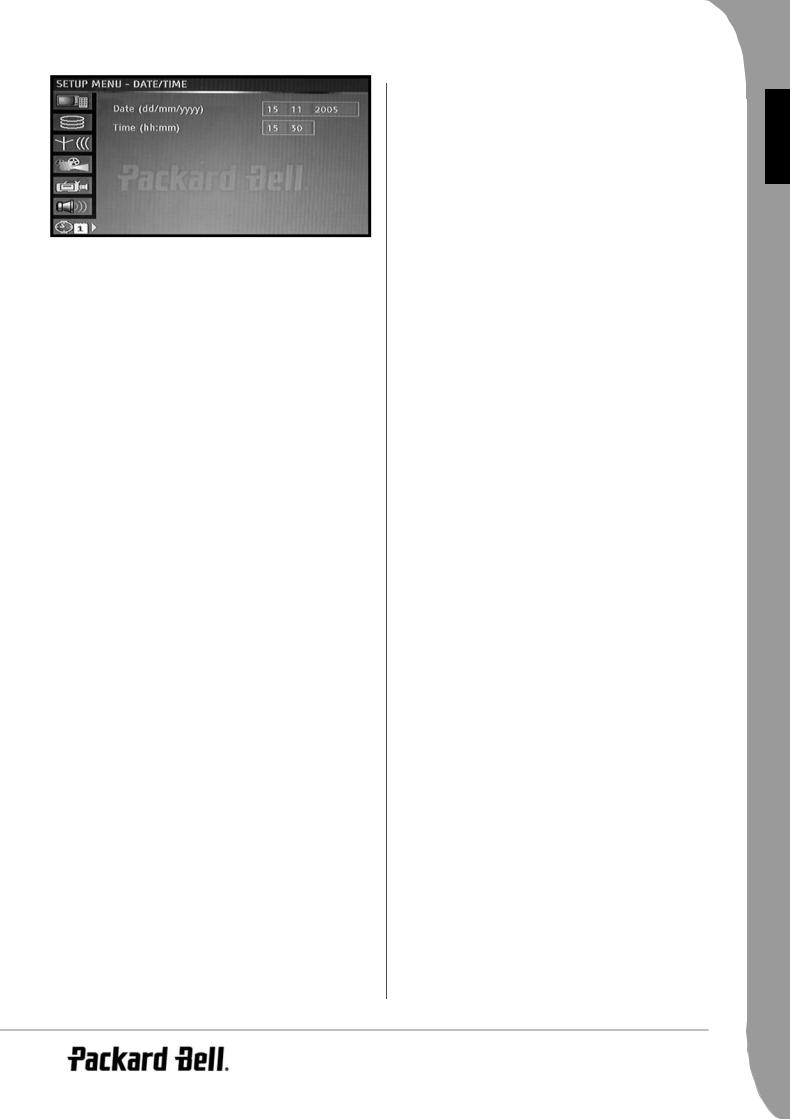
3. Change the system date and time with the Navigation buttons.
System Time Adjustment
The Easy HDD Recorder can automatically adjust the system time according to the time code it receives from the television station. Only the time code integrated in the first TV channel can be used by the appliance. The TV signal must incorporate a time code for this function to work.
EN G L IS H |
System Setup - 26

TROUBLESHOOTING
|
|
|
|
Problem |
Solution |
• Connect the audio cables into the connectors securely.
No sound |
• Verify the connection from the DVD audio output to the TV or receiver audio input. Make sure the cor- |
|
rect AUDIO input is selected on your TV or amplifier. |
||
|
• Refer to your audio amplifier owners manual.
Only sound, no picture |
• |
The scan mode of video output is incorrectly set. Press the P/I button on the remote control to switch to |
||||
|
correct mode. |
|||||
|
|
|
|
|
||
|
|
|
|
|
||
|
|
|
|
• Connect the power plug into the wall outlet securely. |
||
|
|
|
|
• Timer recording is active. Press Power or Stop to cancel time recording. |
||
No response |
|
• |
The appliance might encounter a technical failure. Unplug the power supply and wait for 30 seconds |
|||
|
|
|
|
|
before connecting it to the wall outlet again. If it still doesn't work, try to resume the Easy HDD Recorder |
|
|
|
|
|
|
to factory settings. |
|
|
|
|
|
|
||
|
|
|
|
• The remote control is not pointing to the Easy HDD Recorder. Please aim at the Easy HDD Recorder. |
||
Remote control |
does |
• |
Batteries are flat, replace batteries. |
|||
not work |
|
|
• The appliance might encounter a technical failure. Unload batteries, wait for 30 seconds before place |
|||
|
|
|
|
|||
|
|
|
|
|
them back into the remote control. |
|
|
|
|
|
|
||
|
|
|
|
• Blank disc, replace the disc. |
||
|
|
|
|
• Incompatible disc: please refer to the list of supported disc types. |
||
|
|
|
|
• The disc is loaded with label side down. Make sure to load the disc with label side up. |
||
Cannot play disc |
|
• |
Wrong region code. The region code does not match the region setting of the Easy HDD Recorder. |
|||
|
|
|
|
• Parental lock is on. Unlock the parental lock. Default password is 0000 or 3308. |
||
|
|
|
|
• Choose channel number on the TV set. Choose a correct channel number. |
||
|
|
|
|
• The connection between the Easy HDD Recorder and TV set is loose. Check the connection. |
||
|
|
|
|
|
||
|
|
|
|
• The TV set is not adjusted to the best status. |
||
Poor |
playing |
quality |
• The disc is dirty, clean the disc. |
|||
• Interference may also make the picture distorted. |
||||||
(distorted |
picture/ |
|||||
• |
The wrong setting for the output mode can cause a blank screen or bad quality. If you are experiencing |
|||||
sound) |
|
|
|
|||
|
|
|
|
|
problems with the quality of your display or have a blank screen, please press the progressive scan button |
|
|
|
|
|
|
to switch output mode. |
|
|
|
|
|
|
||
|
|
|
|
• The TV channel you want to record is not saved yet, or you have chosen wrong channel number. |
||
|
|
|
|
• Please check the saved channels. |
||
|
|
|
|
• The disc is write protected. Remove the written protection or change a disc. |
||
|
|
|
|
• The disc is a closed DVD+R or DVD-R disc. Change a disc. |
||
Cannot record |
|
• TV system mismatch. Please make sure the disc has not been recorded in different video format (e.g. PAL |
||||
|
|
or NTSC). The Easy HDD Recorder does not support recordings of different video format on the same |
||||
|
|
|
|
|
||
|
|
|
|
|
DVD+R/RW disc. |
|
|
|
|
|
• The disc you use may not conform to the DVD+R/RW or DVD-R/RW standards. |
||
|
|
|
|
• The recorder does not record to CD-R/RW or DVD-RAM discs. |
||
|
|
|
|
• Please make sure the disc has not been used in a computer before. |
||
|
|
|
|
|
||
|
|
|
|
• The date or time is not correctly set, please check the date and time. |
||
Time |
recording |
does |
• |
The time schedule is not correctly set, please check the time schedule. |
||
not work |
|
|
• |
The disc is locked. Unlock the disc. |
||
|
|
|
|
• The disc is a closed DVD+R or DVD-R disc. Change the disc. |
||
|
|
|
|
|
||
DVD±RW |
disc |
cannot |
• |
The disc is locked. Press the DVD button on the remote control and select Unlock Disc to unlock the disc. |
||
be edited |
|
|
|
|
||
|
|
|
|
|
|
|
TV signal has picture or |
• |
Check the aerial. |
||||
• Check the selected TV system in the system menu. In mainland Europe, the TV system should be PAL or |
||||||
sound interference |
||||||
|
SECAM. |
|||||
|
|
|
|
|
||
|
|
|
|
|||
Distorted |
picture or |
• |
The disc's colour system does not match the TV's colour system. |
|||
black and white picture |
• |
The signal is not a colour signal. |
||||
|
|
|
||||
No digital audio output |
• |
Check whether the digital input connectors match the external instruments' output connectors. |
||||
27 - Troubleshooting

SPECIFICATIONS |
|
|
|
Front Panel |
Key function |
Power, Open/Close, Play/Pause, Stop, |
H |
|
Rec, Source |
S |
|
|
DV in |
I |
|
|
4 Pin IEEE 1394 |
L |
|
|
USB in |
USB Type A |
G |
|
EN |
||
|
Video in |
CVBS + S-Video |
|
|
Audio L/R in |
1 |
|
Rear Panel |
CVBS Out (RCA Jack) |
1 |
|
|
S-Video Out |
1 |
|
|
Audio L/R output (RCA jack) |
1 |
|
|
Component out (Y, Cr, Cb) |
1, progressive scan |
|
|
SCART (with RGB) |
1 in + 1 out |
|
|
Digital audio out |
Coaxial + Optical |
|
|
RF in |
1 |
|
|
RF loop through out |
1 (W/o DVD output) |
|
|
Disc playback compatibility |
CD, CD-R/RW, VCD, SVCD, DVD, |
|
Disc Types |
|
DVD+R, DVD+RW, DVD-R, DVD-RW |
|
|
|
(Video mode) |
|
|
Video playback compatibility |
MPEG 1/2/4, DivX 3/4/5, XviD |
|
|
Photo playback compatibility |
JPEG |
|
|
Recording |
DVD+R, DVD+RW, DVD-R, DVD-RW |
|
Audio format |
Playback analog out (2ch) |
Dolby, MPEG2, MPEG1, MP3 |
|
|
Playback digital out (spdif) |
Dolby, MPEG2, MPEG1, MP3, DTS |
|
|
Recording (2ch) |
MPEG 2 |
|
TV standard |
Playback |
PAL/SECAM/NTSC |
|
|
Recording |
PAL/SECAM/NTSC |
|
|
Internal tuner |
SECAM B/G D/K L; PAL B/G D/K I |
|
Time recording |
Number of events |
20; once; daily; weekly |
|
|
Timer programming |
Manual |
|
|
Save record |
Yes |
|
Recording functions |
Split title |
Yes |
|
|
Delete title |
Yes |
|
|
Append |
Yes |
|
|
Disc write protection |
On/Off |
|
|
Recording information edit |
Title Name, Disc Name |
|
|
One - Touch record (OTR) |
30 min, 60 min, 90 min, 120 min |
|
|
Erase |
Title/Disc; Entirely / Partially |
|
|
Chapter |
insertion/deletion/hide/unhide |
|
|
DVD Max. recording time |
360 min |
|
|
HDD to DVD hi-speed dubbing |
Yes |
|
DVD playback feature |
Multi aspect ratio |
4:3 LB, 4:3 Panscan, 16:9 wide screen |
|
|
Multi angle |
On/Off |
|
|
Multi audio |
On/Off |
|
|
Multi subtitles |
On/Off |
|
|
Parental lock |
On/Off |
|
|
Fast forward / reverse |
x2, x4, x16, x32, x64 |
|
|
Skip forward / reverse |
Yes |
|
|
Slow forward |
1/2, 1/4, 1/8 |
|
|
Step forward |
Yes |
|
|
Search |
Title/Chapter/Track/Time |
|
|
Repeat playback |
Disc, Title, Chapter, A-B Repeat |
|
|
Zoom function |
x1.5 - x2 |
|
TV channel function |
Scan Channels |
Autosorting-Autonaming/Manual |
|
|
Modify channel information |
TV system, channel name, frequency, skip, fine |
|
|
|
tune |
|
|
Sort channels |
Yes |
|
Dimensions |
|
430(W) x 56(H) x 300(D) mm |
|
Power supply |
|
220V AC 50/60 Hz |
|
Power consumption |
|
36W |
|
Power consumption (stand by) |
|
< 5W |
|
Weight |
|
approximately 4.0 kg |
|
Environment temperature |
|
15~35 C |
|
Humidity |
|
25~75% |
|
Specifications - 28
FR A N Ç A I S
GUIDE DE L'UTILISATEUR DE L'EASY HDD RECORDER DE
PACKARD BELL
Copyright © 2005 Packard Bell B.V. Tous droits réservés. Aucune partie du présent manuel ne peut être transmise sous quelque forme ou par quelque moyen que ce soit, qu'il soit électronique, chimique, manuel ou autre, y compris, sans que cette liste soit exhaustive, les systèmes de photocopie, d'enregistrement, de stockage ou d'extraction de données, et ce quel qu'en soit le motif, sans l'accord préalable écrit de Packard Bell B.V.
Déni de responsabilité
Packard Bell B.V. n'offre aucune garantie explicite ou implicite, notamment, sans que cette liste soit exhaustive, des garanties implicites sur la valeur marchande ou l'adéquation de ce produit et de sa documentation pour un usage spécifique. Les composants matériels sont régulièrement actualisés. Par conséquent, certaines des instructions, des spécifications et des illustrations fournies dans cette documentation peuvent légèrement différer de votre situation. Tous les éléments décrits dans ce guide ne sont fournis qu'à titre d'illustration et peuvent ne pas vous concerner. Aucun droit statutaire ou autre ne peut être obtenu des descriptions figurant dans ce manuel.
Packard Bell B.V. se réserve le droit de modifier ou d'améliorer ce produit ou sa documentation quand bon lui semble, sans en aviser quiconque. Packard Bell B.V. ne peut en aucun cas être tenu responsable des dommages indirects ou accidentels résultant de l'utilisation de ce produit, y compris (sans que cette liste soit exhaustive) le manque à gagner ou tout autre dommage commercial.
Marques commerciales
Packard Bell est une marque déposée de Packard Bell B.V. Tous les autres noms de société ou de produit cités sont les marques commerciales, les marques déposées ou les marques de service de leurs détenteurs respectifs.
Avertissement
Pour prévenir les risques d'incendie ou d'électrocution, ne branchez pas la fiche sur une rallonge, une prise électrique ou tout autre connecteur de sortie, excepté si la fiche peut y être entièrement insérée. N'exposez pas cet appareil à la pluie ou à l'humidité.
Le symbole en forme d'éclair fléché placé dans un triangle équilatéral informe l'utilisateur de la présence de tensions dangereuses non isolées au sein du boîtier du produit qui sont susceptibles de l'électrocuter.
AVERTISSEMENT : POUR LIMITER LES RISQUES D'ÉLECTROCUTION, NE RETIREZ PAS LE CAPOT (NI LE PANNEAU ARRIÈRE). LE PRODUIT NE CONTENANT AUCUNE PIÈCE REMPLAÇABLE PAR L'UTILISATEUR, CONFIEZ SA MAINTENANCE À DES TECHNICIENS QUALIFIÉS.
Consignes de sécurité importantes
•Lisez ces instructions.
•Conservez ces instructions.
•Tenez compte de tous les avertissements.
•Suivez toutes les instructions.
•N'utilisez pas cet appareil près d'une source d'humidité.
• Nettoyez-le à l’aide d'un chiffon sec. |
|
|
• N'obstruez aucun des orifices d'aération. Installez cet appareil |
|
|
conformément aux instructions du fabricant. |
|
|
• N'installez pas ce produit près de sources de chaleur, notamment |
|
|
des radiateurs, des bouches de chauffage, des poêles ou d'autres |
|
|
appareils générant de la chaleur (y compris des amplificateurs). |
I S |
|
• Ne retirez pas le dispositif de sécurité de la fiche polarisée ou de la |
||
fiche de terre. Les fiches polarisées sont pourvues de deux lames, |
A |
|
Ç |
||
l'une étant plus large que l'autre. Les fiches de terre sont |
||
N |
||
constituées de deux lames et d'une broche de terre. La lame la plus |
||
A |
||
large ou la broche de terre permet de garantir votre sécurité. Si la |
||
FR |
||
fiche fournie ne s'insère pas dans votre prise, contactez un |
||
électricien pour qu'il remplace la prise obsolète. |
|
|
• Installez le cordon d'alimentation de sorte que personne ne puisse |
|
|
marcher dessus et qu'il ne soit pas comprimé. |
|
|
• N'utilisez que les fixations/accessoires spécifiés par le fabricant. |
|
|
• Débranchez cet appareil en cas d'orage ou lorsque vous ne l'utilisez |
|
|
pas pendant de longues périodes. Veuillez noter que la garantie de |
|
|
ce produit ne couvre pas les dommages résultant de la foudre. |
|
|
• La maintenance de cet appareil doit être effectuée par des |
|
|
techniciens qualifiés lorsqu'il a été endommagé de quelque façon |
|
|
que ce soit, qu'il a été exposé à la pluie ou à l'humidité, qu'il ne |
|
|
fonctionne pas normalement ou qu'il est tombé. |
|
|
• Vous devez débrancher le cordon d'alimentation pour couper |
|
|
l'alimentation de l'appareil. Il est donc impératif que la prise de |
|
|
courant soit située tout près de l'appareil et qu'elle soit facilement |
|
|
accessible. |
|
|
Mise au rebut du produit |
|
|
Conformément aux exigences de la directive DEEE |
|
|
(Déchets d'Équipements Électriques et Électroniques), |
|
|
les produits électriques et électroniques usagés doivent |
|
|
être détruits séparément des ordures ménagères |
|
|
normales afin de promouvoir la réutilisation, le |
|
|
recyclage et d'autres formes de récupération, ainsi que |
|
|
de limiter la quantité de déchets devant être éliminés |
|
|
et de réduire du même coup les décharges. Ceci inclut des accessoires, |
|
|
comme une télécommande, des cordons d’alimentation, etc. Lorsque |
|
|
vous vous débarrassez de tels produits, veuillez vous conformer aux |
|
|
consignes des autorités municipales et/ou vous renseigner auprès de |
|
|
votre revendeur lors de l'achat d'un nouveau produit. |
|
- 29

SOMMAIRE |
|
Introduction.................................................................................... |
31 |
Principales caractéristiques .................................................................... |
31 |
Contenu de l'emballage ......................................................................... |
32 |
Disques lisibles et non lisibles ................................................................ |
32 |
Disques inscriptibles .............................................................................. |
32 |
Premiers pas - Commandes.............................................................. |
33 |
Préparation de la télécommande ............................................................ |
33 |
Boutons généraux de la télécommande .................................................. |
33 |
Liste des boutons de la télécommande ................................................... |
35 |
Commandes et caractéristiques du panneau avant .................................. |
36 |
Schéma du panneau arrière ................................................................... |
36 |
Premiers pas - Installation ................................................................ |
37 |
Branchement à un téléviseur (configuration de base) .............................. |
37 |
Branchement à un téléviseur (autres configurations) .............................. |
37 |
Branchement sur un système audio externe ........................................... |
38 |
Branchement de périphériques USB ....................................................... |
39 |
Lecture ........................................................................................... |
40 |
Lecture d'un DVD ou d'un CD avec des fichiers MP3, JPEG ou/et DivX |
41 |
Lecture du contenu à partir d’un périphérique USB ................................ |
41 |
Liste des titres résidant sur le disque dur ................................................ |
42 |
Time Shifting .................................................................................. |
43 |
Mode Enregistrement/Time Shifting ..................................................... |
43 |
Définition de la qualité d’enregistrement ............................................... |
45 |
Enregistrement sur DVD ....................................................................... |
45 |
Enregistrement sur disque dur ............................................................... |
45 |
Programme d'enregistrement ................................................................. |
46 |
Édition et montage .......................................................................... |
47 |
Édition de DVD ..................................................................................... |
47 |
Édition du disque dur ............................................................................ |
48 |
Montage (copie du disque dur sur un DVD) ........................................... |
50 |
Configuration du système ................................................................ |
52 |
Dépannage...................................................................................... |
55 |
Spécifications .................................................................................. |
57 |
30 -
 Loading...