


pc
Table of contents
 Loading...
Table of Contents - 1
Quick Start & Troubleshooting
Guide
TABLE OF CONTENTS
Product Registration 2
Important Information 3
Computer Basics 4
Safety and Comfort ..................................................... 4
Safety Precautions ............................................... 4
Health Precautions............................................... 5
Getting to Know your Computer.................................. 6
Control Devices (Keyboard/Mouse) ...................... 6
Volume Controls .................................................. 8
Remote Control (optional) ................................... 8
Your Computer’s Drives........................................ 9
Ports and Connectors ......................................... 10
Turning your Computer ON or OFF...................... 12
Upgrading your Computer ................................. 13
Internet and Software 15
Using Windows and your Software ........................... 15
Windows Welcome Center ................................. 15
Internet Security Offer........................................ 15
Packard Bell Recovery Management .................. 16
Packard Bell Updater.......................................... 17
Your Computer's Documentation ....................... 18
Playing Multimedia Files.................................... 18
First steps on the Net................................................. 20
Protecting your computer .................................. 20
Choose an ‘Internet Service Provider’................. 20
Network connections ......................................... 21
Surf the Net! ...................................................... 23
Helpdesk 25
Safe Computing ........................................................ 25
Maintenance...................................................... 25
Updates ............................................................. 28
Security.............................................................. 28
Windows Remote Assistance ............................. 33
Diagnose & Repair..................................................... 34
Top Troubleshooting Cases ................................ 34
Miscellaneous Troubleshooting ......................... 39
Recovering your system ............................................ 46
To recover your system ...................................... 46
Recovering pre-installed software and drivers... 46
Returning to a previous system condition.......... 47
Returning your system to its factory condition .. 48
Regulatory Information 49
Environment 51
Software License 52
Index 53
Copyright ©2009. All Rights Reserved. PBDT

2 - Quick Start & Troubleshooting Guide
PRODUCT REGISTRATION
When using your computer for the first time, it is recommended that you immediately register it. This will give you access to
some useful benefits, such as:
• Faster service from our trained representatives
• Membership in the Packard Bell community: receive promotions and participate in customer surveys
• The latest news from Packard Bell
Hurry and register, as other advantages await you!
How to Register
During the initial startup of your computer, a window will invite you to register. Please fill in the information and click Next.
The second window you'll see contains optional fields that will help us to provide you with a more personable customer
service experience.
Another Option
Another way to register your Packard Bell product is to visit our website at register.packardbell.com. Choose your country
and follow the simple instructions.
After we receive your product registration, you will be sent a confirmation email with important data that you should keep in
a safe place.

Important Information - 3
IMPORTANT INFORMATION
Thank you for purchasing a Packard Bell computer!
This guide has been designed to introduce you to the features of your computer and assist in your computing experience. It
will also help you maintain your computer and troubleshoot in case you encounter a problem.
To make the most of your computer, Packard Bell recommends you perform the actions described below before you start
working with your computer.
Packard Bell Recovery Management
If you should ever encounter a problem with your computer and the troubleshooting steps included in the Quick Start &
Troubleshooting Guide did not help fix it, you can run the Packard Bell Recovery Management program. This will restore your
computer to the same state as when you purchased it, while giving you an option to retain all settings and personal data for
later retrieval (see page 46 for details).
Packard Bell Updater
To ensure that your computer has the latest updates for drivers and software, please use the Packard Bell Updat er program as
soon as you have configured an Internet connection (see page 17 for details).
Packard Bell InfoCentre
To discover more about your computer, please make sure you check Packard Bell InfoCentre, the electronic user‘s
guide installed on your computer. You need to update the guide at least once online (see page 18 for details).
Packard Bell Website
Remember to visit www.packardbell.com often! Check out the Support section; it contains our online Troubleshooter, up-to-
date information, help, drivers and downloads. Visit store.packardbell.com to discover our accessories, then buy online or
locate a store near you!
Packard Bell Support
Make sure you write down your computer serial number, date and place of purchase and model name
on the cover of this guide. Also, save your proof of purchase. If you call us, please write down any error
message causing the problem, and have the computer in front of you and switched on if possible.
Having these items to hand when contacting us will ensure better and quicker service.

4 - Quick Start & Troubleshooting Guide
COMPUTER BASICS
SAFETY AND COMFORT
Safety Precautions
Please follow the guidelines below to use your computer comfortably and to avoid health problems.
Computer Environment
Make sure that the computer:
• Is used on a stable surface, stand or table. A fall can seriously damage the computer.
• Is not used on a surface that vibrates, or used when taking part in sport, exercise or other activities in a dynamic
environment. Vibration or movement can loosen fastenings, damage internal components and even cause battery
leakage.
• Is away from direct sunlight and sources of heat.
• Is away from magnetic fields or any device generating static electricity.
• Is kept at least 30 centimetres (one foot) away from a mobile phone.
• Is not in a dusty or damp environment.
• Is not used near water. Never spill liquids of any kind on or into your computer.
• Is not placed on a carpet or any other surface that may have an electrical charge.
Cables
Make sure that:
• Cables are not strained and that there is no risk of people walking or tripping over them.
• Other devices do not crush the cables.
• The power cable is connected to the computer before connecting the power cable to the AC power outlet.
• The power cable is unplugged from the power outlet before disconnecting the power cable from the computer.
• Three-pin power cords are connected to a grounded power outlet.
• The power outlet is easily accessible and as close to the computer as possible (do not overload it with too many adapters).
If your computer uses an external AC adapter:
• Do not cover or place objects on the AC adapter. Allow the adapter to cool properly during use by keeping it clear of objects.
• Only use the AC adapter that is supplied with your computer. Although other adapters may look similar, using them can
damage your computer. If a replacement is required, use only parts certified for use with your computer.
Cleaning your Computer
• Always unplug your computer from the power outlet before cleaning it.
• Do not use liquid or aerosol cleaners, use a damp cloth instead.
• Never spray cleaning product directly on the screen.
• If dust has accumulated inside your computer, do not use a vacuum cleaner to remove it.
• If you sp ill liquid on yo ur computer or any device attache d to it, switch it off imm ediately, unplug the power cord and make
sure it is completely dry before switching it on again. Wait overnight if necessary.
Note: If your computer includes slots for memory cards or expansion devices, plastic ’dummies’ may be installed in the card
slots. Dummies protect unused slots from dust, metal objects or other particles. Save the dummies for use when no cards
are in the slots.

Computer Basics - 5
Servicing your Computer
Do not attempt to service your computer yourself, as opening or removing covers may expose you to dangerous voltage or
other risks. Refer all servicing to qualified service personnel.
Unplug your computer from the wall outlet and refer servicing to qualified service personnel when:
• the power cord or plug is damaged, cut or frayed,
• liquid was spilled into the product,
• the product was exposed to rain or water,
• the product has been dropped or the case has been damaged
• the product exhibits a distinct change in performance, indicating a need for service
• the product does not operate normally after following the operating instructions
Note: Adjust only those controls that are covered by the operating instructions, since improper adjustment of other
controls may result in damage and will often require extensive work by a qualified technician to restore the product to
normal condition.
Health Precautions
• The computer and accessories may contain small parts. Keep them out of the reach of small children.
• If you wor k or play for hou rs at a time, then make sure you ta ke regular breaks. Look away from the com puter's screen once
in a while. Do not use your computer if you are tired.
• To protect your hearing, when using speakers or headphones, increase volume gradually until you can hear clearly and
comfortably; do not increase the volume level after your ears have adjusted. Do not listen to high volumes for extended
periods. Do not increase the volume to block out noisy surroundings; decrease the volume if you cannot hear people
speaking near you.
• Ensure that the computer’s ventilation slots and openings are never obstructed or covered. Do not place the computer on a
soft surface (such as a carpet, chair or bed) that may block ventilation slots.
• Do not push objects of any kind into ventilation or case slots as they may touch dangerous voltage points or short-out
parts that may result in a fire or electric shock.
• Some disorders of the hands, wrists, arms, neck, shoulders, legs and back may be associated with, or aggravated by certain
repetitive actions. To reduce your risk of developing these disorders, type with your wrists straight and your hands and
wrists floating above the keyboard. If you experience periods of pain, tingling, numbness or other discomfort, please
contact your doctor.
• We advise that parents monitor the use of games by their children. If you or your child experience any of the following
symptoms: dizziness, blurred vision, eye or muscle twitches, loss of consciousness, disorientation, any involuntary
movement or convulsion, IMMEDIATELY discontinue use and consult your doctor. This may happen even if the person has
no medical history of epilepsy.
To use your computer comfortably, remember the following:
• Sit up straight with your back relaxed
• Adjustable chair
• Feet flat on floor or on footrest
• Desk height 60-70 centimetres (24-28 inches) from the floor
• Free space around the computer and devices to allow proper ventilation
• Top of monitor at eye level
• Eye distance 45-70 centimetres (18-30 inches) from screen
• Easy access to drives and controls
6 - Quick Start & Troubleshooting Guide
GETTING TO KNOW YOUR COMPUTER
Control Devices (Keyboard/Mouse)
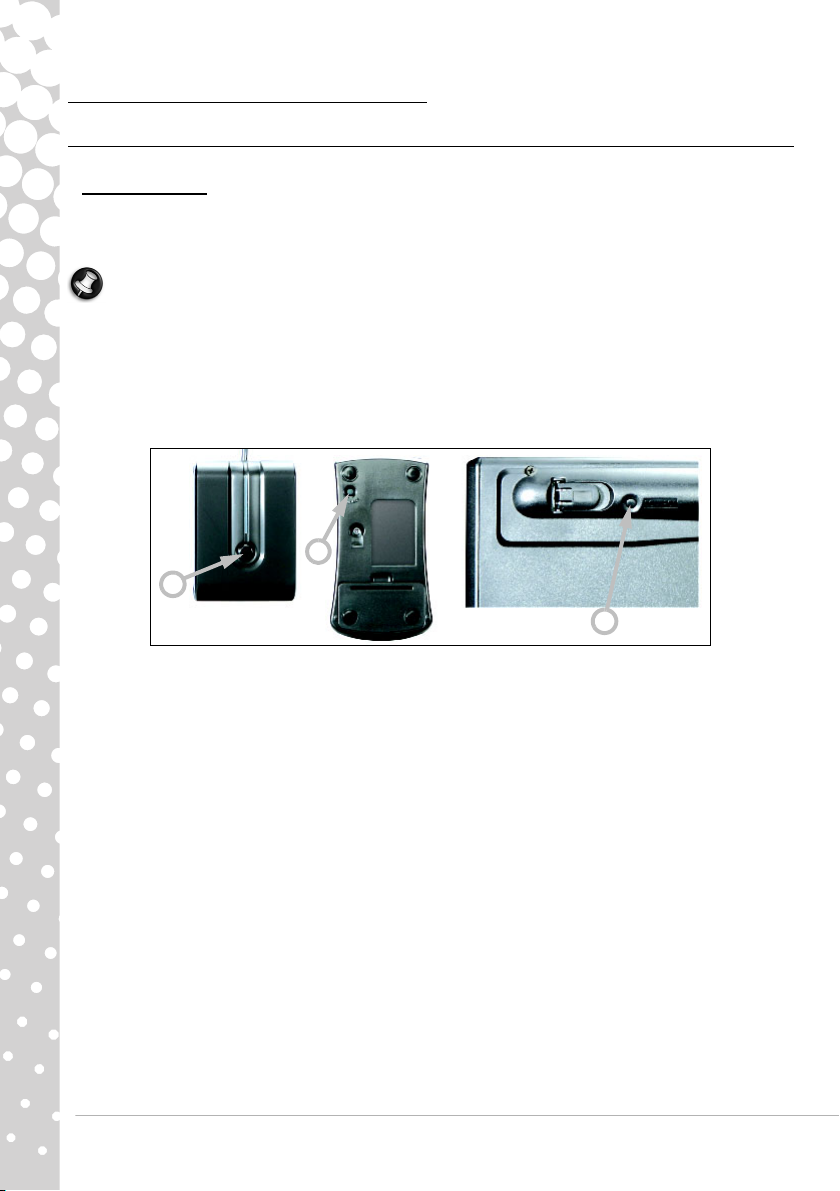
Cordless Devices
The cordless mouse and keyboard normally connect automatically as soon as you turn your computer on. However, if the
cordless mouse and keyboard do not work after installation, you should try to manually establish communication with the
receiver.
Note: The Keyboard/Mouse and Receiver shown below may not be the same as the Keyboard/Mouse supplied with your
computer. Check your InfoCentre documentation to see your Keyboard/Mouse specifications if they are different from those
shown below.
1. First check that the batteries for the keyboard and mouse are inserted correctly.
2. Then identify the mouse:
•Press the connect button on the receiver (A).
• Turn the mouse over.
• Use a thin object (such as a pen tip) to press the connect button on the mouse (B).
3. Wait 20 seconds.
4. Identify the keyboard:
•Press the connect button on the receiver (A).
• Turn the keyboard over.
• Use a thin object (such as a pen tip) to press the connect button on the keyboard (C).
A
B
C
Computer Basics - 7
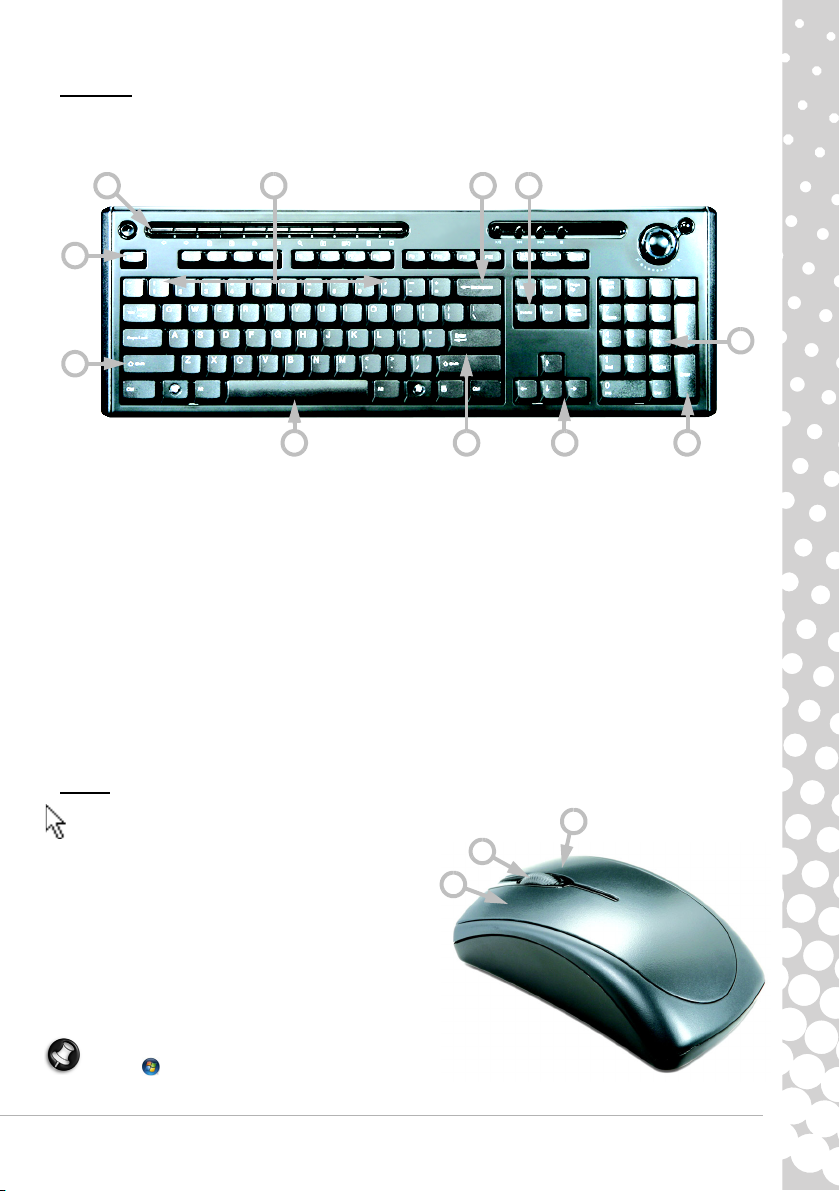
Keyboard
The keyboard is used to enter text or commands. The functions of the keys depend on the program you are using. The
keyboard displayed in this guide is just an example. The layout of your keyboard may vary slightly. For a full description of
your keyboard, please refer to InfoCentre.
1. Numbers: Used to enter numbers and special characters. Press Shift simultaneously for characters on the top and press
Ctrl+Alt for characters on the right.
2. Backspace: Used to go back one space and delete the last key pressed.
3. Del: Deletes any selected items or the character to the right of the cursor when editing text.
4. Optional Numeric keypad: Functions as a second set of number or cursor keys. Press the Numlock key to switch between
the two functions.
5. Arrow keys: Move the cursor up, down, left and right.
6. Enter: Press to enter a command, insert a paragraph break in a text or accept a chosen option.
7. Space: used to enter an empty space in your text.
8. Shift: Use simultaneously with a letter key to enter capital letters.
9. Esc: Cancels most current tasks.
10. Multimedia and special keys (optional): These keys, usually across the top of the keyboard, may allow you to activate and
control the media player on your computer, change volume and access special functions or websites. Please update
Packard Bell InfoCentre for information on your specific keyboard
Mouse
The mouse controls the arrow on the screen; called the
pointer or the cursor. When you move the mouse over a hard
and flat surface, the pointer will follow this movement.
Click one of the buttons on the top of your mouse to select or
activate the command the cursor is pointing at.
1. Left-click to select the item under the pointer.
Double-click to start the program under the cursor, or select
an entire word when typing text.
2. Right-click to bring up a pop-up menu.
3. Use the scroll wheel or button to move through compatible
applications.
Note: Improve the motion and visibility of the pointer! Click
on Start > Control Panel > Hardware and Sound >
Mouse > Pointer Options.
1 2 3
4
567
8
9
10
6
3
2
1
8 - Quick Start & Troubleshooting Guide
Volume Controls
Apart from the volume controls on your computer, keyboard, monitor or speakers (depending on your equipment), you can
also adjust the volume and balance of your speakers from Windows.
Adjusting the Volume
To adjust the volume, simply click on the Speaker icon located in the Notification Area, next to the clock.
Drag the slider up or down to adjust the volume.
Click on the small speaker icon to mute the volume. Click again to resume playback.
Click on Mixer to access advanced volume control settings.
Remote Control (optional)
Enjoy all your favourite digital entertainment in one place with the easy-to-use Media Center (see page 19) and remote
control!
Installing the Remote Control and optional receiver
Before starting Windows Media Center (see page 18),
prepare the remote control.
1. If your computer does not feature an internal
infrared receiver, a USB receiver is required. If
supplied, connect the USB receiver to a USB port on
the computer.
2. Insert the batteries into the remote control; check
the batteries are orientated correctly.
Remote Control Functions
1. Power ON/OFF or Quick Resume
2. DVD Menu
3. Playback and record controls (Record, Play, Stop,
Rewind, Fast forward, Skip back, Pause, Skip
forward).
4. Open Record TV
5. Open Guide
6. Open Live TV
7. Direction keys (up, down, left, right) and OK
8. Volume controls (Volume up/down and Mute)
9. Program/Channel up/down
10. Back, Start (Windows key) and More information
11. Teletext selection (red, green, yellow, blue)
12. Teletext (launch Teletext while in TV mode)
13. Number keys, Clear and Enter
4
1
2
3
5
6
7
8
9
10
11
12
13
Computer Basics - 9
Your Computer’s Drives
The drives described below are commonly used on Packard Bell computers. However, this does not mean that they are
present on the computer you have purchased, nor that it is limited to these drives. To view documentation specific to the
model you have purchased, please check Pa ckard Be ll InfoCent re.
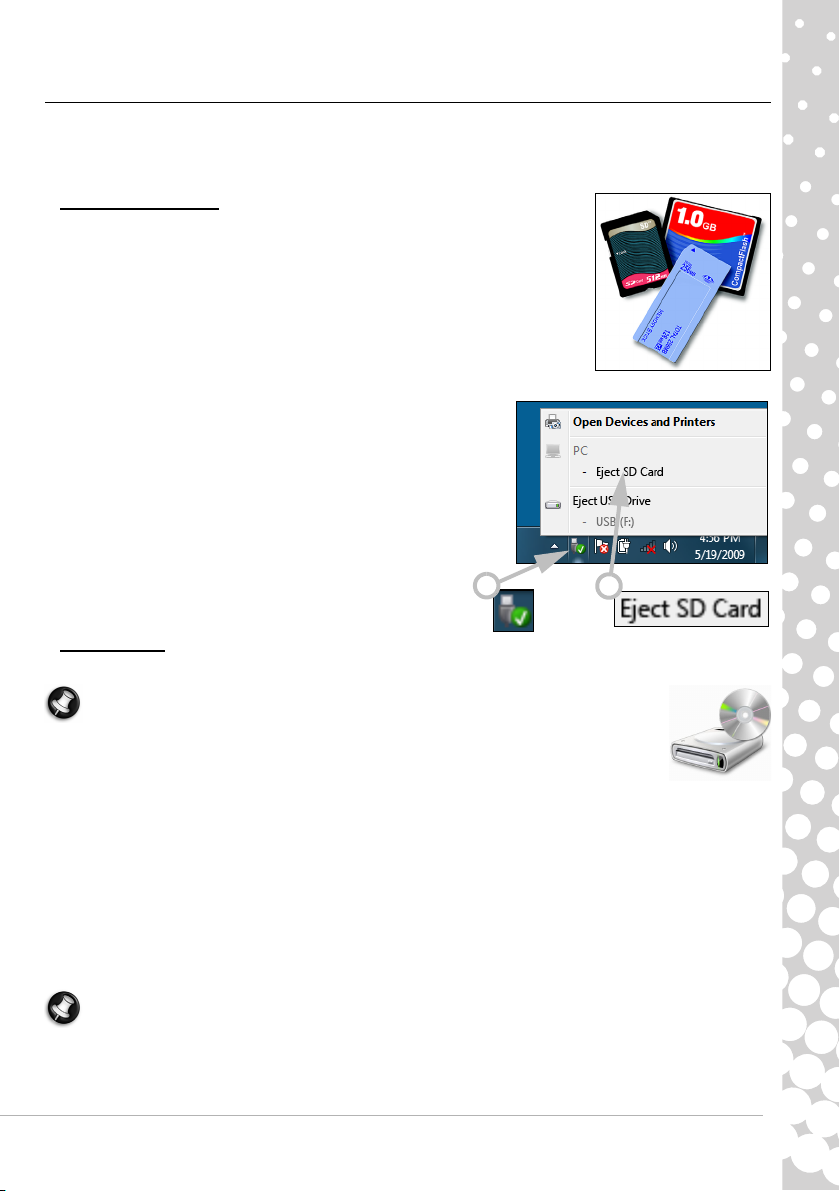
Memory Card Reader
Memory cards are used in a wide selection of digital cameras, PDAs, MP3 players and mobile
phones. Selected computers include an “all-in-one” memory card reader that allows you to
read and write the most common types, such as CF (Compact Flash®), IBM Microdrive™, SM
(Smart Media™), MMC (Multi Media Card™), SD/SDHC Card, xD-Picture Card™ or MS (Memory
Stick®).
Removing a card from an External Card Reader
1. Click on the Safely Remove Hardware icon in the Notification
Area (next to the clock).
2. Click on Eject SD Card (or the name of the device).
3. Wait until a Safe to Remove H ardware message is displayed.
4. Remove the card.
Optical Drives
An optical drive is able to read from (or write to) a variety of CD or DVD discs (e.g. Audio CD, CD-ROM, DVD).
Note: Small computers may omit larger devices such as optical drives. If your computer does not
feature an optical drive and you wish to access files or install a program from an optical disc, you will
need additional equipment; you may use either an external optic al drive, or a computer with an optical
drive and a network connection (i.e. add the optical drive as a resource that may be used over a
network).
Read-only (ROM) drives
Some optical drives are only able to read information from a disc, they cannot be used to store new information. These drives
can be used to watch films, install programs and read data such as photos or music.
Recordable (R) or Re-Writable (RW) Drives
In addition to reading data from compatible discs, the optical drive(s) provided with your computer may be able to write (or
'burn') information to appropriate discs. You can use these drives to duplicate your CDs, create your own music compilations,
digital photo albums or keep a safe copy of your valuable data. Disc recording software must be used to write information to
recordable discs.
Note: Before copying a CD, make sure that its content is not protected by Trademarks and Copyrights, and that you are
authorised to replicate it. In most countries you are allowed to make an archival backup of software or copy music for your
own personal use.
2
1

10 - Quick Start & Troubleshooting Guide
Disc Compatibility for Recordable Drives
•DVD±RW Writer
: DVD±RW drives (or DVD Dual drives) c an write to record able CDs, recordable DVDs ('-
' or '+').
• Double-Layer DVD-RW Writer:
Double-Layer DVD-RW drives (or DVD+R9 DL drives) can write to
recordable CDs and single- or double-layer recordable DVDs.
• Blu-ray Combo Drive
: Blu-ray Combo drives can write to recordable CDs, all 'standard' recordable DVDs
(but not 'HD' DVDs) and may read from (but not write to) Blu-ray discs.
• Blu-ray Writer
: Blu-ray drives can write to recordable CDs, all 'standard' recordable DVDs and recordable Blu-ray discs.
Precautions
✓ If a program needs a disc, insert the disc into the drive before you start the program.
✓ Do not force a disc into the drive; make sure the disc is correctly inserted, then close the disc tray.
✓ Do not eject the disc without first closing the program that is using the disc. This could potentially cause your computer to
stop responding. Should this happen, restart your computer by using the Windows Task Manager.
✓ If the tray does not eject, you may try to open it manually:
1. Switch your computer off.
2. Carefully insert a straightened paper clip into the emergency eject port (if
available). Do not use a pencil as the lead may break inside the eject port
and damage the drive.
✓ Keep the disc tray closed whenever you are not using the drive. Do not touch the optical lens in the drive, if the lens is
dirty, the optical drive may not function correctly.
✓ Do not wipe the lens with a normal cloth. Use a cotton swab to gently clean the lens.
✓ The optical drive is classified as a Class 1 laser product.
Note: This product incorporates copyright protection technology that is protected by U.S. patents and other intellectual
property rights. Use of this copyright protection technology must be authorized by Macrovision, and is intended for home
and other limited viewing uses only unless otherwise authorized by Macrovision. Reverse engineering or disassembly is
prohibited.
Ports and Connectors
The ports and connector types described below are commonly used on Packard Bell computers. However, this does not mean
that they are present on the computer you have purchased, nor that it is limited to these ports. To view documentation
specific to the model you have purchased, please check InfoCentre.
Precautions
✓ Before you attach any device, check the installation instructions that were supplied with it.
✓ Do not remove a device if the computer is using it.
✓ Most devices may be added or removed while the computer is on. They will be detected and installed automatically.
However, certain devices must be deactivated before they can be removed from the computer (for example, see Removing
a card from an External Card Reader on page 9).
Legacy Ports
PS/2 - Connect a mouse and keyboard to these connectors.
Caution: Unlike most connectors, you must turn off your computer before adding or removing a legacy-
device.
Computer Basics - 11
Communication Ports
Network - Connect your computer to a network (‘LAN’) or certain high-speed Internet connections.
Modem - An internal fax/data modem connects you to the Internet over a dial-up connection.
A network port looks very similar to a modem port; they are often found near each other. The network port is slightly
larger than the modem port.
Warning: In thunderstorm conditions, make sure that you disconnect all your connection cables; unplug
the modem from the telephone line, the TV port from the aerial socket and any network cable. A
lightning strike to nearby telephone lines or an aerial could damage your modem, network or TV card or
even your whole computer. Please note that the product warranty does not apply if damage to your
computer is the result of a lightning strike.
Expansion Ports
USB (Universal Serial Bus) - USB ports allow you to connect many peripheral devices to your computer (for example:
keyboard, printer, scanner).
IEEE 1394 (FireWire) - An IEEE 1394 port (aka FireWire™ or i.LINK) allows you to connect high-speed digital devices
to your computer, such as digital video cameras, external hard disk drives, or scanners.
eSATA - An eSATA port allows you to connect a compatible external storage device (usually a hard disk drive) with a
high-speed SATA connection.
Display and Audio Ports
VGA Port - Connect to a monitor with a VGA port. The appropriate cable is usually included with the monitor.
DVI Port - Connect to a monitor with a DVI (Digital Video Interface) port. The appropriate cable is usually included
with the monitor.
Note: Many monitors use a 15-pin analogue connection, so you may need to purchase an adapter or a DVI-to-Analogue
cable.
S-Video (TV-Out) Connection - An S-Video TV-Out port allows you to connect a compatible television.
HDMI (TV-Out) Connection - An HDMI TV-Out port allows you to connect a compatible display device (such as a
high-definition television) with a single, easy-to-use connector.
Caution: If you want to use your television's speakers, you must change the audio output or connect the
Line-Out port of your computer to your television (or a speaker system).
Line-Out - Lets you plug in stereo headphones or powered speakers. Plugging in an audio device disables any
built-in speakers.
Microphone - Allows you to connect an external microphone for mono recording or amplification through the
unit. Plugging in an external microphone disables the built-in microphone.
Other Connectors
Memory Card Reader - Memory cards are used to store and transfer data by a wide selection of digital cameras,
PDAs, MP3 players and mobile phones (see page 9).
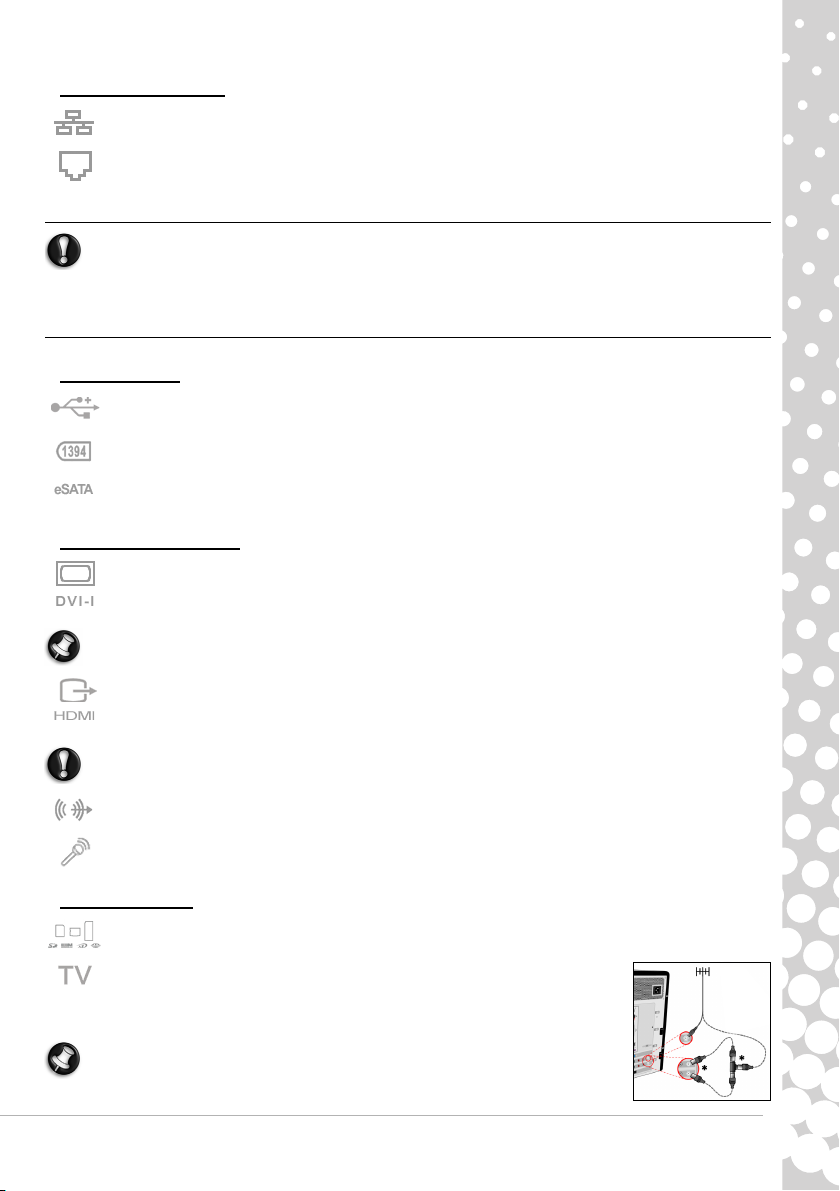
TV Tuner - Allows you to connect an aerial and watch analogue or digital television on
your computer (see page 18). An adapter may be required to connect to an aerial - if your
computer features two TV tuner ports, use a splitter cable to connect both ports to an
aerial.
Note: The TV tuner must be compatible with signals in your area.

12 - Quick Start & Troubleshooting Guide
Other Features
Remote Control Receiver - The remote control receiver (Commercial IR) allows you to control the media functions of
your computer from a distance when used with a compatible remote control (optional).
Caution: The sensor is not an 'full' IR port and can only receive signals from a remote control. It cannot be
used to communicate with other devices, such as mobile telephones.
Turning your Computer ON or OFF
Turning your Computer ON
1. First, switch ON any devices connected to your computer (including a monitor) by pressing the main power button on
these devices.
2. Then switch ON your computer by pressing the main power button.
To share the family computer and have your own system settings every time you turn on the computer, you
can set up accounts for each user. You can access and modify your accounts at any time by clicking on Start
> Control Panel > User Accounts and Family Safety. To learn more about user account
management, please see the section User Account Control on page 32.
Turning your Computer OFF
Make sure all applications are closed before you turn off your computer. Turning off your computer will ensure that a data is
saved and it will use as little power as possible (there may be a small power drain to charge batteries), however your
computer will take longer to start.
Once the computer has shut down, switch OFF all external devices (such as a printer or monitor) if they have a power button.
Sleep mode
Click on the Sleep button to save your session and put the computer in a low-power state so that you may quickly resume
working (see the Power Options section on page 13 for details).
Note: You may also put your computer into sleep mode without going to the Windows Start menu. Simply close all your
applications and press the power button.
1
2
1
2
3
Computer Basics - 13
Forced Shutdown
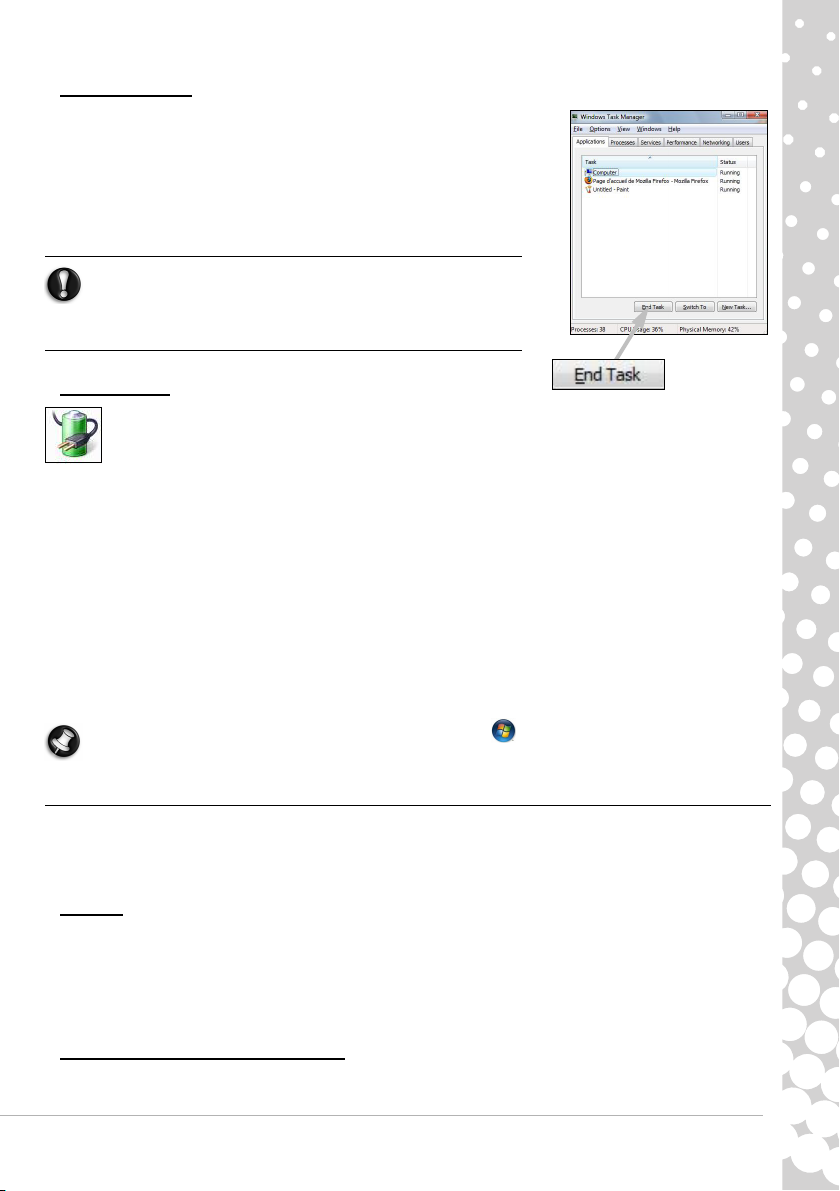
If your computer doesn’t respond, then try using the Task Manager. This utility
provides information about your system’s performance and displays details
about programs and processes running on your computer.
To do so, press the Ctrl+Alt+Del keys simultaneously and select Start Task
Manager.
Click on the Applications tab, select the task that you want to end and click on
End Task.
Warning: If your computer still does not respond, press the
computer power button to turn your computer off. Keep this
button pressed until all of the LEDs turn off and wait for roughly
30 seconds before turning the computer on again.
Power Options
The power options of Windows can control your computer’s power state and allow you to save energy. Depending
on your needs, you can define the power scheme that suits you best. Three power saving modes are provided:
Sleep, Hibernate and Hybrid sleep.
Sleep
Sleep effectively ’pauses’ your computer, keeping all activity in memory, ready to start again. Rousing your computer from
Sleep takes just a few seconds. A small amount of power is still required to store the contents of the memory.
Hibernate
Hibernate stores all activity on your computer’s hard drive, and then powers down. No power is required, but your computer
must be powered on normally before you may continue working.
Hybrid Sleep
Hybrid sleep stores all activity on your computer’s hard drive, just like Hibernate; but also keeps a copy in memory, ready to
start in a few seconds. A small amount of power is still required to store the contents of the memory, but the copy on the disk
drive ensures that you work is safe, even in the event of a power failure. Hybrid Sleep may be disabled on certain computers.
Note: To learn more about personalising your computer, click on Star t > Help and Support.
Upgrading your Computer
Packard Bell strives to make your computing experience as easy and pleasant as possible. Because your computing needs may
evolve, Packard Bell is here to help you choose the right accessories and make the most of your computer.
Visit store.packardbell.com to discover our accessories, then buy online or locate a store near you!
Memory
Memory (RAM) is a key component of your computer. If you run memory-intensive applications such as image or digital-
video editing or 3D games, adding some memory will increase the computer performance and help your computer run faster.
To help you find out the memory module that is best suited to your Packard Bell computer, you can use our online
configurator on www.packardbell.com! The step-by-step configurator is your best pick to find the right module quickly and
easily with no risk of error, at a competitive price.
Storage (e.g. External Hard Disk Drive)
Whether you need additional storage space, need to create backups or need removable storage to carry your data, an external
hard disk drive will be a convenient solution to expand your computer. Simply plug it into a USB port and "drag and drop" to

14 - Quick Start & Troubleshooting Guide
transfer your valuable data in a few seconds. To make temporary backups, this is a lot quicker than burning a CD or DVD! High
capacity drives are also ideal for storing your favourite music, photos and videos and take them with you everywhere you go!
War rant y
Packard Bell computers come with a limited warranty. For further peace of mind, optional PB Care packs let you extend the
standard warranty up to three years (one year + two additional years) and upgrade to on-site service for your computer. For
information, please visit www.packardbell.com.
If your warranty has expired, or if PB Care packs are not available in your area, don't worry, Packard Bell has the answer.
Packard Bell has appointed Authorised Service Centers to provide you with high quality service! You will benefit from the
service of experienced technicians, trained on your Packard Bell product.
Recycling
You just bought a new computer and wonder what you can do with your old equipment? Don't just throw it out! Packard Bell
encourages you to recycle!
Most computer equipment contains hazardous materials, which are best kept out of landfills. Through recycling, many
materials used in computers can be recovered and used again. Many charitable organizations collect computer equipment,
other companies can repair and sell used computers.
Please refer to Environment on page 51 to learn more about product disposal.
Internet and Software - 15
INTERNET AND SOFTWARE
USING WINDOWS AND YOUR SOFTWARE
Packard Bell computers include software to help you use your computer; the programs and categories available on your
computer depend on the model purchased. Most of this software is ’pre-installed’ and ready to be used; however some
software may be provided on a CD or DVD and must first be installed if you wish to use it. To do so, insert the installation CD or
DVD. An installation wizard will start automatically and all you have to do is follow the instructions on the screen.
Windows Welcome Center
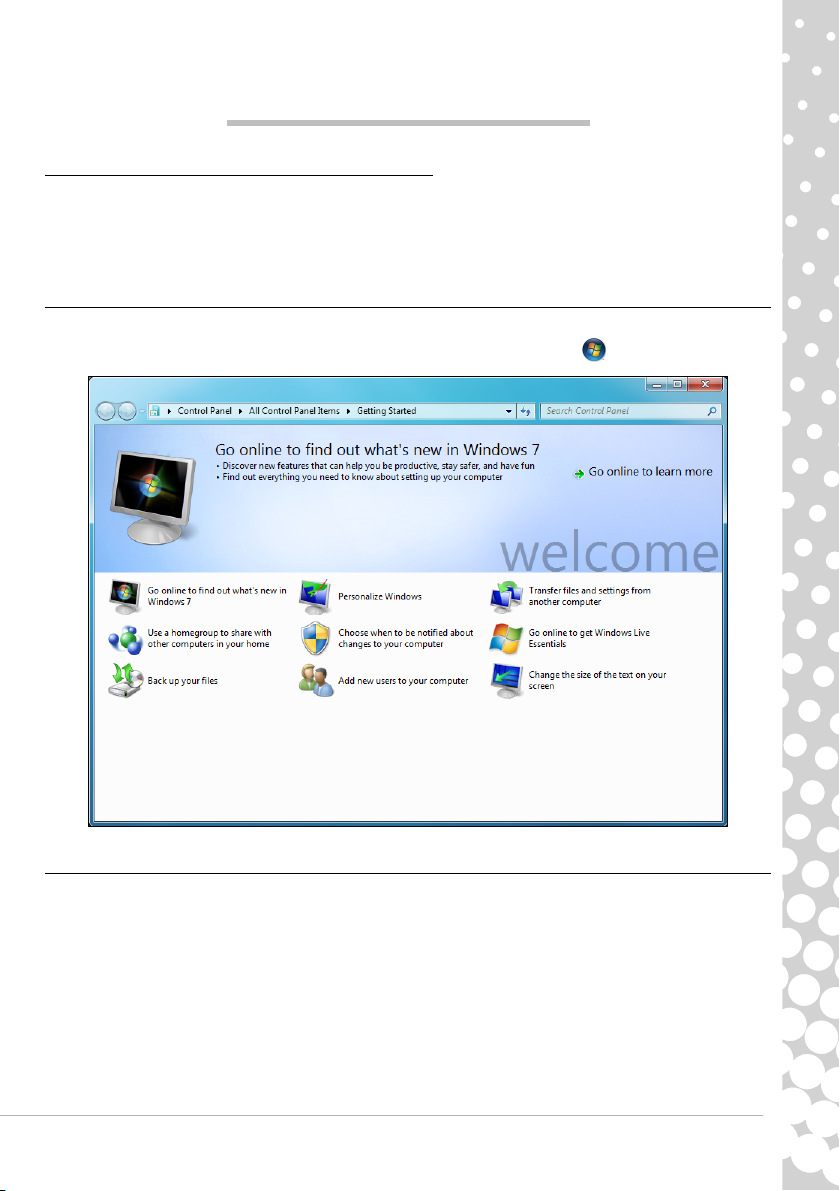
The first time you turn on your computer, the Welcome Center window opens. The Welcome Center introduces you to the new
features and tools of Windows. You can access the Welcome Center later by clicking on Start > Getting Started.
Internet Security Offer
It is vital to protect your computer from viruses and attacks over the Internet (see Security on page 28). An comprehensive
Internet security program is proposed when you first start your computer. You should activate this protection as soon as
possible, certainly before you connect to the Internet.
The offer allows you to use the software and download updates for a period before you must subscribe to continue protecting
your computer against new threats.

16 - Quick Start & Troubleshooting Guide
Packard Bell Recovery Management
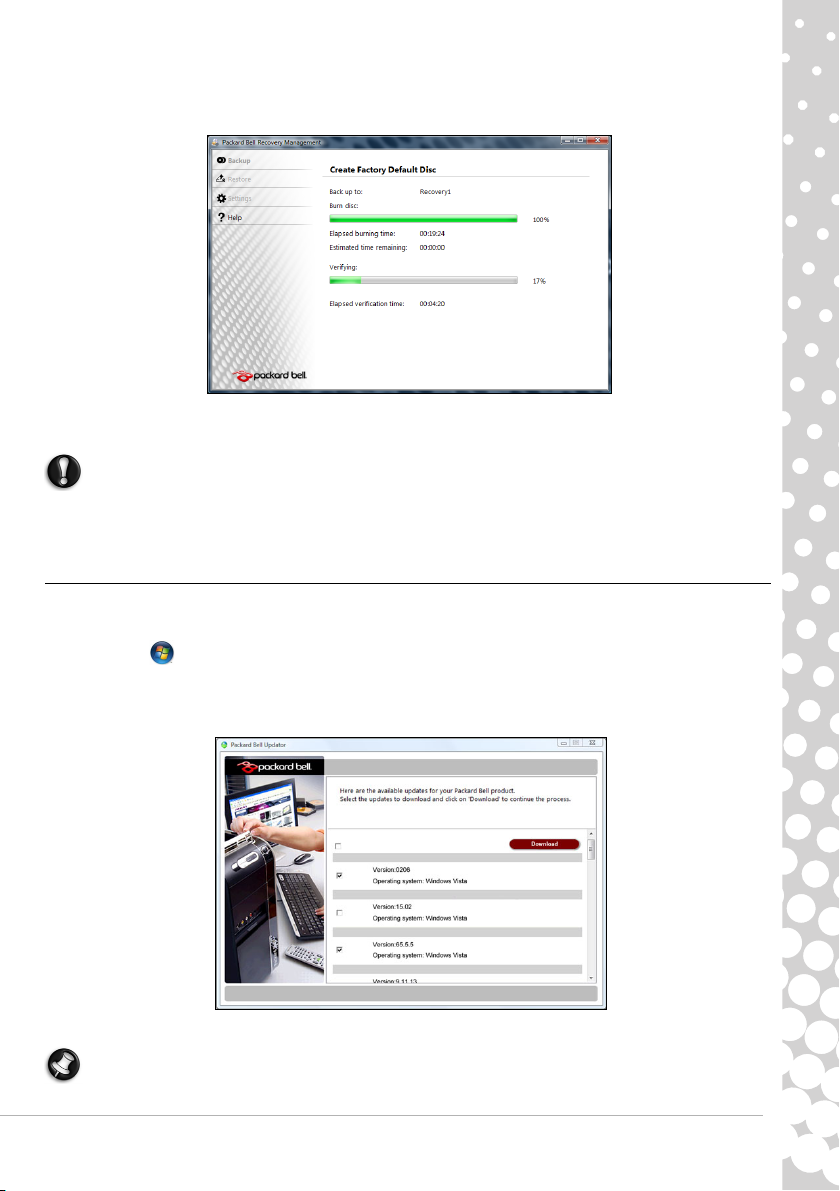
To prepare your computer for system recovery options, you should create a set of recovery discs as soon as possible. Recovery
discs take some time to create, but for long-term reliability, the effort is worth it.
Creating recovery discs
If your computer experiences problems that are not recoverable by other methods, you may need to reinstall the Windows
operating system and factory-loaded software and drivers. To reinstall using discs, you must create the set of recovery discs
beforehand. Throughout the process, you will be guided by on-screen instructions. Please read them carefully!
1. Click on Start > All Programs > Packard Bell, then click on Packard Bell Recovery Management. Packard Bell
Recovery Management opens.
2. To create recovery discs for the hard drive’s entire original contents, including Windows and all factory-loaded software
and drivers, click Create factory default disc.
- OR -
To create recovery discs for only the factory-loaded software and drivers, click Create driver and application backup disc.
Important: We recommend that you create each type of recovery disc as soon as possible.
The Create Backup Disc dialogue box opens.
This dialogue box tells you the number of blank, recordable discs you will need to complete the recovery discs. Make sure that
you have the required number of identical, blank discs ready before continuing.
Internet and Software - 17
3. Insert a blank disc into the drive indicated in the Burn to list, then click Next. The first disc begins recording, and you can
watch its progress on the screen.
When the disc finishes recording, the drive ejects it.
4. Remove the disc from the drive and mark it with a permanent marker.
Important: Write a unique, descriptive label on each disc, such as ‘ Windows Rec overy Disc 1 of 2’ or ‘Ap ps/
Drivers Recovery disc’.
5. If multiple discs are required, insert a new disc when prompted, then click OK. Continue recording discs until the process is
complete.
Packard Bell Updater
To ensure that your computer has the latest available updates for drivers and software, please use the Packard Bell Updater
program as soon as you have configured an Internet connection.
1. Click on Start > All Programs > Packard Bell - Security & Support > Packard Bell Updater or double-click the
Packard Bell Updater icon on the desktop and follow the instructions that are displayed.
2. Packard Bell Updater will search the Packard Bell support website for updates based on your system's serial number and
display a list of available updates.
3. Select the updates you wish to download and then install them.
Note: We recommend that you use this tool on a regular basis.
Loading...