


 Loading...
Packard bell IMEDIA 2579, 755, EASYNOTE BU45-O-002, EASYNOTE MZ36-R-017, IPOWER J8810 QUICK START & TROUBLESHOOTING GUIDE
...Quick Start & Troubleshooting |
|
|||
|
Guide |
|
||
TA B L E O F CO N T E N T S |
|
|||
Important Information |
3 |
Playing Multimedia Files .................... |
24 |
|
Computer Basics |
4 |
Volume Controls................................ |
26 |
|
Helpdesk |
28 |
|||
Safety and Comfort .................................... 4 |
||||
Safety Precautions ................................ 4 |
Safe Computing....................................... |
28 |
||
Health Precautions ............................... 4 |
Maintenance ..................................... |
28 |
||
Getting to Know your Computer................ 5 |
Updates ............................................. |
32 |
||
The Keyboard and Touchpad................ 5 |
Security ............................................. |
32 |
||
Your Computer’s Drives ....................... 6 |
Windows Remote Assistance.............. 37 |
|||
Power Supply....................................... 8 |
Diagnose & Repair ................................... |
38 |
||
Ports and Connectors ........................... 9 |
Top Troubleshooting Cases ................ |
38 |
||
Turning your Computer ON or OFF ... 11 |
Miscellaneous Troubleshooting .......... 44 |
|||
Upgrading your Computer.................. 12 |
Restoration and Recovery......................... 51 |
|||
First steps on the Net ............................... 14 |
Packard Bell Smart Restore................. |
51 |
||
Get Connected! ................................. 14 |
Packard Bell Recovery Program .......... 51 |
|||
Network connections ......................... 15 |
Packard Bell Limited Warranty |
55 |
||
Surf the Net! ...................................... 16 |
||||
Regulatory Information |
60 |
|||
Using Windows and your Software........... 19 |
||||
Windows Welcome Center................. 19 |
Environment |
63 |
||
Setup my PC...................................... 19 |
||||
|
|
|||
Packard Bell Recovery Backup Creator 19 |
Software License |
64 |
||
Packard Bell Updator.......................... 22 |
Index |
65 |
||
Your Computer's Documentation ....... 22 |
||||
Your Software .................................... 23 |
|
|
||
Table of Contents - 1

Copyright Notice
Packard Bell Quick Start & Troubleshooting Guide (NB). Copyright © 2008 Packard Bell B.V. All Rights Reserved. No part of this manual may be reproduced or transmitted, in any form or by any means, whether electronic, chemical, manual or otherwise, including but not limited to photocopying, recording, or information storage and retrieval systems, for any purpose without prior written permission of Packard Bell B.V.
Disclaimer
Packard Bell B.V. specifically disclaims all warranties, either express or implied, including, but not limited to, implied warranties of merchantability and fitness for a particular purpose with respect to this product and documentation. Updates to software and hardware components are made regularly. Therefore some of the instructions, specifications and pictures in this documentation may differ slightly from your particular situation. All items described in this guide are for illustration purposes only and may not apply to your particular situation. No legal rights or entitlements may be obtained from descriptions made in this manual. Packard Bell B.V. reserves the right to revise or make changes or improvements to this product or documentation at any time without obligation to notify any person of such revisions or improvements. In no event shall Packard Bell B.V. be liable for any consequential or incidental damages, including but not limited to loss of business profits or any other commercial damages, arising out of the use of this product.
Trademark
Microsoft and Windows Vista are registered trademarks of Microsoft Corporation. FireWire is a trademark of Apple Computer, Inc. Google is a registered trademark of Google Inc. Packard Bell is a registered trademark of Packard Bell B.V. All other company or product names are trademarks, registered trademarks or service marks of their respective owners.
2 - Quick Start & Troubleshooting Guide

IM P O R T A N T IN F O R M A T I O N
Thank you for purchasing a Packard Bell computer!
This guide has been designed to introduce you to the features of your computer and assist in your computing experience. It will also help you maintain your computer and troubleshoot in case you encounter a problem.
To make the most of your computer, Packard Bell recommends you perform the actions described below before you start working with your computer.
Setup my PC
To make it easy, Packard Bell has gathered all important setup steps in one application! Setup my PC will start automatically when you first turn on your computer, this is an easy step by step process to configure your Internet access, antivirus program, Identity card, etc. (see page 19 for details).
Packard Bell Recovery Backup Creator
Use Recovery Backup Creator (or Recovery DVD Creator) to copy your computer's recovery data to DVDs. No separate copies of the Windows discs and Microsoft utilities are provided. All the programs are included in your recovery data in a specific partition of your hard drive. Packard Bell recommends you create the recovery DVDs before you start to work with your new computer (see page 19 for details).
Packard Bell Updator
To ensure that your computer has the latest updates for drivers and software, please use the Packard Bell Updator program as soon as you have configured an Internet connection (see page 22 for details).
Packard Bell InfoCentre
To discover more about your computer, please make sure you check Packard Bell InfoCentre, the electronic user‘s guide installed on your computer. You need to update the guide at least once online (see page 22 for details).
Packard Bell Website
Remember to visit www.packardbell.com often! Check out the Support section: it contains our online Troubleshooter, up-to-date information, help, drivers and downloads.
Packard Bell Support
Make sure you write down your computer serial number, date and place of purchase and model name on the cover of this guide. Also, save your proof of purchase. If you call us, please write down any error message causing the problem, and have the computer in front of you and switched on if possible. Having these items to hand when contacting us will ensure better and quicker service.
Important Information - 3

CO M P U T E R BA S I C S
SAFETY AND COMFORT
Safety Precautions
Please follow the guidelines below to use your computer comfortably and to avoid health problems.
Computer Environment
Make sure that the computer:
is away from direct sunlight and sources of heat;
is away from magnetic fields or any device generating static electricity;
is kept at least 30 centimetres away from a mobile phone;
is not in a dusty or damp environment;
is not placed on a carpet or any other surface that may have an electrical charge.
Cables
Do not cover or place objects on the AC adapter. Keeping the adapter clear of objects allows the adapter to cool properly during use.
Only use the AC adapter that is supplied with your computer. Although other adapters may look similar, using them can damage your computer.
Cleaning your Computer
never spray cleaning product directly on the screen;
if you spill liquid on your computer, switch it off immediately, unplug the AC adapter, remove the battery and make sure it is completely dry before switching it on again. Wait overnight if necessary.
Health Precautions
If you work or play for hours at a time, then make sure you take regular breaks. Look away from the computer's screen once in a while. Do not use your computer if you are tired.
Arrange your computer so that you can work in a natural and relaxed position. Place items that you use frequently within easy reach.
Position your computer directly in front of you for increased safety and comfort. Ensure that your keyboard and touchpad are at a comfortable height. The screen should be about 45-70 cm from your eyes.
The computer’s underside, power adapter and the air from ventilation slots may become hot during use. Avoid continuous body contact and do not place the computer on your lap while it is operating.
Ensure that the computer’s ventilation slots and openings are never obstructed or covered. Do not place the computer on a soft surface (such as a carpet, chair or bed) that may block ventilation slots.
Some disorders of the hands, wrists, arms, neck, shoulders, legs and back may be associated with, or aggravated by certain repetitive actions. To reduce your risk of developing these disorders, type with your wrists straight and your hands and wrists floating above the keyboard. If you experience periods of pain, tingling, numbness or other discomfort, please contact your doctor.
We advise that parents monitor the use of games by their children. If you or your child experience any of the following symptoms: dizziness, blurred vision, eye or muscle twitches, loss of consciousness, disorientation, any involuntary movement or convulsion, IMMEDIATELY discontinue use and consult your doctor. This may happen even if the person has no medical history of epilepsy.
4 - Quick Start & Troubleshooting Guide
GETTING TO KNOW YOUR COMPUTER
The Keyboard and Touchpad
Keyboard
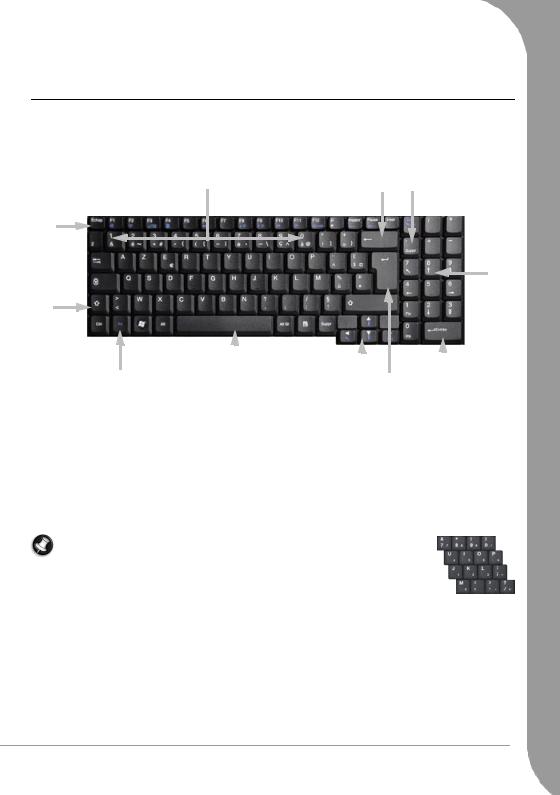
The keyboard is used to enter text or commands. The functions of the keys depend on the program you are using. The keyboard displayed in this guide is just an example. The layout of your keyboard may vary slightly. For a full description of your keyboard, please refer to InfoCentre.
|
|
|
|
|
|
|
|
|
|
|
|
|
|
|
|
||||
1.Numbers: Used to enter numbers and special characters. Press [Shift] simultaneously for characters on the top and press [Ctrl] + [Alt] for characters on the right.
2.Backspace: Used to go back one space and delete the last key pressed.
3.Del: Deletes characters to the right of the cursor or any highlighted item.
4.Numeric keypad: Functions as a second set of cursor keys. Press the [Numlock] key to enter numbers.
5.Arrow keys: Move the cursor up, down, left and right.
6.Enter: Press to enter a command, insert a paragraph break in a text or accept a chosen option.
7.Space: used to enter an empty space in your text.
8.Shift: Use simultaneously with a letter key to enter capital letters.
9.Esc: Cancels most current tasks.
10.Fn: Use simultaneously with the [F1] to [F12] keys (blue symbols) to activate special functions.
Note: To optimise space and weight, certain computers use compact keyboards that do not provide a numeric keypad. If this is the case, you may use the integrated keypad by activating Num Lock and using the keys with characters printed in blue (the keys in the centre-right of the keyboard). Press Num Lock again to return the keys to their normal functions.
Computer Basics - 5
Touchpad
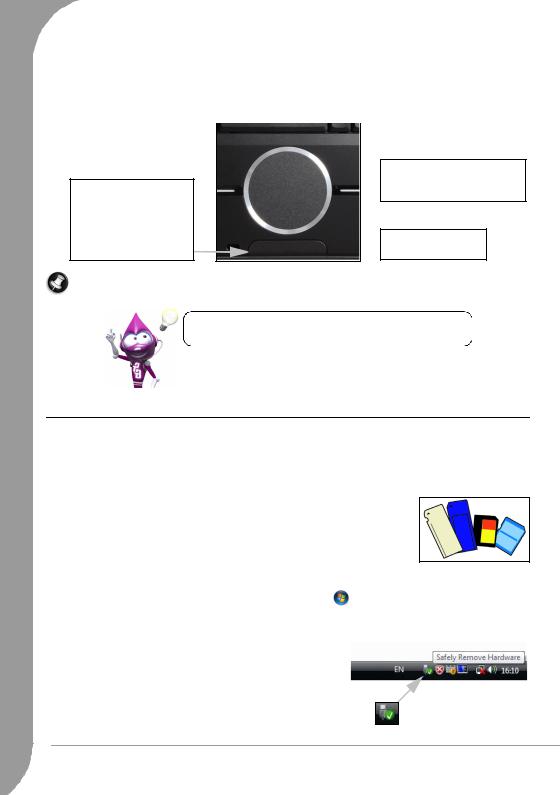
The touchpad controls the arrow on the screen  . This arrow is called the pointer or the cursor. When you slide your finger across the touch-sensitive pad, the pointer will follow this movement. Click one of the touchpad button to select or activate the command the cursor is pointing at. Ensure that you use a light touch on the touchpad surface.
Left-click to select the item under the pointer. Double-click to start the program under the cursor, or select an entire word when typing text.
Two quick taps on the surface  of a touchpad will perform the
same action as a double-click.
Right-click to bring up  a pop-up menu.
Note: You may connect a mouse to your computer. Simply connect it to your computer's USB port. This will not deactivate the touchpad function.
Improve the motion and visibility of the pointer! Click on ‘Start’  > Control Panel > Mouse > Pointer Options.
Your Computer’s Drives
The drives described below are commonly used on Packard Bell computers. However, this does not mean that they are present on the computer you have purchased, nor that it is limited to these drives. To view documentation specific to the model you have purchased, please check Packard Bell InfoCentre.
Memory Card Reader
Memory cards are used in a wide selection of digital cameras, PDAs, MP3 players and mobile phones. Selected computers include an “all-in-one” memory card reader that allows you to read and write the most common types, such as MMC (Multi Media Card™), SD (Secure Digital)™ or MS (Memory Stick®).
Formatting a Memory Card
Before using a card for the first time, it should be formatted.
1. |
Insert your card in the corresponding slot and click on ‘Start’ |
> Computer. |
2. |
Right-click on the card icon and select Format. |
|
3. |
Click on Start in the format window and then click on OK. |
|
|
Removing a card from an External Card Reader |
|
|
|
|
1. |
Click on the Safely Remove Hardware icon in the Notification |
|
|
Area (next to the clock). |
|
2. |
Click on Safely remove USB Mass Storage Device. |
|
3.Wait until a Safe to Remove Hardware message is displayed.
4.Remove the card.
6 - Quick Start & Troubleshooting Guide

Optical Drives
An optical drive is able to read from (or write to) a variety of CD or DVD discs (e.g. Audio CD, CD-ROM, DVD).
Read-only (ROM) drives
Some optical drives are only able to read information from a disc, they cannot be used to store new information. These drives can be used to watch films, install programs and read data such as photos or music.
Recordable (R) or Re-Writable (RW) Drives
In addition to reading data from compatible discs, the optical drive(s) provided with your computer may be able to write (or 'burn') information to appropriate discs. You can use these drives to duplicate your CDs, create your own music compilations, digital photo albums or keep a safe copy of your valuable data. Disc recording software must be used to write information to recordable discs.
Note: Before copying a CD, make sure that its content is not protected by Trademarks and Copyrights, and that you are authorised to replicate it. In most countries you are allowed to make an archival backup of software or copy music for your own personal use.
Disc Compatibility for Recordable Drives
•DVD±RW Writer: DVD±RW drives (or DVD Dual drives) can write to recordable CDs, recordable DVDs ('-' or '+').
•Double-Layer DVD-RW Writer: Double-Layer DVD-RW drives (or DVD+R9 DL drives) can write to recordable CDs and singleor double-layer recordable DVDs.
•Blu-ray Combo Drive: Blu-ray Combo drives can write to recordable CDs, all 'standard' recordable DVDs (but not 'HD' DVDs) and may read from (but not write to) Blu-ray discs.
•Blu-ray Writer: Blu-ray drives can write to recordable CDs, all 'standard' recordable DVDs and recordable Blu-ray discs.
Note: Discs and devices that use the HD DVD standard may not be used with Blu-ray devices.
Precautions
If a program needs a disc, insert the disc into the drive before you start the program.
Do not force a disc into the drive; make sure the disc is correctly inserted, then close the disc tray.
Do not eject the disc without first closing the program that is using the disc. This could potentially cause your computer to stop responding. Should this happen, restart your computer by using the Windows Task Manager.
If the tray does not eject, you may try to open it manually:
1.Switch your computer off.
2.Carefully insert a straightened paper clip into the emergency eject port (if available). Do not use a pencil as the lead may break inside the eject port and damage the drive.
Keep the disc tray closed whenever you are not using the drive. Do not touch the optical lens in the drive, if the lens is dirty, the optical drive may not function correctly.
Do not wipe the lens with a normal cloth. Use a cotton swab to gently clean the lens.
The optical drive is classified as a Class 1 laser product.
Note: This product incorporates copyright protection technology that is protected by U.S. patents and other intellectual property rights. Use of this copyright protection technology must be authorized by Macrovision, and is intended for home and other limited viewing uses only unless otherwise authorized by Macrovision. Reverse engineering or disassembly is prohibited.
Computer Basics - 7
Power Supply
Your computer requires a constant, stable power source to keep running. If you are at home then the AC adapter can be connected to a mains socket and used for as long as necessary. On the road, or if you simply want to avoid trailing wires, your computer's battery can power the computer.
AC Power Adapter
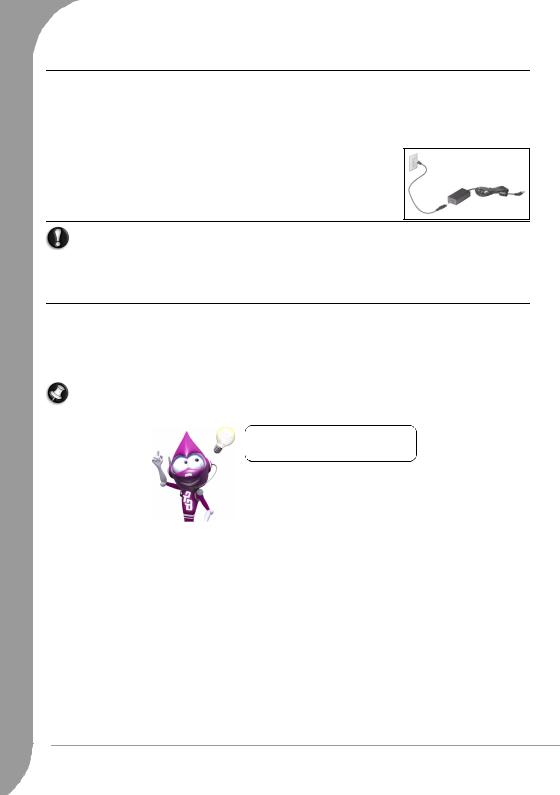
Your computer can use the supplied external power adapter (a power 'brick') to run on AC power. A power cable is provided that is appropriate for the country where the computer was purchased.
The power adapter provides adequate power to run your computer and recharge the battery pack at the same time.
Warning: Do not cover or place objects on the AC adapter. Keeping the adapter clear of objects allows the adapter to cool properly during use.
Only use the AC adapter that is supplied with your computer. Although other adapters may look similar, using them can damage your computer.
The AC adapter and the underside of the computer can become hot after prolonged use. This is normal, but may cause injury with prolonged contact.
Batteries
While you are away from an AC power supply, your computer uses a rechargeable battery. This battery can be removed, which allows you to carry multiple batteries for long journeys, or to replace an aged battery that has lost performance.
Note: Although the battery is charged at the factory, transit and shelf time may reduce the initial battery charge. The first time you use your computer, connect the AC power adapter and charge the battery completely.
Check InfoCentre to learn more about your computer’s battery.
Battery Life
Battery life depends on how the computer is used, the battery's capacity and the computer's design. Batteries will start to perform less effectively with age.
Extending Battery Life
While on the road, it is important to be aware of the simple things you can do to extend the life of the computer's main battery. Turning down the screen brightness extends battery life (most computers reduce screen brightness automatically when using battery power). Battery life is best under the following conditions:
The battery is new and fully charged.
No peripherals (such as ExpressCards) or options (such as Wireless LAN features) are active or connected to your computer.
The computer's hard disk drive, optical drive and processor are idling or under low load.
Power management features are active. You may change the power settings of your computer by clicking on ‘Start’ > Control Panel > Power Options.
Certain battery types require maintenance to avoid a reduction in battery life.
8 - Quick Start & Troubleshooting Guide

Do not leave your battery in direct sunlight. Extreme temperatures can affect the performance of your battery. It’s best to use and charge your battery at room temperatures.
Replacing Batteries
Battery packs can be removed and replaced. Read the precautions on handling the battery before changing the battery.
A small lithium battery (‘CMOS’ battery) in some computers maintains basic configuration information (such as the time and date). In the event that the battery fails to maintain this information, we recommend that you contact a qualified technician who may replace this battery.
Battery Precautions and Disposal
Batteries contain a mix of chemicals that should be treated with care. Before disposing of the battery, put adhesive tape over the terminals. Do not disassemble the battery.
Do not place used batteries in your regular waste. Ultimate disposal of the batteries should be handled according to all national laws and regulations. Contact your local waste management officials for information regarding environmentally sound collection, recycling and disposal of batteries.
There is a danger of explosion if the battery is incorrectly replaced. Replace only with the same or equivalent type recommended by the manufacturer.
Ports and Connectors
The ports and connector types described below are commonly used on Packard Bell computers. However, this does not mean that they are present on the computer you have purchased, nor that it is limited to these ports. To view documentation specific to the model you have purchased, please check InfoCentre.
Precautions
Before you attach any device, check the installation instructions that were supplied with it.
Do not remove a device if the computer is using it.
Most devices may be added or removed while the computer is on. They will be detected and installed automatically. However, they must be deactivated before they can be removed from the computer (for example, see Removing a card from an External Card Reader on page 6).
Communication Ports
Network - Connect your computer to a network (‘LAN’) or certain high-speed Internet connections.
Modem - An internal fax/data modem connects you to the Internet over a dial-up connection.
A network port looks very similar to a modem port; they are often situated near each other. The network port is slightly larger than the modem port.
Warning: In thunderstorm conditions, make sure that you disconnect all your connection cables; unplug the modem from the telephone line, the TV port from the aerial socket and any network cable. A lightning strike to nearby telephone lines or an aerial could damage your modem, network or TV card or even your whole computer. Please note that the product warranty does not apply if damage to your computer is the result of a lightning strike.
Expansion Ports
USB (Universal Serial Bus) - USB ports allow you to connect many peripheral devices to your computer (for example: keyboard, printer, scanner).
IEEE 1394 (FireWire) - An IEEE 1394 port (aka FireWire™ or i.LINK) allows you to connect highspeed digital devices to your computer, such as digital video cameras, external hard disk drives, or scanners.
Computer Basics - 9

ExpressCard - This slot allows you to use an ExpressCard/34 or ExpressCard/54 expansion card.
Note: It is not possible to use a PC Card device in an ExpressCard slot.
eSATA - An eSATA port allows you to connect a compatible external storage device (usually a hard disk drive) with a high-speed SATA connection.
Display and Audio Ports
VGA Port - Connect to a monitor with a VGA port. The appropriate cable is usually included with the monitor.
DVI Port - Connect to a monitor with a DVI (Digital Video Interface) port. The appropriate cable is usually included with the monitor.
Note: Many monitors use a 15-pin analogue connection, so you may need to purchase an adapter or a DVI-to-Analogue cable.
S-Video (TV-Out) Connection - An S-Video TV-Out port allows you to connect a compatible television.
HDMI (TV-Out) Connection - An HDMI TV-Out port allows you to connect a compatible display device (such as a high-definition television) with a single, easy-to-use connector.
Caution: If you want to use your television's speakers, you must change the audio output (see page 26)or connect the Line-Out port of your computer to your television (or a speaker system).
Line-Out - Lets you plug in stereo headphones or powered speakers. Plugging in an audio device disables any built-in speakers.
Microphone - Allows you to connect an external microphone for mono recording or amplification through the unit. Plugging in an external microphone disables the built-in microphone.
Other Connectors
Memory Card Reader - Memory cards are used to store and transfer data by a wide selection of digital cameras, PDAs, MP3 players and mobile phones (see page 6).
TV Tuner - Allows you to connect an aerial and watch analogue or digital television on your computer (see page 24). An adapter may be required to connect to an aerial - if your computer features two TV tuner ports, use a splitter cable to connect both ports to an aerial.
Note: The TV tuner must be compatible with signals in your area.
AC Adapter (DC In) - Lets you attach the computer to the the supplied AC adapter. The computer requires a Packard Bell-certified adapter.
Other Features
Remote Control Receiver - The remote control receiver (Commercial IR) allows you to control the media functions of your computer from a distance when used with a compatible remote control (optional).
Caution: The sensor is not an 'full' IR port and can only receive signals from a remote control. It cannot be used to communicate with a mobile telephone.
Kensington Lock Fixture - This fixture allows you to attach a Kensington security lock or other compatible lock to protect your computer from theft.
10 - Quick Start & Troubleshooting Guide
Turning your Computer ON or OFF
Turning your Computer ON
1.First, switch ON any devices connected to your computer by pressing the main power button on these devices.
2.Then switch ON your computer by pressing the main power button.
To share the family computer and have your own system settings every time you turn on the computer, you can set up accounts for each user. You can access and modify your accounts at any time by clicking on ‘Start’ > Control Panel > User Accounts. To learn more about user account management, please see the section User Account Control on page 37.
Sleep mode
Click on the Sleep button to save your session and put the computer in a low-power state so that you may quickly resume working (see the Power Options section on page 12 for details).
Note: You may also put your computer into sleep mode without going to the Windows Start menu. Simply close all your applications and press the power button.
Turning your Computer OFF
Make sure all applications are closed before you turn off your computer. Turning off your computer will ensure that a data is saved and it will use as little power as possible (there may be a small power drain to charge batteries), however your computer will take longer to start.
Once the computer has shut down, switch OFF all external devices if they have a power button.
Computer Basics - 11
Forced Shutdown
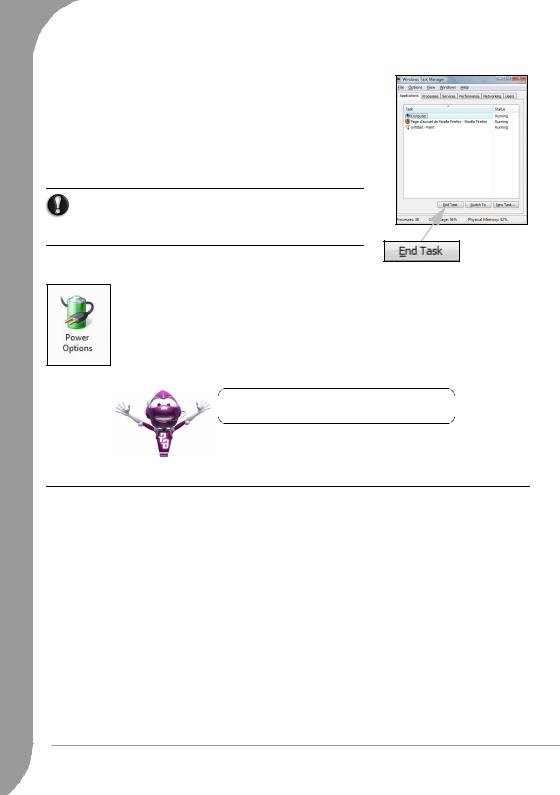
If your computer doesn’t respond, then try using the Task Manager. This utility provides information about your system’s performance and displays details about programs and processes running on your computer.
To do so, press the [Ctrl]+[Alt]+[Del] keys simultaneously and select Start Task Manager in the pop up menu.
Click on the Applications tab, select the task that you want to end and click on End Task.
Warning: If your computer still does not respond, press the computer power button to turn your computer off. Keep this button pressed until all of the LEDs turn off and wait for roughly 30 seconds before turning the computer on again.
Power Options
The power options of Windows can control your computer’s power state and allow you to save energy. Depending on your needs, you can define the power scheme that suits you best. Four power saving modes are provided: Turn off device, Standby, Hibernate and Sleep.
The Sleep state combines the speed of Standby with the data protection features and low power consumption of Hibernate. Resuming use when your computer is in the Sleep state takes just a few seconds. You can shut down and restart your computer less often. The Sleep state not only reduces power consumption, but also helps protect your data.
To learn more about personalising your computer, click on Start  > Help and Support.
Upgrading your Computer
Packard Bell strives to make your computing experience as easy and pleasant as possible. Because your computing needs may evolve, Packard Bell is here to help you choose the right accessories and make the most of your computer.
Memory
Memory (RAM) is a key component of your computer. If you run memory-intensive applications such as image or digital-video editing or 3D games, adding some memory will increase the computer performance and help your computer run faster.
To help you find out the memory module that is best suited to your Packard Bell computer, you can use our online configurator on www.packardbell.com! The step-by-step configurator is your best pick to find the right module quickly and easily with no risk of error, at a competitive price.
Storage (e.g. External Hard Disk Drive)
Whether you need additional storage space, need to create backups or need removable storage to carry your data, an external hard disk drive will be a convenient solution to expand your computer. Simply plug it into a USB port and "drag and drop" to transfer your valuable data in a few seconds. To make temporary backups, this is a lot quicker than burning a CD or DVD! High capacity drives are also ideal for storing your favourite music, photos and videos and take them with you everywhere you go!
12 - Quick Start & Troubleshooting Guide

Visit www.packardbell.com to discover our accessories and buy online or locate a store near you!
Convergence
Packard Bell aims at making the most of today's increasingly digital world with products that are ideally suited to popular and emerging digital activities. Our products integrate the best technologies and allow you to benefit from the latest advances, such as broadband Internet, WiFi networking and digital media. Our home entertainment range includes a collection of MP3 players to bring technology and entertainment with you wherever you go!
Visit www.packardbell.com today and enter the Lounge, where technology is always stress-free and personally enriching!
Warranty
Packard Bell computers come with a limited warranty. For further peace of mind, optional PB Care packs let you extend the standard warranty up to three years (one year + two additional years) and upgrade to on-site service for your computer. For information, please visit www.packardbell.com.
If your warranty has expired, or if PB Care packs are not available in your area, don't worry, Packard Bell has the answer. Packard Bell has appointed Authorised Service Centers to provide you with high quality service! You will benefit from the service of experienced technicians, trained on your Packard Bell product.
Recycling
You just bought a new computer and wonder what you can do with your old equipment? Don't just throw it out! Packard Bell encourages you to recycle!
Most computer equipment contains hazardous materials, which are best kept out of landfills. Through recycling, many materials used in computers can be recovered and used again. Many charitable organizations collect computer equipment, other companies can repair and sell used computers.
Please refer to Regulatory Information on page 60 to learn more about product disposal.
Computer Basics - 13
CO M P U T
FIRST STEPS ON THE NET
Get Connected!
Using the Internet has become natural part of daily computing. To make it easier, Packard Bell has included tools to help you get started!
Internet Service Provider
To get connected, you need to register with an Internet Service Provider (ISP), which supplies the physical connection between your computer and the Internet. Certain computers come with a selection of ISPs already preinstalled.
If you wish to use an ISP that is not proposed, please refer to the instructions supplied with the installation pack from the ISP.
Connection Types
Depending on your computer model, your location and your communication needs, you have several ways to connect to the Internet.
Dial-Up
Most computers include a standard dial-up (‘modem’) connector. This allows you to connect to the Internet using the telephone line. With a dial-up connection, you cannot use the modem and the telephone simultaneously on a single phone line. This type of connection is recommended only if you have limited use of the Internet as the connection speed is low and connection time is typically charged per hour.
DSL (e.g. ADSL)
DSL (Digital Subscriber Line) is an ‘always-on’ connection that runs over the phone line. As DSL and phone do not use the same frequencies, you can use your telephone at the same time you are connected to the Internet (this requires a ‘micro-filter’ on each telephone socket to avoid interference). To be eligible for DSL, you must be located near an DSL-equipped phone exchange (service is sometimes unavailable in rural areas). Connection speeds vary depending on your location, but DSL generally provides very fast and reliable Internet connection. As the connection is always-on, it is generally charged at fixed monthly rates.
Note: A DSL connection requires an appropriate modem. A modem is usually provided by the ISP when you register. Many of these modems include an ‘router’ that provides network and Wi-fi access.
Cable
A cable connection provides fast and ‘always-on’ Internet service via a cable television line. This service is generally available in large cities. You can use your telephone and watch cable TV at the same time you are connected to the Internet.
14 - Quick Start & Troubleshooting Guide

Network connections
A LAN (Local Area Network) is a group of computers (for example, within an office building or home) that share a common communications line and resources. When you set up a network, you can share files, peripheral devices (such as a printer) and an Internet connection. You can set up a LAN using wired technologies (such as Ethernet) or wireless technologies (such as WiFi or Bluetooth).
Wireless networks
A wireless LAN or WLAN is a wireless local area network, which may link two or more computers without using wires. Setting up a wireless network is easy and allows you to share files, peripheral devices and an Internet connection.
Note: More detailed information is available in the InfoCentre wireless networks tutorial.
What are Benefits of a Wireless Network?
Mobility
Wireless LAN systems allow allows you and other user’s of your home network to share access to files and devices connected to the network, for example a printer or scanner.
Also you can share an internet connection with other computers in your home.
Installation Speed and Simplicity
Installing a wireless LAN system can be fast and easy and eliminates the need to pull cables through walls and ceilings.
Components of a Wireless LAN
To set up your Wireless network at home you need to have the following:
Access point (router)
Access points (routers) are two-way transceivers that broadcast data into the surrounding environment. Access points act as a mediator between wired and wireless network. Most routers have a built-in DSL modem that will allow you access to a high speed DSL internet connection. The ISP (Internet Service Provider) you have chosen normally supplies a modem/router with the subscription to their services. Read carefully the documentation supplied with your Access point/router for detailed setup instructions.
Network Cable (RJ45)
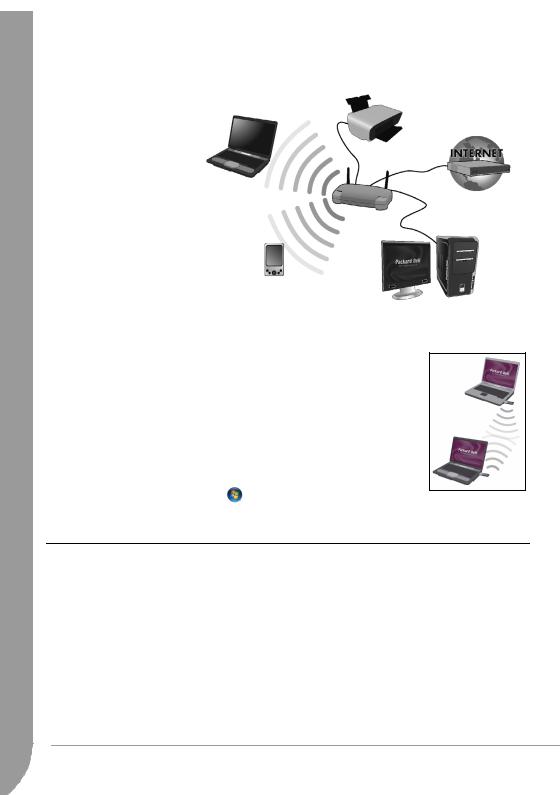
A network cable (also called RJ45 cable) is used to connect the host computer to the access point (see illustration below); this type of cable may also be used to connect peripheral devices to the access point.
Wireless Adapter
An internal wireless adapter is normally already installed in your computer. If this is not the case, you may purchase a USB WiFi adapter. Connect this to one of your computer's USB ports to access a wireless network.
Computer Basics - 15
|
Diagram |
of a working network |
|
|
|
|
1. |
Access point/router |
|
|
|
|
|
|
|
|
|
|||
2. |
Desktop computer |
|
|
|
|
|
3. |
Modem |
|
|
|
||
4. |
Printer |
|
|
|
||
5. |
Portable computer |
|
|
|
||
6. |
PDA/Smartphone |
|
|
|
|
|
7. |
Network cables (RJ45) |
|
|
|||
|
|
|
||||
|
|
|
|
|
|
|
|
|
|
|
|
|
|
|
|
|
|
|
|
|
|
|
|
|
|
|
|
|
|
|
|
|
|
|
Ad-Hoc internet sharing
The Internet Connection Sharing (ICS) feature of Microsoft Windows Vista allows you to share a single Internet connection with multiple computers. Built-in support for IEEE 802.11 wireless LANs (WLANs) allows you to create an ad-hoc wireless network. These two features can be used together to share a wired Internet connection with the members of an ad-hoc wireless network. This is the method of connection if you do not possess an Access Point (router).
Turning On/Off a WiFi Network Connection
Most computers feature a ‘WiFi’ button that turns the network connection on or off. If your computer does not feature a ‘WiFi’ button, you may turn your wireless network on or off, or control what is shared over the network with the network management options. Click on ‘Start’ > Network > Network and Sharing Center.
Surf the Net!
To surf the Internet, you need a program called an Internet browser. Internet Explorer provides an easy and secure web browsing experience. As soon as you have your Internet access installed and you are connected, click on the Internet Explorer shortcut located on the Windows desktop and take your Internet experience to a new level!
16 - Quick Start & Troubleshooting Guide

Internet Explorer features
The image below shows the Internet Explorer browser’s start page. A brief description of some key aspects of the browser are listed below.
|
|
|
|
|
|
|
|
|
|
|
|
|
|
|
|
|
|
|
|
|
|
|
|
1.Link to the Help menu: click to access the Internet Explorer Help section. There you can find information about Internet Explorer and take the Internet Explorer Tour. You may also press [F1] on your keyboard.
2.Reduce, maximize or close the window.
3.Address bar: Type in an Internet address (ex: www.packardbell.com) and press the Enter key on your keyboard, this will take you directly to the address you typed.
4.Instant Search Box: Search the web without having to open a search provider page. You can customize your search by setting your favorite search provider as the default. Use the dropdown list to choose a provider.
5.Back and Forward buttons: go back one page or forward one page while you are browsing.
6.Tabs: View multiple sites in a single browser window by switching from one site to another through tabs at the top of the browser frame.
7.Quick tabs: Select and navigate through open tabs by displaying thumbnails of them all in a single window.
8.Favourites Center: Manage your favourite websites, your browsing history and your RSS Feed subscriptions in just a few clicks.
9.RSS feeds: allow you to keep up with your favourite websites in an automated manner. An illuminated icon on the toolbar indicates that the site offers a feed to which you can subscribe, in order to be notified when content is updated. Your browser delivers the information to your Favourites Center. Now you can read news headlines, sports scores, etc. as soon as they arrive.
Caution: Internet Explorer includes a Phishing Filter that warns you about and helps to protect you from potential or known fraudulent websites (sites that look legitimate but actually are designed to capture your personal information). The address bar will turn yellow and a warning message will be displayed if you visit a suspected phishing site.
Google Desktop (optional)
Google Desktop™ is a free pre-installed application that allows you to easily search and personalise your Packard Bell computer. Google Desktop provides full-text search over your email, files, music, photos, chats, Web pages you've viewed, and more. By making your computer searchable, Google Desktop puts your information easily within your reach and frees
you from having to manually organise your files. Google Desktop also helps you gather new information from the Internet with Sidebar and Google Gadgets, visually appealing mini-applications that can display anything such as your new email, the local weather forecast to personalised news. With Google Desktop, you get
Computer Basics - 17

personalised information when you want it, right on your computer’s desktop. Simply click on the Google Desktop search icon to start the program.
Picasa (optional)
Google's photo organiser, Picasa™, is also installed on your new Packard Bell computer, which means you can easily find, edit and share all your digital photos.
This is the software that should have come with your digital camera. Each time you open Picasa, it automatically locates all your pictures (even the
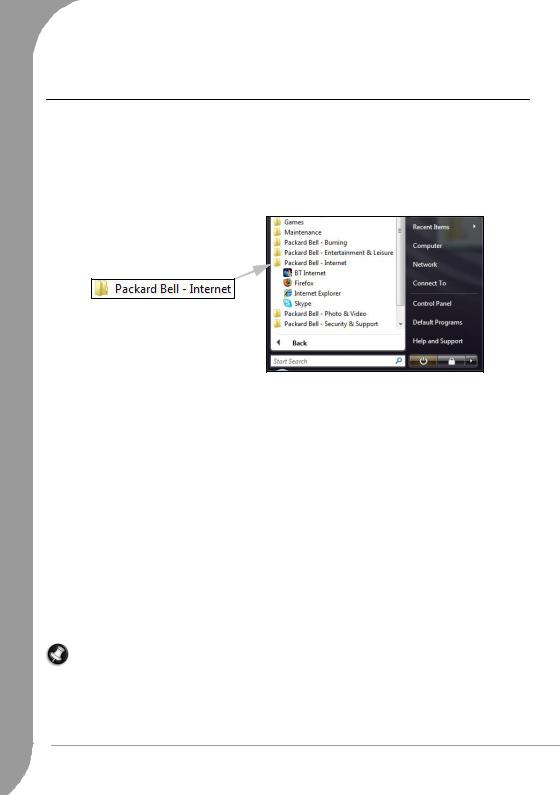
ones you forgot you had) and sorts them into visual albums organised by date with folder names you know. You can drag and drop to arrange your albums and make labels to create new groups. Picasa also makes advanced editing simple by putting one-click fixes and powerful effects at your fingertips. You can find Picasa in the list of installed programs: click on ‘Start’  > All Programs > Packard Bell - Photo/Video > Picasa.
Note: To learn more about Google™ products and features, visit www.google.com.
Packard Bell Website
To get you started why not visit our website, www.packardbell.com. (Click on Select your country on the top of the page)
Packard Bell is dedicated to provide you with on-going personalised support. Check out our Support section to get help tailored to your needs:
The Identification section can recognize your computer serial number and instantly give you all information specific to your computer!
The Troubleshooter can help you find solutions in case you have a problem with your computer (may not be available in all countries).
Enter keywords in the Search box and find all the support articles related to your search!
Enter the Downloads area to search for and download driver updates for your computer, as well as patches and upgrades for programs and firmware.
Share your experiences with other Packard Bell users and find help in the User Forum.
You can also search for product information by range or category, read about your warranty and find contact information.
To learn more about the latest technologies offered by Packard Bell, check out our Product Showroom. With the Shopping section, you can also locate a store near you, or get the latest Packard Bell products delivered straight to your home in a few clicks!
www.packardbell.com is your gateway to a world of online activities and services: visit us regularly for the latest information and downloads!
18 - Quick Start & Troubleshooting Guide

USING WINDOWS AND YOUR SOFTWARE
Windows Welcome Center
The first time you turn on your computer, the Welcome Center window opens. The Welcome Center introduces you to the new features and tools of Windows Vista. You can access the Welcome Center at any time by clicking on ‘Start’  > Control Panel.
Setup my PC
To make it easy, Packard Bell has gathered all important setup steps into one application called Setup my PC. The Setup my PC application will automatically start when you first turn on your computer. A wizard will guide you through the steps to install your Internet access, antivirus software, telephone and gaming programs, Recovery Backup Creator, and print your PC Identity Card. Simply select the items you wish to install and follow the prompts!
Note: The number of options may differ according to your computer model and region.
Caution: Even if you do not use Setup my PC, you should use the Recovery Backup Creator as early as possible.
Packard Bell Recovery Backup Creator
The recovery backup creator (Recovery DVD Creator or Recovery Disk Creator) allows you to make a safe copy of the recovery data stored on your hard disk drive.
Computer Basics - 19

Note: Certain computers are provided with Recovery DVDs instead of the recovery data on the computer's hard disk drive. In this case, the Recovery DVD Creator program is not required. See page 51 for information on using the Recovery DVDs.
Recovery DVD Creator is only available on computers featuring a DVD writer. If your computer was not originally equipped with a DVD writer, and Smart Restore proposes the Create my Recovery disk option (instead of the Recovery DVD Creator) then you may copy the recovery data to an external USB hard disk drive.
Please read carefully before using the recovery backup creator:
The recovery data contains all the programs that were originally supplied with your computer, including your operating system.
No separate copies of the Windows discs and Microsoft utilities are provided.
The Recovery DVDs that you create will only contain the software that was originally on the hard disk of your computer when it left the factory. Your personal files and other software that you have installed will not be copied.
This operation takes time. During the whole process, do not shut down the computer or run any other programs.
Should a power failure occur while you are creating your recovery disk, please restart the recovery backup creator at the earliest opportunity.
If you are creating Recovery DVDs, you will need:
At least one blank recordable DVD; do not use rewritable DVDs.
A CD marker pen to label your discs. Do not use stickers on the disc faces.
If you are creating a Recovery Disk, you will need:
An external USB hard disk drive capable of holding at least 8GB (exact size needed depends on your computer’s configuration).
Certain external disks are not compatible with the recovery process. Once created, always test the disk to check compatibility with the recovery process (see page 21).
Creating your Recovery Disk |
|
To create a recovery disk, open Smart Restore, select ‘Start’ |
> All Programs > Packard Bell - Security & |
Support > Smart Restore. Select Create my Recovery DVD (or in some cases Create my recovery disk) then click on the Create my Recovery DVD button to start the process. Throughout the process, you will be guided by on-screen instructions. Please read them carefully!
|
|
20 - Quick Start & Troubleshooting Guide
Loading...