

Page 1
LÁMPARA SOLAR DE JARDÍN / LÁMPARA SOLAR REDONDA / LAMPADA DA
GIARDINO AD ENERGIA SOLARE / SFERA LUMINOSA AD ENERGIA SOLARE
LÁMPARA SOLAR DE JARDÍN /
LÁMPARA SOLAR REDONDA
Instrucciones de montaje, de uso y de seguridad
SOLAR GARDEN LIGHT /
SOLAR LIGHT BALL
Assembly, operating and safety instructions
LAMPADA DA GIARDINO AD
ENERGIA SOL ARE / SFERA
LUMINOSA AD ENERGIA SOLARE
Istruzioni di montaggio, d’uso e di sicurezza
SOLAR-GARTENLEUCHTE /
SOLAR-LEUCHTKUGEL
Montage-, Bedienungs- und Sicherheitshinweise
IAN 106345
106345_livx_LED-Solar-Gartenleuchten_Modell-D_E_Cover_ES_IT.indd 4 14.11.14 12:15
Page 2
ES Instrucciones de montaje, de uso y de seguridad Página 5
IT / MT Istruzioni di montaggio, d’uso e di sicurezza Pagina 13
GB / MT Assembly, operating and safety instructions Page 21
DE / AT / CH Montage-, Bedienungs- und Sicherheitshinweise Seite 29
106345_livx_LED-Solar-Gartenleuchten_Modell-D_E_Cover_ES_IT.indd 5 14.11.14 12:15
Page 3
A B
1
2
2
E
35 4
106345-14-01
C D
1
7
8
9
10
6
1
3
106345_livx_LED-Solar-Gartenleuchten_Modell-D_E_Content_ES_IT.indd 3 14.11.14 12:12
Page 4
F G
106345-14-02
5
1
2
3
4
5 6
H
J
7
5
6
I
8
4
106345_livx_LED-Solar-Gartenleuchten_Modell-D_E_Content_ES_IT.indd 4 14.11.14 12:12
Page 5

Uso adecuado .............................................................................................................. Página 6
Descripción de las piezas .................................................................................... Página 6
Contenido ......................................................................................................................... Página 6
Características técnicas ......................................................................................... Página 6
Indicaciones generales de seguridad
Indicaciones de seguridad específicas del producto ........................................................ Página 7
Indicaciones de seguridad sobre baterías ......................................................................... Página 8
Funcionamiento .......................................................................................................... Página 8
Puesta en funcionamiento
Montaje ................................................................................................................................ Página 8
Cómo colocar la lámpara ................................................................................................... Página 9
Sustitución de las baterías ................................................................................. Página 9
Limpieza y conservación ..................................................................................... Página 10
Solución de problemas ......................................................................................... Página 11
Desecho del producto ............................................................................................ Página 11
Garantía ............................................................................................................................ Página 12
5 ES
106345_livx_LED-Solar-Gartenleuchten_Modell-D_E_Content_ES_IT.indd 5 14.11.14 12:12
Page 6
Lámpara solar de jardín /
Lámpara solar redonda
Uso adecuado
La lámpara solar sirve para iluminar espacios
exteriores. Este producto no ha sido concebido
para un uso comercial.
Este producto no es apto para la
iluminación ordinaria de las habitaciones domésticas.
Descripción de las piezas
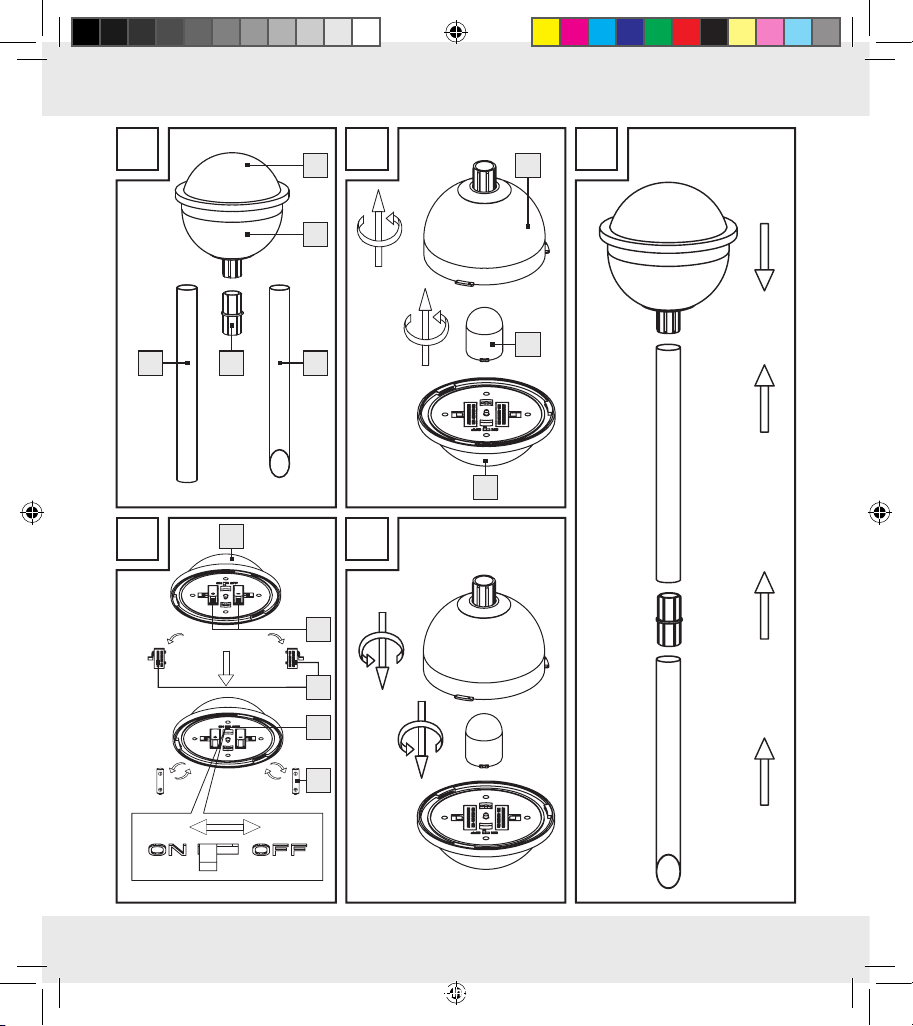
Modelo 106345-14-01
1
Unidad funcional (con célula solar
incorporada)
2
Pantalla de la lámpara
3
Piqueta
4
Conector
5
Tubo vertical
6
Tapa LED
7
Compartimento para baterías
8
Tapa del compartimento para baterías
9
Interruptor ENCENDIDO / APAGADO
10
Batería
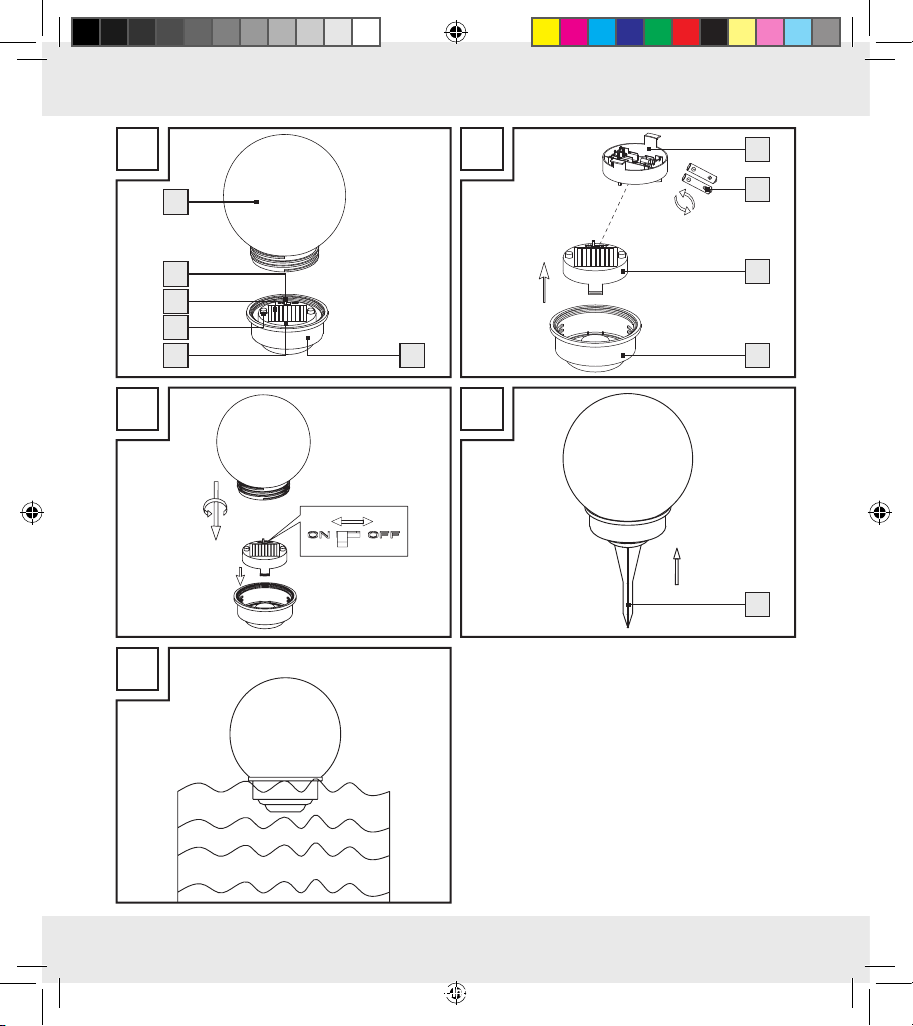
Modelo 106345-14-02
1
Pantalla de la lámpara
2
Interruptor ENCENDIDO / APAGADO
3
Placa solar
4
LED
5
Compartimento para baterías
6
Placa de base
7
Batería
8
Piqueta
Contenido
Compruebe siempre inmediatamente después
de desembalar el producto la integridad del
contenido y el perfecto estado del aparato.
Modelo 106345-14-01
1 lámpara solar de jardín
1 tubo vertical
1 conector
1 piqueta
2 baterías tipo NiMH, AAA, 1,2 V, 600 mAh
1 manual de instrucciones de montaje y manejo
Modelo 106345-14-02
1 lámpara solar de jardín
1 piqueta
2 baterías tipo NiMH, AAA, 1,2 V, 600 mAh
1 manual de instrucciones de montaje y manejo
Características técnicas
Modelo 106345-14-01
Batería: 2 x batería NiMH 1,2 V,
600 mAh, tamaño AAA
Bombilla: 1 x LED RGB de 0,06 W
(LED no reemplazable)
6 ES
106345_livx_LED-Solar-Gartenleuchten_Modell-D_E_Content_ES_IT.indd 6 14.11.14 12:12
Page 7
Tipo de protección: IP43 (protección contra
lluvia hasta 30 % de inclinación)
Placa solar: 60 x 60 mm, monocristalino
Modelo 106345-14-02
Batería: 2 x batería NiMH 1,2 V,
600 mAh, tamaño AAA
Bombillas: 2 x LED de 0,075 W (LED
no son intercambiables)
Tipo de protección: IP67 (protección contra la
entrada de agua sin presión)
Placa solar: 45 x 45 mm, monocristalino
Indicaciones generales
de seguridad
¡Familiarícese con todas las instrucciones de uso y seguridad antes de
utilizar este producto! si entrega
este producto a terceros, ¡no olvide
adjuntar igualmente toda la documentación!
¡PELIGRO DE MUERTE Y
ACCIDENTE PARA BEBÉS
Y NIÑOS! Nunca deje a los niños con el
material de embalaje sin vigilancia. Existe
peligro de asfixia con el material de embalaje. Los niños no suelen ser conscientes del
peligro. Mantenga el material del embalaje
fuera del alcance de los niños.
Este producto no es un juguete.
Este producto puede ser utilizado por niños
mayores de 8 años, así como por personas
con capacidades físicas, sensoriales o mentales reducidas o que cuenten con poca
experiencia y / o falta de conocimientos,
siempre y cuando se les haya enseñado
cómo utilizar el aparato de forma segura y
hayan comprendido los peligros que pueden
resultar de un mal uso del mismo. No permita que los niños jueguen con el producto.
La limpieza y mantenimiento no deben llevarse a cabo por niños sin la vigilancia de
un adulto.
No utilice el producto si detecta cualquier
desperfecto.
Indicaciones de seguridad
específicas del producto
Las bajas temperaturas influyen negativa-
mente en la duración de las baterías. Si no
va a utilizar la lámpara solar durante un
periodo prolongado, por ej. en invierno, le
recomendamos que la limpie y la guarde
en un lugar seco y cálido.
Procure que la célula solar no se ensucie o
se cubra de nieve y hielo en invierno. Esto
disminuye la potencia de la célula solar.
7 ES
106345_livx_LED-Solar-Gartenleuchten_Modell-D_E_Content_ES_IT.indd 7 14.11.14 12:12
Page 8
Indicaciones de seguri-
dad sobre baterías
¡PELIGRO DE
MUERTE! Mantenga las baterías fuera del al-
cance de los niños. ¡En caso de ingestión,
acuda inmediatamente a un médico!
¡CUIDADO!
¡PELIGRO DE EXPLOSIÓN!
No tire las baterías al fuego o al agua.
No aplique a las baterías ninguna carga
mecánica.
No utilice baterías no recargables.
No ponga las baterías en cortocircuito ni
las abra.
Peligro de daños materiales
Utilice únicamente el tipo de baterías
indicado.
¡Al colocar el producto preste atención a la
polaridad correcta! ¡Esta se especifica en
el compartimento de las baterías!
En caso necesario, limpie los contactos de
las pilas y del aparato antes de introducirlas.
Funcionamiento
La célula solar incorporada del artículo transf
la luz del sol en energía eléctrica y la almacena
en dos baterías NiMH.
La luz se enciende cuando comienza a oscurecer.
Los diodos de luz incorporados constituyen una
orma
bombilla de larga duración y de ahorro energético. La duración de la luz depende de la radiación solar, del ángulo de incidencia de la luz
sobre la célula solar y de la temperatura (debido a la dependencia de la temperatura de la
batería). El ángulo de incidencia ideal es vertical
con temperaturas por encima del punto de congelación. El acumulador no llega a su capacidad
máxima hasta completar varios ciclos de carga
y descarga.
Puesta en funcionamiento
Montaje
Modelo 106345-14-01
Monte la lámpara solar como se indica en
las imágenes A–E.
Retire la unidad funcional 1 girando la
pantalla de la lámpara en sentido contrario
a las agujas del reloj
2
(imagen B).
Para encender la lámpara ponga el Interrup-
tor ENCENDIDO / APAGADO 9 en posic
ión
ON (imagen C).
Vuelva a colocar la unidad funcional en la
pantalla de la lámpara y ajústela girando en
el sentido de las agujas del reloj (imagen B).
Introduzca la pantalla de la lámpara en el
tubo vertical
5
(imagen E).
Coloque el tubo vertical con ayuda del co-
4
nector
en la piqueta 3 (imagen E).
8 ES
106345_livx_LED-Solar-Gartenleuchten_Modell-D_E_Content_ES_IT.indd 8 14.11.14 12:12
Page 9
Modelo 106345-14-02
Monte la lámpara solar como se indica en
las imágenes F–J.
Retire la placa de base 6 girando la pan-
talla de la lámpara en sentido contrario a
las agujas del reloj
1
(imagen H).
Para encender la lámpara ponga el Interrup-
tor ENCENDIDO / APAGADO 2 en posic
ON (imagen H).
Vuelva a colocar la placa de base en la pan-
talla de la lámpara y ajústela girando en el
sentido de las agujas del reloj (imagen H).
Si desea fijar la lámpara solar al suelo, co-
loque la piqueta
8
en el orificio de la parte
externa de la placa de base (imagen I).
Si quiere colocar el artículo en un estanque
de jardín, solo tiene que instalar la lámpara
solar sin piqueta
Cómo colocar la lámpara
8
(imagen J).
Utilizar lámpara de pie con piqueta
Clave la lámpara solar ya montada en el
suelo (césped, macizo de flores) lo suficiente
para que se mantenga estable.
Asegúrese de que el producto se encuentra
firmemente insertado. Al montar la lámpara
no aplique fuerza excesiva (por ej. martilla-
zos). Esto puede dañar el producto.
Utilización en agua (por ej. estanque
de jardín) (modelo 106345-14-02)
Coloque la lámpara solar 8 montada sin
piqueta en la superficie de agua.
Asegúrese de que la placa de base 6 se
encuentra debajo (imagen J).
Nunca sumerja la lámpara solar en agua.
La lámpara solar dispone de protección
contra el agua siempre que esta no ejerza
presión sobre el aparato.
Indicaciones generales para la elección
ión
del punto de instalación
Para obtener un resultado óptimo, coloque
la lámpara en un lugar en el que la placa
solar esté expuesta el mayor tiempo posible
a la luz solar directa.
No coloque la lámpara bajo arbustos, árbo-
les, voladizos, etc. ya que impiden la incidencia directa de la luz solar.
Asegúrese de que la placa solar no recibe
la influencia de otra fuente de luz, como por
ej. el alumbrado de una casa o de la calle,
puesto que de ser así, la luz no se encenderá
al amanecer. En caso de poca claridad, la
luz se enciende de forma automática y con
claridad normal, la luz se vuelve a apagar.
Sustitución de las baterías
Para conseguir el mejor rendimiento cambie las
pilas cada 12 meses.
Modelo 106345-14-01
Retire la unidad funcional 1 girando la
pantalla de la lámpara en sentido contrario
a las agujas del reloj
ción la tapa LED
2
. Retire a continua-
6
de la unidad funcional
9 ES
106345_livx_LED-Solar-Gartenleuchten_Modell-D_E_Content_ES_IT.indd 9 14.11.14 12:12
Page 10
girándola en sentido contrario a las agujas
del reloj (imagen B).
Para apagar la lámpara ponga el Interruptor
ENCENDIDO / APAGADO
9
en posición
OFF (imagen C).
Abra la tapa del compartimento de las ba-
8
terías
y saque las pilas antiguas. Coloque
las baterías nuevas (imagen C).
Nota: Utilice únicamente baterías del tipo
indicado en „características técnicas“. Al in-
troducir la batería asegúrese de que la po-
laridad sea la correcta. Esta se especifica en
el compartimento de las baterías.
Cierre la tapa del compartimento de las ba-
terías (imagen C).
Para encender la lámpara ponga el Interrup-
tor ENCENDIDO / APAGADO 9 en posic
ON (imagen C).
Vuelva a colocar la unidad funcional en la
pantalla de la lámpara y ajústela girando en
el sentido de las agujas del reloj (imagen B).
Modelo 106345-14-02
Retire la placa de base 6 girando la pan-
talla de la lámpara en sentido contrario a
las agujas del reloj
1
(imagen H).
Para apagar la lámpara ponga el Interruptor
ENCENDIDO / APAGADO
9
en posición
OFF (imagen H).
Abra el compartimento de las baterías 5
de la placa de base. Se encuentra bajo la
placa solar
3
(imagen G).
Retire las baterías antiguas. Coloque las
baterías nuevas (imagen G).
Nota: Utilice únicamente baterías del tipo
indicado en „características técnicas“. Al introducir la batería asegúrese de que la polaridad sea la correcta. Esta se especifica
en el compartimento de las baterías.
Vuelva a colocar el compartimento de las
baterías en la placa de base (imagen H).
Para encender la lámpara ponga el Interrup-
t
or ENCENDIDO / APAGADO 9 en posici
ON (imagen H).
Vuelva a colocar la unidad funcional en la
pantalla de la lámpara y ajústela girando en
el sentido de las agujas del reloj (imagen H).
Limpieza y conservación
ión
Los diodos luminosos no son reemplazables. La
lámpara solar no requiere mantenimiento alguno,
con excepción del cambio de batería.
Sustituya las baterías cuando la duración
de la iluminación disminuya sensiblemente
pese a una buena exposición a los rayos solares. Utilice únicamente acumuladores con
el tamaño adecuado y el tipo recomendado
(ver capítulo “Características técnicas“).
Limpie regularmente la lámpara con un
paño seco y sin pelusas. Para la suciedad
más persistente, utilice un paño ligeramente
humedecido.
ón
10 ES
106345_livx_LED-Solar-Gartenleuchten_Modell-D_E_Content_ES_IT.indd 10 14.11.14 12:12
Page 11
Solución de problemas
Desecho del producto
Nota: El aparato contiene componentes electrónicos sensibles. Por ello. podría sufrir interferencias por otros equipos de transmisión por radio
que se encuentren en las proximidades. Estos
podrían ser por ej. teléfonos móviles, aparatos
radiofónicos, radios para banda ciudadana, radiocontroles / otros controles remotos y aparatos
de microondas. En caso de detectar daños en el
funcionamiento retire las fuentes de interferencias
del entorno del aparato.
Nota: Las descargas electrostáticas pueden
provocar perturbaciones en el funcionamiento.
En tal caso, retire la batería durante unos instantes e introdúzcala de nuevo.
Problema Causa Solución
La luz no se
enciende a pesar de que la
lámpara ha recibido los rayos del sol todo
el día.
Las fuentes de
luz artificial,
como por
ejemplo la luz
de las farolas,
interfieren con
la lámpara.
Monte la
lámpara en
un lugar en
donde no
haya otras
fuentes de
luz que puedan causar
interferencias
La luz no se
enciende o
solo lo hace
brevemente.
Las baterías
están defectuosas o la luz
del día no ha
sido suficiente.
Cambie las
baterías o
monte la lámpara en un
lugar donde
reciba más
luz solar.
El embalaje está compuesto por materiales no contaminantes que pueden
ser desechados en el centro de reciclaje local.
Para obtener información sobre las posibles formas de eliminación del producto al final de su
vida útil, acuda a la administración de su municipio o ciudad.
En beneficio del medio ambiente, no
tire el producto junto con la basura
doméstica cuando ya no le sea útil.
Deséchelo correctamente. Diríjase a la administración competente para obtener información
sobre los puntos de recogida de residuos y sus
horarios.
Las baterías defectuosas o usadas deben ser
recicladas según lo indicado en la directiva
2006 / 66 / CE. Recicle las baterías y / o el
aparato en los puntos de reciclaje disponibles.
¡Daños medioambientales
.
debidos a un reciclaje inco-
Pb
rrecto de las baterías!
Las pilas usadas no deben desecharse junto con
la basura doméstica. Por ello las pilas usadas
deben reciclarse en un punto de recogida local.
11 ES
106345_livx_LED-Solar-Gartenleuchten_Modell-D_E_Content_ES_IT.indd 11 14.11.14 12:12
Page 12
Garantía
El aparato ha sido fabricado cuidadosamente
siguiendo exigentes normas de calidad y ha
sido probado antes de su entrega. En caso de
defecto del producto, usted tiene derechos legales frente al vendedor del mismo. Nuestra garantía (abajo indicada) no supone una restricción
de dichos derechos legales.
Este aparato tiene una garantía de 3 años a
partir de la fecha de compra. El plazo de garantía comienza a partir de la fecha de compra.
Por favor, conserve adecuadamente el justificante
de compra original. Este documento se requerirá
como prueba de que se realizó la compra.
Si en el plazo de 3 años a partir de la fecha de
compra se produce un fallo de material o fabricación en este producto, repararemos el producto o
lo sustituiremos gratuitamente por un producto
nuevo (según nuestra elección). La garantía quedará anulada si el producto resulta dañado o
es utilizado o mantenido de forma inadecuada.
La garantía cubre defectos de materiales o de
fabricación. Esta garantía no cubre aquellos componentes del producto sometidos a un desgaste
normal y que, por ello, puedan considerarse
piezas de desgaste (por ej. las pilas). Tampoco
cubre daños de componentes frágiles como, por
ejemplo, los interruptores, baterías y piezas de
cristal.
Modelo 106345-14-01
Modelo 106345-14-02
12 ES
106345_livx_LED-Solar-Gartenleuchten_Modell-D_E_Content_ES_IT.indd 12 14.11.14 12:12
Page 13

Utilizzo secondo la destinazione d’uso .................................................. Pagina 14
Descrizione dei componenti ............................................................................. Pagina 14
Contenuto della confezione .............................................................................. Pagina 14
Dati tecnici ....................................................................................................................... Pagina 14
Avvertenze generali di sicurezza
Avvertenze di sicurezza specifiche del prodotto ............................................................... Pagina 15
Avvertenze di sicurezza per le batterie .............................................................................. Pagina 16
Principio di funzionamento ............................................................................... Pagina 16
Avvio
Montaggio............................................................................................................................ Pagina 16
Installazione della lampada ................................................................................................ Pagina 17
Sostituzione delle batterie ................................................................................. Pagina 17
Pulizia e cura ................................................................................................................. Pagina 18
Eliminazione dei guasti ........................................................................................ Pagina 19
Smaltimento ................................................................................................................... Pagina 19
Garanzia ........................................................................................................................... Pagina 20
13 IT/MT
106345_livx_LED-Solar-Gartenleuchten_Modell-D_E_Content_ES_IT.indd 13 14.11.14 12:12
Page 14

Lampada da giardino ad
energia solare / Sfera luminosa
ad energia solare
Utilizzo secondo la
destinazione d’uso
La lampada solare è utilizzata per l‘illuminazione
in ambienti esterni. Questo prodotto non è adatto
all‘uso commerciale.
Questo prodotto non è indicato
per un‘illuminazione domestica.
Descrizione dei componenti
Modello 106345-14-01
1
Unità di funzionamento (con cella fotovol-
taica premontata)
2
Paralume
3
Picchetto
4
Connettore
5
Asta
6
Copertura LED
7
Vano portabatterie
8
Coperchio per vano portabatterie
9
Interruttore ON / OFF
10
Batteria
Modello 106345-14-02
1
Paralume
2
Interruttore ON / OFF
3
Cella fotovoltaica
4
LED
5
Vano portabatterie
6
Base portalampada
7
Batteria
8
Picchetto
Contenuto della confezione
Dopo il disimballaggio, controllare subito l‘integrità e le condizioni perfette dei componenti.
Modello 106345-14-01
1 sfera luminosa solare
1 asta
1 connettore
1 picchetto
2 batterie, tipo NiMH, AAA, 1,2 V, 600 mAh
1 manuale d‘uso e montaggio
Modello 106345-14-02
1 sfera luminosa solare
1 picchetto
2 batterie, tipo NiMH, AAA, 1,2 V, 600 mAh
1 manuale d‘uso e montaggio
Dati tecnici
Modello 106345-14-01
Batterie: 2 x Batterie NiMH 1,2 V,
600 mAh, tipo AAA
Lampadina: 1 x LED RGB con 0,06 W
(LED non sostituibile.)
14 IT/MT
106345_livx_LED-Solar-Gartenleuchten_Modell-D_E_Content_ES_IT.indd 14 14.11.14 12:12
Page 15

Classe di protezione: IP43 (protezione antipiog-
gia fino al 30 % d‘inclinazione.)
Cella fotovoltaica: 60 x 60 mm, monocristal-
lina
Modello 106345-14-02
Batterie: 2 x Batterie NiMH 1,2 V,
600 mAh, tipo AAA
Lampadina: 2 x LED ciascuno da
0,075 W (LED non sostituibili)
Classe di protezione: IP67 (protezione contro
la penetrazione d‘acqua
senza pressione)
Cella fotovoltaica: 45 x 45mm,
monocristallina
di tale materiale. Spesso i bambini sottovalutano i pericoli. Tenere il materiale per imballaggio sempre fuori della portata dei
bambini.
Questo prodotto non è un giocattolo!
Questo dispositivo può essere utilizzato da
bambini di età superiore agli 8 anni, da
persone con capacità fisiche, sensoriali o
mentali ridotte o da persone inesperte solo
se supervisionate o preventivamente istruite
sull’utilizzo in sicurezza del prodotto e solo
se informate dei pericoli legati al prodotto
stesso. Non lasciare che i bambini giochino
con l‘apparecchio. La pulizia e la manuten-
zione non devono essere eseguite da bam-
bini senza supervisione.
Non utilizzare l‘articolo se si notano danni!
Avvertenze generali
di sicurezza
prima dell‘uso leggere attentamente
tutte le istruzioni e le avvertenze di
sicurezza allegate al prodotto! in
caso di cessione del prodotto a
terzi, consegnare anche l‘intera
documentazione del prodotto!
Avvertenze di sicurezza
specifiche del prodotto
Le basse temperature incidono negativa-
mente sulla durata della batteria. Qualora
la lampada solare non venisse utilizzata
per lungo tempo, ad es. in inverno, questa
deve essere pulita e conservata in un luogo
caldo e asciutto.
Fare attenzione che la cella fotovoltaica
PERI-
COLO DI MORTE E DI INFORTUNIO PER INFANTI E
non sia sporca o che, in inverno, non sia
coperta da neve e ghiaccio. Tale fatto ri-
duce la potenza della cella solare.
BAMBINI! Non lasciare mai i bambini in-
custoditi con il materiale d‘imballaggio.
Sussiste il rischio di soffocamento a causa
15 IT/MT
106345_livx_LED-Solar-Gartenleuchten_Modell-D_E_Content_ES_IT.indd 15 14.11.14 12:12
Page 16

Avvertenze di sicurezza
per le batterie
PERICOLO DI MORTE!
Tenere le batterie fuori dalla portata dei bambini. In caso di ingerimento consultare subito un
medico!
ATTENZIONE!
PERICOLO DI ESPLOSIONE!
Non gettare mai le batterie nel fuoco o in
acqua!
Non esercitare alcuna pressione meccanica
sulle batterie!
Non utilizzare batterie non ricaricabili.
Non provocare cortocircuiti e / o aprire le
batterie.
Pericolo di danni materiali
Utilizzare esclusivamente il tipo di batterie
indicato!
Prestare attenzione alla polarità corretta
quando vengono inserite le batterie! Essa è
indicata all‘interno del vano portabatterie!
Se necessario, pulire i contatti della batteria e
dell’apparecchio prima di inserire le batterie!
Principio di funzionamento
In presenza di raggi solari la cella solare installata nell’articolo trasforma la luce in energia
elettrica e la incamera in due batterie NiMH.
La luce viene attivata quando l’oscurità inizia a
manifestarsi. I diodi luminosi installati rappresentano una lampadina a lunga durata e a risparmio energetico. La durata dell’illuminazione
dipende dall’irraggiamento solare, dall’angolo
di incidenza della luce sulla cella solare e dalla
temperatura (a motivo della dipendenza dalla
temperatura della capacità dell’accumulatore).
L’ideale è rappresentato da un angolo di incidenza verticale in presenza di una temperatura
superiore al punto di congelamento. La batteria
raggiunge la sua capacità massima solamente
dopo che sono stati eseguiti diversi cicli di caricamento e scaricamento.
Avvio
Montaggio
Modello 106345-14-01
Montare la lampada solare come indicato
nelle figure da A a E:
Rimuovere l‘unità di funzionamento 1 dal
paralume
2
girando in senso antiorario
(Fig. B).
Spingere l‘interruttore ON / OFF 9 in posi-
zione “ON“ (Fig. C).
Rimettere l‘unità di funzionamento sul para-
lume e chiudere il collegamento girando in
senso orario (Fig. B).
Inserire il paralume sull‘asta 5 (Fig. E).
Inserire l‘asta sul picchetto 3 servendosi del
connettore
4
(Fig. E).
16 IT/MT
106345_livx_LED-Solar-Gartenleuchten_Modell-D_E_Content_ES_IT.indd 16 14.11.14 12:12
Page 17

Modello 106345-14-02
Montare la lampada solare come indicato
nelle figure da F a J:
Rimuovere la base portalampada 6 dal
paralume
1
girando in senso antiorario
(Fig. H).
Spingere l‘interruttore ON / OFF 2 in posi-
zione “ON“ (Fig. H).
Rimettere la base portalampada sul para-
lume e chiudere il collegamento girando in
senso orario (Fig. H).
Se si vuole collocare la lampada solare sul
terreno, inserire il picchetto
8
nell‘apertura
presente sul lato esterno della base portalampada (Fig. I).
Se si desidera mettere l‘articolo nello stagno
da giardino, non applicare il picchetto
8
sulla lampada solare (Fig. J).
Installazione della lampada
Utilizzo della lampada con il picchetto
Inserire la lampada a solare montata, per
quanto possibile, nel terreno (zona erbosa,
aiuola di fiori) affinché sia stabile.
Fare attenzione che il prodotto sia posizio-
nato in maniera sicura e stabile. Eseguendo
il montaggio e l’installazione non usare violenza, evitando di inserire la lampada, ad
esempio, con colpi di martello. Un tale
modo di procedere danneggia il prodotto.
Utilizzo in acqua (ad es. nello stagno
da giardino) (modello 106345-14-02)
Posizionare la lampada solare montata e
priva di picchetto
8
sulla superficie
dell‘acqua.
Assicurarsi che la base portalampada 6 si
trovi al di sotto (Fig. J).
Non immergere la lampada solare sott‘ac-
qua: la protezione dall‘acqua funziona solo
fino a quando l‘acqua non esercita pressione.
Avvertenze generali sulla scelta del
punto di posizionamento
Per ottenere un risultato ottimale installare
la lampada in un luogo dove la cella solare
sia esposta il più a lungo possibile alla luce
diretta del sole.
Non porre la lampada solare sotto cespugli,
alberi, pensiline ecc. poiché ciò riduce l’assorbimento di luce solare.
Assicurarsi che la cella solare non subisca
l‘influsso di un‘altra onte di luce come, p. es.,
l‘illuminazione di strade o terrazze poiché
la luce, in questo caso, non si accenderebbe
al crepuscolo. In presenza di scarsa luminosità, la luce si accende automaticamente,
mentre, in presenza di una luce solare normale, la lampada si spegne nuovamente.
Sostituzione delle batterie
Per ottenere una prestazione ottimale, le batterie
dovrebbero essere sostituite ogni 12 mesi.
17 IT/MT
106345_livx_LED-Solar-Gartenleuchten_Modell-D_E_Content_ES_IT.indd 17 14.11.14 12:12
Page 18

Modello 106345-14-01
Rimuovere l‘unità di funzionamento 1 dal
paralume
Infine rimuovere la copertura LED
2
girando in senso antiorario.
6
dall‘unità di funzionamento girando in senso antiorario (Fig. B).
Premere l‘interruttore ON / OFF 9 sulla
posizione (OFF) (Fig. C).
Aprire il vano portabatterie 8 ed estrarre le
vecchie batterie. Inserire le nuove batterie
(Fig. C).
Nota: utilizzare solamente le batterie indicate nella sezione “Dati tecnici“. Inserendo
le batterie, fare attenzione a rispettare la
polarità corretta. Essa è indicata all‘interno
del vano portabatterie.
Chiudere il coperchio del vano portabatterie
(Fig. C).
Spingere l‘interruttore ON / OFF 9 in posi-
zione “ON“ (Fig. C).
Rimettere l‘unità di funzionamento sul para-
lume e chiudere il collegamento girando in
senso orario (Fig. B).
Modello 106345-14-02
Rimuovere la base portalampada 6 dal
paralume
1
girando in senso antiorario
(Fig. H).
Premere l‘interruttore ON / OFF 9 sulla
posizione (OFF) (Fig. H).
Estrarre il vano portabatterie 5 dalla base
portalampada. Esso si trova al di sotto
della cella fotovoltaica
3
(Fig. G).
Estrarre le vecchie batterie. Inserire le nuove
batterie (Fig. G).
Nota: utilizzare solamente le batterie indicate nella sezione “Dati tecnici“. Inserendo
le batterie, fare attenzione a rispettare la
polarità corretta. Essa è indicata all‘interno
del vano portabatterie.
Reinserire il vano portabatterie nella basa
portalampada (Fig. H).
Spingere l‘interruttore ON / OFF 9 in posi-
zione “ON“ (Fig. H).
Rimettere l‘unità di funzionamento sul para-
lume e chiudere il collegamento girando in
senso orario (Fig. H).
Pulizia e cura
I diodi luminosi non sono sostituibili. La lampada
solare non necessita di manutenzioni sino ad
una sostituzione della batteria.
Sostituire le batterie se la durata dell‘illumi-
nazione, nonostante la radiazione solare,
si abbassa notevolmente dopo un po‘ di
tempo. Utilizzare solamente batterie delle
dimensioni corrette e del tipo raccomandato (vedere il capitolo “Dati tecnici”).
Pulire regolarmente la lampada solare con
un panno asciutto e privo di peli. In caso di
sporco ostinato, utilizzare un panno leggermente inumidito.
18 IT/MT
106345_livx_LED-Solar-Gartenleuchten_Modell-D_E_Content_ES_IT.indd 18 14.11.14 12:12
Page 19

Eliminazione dei guasti
Nota: l’apparecchio contiene dei componenti
elettronici sensibili. E‘ quindi possibile che apparecchi di trasmissione radio eventualmente posti
nelle immediate vicinanze lo disturbino. Tale avvertenza vale, ad esempio, per telefoni cellulari,
apparecchi ricetrasmittenti portatili, ricetrasmittenti per CB, radiotelecomandi / altri telecomandi
e forni a microonde. Qualora si rivelassero guasti nel funzionamento, rimuovere tali fonti di disturbo dalle vicinanze dell’apparecchio.
Nota: le scariche elettrostatiche possono provocare disturbi di funzionamento. In caso di simili disturbi di funzionamento, rimuovere per
breve tempo le batterie e reinserirle.
Errore Causa Soluzione
La luce non si
accende o resta accesa solo
per poco tempo.
Le batterie
sono guaste
oppure la luce
solare non è
sufficiente.
Sostituire le
batterie o
montare la
lampada in
un punto
dove è maggiormente
esposta alla
luce solare.
Smaltimento
L’imballaggio è composto da materiali
ecologici che possono essere smaltiti
presso i siti di riciclaggio locali.
Errore Causa Soluzione
La luce non si
accende, sebbene la lampada sia stata
esposta tutto il
giorno alla
luce solare.
Fonti di illuminazione artificiali, quali ad
esempio
l’illuminazione
stradale, interferiscono con
la lampada.
Montare la
lampada in
un punto
dove non
possa essere
disturbata
da altri fonti
di illuminazione.
Informarsi presso l’amministrazione cittadina o
comunale sulle possibilità di smaltimento del
prodotto usato.
Non gettare il prodotto usurato tra i
rifiuti domestici ma, per motivi di tu-
tela dell‘ambiente, provvedere al suo
corretto smaltimento. È possibile informarsi sui
luoghi di raccolta e i loro orari di apertura presso
l‘amministrazione competente.
Accumulatori difettosi o usati devono essere
riciclati ai sensi della Direttiva 2006 / 66 / CE.
Restituire le batterie e/o l‘apparecchio tramite i
punti di raccolta indicati.
19 IT/MT
106345_livx_LED-Solar-Gartenleuchten_Modell-D_E_Content_ES_IT.indd 19 14.11.14 12:12
Page 20

Uno smaltimento scorretto
delle batterie può arrecare
Pb
danni all‘ambiente!
Le batterie non devono essere smaltite nella spazzatura domestica. Consegnare quindi le batterie
usate presso un punto di raccolta comunale.
Garanzia
La prestazione di garanzia vale sia per difetti di
materiale che per difetti di fabbricazione. La presente garanzia non si estende a parti del prodotto soggette a normale usura e che possono
essere identificate, pertanto, come parti soggette
a usura (p. es., le batterie), né a danni su parti
staccabili,
lizzate in ve
come interruttore, batterie o simili, rea-
tro.
L‘apparecchio è stato prodotto secondo severe
direttive di qualità e controllato con premura
prima della consegna. In caso di difetti del prodotto, l‘acquirente può far valere i propri diritti
legali nei confronti del venditore. Questi diritti
legali non vengono limitati in alcun modo dalla
garanzia di seguito riportata.
Se entro 3 anni dalla data di acquisto di questo
prodotto si rileva un difetto di materiale o di fabbricazione, il prodotto verrà riparato o sostituito
gratuitamente, a nostra discrezione. Il termine di
garanzia ha inizio a partire dalla data di acquisto. Conservare lo scontrino di acquisto originale
in buone condizioni. Questo documento servirà
a documentare l‘avvenuto acquisto.
L‘apparecchio da Lei acquistato dà diritto ad
una garanzia di 3 anni a partire dalla data di
acquisto. La presente garanzia decade nel caso
di danneggiamento del prodotto, di utilizzo o di
manutenzione inadeguati.
20 IT/MT
Modello 106345-14-01
Modello 106345-14-02
106345_livx_LED-Solar-Gartenleuchten_Modell-D_E_Content_ES_IT.indd 20 14.11.14 12:12
Page 21

Intended use ......................................................................................................................Page 22
Parts description ............................................................................................................Page 22
Scope of delivery...........................................................................................................Page 22
Technical Data ..................................................................................................................Page 22
General safety instructions
Product-specific safety instructions ..........................................................................................Page 23
Safety instructions for rechargeable batteries ........................................................................Page 23
Functionality ......................................................................................................................Page 24
Start-up
Installation ................................................................................................................................Page 24
Installing the light .....................................................................................................................Page 25
Replacing the rechargeable batteries .........................................................Page 25
Cleaning and Care ........................................................................................................Page 26
Troubleshooting .............................................................................................................Page 26
Disposal .................................................................................................................................Page 27
Warranty ..............................................................................................................................Page 27
21 GB/MT
106345_livx_LED-Solar-Gartenleuchten_Modell-D_E_Content_ES_IT.indd 21 14.11.14 12:12
Page 22

Solar Garden Light /
Solar Light Ball
7
Rechargeable battery
8
Ground stake
Intended use
The solar light is intended for outdoor use. The
product is not suitable for commercial use.
Not suitable for ordinary lighting
in household room illumination.
Parts description
Model 106345-14-01
1
Functional unit (with built-in solar cell)
2
Lamp shade
3
Ground stake
4
Connector
5
Stand tube
6
LED cover
7
Battery compartment
8
Battery cover
9
ON / OFF switch
10
Rechargeable battery
Model 106345-14-02
1
Lamp shade
2
ON / OFF switch
3
Solar cell
4
LED
5
Battery compartment
6
Bottom splash
Scope of delivery
Check immediately after unpacking that the
parts are complete and that the product is in
proper condition.
Model 106345-14-01
1 Solar light ball
1 Stand tube
1 Connector
1 Ground spike
2 Rechargeable batteries, type NiMH, AAA,
1.2 V, 600 mAh
1 Instructions for assembly and use
Model 106345-14-02
1 Solar light ball
1 Ground spike
2 Rechargeable batteries, type NiMH, AAA,
1.2 V, 600 mAh
1 Instructions for assembly and use
Technical Data
Model 106345-14-01
Rechargeable
battery: 2 x NiMH battery 1.2 V,
600 mAh, size AAA
Lamp: 1 x RGB LED with 0.06 W
(LED not replaceable.)
22 GB/MT
106345_livx_LED-Solar-Gartenleuchten_Modell-D_E_Content_ES_IT.indd 22 14.11.14 12:12
Page 23

Protection class: IP43 (protected from rain
up to 30 % diagonal)
Solar cell: 60 x 60 mm, monocrystalline
Model 106345-14-02
Rechargeable
battery: 2 x NiMH battery 1.2 V,
600 mAh, size AAA
Lamp: 2 x LED with 0.075 W each
(LEDs not replaceable.)
Protection class: IP67 (protects against un-
pressurised water penetrating)
Solar cell: 45 x 45 mm, monocrystalline
General safety
instructions
BeFore using the product, please
Familiarise yourselF with all oF the
saFety inFormation and instructions
For use! when passing this product
on to others, please also include all
the documents!
DANGER
TO LIFE AND ACCIDENT
HAZARD FOR TODDLERS
AND CHILDREN! Never leave children
unattended with the packaging material. The
packaging material represents a danger of
suffocation. Children frequently underestimate
the dangers. Always keep children away
from the packaging material.
This product is not a toy.
This device may be used by children age 8
years and up, as well as by persons with reduced physical, sensory or mental capacities,
or lacking experience and / or knowledge,
so long as they are supervised or instructed
in the safe use of the device and understand
the associated risks. Children should not be
allowed to play with the device. Cleaning and
user maintenance should not be performed
by children without supervision.
Do not use this product if you notice any
damage!
Product-specific safety
instructions
Cold temperatures negatively impact the
battery operating time. When the solar light
is not being used for extended periods, e.g.
in winter, it should be cleaned and stored in
a dry, warm location.
Make sure the solar cell is free of dirt and
free of snow and ice in winter. Otherwise the
performance of the solar panel will diminish.
Safety instructions for
rechargeable batteries
DANGER TO LIFE!
Rechargeable batteries are not intended to be in
the hands of children. If accidentally swallowed
seek immediate medical attention!
23 GB/MT
106345_livx_LED-Solar-Gartenleuchten_Modell-D_E_Content_ES_IT.indd 23 14.11.14 12:12
Page 24

CAUTION!
EXPLOSION HAZARD!
Never throw batteries into fire or water!
Do not exert mechanical strain on batteries!
Do not use non-rechargeable batteries.
Do not short-circuit batteries and / or open
them.
Risk of property damage
Only use the battery type specified!
When inserting the battery ensure the correct
polarity! This is shown inside the battery
compartment!
If necessary, clean the contacts on the
batteries and device before inserting them!
Functionality
Start-up
Installation
Model 106345-14-01
Assemble the solar light as shown in Fig.
A–E:
Remove the functional unit 1 off the lamp
2
shade
(Fig. B).
Slide the ON / OFF switch
position to switch it on (Fig. C).
Reattach the functional unit to the lamp
shade and close the connection by turning
clockwise (Fig. B).
Attach the lamp shade to the stand tube 5
(Fig. E).
Use the connector 4 to attach the stand
tube to the ground stake
by turning it counter-clockwise
9
to the ON
3
(Fig. E).
The product‘s solar panel converts sunlight into
electrical energy and stores it in two NiMH
batteries.
Switches on the light as it begins to get dark.
The in-built light-emitting diodes are a very longlife and energy-saving light source. The light duration depends on the amount of sunlight, the
angle of light on the solar panel and the temperature (the battery capacity is temperaturedependent). A vertical angle of light at temperatures
above the freezing point is ideal. The battery
does not achieve maximum capacity until after
several charge and discharge cycles.
Model 106345-14-02
Assemble the solar light as shown in Fig.
F–J:
Remove the bottom splash 6 from the lamp
1
shade
by turning it counter-clockwise
(Fig. H).
Slide the on / OFF switch 2 to the ON
position to switch it on (Fig. H).
Reattach the bottom splash to the lamp
shade and close the connection by turning
clockwise (Fig. H).
To attach the solar light to the ground stake,
insert the ground stake
8
into the opening
on the outside of the bottom splash (Fig. I).
24 GB/MT
106345_livx_LED-Solar-Gartenleuchten_Modell-D_E_Content_ES_IT.indd 24 14.11.14 12:12
Page 25

To float the product in your garden pond,
operate the solar light without the ground
8
stake
(Fig. J).
Installing the light
Using the ground light with the ground
stake
Push the assembled solar light far enough into
the ground (lawn, flower bed) so it is stable.
Make sure it is firmly positioned. Do not use
any force when assembling or setting up the
product, e.g. hammer blows. This will damage the product.
Water use (e.g. garden pond)
(Model 106345-14-02)
Place the assembled solar light on the water
surface without the ground stake
Ensure the bottom splash 6 is at the bottom
(Fig. J).
Do not submerse the solar light in water:
The solar light is only protected from water
so long as the water does not exert pressure
on it.
General information on selecting the
location
For optimal results, place the solar light in a
location where the solar light is exposed to
direct sunlight as long as possible.
Do not position the solar light under shrubs,
trees, porches, etc. This will reduce the incidence of sunlight.
8
installed.
Make sure the solar cell is not impacted by
other light sources, e.g. yard or street lighting,
or the light will not switch on at dusk. In low
light the light will automatically switch on, and
automatically switch off in normal ambient
light.
Replacing the
rechargeable batteries
For optimal performance, the rechargeable
batteries should be replaced every 12 months.
Model 106345-14-01
Remove the functional unit 1 from the lamp
2
shade
remove the LED cover
unit (Fig. B) by turning counter-clockwise.
Slide the ON / OFF switch 9 to the OFF
position to switch the light off (Fig. C).
Open the battery cover 8 and remove the
old batteries. Insert the new rechargeable
batteries (Fig. C).
Note: Only use the batteries specified under
„Technical Data“. Please note the polarity
when inserting the batteries. It is indicated
in the battery compartment.
Close the battery cover (Fig. C).
Slide the ON / OFF switch 9 to the ON
position to switch it on (Fig. C).
Reattach the functional unit to the lamp shade
and close the connection by turning clockwise
(Fig. B).
by turning counter-clockwise. Then
6
from the functional
25 GB/MT
106345_livx_LED-Solar-Gartenleuchten_Modell-D_E_Content_ES_IT.indd 25 14.11.14 12:12
Page 26

Model 106345-14-02
Remove the bottom splash 6 from the lamp
1
shade
by turning it counter-clockwise
(Fig. H).
Slide the ON / OFF switch 9 to the OFF
position to switch it off (Fig. H).
Remove the battery compartment 5 from
the bottom splash. It is located below the
solar cell
3
(Fig. G).
Remove the old batteries. Insert the new
rechargeable batteries (Fig. G).
Note: Only use the batteries specified under
„Technical Data“. Please note the polarity
when inserting the batteries. It is indicated
in the battery compartment.
Reinsert the battery compartment into the
bottom splash (Fig. H).
Slide the ON / OFF switch 9 to the ON
position to switch it on (Fig. H).
Reattach the functional unit to the lamp
shade and close the connection by turning
it clockwise (Fig. H).
Cleaning and Care
The LEDs cannot be replaced. The solar light is
maintenance-free, except for any necessary
battery replacement.
of the recommended type (see section
„Technical data“).
Regularly clean the solar light with a dry,
lint-free cloth. Use a slightly moist cloth to
remove any stubborn dirt.
Troubleshooting
Note: The device contains sensitive electronic
components. For this reason it is possible that it
can be disrupted by radio transmitting equipment
in the immediate vicinity. This could be, for example, mobile telephones, walkie-talkies, CB radios,
remote controls and microwaves. If you notice that
the device is malfunctioning, remove any sources
of interference from the area of the device.
Note: Electrostatic discharge can cause malfunctions. In the event of such malfunctions briefly
remove and reinsert the rechargeable batteries.
Fault Cause Solution
The light will not
switch on even
though the sun
shone on the
lamp all day.
Artificial light
sources, e.g.
street lights,
are interfering
with the light.
Mount the
lamp in a
place where
it cannot be
disturbed by
other sources
of light.
Replace the rechargeable batteries when
you notice the light‘s period of illumination
has noticeably decreased over time, despite
full exposure to solar radiation. Only use
rechargeable batteries of the right size and
26 GB/MT
106345_livx_LED-Solar-Gartenleuchten_Modell-D_E_Content_ES_IT.indd 26 14.11.14 12:12
Page 27

Fault Cause Solution
The light does
not come on or
comes on only
briefly.
The batteries
are broken or
there was not
enough daylight.
Replace the
rechargeable
batteries or
place the
light where it
is exposed to
more sunlight.
Environmental damage due
to improper disposal of the
Pb
rechargeable batteries!
Rechargeable batteries may not be disposed of
with the usual domestic waste. Therefore dispose
of used batteries through your municipal collection site.
Disposal
The packaging is made of environmentally friendly materials, which
may be disposed of through your local
recycling facilities.
Contact your local community or municipal administration for more details on how to dispose
your worn-out product.
To help protect the environment, please
dispose of the product properly, and
not in household waste, when it has
reached the end of its useful life. Please contact
your local authority for information on collection
points and their opening hours.
Faulty or used rechargeable batteries must be
recycled in accordance with Directive
2006 / 66 / EC. Return rechargeable batteries
and / or the appliance using the recycling facilities provided.
Warranty
The device has been manufactured to strict quality
guidelines and meticulously examined before
delivery. In the event of product defects you have
legal rights against the retailer of this product.
Your legal rights are not limited in any way by
our warranty detailed below.
The warranty for this device is 3 years from the
date of purchase. Should this device show any
fault in materials or manufacture within 3 years
from the
date
of purchase, we will repair or replace
it – at our
The warranty period begins on the date of purchase.
safe location.
proof of purchase. This warranty becomes void
if the device has been damaged or improperly
used or maintained.
The warranty applies to faults in material or manufacture. This warranty does not cover product
parts subject to normal wear, thus possibly
choice – free of charge to you.
Please keep the original sales receipt in a
This document is required as your
27 GB/MT
106345_livx_LED-Solar-Gartenleuchten_Modell-D_E_Content_ES_IT.indd 27 14.11.14 12:12
Page 28

considered consumables (e.g. batteries) or for
damage to fragile parts, e.g. switches, rechargeable batteries or glass parts.
Model 106345-14-01
Model 106345-14-02
28 GB/MT
106345_livx_LED-Solar-Gartenleuchten_Modell-D_E_Content_ES_IT.indd 28 14.11.14 12:12
Page 29

Bestimmungsgemäße Verwendung ..............................................................Seite 30
Teilebeschreibung .........................................................................................................Seite 30
Lieferumfang .....................................................................................................................Seite 30
Technische Daten ...........................................................................................................Seite 30
Allgemeine Sicherheitshinweise
Produktspezifische Sicherheitshinweise ..................................................................................Seite 31
Sicherheitshinweise für Akkus ..................................................................................................Seite 32
Funktionsweise ...............................................................................................................Seite 32
Inbetriebnahme
Montage ...................................................................................................................................Seite 32
Leuchte aufstellen .....................................................................................................................Seite 33
Akkus austauschen ......................................................................................................Seite 33
Reinigung und Pflege .................................................................................................Seite 34
Fehlerbehebung .............................................................................................................Seite 35
Entsorgung ..........................................................................................................................Seite 35
Garantie ................................................................................................................................Seite 36
29 DE/AT/CH
106345_livx_LED-Solar-Gartenleuchten_Modell-D_E_Content_ES_IT.indd 29 14.11.14 12:12
Page 30

Solar-Gartenleuc hte /
Solar-Leuchtkugel
Bestimmungsgemäße
Verwendung
6
Bodenschale
7
Akku
8
Erdspieß
Lieferumfang
Die Solarleuchte dient zur Beleuchtung im Außenbereich. Das Produkt ist nicht für den gewerbliche
Einsatz geeignet.
Dieses Produkt ist nicht zur Raum-
beleuchtung im Haushalt geeignet.
Teilebeschreibung
Modell 106345-14-01
1
Funktionseinheit (mit eingebauter Solarzelle)
2
Lampenschirm
3
Erdspieß
4
Verbinder
5
Standrohr
6
LED-Abdeckung
7
Akkufach
8
Akkufachdeckel
9
EIN- / AUS-Schalter
10
Akku
Modell 106345-14-02
1
Lampenschirm
2
EIN- / AUS-Schalter
3
Solarzelle
4
LED
5
Akkufach
Kontrollieren Sie unmittelbar nach dem Auspacke
immer den Lieferumfang auf Vollständigkeit sowie
n
den einwandfreien Zustand des Gerätes.
Modell 106345-14-01
1 Solar-Leuchtkugel
1 Standrohr
1 Verbinder
1 Erdspieß
2 Akkus, Typ NiMH, AAA, 1,2 V, 600 mAh
1 Montage- und Bedienungsanleitung
Modell 106345-14-02
1 Solar-Leuchtkugel
1 Erdspieß
2 Akkus, Typ NiMH, AAA, 1,2 V, 600 mAh
1 Montage- und Bedienungsanleitung
Technische Daten
Modell 106345-14-01
Akku: 2 x NiMH-Akku 1,2 V,
600 mAh, Größe AAA
Leuchtmittel: 1 x RGB-LED mit 0,06 W
(Die LED ist nicht
austauschbar.)
n
30 DE/AT/CH
106345_livx_LED-Solar-Gartenleuchten_Modell-D_E_Content_ES_IT.indd 30 14.11.14 12:12
Page 31

Schutzart: IP43 (regengeschützt bis
30 % Schräge)
Solarzelle: 60 x 60 mm, monokristallin
Modell 106345-14-02
Akku: 2 x NiMH-Akku 1,2 V,
600 mAh, Größe AAA
Leuchtmittel: 2 x LED mit je 0,075 W
(Die LEDs sind nicht austauschbar.)
Schutzart: IP67 (Schutz gegen Eindrin-
gen von Wasser ohne Druck)
Solarzelle: 45 x 45 mm, monokristallin
Allgemeine
Sicherheitshinweise
machen sie sich vor der ersten Benutzung des produkts mit allen Bedienund sicherheitshinweisen vertraut!
händigen sie alle unterlagen Bei
weitergaBe des produkts an dritte
eBenFalls mit aus!
LEBENS-
UND UNFALLGEFAHREN
FÜR KLEINKINDER UND
KINDER! Lassen Sie Kinder niemals unbe-
aufsichtigt mit dem Verpackungsmaterial. Es
besteht Erstickungsgefahr durch Verpackungsmaterial. Kinder unterschätzen häufig die
Gefahren. Halten Sie Kinder stets vom Verpackungsmaterial fern.
Dieses Produkt ist kein Spielzeug.
Dieses Gerät kann von Kindern ab 8 Jahren
und darüber sowie von Personen mit verringerten physischen, sensorischen oder mentalen Fähigkeiten oder Mangel an Erfahrung
und Wissen benutzt werden, wenn sie beaufsichtigt oder bezüglich des sicheren Gebrauchs des Gerätes unterwiesen wurden
und die daraus resultierenden Gefahren
verstehen. Kinder dürfen nicht mit dem Gerät spielen. Reinigung und Benutzerwartung
dürfen nicht von Kindern ohne Beaufsichtigung durchgeführt werden.
Benutzen Sie den Artikel nicht, wenn Sie ir-
gendwelche Beschädigungen feststellen!
Produktspezifische
Sicherheitshinweise
Kalte Temperaturen haben negativen Einfluss
auf die Akku-Betriebsdauer. Wenn Sie die
Solarleuchte längere Zeit nicht benötigen,
z. B. im Winter, sollten Sie diese reinigen
und in einem trockenen, warmen Raum aufbewahren.
Achten Sie darauf, dass die Solarzelle nicht
verschmutzt oder im Winter durch Schnee
und Eis bedeckt ist. Dies verringert die Leistungsfähigkeit der Solarzelle.
31 DE/AT/CH
106345_livx_LED-Solar-Gartenleuchten_Modell-D_E_Content_ES_IT.indd 31 14.11.14 12:12
Page 32

Sicherheitshinweise
für Akkus
LEBENSGEFAHR!
Akkus gehören nicht in Kinderhände. Suchen
Sie im Falle eines Verschluckens sofort einen
Arzt auf!
VORSICHT!
EXPLOSIONSGEFAHR!
Werfen Sie Akkus niemals in Feuer oder
Wasser!
Setzen Sie Akkus keiner mechanischen
Belastung aus!
Verwenden Sie keine nicht aufladbaren
Batterien.
Schließen Sie Akkus nicht kurz und / oder
öffnen Sie sie nicht.
Gefahr der Sachbeschädigung
Ausschließlich den angegebenen Akkutyp
verwenden!
Achten Sie beim Einlegen auf die richtige
Polarität! Diese wird im Akkufach angezeigt!
Reinigen Sie Batterie- und Gerätekontakte vor
dem Einlegen, falls erforderlich!
Funktionsweise
Die eingebaute Solarzelle des Artikels wandelt bei
Sonneneinstrahlung das Licht in elektrische Energie um und speichert diese in zwei NiMH-Akkus.
Das Licht wird bei beginnender Dunkelheit eingeschaltet. Die eingebauten Leuchtdioden sind ein
sehr langlebiges und energiesparendes Leuchtmittel. Die Leuchtdauer ist von der Sonneneinstrahlung, dem Einfallwinkel des Lichts auf die
Solarzelle und der Temperatur (wegen der Temperaturabhängigkeit der Akkukapazität) abhän
gig.
Ideal ist ein senkrechter Lichteinfallwinkel bei
Temperaturen über dem Gefrierpunkt. Die Akkus
erreichen erst nach mehreren Lade- und Entladezyklen ihre maximale Kapazität.
Inbetriebnahme
Montage
Modell 106345-14-01
Montieren Sie die Solarleuchte, wie in Abb.
A–E dargestellt:
Entfernen Sie die Funktionseinheit 1 durch
Drehen gegen den Uhrzeigersinn vom Lampenschirm
2
(Abb. B).
Schieben Sie den EIN- / AUS-Schalter 9 zum
Einschalten in die Position ON (Abb. C).
Setzen Sie die Funktionseinheit wieder auf
den Lampenschirm und verschließen Sie die
Verbindung durch Drehen im Uhrzeigersinn
(Abb. B).
Stecken Sie den Lampenschirm auf das Stand
5
rohr
(Abb. E).
Stecken Sie das Standrohr mithilfe des Ver-
4
binders
auf den Erdspieß 3 (Abb. E).
-
32 DE/AT/CH
106345_livx_LED-Solar-Gartenleuchten_Modell-D_E_Content_ES_IT.indd 32 14.11.14 12:12
Page 33

Modell 106345-14-02
Montieren Sie die Solarleuchte wie in Abb.
F–J dargestellt:
Entfernen Sie die Bodenschale 6 durch
Drehen gegen den Uhrzeigersinn vom Lampenschirm
Schieben Sie den EIN- / AUS-Schalter 2 zum
1
(Abb. H).
Einschalten in die Position ON (Abb. H).
Setzen Sie die Bodenschale wieder auf den
Lampenschirm und verschließen Sie die Verbindung durch Drehen im Uhrzeigersinn
(Abb. H).
Falls Sie die Solarleuchte im Erdboden be-
festigen möchten, stecken Sie den Erdspieß
8
in die Öffnung auf der Außenseite der
Bodenschale (Abb. I).
Falls Sie den Artikel im Gartenteich schwim-
men lassen möchten, betreiben Sie die Solarleuchte ohne den Erdspieß
Leuchte aufstellen
8
(Abb. J).
Bodenleuchte mit Erdspieß verwenden
Stecken Sie die montierte Solarleuchte so
weit in den Boden (Rasen, Blumenbeet), dass
sie stabil steht.
Achten Sie auf einen sicheren Stand. Wenden
Sie bei der Montage bzw. beim Aufstellen
keine Gewalt an, z.B. durch Hammerschläge.
Dies beschädigt das Produkt.
Im Wasser (z.B. Gartenteich) verwenden
(Modell 106345-14-02)
Legen Sie die montierte Solarleuchte ohne
montierten Erdspieß
8
auf die Wasser-
oberfläche.
Achten Sie darauf, dass sich die Bodenschale
6
unten befindet (Abb. J).
Tauchen Sie die Solarleuchte nicht unter
Wasser: Die Solarleuchte verfügt nur über
einen Wasserschutz, solange das Wasser
keinen Druck ausübt.
Allgemeine Hinweise zur Wahl des
Aufstellorts
Um ein optimales Ergebnis zu erzielen, stellen
Sie die Solarleuchte an einem Ort auf, an
dem die Solarzelle möglichst lange direktem
Sonnenlicht ausgesetzt ist.
Stellen Sie die Solarleuchte nicht unter Büsche,
Bäume, Vordächer, etc. Dies vermindert den
Einfall von Sonnenlicht.
Stellen Sie sicher, dass die Solarzelle nicht
von einer anderen Lichtquelle, wie z.B. Hofoder Straßenbeleuchtung beeinflusst wird, da
sich das Licht sonst in der Dämmerung nicht
einschaltet. Bei niedriger Helligkeit schaltet
sich das Licht automatisch ein, bei normaler
Umgebungshelligkeit schaltet sich das Licht
wieder aus.
Akkus austauschen
Um eine optimale Leistung zu erzielen, sollten
Sie die Akkus alle 12 Monate austauschen.
33 DE/AT/CH
106345_livx_LED-Solar-Gartenleuchten_Modell-D_E_Content_ES_IT.indd 33 14.11.14 12:12
Page 34

Modell 106345-14-01
Entfernen Sie die Funktionseinheit 1 durch
Drehen gegen den Uhrzeigersinn vom Lampenschirm
die LED-Abdeckung
2
. Entfernen Sie anschließend
6
durch Drehen gegen
den Uhrzeigersinn aus der Funktionseinheit
(Abb. B).
Schieben Sie den EIN- / AUS-Schalter 9 zum
Ausschalten in die Position OFF (Abb. C).
Öffnen Sie den Akkufachdeckel 8 und ent-
nehmen Sie die alten Akkus. Setzen Sie die
neuen Akkus ein (Abb. C).
Hinweis: Verwenden Sie nur solche Akkus,
wie unter „Technische Daten“ angegeben.
Achten Sie beim Einsetzen der Akkus auf die
richtige Polarität. Diese wird im Akkufach
angezeigt.
Schließen Sie den Akkufachdeckel (Abb. C).
Schieben Sie den EIN- / AUS-Schalter 9 zum
Einschalten in die Position ON (Abb. C).
Setzen Sie die Funktionseinheit wieder auf
den Lampenschirm und verschließen Sie die
Verbindung durch Drehen im Uhrzeigersinn
(Abb. B).
Modell 106345-14-02
Entfernen Sie die Bodenschale 6 durch
Drehen gegen den Uhrzeigersinn vom Lampenschirm
Schieben Sie den EIN- / AUS-Schalter 9 zum
1
(Abb. H).
Ausschalten in die Position OFF (Abb. H).
Nehmen Sie das Akkufach 5 aus der Bod
schale. Es befindet sich unter der Solarzelle 3
(Abb. G).
Entnehmen Sie die alten Akkus. Setzen Sie
die neuen Akkus ein (Abb. G).
Hinweis: Verwenden Sie nur solche Akkus,
wie unter „Technische Daten“ angegeben.
Achten Sie beim Einsetzen der Akkus auf die
richtige Polarität. Diese wird im Akkufach
angezeigt.
Setzen Sie das Akkufach wieder in die
Bodenschale (Abb. H).
Schieben Sie den EIN- / AUS-Schalter 9 zu
Einschalten in die Position ON (Abb. H).
Setzen Sie die Funktionseinheit wieder auf
den Lampenschirm und verschließen Sie die
Verbindung durch Drehen im Uhrzeigersinn
(Abb. H).
Reinigung und Pflege
Die Leuchtdioden sind nicht austauschbar. Die
Solarleuchte ist bis auf einen erforderlichen Akkuwechsel wartungsfrei.
Tauschen Sie die Akkus aus, wenn die Leucht-
dauer trotz guter Sonneneinstrahlung nach
einiger Zeit merklich nachlässt. Benutzen Sie
nur Akkus der richtigen Größe und des empfohlenen Typs (siehe Kapitel „Technische
Daten“).
Reinigen Sie die Solarleuchte regelmäßig
mit einem trockenen, fusselfreien Tuch. Ver-
en-
wenden Sie bei stärkeren Verschmutzungen
ein leicht angefeuchtetes Tuch.
m
34 DE/AT/CH
106345_livx_LED-Solar-Gartenleuchten_Modell-D_E_Content_ES_IT.indd 34 14.11.14 12:12
Page 35

Fehlerbehebung
Hinweis: Das Gerät enthält empfindliche elektronische Bauteile. Daher ist es möglich, dass es
durch Funkübertragungsgeräte in unmittelbarer
Nähe gestört wird. Dies können z.B. Mobiltelefone, Funksprechgeräte, CB-Funkgeräte, Funkfernsteuerungen / andere Fernbedienungen und
Mikrowellengeräte sein. Falls Sie Störungen in
der Funktion feststellen, entfernen Sie solche
Störquellen aus der Umgebung des Gerätes.
Hinweis: Elektrostatische Entladungen können
zu Funktionsstörungen führen. Entfernen Sie bei
solchen Funktionsstörungen kurzzeitig die Akkus
und setzen Sie diese erneut ein.
Fehler Ursache Lösung
Das Licht
schaltet sich
nicht ein, obwohl die
Leuchte den
ganzen Tag
von der Sonne
angestrahlt
wurde.
Künstliche
Lichtquellen,
wie z.B.
Straßenlichter,
stören die
Leuchte.
Montieren
Sie die Leuchte an einer
Stelle, an
der sie nicht
von anderen
Lichtquellen
gestört werden kann.
Fehler Ursache Lösung
Das Licht
schaltet sich
nicht oder nur
kurz ein.
Die Akkus sind
kaputt oder
das Tageslicht
hat nicht ausgereicht.
Tauschen Sie
die Akkus
aus oder
montieren Sie
die Leuchte
an einer Stelle, an der sie
mehr Sonnen
licht erhält.
Entsorgung
Die Verpackung besteht aus umweltfreundlichen Materialien, die Sie
über die örtlichen Recyclingstellen
entsorgen können.
Möglichkeiten zur Entsorgung des ausgedienten
Produktes erfahren Sie bei Ihrer Gemeinde oder
Stadtverwaltung.
Werfen Sie Ihr Produkt, wenn es
ausgedient hat, im Interesse des Um-
weltschutzes nicht in den Hausmüll,
sondern führen Sie es einer fachgerechten Entsorgung zu. Über Sammelstellen und deren
Öffnungszeiten können Sie sich bei Ihrer zuständigen Verwaltung informieren.
-
Defekte oder verbrauchte Akkus müssen gemäß
Richtlinie 2006 / 66 / EG recycelt werden. Geben
Sie Akkus und / oder das Gerät über die angebotenen Sammeleinrichtungen zurück.
35 DE/AT/CH
106345_livx_LED-Solar-Gartenleuchten_Modell-D_E_Content_ES_IT.indd 35 14.11.14 12:12
Page 36

Umweltschäden durch falsche
Entsorgung der Akkus!
Pb
Akkus dürfen nicht über den Hausmüll entsorgt
werden. Geben Sie deshalb verbrauchte Batterie
bei einer kommunalen Sammelstelle ab.
Garantie
Das Produkt wurde nach strengen Qualitätsrichtlinien sorgfältig produziert und vor Anlieferung
gewissenhaft geprüft. Im Falle von Mängeln dieses Produkts stehen Ihnen gegen den Verkäufer
des Produkts gesetzliche Rechte zu. Diese gesetzlichen Rechte werden durch unsere im Folgenden
dargestellte Garantie nicht eingeschränkt.
Sie erhalten auf dieses Gerät 3 Jahre Garantie
ab Kaufdatum. Die Garantiefrist beginnt mit dem
Kaufdatum. Bitte bewahren Sie den Original
Kassenbon gut auf. Diese Unterlage wird als
Nachweis für den Kauf benötigt.
Tritt innerhalb von 3 Jahren ab dem Kaufdatum
dieses Produkts ein Material- oder Fabrikationsfehler auf, wird das Produkt von uns – nach unserer Wahl – für Sie kostenlos repariert oder
ersetzt. Diese Garantie verfällt, wenn das Produkt
beschädigt, nicht sachgemäß benutzt oder gewartet wurde.
ausgesetzt sind (z. B. Batterien) und daher als
Verschleißteile angesehen werden können oder
für Beschädigungen an zerbrechlichen Teilen, z. B.
Schalter, Akkus oder die aus Glas gefertigt sind.
n
Modell 106345-14-01
Modell 106345-14-02
Die Garantieleistung gilt für Material- oder Fabrikationsfehler. Diese Garantie erstreckt sich
nicht auf Produktteile, die normaler Abnutzung
36 DE/AT/CH
106345_livx_LED-Solar-Gartenleuchten_Modell-D_E_Content_ES_IT.indd 36 14.11.14 12:12
Page 37

OWIM GmbH & Co. KG
Stiftsbergstraße 1
D-74167 Neckarsulm
Model-No.: 106345-14-01 / 106345-14-02
Version: 11 / 2014
Estado de las informaciones · Versione delle
informazioni · Last Information Update
Stand der Informationen:11 / 2014
Ident.-No.: 106345-14-01 / 02112014-ES / IT
IAN 106345
106345_livx_LED-Solar-Gartenleuchten_Modell-D_E_Cover_ES_IT.indd 3 14.11.14 12:15
 Loading...