


ELITE Series
Garage Door Opener
User’s Guide
FOR RESIDENTIAL USE ONLY
.
Write down the following information for future reference:
Serial Number:
Date of Purchase:
■Please read this guide and the enclosed safety materials carefully!
■The door WILL NOT CLOSE unless the Protector System® is connected and properly aligned.
■Periodic checks of the garage door opener are required to ensure safe operation.
■This garage door opener is ONLY compatible with MyQ™ and Security 2.0™ accessories.
■DO NOT enable the Timer-to-Close feature if you are installing the garage
door opener on a one-piece door. The Timer-to-Close is to be used ONLY with sectional doors.
■ Attach enclosed warning labels to the location indicated on label.
CONTACT INFORMATION
Leave this Users Guide with the homeowner.
The images throughout this manual are for reference and your product may look different.
CONTENTS |
|
|
Important Safety Instructions ......... |
|
2-3 |
Operation.................................... |
|
4 |
Using the Door Control.................. |
|
5 |
Programming-Door Control Panel |
....6 |
|
Programming - Remote Controls...... |
|
7 |
To Erase the Memory ................... |
|
7 |
To Open the Door Manually ............ |
|
8 |
Battery Backup*.......................... |
|
8 |
Adjustment.................................. |
|
9 |
Program the Travel .................... |
|
10 |
Test the Safety Reversal System.... |
|
11 |
Test the Protector System® .......... |
|
11 |
Maintenance.............................. |
|
12 |
Troubleshooting...................... |
13-14 |
|
Repair Parts .............................. |
|
15 |
Warranty .................................. |
|
16 |
www.liftmaster.com
The Chamberlain Group, Inc.
845 Larch Avenue
Elmhurst, Illinois 60126-1196
*If applicable.

Important Safety Instructions
Safety Symbol and Signal |
|
|
|
|
|
|
|
||
|
|
|
IMPORTANT INSTALLATION INSTRUCTIONS |
||||||
Word Review |
|
|
|
||||||
This garage door opener has been designed |
|
|
|
||||||
is installed, operated, maintained and tested |
|
|
|
WARNING |
|||||
and tested to offer safe service provided it |
|
|
|
|
|
|
|
||
in strict accordance with the instructions |
|
|
|
|
|
|
|
||
|
|
|
To reduce the risk of SEVERE INJURY or DEATH: |
|
|||||
and warnings contained in this manual. |
|
|
|
|
|||||
|
|
|
|
|
|
|
|||
When you see these Safety Symbols and |
|
|
1. READ AND FOLLOW ALL WARNINGS AND INSTRUCTIONS. |
9. |
Install wall-mounted garage door control: |
|
|||
Signal Words on the following pages, they |
|
|
|
||||||
|
2. |
Install garage door opener ONLY on properly balanced and |
|
• within sight of the garage door. |
|||||
will alert you to the possibility of serious |
|
|
|||||||
|
|
|
lubricated garage door. An improperly balanced door may |
|
• out of reach of children at minimum height of 5 feet (1.5 m). |
||||
injury or death if you do not comply |
|
|
|
|
|||||
|
|
|
NOT reverse when required and could result in SEVERE |
|
• away from ALL moving parts of the door. |
||||
with the warnings that accompany them. |
|
|
|
|
|||||
|
|
|
INJURY or DEATH. |
10. |
Place entrapment warning label on wall next to garage door |
||||
The hazard may come from something |
|
|
|
||||||
mechanical or from electric shock. Read |
|
3. |
ALL repairs to cables, spring assemblies and other hardware |
|
control. |
||||
the warnings carefully. |
|
|
|
MUST be made by a trained door systems technician |
11. |
Place manual release/safety reverse test label in plain view on |
|||
|
|
|
|
|
|
BEFORE installing opener. |
|
inside of garage door. |
|
|
|
|
|
4. |
Disable ALL locks and remove ALL ropes connected |
12. |
Upon completion of installation, test safety reversal system. |
||
|
|
|
|||||||
|
|
|
|
|
|
to garage door BEFORE installing opener to avoid |
|
Door MUST reverse on contact with a 1-1/2" (3.8 cm) high |
|
|
|
|
|
|
|
|
|||
Mechanical |
|
|
|
entanglement. |
|
object (or a 2x4 laid flat) on the floor. |
|||
|
|
|
|
|
5. Install garage door opener 7 feet (2.13 m) or more above |
13. |
To avoid SERIOUS PERSONAL INJURY or DEATH from |
||
|
|
|
|
|
|
floor. |
|||
|
|
|
|
|
|
|
electrocution, disconnect ALL electric and battery power |
||
|
|
|
|
6. |
Mount the emergency release within reach, but at least 6 feet |
|
BEFORE performing ANY service or maintenance. |
||
|
|
|
|
||||||
Electrical |
|
|
|
(1.83 m) above the floor and avoiding contact with vehicles |
14. |
DO NOT enable the Timer-to-Close functionality if operating |
|||
When you see this Signal Word on the |
|
|
|
to avoid accidental release. |
|
either one-piece or swinging garage doors. To be enabled |
|||
|
|
7. NEVER connect garage door opener to power source until |
|
||||||
|
|
|
ONLY when operating a sectional door. |
||||||
following pages, it will alert you to the |
|
|
|
||||||
|
|
|
instructed to do so. |
|
|||||
|
|
|
|
SAVE THESE |
|||||
possibility of damage to your garage door |
|
|
|
|
|||||
|
|
8. NEVER wear watches, rings or loose clothing while installing |
15. |
||||||
and/or the garage door opener if you do not |
|
|
|||||||
comply with the cautionary statements that |
|
|
|
or servicing opener. They could be caught in garage door or |
|
INSTRUCTIONS. |
|||
|
|
|
opener mechanisms. |
|
|||||
accompany it. Read them carefully. |
|
|
|
|
|||||
|
|
|
|
|
|
|
|
|
|
|
|
|
|
|
|
|
|
|
|
|
|
|
|
|
|
|
|
|
|
|
|
|
|
|
|
|
|
|
|
|
|
|
|
|
|
|
|
|
|
NOTE: For complete installation instructions visit www.liftmaster.com to print the entire owner’s manual.
2

Important Safety Instructions
IMPORTANT SAFETY INSTRUCTIONS

 WARNING
To reduce the risk of SEVERE INJURY or DEATH:
1.READ AND FOLLOW ALL WARNINGS AND INSTRUCTIONS.
2.ALWAYS keep remote controls out of reach of children. NEVER permit children to operate or play with garage door control push buttons or remote controls.
3.ONLY activate garage door when it can be seen clearly, it is properly adjusted, and there are no obstructions to door travel.
4.ALWAYS keep garage door in sight and away from people and objects until completely closed. NO ONE SHOULD CROSS THE PATH OF THE MOVING DOOR.
5.NO ONE SHOULD GO UNDER A STOPPED, PARTIALLY OPENED DOOR.
6.If possible, use emergency release handle to disengage trolley ONLY when garage door is CLOSED. Use caution when using this release with the door open. Weak or broken springs or unbalanced door could result in an open door falling rapidly and/or unexpectedly and increasing the risk of SEVERE INJURY or DEATH.
7.NEVER use emergency release handle unless garage doorway is clear of persons and obstructions.
8.NEVER use handle to pull garage door open or closed. If rope knot becomes untied, you could fall.
9.After ANY adjustments are made, the safety reversal system MUST be tested.
10.Safety reversal system MUST be tested every month. Garage door MUST reverse on contact with 1-1/2" high (3.8 cm) object (or a 2x4 laid flat) on the floor. Failure to adjust the garage door opener properly increases the risk of SEVERE INJURY or DEATH.
11.ALWAYS KEEP GARAGE DOOR PROPERLY BALANCED. An improperly balanced door may NOT reverse when required and could result in SEVERE INJURY or DEATH.
12.ALL repairs to cables, spring assemblies and other hardware, ALL of which are under EXTREME tension, MUST be made by a trained door systems technician.
13.ALWAYS disconnect electric power to garage door opener BEFORE making ANY repairs or removing covers.
14.This operator system is equipped with an unattended operation feature. The door could move unexpectedly. NO ONE SHOULD CROSS THE PATH OF THE MOVING DOOR.
15.DO NOT enable the Timer-to-Close functionality if operating either one-piece or swinging garage doors. To be enabled ONLY when operating a sectional door.
16.SAVE THESE
INSTRUCTIONS.
3

Operation
Your garage door opener is equipped with features to provide you with greater control over your garage door operation. Accessories provided with your garage door opener will vary depending on the garage door opener model purchased.
ALERT2CLOSE
The Alert2Close feature provides a visual and an audible alert that an unattended door is closing.
TIMER-TO-CLOSE (TTC)
The Timer-to-Close feature automatically closes the door after a specified time period that can be adjusted using a TTC enabled door control (Models 881LM or 880LM). Prior to and during the door closing the garage door opener lights will flash and the garage door opener will beep.
MyQ™
MyQ™ technology uses a 900MHz signal to provide two-way communication between the garage door opener and MyQ™ enabled accessories. Your garage door opener is compatible with up to 16 MyQ™ accessories.
REMOTE CONTROLS AND DOOR CONTROLS (SECURITY 2.0™)
Your garage door opener has already been programmed at the factory to operate with your remote control, which changes with each use, randomly accessing over 100 billion new codes. Compatible with MyQ™ and Security 2.0™.
NOTE: Older LiftMaster remote controls, door controls, and third party products are not compatible.
Accessories (Security 2.0™) |
|
MEMORY CAPACITY |
|
Remote Controls |
Up to 40 |
||
|
|
|
|
Door Controls |
Up to 2 Smart Control Panels or 4 of any other |
||
|
Security+ 2.0™ door controls |
||
Keyless Entries |
Up to 4 |
||
|
|
|
|
THE PROTECTOR SYSTEM® (SAFETY REVERSING SENSORS)
When properly connected and aligned, the safety reversing sensors will detect an obstruction in the path of the infrared beam. If an obstruction breaks the infrared beam while the door is closing, the door will stop and reverse to full open position, and the opener lights will flash 10 times. If the door is fully open, and the safety reversing sensors are not installed, or are misaligned, the door will not close from a remote control. However, you can close the door
if you hold the button on the door control or keyless entry until the door is fully closed. The safety reversing sensors do not affect the opening cycle.
ENERGY CONSERVATION
For energy efficiency the garage door opener will enter sleep mode when the door is fully closed. The sleep mode shuts the garage door opener down until activated. The sleep mode is sequenced with the garage door opener light bulb; as the light bulb turns off the sensor LEDs will turn off and whenever the garage door opener lights turn on the sensor LEDs will light.
LIGHTS
The garage door opener light bulbs will turn on when the opener is initially plugged in; power is restored after interruption, or when the garage door opener is activated. The lights will turn off automatically after 4-1/2 minutes. An incandescent A19 light bulb (100 watt maximum) or for maximum energy efficiency a 26 W (100 W equivalent) compact fluorescent light (CFL) bulb may be used.
Light Feature
The garage door opener is equipped with an added feature; the lights will turn on when someone enters through the open garage door and the safety reversing sensor infrared beam is broken. For added control over the light bulbs on your garage door opener, see page 6.
USING YOUR GARAGE DOOR OPENER
The garage door opener can be activated through a wall-mounted door control, remote control, wireless keyless entry or MyQ™ accessory. When the door is closed and the garage door opener is activated the door will open. If the door senses an obstruction or is interrupted while opening the door will stop. When the door is in any position other than
closed and the garage door opener is activated the door will close. If the garage door opener senses an obstruction while closing, the door will reverse. If the obstruction interrupts the sensor beam the garage door opener lights will blink 10 times. However, you can close the door if you hold the button on the door control or keyless entry until the door is fully closed. The safety reversing sensors do not affect the opening cycle. The safety reversing sensor must be connected and aligned correctly before the garage door opener will move in the down direction.
4

Operation
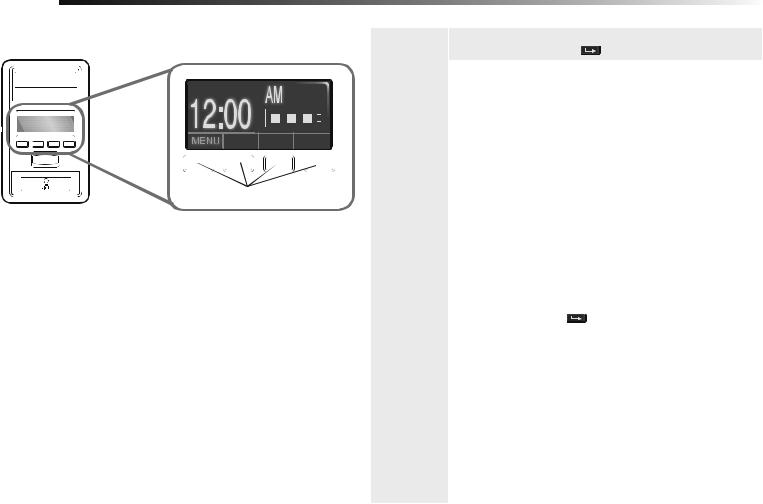
Using the Door Control
SMART CONTROL PANEL
Push Bar
Navigation
Buttons  Screen
Light Button
PUSH BAR
Press the push bar to open and close the door.
LIGHT BUTTON
Press the LIGHT button to turn the garage door opener lights on or off. When the lights are turned on they will stay on until the LIGHT button is pressed again, or until the garage door opener is activated. Once the garage door opener is activated the lights will turn off after the specified period of time (the factory setting is 4-1/2 minutes). The LIGHT button will not
control the lights when the door is in motion. The duration of the light timing can be adjusted using the door control, see page 6.
NAVIGATION BUTTONS
Use the navigation buttons to make selections and program features.
SCREEN
The screen will display the time and temperature until the menu button is pressed, and then it will display the menu options. If there is a problem with the garage door opener the screen will display the Diagnostic Code.
The following features are accessible through the screen using the navigation buttons.
LEARN A DEVICE
Any compatible remote controls, wireless keyless entry, or MyQ™ accessories can be programmed to the garage door opener by accessing the menu and using the navigation buttons on the Smart Control Panel.
LOCK
The LOCK feature is designed to prevent activation of the garage door opener from remote controls while still allowing activation from the door control and keyless entry. This feature is useful for added peace of mind when the home is empty (i.e. vacation).
TIMER-TO-CLOSE (TTC)
DO NOT enable TTC if operating a one-piece door. Factory default is set to off. The garage door opener will Beep and the lights will Flash before closing the door.
If the door encounters an obstruction while closing, the garage door opener will make a second attempt to close the door. If the obstruction has not been cleared after the second attempt, the garage door opener will reverse open, stop and WILL NOT close until the obstruction has been cleared. TTC WILL NOT work if the garage door opener is operating by battery power or if the safety reversing sensors are misaligned. This feature is NOT intended to be the primary method of closing the door. A keyless entry should be installed in the event of an accidental lock out when using this feature.
AUTOMATIC LIGHT
Motion Sensor
Factory default is set to on. This feature automatically turns on the garage door opener lights when motion is sensed. The lights will come on for the set period of time, then shut off. If using the garage door opener light as a work light disable the motion sensor, otherwise the light will turn off automatically if you are beyond the range of the sensor.
Light Feature
The lights will turn on when someone enters through the open garage door and the safety reversing sensor infrared beam is broken.
MAINTENANCE ALERT (MAS)
This feature assists the homeowner in ensuring the garage door opener system stays in good working condition. A maintenance alert message will display on the screen indicating the garage door opener may be in need of maintenance. The factory setting for the MAS feature is off and can be activated at time of installation. Contact your installing dealer for service.
5
Operation
Programming - Smart Control Panel*
Navigation Buttons
Features |
How to Set Features: Use the navigation buttons to scroll to the menus. |
||||
|
Use the |
|
|
|
button to select the desired feature. |
|
|
|
|
|
|
Clock Setup |
Set the time, choose 12 or 24 hour clock and show/hide clock. |
||||
|
|
|
|
|
|
Timer to Close |
Set the Timer-to-Close feature off/on and set the time interval (1, 5, 10 |
||||
(TTC) |
or a custom setting up to 99 minutes) before door closes. NOTE: DO |
||||
|
NOT enable TTC if operating a one-piece door. TTC is to be used ONLY |
||||
|
with sectional doors. |
|
|
|
|
Lock |
Enable/disable lock. |
|
|
|
|
|
|
|
|
|
|
Temperature |
Display the temperature in Fahrenheit or Celsius and show/hide the |
||||
|
temperature. |
|
|
|
|
|
|
|
|
|
|
Language |
Select a language. |
|
|
|
|
|
|
|
|
|
|
Light |
Set duration for garage door opener light to stay on after operation, |
||||
|
selectable range of 1-1/2 to 4-1/2 minutes. Turn the Motion sensor off/ |
||||
|
on, and turn the entry light feature off/on. |
||||
|
|
|
|
|
|
* Not included with all models. Accessories vary depending on the model purchased.
Contrast |
Adjust the contrast of the screen. |
|||||
To Program |
1. |
Press the navigation button below “MENU” to view the Features |
||||
a Remote |
|
menu. |
|
|
||
Control or |
2. |
Use the navigation buttons to scroll to “PROGRAM” and press the |
||||
Keyless Entry |
||||||
|
navigation button under |
|
|
to continue. |
||
3.Select “REMOTE” or “KEYPAD” to program from the program menu. Press  to continue.
4.Remote Control: Press the button on the remote control that you wish to operate your garage door.
Keyless Entry: Enter a 4-digit personal identification number (PIN) of your choice on the keyless entry keypad. Then press the ENTER button.
The garage door opener lights will flash (or two clicks will be heard) when the code has been programmed.
Repeat the steps above for programming additional remote controls or keyless entry devices. If programming is unsuccessful, repeat steps 1-3 or program the remote using the learn button on the garage door opener.
6
Operation
Programming - Remote Controls
Your garage door opener has been programmed at the factory to operate with your remote control. Older LiftMaster remote controls are NOT compatible. Programming can be done through the door control or the Learn button on the garage door opener. To program additional remote controls refer to the instructions provided with the additional remote controls or visit www.liftmaster.com. If your vehicle is equipped with a Homelink®, you may require an external adapter depending on the make, model, and year of your vehicle. Visit www.homelink.com for additional information.
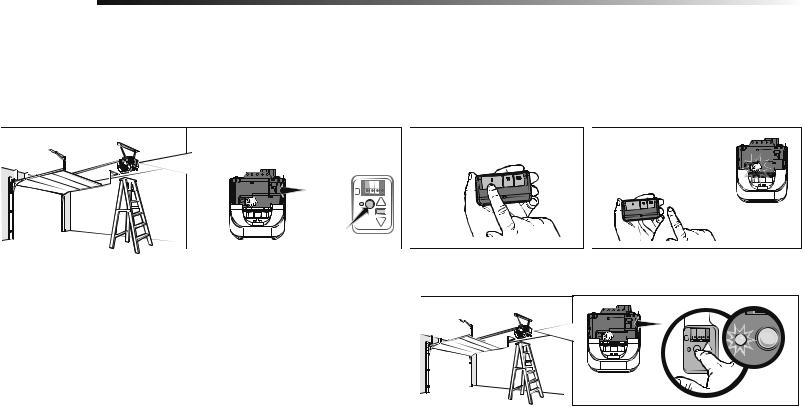
PROGRAM A REMOTE USING THE LEARN BUTTON ON THE GARAGE DOOR OPENER
1 Press and release the Learn button on the garage door opener. The Learn indicator light will glow steadily for 30 seconds.
Learn
Indicator Light
Yellow
Learn
Button
When replacing the light lens cover, ensure the antenna wires are hanging straight down.
ERASE ALL REMOTE CONTROLS AND KEYLESS ENTRIES
1Press and hold the learn button on garage door opener until the learn LED goes out (approximately 6 seconds). All remote control and keyless entry codes are now erased.
Reprogram any accessory you wish to use.
ERASE ALL DEVICES (Including MyQ™ enabled accessories)
1Press and hold the learn button on garage door opener until the learn LED goes out (approximately 6 seconds).
2Immediately press and hold the learn button again until the learn LED goes out. All codes are now erased.
Reprogram any accessory you wish to use.
2Within 30 seconds, press and hold the button on the remote control.
3Release the button when the garage door opener light blinks. It has learned the code. If light bulbs are not installed, two clicks will be heard.
7
Operation
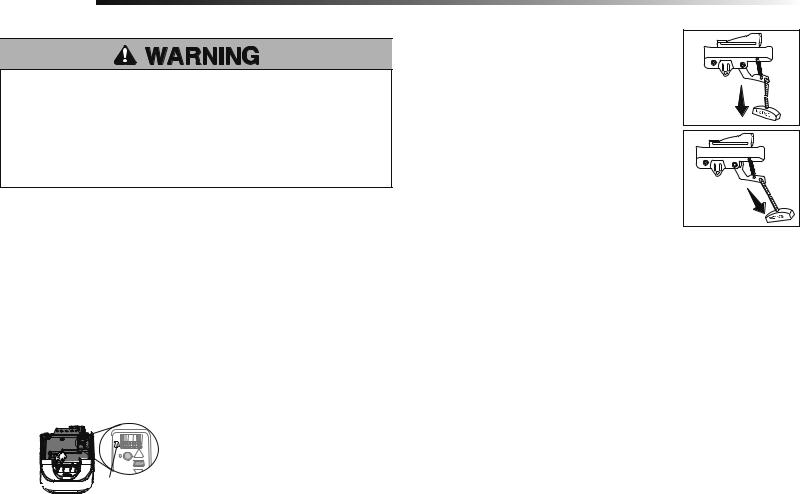
To Open the Door Manually
To prevent possible SERIOUS INJURY or DEATH from a falling garage door:
•If possible, use emergency release handle to disengage trolley ONLY when garage door is CLOSED. Weak or broken springs or unbalanced door could result in an open door falling rapidly and/or unexpectedly.
•NEVER use emergency release handle unless garage doorway is clear of persons and obstructions.
•NEVER use handle to pull door open or closed. If rope knot becomes untied, you could fall.
Battery Backup (If applicable)
DISCONNECT THE TROLLEY
1 The door should be fully closed if possible.
2 Pull down on the emergency release handle.
RECONNECT THE TROLLEY
The lockout feature prevents the trolley from reconnecting automatically.
1Pull the emergency release handle down and back (toward the opener). The door can then be raised and lowered manually as often as necessary.
2To disengage the lockout feature, pull the handle straight down.
The trolley will reconnect on the next UP or DOWN operation, either manually or by using the door control or remote control.
The battery backup system allows access in and out of your garage, even when the power is out. When the garage door opener is operating on battery power, the garage door opener will run slower, the light will not function, the Battery Status LED will glow solid orange, and a beep will sound approximately every 2 seconds.
The battery charges when the garage door opener is plugged into a 110Vac electrical outlet that has power and requires 24 hours to fully charge. A fully charged battery supplies 12Vdc to the garage door opener for one to two days of normal operation during an electrical power outage. After the electrical power has been restored, the battery will recharge within 24 hours. The battery will last approximately 1 to 2 years with normal usage. Instructions for replacement are provided with the battery. To obtain maximum battery life and prevent damage, disconnect the battery when the garage door opener is unplugged for an extended period of time.
NOTE: When the garage door opener is in battery backup mode the garage door opener lights, Timer-to-Close, and Remote Close features are unavailable.
BATTERY STATUS LED
NOTE: The Battery Status LED is most visible with the garage door opener light off. Battery does not have to be fully charged to operate the garage door opener.


 Battery Status LED
GREEN LED:
All systems are normal.
•A solid green LED light indicates the battery is fully charged.
•A flashing green LED indicates the battery is being charged.
ORANGE LED:
The garage door opener has lost power and is in battery backup mode.
•A solid orange LED with beep, sounding approximately every 2 seconds, indicates the garage door opener is operating on battery power.
•A flashing orange LED with beep, sounding every 30 seconds, indicates the battery is low.
RED LED:
The garage door opener’s 12V battery needs to be replaced.
•A solid red LED with beep, sounding every 30 seconds, indicates the garage door opener needs servicing. Please call for replacement battery to allow your system to operate during a power outage.
8

Adjustment
Introduction
Without a properly installed safety reversal system, persons (particularly small children) could be SERIOUSLY INJURED or KILLED by a closing garage door.
•Incorrect adjustment of garage door travel limits will interfere with proper operation of safety reversal system.
•After ANY adjustments are made, the safety reversal system MUST be tested. Door MUST reverse on contact with 1-1/2" (3.8 cm) high object (or 2x4 laid flat) on floor.
To prevent damage to vehicles, be sure fully open door provides adequate clearance.
Your garage door opener is designed with electronic controls to make setup and adjustments easy. The adjustments allow you to program where the door will stop in the open (UP) and close (DOWN) position. The electronic controls sense the amount of force required to open and close the door.
NOTE: If anything interferes with the door’s upward travel it will stop. If anything interferes with the door’s downward travel, it will reverse.
To watch a short instructional video on programming your new garage door opener use your smartphone to read the QR Code below:
PROGRAMMING BUTTONS
The programming buttons are located on the left side panel of the garage door opener and are used to program the travel.
UP (Open) |
DOWN (Close) |
PROGRAMMING BUTTONS
UP Button
Adjustment
Button
DOWN Button
9

Adjustment
1 Program the Travel
Without a properly installed safety reversal system, persons (particularly small children) could be SERIOUSLY INJURED or KILLED by a closing garage door.
•Incorrect adjustment of garage door travel limits will interfere with proper operation of safety reversal system.
•After ANY adjustments are made, the safety reversal system MUST be tested. Door MUST reverse on contact with 1-1/2" (3.8 cm) high object (or 2x4 laid flat) on floor.
1.1Press and hold the Adjustment Button until the UP Button begins to flash and/or a beep is heard.
1.5Once the door is in the desired DOWN position press and release the Adjustment Button. The garage door opener lights will flash twice and the UP Button will begin to flash.
1.2Press and hold the UP Button until the door is in the desired UP position.
NOTE: The UP and DOWN Buttons can be used to move the door up and down as needed.
1.6Press and release the UP Button. When the door travels to the programmed UP position, the DOWN Button will begin to flash.
1.3Once the door is in the desired UP position press and release the Adjustment Button. The garage door opener lights will flash twice and the DOWN Button will begin to flash.
1.7Press and release the DOWN Button. The door will travel to the programmed DOWN position. Programming is complete.
1.4Press and hold the DOWN Button until the door is in the desired DOWN position.
NOTE: The UP and DOWN Buttons can be used to move the door up and down as needed.
*If the garage door opener lights are flashing 5 times during the steps for Program the Travel, the programming has timed out. If the garage door opener lights are flashing 10 times during the steps for Program the Travel, the safety reversing sensors are misaligned or obstructed. When the sensors are aligned and unobstructed, cycle the door through a complete up and down cycle using the remote control or the UP and DOWN buttons. Programming is complete. If you are unable to operate the door up and down, repeat the steps for Programming the Travel.
10
 Loading...