


 Loading...
APPLICATION
The receiver can be used as a single or three channel receiver to control up to 3 gates or commercial door operators. The receiver can also be used with a 3-button remote control to operate the OPEN, CLOSE, and STOP feature on a commercial door operator. The receiver is not for use with MyQ® enabled garage door openers or devices.
Each channel is compatible with a certain number of remote controls and keypads. Refer to the list below:
•CH1: 50 remote controls and 2 keypads
•CH2: 20 remote controls and 2 keypads
•CH3: 20 remote controls and 2 keypads
When the channel has reached full capacity for remote controls, all LEDs will blink 3 times. When the channel has reached full capacity for keypads, all LEDs will blink 4 times. Additional accessories can be programmed, however, the newly programmed accessory will replace the first programmed accessory.
NOTE: The receiver will only allow you to program a button on the remote control to one channel at a time. For example, if the button on the remote control is already programmed to channel 1 and then is programmed to channel 3, the button will be erased from channel 1 and will only work on channel 3.
3-CHANNEL UNIVERSAL RECEIVER
MODELS 850LM AND 850LMC
To prevent possible SERIOUS INJURY or DEATH from electrocution:
• Be sure power is NOT connected BEFORE installing the receiver.
To prevent possible SERIOUS INJURY or DEATH from a moving gate or garage door:
•ALWAYS keep remote controls out of reach of children. NEVER permit children to operate, or play with remote control transmitters.
•Activate gate or door ONLY when it can be seen clearly, is properly adjusted, and there are no obstructions to door travel.
•ALWAYS keep gate or garage door in sight until completely closed. NEVER permit anyone to cross path of moving gate or door.
To prevent possible SERIOUS INJURY or DEATH, the use of CONSTANT OPERATION on residential openers is PROHIBITED.
When a receiver is used to activate a commercial door opener, a reversing edge MUST be installed on the bottom of the door. Failure to install a reversing edge under these circumstances may result in SERIOUS INJURY or DEATH to persons trapped beneath the door.
LEDs
CH3
CH1 CH2
INSTALLATION
The receiver and antenna use TV Type F coaxial connectors. The antenna can be connected directly to the receiver or it can be installed remotely using a coaxial cable extension kit (Model 86LM, 15 ft. or 86LMT, 25 ft.).
1Select a location for the receiver which allows access to the terminals and space for the antenna. Ensure antenna does not touch metal surfaces. DO NOT bend or fold the antenna.
2Fasten the receiver securely with the hook and loop fasteners (provided) or screws (not provided).
3After installation is complete, connect power. You may use 85LM plug-in or 95LM wired-in transformer, or power provided from your operator (9-30 V AC, 9-34 Vdc or see power ratings on next page).
NOTE: The receiver can command the operator to close the
door or gate by constant pressure. This feature is only available with a wireless control panel (Model 885LM). To enable this feature, press and hold the push bar until the gate or garage door moves to the closed position.
WIRING
Refer to your commercial door operator or gate operator owner manual or wiring diagrams for specific wiring information.
SINGLE CHANNEL
Receiver
Single Operator(s)
Operator 3
THREE CHANNEL
Receiver
Operator 2
Operator 1
1
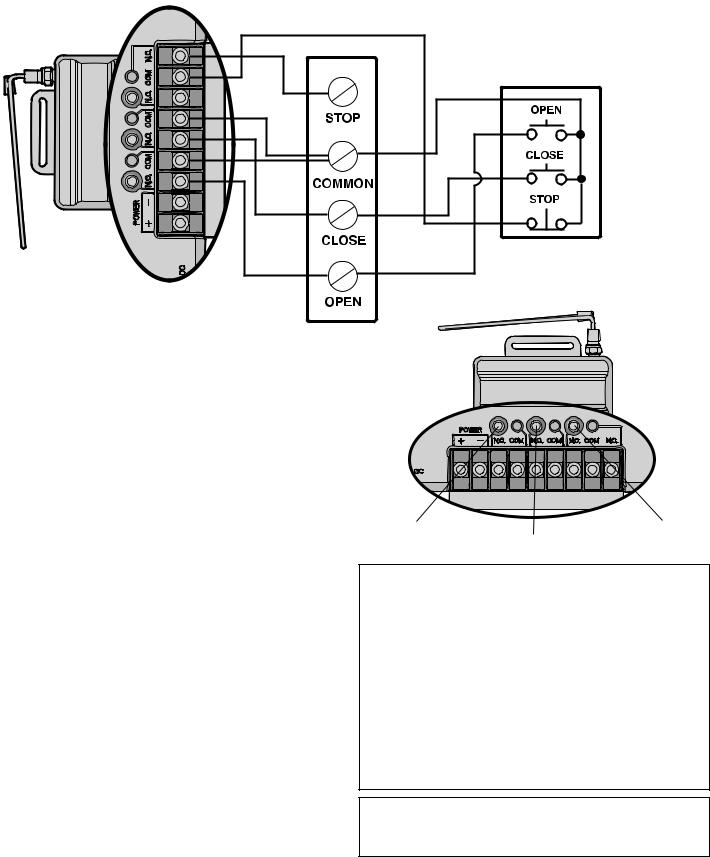
WIRING CONTINUED
OPEN, CLOSE, STOP
Single Operator
Receiver
3-Button Control Device
Refer to your commercial door operator or gate operator wiring diagrams for instructions on connecting two or more 3-Button control devices.
PROGRAMMING
PROGRAM A SINGLE BUTTON REMOTE CONTROL
1Press and release the Learn button for the selected channel on the receiver. The corresponding LED will glow steadily for 30 seconds.
2Within 30 seconds press and hold the button on the remote control that you wish to program to the receiver.
3Release the remote control button when the LED on the receiver blinks, then turns off. Programming is complete.
Repeat the steps above for each remote control you would like to program.
PROGRAM A 3-BUTTON REMOTE CONTROL AS OPEN, CLOSE, AND STOP
CH1 Learn Button |
CH3 Learn Button |
CH2 Learn Button
1 Press and release the CH1 Learn button on the receiver.
2Within 30 seconds press the desired OPEN button on the remote control.
3 Press and release the CH2 Learn button on the receiver.
4Within 30 seconds press the desired CLOSE button on the remote control.
5 Press and release the CH3 Learn button on the receiver.
6Within 30 seconds press the desired STOP button on the remote control.
NOTE: If a remote control button is not pressed within 30 seconds, the LED next to the selected Learn button will turn OFF. In that case, repeat the programming.
TO ERASE THE MEMORY
1Press and hold the Learn button for the channel you want to erase. Release the button when the corresponding LED turns off; the memory has been erased.
|
SPECIFICATIONS |
Contact Rating . . . . . . . . |
. . . . . . . . . . . . . . 5 Amps 28 Vac or dc Max. |
Power. . . . . . . . . . . . . . . . |
. . . . . .9-30V AC or 9-34V DC, 50mA, 60Hz |
RF Frequency: . . . . . . . . . |
. . . . . . . . . . . . . . . .310, 315, and 390 MHz |
NOTE: If your operator does not meet the power specifications you will need a transformer (Model 85LM plug-in or 95LM wired-in).
COMPATIBLE ACCESSORIES
Remote Controls . . . . . . . |
. . . Models 811LM, 813LM, 891LM, 893LM, |
|
890MAX, 893MAX, 895MAX, 892LT, 894LT |
Keypads . . . . . . . . . . . . . . . |
. . . . . . . . . . . . . . Models 877LM, 877MAX |
Antenna Extension Kits . . . |
. . . . . . . . . . . . . . . . .Models 86LM, 86LMT |
Antenna Only . . . . . . . . . . . |
. . . . . . . . . . . . . . . . . . . . . . . . . K77-36541 |
NOTICE: To comply with FCC and/or Industry Canada (IC) rules. adjustment or modifications of this receiver are prohibited. THERE ARE NO USER SERVICEABLE PARTS.
This device complies with Part 15 of the FCC rules and IC RSS-210. Operation is subject to the following two conditions: (1) this device may not cause harmful interference, and (2) this device must accept any interference received, including interference that may cause undesired operation.
FOR TECHNICAL SUPPORT DIAL OUR TOLL FREE NUMBER:
1-800-528-2806
2

UTILISATION
Cet appareil peut s’utiliser comme récepteur à un ou trois canaux de manière à commander jusqu’à trois ouvre-porte ou ouvre-portail commerciaux. Il peut aussi s’utiliser avec une télécommande à 3 boutons pour actionner les fonctions OUVERTURE, FERMETURE et ARRÊT d’un ouvre-porte commercial. Il n’est pas pour conçu pour fonctionner avec les ouvre-porte et autres appareils compatibles MyQ®.
Chaque canal est compatible avec un certain nombre de télécommandes et de claviers comme indiqué ci-dessous :
•Canal 1 : 50 télécommandes et 2 claviers
•Canal 2 : 20 télécommandes et 2 claviers
•Canal 3 : 20 télécommandes et 2 claviers
Lorsque le canal a atteint la pleine capacité des télécommandes, tous les témoins DEL clignotent trois fois. Lorsque le canal a atteint la pleine capacité des claviers, tous les témoins DEL clignotent quatre fois. On peut programmer des accessoires supplémentaires; toutefois, l'accessoire nouvellement programmé remplacera celui qui a été programmé en premier.
REMARQUE : Le récepteur ne vous permet de programmer un bouton de télécommande que pour un seul canal à la fois. Par exemple, si le bouton de la télécommande est déjà programmé pour le canal 1, puis pour le canal 3, il sera effacé du canal 1 et ne fonctionnera que sur le canal 3.
LEDs
Canal 1 |
Canal 2 |
Canal 3 |
INSTALLATION
Le récepteur et l’antenne utilisent des connecteurs coaxiaux de type F. L’antenne peut être connectée directement au récepteur ou installée à distance avec une rallonge coaxiale modèle 86LM (4,57 m) ou 86LMT (7,62 m).
1Choisir pour installer le récepteur un emplacement permettant d’accéder aux bornes et laissant assez d’espace pour l’antenne. S’assurer que l’antenne ne touche pas de surfaces métalliques. NE PAS plier ou courber l’antenne.
2Fixer solidement le récepteur avec les bandes auto-agrippantes (fournies) ou avec des vis (non fournies).
3Une fois l'installation terminée, branchez le cordon d'alimentation. Vous pouvez utiliser un transformateur 85LM à prise ou 95LM à câble, ou alimenté par votre opérateur (9-30 V c.a., 9-34 V c.c. ou consultez les régimes d'alimentation à la page suivante).
REMARQUE : Le récepteur peut commander à l'opérateur de fermer la porte ou le portail par une pression constante. Cette fonction est uniquement disponible avec un panneau de commande sans fil (modèle 885LM). Pour activer cette fonction, appuyez sur la barre de poussée et gardez-la enfoncée jusqu'à ce que le portail ou la porte de garage se déplace vers la position fermée.
RADIO UNIVERSELLE AVEC 3 CANAL
MODÈLES 850LM ET 850LMC
Pour prévenir le risque de BLESSURES GRAVES ou de DÉCÈS par électrocution :
•S’assurer que l’alimentation n’est PAS branchée AVANT d’installer le récepteur.
Pour prévenir le risque de BLESSURES GRAVES ou de DÉCÈS causés par un portail ou une porte de garage en mouvement :
•TOUJOURS tenir les télécommandes hors de portée des enfants. Ne JAMAIS laisser un enfant utiliser une télécommande ou jouer avec.
•Actionner la porte ou le portail UNIQUEMENT lorsqu’ils sont bien visibles et bien ajustés et que rien ne fait obstacle à leur mouvement.
•TOUJOURS surveiller du regard le portail ou la porte de garage jusqu’à sa fermeture complète. Ne JAMAIS laisser personne franchir une porte ou un portail en mouvement.
Pour prévenir le risque de BLESSURES GRAVES ou de DÉCÈS, il est INTERDIT d’utiliser les ouvre-porte résidentiels EN FONCTIONNEMENT CONTINUEL.
Avant d’utiliser un récepteur pour actionner un ouvre-porte commercial, il est IMPÉRATIF d’installer une tranche de sécurité (barre palpeuse) au bas de la porte. L’absence de tranche de sécurité convenablement installée peut entraîner des BLESSURES GRAVES ou un DÉCÈS si quelqu’un se retrouve coincé sous la porte.
CÂBLAGE
Pour obtenir des informations précises sur le câblage, consulter la notice ou les schémas de câblage de l’ouvre-porte ou ouvre-portail.
UN CANAL
Récepteur
Operator(s) singulier
Operator 3
TROIS CANAL
Récepteur
Operator 2
Operator 1
3
Loading...