Liftmaster 8500W User Manual

USER’S GUIDE
FOR RESIDENTIAL USE ONLY
INSTALL ON SECTIONAL DOORS WITH
TORSION ASSEMBLIES ONLY
Wall Mount Wi-Fi® Garage Door Opener
Model 8500W
This product is intended for installation only by trained garage door technicians. This product may require adjustments to door springs and/or track configurations. This product is not intended for use on low headroom tracks with outside pickup drum or garage doors utilizing extension springs.
•Please read this manual and the enclosed safety materials carefully!
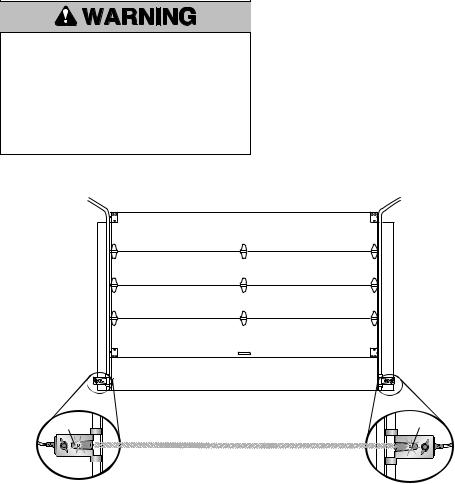
•The door WILL NOT CLOSE unless the Protector System® and cable tension monitor are connected and properly aligned.
•Periodic checks of the garage door opener are required to ensure safe operation.
•The model number is located on the front cover of the operator.
•This garage door opener is ONLY compatible with MyQ® and Security+ 2.0® accessories.
Register your garage door opener to receive updates and offers from LiftMaster OR register online at: www.prodregister.com/LiftMaster
SM
Take a photo of the camera icon including the points ( ).
).
Send it in by texting the photo to 71403 (US) or visit www.liftmaster.photo (Global)
LiftMaster.com
LiftMaster
300 Windsor Drive
Oak Brook, IL 60523
Contents |
|
Important Safety Instructions ............................. |
3-4 |
Connect With Your Smartphone .......................... |
5-6 |
Test the Wi-Fi Signal Strength .......................... |
5 |
Connect Your Garage Door Opener to Your |
|
Home Wi-Fi Network...................................... |
6 |
Programming................................................ |
7-8 |
893MAX Remote Control ................................. |
7 |
Wireless Keypad........................................... |
7 |
To Erase the Memory ..................................... |
7 |
Program the MyQ LED Remote Light ................... |
8 |
HomeLink................................................... |
8 |
Operation................................................... |
9-11 |
To Open the Door Manually.............................. |
9 |
Door Control............................................... |
10 |
Battery Backup ............................................ |
10 |
The Protector System |
|
(Safety Reversing Sensors)............................. |
11 |
Adjustments .............................................. |
12-14 |
Introduction ............................................... |
12 |
Program the Travel....................................... |
13 |
Test the Safety Reversal System....................... |
14 |
Test the Protector System............................... |
14 |
Maintenance.................................................. |
15 |
Troubleshooting.......................................... |
16-17 |
Automatic Garage Door Opener |
|
Safety & Maintenance Guide........................... |
18-19 |
Repair Parts .................................................. |
20 |
Warranty ...................................................... |
20 |
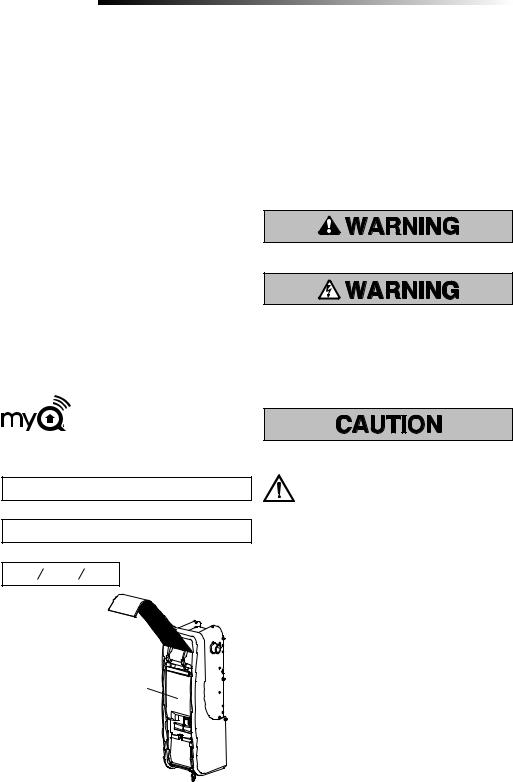
Safety Symbol and Signal Word Review
This garage door opener has been designed and tested to offer safe service provided it is installed, operated, maintained and tested in strict accordance with the instructions and warnings contained in this manual.
When you see these Safety Symbols and Signal Words on the following pages, they will alert you to the possibility of serious injury or death if you do not comply with the warnings that accompany them. The hazard may come from something mechanical or from electric shock. Read the warnings carefully.
Mechanical
Electrical
When you see this Signal Word on the following pages, it will alert you to the possibility of damage to your garage door and/or the garage door opener if you do not comply with the cautionary statements that accompany it. Read them carefully.
Serial Number:
Write down the following information for future reference:
MyQ Serial Number:
Product S/N:
Date of Purchase:
Serial Numbers
WARNING: This product can expose you to chemicals including lead, which are known to the State of California to cause cancer or birth defects or other reproductive harm. For more information go to www.P65Warnings.ca.gov
Unattended Operation
The Timer-to-Close (TTC) feature, the MyQ® Smartphone Control app, and MyQ® Garage Door and Gate Monitor are examples of unattended close and are to be used ONLY with sectional doors. Any device or feature that allows the door to close without being in the line of sight of the door is considered unattended close. The Timer-to-Close (TTC) feature, the MyQ® Smartphone Control, and any other MyQ® devices are to be used ONLY with sectional doors.
MyQ Remote LED Light must be installed to enable use of Timer To Close or MyQ Smartphone Control of the door.
2 |
For the complete manual visit LiftMaster.com/Customer-Support |

Important Safety Instructions
IMPORTANT INSTALLATION INSTRUCTIONS
To reduce the risk of SEVERE INJURY or DEATH:
1.READ AND FOLLOW ALL WARNINGS AND INSTRUCTIONS.
2.Install garage door opener ONLY on properly balanced and lubricated garage door. An improperly balanced door may NOT reverse when required and could result in SEVERE INJURY or DEATH.
3.ALL repairs to cables, spring assemblies and other hardware MUST be made by a trained door systems technician BEFORE installing opener.
4.Disable ALL locks and remove ALL ropes connected to garage door BEFORE installing opener to avoid entanglement.
5.Where possible, install the door operator 7 feet (2.13 m) or more above the floor.
6.Mount the emergency release within reach, but at least 6 feet (1.83 m) above the floor and avoiding contact with vehicles to avoid accidental release.
7.NEVER connect garage door opener to power source until instructed to do so.
8.NEVER wear watches, rings or loose clothing while installing or servicing opener. They could be caught in garage door or opener mechanisms.
9.Install wall-mounted garage door control:
•within sight of the garage door.
•out of reach of small children at a minimum height of 5 feet (1.53 m) above floors, landings, steps or any other adjacent walking surface.
•away from ALL moving parts of the door.
10.Install the emergency release marking. Attach the marking on or next to the emergency release. Install the entrapment warning placard next to the door control in a prominent location.
11.Place emergency release/safety reverse test label in plain view on inside of garage door.
12.Upon completion of installation, test safety reversal system. Door MUST reverse on contact with a 1-1/2" (3.8 cm) high object (or a 2x4 laid flat) on the floor.
13.To avoid SERIOUS PERSONAL INJURY or DEATH from electrocution, disconnect ALL electric and battery power BEFORE performing ANY service or maintenance.
14.SAVE THESE INSTRUCTIONS.
3

Important Safety Instructions
IMPORTANT SAFETY INSTRUCTIONS
To reduce the risk of SEVERE INJURY or DEATH:
1.READ AND FOLLOW ALL WARNINGS AND INSTRUCTIONS.
2.ALWAYS keep remote controls out of reach of children. NEVER permit children to operate or play with garage door control push buttons or remote controls.
3.ONLY activate garage door when it can be seen clearly, it is properly adjusted, and there are no obstructions to door travel.
4.ALWAYS keep garage door in sight and away from people and objects until completely closed. NO ONE SHOULD CROSS THE PATH OF THE MOVING DOOR.
5.NO ONE SHOULD GO UNDER A STOPPED, PARTIALLY OPENED DOOR.
6.If possible, use emergency release handle to disengage trolley ONLY when garage door is CLOSED. Use caution when using this release with the door open. Weak or broken springs or unbalanced door could result in an open door falling rapidly and/or unexpectedly and increasing the risk of SEVERE INJURY or DEATH.
7.NEVER use emergency release handle unless garage doorway is clear of persons and obstructions.
8.NEVER use emergency release handle to pull garage door open or closed. If rope knot becomes untied, you could fall.
9.After ANY adjustments are made, the safety reversal system MUST be tested.
10.Safety reversal system MUST be tested every month. Garage door MUST reverse on contact with 1-1/2" high (3.8 cm) object (or a 2x4 laid flat) on the floor. Failure to adjust the garage door opener properly increases the risk of SEVERE INJURY or DEATH.
11.ALWAYS KEEP GARAGE DOOR PROPERLY BALANCED. An improperly balanced door may NOT reverse when required and could result in SEVERE INJURY or DEATH.
12.ALL repairs to cables, spring assemblies and other hardware, ALL of which are under EXTREME tension, MUST be made by a trained door systems technician.
13.ALWAYS disconnect electric power to garage door opener BEFORE making ANY repairs or removing covers.
14.This operator system is equipped with an unattended operation feature. The door could move unexpectedly. NO ONE SHOULD CROSS THE PATH OF THE MOVING DOOR.
15.SAVE THESE INSTRUCTIONS.
4 |
For the complete manual visit LiftMaster.com/Customer-Support |
Power
To reduce the risk of electric shock, your garage door opener has a grounding type plug with a third grounding pin. This plug will only fit into a grounding type outlet. If the plug doesn’t fit into the outlet you have, contact a qualified electrician to install the proper outlet.
OPTION A: TYPICAL WIRING
1.Plug in the garage door opener into a grounded outlet.
2.DO NOT run garage door opener at this time.
OPTION B: PERMANENT WIRING CONNECTION
If permanent wiring is required by your local code, refer to the following procedure.
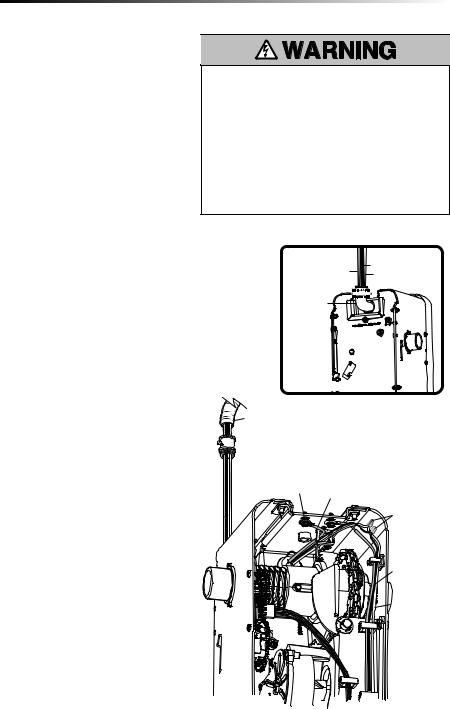
To make a permanent connection through the 7/8 inch hole in the back of the garage door opener (according to local code):
1.Be sure power is NOT connected to the opener, and disconnect power to circuit.
2.Remove the garage door opener from the torsion bar, remove cover screws and set the cover aside.
3.Cut the line cord 6" (15.2 cm) above the strain relief.
4.Squeeze the strain relief and push into motor unit, then remove the strain relief from the line cord.
5.Install a 90° conduit (not provided) or flex cable adapter (not provided) to the 7/8" hole. Reinstall garage door opener to torsion bar.
6.Run wires through conduit, cut to proper length and strip insulation.
7.Strip 1/2" (1.3 cm) of insulation from the existing black, white and green wires.
8.Connect the line to the black wire and neutral to the white wire with wire nuts (not provided). Connect ground wire to the green ground screw.
9.Properly secure wires under plastic ties so that they do not come into contact with moving parts.
10.Reinstall cover.
To prevent possible SERIOUS INJURY or DEATH from electrocution or fire:
•Be sure power is NOT connected to the opener, and disconnect power to circuit BEFORE removing cover to establish permanent wiring connection.
•Garage door installation and wiring MUST be in compliance with ALL local electrical and building codes.
•NEVER use an extension cord, 2-wire adapter or change plug in ANY way to make it fit outlet. Be sure the opener is grounded.
Green Wire |
Black Wire |
|
White Wire |
||
|
90˚ Connector (Not 
 Provided)
BACK VIEW

Flexible
Conduit
Green |
|
Ground |
|
Screw |
Ground Wire |
|
|
|
Wire Nuts |
|
(Not Provided |
|
Black Wire |
|
White Wire |
5
Connect With Your Smartphone
Before You Begin
You will need:
•Wi-Fi enabled smartphone, tablet or laptop
•Broadband Internet Connection
•Wi-Fi signal in the garage (2.4 Ghz, 802.11b/g/n required)
•Password for your Wi-Fi network (main network, not a guest network)
Test the Wi-Fi Signal Strength
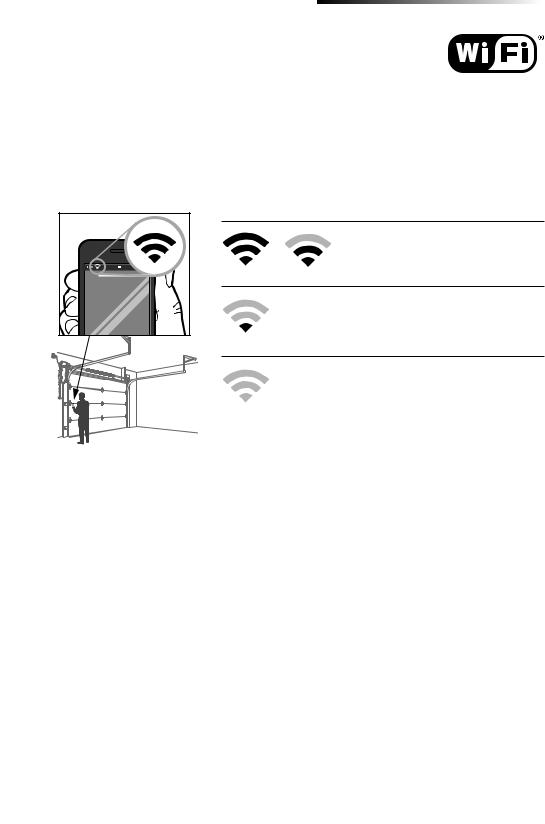
Make sure your mobile device is connected to your Wi-Fi network. Hold your mobile device in the place where your garage door opener is installed and check the Wi-Fi signal strength.
Check Signal Strength. If you see:
Wi-Fi signal is strong.
The garage door opener will connect to your Wi-Fi network.
Wi-Fi signal is weak.
The garage door opener may connect to your Wi-Fi network. If not, try one of the options below to improve the Wi-Fi signal.
No Wi-Fi signal.
The garage door opener will not be able to connect to your Wi-Fi network. Try one of the options below to improve the Wi-Fi signal:
• Move your router closer to the garage door opener to minimize interference from walls and other objects
• Buy a Wi-Fi range extender
For compatible router specifications and help, visit
WiFiHelp.LiftMaster.com.
Proceed to page 7.
6 |
For the complete manual visit LiftMaster.com/Customer-Support |
Connect With Your Smartphone
Connect Your Garage Door Opener to Your Home Wi-Fi Network
Get connected and control your garage door opener with the MyQ app. The garage door opener must run through a complete cycle before it will activate Wi-Fi programming.
For help related to Wi-Fi, visit WiFiHelp.LiftMaster.com.
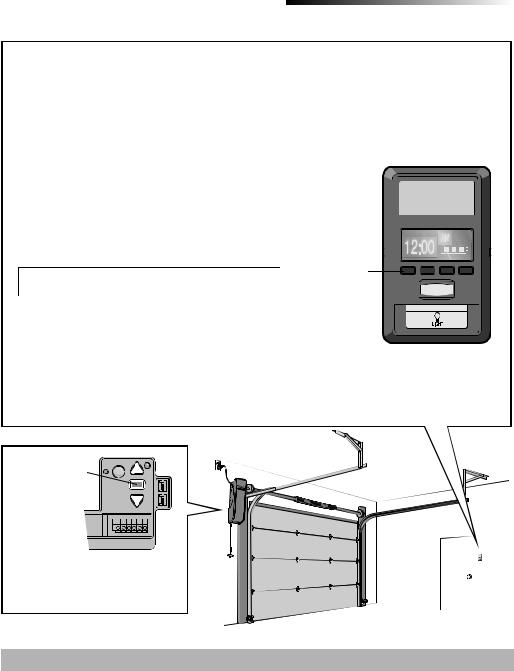
1.Use the Smart Control Panel®, go to Menu > Program > Wi-Fi Setup. The garage door opener will beep once. You have 20 minutes to complete the connection process.
2. On your mobile device, go to Settings > Wi-Fi and select the network with the “MyQ-” prefix.
3.Launch the web browser on your smartphone or tablet. Enter setup.myqdevice.com into the browser address bar. Follow the on screen prompts to connect the garage door opener to your
Wi-Fi network. The MyQ serial number will display on screen. Write the serial number in the space below.
Navigation buttons
4. Download the MyQ app from the App Store® or Google Play™ store. Sign up for your MyQ account and add the MyQ serial number to your account.
To add a second Wi-Fi garage door opener, repeat steps 1-3. Add the second MyQ serial number to your account in the MyQ app.
If you are unsuccessful adding your device, try an alternate web browser.
LED
An LED on the garage door opener will indicate Wi-Fi status. See table below.
LED |
Definition |
|
|
Blue |
Off - Wi-Fi is not turned on. |
|
Blinking - Garage door opener is in Wi-Fi learn mode. |
|
Solid - Mobile device connected to the garage door opener. |
|
|
Blue and Green |
Blinking - Attempting to connect to router. |
|
|
Green |
Blinking - Attempting to connect to the Internet server. |
|
Solid - Wi-Fi has been set up and garage door opener is connected to the internet. |
|
|
7
Programming
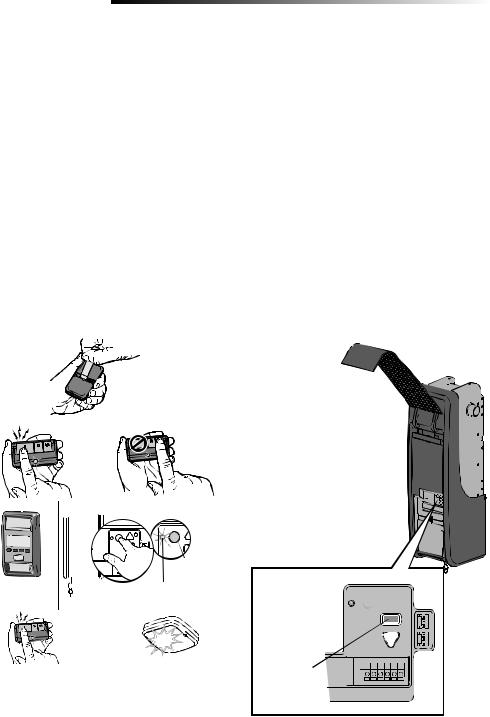
893MAX Remote Control
Below are the steps to program a new or existing remote control. Test remote control before reprogramming.
1.Press and hold the program button on the remote control until the LED on the front of the remote control turns on.
2.Press and release the remote control button you wish to use.
3.Press any remote control button except the button that was just programmed.
4a. Select Menu > Program > Remote and follow the on screen prompts.
OR
4b. Press and release the LEARN button on the garage door opener. The Learn LED will light. Within 30 seconds...
5.Press the remote control button programmed in step 2 until the garage door opener light flashes or two clicks are heard.
To program other types of remote controls or keyless entries see the instructions included with the device or visit LiftMaster.com.
1
Visor Clip
2 |
3 |
|
|
4a |
4b |
LEARN
Button
Menu > Program > |
LEARN LED |
Remote |
|
|
|
5 |
“click” |
|
|
|
“click” |
Wireless Keypad
Refer to the instructions provided with your keyless entry or go to LiftMaster.com to download instructions.
To Erase the Memory
Erase ALL Remote Controls and Keyless Entries
Press and hold the LEARN button until the LED goes out (approximately 6 seconds).
All remote controls and keyless entries are now erased.
Erase ALL Devices (Including MyQ enabled accessories)
1.Press and hold the LEARN button until the LED goes out (approximately 6 seconds).
2.Immediately press and hold the LEARN button until the LED goes out. All codes are now erased.
Erase the Wi-Fi Network from the Garage Door Opener
Press and hold the adjustment button until 3 beeps are heard (approximately 6 seconds).
Erase a MyQ Account
Go to myLiftMaster.com to delete your MyQ account.
LEARN Button 


Adjustment
Button
8 |
For the complete manual visit LiftMaster.com/Customer-Support |
Programming
Program the MyQ LED Remote Light
MyQ Remote LED Light must be installed to enable use of Timer To Close or MyQ Smartphone Control of the door.
Your garage door opener remote light has already been programmed at the factory to operate with your opener. Any additional or replacement remote lights will need to be programmed.
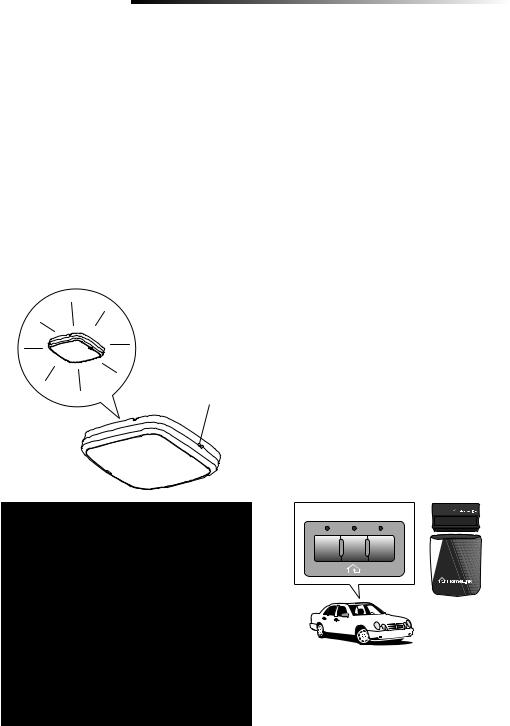
1.Press the LEARN button on the light until the green LED comes ON.
2.Press the LEARN button on the garage door opener.
OR
On the Smart Control Panel, go to Menu > Program > MyQ Device.
3.The code has been programmed when the remote light blinks once.
NOTE: The LED light is very bright and will blink while programming. DO NOT stare at the light while on a ladder.
LEARN Button
HomeLink®
In the rare case the HomeLink system does not program with the Security+ 2.0 Garage door opener, install a repeater kit. Refer to HomeLink Instructions Below.
HomeLink is the in-vehicle system. The image used is for reference only and your product may look different.
WHEN TO INSTALL A HOMELINK REPEATER KIT
All 2006 and Older vehicles – A repeater kit is required and must be purchased by the homeowner.
All 2007 and Newer vehicles – Program the HomeLink according to the vehicle instructions. If after ONE attempt to program the HomeLink to the garage door opener and you are unsuccessful, install a repeater.
HOW TO ORDER
Order the HomeLink repeater kit from an installer or call 1-800-355-3515. To program the HomeLink repeater kit, refer to the instructions provided in the kit or visit: http://www.homelink.com/program.
INSTALLATION QUICK FACTS
•Only one repeater kit is required per home.
•Use different HomeLink buttons in vehicle if programming multiple cars, button 1 first car, button 2 second car… etc.
•HomeLink remote is NOT a garage door opener.
•If you are using the HomeLink repeater with a garage door opener that has a battery backup system, ensure your original garage door opener remote control is programmed to the garage door opener and place it in your glove box for use in the event of a power outage.
•The remote included in this repeater kit MUST be kept for future programming (new vehicle, new garage door opener etc).
HomeLink®
LEARN Button
I |
II |
III |
Repeater Kit
OR
9
Operation
To prevent possible SERIOUS INJURY or DEATH from a falling garage door:
•If possible, use emergency release handle to disengage trolley ONLY when garage door is CLOSED. Weak or broken springs or unbalanced door could result in an open door falling rapidly and/ or unexpectedly.
•NEVER use emergency release handle unless garage doorway is clear of persons and obstructions.
•NEVER use emergency release handle to pull door open or closed. If rope knot becomes untied, you could fall.
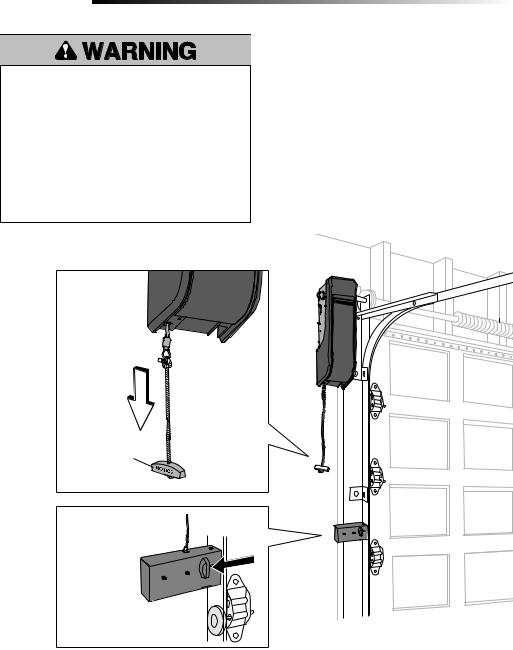
To Open the Door Manually
Disengage door lock before proceeding.
1.The door should be fully closed if possible.
2.Pull down on the emergency release handle until a click noise is heard.
3.To reconnect the door to the garage door opener, pull the emergency release handle straight down a second time until a click noise is heard.
The door will reconnect on the next UP or DOWN operation.
Emergency
Release Handle
Disengage automatic garage door lock before opening
door manually.
10 |
For the complete manual visit LiftMaster.com/Customer-Support |
Operation
Door Control
Battery Backup
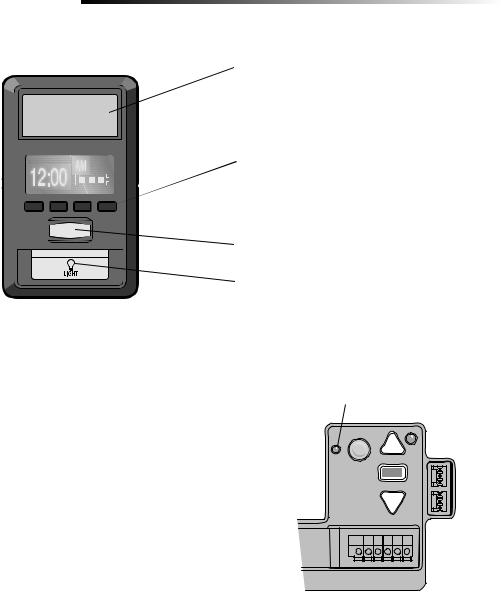
The battery backup allows access in and out of your garage when the power is out. When the garage door opener is operating on battery power, the garage door opener will run slower and the lights, Timer-to-Close, and remote close features (MyQ App) are disabled. In battery backup mode, the Automatic Garage Door Lock will unlock when the garage door is opened, and will remain disabled until power is restored. During a power outage the battery supplies power for up to 24 hours of operation. For maximum battery life and prevent damage, disconnect the battery when the garage door opener is unplugged for an extended period of time.
•Solid green LED - Charged battery
•Flashing green LED - Charging battery
•Solid orange LED with beep - Operating on battery power
•Flashing orange LED with beep - Low battery
•Solid red LED with beep - Replace battery
Push Bar:
Open/Close garage door.
Navigation Buttons:
Access menu:
Clock Setup, Timer-to-Close, Lock, Program, Temperature, Language, Light Settings, Contrast Adjust, Maintenance Alert System, and Wi-Fi Setup.
Motion Sensor
Light Button
Battery Status LED
11
Operation 
The Protector System (Safety Reversing Sensors)
Be sure power is NOT connected to the garage door opener BEFORE installing the safety reversing sensor. To prevent SERIOUS INJURY or DEATH from closing garage door:
•Correctly connect and align the safety reversing sensor. This required safety device MUST NOT be disabled.
•Install the safety reversing sensor so beam is NO HIGHER than 6" (15 cm) above garage floor.
The safety reversing sensors must be connected and aligned correctly before the garage door opener will move in the down direction.
When the light beam is obstructed or misaligned while the door is closing, the door will reverse and the garage door opener lights will flash ten times. If the door is already open, it will not close.
The sensors can be aligned by loosening the wing nuts, aligning the sensors, and tightening the wing nuts. Check to make sure the LEDs in both sensors are glowing steadily. The LEDs in both sensors will glow steadily if they are aligned and wired correctly.
Amber LED |
Green LED |
|
(invisible light beam) |
Safety Reversing Sensor |
Safety Reversing Sensor |
6" (15 cm) max. above floor |
6" (15 cm) max. above floor |
12 |
For the complete manual visit LiftMaster.com/Customer-Support |
 Loading...