


Owner´s Manual
E 2
1
Thank you for purchasing the Korg WAVEDRUM dynamic percussion synthesizer.
This owner’s manual contains a great deal of information that will help you understand the WAVEDRUM and play it to its fullest potential. In orderto ensure that you are taking complete advantage of your WAVEDRUM, please read this manual carefully and use the product as directed.
Precautions
Location
Using the unit in the following locations can result in a malfunction.
•In direct sunlight
•Locations of extreme temperature or humidity
•Excessively dusty or dirty locations
•Locations of excessive vibration
•Close to magnetic fields
Power supply
Please connect the designated AC adapter to an AC outlet of the correct voltage. Do not connect it to an AC outlet of voltage other than that for which your unit is intended.
Interference with other electrical devices
Radios and televisions placed nearby may experience reception interference. Operate this unit at a suitable distance from radios and televisions.
Handling
To avoid breakage, do not apply excessive force to the switches or controls.
Care
If the exterior becomes dirty, wipe it with a clean, dry cloth. Do not use liquid cleaners such as benzene or thinner, or cleaning compounds or flammable polishes.
Keep this manual
After reading this manual, please keep it for later reference.
Keeping foreign matter out of your equipment
Never set any container with liquid in it near this equipment. If liquid gets into the equipment, it could cause a breakdown, fire, or electrical shock.
Be careful not to let metal objects get into the equipment. If something does slip into the equipment, unplug the AC adapter from the wall outlet. Then contact your nearest Korg dealer or the store where the equipment was purchased.
THE FCC REGULATION WARNING (for USA)
This equipment has been tested and found to comply with the limits for a Class B digital device, pursuant to Part 15 of the FCC Rules. These limits are designed to provide reasonable protection against harmful interference in a residential installation. This equipment generates, uses, and can radiate radio frequency energy and, if not installed and used in accordance with the instructions, may cause harmful interference to radio communications. However, there is no guarantee that interference will not occur in a particular installation. If this equipment does cause harmful interference to radio or television reception, which can be determined by turning the equipment off and on, the user is encouraged to try to correct the interference by one or more of the following measures:
•Reorient or relocate the receiving antenna.
•Increase the separation between the equipment and receiver.
•Connect the equipment into an outlet on a circuit different from that to which the receiver is connected.
•Consult the dealer or an experienced radio/TV technician for help.
Unauthorized changes or modification to this system can void the user’s authority to operate this equipment.
Notice regarding disposal (EU only)
When this “crossed-out wheeled bin” symbol is displayed on the product, owner’s manual,
battery, or battery package, it signifies that when you wish to dispose of this product, manual, package or battery you must do so in an approved manner. Do not discard this prod-
uct, manual, package or battery along with ordinary household waste. Disposing in the correct manner will prevent harm to human health and potential damage to the environment. Since the correct method of disposal will depend on the applicable laws and regulations in your locality, please contact your local administrative body for details. If the battery contains heavy metals in excess of the regulated amount, a chemical symbol is displayed below the “crossedout wheeled bin” symbol on the battery or battery package.
2

Cautions for use
Cautions for use
Each individual WAVEDRUM unit will differ slightly depending on the type of head used, how it is tuned or played, and how it has been maintained. Please take note of the following points as well as the preceding “Cautions for safety.”
Do not place heavy objects on the head for long periods
If pressure is applied to the surface of the head for a long period, the rubber cushion and sensor under the head will become deformed, and this can harm the playability of the instrument.
Avoid placing heavy objects on the head or placing the WAVEDRUM upside down for long periods.
Feedback
The sensors in the WAVEDRUM detect the vibrations that occur in the head and body when you strike the WAVEDRUM with your hand or a drum stick. In some situations, the WAVEDRUM may also act as a microphone and pick up loud sounds from nearby high output speakers in addition to vibrations produced by directly striking the WAVEDRUM.
Especially when monitoring the WAVEDRUM with a large PA setup, the WAVEDRUM sounds emitted by the speakers can be transmitted through the floor or stand (or directly through the air) and be picked up once again by the WAVEDRUM.
When such vibrations are detected by the WAVEDRUM and sent back through the speakers, feedback will occur, and an uncontrollable and continuous sound will result.
Feedback places severe stress on amps and speakers, and can cause serious damage to equipment. Thus, when a powerful monitoring system is used, the equalizers and limiters of the PA system should be adjusted to prevent the WAVEDRUM from producing feedback, similar to preventing feedback for vocal and acoustic instrument mics.
Data handling
Unexpected malfunctions can result in the loss of memory contents. Korg cannot accept any responsibility for any loss or damage which you may incur as a result of data loss.
*This product was developed under license of physical modeling tone generator patents (http://www.sondiusxg.com) owned by Stanford University USA and Yamaha Corporation.
*All product names and company names are the trademarks or registered trademarks of their respective owners.
Contents |
|
Precautions ................................................................ |
2 |
Cautions for use ......................................................... |
3 |
Introduction ............................................................... |
4 |
Parts of the WAVEDRUM ............................................ |
5 |
Preparations .......................................... |
6 |
Connecting audio devices .......................................... |
6 |
Turning the power on ................................................ |
6 |
Attaching the WAVEDRUM to a stand ........................ |
6 |
Performing ............................................. |
7 |
Performance techniques ............................................ |
7 |
Selecting programs .................................................... |
7 |
Assigning programs to buttons 1–4 .......................... |
7 |
Editing ................................................... |
8 |
Basic editing procedure ............................................. |
8 |
Saving your edited settings ....................................... |
9 |
Important editing parameters ................................... |
9 |
Parameter list ...................................... |
12 |
Edit 1 ( E d 1 ) ........................................................... |
12 |
Edit 2 ( E d 2 ) ........................................................... |
14 |
Global ( G L b ) .......................................................... |
15 |
Single-size algorithm .............................................. |
16 |
Double-size algorithms ............................................ |
26 |
Appendix .............................................. |
28 |
Restoring the factory settings .................................. |
28 |
Replacing the drum head ........................................ |
28 |
Tuning the drum head ............................................. |
28 |
Calibration ............................................................... |
29 |
Error messages ........................................................ |
30 |
Troubleshooting ...................................................... |
30 |
Specifications ........................................................... |
30 |
Index ....................................................................... |
31 |
3

Introduction
Main features
Revolutionary synthesis technology
The WAVEDRUM generates sound by detecting the sound of your strike via the head and rim sensors, and processing this audio source by DSP (Digital Signal Processing) sound synthesis technology to create unique sounds. At the same time, a PCM sound source is also played using your strike as the trigger.
Using this combination of methods, the WAVEDRUM produces a rich variety of percussion sounds that give you an extremely wide range of freedom for performance expression. By using subtle motions of your fingers or hand to strike, rub, or scratch the WAVEDRUM, or by playing it using sticks, mallets, or brushes, you can obtain a high degree of expressive and dynamic range that rivals that of acoustic drums or percussion instruments.
Unique sounds generated by 36 different algorithms
The WAVEDRUM uses DSP technology to carry out a variety of software synthesis methods including analog, additive, non-linear, and physical modeling, and combines these sounds to create the final output sound. Such combinations are called “algorithms,” and the WAVEDRUM contains 36 different single-size and double-size algorithms. By specifying different algorithms you can create completely new sounds that can be produced only by the WAVEDRUM, as well as a variety of instrumental sounds or sounds of nature.
200 different PCM instruments for head and rim
The PCM instruments (PCM sound sources produce a rich variety of sounds in addition to the algorithms. Programs that use a single-size algorithm allow you to freely assign a different algorithm and PCM instrument to the head and the rim, giving you a very broad array of sounds. Programs that use a double-size algorithm are optimized for simulating acoustic instruments such as a snare, djembe, or cajon; within the algorithm, these programs analyze your performance in realtime, and based on this analysis control the PCM instrument to create natural response that cannot be obtained from a conventional PCM sound generator.
100 preset programs, 100 user programs
There are 100 built-in preset programs that combine percussion, drums, and sound effects in complex ways that can produce completely different sounds according to your playing technique. Programs that you edit can be saved in the 100 user programs.
Live mode
You can register twelve frequently-used programs (four programs x three banks) in buttons 1–4 for immediate recall. This is convenient for live performances.
100 loop phrases
The built-in 100 loop phrases cover a broad range of genres and tempos, allowing you to play along for a oneperson jam session.
AUX IN connector
The AUX IN connector lets you connect another WAVEDRUM unit, an audio device, or an external sound module, and play along with that audio source.
Lightweight and compact design
The WAVEDRUM features a lightweight and compact design for comfortable playing on your lap as well as easy portability. You can also perform with it attached to a stand (sold separately) for stand-up performance (Percussion Stand ST-WD) or a commercially-available snare stand.
4

Parts of the WAVEDRUM
Parts of the WAVEDRUM
Operating panel
Sensor cover
Head
Rim
Notch |
Notch |
Tension bolt (x 5)
Power switch |
Headphone jack |
||
DC IN connector |
OUTPUT |
AUX IN jack |
|
Cable hook |
L,R jacks |
Cable hook |
|
|
|
||
AC adaptor |
OUTPUT |
Headphones |
INPUT |
|
|
(included) |
|
|
|
|
Audio player |
|
|
or |
to AC outlet |
Powered monitors, etc. |
another WAVEDRUM |
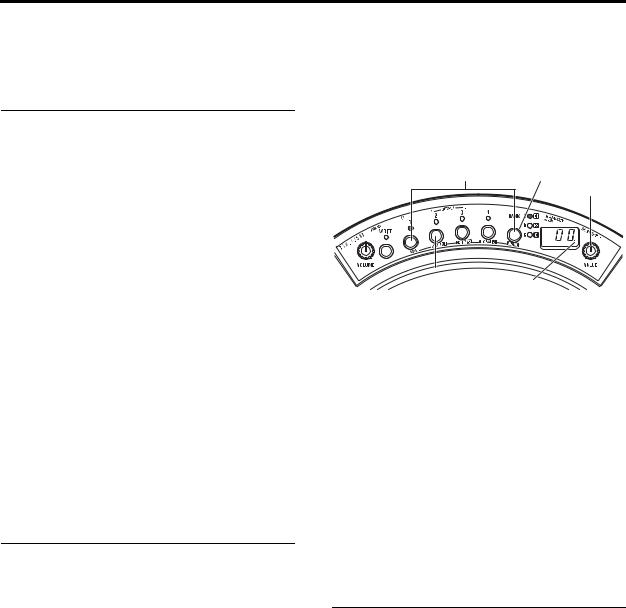
Operating panel
VOLUME knob |
Display |
WRITE button |
VALUE knob |
|
Buttons 1-4 |
|
BANK/MODE button |
5

Preparations
Connecting audio devices
 Before you make connections to other equipment, you must turn down the volume of all equipment and turn off the power. Careless operation may damage your speaker system or cause malfunctions.
Please refer to the preceding page for a diagram of connections.
Connecting the output jacks to powered monitors or a mixer
•Connect the WAVEDRUM’s OUTPUT L, R jacks to the input jacks of your powered monitors or mixer.
If you're monitoring through headphones, connect your headphones to the WAVEDRUM’s headphone jack. The VOLUME knob adjusts the L & R OUTPUT as well as the headphone volume.
Connecting an audio device to the input jack
•You can connect the OUTPUT L, R jacks of a second WAVEDRUM unit or the output jacks of other audio devices or to the WAVEDRUM’s AUX IN jack. The sound that is input via this jack will be output from the OUTPUT L, R jacks and the headphone jack.
note: To input sound from a device connected to the AUX IN jack, you must go to Global mode and raise the AUX IN jack mix level appropriately. The mix level is 0 by default (See page 15).
Turning the power on
Connecting the AC adapter
1. Make sure that the WAVEDRUM’s power switch is turned off (not pressed inward).
2. Connect the included AC adapter to the WAVEDRUM's rear panel DC IN jack.
 Use only the included AC adapter. Using any other AC adapter may cause malfunctions.
3. Plug the AC adapter into an AC outlet.
 Be sure to use an AC outlet that is the correct voltage for the adapter.
4. To prevent the plug from being accidentally disconnected, secure the power cable by wrapping it around the WAVEDRUM’s cable hook.
Turning the power on
1. Make sure that the WAVEDRUM and any connected equipment is powered off, and that all volume controls are set to 0.
2. Power-on the equipment that’s connected to the AUX IN jack.
3. Press the WAVEDRUM’s power switch to turn it on.
 When powering-on the WAVEDRUM, do not rest your hand or any other object on the head. The WAVEDRUM may malfunction if this is the case.
4. Turn on your powered monitors or other equipment connected to the OUTPUT L, R jacks.
5. Adjust the volume of each device. Adjust the WAVEDRUM’s volume by turning its VOLUME knob. If you’re using the AUX IN jack, use the mix level setting to adjust its volume (See page 15).
 Sudden high volumes produced by the WAVEDRUM can damage your monitor equipment, or your hearing if you're monitoring through headphones. Please be sure to set the volume appropriately.
Turning the power off
When you’ve completed any necessary steps such as saving a program that you were editing, turn off the power by following the procedure below (See page 9).
 Never turn off the power while data is being saved. Internal data may be destroyed if you do so.
1. Minimize the volume and then power off your powered monitors or other equipment that is connected to the OUTPUT L, R jacks.
2. Turn the WAVEDRUM’s VOLUME knob all the way to the left, and then press the power switch to turn off the power.
3. Power off the power to any equipment connected to the AUX IN jack.
Attaching the WAVEDRUM to a stand
The WAVEDRUM can be used with any commerciallyavailable 14-inch three-arm snare stand.
If you want to play the WAVEDRUM in a standing position, like a conga, you can use the optional Percussion Stand ST-WD (sold separately).
 Place the stand on a flat and stable location. Bundle the power adapter and all connection cables neatly so that no one trips over them.
For details on attaching the WAVEDRUM to your stand, carefully read the owner’s manual included with the stand that and as described.
6
Performing Performance techniques
Performing
Performance techniques
The sound of the WAVEDRUM will respond to the subtle nuances in the way that you strike, rub, or scratch it with your fingers or hand, or the way that you strike it with a stick, mallet, or brush. It will also respond differently depending on whether you strike the center of the head, the edge, or the rim. The WAVEDRUM produces expressive and dynamic range that rivals that of an acoustic drum or percussion instrument, covering the full spectrum of performance gestures from a light brush across the head to a hard rimshot.
Some of the programs simulate conventional percussion instruments, while others produce a different pitch each time you strike; some allow you to play a phrase in a specified scale. You can use a variety of techniques; after striking the surface of the head with your hand or mallet, you can apply additional pressure to control the pitch or tone of the decay, or you can produce sustaining sounds simply by applying pressure without striking the drum.
For details on each program, refer to the separate leaflet “Voice Name List” and to page 16 and following of this manual.
 Do not strike below the sensor cover or on the operating panel area.
Selecting programs
1. Hold down the BANK/MODE button and press button 1.
This selects Live mode, which is the mode you’ll use when playing the WAVEDRUM. The display will indicate L I U , and will then indicate the program number (0 0 –9 9 , P 0 0 –P 9 9 ).
note: Immediately after you turn on the power, the program stored in button 1 of bank a will be selected.
2. Press the BANK/MODE button to switch banks.
Each time you press the button, you'll switch banks in the order of a→b→c→a... The indicators at the right of the button will light consecutively. The display will indicate the bank name, or will indicate the program number for the bank of the program that is currently selected.
3. Press a button 1–4 to select the program that you want to play.
The indicator above the selected button will light up, and the display will indicate the program number.
Strike the head or rim to hear the selected program.
4. If you want to select a program from a different bank, repeat steps 2 and 3 to select the desired program.
note: The WAVEDRUM contains loop phrases, such as drum phrases. You can play along with these loop phrases (See page 15).
1 2
VALUE
3 Dot
Playing all programs consecutively
•When the display shows the program number, turning the VALUE knob will switch through the programs consecutively (0 0 –9 9 , P 0 0 –P 9 9 ).
If a program number has been changed, the decimal point to the right of the program number in the display will light up. If you want to return to the original program that was assigned, press the button whose indicator is lit.
About the programs
The WAVEDRUM contains one hundred user programs ( 0 0 –9 9 ) and one hundred preset programs ( P 0 0 –
P 9 9 ). User programs, on the other hand, can be used to save a program that you've edited. You cannot rewrite preset programs. By default the user programs contain the same programs as the preset programs.
Assigning programs to buttons 1–4
You can assign your favorite programs to buttons 1–4 assignable locations. You can assign a total of 12 programs (1–4 for banks a, b and c) for quick access.
1. Select the bank and button that you want to assign.
As an example, here’s how to assign bank a button 1. Press the BANK/MODE button to select bank a, and then press button 1.
2. Turn the VALUE knob to select the program that you want to assign.
3. Press the WRITE button. The indicator above the button will blink, and the display will blink to indicate the newly assigned bank and button number a - 1 and the program number.
4. Press the WRITE button once again to complete the assignment.
If you decide not to assign the program, press any button other than the WRITE button.
7
Editing
By editing a program you can adjust it to suit your playing style, or transform it into a completely new sound. For example, you can adjust the pitch or the decay time to match your song or your playing method, or you can select the way that different strikes will affect the volume or tone. You can also adjust reverb and delay effects.
By adjusting the algorithm parameters you can make more detailed changes to the sound or even transform the sound radically. For example, even with the same algorithm, it’s possible to create a range of variation not possible with a typical percussion instrument, such as changing the head of a drum from skin to metal.
You can also switch the algorithm itself or choose a different PCM instrument, and create sounds from scratch.
The process of making these changes is called “editing.” On the WAVEDRUM, you can edit using the Edit modes described below.
Basic editing procedure
note: In order to edit a program, you must first select the program that you want to edit in Live mode (See page 7).
1. Select the desired Edit mode.
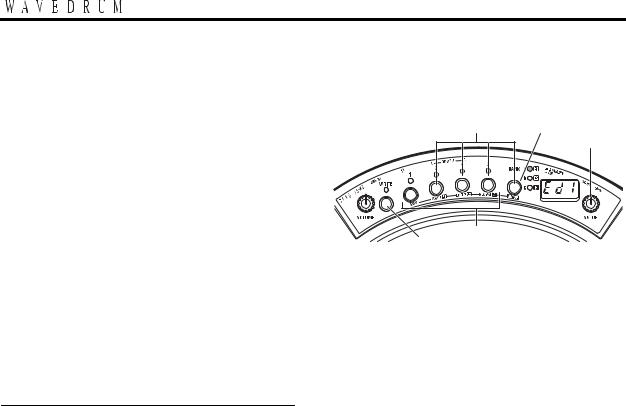
Edit 1: Hold down the BANK/MODE button and press button 2. The display will indicate E d 1 for several seconds.
In Edit 1 mode you can adjust parameters such as Tune, Decay, Level, Curve, and Effect (reverb, delay), and select the algorithm and PCM instrument (See page 12).
Edit 2: Hold down the BANK/MODE button and press button 3. The display will indicate E d 2 for several seconds.
In Edit 2 mode you can adjust the algorithm (See page 14).
Global: Hold down the BANK/MODE button and press button 4. The display will indicate G L b for several seconds.
In Global mode you can adjust the final panning, play back looped phrases, and adjust the WAVEDRUM's calibration (See page 15).
note: In Edit 1 and 2 modes you'll be editing the sound of an individual program. In contrast, the settings in Global mode are common to the entire WAVEDRUM; they are not specific to an individual program.
1 2
2, 4
WRITE 3
For details on each mode, please refer to the respective reference pages.
The [E1], [E2], or [G] indicator at the right of the BANK/MODE button will blink.
If you select Edit mode 1 or 2, the display will indicate E d 1 or E d 2 , and will then indicate the current page.
In Global mode, the display will indicate G L b , and will then indicate the parameter that was last selected. (The unit will be in this state following step 3. Immediately after you turn on the power, Pan will be selected.)
2. Select the page that you want to edit. Press the BANK/MODE button. Press the button until the desired page appears. Alternatively, you can turn the VALUE knob to select a page.
For example if you press the BANK/MODE button in Edit 1 mode, the page will change in the order of Tune ( t u n ) → Decay ( d c Y ) → Level ( L E U ) → ...
(See page 12).
3. Press one of the buttons 1–4 to select the parameter that you want to edit.
The indicator above the button will light up. The display will indicate the parameter name, and then the value.
note: If a button other than the selected button (1–4) is blinking, this indicates that the corresponding parameter value has been edited.
4. Turn the VALUE knob to edit the value.
The value indicated in the display will change, and the decimal point to the right of the value will light up. (The decimal point will go dark if you return the value to its original setting.)
5. If you want to edit a parameter located on another page, press the BANK/MODE button to switch pages (see step 2). Then edit the value as described in steps 3 and 4.
6. If you want to keep the changes that you’ve made, you must save them. Please see next page.
note: If you return to Live mode without saving the program that you’ve edited, the indicator of the selected button (1–4) will blink, and the decimal point at the right edge of the display will light up. This indicates that the program has not been saved.
8

Editing Saving your edited settings
Saving your edited settings
If you would like to use your edited program again later, you'll need to save it. If you've edited a program and then power-off or switch to a different program without saving it, the changes that you made will be lost.
Changes you make to the settings of Global mode will also be lost if you power-off without saving. After editing, be sure to save your changes if you want to keep them.
 Never turn off the power while data is being saved. Doing so may harm the memory.
Saving a program
This operation will save all of the Edit 1 and Edit 2 mode parameters of the program that is currently selected.
1. In Edit 1 or Edit 2 mode, press the WRITE button.
The WRITE button will blink, and the save-destina- tion program number 0 0 – 9 9 will blink in the display. You can't save to P 0 0 – P 9 9 .
2. Turn the VALUE knob to select the program number for the desired save location.
note: When you save a program, the contents of the destination program will be lost.
3. Press the WRITE button once again; the program will be saved, and you'll return to Live mode.
If you decide not to save, press any button other than the WRITE button.
When you save, the button where the edited program had been assigned will be reassigned to the newly saved program (number).
Saving global settings
This operation will save all Global mode parameters other than the loop phrase start/stop setting. When you turn on the power, the loop phrase will be stopped.
1. In Global mode, press the WRITE button. The WRITE button will blink, and the display will blink G L b .
2. Press the WRITE button once again; the settings will be saved.
If you decide not to save, press any button other than the WRITE button.
Important editing parameters
Tune and decay
Edit 1 – Tune ( t u n ): This adjusts the pitch.
Depending on the algorithm, the pitch may change smoothly or in semitone steps. Also depending on the pitch, this may affect the vibration of the skin, or the body resonances.
For algorithms where the Tune parameter has a special role, its specific function is described separately for each algorithm (See pages 16, 26).
For PCM instruments, you can adjust the pitch in semitone steps in a range of four octaves up or down.
Edit 1 – Decay (d c Y ): This adjusts the time it takes for the sound to decay.
Like the Tune parameter, there are cases where the Decay parameter will affect only the vibration of the skin, or the body resonance.
For algorithms where the Decay parameter has a special role, its specific function is described separately for each algorithm (See pages 16, 26).
Head and rim volume and pan
Edit 1 – Level ( L E U ): This adjusts the volume balance between the head and rim.
Edit 1 – Pan ( P a n ): This adjusts the panning of the head and rim.
Edit 2 – Pre EQ ( E q ): Use this to select the EQ/amp type that will be most appropriate, depending on whether you're using your hand or a stick to strike the drum.
Reverb and delay
Edit 1 – Reverb ( r E b ): This adjusts the reverberation added to the sound. You can adjust the reverb type and depth.
Edit 1 – Delay ( d L y ): This adjusts the delay that is added to the sound. You can adjust the delay time and depth.
Algorithm
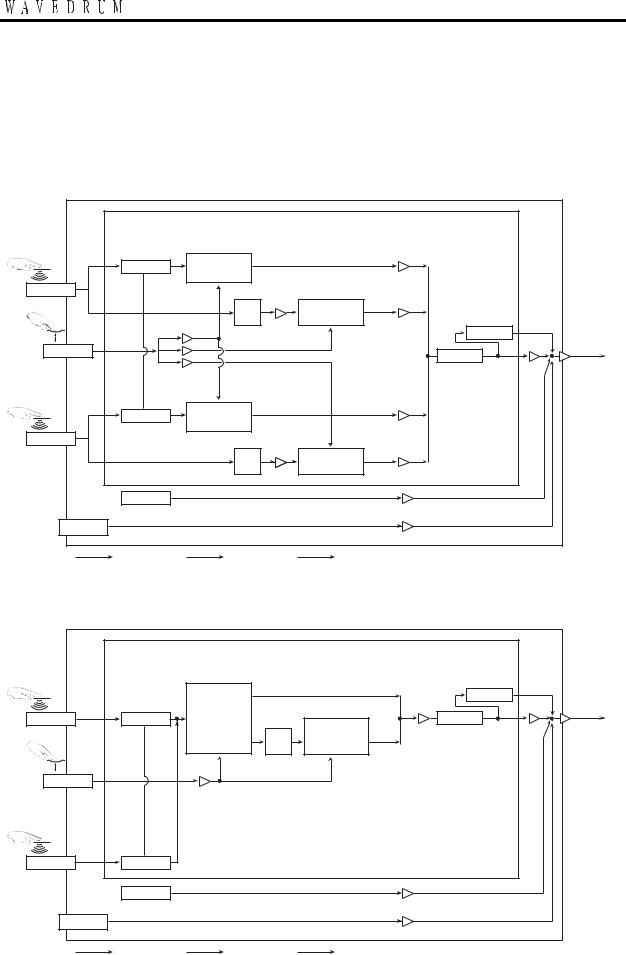
The WAVEDRUM implements a variety of synthesis methods in software, including analog, additive, non-lin- ear, and physical modeling. These methods are then combined, and the result is processed. These combinations are called “algorithms ,” and the WAVEDRUM contains 36 different algorithms. An algorithm collects the elements that determine the sound of an instrument or other sound-producing object, and combines these elements in a wide variety of ways. This means that when a source sound (such as the sound of a drum head being struck) is passed through an algorithm, it will be output as a sound that is uniquely transformed by the characteristics of that algorithm, for example becoming the sound of a snare drum, the ringing of a bell, or the sound of a metal pipe being struck.
Each algorithm consists of different elements that determine the sound in various ways, and each element is expressed as an “amount” (large/small, long/short, positive/negative) such as the size of a guitar's body, the depth of a snare's shell, the length of a pipe, or the den-
9
sity of a metal object. These amounts can be varied to synthesize the sound of instruments or other sound-pro- ducing objects that could not exist in reality.
The WAVEDRUM’s algorithms differ in structure depending on whether they are “single-size” or “doublesize.”
Single-size Algorithm Type |
|
|
|
|
|
|
|
Program |
- Tune |
|
|
|
|
|
|
- Decay |
|
|
|
|
|
|
- Algorithm Select |
|
|
|
|
|
- Type Select |
- Algorithm Parameter 1-8 |
|
- Level |
|
|
|
Head Single-size |
|
- Pan |
|
|
|
|
Pre EQ |
|
|
|
|
|
|
Algorithm |
- Tune |
|
|
|
|
|
|
|
|
|
||
Head Sensor |
|
- Head |
- Decay |
|
|
|
|
Velocity |
- Instruments Select |
- Level |
- Type Select |
|
|
|
|
Curve |
Head PCM |
- Pan |
- Level |
|
|
|
Trigger |
|
- Depth |
|
|
|
|
Instruments |
|
|
||
|
- Pressure Curve |
|
- High Damp |
|
||
|
|
|
Reverb |
|
||
|
|
|
|
|
|
|
Pressure Sensor |
|
|
|
|
- Pan |
- Master Level |
|
|
|
|
Delay |
|
|
|
|
|
|
|
|
|
|
|
- Tune |
|
|
- Delay Time |
Output L, R |
|
|
- Decay |
|
|
- Level |
Phones L, R |
|
|
- Algorithm Select |
|
|
- Feedback |
|
|
|
- Algorithm Parameter 1-8 |
|
- Level |
- High Damp |
|
|
|
Rim Single-size |
|
- Pan |
|
|
|
Amp |
|
|
|
|
|
|
Algorithm |
- Tune |
|
|
|
|
|
|
|
|
|
||
Rim Sensor |
|
- Rim |
- Decay |
|
|
|
|
Velocity |
- Instruments Select |
- Level |
|
|
|
|
|
Curve |
Rim PCM |
- Pan |
|
|
|
|
Trigger |
|
|
|
|
|
|
Instruments |
|
|
|
|
|
|
|
|
|
|
|
|
Phrase Looper |
|
|
- Level |
|
|
|
- Sample Type Select |
|
|
|
|
|
AUX IN |
- Start/Stop |
|
|
|
|
|
|
|
|
- Level |
|
|
|
|
|
|
|
|
|
|
|
Audio Line (Mono) |
Audio Line (Stereo) |
Control Line |
|
|
|
Double-size Algorithm Type |
|
|
|
|
|
|
|
Program |
- Tune |
|
|
- Type Select |
|
|
|
- Decay |
|
|
|
|
|
|
|
|
- Level |
|
|
|
|
- Algorithm Select |
|
|
|
|
|
|
|
|
- Depth |
|
|
|
|
- Algorithm Parameter 1-8 |
|
|
|
|
|
|
|
|
- High Damp |
|
|
|
|
|
|
|
|
|
|
- Type Select |
|
|
- Level |
Reverb |
|
|
Double-size |
|
- Pan |
- Pan |
- Master Level |
|
Head Sensor |
Pre EQ |
|
|
Delay |
||
Algorithm |
PCM |
|
Output L, R |
|||
|
|
|
- Delay Time |
|||
|
|
Trigger |
|
|||
|
|
Instruments |
|
- Level |
Phones L, R |
|
|
|
|
|
|
- Feedback |
|
|
|
|
|
|
- High Damp |
|
Pressure Sensor |
|
|
|
|
|
|
|
|
- Pressure Curve |
|
|
|
|
Rim Sensor |
Amp |
|
|
|
|
|
|
Phrase Looper |
|
|
|
|
|
|
- Sample Type Select |
|
|
- Level |
|
|
AUX IN |
- Start/Stop |
|
|
|
|
|
|
|
|
- Level |
|
|
|
|
|
|
|
|
|
|
|
Audio Line (Mono) |
Audio Line (Stereo) |
Control Line |
|
|
|
10
 Loading...