


 Loading...
Advanced Setup Guide
Online Guide
Date: Autumn 1997

How to Use This Online Guide
How to Use This Online Guide
|
|
|
|
|
|
|
|
Click underlined red text to go to the topic indicated. Underlined red text is text that is “linked” |
|
|
|
|
|
Topic |
|
||||
|
|
|
|
|
to another topic in the guide. |
||||
|
|
|
|
|
|
|
|
||
|
|
|
|
|
|
|
|
Click the Go Back button in the toolbar to go back to your previous place in the guide. |
|
|
|
|
|
|
|
|
|
||
|
|
|
|
|
|
|
|
Click the Next Page button in the toolbar to go to the next page in the guide. |
|
|
|
|
|
|
|
|
|
||
|
|
|
|
|
|
|
|
||
|
|
|
|
|
|
|
|
Click the Previous Page button in the toolbar to go to the previous page in the guide. |
|
|
|
|
|
|
|
|
|
||
|
|
|
|
|
|
|
|
||
|
|
|
|
|
|
|
|
Click the First Page button in the toolbar to go to the opening screen of the guide. |
|
|
|
|
|
|
|
|
|
||
|
|
|
|
|
|
|
|
||
|
|
|
|
|
|
|
|
||
|
|
|
|
|
|
|
|
|
Click a bookmark name (to the left of the screen) to go to the topic corresponding to that |
|
|
|
|
|
|
|
|
|
|
|
|
Advanced Setup Guide |
|
||||||
|
|
|
bookmark. Click the small triangle to the left of the bookmark to hide or show subordinate |
||||||
|
|
|
|||||||
|
|
|
|
|
How to use this |
|
|||
|
|
|
|
|
|
bookmarks. |
|||
|
|
|
|
|
Notice |
|
|||
|
|
|
|
|
|
||||
|
|
|
|
|
|
|
|||
|
|
|
|
|
Contents |
|
|
||
|
|
|
|
|
|
|
|||
|
|
|
|
|
Introducing the Adva |
|
|
||
|
|
|
|
|
|
|
|||
|
|
|
|
|
|
|
|
|
|
Note |
You can print this book, but only in landscape format. |
|
|
2

Notice
Notice
The information contained in this document is subject to change without notice.
Hewlett-Packard makes no warranty of any kind with regard to this material, including, but not limited to, the implied warranties of merchantability and fitness for a particular purpose. Hewlett-Packard shall not be liable for errors contained herein or for incidental or consequential damages in connection with the furnishing, performance, or use of this material.
This document contains proprietary information that is protected by copyright. All rights are reserved. No part of this document may be photocopied, reproduced, or translated to another language without the prior written consent of Hewlett-Packard Company.
CompuServeä is a U.S. trademark of CompuServe, Inc.
Microsoftâ, MS-DOSâ and Windowsâ are U.S. registered trademarks of Microsoft Corporation.
Hewlett-Packard France
Grenoble Personal Computer Division
Technical Marketing
38053 Grenoble Cedex 9
France
ã1997 Hewlett-Packard Company
3

Advanced Setup Guide
Advanced Setup Guide

The HP PC
The HP PC
The HP PC provides the following components and features:
System Board
•Enhanced IDE (Integrated Drive Electronics) controller with two channels on the PCI bus:
A primary IDE channel for two IDE hard disk drives.
A secondary IDE channel for an IDE CD-ROM drive or a IDE hard disk drive.
•Rear panel connectors:
1 mouse socket
1 keyboard socket
1 display connector
1 Universal Serial Bus (USB) connector
1 parallel port
1 serial port
•Keyboard/mouse controller and interface.
•Four memory module sockets for DRAM main memory, allowing installation of up to 128 MB.
•1 MB Integrated video memory on the system board, upgradeable to 2MB.
•System ROM (using flash ROM technology) that can be easily updated with the latest firmware, using the Phlash.exe program supplied with the firmware upgrade.
6

The HP PC
The system ROM contains:
The BIOS (system BIOS, video BIOS and low-option ROM).
The menu-driven Setup program with context-sensitive help (in U.S. English only).
•Energy Star-compliant power management.
All PCs described in this manual have a power-saving capability in accordance with the Energy Star guidelines (U.S. Environmental Protection Agency). Nevertheless, it is possible that some configurations (e.g. fully loaded multi-media models) use slightly more than 30W in sleep mode, which is the limit required for obtaining the Energy Star label. Inclusion of the Energy Star label indicates that your PC is Energy Star-compliant.
Backplane
Five expansion card slots for the installation of:
Two 32-bit PCI (Peripheral Component Interconnect) cards and three 16-bit ISA (Industry Standard Architecture) cards, or
Three 32-bit PCI cards and two 16-bit ISA cards.
Preinstalled Software
Your HP PC is preinstalled with the following operating software:
•BIOS: Phoenix.
•Operating system: On most models, Windows 95 is provided. This operating system provides: configuration tools, Plug and Play mode, and many other features.
•Depending on the model you have purchased, your computer may also include: business applications, communication software, and a range of information sources, tools, and utilities to better tailor your PC to suit your needs.
7

Associated Documentation
Associated Documentation
The following HP publications may also assist the reader of this manual:
•Communications - paper book providing guidance on how to set up your communications software.
•Getting Support - paper book explaining how to obtain HP support. The book also contains safety and warranty information.
•Questions & Answers - paper document that answers your most commonly asked questions.
•Upgrade Guide - online book explaining how to upgrade your PC.
•Learning About Your HP PC - online help giving information about your computer.
For a list of available documentation, double-click the HP Guide to Documentation |
|
icon on the desktop, or press |
the Information key on your keyboard. |
|
|
|
|
If your PC is up and running but you are experiencing some problems, refer to the online support center on page 9 .
8

|
|
HP Centers |
|
|
|
HP Centers |
|
|
Double-click the |
icon on the desktop, or click the Start menu and then HP Centers, or press the |
key on |
your keyboard, to open the HP Centers window. |
|
|
Once you have opened the HP Centers window you can access and use the following centers:
•Communications - communicate easily with the outside world1. You can set up your fax program, send a fax, enable/disable fax reception, set up your answering machine, dial a phone number, and listen to your voice messages.
•Data Protection - make sure your data is secure and protected. You can protect your PC from viruses, back up your data, maintain your hard disk (for example, scan it for errors), and restrict access to your PC.
•Network - share and access local network resources2. You can share and access printers, folders and files, fax modems, CD-ROM drives, Internet connections, and so on.
•Welcome - discover what you can do with your PC and how to personalize it. You can register your PC, check your PC settings, follow a PC tour, and see what documentation is available to you.
•Support - solve computer problems with the support tools and services provided by HP. You can diagnose hardware problems, recover software applications that were preinstalled on your PC, access HP online support services, and run Windows 95 troubleshooting tools.
1.Communications features are only available on communications models.
2.To use a local area network (LAN), you need to install a network card and software.
9

HP Centers
10
Contents
How to Use This Online Guide . . . . . . . . . . . . . . . . . . . . . . . . . . . . . . . . . . . . . . . . . . . . . . . . . . . . . . . . . . . . . . . 2
Notice . . . . . . . . . . . . . . . . . . . . . . . . . . . . . . . . . . . . . . . . . . . . . . . . . . . . . . . . . . . . . . . . . . . . . . . . . . . . . . . . . . . . 3
The HP PC . . . . . . . . . . . . . . . . . . . . . . . . . . . . . . . . . . . . . . . . . . . . . . . . . . . . . . . . . . . . . . . . . . . . . . . . . . . . . . . . 6
Associated Documentation . . . . . . . . . . . . . . . . . . . . . . . . . . . . . . . . . . . . . . . . . . . . . . . . . . . . . . . . . . . . . . . . . . 8
HP Centers. . . . . . . . . . . . . . . . . . . . . . . . . . . . . . . . . . . . . . . . . . . . . . . . . . . . . . . . . . . . . . . . . . . . . . . . . . . . . . . . 9
1 Introducing the Advanced Setup Guide |
|
Purpose of the Guide . . . . . . . . . . . . . . . . . . . . . . . . . . . . . . . . . . . . . . . . . . . . . . . . . . . . . . . . . . . . . . . . . . . . . . |
18 |
The HP Setup Program. . . . . . . . . . . . . . . . . . . . . . . . . . . . . . . . . . . . . . . . . . . . . . . . . . . . . . . . . . . . . . . . |
18 |
System Board Layout . . . . . . . . . . . . . . . . . . . . . . . . . . . . . . . . . . . . . . . . . . . . . . . . . . . . . . . . . . . . . . . . . . . . . . |
19 |
CMOS Jumper (JP6). . . . . . . . . . . . . . . . . . . . . . . . . . . . . . . . . . . . . . . . . . . . . . . . . . . . . . . . . . . . . . . . . . |
20 |
2 Protecting and Using Your PC |
|
Security Features . . . . . . . . . . . . . . . . . . . . . . . . . . . . . . . . . . . . . . . . . . . . . . . . . . . . . . . . . . . . . . . . . . . . . . . . . |
22 |
HP Setup Program . . . . . . . . . . . . . . . . . . . . . . . . . . . . . . . . . . . . . . . . . . . . . . . . . . . . . . . . . . . . . . . . . . . |
22 |
Protecting Your PC from Virus Infections . . . . . . . . . . . . . . . . . . . . . . . . . . . . . . . . . . . . . . . . . . . . . . . . . |
22 |
Maintaining Your Disk and Files. . . . . . . . . . . . . . . . . . . . . . . . . . . . . . . . . . . . . . . . . . . . . . . . . . . . . . . . . . . . . |
23 |
Improving File Access Time . . . . . . . . . . . . . . . . . . . . . . . . . . . . . . . . . . . . . . . . . . . . . . . . . . . . . . . . . . . . |
23 |
Increasing Disk Space. . . . . . . . . . . . . . . . . . . . . . . . . . . . . . . . . . . . . . . . . . . . . . . . . . . . . . . . . . . . . . . . . |
24 |
11

Using Power Management in Windows 95 . . . . . . . . . . . . . . . . . . . . . . . . . . . . . . . . . . . . . . . . . . . . . . . . . . . . 25
Enhanced Keyboard . . . . . . . . . . . . . . . . . . . . . . . . . . . . . . . . . . . . . . . . . . . . . . . . . . . . . . . . . . . . . . . . . . . . . . 27
Configuring Shortcut Keys . . . . . . . . . . . . . . . . . . . . . . . . . . . . . . . . . . . . . . . . . . . . . . . . . . . . . . . . . . . . . 29
3 The HP Setup Program
HP/Phoenix BIOS Description . . . . . . . . . . . . . . . . . . . . . . . . . . . . . . . . . . . . . . . . . . . . . . . . . . . . . . . . . . . . . . 32
Power-On Self-Test (POST) . . . . . . . . . . . . . . . . . . . . . . . . . . . . . . . . . . . . . . . . . . . . . . . . . . . . . . . . . . . . 32
Beep Codes . . . . . . . . . . . . . . . . . . . . . . . . . . . . . . . . . . . . . . . . . . . . . . . . . . . . . . . . . . . . . . . . . . . . . . . . . 32
HP Setup Program . . . . . . . . . . . . . . . . . . . . . . . . . . . . . . . . . . . . . . . . . . . . . . . . . . . . . . . . . . . . . . . . . . . . . . . . 34
HP Setup Key Functions . . . . . . . . . . . . . . . . . . . . . . . . . . . . . . . . . . . . . . . . . . . . . . . . . . . . . . . . . . . . . . . 35
Boot Device Priority . . . . . . . . . . . . . . . . . . . . . . . . . . . . . . . . . . . . . . . . . . . . . . . . . . . . . . . . . . . . . . . . . . 36
Summary Screen . . . . . . . . . . . . . . . . . . . . . . . . . . . . . . . . . . . . . . . . . . . . . . . . . . . . . . . . . . . . . . . . . . . . . 36
Setting Passwords . . . . . . . . . . . . . . . . . . . . . . . . . . . . . . . . . . . . . . . . . . . . . . . . . . . . . . . . . . . . . . . . . . . . 36
Power Management in the BIOS . . . . . . . . . . . . . . . . . . . . . . . . . . . . . . . . . . . . . . . . . . . . . . . . . . . . . . . . . 39
Saving Your Changes and Leaving Setup . . . . . . . . . . . . . . . . . . . . . . . . . . . . . . . . . . . . . . . . . . . . . . . . . . 40
4 Business Communications Options
Introduction . . . . . . . . . . . . . . . . . . . . . . . . . . . . . . . . . . . . . . . . . . . . . . . . . . . . . . . . . . . . . . . . . . . . . . . . . . . . . 42
What Is a Modem? . . . . . . . . . . . . . . . . . . . . . . . . . . . . . . . . . . . . . . . . . . . . . . . . . . . . . . . . . . . . . . . . . . . . 42
How Your Modem Works . . . . . . . . . . . . . . . . . . . . . . . . . . . . . . . . . . . . . . . . . . . . . . . . . . . . . . . . . . . . . . . . . . 44
Modem Features . . . . . . . . . . . . . . . . . . . . . . . . . . . . . . . . . . . . . . . . . . . . . . . . . . . . . . . . . . . . . . . . . . . . . 44
12

Software Settings . . . . . . . . . . . . . . . . . . . . . . . . . . . . . . . . . . . . . . . . . . . . . . . . . . . . . . . . . . . . . . . . . . . . . . . . . 45
Viewing the Software Settings . . . . . . . . . . . . . . . . . . . . . . . . . . . . . . . . . . . . . . . . . . . . . . . . . . . . . . . . . . 46
Basic AT Commands . . . . . . . . . . . . . . . . . . . . . . . . . . . . . . . . . . . . . . . . . . . . . . . . . . . . . . . . . . . . . . . . . . . . . . 47
Modem Response Messages . . . . . . . . . . . . . . . . . . . . . . . . . . . . . . . . . . . . . . . . . . . . . . . . . . . . . . . . . . . . . . . . 52
5 Using Sound on Your PC
Why Do I Need Sound? . . . . . . . . . . . . . . . . . . . . . . . . . . . . . . . . . . . . . . . . . . . . . . . . . . . . . . . . . . . . . . . . . . . . 58
Running the Audio Programs . . . . . . . . . . . . . . . . . . . . . . . . . . . . . . . . . . . . . . . . . . . . . . . . . . . . . . . . . . . . . . . 60
Testing Your Audio Setup . . . . . . . . . . . . . . . . . . . . . . . . . . . . . . . . . . . . . . . . . . . . . . . . . . . . . . . . . . . . . . . . . . 61
How to Use a Headset . . . . . . . . . . . . . . . . . . . . . . . . . . . . . . . . . . . . . . . . . . . . . . . . . . . . . . . . . . . . . . . . . . . . . 62
Volume Control . . . . . . . . . . . . . . . . . . . . . . . . . . . . . . . . . . . . . . . . . . . . . . . . . . . . . . . . . . . . . . . . . . . . . . 63
Connecting a MIDI Keyboard . . . . . . . . . . . . . . . . . . . . . . . . . . . . . . . . . . . . . . . . . . . . . . . . . . . . . . . . . . . . . . . 68
Setting Up. . . . . . . . . . . . . . . . . . . . . . . . . . . . . . . . . . . . . . . . . . . . . . . . . . . . . . . . . . . . . . . . . . . . . . . . . . . 69
Software Settings . . . . . . . . . . . . . . . . . . . . . . . . . . . . . . . . . . . . . . . . . . . . . . . . . . . . . . . . . . . . . . . . . . . . . . . . . 72
Viewing the Software Settings . . . . . . . . . . . . . . . . . . . . . . . . . . . . . . . . . . . . . . . . . . . . . . . . . . . . . . . . . . 73
Playing CDs. . . . . . . . . . . . . . . . . . . . . . . . . . . . . . . . . . . . . . . . . . . . . . . . . . . . . . . . . . . . . . . . . . . . . . . . . . . . . . 74
Recording Your Voice . . . . . . . . . . . . . . . . . . . . . . . . . . . . . . . . . . . . . . . . . . . . . . . . . . . . . . . . . . . . . . . . . . . . . 75
Mixing Sounds . . . . . . . . . . . . . . . . . . . . . . . . . . . . . . . . . . . . . . . . . . . . . . . . . . . . . . . . . . . . . . . . . . . . . . . 76
13

6 Peripheral Connections
Backplane . . . . . . . . . . . . . . . . . . . . . . . . . . . . . . . . . . . . . . . . . . . . . . . . . . . . . . . . . . . . . . . . . . . . . . . . . . . . . . . 78
Connecting the Mouse, Keyboard, Printer and Display . . . . . . . . . . . . . . . . . . . . . . . . . . . . . . . . . . . . . . . . . 79
Sound Card Connectors . . . . . . . . . . . . . . . . . . . . . . . . . . . . . . . . . . . . . . . . . . . . . . . . . . . . . . . . . . . . . . . . . . . 80
AUX In Connector . . . . . . . . . . . . . . . . . . . . . . . . . . . . . . . . . . . . . . . . . . . . . . . . . . . . . . . . . . . . . . . . . . . . 81 CD Audio Connector . . . . . . . . . . . . . . . . . . . . . . . . . . . . . . . . . . . . . . . . . . . . . . . . . . . . . . . . . . . . . . . . . . 81 Telephone Answering Device Connector . . . . . . . . . . . . . . . . . . . . . . . . . . . . . . . . . . . . . . . . . . . . . . . . . . 82 Connecting Audio Devices to the Rear Panel. . . . . . . . . . . . . . . . . . . . . . . . . . . . . . . . . . . . . . . . . . . . . . . 82
Modem Card Connectors . . . . . . . . . . . . . . . . . . . . . . . . . . . . . . . . . . . . . . . . . . . . . . . . . . . . . . . . . . . . . . . . . . 84
Telephone Connections for the U.S. and Canada. . . . . . . . . . . . . . . . . . . . . . . . . . . . . . . . . . . . . . . . . . . . 84 International Telephone Connections. . . . . . . . . . . . . . . . . . . . . . . . . . . . . . . . . . . . . . . . . . . . . . . . . . . . . 85 Warnings . . . . . . . . . . . . . . . . . . . . . . . . . . . . . . . . . . . . . . . . . . . . . . . . . . . . . . . . . . . . . . . . . . . . . . . . . . . . 86
7 Technical Characteristics
System Characteristics . . . . . . . . . . . . . . . . . . . . . . . . . . . . . . . . . . . . . . . . . . . . . . . . . . . . . . . . . . . . . . . . . . . . 88
Physical Characteristics . . . . . . . . . . . . . . . . . . . . . . . . . . . . . . . . . . . . . . . . . . . . . . . . . . . . . . . . . . . . . . . . . . . 90
Power Consumption . . . . . . . . . . . . . . . . . . . . . . . . . . . . . . . . . . . . . . . . . . . . . . . . . . . . . . . . . . . . . . . . . . . . . . 91
VESA Feature Connector . . . . . . . . . . . . . . . . . . . . . . . . . . . . . . . . . . . . . . . . . . . . . . . . . . . . . . . . . . . . . . . . . . 93
Checking Resource Settings. . . . . . . . . . . . . . . . . . . . . . . . . . . . . . . . . . . . . . . . . . . . . . . . . . . . . . . . . . . . . . . . 93
14

Glossary . . . . . . . . . . . . . . . . . . . . . . . . . . . . . . . . . . . . . . . . . . . . . . . . . . . . . . . . . . . . . . . . . . . . . . .95
Index . . . . . . . . . . . . . . . . . . . . . . . . . . . . . . . . . . . . . . . . . . . . . . . . . . . . . . . . . . . . . . . . . . . . . . . .103
15

16

1
Introducing the Advanced Setup Guide
The Advanced Setup Guide is an online document that can be read directly from the screen or can be printed out, keeping the same book structure as seen online.

1 Introducing the Advanced Setup Guide
Purpose of the Guide
Purpose of the Guide
The Advanced Setup Guide is intended to provide users with information on the system characteristics of the HP PC computers.
For more detailed information concerning memory, mass storage devices, processors, and how to upgrade your PC, refer to the Upgrade Guide.
As well as referring to the technical information and peripheral connection possibilities, this guide can be helpful in assisting you in protecting and setting up your system, managing your disks, and using the HP Setup program.
The HP Setup Program
The HP Setup program is menu-driven, with context-sensitive help (in English only), and should be used to check your configuration when you first start up your PC. The HP Setup program can be used to verify the main memory, cache memory and video settings. For mass storage devices, use the HP Setup program for all settings during installation and upgrading.
18
1 Introducing the Advanced Setup Guide
System Board Layout
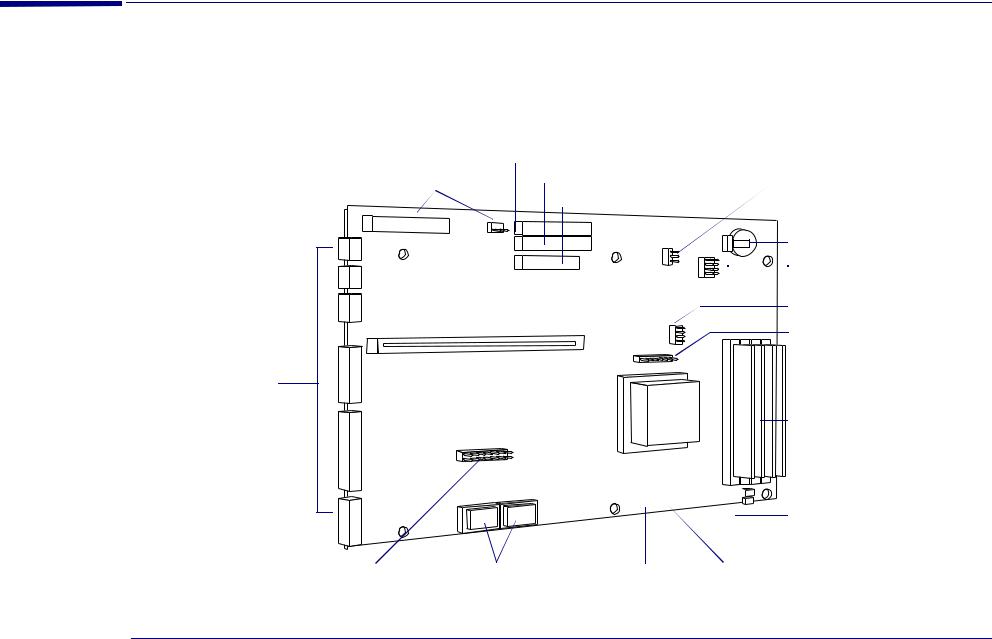
System Board Layout
The following system board block diagram will help you identify where the different components and connections are
located on the board.
Secondary IDE Connector
|
Power Connectors |
Primary IDE Connector |
|
|
(to power supply) |
||
|
Floppy Disk Drive |
||
Backplane |
|
||
|
|
|
|
Connector |
J30 |
J12 |
JP6 |
|
|||
|
J1 |
J15 |
|
|
|
1 |
|
|
|
J20 |
2 |
|
|
3 |
|
|
|
|
JP7 |
|
|
|
1 |
|
|
|
3 |
|
|
|
5 |
Rear Panel |
|
|
|
Connectors |
|
|
|
(refer to page 79) |
|
|
|
VESA Feature Connector |
Video Memory |
Processor Fan |
(refer to page 93) |
Upgrade Sockets |
Connector |
|
|
Clear CMOS (refer to page 20) |
|
|
Backup Battery |
1 |
2 |
Processor |
5 |
6 |
|
3 |
4 |
|
7 |
8 |
|
9 |
10 |
|
|
J37 |
Voltage Selection |
|
Clock Ratio |
|
|
|
|
2 |
|
Front Bezel Switch |
4 |
|
|
6 |
|
|
|
|
|
|
|
Connector |
|
|
Main Memory Module |
|
|
and Sockets |
A B C D
C D
Processor Socket
Front Bezel Fan
Connector
19

1 Introducing the Advanced Setup Guide
System Board Layout
CMOS Jumper (JP6)
The CMOS memory stores information, such as your computer’s configuration, which is preserved when you turn off your computer. A jumper placed on pins 1-2 prevents changes to the CMOS configuration.
The following table shows the possible pin settings:
Jumper Function |
Pins |
Description |
||
|
|
|
|
|
Default setting |
1 |
- 2 |
The jumper on these pins prevents any change to the CMOS configuration. |
|
(top two pins) |
||||
|
|
|||
|
|
|
|
|
Clear CMOS |
2 |
- 3 |
Place the jumper on these pins to clear the CMOS. |
|
|
|
|
|
|
The only time you need to clear the CMOS is if the configuration stored in memory is corrupted or you have forgotten the system password.
To clear the configuration:
1Turn off the computer. Unplug the computer from the electrical socket. Disconnect any peripherals from the computer.
2Remove the computer’s cover (refer to the Upgrade Guide for any assistance).
3Place the jumper on pins 2-3 (refer to page 19 for jumper location on the system board) to clear the CMOS.
Note |
The CMOS will be cleared only if the computer is unplugged from the electrical socket. |
|
|
4Wait for a couple of seconds, then place the jumper on pins 1-2 to re-enable the configuration.
5Replace the cover. Reconnect the power cord and any peripherals to the computer.
6Turn on the computer.
To set a new system password, you will need to run the Setup program.
20
2
Protecting and Using Your PC
This chapter presents an overview of the security features provided with the HP PC and a list of tasks that should be carried out on a regular basis to protect and look after your files. This section also includes information about the different features available with the HP Enhanced Keyboard.

2 Protecting and Using Your PC
Security Features
Security Features
The HP PC has many security features to protect stored files, and to prevent unauthorized operation of software applications.
HP Setup Program
The following security features are set by using the HP Setup Program:
•User password.
•Supervisor password (system configuration protection).
•Power-on prompt, with password.
For further information on how to use the program and its features, refer to chapter 3, “The HP Setup Program”.
Protecting Your PC from Virus Infections
A virus is a small part of a program that is capable of inserting itself in the code of another program, then spreading from this program to another, and so on. Viruses can have different impacts on your PC, from displaying annoying messages to damaging data. The regular use of updated antivirus software is the best way to protect your PC against a virus. You should regularly scan the hard disk and any other disks you use for virus infections.
Your PC is installed with the VirusScan antivirus software. McAfee VirusScan and VShield can be accessed from the HP data protection center. McAfee VirusScan also includes an on-access scanning component, Vshield, which intercepts and scans programs before they are executed. However, Vshield will only be activated once you have agreed to the license agreement that is displayed the first time you use VirusScan.
22

2 Protecting and Using Your PC
Maintaining Your Disk and Files
Maintaining Your Disk and Files
To ensure that you have a good and efficient working environment, you can use the tools provided with your HP PC to protect all your files and keep your system at its highest possible performance level. It is recommended that you schedule maintenance tasks on your PC on a regular basis.
Improving File Access Time
As programs are continually reading or writing to the hard disk, fragmentation eventually occurs, meaning that files are stored in non-contiguous sectors. Although this does not have any affect on the files themselves, it does take the computer a longer time to access fragmented files for reading and writing operations. It is therefore advisable to run a disk defragmenter on a regular basis, as this consolidates files and thereby improves file access time.
Note |
It should be noted that when using a defragmenter you can safely use your computer to work on other applications, |
|
but response time will be slower than normal. |
|
|
This tool can be accessed from the HP data protection center.
Refer to the Windows 95 documentation for information on how to use the disk defragmenter utility.
23

2 Protecting and Using Your PC
Maintaining Your Disk and Files
Increasing Disk Space
If there is a need for some extra space on the disk, this can be met by compressing the files on the disk. Disk drives can also be compressed. For most programs, a compressed drive appears as a real disk drive.
The Windows 95 utility DriveSpace can compress and manage drives compressed with DriveSpace or DoubleSpace.
To run the Windows 95 DriveSpace utility:
1Click the Start button.
2Select Programs, then Accessories, then System Tools.
3Select DriveSpace, then click the drive you want to compress.
It should also be noted that whenever a file or directory is deleted, it is moved to the Windows 95 Recycle Bin. You should check this regularly and delete any unwanted files. The Recycle Bin can be configured to delete files either immediately it receives them or, alternatively, only when you request it to do so.
To configure the Recycle Bin:
1Place the pointer over the Recycle Bin.
2Click the right mouse button.
3In the pop-up menu which is then displayed, select Properties, choose the desired configuration, and click OK to save and exit.
For further details on disk compression and how to reconfigure the Recycle Bin, refer to the Windows 95 documentation.
24

2 Protecting and Using Your PC
Using Power Management in Windows 95
Using Power Management in Windows 95
The HP PC has a power-saving capability that is implemented according to the Environmental Protection Agency (EPA) Energy Star guidelines. You can use the power management features to reduce the power used by your computer and display when they are not in use.
There are four levels of power saving that you can configure in the Windows 95 Control Panel—two for the display and two for the computer. For information concerning the power management features offered by the HP Setup program, refer to “Power Management in the BIOS” on page 39.
The following table is designed to help you understand the power management features available in Windows 95, and their association with the power management features in the BIOS.
Option |
Feature |
Comments |
|
|
|
|
Low-power standby mode: reduces the power used by your display by automatically switching it to Standby |
This feature is not linked to the |
|
mode after a certain period of inactivity. You can use this form of power saving if your display is Energy Star- |
computer and BIOS standby feature. |
|
compliant. Use the Display icon in the Control Panel to configure this mode. To return to full power mode, |
|
|
move the mouse, or press any key on the keyboard. |
|
Display |
|
|
|
|
|
|
Shut off monitor mode: reduces the power used by your display by shutting it off after a certain period of |
This feature is not linked to the |
|
inactivity. This mode saves more power than Low-power standby mode. You can select Shut off monitor |
computer and BIOS suspend feature. |
|
mode if your display is Energy Star-compliant. Use the Display icon in the Control Panel to configure this |
|
|
mode. To return to full power mode, move the mouse, or press any key on the keyboard. |
|
|
|
|
25

|
|
|
|
2 Protecting and Using Your PC |
||
|
|
|
|
Using Power Management in Windows 95 |
||
|
|
|
|
|
|
|
|
Option |
|
Feature |
Comments |
|
|
|
|
|
|
|
|
|
|
|
Standby mode, activates automatically after a period of time without any computer activity. In this mode, |
The HP Setup Program defines the |
|
||
|
|
the processor runs at a slow speed.This feature is enabled by selecting “Allow Windows to manage power |
timeout duration. |
|
||
|
|
use on this computer” in the Power Properties dialog box. To return the PC to full speed, move the mouse, or |
|
|
|
|
|
|
press any key on the keyboard. |
|
|
|
|
|
Computer |
|
|
|
|
|
Suspend mode, activates manually by choosing Suspend from the Start menu, or by pressing the Power key |
This feature links with the HP Setup |
|
||||
|
|
|
||||
|
|
on the keyboard. It reduces power used by the PC by stopping the processor. You will return to full power |
Program. The HP Setup Program |
|
||
|
|
mode, when any key is pressed on the keyboard, or the mouse is moved. |
defines the IRQ that will wake-up the |
|
||
|
|
On certain models, this feature is not available when your PC is in fax wakeup mode. |
PC from suspend mode. |
|
||
|
|
|
|
|
||
|
|
|
|
|
|
|
|
|
|
|
|
||
|
Note |
|
If your computer is on a Novell network, the Suspend mode option will disconnect you from the network. Some other |
|
||
|
|
|
software applications are also incompatible with Suspend mode. |
|
|
|
|
|
|
|
|
|
|
26

2 Protecting and Using Your PC
Enhanced Keyboard
Enhanced Keyboard
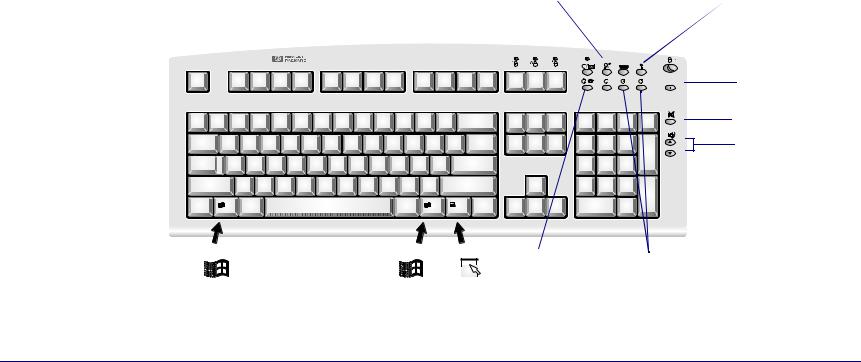
The HP Enhanced Keyboard allows you to access directly various software applications. You can also create your own shortcuts to your most frequent tasks by configuring some keys. For example, you can access your word processor application at a touch of a single key.
The keys are located on the right-hand side of the keyboard and can be used as follows:
Key |
Function |
Configure Key |
||
|
|
|
|
|
|
Monitors the arrival of voice-mail messages, fax messages or electronic mail. The LED blinks when a new voice- |
|
|
No |
Messages and LED |
mail, fax, or E-mail arrives. The LED is turned off when you open the message. Pressing the Message key starts the |
|
|
|
Microsoft Exchange program and opens the Inbox folder. If you have not configured Microsoft Exchange, the |
|
|
|
|
|
configuration dialog box for the Inbox is launched. However, it is recommended that you use the HP |
|
|
|
|
communication center to configure Microsoft Exchange. |
|
|
|
|
|
|
|
|
HP Centers |
Accesses the HP communication, data protection, network, welcome and support centers. |
|
|
No |
|
|
|
|
|
Web Browser |
Launches your default Internet browser configured in your system. |
|
|
No |
|
|
|
|
|
Menu |
Displays the current configuration of the keys and the actions mapped to them. |
|
|
No |
|
|
|
||
|
This key can be used to either turn on power management, lock the keyboard if a password is set in the BIOS, or |
Yes. Refer to |
||
Power |
start the screen saver. |
|
“Configuring |
|
|
|
|
|
|
|
Shortcut Keys” on |
|||
|
|
|||
|
|
|
|
page 29 |
|
|
|
|
|
Information |
Starts the HP guide to documentation. |
|
|
No |
|
|
|
|
|
Mute and Volume Control |
Press the Mute key to mute the audio. The volume keys are used to adjust the volume level. If no sound card is |
|
|
No |
installed in your computer, a warning will be displayed on the screen if one of these three keys is pressed. |
|
|
|
|
|
|
|
|
|
|
|
|
|
|
27
2 Protecting and Using Your PC
Enhanced Keyboard
Key |
Function |
Configure Key |
|||
|
|
|
|||
Shortcuts |
You can assign these keys to start applications, open files, or open URLs on the Internet. For example, you can |
Yes. Refer to |
|||
access your word processor application at a touch of a single key. |
|
“Configuring |
|||
(S3, S4, S5) |
|
|
|
|
|
|
Shortcut Keys” on |
||||
|
|
|
|
page 29 |
|
|
|
|
|||
|
This key can be used to either start the HP phone dialer1 or access telephone directory sites world-wide. If the |
Yes. Refer to |
|||
Phone |
hands-free communication application is available, then you can use this key like a hands-free button on a regular |
|
“Configuring |
||
|
|
|
|
||
telephone. You can also reconfigure this key in the same way as the shortcut keys. |
Shortcut Keys” on |
||||
|
|||||
|
|
|
|
page 29 |
|
|
|
|
|
|
|
1. Available only if you have a communication card installed, and the communication software has been set up through the HP communication center.
Messages key, with |
HP centers |
WEB browser |
|
|
Menu key |
|
|
mail LED |
|
|
|
|
|
|
|
|
|
|
|
|
Power key |
||
|
|
|
|
|
|
||
|
|
|
|
|
|
|
|
|
|
|
|
|
|
|
|
Information
Mute
Volume control
|
|
|
|
|
|
|
|
|
|
Phone key |
Shortcut keys |
|
|
|
|
|
|
|
|
|
|
|
|
|
|
|
|
|
|
|
|
|
|
|
|
|
|
|
|
|
|
|
|
|
|
|
|
Display the Windows 95 Start menu by |
Access the right-mouse- |
pressing either of the two Windows keys. |
button functions. |
28

2 Protecting and Using Your PC
Enhanced Keyboard
Configuring Shortcut Keys
You have three standard configurable shortcut keys (S3, S4, S5), along with the Phone Dialer which can also be configured. You can configure shortcut keys from the Control Panel. Double-click the Keyboard icon, then select the Shortcuts tab from the Keyboard Properties screen. To define a Shortcut key, you need to:
Provide a Description of the application you are assigning to the Shortcut key.
Provide a Command, which is the executable that starts the application.
Use the Browse button to locate the file you want to use  in the Command field.
Click here to activate the  Question Mark pointer. Then click any element to obtain information.
Click here to restore the  HP default settings.
29
2 Protecting and Using Your PC
Enhanced Keyboard
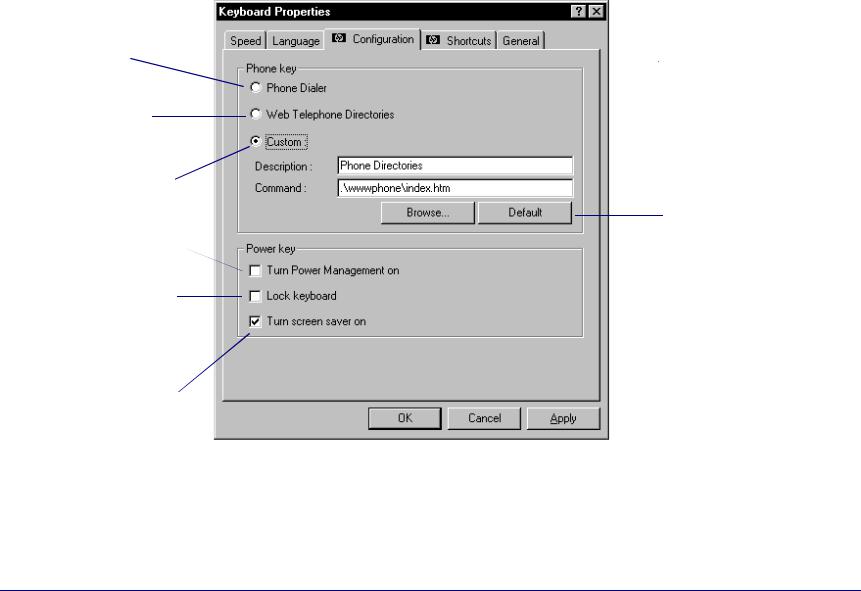
You can configure shortcuts from the Control Panel. Double-click the Keyboard icon, then select the Configuration tab from the Keyboard Properties screen.
Start Phone Dialer.
Link to telephone directories world-wide.
Specify your own Description and Command for this key. 
Reduce the power used by the PC by putting it in suspend mode.
Lock the keyboard when desired. The password in the HP Setup program must be set to use this option (may not be supported in some models).
Launch the screen saver for confidentiality.
Click here to activate the Question Mark pointer. Then click any element to obtain information.
Restores the HP default settings.
30
Loading...