


PX940
High Performance Industrial Printer
User Guide
Disclaimer
Honeywell International Inc. (“HII”) reserves the right to make changes in specifications and other information contained in this document without prior notice, and the reader should in all cases consult HII to determine whether any such changes have been made. The information in this publication does not represent a commitment on the part of HII.
HII shall not be liable for technical or editorial errors or omissions contained herein; nor for incidental or consequential damages resulting from the furnishing, performance, or use of this material. HII disclaims all responsibility for the selection and use of software and/or hardware to achieve intended results.
This document contains proprietary information that is protected by copyright. All rights are reserved. No part of this document may be photocopied, reproduced, or translated into another language without the prior written consent of HII.
Copyright 2019 Honeywell International Inc. All rights reserved.
Web Address: www.honeywellaidc.com
Trademarks
Microsoft® Windows®, Windows NT®, Windows 2000, Windows ME, Windows XP, and the Windows logo are trademarks or registered trademarks of Microsoft Corporation.
Wi-Fee is a registered certification mark of the Wi-Fee Alliance.
Bluetooth is a trademark of Bluetooth SIG, Inc., U.S.A.
Apple® and App Store® are registered trademarks of Apple Inc., registered in the U.S. and other countries.
Google™, Android™ and Google Play Store™ are registered trademarks of Google, LLC.
Zebra is a trademark or registered trademark of Zebra Corporation.
Other product names or marks mentioned in this document may be trademarks or registered trademarks of other companies and are the property of their respective owners.
For patent information, refer to www.hsmpats.com.

TABLE OF CONTENTS
Customer Support ........................................................................................................................ |
xi |
Technical Assistance ............................................................................................................. |
xi |
Product Service and Repair ................................................................................................ |
xi |
Limited Warranty.................................................................................................................... |
xi |
Safety Warnings..................................................................................................................... |
xii |
Caution Statements.............................................................................................................. |
xii |
Shipping the Printer ............................................................................................................ |
xiii |
Chapter 1 - Get Started.................................................................................... |
1 |
Features ............................................................................................................................................. |
1 |
About the Display..................................................................................................................... |
1 |
Back View (Ports and Power)............................................................................................... |
2 |
Print Button................................................................................................................................ |
2 |
Ready Screen............................................................................................................................. |
2 |
Main Menu ................................................................................................................................. |
4 |
Navigate the Main Menu...................................................................................................... |
5 |
Wizards............................................................................................................................................... |
5 |
Printing Wizard......................................................................................................................... |
6 |
Communications Wizard ...................................................................................................... |
6 |
Calibration Wizard................................................................................................................... |
6 |
Printer Command Languages and Simulator Support Options ................................. |
6 |
Autosense .................................................................................................................................. |
7 |
Direct Protocol.......................................................................................................................... |
7 |
Fingerprint.................................................................................................................................. |
7 |
IPL.................................................................................................................................................. |
7 |
PX900/PX900V User Guide |
iii |
ZSim............................................................................................................................................... |
7 |
DPL ................................................................................................................................................ |
8 |
Smart Printing........................................................................................................................... |
8 |
Access the Printer Web Page...................................................................................................... |
8 |
Set the Printer Command Language...................................................................................... |
8 |
From the Printer Web Page .................................................................................................. |
8 |
From the Main Menu .............................................................................................................. |
9 |
Chapter 2 - Set Up the Printer ..................................................................... |
11 |
Power Up the Printer................................................................................................................... |
11 |
Calibrate the Touch Screen...................................................................................................... |
12 |
To calibrate the screen from the website:.................................................................... |
12 |
About the Media........................................................................................................................... |
12 |
Load Media for Tear-Off Printing ................................................................................... |
12 |
Load Media for Rewind Printing ..................................................................................... |
16 |
Load Media for Peel-Off Printing ................................................................................... |
17 |
Load Fanfold Media............................................................................................................. |
18 |
About the Ribbon......................................................................................................................... |
19 |
Load Ribbon............................................................................................................................ |
19 |
Ribbon Removal..................................................................................................................... |
20 |
Print a Test Label ......................................................................................................................... |
21 |
Printhead Pressure and Toggle Position............................................................................ |
22 |
Pressure Adjustment ........................................................................................................... |
22 |
Toggle Position Adjustment.............................................................................................. |
22 |
Toggle Settings ..................................................................................................................... |
23 |
Chapter 3 - Connect the Printer.................................................................. |
25 |
Connect the Printer to Your PC .............................................................................................. |
25 |
Connect the Printer Using a Serial Cable.................................................................... |
25 |
Connect the Printer Using a USB Cable....................................................................... |
25 |
Connect the Printer to Your Network ................................................................................... |
25 |
Connect the Printer to an Ethernet Network.............................................................. |
26 |
Configure Bluetooth Communications from the Web Page................................ |
26 |
iv |
PX900/PX900V User Guide |
Configure Bluetooth Communications from the Main Menu |
.............................27 |
Connect the Printer via Wi-Fi............................................................................................ |
27 |
Configure Wi-Fi Communications from the Web Page ................................... |
27 |
Configure Wi-Fi Communications from the Main Menu ................................ |
28 |
Install Authentication Certificates........................................................................... |
28 |
Printer Drivers................................................................................................................................ |
29 |
Install Honeywell Windows Driver .................................................................................. |
29 |
USB Host Port................................................................................................................................ |
29 |
Connect a USB Device......................................................................................................... |
30 |
Chapter 4 - Configure the Printer................................................................ |
31 |
Printer Configuration Menus .................................................................................................. |
31 |
Printer Configuration........................................................................................................... |
32 |
Restrict Access to the Main Menu .................................................................................. |
32 |
Access the Printer Web Page ............................................................................................ |
32 |
Printer Webpage User Name and Password............................................................... |
33 |
Configure the Printer from the Web Page.......................................................................... |
33 |
Configure the Printer with PrintSet 5 or Print Set MC................................................... |
34 |
Configure the Printer with Programming Commands.................................................. |
34 |
Uploading from the Web Page ......................................................................................... |
34 |
Uploading from a USB Storage Device......................................................................... |
35 |
Change Background Image for the Ready Screen.......................................................... |
35 |
Printer Profiles............................................................................................................................... |
36 |
Save a Printer Profile from the Web Page.................................................................... |
36 |
Load a Printer Profile from the Web Page ................................................................... |
36 |
Save a Printer Profile from the Main Menu................................................................. |
37 |
Load a Printer Profile from the Main Menu................................................................ |
37 |
Load a Printer Profile Using Programming Commands........................................ |
37 |
Install a Configuration File from a USB Storage Device........................................ |
38 |
Export a Configuration File to a USB Storage Device............................................. |
38 |
Menu Shortcuts............................................................................................................................ |
39 |
Create Menu Shortcuts....................................................................................................... |
39 |
Customize the Printer Web Page........................................................................................... |
40 |
PX900/PX900V User Guide |
v |
Chapter 5 - About the Verifier...................................................................... |
41 |
Setting up the Verifier................................................................................................................ |
41 |
Webpage................................................................................................................................... |
42 |
Front Panel............................................................................................................................... |
42 |
Calibration...................................................................................................................................... |
42 |
Verifier Calibration Card..................................................................................................... |
42 |
Handling Instructions................................................................................................... |
42 |
Calibrating the Printer......................................................................................................... |
43 |
Verifier Settings............................................................................................................................ |
44 |
Verification Type .................................................................................................................... |
44 |
Passing Grade......................................................................................................................... |
44 |
Aperture .................................................................................................................................... |
44 |
Maximum Consecutive Failures...................................................................................... |
44 |
Verification Failure Action ................................................................................................. |
44 |
Save Failed Label Images .................................................................................................. |
44 |
Void Pattern............................................................................................................................. |
45 |
Print Modes and Speed....................................................................................................... |
45 |
Barcode Symbologies Supported................................................................................... |
45 |
Barcode Orientations........................................................................................................... |
45 |
Barcode Size Supported..................................................................................................... |
45 |
Verification Length............................................................................................................... |
46 |
Maximum Number of Barcodes per Label.................................................................. |
46 |
Printing Behavior after Error Recovery......................................................................... |
46 |
Printing Behavior after Recovered from error above: ............................................. |
46 |
Printing Errors........................................................................................................................ |
48 |
Unsupported Barcode Behavior...................................................................................... |
48 |
Example:............................................................................................................................. |
48 |
Verification Failed Error Handling.................................................................................. |
48 |
Failed Label Image File ............................................................................................... |
49 |
USB Thumbdrive............................................................................................................. |
49 |
Reporting and Statistics..................................................................................................... |
50 |
Report Formats ...................................................................................................................... |
50 |
Individual Report................................................................................................................... |
50 |
vi |
PX900/PX900V User Guide |
Report Header ................................................................................................................. |
51 |
Barcode Information ............................................................................................................ |
53 |
All Supported 1D Barcodes Overall Parameters ....................................................... |
54 |
2D Barcode, DataMatrix Overall Parameters ............................................................. |
55 |
1D barcode 10 line Profile Grading Parameters....................................................... |
57 |
Summary Report.................................................................................................................... |
58 |
Restore Default Verification Files.................................................................................... |
58 |
Fingerprint Command......................................................................................................... |
59 |
Chapter 6 - Troubleshooting......................................................................... |
61 |
System Information..................................................................................................................... |
61 |
Statistics.................................................................................................................................... |
61 |
Printer Odometer ......................................................................................................................... |
62 |
Maintenance Alerts..................................................................................................................... |
62 |
Set Alerts................................................................................................................................... |
62 |
Alert Notifications ................................................................................................................. |
63 |
Error Alerts and Solutions.................................................................................................. |
64 |
Verifier Error Alerts and Solutions .................................................................................. |
65 |
Troubleshoot Printer Problems and Find Solutions....................................................... |
65 |
Print Problems........................................................................................................................ |
65 |
Verifier Problems ................................................................................................................... |
67 |
Networking Problems .......................................................................................................... |
68 |
Restore Printer Defaults............................................................................................................ |
68 |
Restore Defaults from the Printer Web Page.............................................................. |
68 |
Restore Defaults from the Main Menu ......................................................................... |
68 |
Restore Defaults with a Hardware-Based Reset ....................................................... |
69 |
Upgrade the Printer Firmware ................................................................................................ |
69 |
Upgrade Firmware from the Printer Web Page.......................................................... |
70 |
Upgrade Firmware from a USB Storage Device ........................................................ |
70 |
Chapter 7 - Maintenance............................................................................... |
71 |
Clean the Printer........................................................................................................................... |
71 |
Clean the Printhead.............................................................................................................. |
72 |
Clean the Front Sensor (PX940A) ................................................................................... |
72 |
PX900/PX900V User Guide |
vii |
Clean the Verifier (PX940V)............................................................................................... |
73 |
Clean the Media Path .......................................................................................................... |
73 |
Clean the Exterior of the Printer...................................................................................... |
73 |
Replace the Printhead ............................................................................................................... |
73 |
Replace the Platen Roller ......................................................................................................... |
74 |
Label Taken Sensor Calibration....................................................................................... |
76 |
Label Gap and Black Mark Sensor Adjustments...................................................... |
76 |
Chapter 8 - Product Specifications............................................................. |
79 |
Printer and Environmental Specifications ........................................................................ |
79 |
Command Languages and Simulator Support Features ............................................ |
79 |
Print Sensors ................................................................................................................................. |
79 |
Network Services.......................................................................................................................... |
80 |
Fonts................................................................................................................................................. |
80 |
Resident Fonts........................................................................................................................ |
80 |
Downloadable Fonts ............................................................................................................ |
81 |
Supported Font Types ......................................................................................................... |
82 |
Printed Barcode Symbologies.......................................................................................... |
82 |
1D Barcode Symbologies ............................................................................................ |
82 |
2D Barcode Symbologies ............................................................................................ |
82 |
Graphic File Types................................................................................................................. |
83 |
Appendix A - Default Settings...................................................................... |
85 |
Communications Settings ....................................................................................................... |
85 |
Serial Port................................................................................................................................. |
85 |
Ethernet .................................................................................................................................... |
86 |
Bluetooth Settings ...................................................................................................................... |
86 |
Media Settings.............................................................................................................................. |
86 |
Print Quality Settings................................................................................................................. |
89 |
System Settings............................................................................................................................ |
90 |
General System...................................................................................................................... |
90 |
Display and Audio Settings............................................................................................... |
91 |
System I/O ............................................................................................................................... |
91 |
viii |
PX900/PX900V User Guide |
System Network Services ................................................................................................... |
92 |
Verifier Settings ............................................................................................................................ |
93 |
Maintenance Alerts.................................................................................................................... |
94 |
Appendix B - Print Labels with INPrint....................................................... |
95 |
The INPrint Page .......................................................................................................................... |
95 |
Print INPrint Labels.............................................................................................................. |
95 |
Appendix C - Accessories and Options........................................................ |
97 |
Printer Accessories and Options............................................................................................ |
97 |
PX900/PX900V User Guide |
ix |
x |
PX900/PX900V User Guide |
Customer Support
Technical Assistance
To search our knowledge base for a solution or to log in to the Technical Support portal and report a problem, go to www.hsmcontactsupport.com.
For our latest contact information, see www.honeywellaidc.com/locations.
Product Service and Repair
Honeywell International Inc. provides service for all of its products through service centers throughout the world. To obtain warranty or non-warranty service, return your product to Honeywell (postage paid) with a copy of the dated purchase record. To learn more, go to www.honeywellaidc.com and select Service & Repair at the bottom of the page.
Limited Warranty
For warranty information, go to www.honeywellaidc.com and click Get Resources >
Product Warranty.
PX940 User Guide |
xi |

Safety Warnings
Warning: Moving parts are exposed when the cover is open. Make sure the cover is closed before operating the printer.
Warning: The printhead/motor may be hot. Allow the printhead/motor to cool.
Warning: Do not put your fingers inside the print mechanism when the power is on.
Warning: The tear bar contains sharp edges. Keep fingers and other body parts away from the tear bar.
Warning: Installing the printer requires a power cord connected to a socket-outlet with an earthing connection.
Warning: Disconnect the power cord from the socket-outlet before installing user-service parts in the printer.
Warning: This printer contains a coin battery and is NOT user replaceable. Keep children away from the printer when the printer is in service.
Never put batteries in your mouth as swallowing may lead to serious injury or death. If swallowed, seek medical attention immediately from a physician or local poison control center.
Caution Statements
Caution: Read and review the warnings in this manual carefully before connecting the printer.
Caution: Observe all safety and accident prevention regulations applicable to your specific region and application.
Caution: Do not spray the printer with water. If you are using a hose to clean the premises in an industrial environment, remove the
printer or protect it carefully from spray and moisture. Caution: You must implement both hardware and software safety
precautions to prevent the possibility of undefined system states.
Caution: You must make sure that dangerous conditions cannot occur under any circumstances, even for a brief period of time.
Caution: Carefully read the warning text on the envelope before using a cleaning card.
xii |
PX940 User Guide |

Caution: To reduce the risk of electric shock or fire, keep the cover closed and turn off the printer when not in use. There are no userserviceable parts inside the power supply unit.
Shipping the Printer
To avoid printer damage during transit:
1.Power off the printer and remove all cables.
2.Remove media and ribbon (if installed) from the printer.
3.Lower the printhead and front arm.
4.Pack the printer in the original container.
Note: Honeywell is not responsible for any damage caused during shipment/transit.
PX940 User Guide |
xiii |
xiv |
PX940 User Guide |

CHAPTER
1
GET STARTED
The PX940 industrial printer series includes:
•PX940 productivity version (PX940A)
•PX940 Verifier version (PX940V) with an integrated barcode verification module.
Both PX940A and PX940V printers are rugged label printers that include integrated USB, RS-232, Ethernet, and Bluetooth LE interfaces. You can connect the printers to a single PC, a wired network, or a wireless (optional) network.
Note: Bluetooth LE is only used with Print Set MC to configure the printer on Android and iOS devices.
Features
•USB host port for connecting storage devices, scanners, or keyboards.
•USB device port to connect to a PC.
•Support for printer command languages including Fingerprint (FP), Direct Protocol (DP), Intermec Printer Language (IPL), Zebra Simulation (ZSim), Datamax Printer Language (DPL), and Smart Printing.
About the Display
The front panel has a 3.5 inch full-touch screen that supports touch input with fingers, gloved hands, or a stylus.
PX940 User Guide |
1 |
Back View (Ports and Power)
|
IEEE 802.11 Port |
|
|
(Optional) |
|
Ethernet Port |
|
|
IEEE 1284 Port |
RS-232 Serial Port |
|
USB Device Port |
||
(Optional) |
||
USB Host Port |
||
|


 On/Off Switch
AC Power
Print Button
Use the Print button to feed media, pause print jobs, calibrate, test feed, and print.
Printer State |
Print Button Action |
|
|
Startup |
Press the Print button during startup to enter Calibration mode or to restore |
|
defaults if the printhead is lifted. |
|
|
Ready |
Press the Print button to advance the media. |
|
|
|
If the print key feature is on, press the Print button to reprint the last job. |
|
|
|
Press and hold the Print button to calibrate the media sensors. |
|
|
Printing |
Press the Print button to stop or pause printing. The printer stops after |
|
completing the current label. |
|
|
Paused |
Press the Print button to resume printing. |
|
|
Error |
Press the Print button to advance the media. |
|
|
Ready Screen
The Ready Screen appears when the printer is powered on and has completed its startup process.
Note: The icon for Wi-Fi status appears only when the optional Wi-Fi module is installed.
2 |
PX940 User Guide |

By default, the information bar at the bottom of the screen shows the printer command language and the printer IP address. You will see the time and current date only if the real time clock (RTC) is installed. You can customize the screen to show different types of information.
The status bar at the top of the screen includes these icons:
Icon |
Name |
Description |
|
|
|
|
Main Menu |
Press the icon to view the main menu for your printer. |
|
|
|
|
Communications |
Press the icon to view communications information for your |
|
|
printer. |
|
|
|
|
Printing |
Press the icon to view specific printer information. |
|
|
|
|
Bluetooth |
Press the icon to view Bluetooth LE information for your |
|
|
printer. |
|
|
|
|
Back |
Press this icon to navigate back through the printer menus. |
|
|
|
PX940 User Guide |
3 |
Main Menu
On the printer Ready screen, press  to view the Main Menu.
Note: If you create menu shortcuts, the Main Menu is replaced by the Quick Choices menu.
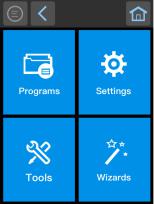
Press a button to select the Programs, Settings, Tools, or Wizards menu.
•Programs displays a list of programs installed on the printer. This list includes utility programs provided as part of the firmware and programs you have installed. Programs appears in the Main Menu only if the printer is using Fingerprint or Direct Protocol as the command language.
•Select Settings to view and change printer settings.
•Select Tools to print test labels, manage a connected USB storage device, restore printer default settings, or save and load printer profiles.
•Select Wizards to see a list of wizards that help you configure printing or communication settings, or calibrate the media sensors.
Note: The printer cannot print while the Main Menu is showing. Exit the Main Menu and return to the Ready screen to begin printing.
4 |
PX940 User Guide |
Navigate the Main Menu
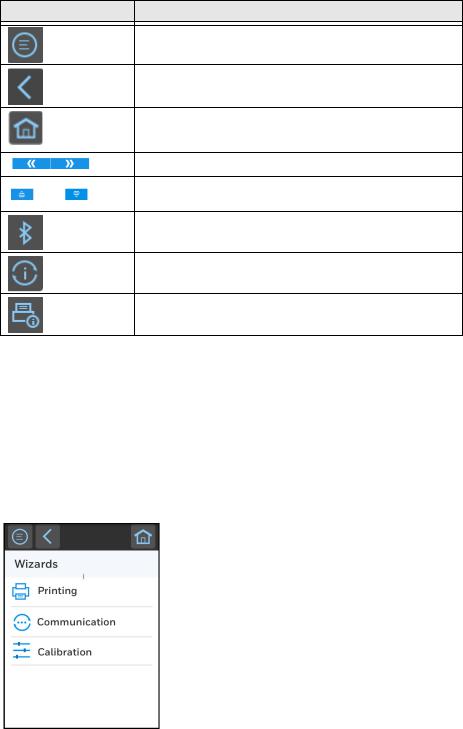
Use the status bar buttons to navigate between menus in the Main menu and save changes.
Button Description
Returns to the Main menu
Goes back one level in the menu
Returns to the Ready screen
Moves between options in a settings menu
Moves to additional options not viewable in the menu
Bluetooth: Gives the device name and device address
Information: Gives Communications information such as
Ethernet, Serial, and USB.
Printer Information
Note: Use the horizontal scroll bar for settings with additional options.
Wizards
The printer includes several wizards you can use to quickly set up your printer. You can start all of the wizards from the Main menu except for the startup wizard. The startup wizard appears the first time you turn on the printer and after the printer has been reset to the factory default state.
PX940 User Guide |
5 |
Printing Wizard
|
Wizard |
Description |
|
|
|
|
|
|
|
Media Loading Guide |
Shows how to load media. |
|
|
|
|
Ribbon Loading Guide |
Shows how to load ribbon. |
|
|
|
|
Media Setup |
Select media and printing type (DT or TTR), media width, length, and X- |
|
|
margin, Label Reset and Label Top Adjust values, and print speed. |
|
|
|
|
Print Quality |
Prints a series of labels to determine the best print quality setting. |
|
|
|
Communications Wizard |
|
|
|
Wizard |
Description |
|
|
|
|
|
|
|
Line Analyzer |
Logs all incoming data on all communications channels and saves the |
|
|
data to a log file. For advanced users. |
|
|
|
Calibration Wizard |
|
|
|
|
|
|
Wizard |
Description |
|
|
|
|
|
|
|
Media |
Calibrates all media sensors and shows current print settings. |
|
|
|
|
Verifier |
Calibrates the Verifier. (for PX940V only) |
|
|
|
|
Label Taken Sensor |
Calibrates the label taken sensor used with the label dispenser. Available |
|
|
when the label taken sensor is installed. |
|
|
|
|
Date and Time |
Calibrates the date and time. |
|
|
|
|
Screen |
Calibrates the touch screen. |
|
|
|
Printer Command Languages and Simulator Support
Options
A printer command language is a set of instructions that controls printer functions:
•Configure the printer.
•Return the status of the printer.
•Control peripheral devices.
•Format a label or receipt for printing.
The printer supports these command languages and language simulator support options:
•Autosense
•Direct Protocol
•Fingerprint
•IPL
6 |
PX940 User Guide |
•ZSim
•DPL
•Smart Printing
Autosense
Autosense allows the printer to automatically sense from label to label, the incoming data stream and its language, and print each label accordingly.
Note: Autosense is the default printer configuration and does not support an IPL data stream.
Direct Protocol
Direct Protocol (DP) uses a more intuitive English-like syntax. Direct Protocol lets you combine predefined layouts and variable data to create labels, tickets, and tags. If you are using barcode software, select Direct Protocol as your printer command language.
Fingerprint
Fingerprint is a BASIC-inspired general purpose printer language. Use Fingerprint to design custom label formats and write printer application software. If you plan to run Smart Printing applications directly on the printer, without connecting to a PC, select Fingerprint as your printer command language.
IPL
IPL is a host-based printer command language. Use IPL to design, modify, and download label formats, write printer application software, and configure the printer. If you are sending IPL label files to the printer, select IPL as your printer command language.
Note: IPL can be supported on 200dpi and 300dpi printers only.
ZSim
The ZSim (Zebra Printer Language Simulator) interprets Zebra™ programs (ZPL II or later) without requiring any host programming changes. If you are sending ZPL label files to the printer, select ZSim as your printer command language.
PX940 User Guide |
7 |
DPL
The DPL command language interprets Datamax™ data streams without requiring any host programming changes. If you are sending DPL label files to the printer, select DPL as your printer command language.
Smart Printing
Smart Printing refers to the ability of the printer to independently run printing operations without being connected to a host computer. If you are running printer-based applications written in C#, select Smart Printing as your printer command language.
Access the Printer Web Page
1.Open a browser window on your PC.
2.In the location or address bar, type the printer IP address and press Enter.
3.Click Login. The Login page appears.
You will be prompted for a user name and password. The defaults are:
•User Name: itadmin
•Password: pass
After logging in, you will be prompted to change your password.
Set the Printer Command Language
You can use one of these methods to change the printer command language:
•From the printer web page
•From the Main Menu
•PrintSet 5
•Print Set MC
From the Printer Web Page
To set the command language from the printer web page, you need to turn on the printer and connect to your network.
1.Make sure that the printer has media and ribbon installed (if necessary).
2.Follow the directions to Access the Printer Web Page.
3.Once you are logged in to the printer web page, click the Configure tab.
8 |
PX940 User Guide |
4.Click System Settings > General.
5.select the printer command language you want to used from the Command Language list, and then click Save. A restart button will appear at the top of the page.
6.Click Restart.
From the Main Menu
You can use this procedure to change the printer command language from the main menu on the printer.
1.From the Ready screen, press the Main Menu button.
2.From the Main Menu, press Settings > System Settings > General.
3.Scroll down until you reach Command Language, and make your selection.
4.Restart the printer: the printer starts up in the command language that you selected.
PX940 User Guide |
9 |
10 |
PX940 User Guide |

CHAPTER
2 SET UP THE PRINTER
This section contains information about loading media and ribbon, printing a test label, calibrating the screen, and adjusting the printer.
Power Up the Printer
The printer goes through a startup wizard the first time you turn on the power.
1.Connect one end of the power cord to the back of the printer and plug the other end to AC power.
2.Press the power switch to turn on the printer.
3.As the printer starts up, a progress bar appears, then the startup wizard appears.
4.Follow the steps on the touch screen to complete the startup wizard.
PX940 User Guide |
11 |
Calibrate the Touch Screen
You can calibrate the screen from the printer website or from the touch panel on the printer.
To calibrate the screen from the website:
To access the website, make sure your printer is connected to the same network as your computer.
1.Open your browser and type the printer IP address into the web address bar.
2.In the menu section, click on Services > Screen Calibration. If you are prompted to login, the temporary username is itadmin and the password is pass.
3.Click on the blue Screen Calibration button, this will engage the touch panel to start screen calibration.
•When the small square appears on the front touch panel of the printer, touch the square and continue to touch the square until the printer beeps.
4.Once calibration is complete, your touch screen will automatically return to the Ready screen.
Note: Typical screen calibration consists of five touches (one in each corner and one in the middle of the screen)
About the Media
The printers can print on labels, tickets, tags, and continuous stock. The procedure you use to load media depends on how you are operating the printer and the options you have installed.
Note: The PX940 series printers only support out-wound media.
Load Media for Tear-Off Printing
Tear-off printing is applicable to media with perforation. Printed labels, tickets, and other printed media are manually torn from the front of the printer. These of media can be used for tear-off printing:
•Non-adhesive continuous stock.
•Self-adhesive continuous stock with liner.
•Self-adhesive labels with liner.
•Tickets with gaps, with or without perforations.
•Tickets with black marks, with or without perforations.
12 |
PX940 User Guide |

To load media for tear off printing:
1.Open the media cover and remove the rewinder plate (if installed).
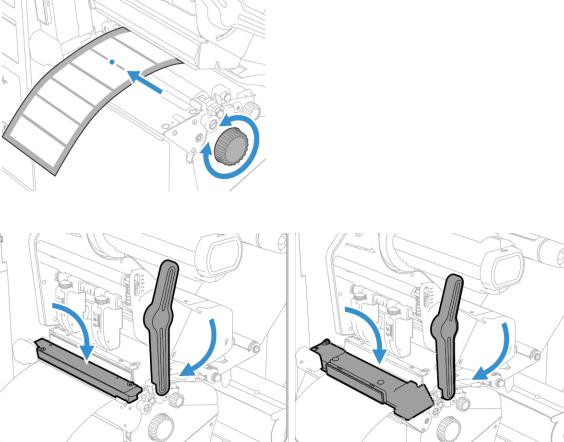
2.Turn the printhead lift lever counterclockwise to raise the printhead and lift the front arm or verifier arm.
printhead and front arm lifted (PX940A)printheadandfrontarmlifted(PX940V)
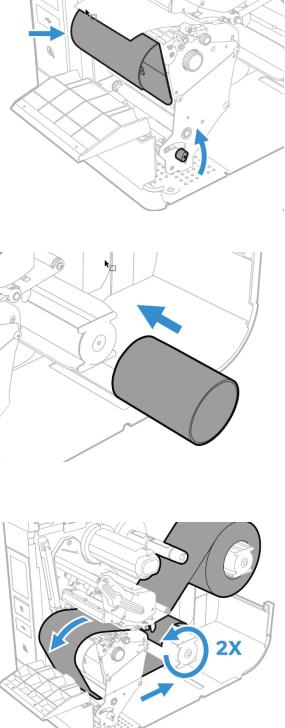
3.Load a media roll onto the media supply hub.
Note: Make sure you push the roll all the way against the inner wall of the printer.
PX940 User Guide |
13 |
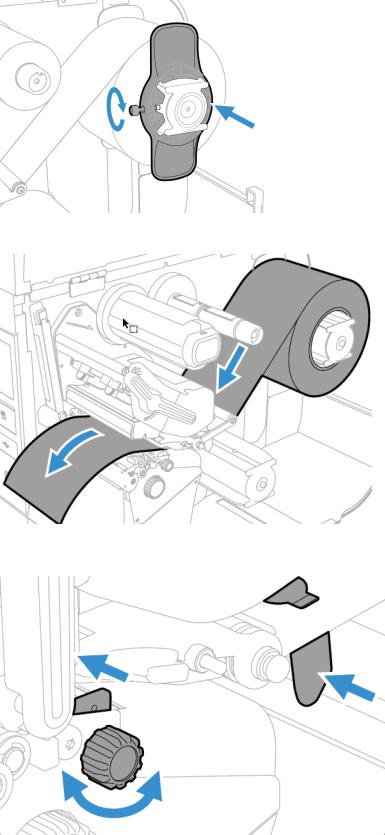
4.Insert the media roll holder and tighten the screw.
5.Route the media through the print mechanism, through the front arm.
6.Adjust the media and dancer guides to hold the media in place.
14 |
PX940 User Guide |
Note: There is a media guide that is located near the printhead. It is recommended to adjust the media guide all the way to the right in order to insert the media. If not, it can be difficult to load the media.
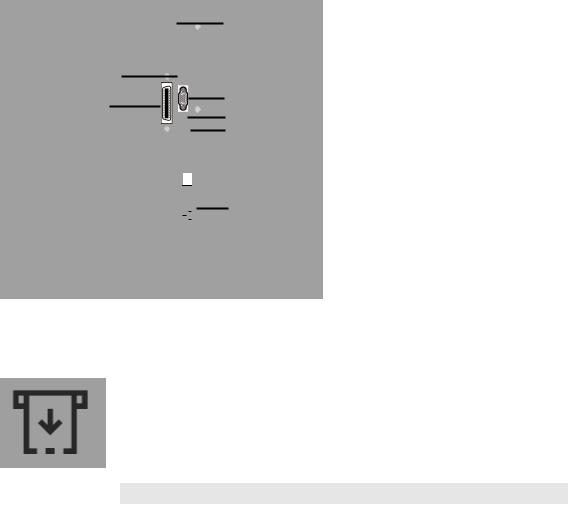
7.Adjust the label gap and black mark sensor. The sensor blue LED should line up with the center of the media.
8.Turn the printhead lift lever clockwise to close the printhead and lower the front arm and click into place.
front arm in place (PX940A) |
front arm in place (PX940V) |
9.Press the Print button to advance the media.
10.Close the media cover.
PX940 User Guide |
15 |
Load Media for Rewind Printing
Follow steps 1-9 from Load Media for Tear-Off Printing, then:
1.Place the rewinder batch plate back on the printer.
2.Insert an empty media core onto the rewinder take-up hub.
3.Round the media through the rewinder batch plate and tape leading edge of label to the empty media core to secure position.
4.Route the media around the media rewinder.
16 |
PX940 User Guide |
 Loading...