


 Loading...
MX7 Tecton™ Mobile Computer
with Microsoft® Windows® Mobile 6.5
User’s Guide

Disclaimer
Honeywell International Inc. (“HII”) reserves the right to make changes in specifications and other information contained in this document without prior notice, and the reader should in all cases consult HII to determine whether any such changes have been made. The information in this publication does not represent a commitment on the part of HII.
HII shall not be liable for technical or editorial errors or omissions contained herein; nor for incidental or consequential damages resulting from the furnishing, performance, or use of this material.
HII disclaims all responsibility for the selection and use of software and/or hardware to achieve intended results.
This document contains proprietary information that is protected by copyright. All rights are reserved. No part of this document may be photocopied, reproduced, or translated into another language without the prior written consent of HII.
© 2011-2014 Honeywell International Inc. All rights reserved.
Web Address: www.honeywellaidc.com
Trademarks
RFTerm is a trademark or registered trademark of EMS Technologies, Inc. in the United States and/or other countries.
Microsoft® Windows®, ActiveSync®, MSN, Outlook®, Windows Mobile®, the Windows logo, and Windows Media are registered trademarks or trademarks of Microsoft Corporation in the United States and/or other countries.
Marvell® is a registered trademark of Marvell Technology Group Ltd., or its subsidiaries in the United States and other countries.
Summit Data Communications, the Laird Technologies Logo, the Summit logo, and “Connected. No Matter What” are trademarks of Laird Technologies, Inc.
The Bluetooth® word mark and logos are owned by the Bluetooth SIG, Inc.
microSD and microSDHC are trademarks or registered trademarks of SD-3C, LLC in the United States and/or other countries.”
Symbol® is a registered trademark of Symbol Technologies. MOTOROLA, MOTO, MOTOROLA SOLUTIONS and the Stylized M Logo are trademarks or registered trademarks of Motorola Trademark Holdings, LLC and are used under license.
Hand Held is a trademark of Hand Held Products, Inc., a subsidiary of Honeywell International.
RAM® and RAM Mount™ are both trademarks of National Products Inc., 1205 S. Orr Street, Seattle, WA 98108.
Wavelink®, the Wavelink logo and tagline, Wavelink Studio™, Avalanche Management Console™, Mobile Manager™, Mobile Manager Enterprise™ are trademarks of Wavelink Corporation, Kirkland.
Wi-Fi®, WMM®, Wi-Fi Mutlimedia™, Wi-Fi Protected Access®, WPA™, WPA2™ and the Wi-Fi CERTIFIED™ logo are trademarks or registered trademarks of Wi-Fi Alliance.
Acrobat® Reader © 2014 with express permission from Adobe Systems Incorporated.
Other product names or marks mentioned in this document may be trademarks or registered trademarks of other companies and are the property of their respective owners.
Patents
For patent information, please refer to www.hsmpats.com.

Table of Contents
Chapter 1 - MX7 Tecton Agency Compliance
Laser Warnings .................................................................................................................................. |
1-1 |
Laser Label Location.......................................................................................................................... |
1-1 |
Laser Safety Statement...................................................................................................................... |
1-1 |
Model Number and Serial Number Labels ......................................................................................... |
1-1 |
FCC Part 15 Statement...................................................................................................................... |
1-1 |
FCC 5GHz Statement ........................................................................................................................ |
1-2 |
Canadian Compliance........................................................................................................................ |
1-2 |
CE Mark ............................................................................................................................................. |
1-3 |
RF Notices ......................................................................................................................................... |
1-3 |
RF Safety Notice ................................................................................................................................ |
1-3 |
Bluetooth ............................................................................................................................................ |
1-3 |
Honeywell Scanning & Mobility Product Environmental Information.................................................. |
1-3 |
Dealer License - Republic of Singapore............................................................................................. |
1-3 |
Vehicle Power Supply Connection Safety Statement ........................................................................ |
1-3 |
Chapter 2 - Getting Started
Overview ............................................................................................................................................ |
2-1 |
About this Guide................................................................................................................................. |
2-1 |
Out of the Box .................................................................................................................................... |
2-1 |
Initial Setup for MX7 Tecton............................................................................................................... |
2-2 |
Hardware Setup........................................................................................................................... |
2-2 |
Software Setup ............................................................................................................................ |
2-2 |
Components....................................................................................................................................... |
2-3 |
Front View ................................................................................................................................... |
2-3 |
Back View.................................................................................................................................... |
2-4 |
I/O Port and Cables ..................................................................................................................... |
2-4 |
Scanner / Imager Aperture .......................................................................................................... |
2-5 |
Handle ......................................................................................................................................... |
2-6 |
Handstrap .................................................................................................................................... |
2-6 |
Keypads....................................................................................................................................... |
2-7 |
55 Key Primary Delete ANSI Keypad.................................................................................... |
2-7 |
55 Key Primary Backspace ANSI Keypad ............................................................................ |
2-7 |
32 Key Numeric-Alpha Keypad ............................................................................................. |
2-8 |
Locking and Unlocking the MX7 Tecton............................................................................................. |
2-8 |
Unlocking the MX7 Tecton .......................................................................................................... |
2-8 |
Rebooting the MX7 Tecton ................................................................................................................ |
2-9 |
Suspend / Resume ...................................................................................................................... |
2-9 |
Warmboot .................................................................................................................................... |
2-9 |
Restart ......................................................................................................................................... |
2-9 |
Clean Boot / Reset ...................................................................................................................... |
2-9 |
Inserting and Removing the Battery Pack........................................................................................ |
2-10 |
Inserting the Battery .................................................................................................................. |
2-10 |
Removing the Battery ................................................................................................................ |
2-10 |
Charging the Main Battery ............................................................................................................... |
2-10 |
LEDs and Indicators......................................................................................................................... |
2-11 |
System Status LED ................................................................................................................... |
2-11 |
Alpha mode Status LED ........................................................................................................... |
2-11 |
i

Scan Status Indicator ................................................................................................................. |
2-11 |
Toggle Vibrate Indicator ............................................................................................................. |
2-11 |
Tapping the Touch Screen with a Stylus .......................................................................................... |
2-12 |
Calibrating the Touch Screen ........................................................................................................... |
2-12 |
Setting the Display Backlight Timer.................................................................................................. |
2-12 |
Applying the Touch Screen Protective Film...................................................................................... |
2-12 |
Setting the Date and Time Zone....................................................................................................... |
2-13 |
Setting Speaker Volume................................................................................................................... |
2-13 |
Using the Keypad....................................................................................................................... |
2-13 |
Using a Control Panel ................................................................................................................ |
2-13 |
Setting Terminal Emulation Parameters........................................................................................... |
2-14 |
Using the AppLock Switchpad.......................................................................................................... |
2-14 |
Using the Keypad....................................................................................................................... |
2-14 |
Using the Touch Screen............................................................................................................. |
2-14 |
Using the Input Panel / Virtual Keyboard.......................................................................................... |
2-15 |
Connecting to Bluetooth Devices ..................................................................................................... |
2-16 |
Taskbar Bluetooth Indicator ....................................................................................................... |
2-16 |
Attaching the Handstrap ................................................................................................................... |
2-17 |
Attaching the Trigger Handle............................................................................................................ |
2-18 |
Assembling the Carry Case.............................................................................................................. |
2-19 |
Connecting a Headset Cable............................................................................................................ |
2-19 |
Adjusting Headset / Microphone and Securing the Cable.......................................................... |
2-20 |
Connecting the USB Client and Power Cable .................................................................................. |
2-21 |
Connecting the Serial and Power Cable........................................................................................... |
2-21 |
Assembling the AC/DC Power Supply.............................................................................................. |
2-22 |
Startup Help...................................................................................................................................... |
2-23 |
Chapter 3 - Hardware Configuration
System Hardware ............................................................................................................................... |
3-1 |
802.11 a/b/g Wireless Client ........................................................................................................ |
3-1 |
Central Processing Unit ............................................................................................................... |
3-1 |
System Memory ........................................................................................................................... |
3-1 |
Internal SD Card Slot ................................................................................................................... |
3-1 |
Video Subsystem ......................................................................................................................... |
3-2 |
Power Supply ............................................................................................................................... |
3-2 |
COM Ports ................................................................................................................................... |
3-2 |
RS232 Serial Port ........................................................................................................................ |
3-2 |
USB Client Port ............................................................................................................................ |
3-2 |
Audio Connection......................................................................................................................... |
3-2 |
Audio Support .............................................................................................................................. |
3-3 |
Speaker ................................................................................................................................. |
3-3 |
Volume Control...................................................................................................................... |
3-3 |
Voice...................................................................................................................................... |
3-3 |
Scanner / Imager Port .................................................................................................................. |
3-3 |
Bluetooth EZPair (or LXEZ Pairing) ............................................................................................. |
3-3 |
Keypads ....................................................................................................................................... |
3-4 |
55 Key Keypads .................................................................................................................... |
3-4 |
32 Key Keypad ...................................................................................................................... |
3-5 |
Display ......................................................................................................................................... |
3-6 |
Display Backlight Timer ......................................................................................................... |
3-6 |
Status LEDs ................................................................................................................................. |
3-6 |
ii

Cold Storage Configuration.......................................................................................................... |
3-6 |
Cold Storage Battery ............................................................................................................. |
3-6 |
Snowflake Decal.................................................................................................................... |
3-7 |
Heating Elements .................................................................................................................. |
3-7 |
Recharging Cold Storage Batteries ....................................................................................... |
3-7 |
Hot-swapping the Cold Storage Battery ................................................................................ |
3-7 |
Normal Operation Temperature Ranges ............................................................................... |
3-7 |
Chapter 4 - Power Modes and Batteries
Power Modes...................................................................................................................................... |
4-1 |
On Mode ...................................................................................................................................... |
4-1 |
Suspend Mode ............................................................................................................................. |
4-1 |
Off Mode ...................................................................................................................................... |
4-1 |
Batteries ............................................................................................................................................. |
4-2 |
Checking Battery Status............................................................................................................... |
4-2 |
Main Battery Pack ........................................................................................................................ |
4-2 |
Battery Hotswapping .................................................................................................................... |
4-2 |
Low Battery Warning.................................................................................................................... |
4-2 |
Super-cap Internal Battery ........................................................................................................... |
4-2 |
Handling Batteries Safely............................................................................................................. |
4-3 |
Chapter 5 - Software Configuration
Introduction......................................................................................................................................... |
5-1 |
Windows Mobile ................................................................................................................................. |
5-1 |
Installed Software ............................................................................................................................... |
5-1 |
Software Load .............................................................................................................................. |
5-1 |
Software Backup .......................................................................................................................... |
5-1 |
Version Control ............................................................................................................................ |
5-1 |
Boot Loader.................................................................................................................................. |
5-2 |
Startup Folders and Launch Sequences...................................................................................... |
5-2 |
Software Development ....................................................................................................................... |
5-2 |
Today Screen ..................................................................................................................................... |
5-2 |
Start Menu.................................................................................................................................... |
5-3 |
Configurable Today Screen Listing .............................................................................................. |
5-3 |
Date.............................................................................................................................................. |
5-3 |
Device Unlocked / Device Locked................................................................................................ |
5-3 |
Notification Bar............................................................................................................................. |
5-3 |
Status Icons ................................................................................................................................. |
5-4 |
Soft Keys...................................................................................................................................... |
5-4 |
Installed Programs.............................................................................................................................. |
5-4 |
Internet Explorer Mobile ............................................................................................................... |
5-4 |
Office Mobile Applications............................................................................................................ |
5-4 |
ActiveSync ................................................................................................................................... |
5-4 |
AppLock (Option) ......................................................................................................................... |
5-5 |
Summit ......................................................................................................................................... |
5-5 |
Windows Media............................................................................................................................ |
5-5 |
Bluetooth (Option) ........................................................................................................................ |
5-5 |
RFTerm (Option) .......................................................................................................................... |
5-5 |
Status Popup................................................................................................................................ |
5-5 |
iii

HSM Connect (or LXEConnect) ................................................................................................... |
5-5 |
GrabTime ..................................................................................................................................... |
5-5 |
Synchronize with a local time server ..................................................................................... |
5-6 |
Enhanced Launch ........................................................................................................................ |
5-6 |
MX7 Tecton OS Upgrade ................................................................................................................... |
5-7 |
Preparation................................................................................................................................... |
5-7 |
Procedure..................................................................................................................................... |
5-7 |
Battery State and OS Upgrade .................................................................................................... |
5-8 |
Update Help ................................................................................................................................. |
5-8 |
Start Menu Options............................................................................................................................. |
5-8 |
Office Mobile .............................................................................................................................. |
5-11 |
Settings ...................................................................................................................................... |
5-11 |
Personal ..................................................................................................................................... |
5-12 |
System ....................................................................................................................................... |
5-12 |
Connections ............................................................................................................................... |
5-14 |
Settings Panels................................................................................................................................. |
5-14 |
Clock & Alarms........................................................................................................................... |
5-14 |
Time..................................................................................................................................... |
5-14 |
Alarms ................................................................................................................................. |
5-15 |
More .................................................................................................................................... |
5-15 |
Lock............................................................................................................................................ |
5-16 |
Password............................................................................................................................. |
5-16 |
Hint ...................................................................................................................................... |
5-17 |
Power ......................................................................................................................................... |
5-18 |
Battery ................................................................................................................................. |
5-18 |
Advanced............................................................................................................................. |
5-19 |
Sounds & Notifications ............................................................................................................... |
5-20 |
Sounds ................................................................................................................................ |
5-20 |
Notifications ......................................................................................................................... |
5-21 |
Today ......................................................................................................................................... |
5-22 |
Appearance ......................................................................................................................... |
5-22 |
Items.................................................................................................................................... |
5-22 |
Personal Panels ............................................................................................................................... |
5-23 |
About Info (or About LXE) .......................................................................................................... |
5-23 |
Software .............................................................................................................................. |
5-23 |
Hardware ............................................................................................................................. |
5-23 |
Version ................................................................................................................................ |
5-23 |
Buttons ....................................................................................................................................... |
5-24 |
Program Buttons.................................................................................................................. |
5-24 |
Up/Down Control ................................................................................................................. |
5-25 |
Input ........................................................................................................................................... |
5-26 |
Input Method........................................................................................................................ |
5-26 |
Word Completion................................................................................................................. |
5-27 |
Options ................................................................................................................................ |
5-27 |
Owner Information...................................................................................................................... |
5-28 |
System Panels.................................................................................................................................. |
5-29 |
About.......................................................................................................................................... |
5-29 |
Version ................................................................................................................................ |
5-29 |
Device ID ............................................................................................................................. |
5-29 |
Copyrights ........................................................................................................................... |
5-30 |
Backlight..................................................................................................................................... |
5-31 |
Brightness............................................................................................................................ |
5-31 |
iv

Battery Power ...................................................................................................................... |
5-32 |
External Power .................................................................................................................... |
5-32 |
Battery........................................................................................................................................ |
5-33 |
Certificates ................................................................................................................................. |
5-34 |
Personal .............................................................................................................................. |
5-34 |
Intermediate......................................................................................................................... |
5-34 |
Root ..................................................................................................................................... |
5-35 |
Encryption .................................................................................................................................. |
5-35 |
External GPS ............................................................................................................................. |
5-36 |
License Manager........................................................................................................................ |
5-37 |
Managed Programs.................................................................................................................... |
5-37 |
Memory ...................................................................................................................................... |
5-38 |
Main..................................................................................................................................... |
5-38 |
Storage Card ....................................................................................................................... |
5-38 |
Mixer .......................................................................................................................................... |
5-39 |
MX7 Tecton Options .................................................................................................................. |
5-40 |
Communication.................................................................................................................... |
5-40 |
Misc ..................................................................................................................................... |
5-40 |
Status Popup ....................................................................................................................... |
5-41 |
Peripherals ................................................................................................................................. |
5-42 |
Regional Settings ....................................................................................................................... |
5-43 |
Registry ...................................................................................................................................... |
5-45 |
Load User Defaults.............................................................................................................. |
5-45 |
Save User Defaults.............................................................................................................. |
5-45 |
Load Factory Defaults ......................................................................................................... |
5-45 |
Warmboot ............................................................................................................................ |
5-45 |
Restart ................................................................................................................................. |
5-45 |
Remove Programs ..................................................................................................................... |
5-46 |
Screen........................................................................................................................................ |
5-46 |
General................................................................................................................................ |
5-46 |
Align Screen ........................................................................................................................ |
5-47 |
Clear Type ........................................................................................................................... |
5-47 |
Text Size.............................................................................................................................. |
5-48 |
Task Manager ............................................................................................................................ |
5-49 |
Wi-Fi........................................................................................................................................... |
5-49 |
Connections Panels.......................................................................................................................... |
5-50 |
Beam.......................................................................................................................................... |
5-50 |
Connections ............................................................................................................................... |
5-51 |
Advanced Options ............................................................................................................... |
5-51 |
Domain Enroll............................................................................................................................. |
5-52 |
Network Cards ........................................................................................................................... |
5-53 |
USB to PC.................................................................................................................................. |
5-54 |
Standard Microsoft Applications ....................................................................................................... |
5-54 |
Calculator ................................................................................................................................... |
5-54 |
Calendar..................................................................................................................................... |
5-55 |
Contacts ..................................................................................................................................... |
5-55 |
Email .......................................................................................................................................... |
5-56 |
File Explorer ............................................................................................................................... |
5-56 |
Getting Started ........................................................................................................................... |
5-57 |
Help............................................................................................................................................ |
5-57 |
Notes.......................................................................................................................................... |
5-58 |
Pictures and Video ..................................................................................................................... |
5-58 |
Tasks.......................................................................................................................................... |
5-59 |
v

Windows Live ............................................................................................................................. |
5-59 |
Windows Media.......................................................................................................................... |
5-60 |
Internet Explorer Mobile ............................................................................................................. |
5-61 |
Options ................................................................................................................................ |
5-62 |
Office Mobile .............................................................................................................................. |
5-64 |
Excel Mobile ........................................................................................................................ |
5-64 |
PowerPoint Mobile............................................................................................................... |
5-65 |
Word Mobile ........................................................................................................................ |
5-65 |
OneNote Mobile................................................................................................................... |
5-66 |
Remote Desktop............................................................................................................................... |
5-67 |
Set Remote Desktop Mobile Options ......................................................................................... |
5-67 |
Connect to a Remote Server...................................................................................................... |
5-68 |
Installing Applications ....................................................................................................................... |
5-69 |
Preparation................................................................................................................................. |
5-69 |
Package File Installation ............................................................................................................ |
5-69 |
PKG Installation Help ................................................................................................................. |
5-69 |
Using ActiveSync.............................................................................................................................. |
5-70 |
Introduction ................................................................................................................................ |
5-70 |
Initial Setup ................................................................................................................................ |
5-71 |
Connect via USB........................................................................................................................ |
5-71 |
Cable for USB ActiveSync Connection................................................................................ |
5-71 |
Explore ....................................................................................................................................... |
5-71 |
Backup Data Files using ActiveSync.......................................................................................... |
5-71 |
Requirements ...................................................................................................................... |
5-71 |
Connect ............................................................................................................................... |
5-71 |
Disconnect........................................................................................................................... |
5-71 |
MX7 Tecton with a Disabled Touch Screen ............................................................................... |
5-72 |
Reset and Loss of Host Re-connection...................................................................................... |
5-72 |
ActiveSync Help ......................................................................................................................... |
5-72 |
Configuring the MX7 Tecton with HSM Connect (or LXEConnect) .................................................. |
5-73 |
Install HSM Connect .................................................................................................................. |
5-73 |
Using HSM Connect................................................................................................................... |
5-73 |
Chapter 6 - AppLock (Application Locking)
Introduction......................................................................................................................................... |
6-1 |
Setup a New Device ........................................................................................................................... |
6-1 |
Administration Mode........................................................................................................................... |
6-1 |
End User Mode................................................................................................................................... |
6-2 |
Passwords .......................................................................................................................................... |
6-3 |
AppLock Password Help .............................................................................................................. |
6-3 |
End-User Switching Technique .......................................................................................................... |
6-3 |
Using a Stylus Tap ....................................................................................................................... |
6-3 |
Using the Switch Key Sequence .................................................................................................. |
6-3 |
Hotkey (Activation hotkey) ........................................................................................................... |
6-4 |
End User Internet Explorer (EUIE) ..................................................................................................... |
6-4 |
Application Configuration.................................................................................................................... |
6-5 |
Application.................................................................................................................................... |
6-5 |
Launch Button ....................................................................................................................... |
6-7 |
Security ........................................................................................................................................ |
6-9 |
Setting an Activation Hotkey.................................................................................................. |
6-9 |
Setting a Password in the Security Panel.............................................................................. |
6-9 |
vi

Options....................................................................................................................................... |
6-10 |
Status ......................................................................................................................................... |
6-11 |
View..................................................................................................................................... |
6-11 |
Log....................................................................................................................................... |
6-12 |
Save As ............................................................................................................................... |
6-12 |
AppLock Help ................................................................................................................................... |
6-12 |
AppLock Error Messages ................................................................................................................. |
6-13 |
Chapter 7 - Bluetooth Configuration
Introduction......................................................................................................................................... |
7-1 |
Initial Configuration............................................................................................................................. |
7-1 |
Subsequent Use ................................................................................................................................. |
7-2 |
Bluetooth Devices............................................................................................................................... |
7-3 |
Clear Button ................................................................................................................................. |
7-3 |
Discover Button............................................................................................................................ |
7-3 |
Discovering............................................................................................................................ |
7-4 |
Bluetooth Device List............................................................................................................. |
7-4 |
Bluetooth Device Menu ................................................................................................................ |
7-5 |
Right Click Menu Options ...................................................................................................... |
7-5 |
Bluetooth Properties .............................................................................................................. |
7-6 |
Settings............................................................................................................................................... |
7-6 |
Turn On Bluetooth Button ............................................................................................................ |
7-6 |
Options......................................................................................................................................... |
7-7 |
Reconnect .......................................................................................................................................... |
7-8 |
Options ........................................................................................................................................ |
7-8 |
About .................................................................................................................................................. |
7-9 |
Easy Pairing and Auto-Reconnect...................................................................................................... |
7-9 |
Bluetooth Indicators.......................................................................................................................... |
7-10 |
Bluetooth Bar Code Reader Setup ................................................................................................... |
7-10 |
Introduction ................................................................................................................................ |
7-10 |
MX7 Tecton with Label............................................................................................................... |
7-11 |
MX7 Tecton without Label.......................................................................................................... |
7-11 |
Bluetooth Reader Beep and LED Indications ................................................................................... |
7-12 |
Bluetooth Printer Setup .................................................................................................................... |
7-12 |
Chapter 8 - Data Collection Wedge
Introduction......................................................................................................................................... |
8-1 |
Symbol or Honeywell scanner...................................................................................................... |
8-1 |
Hand Held Products Imager......................................................................................................... |
8-1 |
Data Processing Overview ................................................................................................................. |
8-2 |
Main.................................................................................................................................................... |
8-3 |
Continuous Scan Mode................................................................................................................ |
8-4 |
COM1 ................................................................................................................................................. |
8-4 |
Notification.......................................................................................................................................... |
8-5 |
Vibration ....................................................................................................................................... |
8-5 |
Data Options....................................................................................................................................... |
8-7 |
Enable Code ID............................................................................................................................ |
8-8 |
Enable Code ID Options........................................................................................................ |
8-9 |
Enable Code ID Buttons ........................................................................................................ |
8-9 |
vii

Symbology Settings ..................................................................................................................... |
8-9 |
Clear Button......................................................................................................................... |
8-10 |
Advanced Button ................................................................................................................. |
8-10 |
Processing Order................................................................................................................. |
8-10 |
Enable, Min, Max................................................................................................................. |
8-11 |
Strip Leading/Trailing Control .............................................................................................. |
8-11 |
Bar Code Data Match List ................................................................................................... |
8-12 |
Add Prefix/Suffix Control ..................................................................................................... |
8-13 |
Symbologies............................................................................................................................... |
8-14 |
AIM Symbologies................................................................................................................. |
8-14 |
HHP Symbologies ............................................................................................................... |
8-15 |
Advanced Button (Hand Held Products Imager Only) ......................................................... |
8-15 |
HHP Properties.................................................................................................................... |
8-29 |
Ctrl Char Mapping ...................................................................................................................... |
8-30 |
Translate All......................................................................................................................... |
8-30 |
Custom Identifiers ...................................................................................................................... |
8-31 |
Name text box ..................................................................................................................... |
8-32 |
ID Code text box.................................................................................................................. |
8-32 |
Custom ID Buttons .............................................................................................................. |
8-32 |
Control Code Replacement Examples ....................................................................................... |
8-33 |
Bar Code Processing Examples ................................................................................................ |
8-33 |
Length Based Bar Code Stripping.............................................................................................. |
8-35 |
Processing........................................................................................................................................ |
8-37 |
Enable buffered key output ........................................................................................................ |
8-37 |
Same buffer limit ........................................................................................................................ |
8-37 |
Delay between (key) buffers ...................................................................................................... |
8-37 |
About ................................................................................................................................................ |
8-38 |
Hat Encoding .................................................................................................................................... |
8-39 |
Chapter 9 - Enhanced Launch Utility
Introduction......................................................................................................................................... |
9-1 |
Registry Based Launch Items............................................................................................................. |
9-1 |
Launch Startup Options ............................................................................................................... |
9-3 |
Script Based Launch Items................................................................................................................. |
9-4 |
Enhanced Launch Utility Use ....................................................................................................... |
9-4 |
File Names ................................................................................................................................... |
9-4 |
Command line structure ............................................................................................................... |
9-4 |
Comments.................................................................................................................................... |
9-5 |
Commands Supported by Launch................................................................................................ |
9-6 |
Copy ...................................................................................................................................... |
9-6 |
Delete .................................................................................................................................... |
9-6 |
DelRegData ........................................................................................................................... |
9-6 |
DelRegKey ............................................................................................................................ |
9-7 |
ElseIf...................................................................................................................................... |
9-7 |
ElseIfFile................................................................................................................................ |
9-7 |
EndIf ..................................................................................................................................... |
9-8 |
EndIfFile ................................................................................................................................ |
9-8 |
EndIfTerm.............................................................................................................................. |
9-8 |
FCopy .................................................................................................................................... |
9-8 |
IfFile....................................................................................................................................... |
9-9 |
IfTerm .................................................................................................................................... |
9-9 |
viii
Launch................................................................................................................................... |
9-9 |
LaunchCmd ......................................................................................................................... |
9-10 |
Message .............................................................................................................................. |
9-10 |
Mkdir.................................................................................................................................... |
9-10 |
Rmdir ................................................................................................................................... |
9-11 |
SetRegData ......................................................................................................................... |
9-11 |
SetRegKey .......................................................................................................................... |
9-12 |
Shortcut ............................................................................................................................... |
9-12 |
Launch Error Messages ................................................................................................................... |
9-13 |
Example Script File........................................................................................................................... |
9-14 |
Chapter 10 - Enabler Installation and Configuration
Introduction....................................................................................................................................... |
10-1 |
Installation ........................................................................................................................................ |
10-1 |
Installing the Enabler on Mobile Devices.......................................................................................... |
10-1 |
Enabler Uninstall Process ................................................................................................................ |
10-2 |
Stop the Enabler Service.................................................................................................................. |
10-2 |
Update Monitoring Overview ............................................................................................................ |
10-2 |
Mobile Device Wireless and Network Settings ................................................................................. |
10-2 |
Preparing a Device for Remote Management .................................................................................. |
10-3 |
Remote Management Utility (RMU) ........................................................................................... |
10-3 |
Wireless Configuration Application (WCA)................................................................................. |
10-3 |
User Interface ................................................................................................................................... |
10-4 |
Enabler Configuration ................................................................................................................ |
10-4 |
File Menu Options ...................................................................................................................... |
10-5 |
Avalanche Update using File > Settings .................................................................................... |
10-6 |
Menu Options ...................................................................................................................... |
10-6 |
Connection .......................................................................................................................... |
10-7 |
Execution............................................................................................................................. |
10-8 |
Server Contact..................................................................................................................... |
10-9 |
Data ................................................................................................................................... |
10-10 |
Preferences ....................................................................................................................... |
10-11 |
Taskbar.............................................................................................................................. |
10-13 |
Scan Config ....................................................................................................................... |
10-13 |
Display............................................................................................................................... |
10-15 |
Shortcuts ........................................................................................................................... |
10-16 |
SaaS.................................................................................................................................. |
10-17 |
Adapters ............................................................................................................................ |
10-18 |
Status ................................................................................................................................ |
10-20 |
Exit..................................................................................................................................... |
10-21 |
Using Remote Management........................................................................................................... |
10-22 |
Using eXpress Scan ....................................................................................................................... |
10-22 |
Creating Bar Codes.................................................................................................................. |
10-22 |
Scanning Bar Codes ................................................................................................................ |
10-22 |
Process Complete.................................................................................................................... |
10-23 |
Chapter 11 - Wireless Network Configuration
Introduction....................................................................................................................................... |
11-1 |
Important Notes ................................................................................................................................ |
11-1 |
ix

Summit Client Utility ......................................................................................................................... |
11-1 |
Help............................................................................................................................................ |
11-1 |
Summit Tray Icon ....................................................................................................................... |
11-2 |
Using Windows Mobile Wireless Manager................................................................................. |
11-2 |
Create a New Network Connection ..................................................................................... |
11-3 |
Edit a Network Connection .................................................................................................. |
11-4 |
Switch Control to SCU......................................................................................................... |
11-5 |
Main ........................................................................................................................................... |
11-5 |
Auto Profile .......................................................................................................................... |
11-6 |
Admin Login......................................................................................................................... |
11-6 |
Profile ......................................................................................................................................... |
11-8 |
Buttons ................................................................................................................................ |
11-9 |
Profile Parameters............................................................................................................. |
11-10 |
Status ....................................................................................................................................... |
11-11 |
Diags ........................................................................................................................................ |
11-12 |
Global....................................................................................................................................... |
11-13 |
Custom Parameter Option................................................................................................. |
11-14 |
Global Parameters............................................................................................................. |
11-14 |
Sign-On vs. Stored Credentials ...................................................................................................... |
11-17 |
Using Stored Credentials ......................................................................................................... |
11-17 |
Using a Sign On Screen........................................................................................................... |
11-17 |
Windows Certificate Store vs. Certs Path....................................................................................... |
11-19 |
User Certificates....................................................................................................................... |
11-19 |
Root CA Certificates................................................................................................................. |
11-19 |
Using the Certs Path ......................................................................................................... |
11-19 |
Using the Windows Certificate Store ................................................................................. |
11-19 |
Configuring Profiles ........................................................................................................................ |
11-21 |
No Security............................................................................................................................... |
11-21 |
WEP ......................................................................................................................................... |
11-22 |
LEAP ........................................................................................................................................ |
11-23 |
PEAP/MSCHAP ....................................................................................................................... |
11-25 |
PEAP/GTC ............................................................................................................................... |
11-27 |
WPA/LEAP............................................................................................................................... |
11-29 |
EAP-FAST................................................................................................................................ |
11-31 |
EAP-TLS .................................................................................................................................. |
11-33 |
WPA PSK................................................................................................................................. |
11-35 |
Certificates...................................................................................................................................... |
11-36 |
Generating a Root CA Certificate............................................................................................. |
11-36 |
Installing a Root CA Certificate ................................................................................................ |
11-39 |
Generating a User Certificate................................................................................................... |
11-39 |
Exporting a User Certificate ..................................................................................................... |
11-42 |
Installing a User Certificate ...................................................................................................... |
11-43 |
Verify Installation...................................................................................................................... |
11-43 |
Chapter 12 - Keymaps
Introduction....................................................................................................................................... |
12-1 |
55 key Alphanumeric Keymap - Primary Delete ........................................................................ |
12-1 |
55 Key 5250 Alphanumeric KeyMap - Primary Delete............................................................... |
12-6 |
55 key Alphanumeric Keymap - Primary Backspace ............................................................... |
12-11 |
32 key Numeric-Alpha Keymap................................................................................................ |
12-16 |
x

Chapter 13 - Battery Charger
Unpacking your Battery Charger ...................................................................................................... |
13-1 |
Introduction....................................................................................................................................... |
13-1 |
Cautions and Warnings .................................................................................................................... |
13-2 |
Battery Charger.......................................................................................................................... |
13-2 |
Lithium-Ion Battery Pack ............................................................................................................ |
13-2 |
Front View ........................................................................................................................................ |
13-2 |
Top View.......................................................................................................................................... |
13-3 |
Installation ........................................................................................................................................ |
13-4 |
Assemble the Power Supply ...................................................................................................... |
13-4 |
Setup.......................................................................................................................................... |
13-4 |
Mounting........................................................................................................................................... |
13-5 |
Charging Batteries............................................................................................................................ |
13-6 |
Inserting a Battery into the Charging Pocket.............................................................................. |
13-6 |
Remove the Battery from the Charging Pocket.......................................................................... |
13-6 |
Interpreting the Charging Pocket LEDs ............................................................................................ |
13-6 |
Battery Charger Help........................................................................................................................ |
13-7 |
Charger Cleaning, Storage and Service........................................................................................... |
13-8 |
Cleaning ..................................................................................................................................... |
13-8 |
Storage....................................................................................................................................... |
13-8 |
Service ....................................................................................................................................... |
13-8 |
Battery Cleaning, Storage and Service ............................................................................................ |
13-9 |
Cleaning ..................................................................................................................................... |
13-9 |
Storage....................................................................................................................................... |
13-9 |
Service ....................................................................................................................................... |
13-9 |
Chapter 14 - Cradles
Unpacking your Cradles ................................................................................................................... |
14-1 |
Overview........................................................................................................................................... |
14-1 |
Preparing the Cradle for Use............................................................................................................ |
14-1 |
Tethered Scanners and the MX7 Tecton Cradles ............................................................................ |
14-2 |
Maintenance ..................................................................................................................................... |
14-2 |
Cleaning ........................................................................................................................................... |
14-2 |
Using a Desktop Cradle.................................................................................................................... |
14-3 |
Introduction ................................................................................................................................ |
14-3 |
Quick Start - Desktop Cradle ..................................................................................................... |
14-3 |
Battery Charging in a Desktop Cradle........................................................................................ |
14-3 |
Front View .................................................................................................................................. |
14-4 |
Back View .................................................................................................................................. |
14-5 |
Top View .................................................................................................................................... |
14-6 |
Desktop Mounting Footprint ....................................................................................................... |
14-6 |
Installing and Removing the Docking Bay Adapter Cup ............................................................ |
14-7 |
Installing .............................................................................................................................. |
14-7 |
Removing ............................................................................................................................ |
14-7 |
Assemble/Attach the AC Power Adapter ................................................................................... |
14-8 |
Connecting Input/Output Cables to the Desktop Cradle ............................................................ |
14-9 |
Attaching a Serial Cable ...................................................................................................... |
14-9 |
Attaching the Input/Output (I/O) Cable ................................................................................ |
14-9 |
Cradle LEDs............................................................................................................................... |
14-9 |
Docked LED ........................................................................................................................ |
14-9 |
xi

Spare Battery LED............................................................................................................. |
14-10 |
MX7 Tecton System Status LED Status when Docked ..................................................... |
14-10 |
Docking and Undocking the MX7 Tecton................................................................................. |
14-10 |
Dock the MX7 Tecton ........................................................................................................ |
14-10 |
Undock the MX7 Tecton .................................................................................................... |
14-10 |
Inserting / Removing a Spare Battery from the Desktop Cradle .............................................. |
14-11 |
Inserting a Spare Battery................................................................................................... |
14-11 |
Removing a Spare Battery ................................................................................................ |
14-11 |
Desktop Cradle Help ................................................................................................................ |
14-12 |
Using a Passive Vehicle Cradle ..................................................................................................... |
14-14 |
Introduction .............................................................................................................................. |
14-14 |
Quick Start ............................................................................................................................... |
14-14 |
Components............................................................................................................................. |
14-15 |
U-Bracket Footprint ........................................................................................................... |
14-15 |
RAM Assembly Components............................................................................................. |
14-15 |
RAM Assembly Footprint................................................................................................... |
14-16 |
Installing the Cradle U-Bracket ................................................................................................ |
14-16 |
Installing the RAM Bracket....................................................................................................... |
14-17 |
Using a Powered Vehicle Cradle.................................................................................................... |
14-18 |
Introduction .............................................................................................................................. |
14-18 |
Quick Start ............................................................................................................................... |
14-18 |
Components............................................................................................................................. |
14-19 |
Front View ......................................................................................................................... |
14-19 |
Back View.......................................................................................................................... |
14-20 |
Installing or Removing Vehicle Cradle Adapter Cup and Top Adapter .................................... |
14-21 |
Installing the Adapter ............................................................................................................... |
14-22 |
Charging Pocket Adapter Cup........................................................................................... |
14-22 |
Retainer Insert ................................................................................................................... |
14-22 |
Removing the Adapter Assembly............................................................................................. |
14-23 |
RAM Bracket Mounting ............................................................................................................ |
14-24 |
RAM Bracket Mounting Points........................................................................................... |
14-24 |
Vehicle Cradle RAM Ball Assembly................................................................................... |
14-25 |
RAM Circular Base Footprint............................................................................................. |
14-25 |
DC/DC Power Supply Installation, Screws on Top of lid.......................................................... |
14-26 |
Connecting Electrical Cables to Power Sources ............................................................... |
14-26 |
Specifications for Electrical Supply.................................................................................... |
14-26 |
Wiring Schematic............................................................................................................... |
14-27 |
Connecting Vehicle Electrical Supply ................................................................................ |
14-27 |
DC/DC Power Supply Installation, Screws on Side of Lid........................................................ |
14-29 |
Connecting Electrical Cables to Power Sources ............................................................... |
14-29 |
Specifications for Electrical Supply.................................................................................... |
14-29 |
Wiring Schematic............................................................................................................... |
14-30 |
Connecting to Vehicle Power ............................................................................................ |
14-30 |
Vehicle 12V Bare Wire Adapter ............................................................................................... |
14-32 |
Vehicle Cable Connection Cable (Fuse Not Shown)......................................................... |
14-32 |
Connecting the Power Cable to the Vehicle ...................................................................... |
14-32 |
Connecting Vehicle 12 VDC Supply .................................................................................. |
14-32 |
Connecting Power Supply to Vehicle Cradle ..................................................................... |
14-33 |
Attaching a Serial or I/O Connector................................................................................... |
14-33 |
Vehicle Cradle Strain Relief Cable Clamps ....................................................................... |
14-34 |
Vehicle Cradle LED.................................................................................................................. |
14-34 |
Docking the MX7 Tecton in a Powered Vehicle Cradle ........................................................... |
14-35 |
xii

Removing the MX7 Tecton from a Powered Vehicle Cradle.................................................... |
14-36 |
Powered Vehicle Cradle Help .................................................................................................. |
14-36 |
Chapter 15 - Technical Specifications
MX7 Tecton Hardware...................................................................................................................... |
15-1 |
MX7 Tecton Dimensions and Weight ............................................................................................... |
15-1 |
MX7 Tecton Environmental Specifications ....................................................................................... |
15-2 |
MX7 Tecton Network Card Specifications ........................................................................................ |
15-2 |
Summit 802.11 a/b/g SDIO 2.4/5.0GHz ..................................................................................... |
15-2 |
Bluetooth .................................................................................................................................... |
15-2 |
MX7 Tecton AC/DC Wall Adapter .................................................................................................... |
15-2 |
Desktop Cradle................................................................................................................................. |
15-3 |
Serial Port .................................................................................................................................. |
15-3 |
Vehicle Mounted Cradle ................................................................................................................... |
15-4 |
Serial Port .................................................................................................................................. |
15-4 |
Power Connector Port................................................................................................................ |
15-5 |
Battery Charger ................................................................................................................................ |
15-5 |
Electrical..................................................................................................................................... |
15-5 |
Temperature............................................................................................................................... |
15-5 |
Dimensions ................................................................................................................................ |
15-5 |
Chapter 16 - Customer Support
Technical Assistance........................................................................................................................ |
16-1 |
Product Service and Repair.............................................................................................................. |
16-1 |
Limited Warranty .............................................................................................................................. |
16-1 |
xiii

xiv
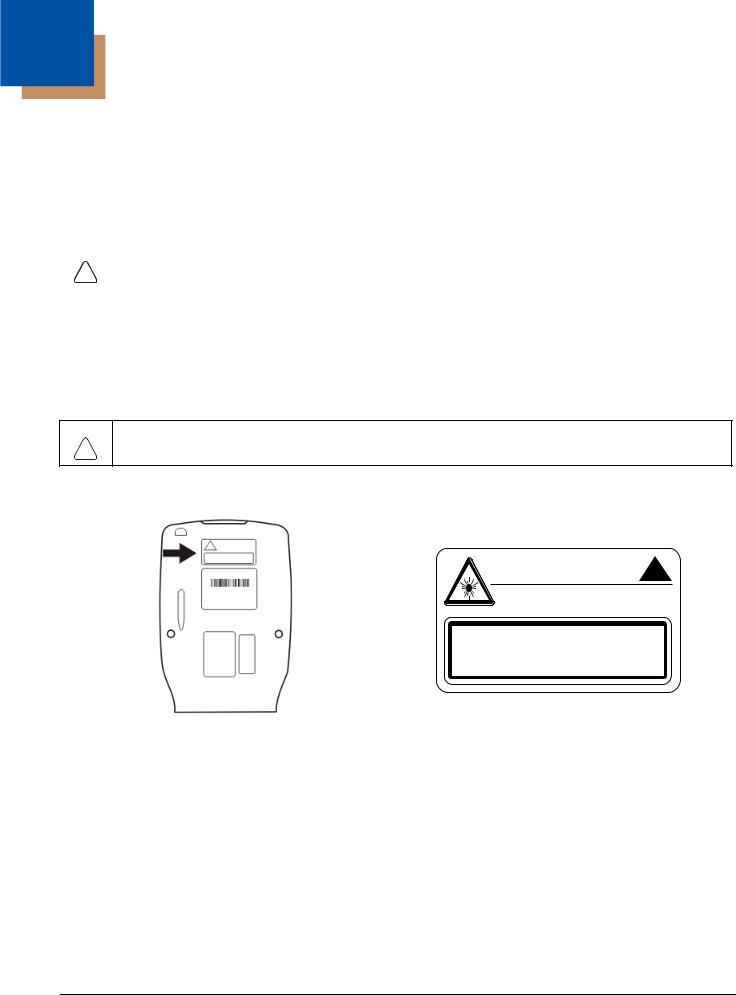
1
MX7 Tecton Agency Compliance
MX7 Tecton mobile computers meet or exceed the requirements of all applicable standards organizations for safe operation. However, as with any electrical equipment, the best way to ensure safe operation is to operate them according to the agency guidelines that follow. Read these guidelines carefully before using your MX7 Tecton.
This documentation is relevant for the following models: Tecton, TectonCS.
Caution: |
RISK OF EXPLOSION IF BATTERY IS REPLACED BY AN INCORRECT TYPE. The battery should be disposed of |
! |
by a qualified recycler or hazardous materials handler. Do not incinerate the battery or dispose of the battery with |
general waste materials. |
Laser Warnings
•Do not look into the laser’s lens.
•Do not stare directly into the laser beam.
•Do not remove the laser caution labels from the Tecton.
•Do not connect the laser bar code aperture to any other device. The laser bar code aperture is certified for use with the MX7 Tecton only.
Caution: Laser radiation when open. Read the caution labels. Use of controls, adjustments or performance of procedures other
!than those specified herein may result in hazardous radiation exposure.
Laser Label Location
If the following label is attached to your product, it indicates the product contains an engine with a laser aimer:
AVOID EXPOSURE - LASER RADIATION IS
EMITTED FROMTHIS APERTURE.
EN60825-1:2007 IEC60825-1:2007
COMPLIES WITH 21 CFR 1040.10 AND 1040.11
LASER LIGHT - DO NOT STARE INTO BEAM
CLASS 2 LASER PRODUCT 1.0mW - 630 - 680nm
Laser Safety Statement
This device has been tested in accordance with and complies with IEC60825-1 ed2 (2007). Complies with 21 CFR 1040.10 and 1040.11, except for deviations pursuant to Laser Notice No. 50, dated June 24, 2007.
LASER LIGHT, DO NOT STARE INTO BEAM, CLASS 2 LASER PRODUCT, 1.0 mW MAX OUTPUT: 630-680nM.
Model Number and Serial Number Labels
The model (item) number and serial number for the terminal are located on labels affixed to the back of the terminal.
FCC Part 15 Statement
This device complies with part 15 of the FCC Rules. Operation is subject to the following two conditions:
1.This device may not cause harmful interference.
2.This device must accept any interference received, including interference that may cause undesired operation.
1 - 1

This equipment has been tested and found to comply with the limits for a Class B digital device pursuant to part 15 of the FCC Rules. These limits are designed to provide reasonable protection against harmful interference in a residential installation. This equipment generates, uses, and can radiate radio frequency energy and, if not installed and used in accordance with the instructions, may cause harmful interference to radio communications. However, there is no guarantee that interference will not occur in a particular installation. If this equipment does cause harmful interference to radio or television reception, which can be determined by turning the equipment off and on, the user is encouraged to try to correct the interference by one or more of the following measures:
•Reorient or relocate the receiving antenna.
•Increase the separation between the equipment and receiver.
•Connect the equipment into an outlet on a circuit different from that to which the receiver is connected.
•Consult the dealer or an experienced radio or television technician for help.
If necessary, the user should consult the dealer or an experienced radio/television technician for additional suggestions. The user may find the following booklet helpful: “Something About Interference.” This is available at FCC local regional offices. Honeywell is not responsible for any radio or television interference caused by unauthorized modifications of this equipment or the substitution or attachment of connecting cables and equipment other than those specified by Honeywell. The correction is the responsibility of the user.
Caution: Any changes or modifications made to this equipment not expressly approved by Honeywell may void the FCC authorization to operate this equipment.
FCC 5GHz Statement
LAN devices are restricted to indoor use only in the band 5150-5250 MHz. For the band 5600-5650 MHz, no operation is permitted.
When using IEEE 802.11a wireless LAN, this product is restricted to indoor use, due to its operation in the 5.15to 5.25-GHz Frequency range. The FCC requires this product to be used indoors for the frequency range of 5.15 GHz to 5.25 GHz to reduce the potential for harmful interference to co-channel mobile satellite systems. High-power radar is allocated as the primary user of the 5.25to 5.35-GHz and 5.65to 5.85-GHz bands. These radar stations can cause interference with and/or damage to this device.
Canadian Compliance
This ISM device complies with Canadian RSS-210.
Operation is subject to the following conditions:
1.This device may not cause harmful interference.
2.This device must accept any interference received, including interference that may cause undesired operation. This Class B digital apparatus complies with Canadian ICES-003.
1 - 2
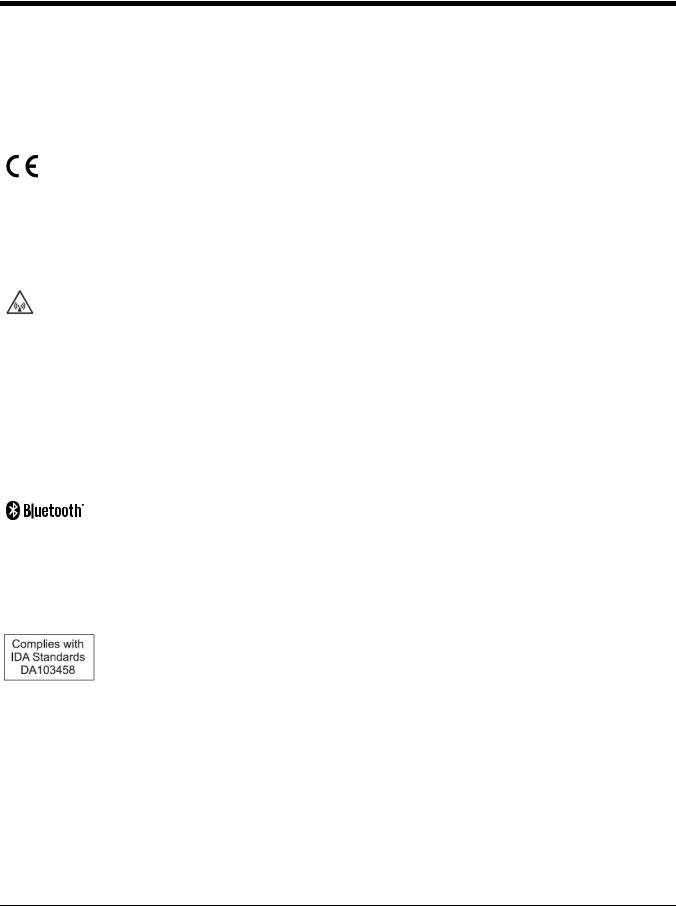
CE Mark
The CE marking indicates compliance with the following directives:
•1995/5/EC R&TTE
•2011/65/EU RoHS (Recast)
In addition, complies to 2006/95/EC Low Voltage Directive, when shipped with recommended power supply. European contact::
Hand Held Products Europe BV
Nijverheidsweg 9-13
5627 BT Eindhoven
The Netherlands
Honeywell shall not be liable for use of our product with equipment (i.e., power supplies, personal computers, etc.) that is not CE marked and does not comply with the Low Voltage Directive.
RF Notices
This device (FCC ID: KDZLXE-MX7T and IC ID: 1995B-LXEMX7T) contains transmitter Module FCC ID: TWG-SD- CMSD30AG and IC ID: 6616A-SDCMSD30AG.
This device does not transmit simultaneously on adjacent or non-adjacent channels.
RF Safety Notice
Caution:
This device was tested for typical body-worn operation. Use only Honeywell tested and approved accessories to ensure FCC Compliance. The use of third-party accessories may not comply with FCC RF exposure compliance requirements, and should be avoided. To comply with FCC RF exposure requirements, this device must be operated in the hand with a minimum separation distance of 2.5 cm (0.9842 inch) or more from a person's body.
Bluetooth
Class II
Honeywell Scanning & Mobility Product Environmental Information
Refer to www.honeywellaidc.com/environmental for the RoHS / REACH / WEEE information.
Dealer License - Republic of Singapore
Vehicle Power Supply Connection Safety Statement
Vehicle Power Supply Connection: If the supply connection is made directly to the battery, a 10A slow-blow fuse should be installed in the positive lead within 5 inches (12.7 cm) of the battery positive (+) terminal.
1 - 3

1 - 4
2
Getting Started
Overview
The MX7 Tecton™ is a rugged, portable, hand-held mobile computer capable of wireless data communications. The MX7 Tecton can transmit information using an 802.11 network card and it can store information for later transmission through an RS232 or USB port. The MX7CS (Cold Storage) device functions normally in various temperature ranges.
The MX7 Tecton is vertically oriented and features backlighting for the display. Keypads are available in 55-key alphanumeric and 32-key numeric-alpha versions.
This device can be scaled from a limited function batch computer to an integrated wireless scanning computer. A trigger handle is available as an accessory.
The stylus attached to the hand strap is used to assist in entering data and configuring the device. Protective film for the touch screen is available as an accessory.
The MX7 Tecton is powered by a 2200 mAh Lithium-Ion main battery pack and an internal Super-capacitor (Super-cap) battery.
Note: Contact Technical Assistance (page 16-1) for upgrade availability if your application or control panels are not the same as the application or control panels presented in this guide.
About this Guide
This MX7 Tecton User’s Guide provides instruction for the system administrator to follow when configuring a MX7 Tecton. Also included are setup and use instructions for the MX7 Tecton Battery Charger, Desktop Cradle, Passive Vehicle Mounted Cradle, and Powered Vehicle Mounted Cradle.
Note: The MX7 Tecton may have a Microsoft Windows CE 6 or Microsoft Windows Mobile 6.5 operating system. This guide is for the MX7 Tecton with a Windows Mobile 6.5 operating system
Out of the Box
After you open the shipping carton verify it contains the following items:
•MX7 Tecton
•Rechargeable battery
•Hand Strap (attached to the MX7 Tecton)
•Quick Start Guide
•Getting Started Disc
If you ordered accessories for the MX7 Tecton, verify they are also included with the order. Keep the original packaging material in the event the MX7 Tecton should need to be returned for service. For details, see Product Service and Repair (page 16-1)
2 - 1

Initial Setup for MX7 Tecton
Following are steps you might take when setting up a new MX7 Tecton. Follow the links for further instruction for each step. Contact Technical Assistance (page 16-1) if you need additional help.
Note: Installing or removing accessories should be performed on a clean, well-lit surface. When necessary, protect the work surface, the MX7 Tecton, and components from electrostatic discharge.
Hardware Setup
1.Connect accessories e.g., hand strap (if necessary), trigger handle, etc.
2.Provide a power source:
•Insert a fully charged main battery.
•Connect a power cable (USB/Power or Serial/Power).
•Place the MX7 Tecton in a powered desktop or vehicle mounted cradle.
3.Press the Power key.
Software Setup
Hardware setup should be completed before starting software setup.
1.Calibrate Touch display.
2.Set Date and Time Zone.
3.Set Power Timers.
4.Set Speaker Volume.
5.Pair Bluetooth devices.
6.Set Wireless client parameters.
7.Set terminal emulation parameters.
8.Set AppLock parameters.
9.Set DCWedge parameters.
2 - 2
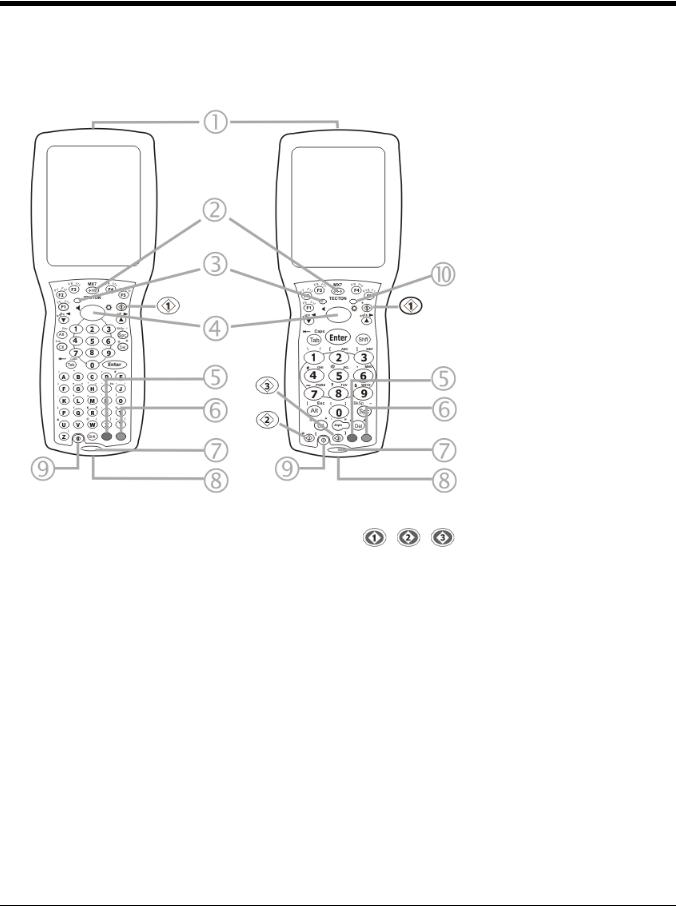
Components
Front View
1. Scanner/Imager Aperture
2. Speaker
3. System Status LED
4. Scan Button
5. Orange Key (Sticky Key)
6. Blue Key (Sticky Key)
7. Scan Status LED
8. Cable Port
9. On / Off Button
10. Alpha Lock LED (32 Key
keypad only)
55-key Keypad |
32-key Keypad |
Diamond Keys
2 - 3
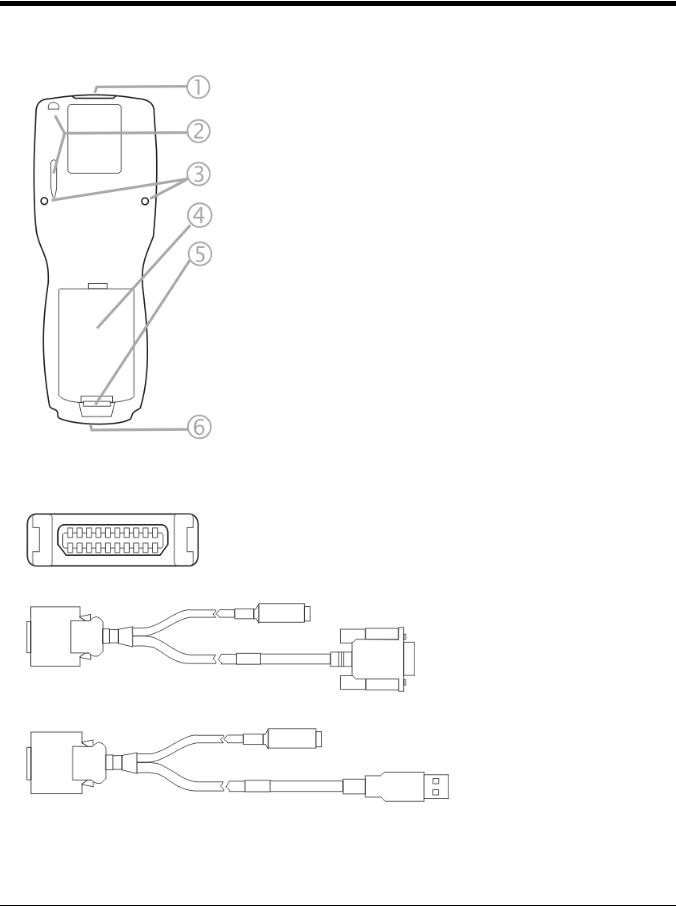
Back View
1. Scanner/Imager Aperture
2. Stylus and Stylus Pocket
3. Trigger Handle Attach Points
4. Main Battery
5. Battery Fastener
6. Cable Port
I/O Port and Cables
Input / Output Port (I/O)
Cable: Multipurpose RS232 and Power (MX7055CABLE)
Cable: Multipurpose USB and Power (MX7052CABLE)
2 - 4
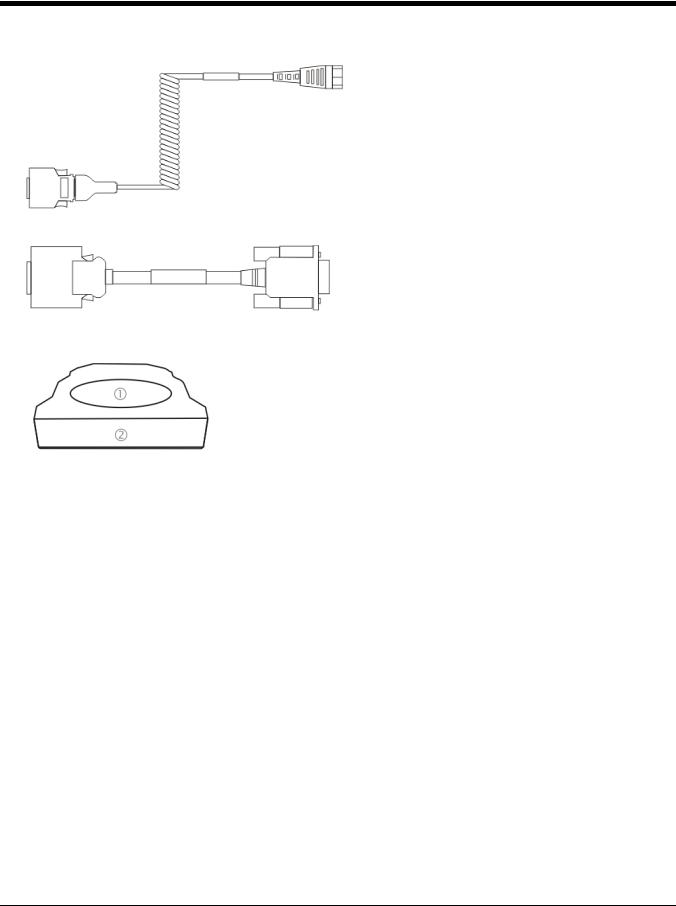
Adapter/Cable: Audio (MX7060CABLE)
Adapter: RS232 PC port to D9 male (MX7058CABLE)
Scanner / Imager Aperture
1.Scanner Aperture
2.MX7 Tecton Front
Caution: Never stare directly into the beam aperture.
If Continuous Scan Mode has been enabled (disabled by default, setting can be changed by user), the laser is always on and decoding and the laser beam is emitted continuously.
2 - 5

Handle
1. Imager / Scanner Aper-
ture
2. Trigger
3. Handle
4. Tether Attach Point
Handstrap
1.Handstrap
2.Handstrap Retainer Bracket and mounting screws
3.Handstrap Clip
2 - 6

Keypads
55 Key Primary Delete ANSI Keypad
|
10 |
1 |
9 |
2 |
8 |
|
7
3 |
6 |
4 |
5 |
55 Key Primary Backspace ANSI Keypad
|
10 |
1 |
9 |
2 |
8 |
|
|
|
Del |
|
BkSp |
|
7 |
3 |
6 |
4 |
5 |
1.System Status LED
2.Volume Control Icon
3.On Off Button
4.Scan Status LED
5.Orange Key (Sticky Key)
6.Blue Key (Sticky Key)
7.Enter Key
8.Scan Button
9.Diamond Key
10.Display Brightness Icon
Spc and Del key location
1.System Status LED
2.Volume Control Icon
3.On Off Button
4.Scan Status LED
5.Orange Key (Sticky Key)
6.Blue Key (Sticky Key)
7.Enter Key
8.Scan Button
9.Diamond Key
10.Display Brightness Icon
Del 


 BkSp
BkSp
Spc and Bksp key location
2 - 7
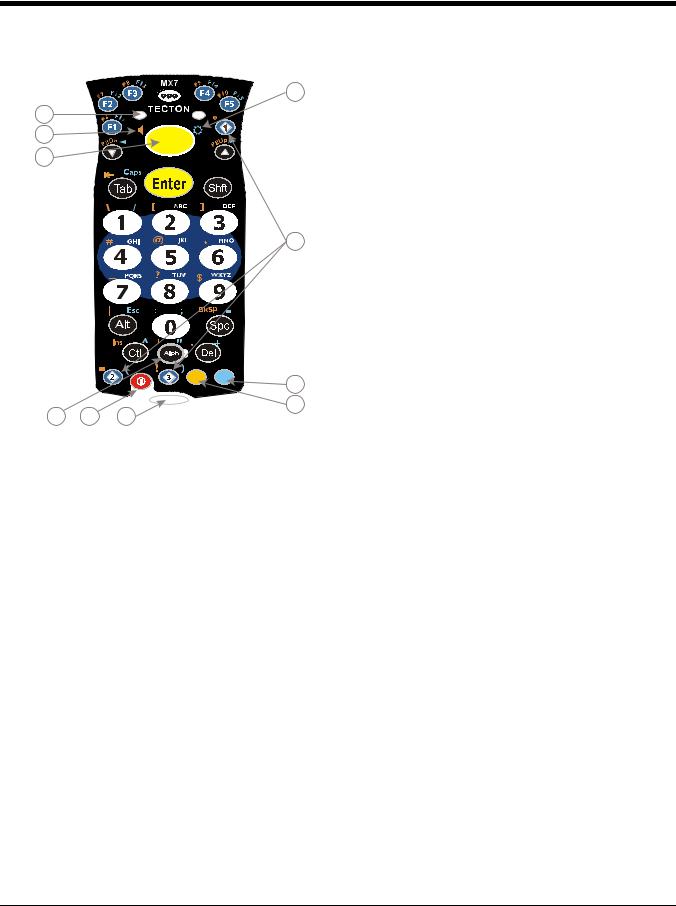
32 Key Numeric-Alpha Keypad
10 |
1. |
System Status LED |
|
2. |
Alpha Status LED |
||
1 |
|||
3. |
Diamond Keys |
||
2 |
|||
4. |
Scan Button |
||
3 |
|||
5. |
Enter Key |
||
|
|||
|
6. |
Alph Key |
|
|
7. |
Orange Key (Sticky Key) |
|
9 |
8. |
Blue Key (Sticky Key) |
|
|
|
||
|
9. |
On Off Button |
|
|
10. |
Scan Status LED |
|
|
8 |
4 |
5 |
7 |
6 |
Locking and Unlocking the MX7 Tecton
Locking the MX7 Tecton
The MX7 Tecton can be locked manually by tapping Start > Lock. By default, this option is included on the Start screen at the bottom of the screen. Care should be taken to not accidentally tap this area of the Start screen.
Note: Review the Unlock process before locking the MX7 Tecton.
Lock can be removed from the Today screen by selecting Start > Settings > Today > Items (page 5-22) tab. Deselect Device Lock.
The MX7 Tecton can also be configured to Lock automatically after a defined period of inactivity. This setting is accessed via Start > Settings > Lock > Password tab. By default, this option is Disabled.
The password and hint are configured by selecting Start > Settings > Lock > Password (page 5-16) and Hint (page 5-17) tabs.
Unlocking the MX7 Tecton
When the MX7 Tecton is locked, the Start screen displays Unlock at the lower part of the screen.
•If there is no password or PIN set, tap Unlock on the next screen to unlock the MX7 Tecton. The MX7 Tecton is returned to normal operation.
•If there is a password or PIN set, enter the password/PIN and tap Unlock. If several unsuccessful attempts are made, the MX7 Tecton may be configured to display a password hint.
2 - 8

Rebooting the MX7 Tecton
When the Desktop/Start screen is displayed or an application begins, the power up sequence is complete. If you have previously saved your settings, they will be restored on reboot. Application panel changes are saved when OK is tapped on an application properties panel.
During the processes that follow there may be small delays while MX7 Tecton wireless clients connect to the network and Bluetooth relationships establish or re-establish.
Suspend / Resume
Quickly tapping the Power key places the MX7 Tecton in Suspend mode. Quickly tapping the Power key again, pressing any key, pressing the trigger (on the trigger handle), or tapping the touch screen, returns the MX7 Tecton from Suspend and to the exact state before the Power key press. The System LED blinks green when the video display is Off (and the device is not in Suspend Mode or critical suspend).
Warmboot
A warmboot reboots the MX7 Tecton without erasing any registry data. Configuration settings and data in RAM are preserved during a warmboot. Network sessions are lost and any data in running applications that has not been previously saved may be lost. CAB files already installed remain installed.
• Using the Registry control panel, tap the Warmboot button. The MX7 Tecton immediately warmboots.
Restart
The OS and CAB files are reloaded. Restart erases the contents of RAM but preserves all registry configuration settings. Any files that are stored only in RAM drives will be lost. Restart erases any user-stored applications or data, but preserves anything stored on the System drive in flash (which are files explicitly copied to the System folder, plus the registry files created by the OS). All CABs and applications that are configured are reinstalled by the Launch utility. Touch screen calibration data is preserved. Network sessions are lost, and any data in running applications that has not been specifically sent to storage may be lost.
•Tap the Restart button on the Registry control panel. The operating system performs the operation and the MX7 Tecton restarts.
•An alternate method to Restart is to hold down the Blue key, the Scan key and the Power key until the screen blanks. Release the keys and the MX7 restarts (may also be called a cold boot). Be sure the press the Scan key, not the Enter key. Pressing the Enter key begins a warmboot function instead of a coldboot function.
Clean Boot / Reset
Important -- Because of the extreme nature of resetting the Windows Mobile device to factory default settings, this process should be used only as an emergency procedure and suspend/resume or restart should be used whenever necessary.
To reset all Windows Mobile device configuration to factory defaults:
1.Hold down the Blue + Scan + Power keys at the same time. After the key sequence is complete, the display turns solid white. Be sure to press the Scan key, not the Enter key.
2.Release the keys and immediately press and hold the Enter + Scan keys. After the keypress, the display turns dark. (If these keys are not pressed immediately the MX7 Tecton performs a Cold Boot. Wait until the MX7 Tecton boots and try again.)
3.Release the Reset key sequence. A message is displayed stating the change is in process. If the message does not appear, try again.
When all programs have finished loading, the Windows Mobile Start screen is displayed. If prompted, tap the touch screen to set up your Windows Mobile based device.
2 - 9

Inserting and Removing the Battery Pack
Note: The battery should not be replaced in a dirty, harsh or hazardous environment. When the battery is not connected to the MX7 Tecton, any dust or moisture that enters the battery well or connector may transfer to the battery/well terminals, potentially causing damage. Only use Honeywell batteries as replacements: MX7A380BATT / MX7392BATT or a Low Temperature (CS) Battery : MX7A381BATT / MX7393BATT / MX7396BATTERY.
The MX7 Tecton will not function unless the battery pack is in place and securely latched. Any work in progress should be saved prior to replacing the battery pack.
Be sure to place the unit in Suspend Mode before removing the battery. Failing to properly place the device in Suspend mode will result in a loss of all unsaved data.
An MX7 Tecton will retain data, while the main battery is removed and replaced with a fully charged main battery, for 5 minutes.
Note: When internal battery power is Low or Very Low connect the AC/DC adapter to the MX7 Tecton before replacing the main battery.
Inserting the Battery
To insert the main battery, complete the following steps:
1.Place the MX7 Tecton in Suspend Mode (if On).
2.Detach the bottom hook of the handstrap (if installed).
3.Tilt the end (without the latch) of the fully charged battery pack into the upper end of the battery compartment, and firmly press the other end down until it is fully inserted into the battery compartment
4.Push down on the battery until the retaining clip clicks into place. The MX7 Tecton draws power from the battery immediately upon successful connection.
5.Replace the handstrap clip in its holder (if installed).
Removing the Battery
To remove the battery, complete the following steps:
1.Place the MX7 Tecton in Suspend mode (if On).
2.Detach the bottom hook of the handstrap (if installed).
3.Slide the battery retaining clip down to release the main battery.
4.Pull the battery up and out of the battery compartment.
5.Place the discharged battery pack in a powered battery charger to re-charge.
Charging the Main Battery
Note: The MX7 Tecton Battery Charger is designed for an indoor, protected environment.
New batteries must be fully charged prior to use.
The main battery can be recharged in an AC powered Battery Charger after the battery has been removed from the MX7 Tecton or its packing material when new.
The main battery can be recharged while it is in the MX7 Tecton:
•by connecting the MX7 Tecton AC power adapter to the I/O connector at the base of the MX7 Tecton.
•by docking the MX7 Tecton in a powered desk cradle.
•by docking the MX7 Tecton in a powered vehicle cradle.
•or by connecting the car power adapter (CLA) to the I/O connector at the base of the MX7 Tecton.
Note: An uninterrupted external power source (wall AC adapters) transfers power to the computer’s internal charging circuitry which, in turn, recharges the main battery and internal battery. Frequent connection to an external power source, if feasible, is recommended to maintain internal battery charge status as the internal battery cannot be recharged by a dead or missing main battery.
2 - 10
Loading...