


 Loading...
EMS20300
EN |
Microwave Oven |
User Manual |
2 |
FI |
Mikroaaltouuni |
Käyttöohje |
18 |
FR |
Four à micro-ondes |
Notice d'utilisation |
34 |
PT |
Forno microondas |
Manual de instruções |
52 |
SV |
Mikrovågsugn |
Bruksanvisning |
69 |

2www.electrolux.com
CONTENTS
1. |
SAFETY INFORMATION.................................................................................... |
3 |
|
2. |
SAFETY INSTRUCTIONS.................................................................................. |
5 |
|
3. |
PRODUCT DESCRIPTION................................................................................ |
6 |
|
4. |
BEFORE FIRST USE......................................................................................... |
8 |
|
5. |
DAILY USE......................................................................................................... |
8 |
|
6. |
AUTOMATIC PROGRAMMES......................................................................... |
12 |
|
7. |
USING THE ACCESSORIES........................................................................... |
13 |
|
8. |
ADDITIONAL FUNCTIONS.............................................................................. |
13 |
|
9. |
HINTS AND TIPS............................................................................................. |
13 |
|
10. |
CARE AND CLEANING.................................................................................. |
14 |
|
11. |
TROUBLESHOOTING.................................................................................... |
15 |
|
12. |
INSTALLATION.............................................................................................. |
16 |
|
WE’RE THINKING OF YOU
Thank you for purchasing an Electrolux appliance. You’ve chosen a product that brings with it decades of professional experience and innovation. Ingenious and stylish, it has been designed with you in mind. So whenever you use it, you can be safe in the knowledge that you’ll get great results every time.
Welcome to Electrolux.
Visit our website for:
Get usage advice, brochures, trouble shooter, service information: www.electrolux.com/webselfservice
Register your product for better service:
www.registerelectrolux.com
Buy Accessories, Consumables and Original spare parts for your appliance:
www.electrolux.com/shop
CUSTOMER CARE AND SERVICE
Always use original spare parts.
When contacting our Authorised Service Centre, ensure that you have the following data available: Model, PNC, Serial Number.
The information can be found on the rating plate.
 Warning / Caution-Safety information
 General information and tips
  Environmental information
Subject to change without notice.

ENGLISH 3
1.  SAFETY INFORMATION
Before the installation and use of the appliance, carefully read the supplied instructions. The manufacturer is not responsible if an incorrect installation and use causes injuries and damages. Always keep the instructions with the appliance for future reference.
1.1 Children and vulnerable people safety
WARNING!
Risk of suffocation, injury or permanent disability.
•This appliance can be used by children aged from 8 years and above and persons with reduced physical, sensory or mental capabilities or lack of experience and knowledge if they have been given supervision or instruction concerning use of the appliance in a safe way and understand the hazards involved.
•Do not let children play with the appliance.
Children under 3 years must not be left unsupervised in the vicinity of the appliance.
•Keep all packaging away from children.
•Keep children and pets away from the appliance when it operates or when it cools down. Accessible parts are hot.
•If the appliance has a child safety device, we recommend you activate it.
•Cleaning and user maintenance shall not be made by children without supervision.
•Keep the appliance and its cord out of reach of children less than 8 years.
1.2General Safety
•This appliance is intended to be used in household and similar applications such as:
– Farm houses; staff kitchen areas in shops, offices
and other working environments;
4www.electrolux.com
–By clients in hotels, motels, bed and breakfast and other residential type environments
•Internally the appliance becomes hot when in operation. Do not touch the heating elements that are in the appliance. Always use oven gloves to remove or put in accessories or ovenware.
•Do not use a steam cleaner to clean the appliance.
•Before maintenance, deactivate the appliance and disconnect the mains plug from the mains socket.
•If the door or door seals are damaged, the appliance must not be operated until it has been repaired by a qualified person.
•If the supply cord is damaged, it must be replaced by the manufacturer, its Authorised Service Centre or similarly qualified persons in order to avoid a hazard.
•Only a qualified person can carry out any service or repair operation that involves the removal of a cover which gives protection against exposure to microwave energy.
•Do not operate the appliance by means of an external timer or separate remote-control system.
•Do not heat liquids and other foods in sealed containers. They are liable to explode.
•Only use utensils that are suitable for use in microwave ovens.
•When heating food in plastic or paper containers, keep an eye on the appliance due to the possibility of ignition.
•The appliance is intended for heating food and beverages. Drying of food or clothing and heating of warming pads, slippers, sponges, damp cloth and similar may lead to risk of injury, ignition or fire.
•If smoke is emitted, switch off or unplug the appliance and keep the door closed in order to stifle any flames.
•Microwave heating of beverages can result in delayed eruptive boiling. Care must be taken when handling the container.

ENGLISH 5
•The contents of feeding bottles and baby food jars shall be stirred or shaken and the temperature checked before consumption, in order to avoid burns.
•Eggs in their shell and whole hard-boiled eggs should not be heated in the appliance since they may explode, even after microwave heating has ended.
•The appliance should be cleaned regularly and any food deposits removed.
•Failure to maintain the appliance in a clean condition could lead to deterioration of the surface that could adversely affect the life of the appliance and possibly result in a hazardous situation.
•The temperature of accessible surfaces may be high when the appliance is operating.
•The microwave oven shall not be placed in a cabinet unless it has been tested in a Cabinet.
•The rear surface of appliances shall be placed against a wall.
•Do not use harsh abrasive cleaners or sharp metal scrapers to clean the glass door since they can scratch the surface, which may result in shattering of the glass.
2.SAFETY INSTRUCTIONS
2.1 Installation
WARNING!
Only a qualified person must install this appliance.
•Do not install or use a damaged appliance.
•Obey the installation instruction supplied with the appliance.
•The appliance can be placed almost anywhere in the kitchen. Make sure the oven is placed on a flat, level surface and that vents as well as the surface underneath the appliance are not blocked (for sufficient ventilation).
2.2 Electrical Connection
WARNING!
Risk of fire and electrical shock.
•All electrical connections should be made by a qualified electrician.
•The appliance must be earthed.
•Make sure that the electrical information on the rating plate agrees with the power supply. If not, contact an electrician.
•If the appliance is connected to the socket via an extension cord, make sure the cord is earthed.
•Make sure not to cause damage to the mains plug and to the mains cable. Contact the Service or an
6www.electrolux.com
electrician to change a damaged mains cable.
•Do not pull the mains cable to disconnect the appliance. Always pull the mains plug.
2.3 Use
WARNING!
Risk of injury, burns and electrical shock or explosion.
•Do not change the specification of this appliance.
•Do not let the appliance stay unattended during operation.
•Do not apply pressure on the open door.
•Make sure that the ventilation openings are not blocked.
•Do not use the appliance as a work surface and do not use the cavity for storage purposes.
2.4 Care and Cleaning
WARNING!
Risk of injury, fire, or damage to the appliance.
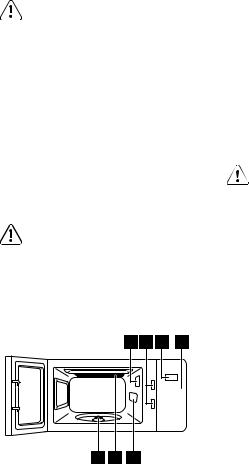
3. PRODUCT DESCRIPTION
3.1 General overview
1 2 3 4
7 6 5
•Before maintenance, deactivate the appliance and disconnect the mains plug from the mains socket.
•Clean regularly the appliance to prevent the deterioration of the surface material.
•Do not allow food spills or cleaner residue to accumulate on door sealing surfaces.
•Remaining fat or food in the appliance can cause fire.
•Clean the appliance with a moist soft cloth. Only use neutral detergents. Do not use abrasive products, abrasive cleaning pads, solvents or metal objects.
•If you use an oven spray, obey the safety instructions on the packaging.
2.5 Disposal
WARNING!
Risk of injury or suffocation.
•Disconnect the appliance from the mains supply.
•Cut off the mains cable and discard it.
 Lamp
Lamp
 Safety interlock system
 Display
 Control panel
 Waveguide cover
 Grill
Grill
 Turntable shaft
ENGLISH 7
3.2 Control Panel
1
2
9
3
4
5
8
6
7
|
|
Symbol |
Function |
Description |
|
|
— |
Display |
Shows the settings and cur |
1 |
||||
|
|
|
|
rent time. |
|
|
|
|
|
|
|
|
Time defrosting but To defrost food by time. |
|
|
2 |
|
ton |
|
|
|
|
||
|
|
|
|
|
|
|
|
Clock button |
To set the clock. |
|
3 |
|
||
|
|
|
|
|
|
|
|
|
|
|
|
|
Auto cook button |
To use Auto cooking. |
|
4 |
|
||
|
|
|
|
|
|
|
|
|
|
|
|
|
Clear button |
To deactivate the microwave |
|
5 |
|
|
or to delete the cooking set |
|
|
|
|
tings. |
|
|
|
Function button |
To set the microwave / grill / |
|
6 |
|
|
combi cooking function. |
|
|
|
||
|
|
|
|
|
|
|
|
Setting knob |
To set the cooking time or |
|
7 |
, |
|
weight or function. |
|
|
|||
|
|
|
|
|
|
|
|
Start button |
To start the appliance or in |
|
8 |
|
|
crease the cooking time for 60 |
|
|
|
|
seconds at full power. |
|
|
|
Weight defrosting |
To defrost food by weight. |
|
9 |
|
button |
|
|
|
|
||
|
|
|
|
|
8www.electrolux.com
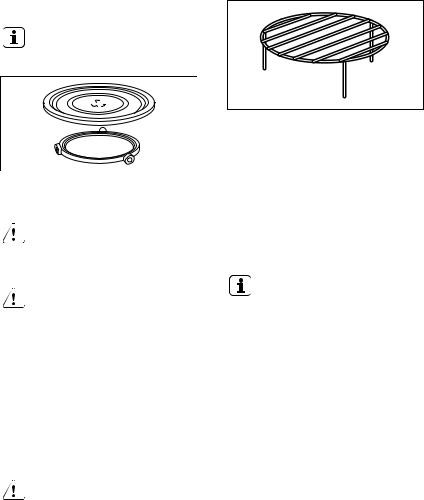
3.3Accessories
Turntable set
Always use the turntable set to prepare food in the microwave.
4. BEFORE FIRST USE
WARNING!
Refer to Safety chapters.
4.1 Initial Cleaning
CAUTION!
Refer to chapter "Care and
Cleaning".
•Remove all the parts and additional packaging from the microwave.
•Clean the appliance before first use.
4.2 Setting the time
If the clock is not set, it does not operate when the microwave is in use.
5. DAILY USE
WARNING!
Refer to Safety chapters.
5.1 General information about using the appliance
•After you deactivate the appliance, let the food stand for some minutes.
•Remove the aluminium foil packaging, metal containers, etc. before you prepare the food.
Cooking
•If possible, cook food covered with material suitable for use in the
Glass cooking tray and roller guide.
Grill Rack
Use for:
•grilling food
•combi cooking
When you connect the appliance to the electrical supply or after a power cut, the display shows 0:00 and an acoustic signal sounds.
You can set the time in a 24 hour clock system.
1.Press  .
.
2.Turn the Setting knob to set the hours.
3.Press  to confirm.
4.Turn the Time Setting knob to enter the amount of minutes.
5.Press  to confirm.
microwave. Only cook food without a cover if you want to keep it crusty
•Do not overcook the dishes by setting the power and time too high. The food can dry out, burn or catch fire in some places.
•Do not use the appliance to cook eggs or snails in their shells, because they can explode. With fried eggs, pierce the yolks first.
•Prick food with "skin" or "peel", such as potatoes, tomatoes, sausages, with a fork several times before cooking so that the food does not explode.
|
|
|
|
ENGLISH |
9 |
||
• For chilled or frozen food, set a longer |
then remove the pieces that started to |
||||||
cooking time. |
|
defrost. |
|
|
|
|
|
• Dishes which contain sauce must be |
|
Defrosting butter, portions of gateau, |
|
||||
stirred from time to time. |
|
|
|||||
|
quark |
|
|
|
|
||
• Vegetables that have a firm structure, |
|
|
|
|
|||
• Do not fully defrost the food in the |
|
||||||
such as carrots, peas or cauliflower, |
|
|
|||||
|
appliance, but let it defrost at room |
|
|||||
must be cooked in water. |
|
|
|||||
|
temperature. This gives a more even |
|
|||||
• Turn larger pieces after half of the |
|
|
|||||
|
result. Fully remove all metal or |
|
|||||
cooking time. |
|
|
|||||
|
aluminium packaging before |
|
|||||
• If possible, cut vegetables into similar- |
|
||||||
defrosting. |
|
|
|
|
|||
sized pieces. |
|
|
|
|
|
||
|
Defrosting fruit, vegetables |
|
|
||||
• Use flat, wide dishes. |
|
|
|
||||
• Do not use cookware made of |
|
• Do not fully defrost fruit and |
|
||||
porcelain, ceramic or earthenware |
|
vegetables, which are to be further |
|
||||
with small holes, e. g. on handles or |
|
prepared while raw, in the appliance. |
|
||||
unglazed bottoms. Moisture going into |
Let them defrost at room temperature. |
||||||
the holes can cause the cookware to |
|
• You can use a higher microwave |
|
||||
crack when it is heated. |
|
power to cook fruit and vegetables |
|
||||
• The glass cooking tray is a work |
|
without defrosting them first. |
|
||||
space for heating food or liquids. It is |
|
Ready meals |
|
|
|
|
|
necessary for the operation of the |
|
|
|
|
|
||
|
• You can prepare ready meals in the |
|
|||||
microwave. |
|
|
|||||
|
appliance only if their packaging is |
|
|||||
Defrosting meat, poultry, fish |
|
suitable for microwave use. |
|
|
|||
• Put the frozen, unwrapped food on a |
|
• You must follow the manufacturer's |
|
||||
small upturned plate with a container |
|
instructions printed on the packaging |
|
||||
below it so that the defrosting liquid |
|
(e.g. remove the metal cover and |
|
||||
collects in the container. |
|
pierce the plastic film). |
|
|
|||
• Turn the food after half of the |
|
|
|
|
|
|
|
defrosting time. If possible, divide and |
|
|
|
|
|
||
Suitable cookware and materials |
|
|
|
|
|
|
|
|
|
|
|
|
|
|
|
Cookware / Material |
|
|
Microwave |
|
|
Grilling |
|
|
|
Defrosting Heating |
Cooking |
|
|
|
|
Ovenproof glass and porcelain (with |
X |
X |
X |
X |
|
||
no metal components, e. g. Pyrex, |
|
|
|
|
|
|
|
heat-proof glass) |
|
|
|
|
|
|
|
Non-ovenproof glass and porcelain 1) |
X |
-- |
-- |
|
-- |
|
|
Glass and glass ceramic made of |
X |
X |
X |
X |
|
||
ovenproof/frost-proof material (e. g. |
|
|
|
|
|
|
|
Arcoflam), grill shelf |
|
|
|
|
|
|
|
Ceramic 2), earthenware 2). |
X |
X |
X |
-- |
|
||
Heat-resistant plastic up to 200 °C 3) |
X |
X |
X |
-- |
|
||
Cardboard, paper |
X |
-- |
-- |
|
-- |
|
|
Clingfilm |
X |
-- |
-- |
|
-- |
|
|
Roasting film with microwave safe |
X |
X |
X |
-- |
|
||
closure 3) |
|
|
|
|
|
|
|

10 www.electrolux.com
Cookware / Material |
|
Microwave |
|
Grilling |
|
|
|
Defrosting |
Heating |
Cooking |
|
Roasting dishes made of metal, e. g. |
-- |
-- |
-- |
X |
|
enamel, cast iron |
|
|
|
|
|
Baking tins, black lacquer or silicon- |
-- |
-- |
-- |
X |
|
coated 3) |
|
|
|
|
|
Baking tray |
-- |
-- |
-- |
X |
|
Browning cookware, e. g. Crisp pan |
-- |
X |
X |
-- |
|
or Crunch plate |
|
|
|
|
|
Ready meals in packaging 3) |
X |
X |
X |
X |
|
1) |
With no silver, gold, platinum or metal plating / decorations |
|
|
||
2) |
Without quartz or metal components, or glazes which contain metals |
|
|||
3) |
You must follow the manufacturer’s instructions about the maximum temperatures. |
||||
X suitable
-- not suitable
5.2 Activating and deactivating the microwave
CAUTION!
Do not let the microwave operate if there is no food in it.
1.Press the Function button.
2.Turn the Setting knob to set the desired function.
3.Press the Function button to confirm.
4.Turn the Setting knob to set the time.
5.Press 
 to confirm and activate the microwave.
To deactivate the microwave:
•wait until the microwave deactivates automatically, when the time comes to an end.
•open the door. The microwave stops automatically. Close the door and
press 
 to continue to cook. Use this option to inspect food.
•press  .
.
When the microwave deactivates automatically, an acoustic signal sounds.
5.3 Power setting table
Power setting |
Approximate Percentage of |
Power |
|
Power |
|
P100 |
100 % |
800 Watt |
P80 |
80 % |
640 Watt |
P50 |
50 % |
400 Watt |
P30 |
30 % |
240 Watt |
P10 |
10 % |
80 Watt |
|
|
|
ENGLISH 11
Other functions
Power setting |
Function mode |
|
|||||
|
|
|
Grill |
|
|
||
G |
|
|
Full Grill |
|
|
|
|
|
|
Combi Cooking |
|
||||
C – 1 |
|
55 % Microwaves, 45 % Grill |
|||||
C – 2 |
|
36 % Microwaves, 64 % Grill |
|||||
5.4 Quick Start |
|
2. |
Turn the Setting knob to set the |
||||
|
The maximum cooking time |
|
|
weight or time. |
|||
|
|
|
For weight defrosting the time is set |
||||
|
is 99 minutes. |
|
|
automatically. |
|||
Press |
to activate the microwave for |
3. |
Press |
to confirm and activate the |
|||
|
microwave. |
||||||
60 seconds at full power. |
|
5.6 Multistage cooking |
|||||
The cooking time increases by 60 |
|
||||||
seconds with each additional press of the |
|||||||
button. |
|
|
|
If one stage is defrosting, set |
|||
|
• In standby mode, turn the Setting |
|
it as the first stage. |
||||
|
knob counterclockwise to set the |
You can cook food in maximum 3 stages. |
|||||
|
cooking time, then press |
to |
|||||
|
|
|
|
||||
|
activate the microwave at full |
1. |
Press |
for weight defrosting or |
|||
|
power. |
|
|||||
|
|
|
for time defrosting. |
||||
5.5 Defrosting |
|
2. |
|||||
|
Turn the Setting knob to set the |
||||||
You can choose between 2 defrosting |
|
defrosting time or weight. |
|||||
3. |
Press |
to confirm. |
|||||
modes: |
|
|
|||||
|
|
4. Turn the setting knob to set the |
|||||
|
|
|
|
||||
• |
Weight defrosting |
|
|
power level. |
|||
|
5. |
Press |
to confirm. |
||||
• |
Time defrosting |
|
|||||
|
6. Turn the Setting knob to set the time. |
||||||
|
Do not use weight defrosting |
||||||
|
7. |
Press |
to confirm and activate the |
||||
|
on food that is left out of the |
|
|
microwave. |
|||
|
freezer for more than 20 |
|
|
After each step an acoustic signal |
|||
|
minutes, or for frozen ready- |
|
sounds. |
|
|||
|
made food. |
|
5.7 Grilling and Combi Cooking |
||||
|
To activate weight defrosting |
||||||
|
|
|
|
||||
|
you must use more than 100 |
1. |
Press |
. |
|||
|
g of food and less than 2000 |
||||||
|
2. Turn the Setting knob to set the |
||||||
|
g. |
|
|
||||
|
|
|
|
desired function |
|||
|
|
|
|
|
|||
|
To defrost less than 200 g of |
3. |
Press |
to confirm. |
|||
|
food place it on the edge of |
|
4. |
Turn the Setting knob to set the time. |
|||
|
the turntable. |
|
5. |
Press |
to confirm and activate the |
||
|
|
|
|
|
microwave. |
||
1. |
Press |
for weight defrosting or |
|
You can change the power setting or |
|||
|
for time defrosting. |
|
|
time, while the Grilling or Combi |
|||
|
|
|
cooking mode is active. |
||||
|
|
|
|
|
|||
12 www.electrolux.com
6. AUTOMATIC PROGRAMMES
WARNING!
Refer to Safety chapters.
6.1 Auto cooking
Use this function to easily cook favourite food. The microwave automatically sets the optimum settings.
1. Press  .
.
2.Turn the Setting knob to set the desired menu.
3.Press  to confirm.
4.Turn the Setting knob to set the weight of the menu.
5.Press 
 to confirm and activate the microwave.
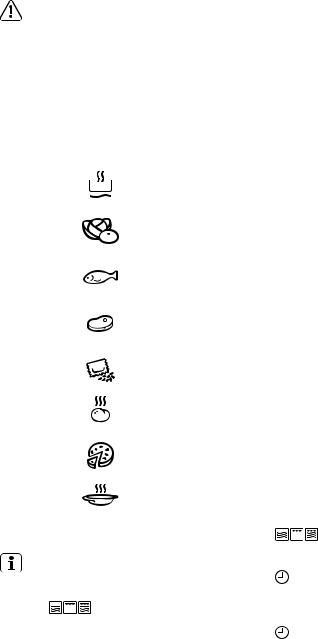
Symbols |
|
Menu |
|
Amount |
|
|
|
Reheat |
|
200 g |
|
A-1 |
|
|
|
400 g |
|
|
|
|
600 g |
||
|
|
|
|
||
|
|
Vegetable |
|
200 g |
|
A-2 |
|
|
|
300 g |
|
|
|
|
400 g |
||
|
|
|
|
||
|
|
Fish |
|
250 g |
|
A-3 |
|
|
|
350 g |
|
|
|
|
450 g |
||
|
|
|
|
||
|
|
Meat |
|
250 g |
|
A-4 |
|
|
|
350 g |
|
|
|
|
450 g |
||
|
|
|
|
||
|
|
Pasta |
|
50 g (add 450 ml of water) |
|
A-5 |
|
|
|
100 g (add 800 ml of water) |
|
|
|
|
|
||
|
|
Potato |
|
200 g |
|
A-6 |
|
|
|
400 g |
|
|
|
|
600 g |
||
|
|
|
|
||
|
|
Pizza |
|
200 g |
|
A-7 |
|
|
|
400 g |
|
|
|
|
|
||
|
|
Soup |
|
200 ml |
|
A-8 |
|
|
|
400 ml |
|
|
|
|
|
||
6.2 Delayed Start |
3. |
Press |
to confirm. |
||
You can programme the |
4. Turn the Setting knob to set the |
||||
|
cooking time. |
||||
microwave for maximum 3 |
|
||||
5. |
Press |
to programme the |
|||
stages. |
|
||||
|
|
|
activation of the microwave. |
||
1. Press |
. |
6. Turn the Setting knob to set the |
|||
|
hours. |
|
|||
2. Turn the Setting knob to set the |
|
|
|||
power level |
|
7. |
Press |
to confirm. |
|
8.Turn the Setting knob to set the minutes.
9.Press 
 to end the settings.
ENGLISH 13
The microwave activates automatically when the set time is reached.
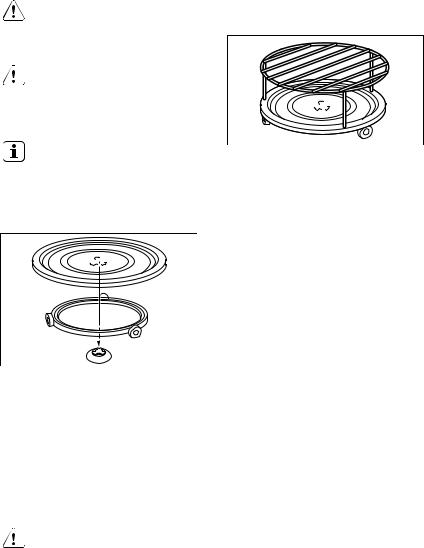
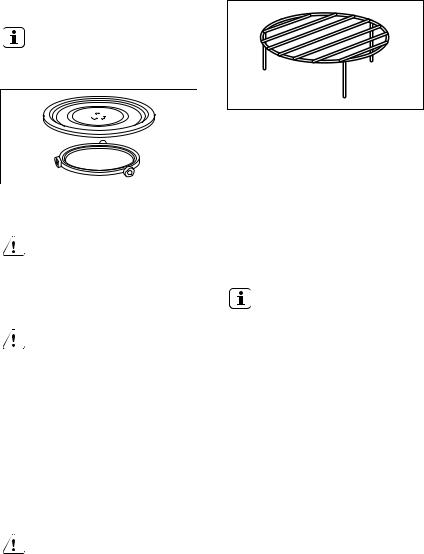
7. USING THE ACCESSORIES
WARNING! |
7.2 Inserting the grill rack |
Refer to Safety chapters. |
Place the grill rack on the turntable set. |
7.1 Inserting the turntable set
CAUTION!
Do not cook food without the turntable set. Use only the turntable set provided with the microwave.
Never cook food directly on the glass cooking tray.
1.Place the roller guide around the turntable shaft.
2.Place the glass cooking tray on the roller guide
8.ADDITIONAL FUNCTIONS
8.1 Child Safety Lock
The Child Safety Lock prevents an accidental operation of the microwave.
Press and hold  for 3 second.
9. HINTS AND TIPS
WARNING!
Refer to Safety chapters.
An acoustic signal sounds.
When the Child Safety Lock is active the display shows  .
.

14www.electrolux.com
9.1Tips for the microwave
Problem |
Remedy |
|
|
You cannot find details for the |
Look for a similar food. Increase or shorten the |
amount of food prepared. |
length of the cooking times according to the |
|
following rule: Double the amount = almost |
|
double the time, Half the amount = half the |
|
time |
The food got too dry.
Set shorter cooking time or select lower micro wave power.
The food is not defrosted, hot or cooked after the time came to an end.
Set longer cooking time or set higher power. Note that large dishes need longer time.
After the cooking time comes to an |
Next time set a lower power and a longer time. |
|
end, the food is overheated at the |
Stir liquids halfway through, e.g. soup. |
|
edge but is still not ready in the mid |
|
|
dle. |
|
|
To get better results for rice use a flat, |
|
Cut the fresh vegetables into even size |
wide dish. |
|
pieces before cooking. Cook all |
9.2 Defrosting |
|
vegetables with a cover on the container. |
|
9.4 Reheating |
|
Always defrost roast with the fat side |
|
|
down. |
|
When you reheat packed ready meals |
Do not defrost covered meat because |
|
always follow the instruction written on |
|
the packaging. |
|
this may cause cooking instead of |
|
|
defrosting. |
|
9.5 Grilling |
Always defrost whole poultry breast side |
||
down. |
|
Grill flat food items in the middle of the |
9.3 Cooking |
|
grill rack. |
|
Turn the food over halfway through the |
|
Always remove chilled meat and poultry |
set time and continue grilling. |
|
from the refrigerator at least 30 minutes |
9.6 Combi Cooking |
|
before cooking. |
|
|
Let the meat, poultry, fish and vegetables stay covered after cooking.
Brush a little oil or melted butter over the fish.
All vegetables should be cooked at full microwave power.
Add 30 - 45 ml of cold water for every 250 g of vegetables.
Use the Combi Cooking to keep the crispness of certain foods.
At the half of the cooking time, turn over the foods then continue.
There are 2 modes for Combi Cooking. Each mode combines the microwave and the grill functions at different time periods and power levels.
10. CARE AND CLEANING
WARNING!
Refer to Safety chapters.

10.1 Notes and tips on cleaning
•Clean the front of the appliance with a soft cloth with warm water and a cleaning agent.
•To clean metal surfaces, use a usual cleaning agent.
•Clean the appliance interior after each use. Then you can remove dirt more easily and it does not burn on.
•Clean stubborn dirt with a special cleaner.
ENGLISH 15
•Clean all accessories regularly and let them dry. Use a soft cloth with warm water and a cleaning agent.
•To soften the hard to remove remains, boil a glass of water at full microwave power for 2 to 3 minutes.
•To remove odours, mix a glass of water with 2 tsp of lemon juice and boil at full microwave power for 5 minutes.
11. TROUBLESHOOTING
WARNING!
Refer to Safety chapters.
11.1 What to do if...
Problem |
Possible cause |
Remedy |
|
|
|
The appliance does |
The appliance is deactivated. |
Activate the appliance. |
not operate. |
|
|
The appliance does |
The appliance is not plugged |
Plug in the appliance. |
not operate. |
in. |
|
The appliance does |
The fuse in the fuse box is |
not operate. |
blown. |
Check the fuse. If the fuse blows more than one time, contact a qualified electrician.
The appliance does |
The door is not closed proper |
Make sure that nothing blocks |
not operate. |
ly. |
the door. |
|
|
|
The lamp does not |
The lamp is defective. |
The lamp has to be replace. |
operate. |
|
|
There is sparking in |
There are metal dishes or |
the cavity. |
dishes with metal trim. |
Remove the dish from the ap pliance.
There is sparking in |
There are metal skewers or |
Make sure that the skewers |
the cavity. |
aluminium foil that touches the |
and foil does not touch the in |
|
interior walls. |
terior walls. |
The turntable set |
There is an object or dirt be |
makes scratching or |
low the glass cooking tray. |
grinding noise. |
|
Clean the area below the glass cooking tray.
The appliance stop There is a malfunction. |
If this situation repeats call the |
to operate without a |
Authorised Service Center. |
clear reason. |
|
|
|
16 www.electrolux.com
11.2 Service data
If you cannot find a solution to the problem yourself, contact your dealer or an Authorised Service Centre.
The necessary data for the service centre is on the rating plate. The rating plate is on the appliance. Do not remove the rating plate from the appliance.
We recommend that you write the data here:
Model (MOD.) ...............................
.........
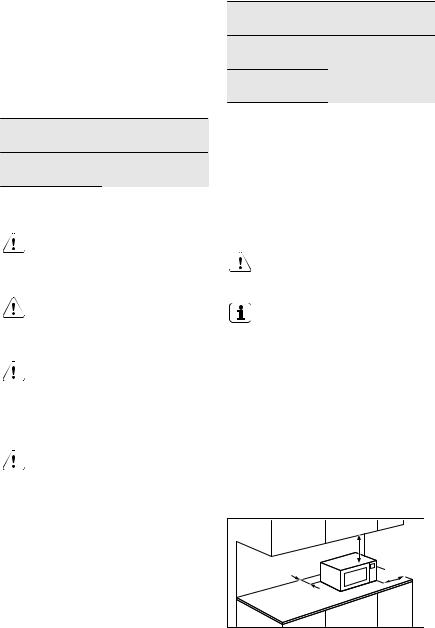
12. INSTALLATION
WARNING!
Refer to Safety chapters.
12.1 General Information
CAUTION!
Do not block the air vents. If you do that, the appliance can overheat.
CAUTION!
Do not connect the appliance to adapters or extension leads. This can cause overloading and risk of fire.
CAUTION!
The minimum installation height is 85 cm.
•The microwave is for a kitchen counter top use only. It must be placed on a stable and flat surface.
•Put the microwave far away from steam, hot air and water splashes.
•If the microwave is to close to the TV and radio it may cause interference in the received signal.
•If you transport the microwave in cold weather, do not activate it immediately after the installation. Let is stand in the room temperature and absorb the heat.
We recommend that you write the data here:
Product number ...............................
(PNC) .........
Serial number ...............................
(S.N.) .........
12.2 Electrical installation
WARNING!
Only a qualified person must do the electrical installation.
The manufacturer is not responsible if you do not follow the safety precautions from the chapter "Safety Information".
This microwave is supplied with a main cable and main plug.
The cable has an earth wire with an earthing plug. The plug must be plugged into an outlet that is properly installed and earthed. In the event of an electrical short circuit, earthing reduces the risk of electric shock.
12.3 Minimal distances
A |
B |
C |

ENGLISH 17
Dimension |
mm |
A |
300 |
B |
200 |
|
|
Dimension mm
C0
13. ENVIRONMENT CONCERNS
Recycle the materials with the symbol
 . Put the packaging in applicable containers to recycle it. Help protect the environment and human health and to recycle waste of electrical and electronic appliances. Do not dispose appliances
marked with the symbol  with the household waste. Return the product to your local recycling facility or contact your municipal office.

18 www.electrolux.com
SISÄLTÖ
1. |
TURVALLISUUSTIEDOT................................................................................. |
19 |
|
2. |
TURVALLISUUSOHJEET................................................................................ |
21 |
|
3. |
LAITTEEN KUVAUS......................................................................................... |
22 |
|
4. |
KÄYTTÖÖNOTTO............................................................................................ |
24 |
|
5. |
PÄIVITTÄINEN KÄYTTÖ.................................................................................. |
24 |
|
6. |
AUTOMAATTISET OHJELMAT....................................................................... |
28 |
|
7. |
LISÄVARUSTEIDEN KÄYTTÄMINEN.............................................................. |
29 |
|
8. |
LISÄTOIMINNOT.............................................................................................. |
30 |
|
9. |
VIHJEITÄ JA NEUVOJA................................................................................... |
30 |
|
10. |
HOITO JA PUHDISTUS................................................................................. |
31 |
|
11. |
VIANMÄÄRITYS............................................................................................. |
31 |
|
12. |
ASENNUS...................................................................................................... |
32 |
|
SINUN PARHAAKSESI
Kiitämme teitä Electrolux-laitteen hankinnasta. Olette valinneet tuotteen, joka perustuu vuosikymmenien aikana saatuun kokemukseen ja innovaatioon. Kekseliäs ja tyylikäs laite, joka on suunniteltu teitä ajatellen. Laitetta käyttäessänne voitte olla aina varma erinomaisista tuloksista.
Tervetuloa Electroluxiin.
Vieraile verkkosivullamme:
Saadaksesi käyttöön liittyviä neuvoja, esitteitä, vianmääritysohjeita ja huoltoohjeita:
www.electrolux.com/webselfservice
Tuotteen rekisteröimiseksi parempaa huoltoa varten: www.registerelectrolux.com
Ostaaksesi laitteesi lisävarusteita, kulutusosia ja alkuperäisiä varaosia:
www.electrolux.com/shop
ASIAKASPALVELU JA HUOLTO
Suosittelemme alkuperäisten varaosien käyttöä.
Pidä seuraavat tiedot saatavilla ottaessasi yhteyttä valtuutettuun huoltoliikkeeseemme. Malli, tuotenumero, sarjanumero. Kyseiset tiedot löytyvät laitteen arvokilvestä.
 Varoitukset/huomautukset ja turvallisuusohjeet
 Yleisohjeet ja vinkit
  Ympäristönsuojeluohjeita
Oikeus muutoksiin pidätetään.

SUOMI 19
1.  TURVALLISUUSTIEDOT
Lue laitteen mukana toimitetut ohjeet ennen laitteen asennusta ja käyttöä. Valmistaja ei ota vastuuta henkilötai omaisuusvahingoista, jotka aiheutuvat laitteen virheellisestä asennuksesta tai käytöstä. Pidä ohjeet aina laitteen mukana tulevia käyttökertoja varten.
1.1 Lasten ja taitamattomien henkilöiden turvallisuus
VAROITUS!
Tukehtumis-, henkilövammatai pysyvän vammautumisen vaara.
•Vähintään 8 vuotta täyttäneet lapset ja sellaiset henkilöt, joiden fyysiset, sensoriset tai henkiset kyvyt eivät ole tähän riittäviä tai joilla ei ole laitteen tuntemusta tai kokemusta sen käytöstä, saavat käyttää tätä laitetta ainoastaan silloin, kun heidän turvallisuudestaan vastaava henkilö valvoo ja ohjaa heitä käyttämään laitetta turvallisesti ja ymmärtämään sen käyttöön liittyvät vaarat.
•Älä anna lasten leikkiä laitteella.
Alle 3-vuotiaita lapsia ei saa jättää ilman valvontaa laitteen lähelle.
•Pidä kaikki pakkausmateriaalit lasten ulottumattomissa.
•Pidä lapset ja kotieläimet poissa laitteen luota silloin, kun se on toiminnassa tai se jäähtyy. Laitteen kosketettavissa olevat osat ovat kuumia.
•Jos laitteessa on lapsilukko, suosittelemme sen käyttämistä.
•Lapset eivät saa suorittaa puhdistusta tai huoltoa ilman valvontaa.
•Pidä laite ja sen johto alle 8-vuotiaiden lasten ulottumattomissa.
20www.electrolux.com
1.2Yleiset turvallisuusohjeet
•Laite on tarkoitettu käytettäväksi kotiympäristöissä ja vastaavissa ympäristöissä, kuten:
–maatalot, henkilöstön keittiöympäristöt liikkeissä, toimistoissa ja muissa työympäristöissä
–hotellien, motellien ja muiden majatalojen asiakkaiden käyttöympäristöt.
•Laitteen sisäosa kuumenee käytön aikana. Älä kosketa laitteen lämpövastuksiin. Käytä aina uunikintaita, kun käsittelet lisävarusteita tai uunivuokia.
•Laitteen puhdistuksessa ei saa käyttää painepesuria.
•Kytke laite pois toiminnasta ja irrota pistoke pistorasiasta ennen ylläpitotoimien aloittamista.
•Mikäli luukku tai luukun tiivisteet ovat vaurioituneet, laitetta ei saa käyttää ennen kuin ammattitaitoinen henkilö on korjannut sen.
•Jos virtajohto vaurioituu, sen saa vaaratilanteiden välttämiseksi vaihtaa vain valmistaja, valtuutettu huoltoliike tai vastaava ammattitaitoinen henkilö.
•Ainoastaan ammattitaitoinen henkilö saa suorittaa huoltotai korjaustoimenpiteet, joissa mikroaaltoenergialta suojaava suojakansi on poistettava.
•Älä käytä tätä laitetta ulkoisella ajastimella tai erillisellä kaukosäädinjärjestelmällä.
•Älä lämmitä nesteitä ja muita elintarvikkeita tiivistetyissä astioissa. Ne voivat räjähtää.
•Käytä ainoastaan välineitä, jotka sopivat mikroaaltouunissa käytettäviksi.
•Syttymisvaaran vuoksi laitetta on valvottava, jos ruokaa lämmitetään muovitai paperiastioissa.
•Laite on tarkoitettu elintarvikkeiden ja juomien lämmittämiseen. Henkilö-, syttymistai tulipalovaara on olemassa, jos laitteella kuivataan elintarvikkeita tai vaatteita tai lämmitetään lämmitysalustoja, tossuja, sieniä, kosteita liinoja tms.
SUOMI 21
•Jos laitteesta pääsee savua, kytke laite pois toiminnasta tai irrota pistoke pistorasiasta. Pidä luukku kiinni, jotta liekit tukahtuvat.
•Juomien kuumentaminen mikroaaltotoiminnolla voi aiheuttaa viivästyneen kiehumisen. Käsittele astiaa varovasti.
•Ravistele tuttipullojuomaa ja sekoita vauvanruokatölkin sisältö ja tarkista lämpötila ennen kuin annat ruoan lapselle palovammojen välttämiseksi.
•Laitteella ei saa lämmittää kananmunia kuorineen ja keitettyjä kananmunia, sillä ne voivat räjähtää jopa mikroaaltolämmityksen päätyttyä.
•Laite tulee puhdistaa säännöllisesti ja kaikki ruokajäämät tulee poistaa.
•Jos laitetta ei pidetä puhtaana, sen pinnan kunto voi heikentyä, jolloin laitteen käyttöikä voi lyhentyä ja mahdollisia vaaratilanteita esiintyä.
•Kosketettavissa olevien pintojen lämpötila saattaa tulla kuumaksi laitteen toiminnan aikana.
•Mikroaaltouunia ei saa sijoittaa kalustekaapin sisälle, ellei sitä ole tarkoitettu kalusteeseen asennettavaksi.
•Laitteiden takaosan pinta on asetettava seinää vasten.
•Älä käytä hankausaineita tai teräviä metallikaapimia lasiluukun puhdistamisessa, sillä ne voivat naarmuttaa pintaa, mistä voi olla seurauksena luukun lasin särkyminen.
2.TURVALLISUUSOHJEET
2.1 Asennus
VAROITUS!
Asennuksen saa suorittaa vain ammattitaitoinen henkilö.
•Vaurioitunutta laitetta ei saa asentaa tai käyttää.
•Noudata koneen mukana toimitettuja ohjeita.
•Laite voidaan sijoittaa lähes minne tahansa keittiössä. Sijoita uuni tasaiselle ja tukevalle alustalle ja
tarkista, että ilmanvaihtoaukot eivät ole tukossa ja että laitteen alle jää rako (riittävän ilmankierron varmistamiseksi).
2.2 Sähköliitännät
VAROITUS!
Tulipaloja sähköiskuvaara.
•Kaikki sähkökytkennät tulee jättää asiantuntevan sähköasentajan vastuulle.

22www.electrolux.com
•Laite on kytkettävä maadoitettuun pistorasiaan.
•Varmista, että arvokilven sähkötiedot vastaavat kotitalouden sähköverkon arvoja. Ota muussa tapauksessa yhteyttä sähköasentajaan.
•Jos laite kytketään pistorasiaan jatkojohdolla, tarkista, että johto on maadoitettu.
•Varmista, ettei pistoke ja virtajohto vaurioidu. Ota yhteyttä huoltopalveluun tai sähköasentajaan vaurioituneen virtajohdon vaihtamiseksi.
•Älä vedä virtajohdosta pistoketta irrottaessasi. Vedä aina pistokkeesta.
2.3 Käyttö
VAROITUS!
Henkilövahinkojen, palovammojen ja sähköiskujen tai räjähdyksen vaara.
•Älä muuta laitteen teknisiä ominaisuuksia.
•Älä jätä laitetta ilman valvontaa toiminnan aikana.
•Älä paina avointa uunin luukkua.
•Varmista, ettei tuuletusaukoissa ole esteitä.
•Älä käytä laitetta työtasona tai sen sisätilaa tavaroiden tai tuotteiden säilyttämiseen.
3.LAITTEEN KUVAUS
3.1 Laitteen osat
1 2 3 4
2.4 Hoito ja puhdistus
VAROITUS!
Ne voivat aiheuttaa henkilövahinkoja, tulipaloja tai laitteen vaurioitumisen.
•Kytke laite pois toiminnasta ja irrota pistoke pistorasiasta ennen ylläpitotoimien aloittamista.
•Puhdista laite säännöllisesti, jotta pintamateriaali ei vaurioidu.
•Älä anna ruokaroiskeiden tai pesuaineen jäämien kerääntyä luukun tiivisteeseen.
•Laitteeseen jäänyt rasva tai ruoka voi aiheuttaa tulipalon.
•Puhdista laite kostealla pehmeällä liinalla. Käytä vain mietoja puhdistusaineita. Älä käytä hankausainetta, hankaavia pesulappuja, liuottimia tai metalliesineitä.
•Jos käytät uuninpuhdistussuihketta, noudata tuotepakkauksessa olevia turvallisuusohjeita.
2.5 Hävittäminen
VAROITUS!
Henkilövahinkotai tukehtumisvaara.
•Irrota pistoke pistorasiasta.
•Leikkaa johto irti ja hävitä se.
 Valo
Valo
 Lukitusjärjestelmä
 Näyttö
 Käyttöpaneeli
 Aallonohjaimen suojus
 Grilli
 Pyörivän alustan akseli
7 6 5

SUOMI 23
3.2 Käyttöpaneeli
1
2
9
3
4
5
8
6
7
|
|
Symboli |
Toiminto |
Kuvaus |
|
|
|
|
|
|
|
— |
Näyttö |
Näyttää asetukset ja sen |
|
1 |
|||
|
|
|
|
hetkisen kellonajan. |
|
|
|
|
|
|
|
|
Aikasulatus-painike |
Ruoan sulattaminen ajan peru |
|
2 |
|
|
steella. |
|
|
|
|
|
|
|
|
|
|
|
|
|
Kello-painike |
Kellonajan asettaminen. |
|
3 |
|
||
|
|
|
|
|
|
|
|
|
|
|
|
|
Automaattisen kyp |
Automaattisen kypsennystoi |
4sennystoiminnon pai minnon käyttäminen. nike
|
|
Tyhjennyspainike |
Mikroaaltouunin kytkeminen |
|
|
|
pois toiminnasta tai asetuksien |
|
5 |
|
|
|
|
|
poistaminen. |
|
|
|
|
|
|
Toimintopainike |
Mikroaalto-/grilli-/yhdistelmä |
|
6 |
|
toiminnon asettaminen. |
|
|
|
|
|
|
|
|
|
|
Asetuskytkin |
Kypsennysajan tai painon tai |
|
7 |
, |
toiminnon asettaminen. |
|
|
||
|
|
|
|
|
|
|
|
|
|
Käynnistyspainike |
Laitteen käynnistäminen tai 60 |
|
8 |
|
sekunnin lisääminen kypsen |
|
|
|
nysaikaan täydellä teholla. |
|
|
Painosulatus-painike |
Ruoan sulattaminen painon |
|
9 |
|
perusteella. |
|
|
|
|
|
|
|
|
24www.electrolux.com
3.3Varusteet
Pyörivä alustakokoonpano
Käytä aina pyörivää alustakokoonpanoa valmistaessasi ruokaa mikroaaltouunilla.
4. KÄYTTÖÖNOTTO
VAROITUS!
Lue turvallisuutta koskevat luvut.
4.1 Uuden laitteen puhdistaminen
HUOMIO!
Lue ohjeet kohdasta "Hoito ja puhdistus".
•Poista kaikki osat ja ylimääräiset pakkausmateriaalit mikroaaltouunista.
•Puhdista laite ennen ensimmäistä käyttökertaa.
4.2 Kellonajan asettaminen
Jos kelloa ei ole asetettu, se ei toimi mikroaaltouunin ollessa toiminnassa.
5. PÄIVITTÄINEN KÄYTTÖ
VAROITUS!
Lue turvallisuutta koskevat luvut.
5.1 Yleistietoa laitteen käytöstä
•Kun laite on kytketty pois päältä, anna ruoan olla joidenkin minuuttien ajan.
•Poista alumiinifolio, metalliastiat jne. ennen ruoan valmistamista.
Lasialusta ja rullaohjain.
Grillausritilä
Käyttö:
•grillaus
•yhdistelmätoiminto
Kun laite kytketään sähköverkkoon tai kun on tapahtunut sähkökatkos, näytössä näkyy 0:00 ja laitteesta kuuluu äänimerkki.
Voit asettaa ajan 24 tunnin kellojärjestelmällä.
1.Paina painiketta  .
.
2.Aseta tunnit kääntämällä asetuskytkintä.
3.Vahvista  -painikkeella.
4.Syötä minuuttimäärä ajan asetuskytkintä kääntämällä.
5.Vahvista  -painikkeella.
Kypsennys
•Jos mahdollista, peitä kypsennettävä ruoka materiaalilla, joka sopii käytettäväksi mikroaaltouunissa. Voit jättää ruoan peittämättä vain silloin, kun haluat saavuttaa rapean lopputuloksen.
•Älä ylikypsennä ruokia valitsemalla liian suuren tehon tai pitkän aikaasetuksen. Ruoka voi kuivua, palaa tai syttyä.
|
|
|
SUOMI 25 |
|
• Älä käytä laitetta kananmunien tai |
|
lautaselle astiaan, jotta sulanut neste |
||
|
etanoiden kypsentämiseen kuorineen, |
• |
valuu astiaan. |
|
|
sillä ne voivat räjähtää. Munakkaissa |
Käännä ruoka sulatuksen |
||
|
munankeltuaiset on lävistettävä ensin. |
|
puolivälissä. Jos mahdollista, jaa ja |
|
• Pistä ruokaan haarukalla useita |
|
poista sitten sulaneet kappaleet. |
||
|
kertoja reikiä ennen kypsentämistä, |
Voin, kakkupalojen, rahkan |
||
|
kun ruoassa on "kalvo" tai "kuori" |
|||
|
sulattaminen |
|||
|
(esim. perunat, tomaatit, makkarat). |
|||
|
• Älä sulata ruokaa kokonaan |
|||
|
Täten vältät ruoan räjähtämisen. |
|||
|
|
laitteessa, vaan anna ruoan sulaa |
||
• Aseta pitempi aika-asetus, jos ruoka |
|
|||
|
huoneenlämpötilassa. Tulos on tällöin |
|||
|
on viileää tai pakastettu. |
|
||
|
|
tasaisempi. Poista kaikki metallitai |
||
• Kastiketta sisältävää ruokaa on |
|
|||
|
alumiinipakkaukset kokonaan ennen |
|||
|
sekoitettava aika ajoin. |
|
||
|
|
sulattamista. |
||
• Vihannekset, jotka ovat rakenteeltaan |
|
|||
Hedelmien ja vihannesten |
||||
|
kovia (esim. porkkanat, herneet tai |
|||
• |
kukkakaali), tulee kypsentää vedessä. |
sulattaminen |
||
Käännä suurempia kappaleita |
• Älä sulata laitteessa kokonaan |
|||
|
kypsennyksen puolivälissä. |
|
hedelmiä ja vihanneksia, joita |
|
• Jos mahdollista, leikkaa vihannekset |
|
halutaan käyttää raakoina. Anna |
||
|
samankokoisiksi paloiksi. |
|
niiden sulaa huoneenlämpötilassa. |
|
• Käytä tasaisia leveitä astioita. |
• Voit käyttää korkeampaa tehoa |
|||
• Älä käytä posliini-, keraamisia tai |
|
mikroaaltouunissa, kun kypsennät |
||
|
saviastioita, joissa on pieniä reikiä |
|
hedelmiä ja vihanneksia sulattamatta |
|
|
(esim. kahvoissa tai lasittomissa |
|
niitä ensin. |
|
|
pohjissa). Reikiin pääsevä kosteus voi |
Valmisruoat |
||
|
aiheuttaa astian halkeamisen |
• |
Voit valmistaa valmisaterioita |
|
|
lämmittäessä. |
|||
|
|
laitteessa vain silloin, kun niiden |
||
• |
Lasialusta toimii lämmitettävien |
|
||
|
pakkaus sopii mikroaaltouuniin |
|||
|
ruokien tai nesteiden työalustana. |
|
||
|
|
käytettäväksi. |
||
|
Mikroaaltouunin toiminta edellyttää |
|
||
|
• |
Noudata pakkauksessa olevia |
||
|
sen käyttöä. |
|||
|
|
valmistajan ohjeita (esim. poista |
||
Lihan, linnunlihan ja kalan |
|
metallikansi ja lävistä muovikalvo). |
||
sulattaminen |
|
|
||
•Aseta pakasteruoka ilman pakkausta pienelle ylösalaisin käännetylle
Sopivat keittoastiat ja materiaalit
Keittoastia / materiaali |
|
Mikroaalto |
|
Grilli |
|
Sulattami |
Lämmi |
Kypsen |
|
|
nen |
tys |
nys |
|
Uunin kestävä lasi ja posliini (ei met |
X |
X |
X |
X |
alliosia, esim. Pyrex, kuumuutta kes |
|
|
|
|
tävä lasi) |
|
|
|
|
Uuniin sopimaton lasi ja posliini 1) |
X |
-- |
-- |
-- |
Lasi ja lasikeraaminen uunin/sulatuk |
X |
X |
X |
X |
sen kestävä materiaali (esim. Arco |
|
|
|
|
flam), grillin ritilä |
|
|
|
|
Keramiikka 2), saviastiat2). |
X |
X |
X |
-- |

26 www.electrolux.com
Keittoastia / materiaali |
|
Mikroaalto |
|
Grilli |
|
|
|
|
|
|
Sulattami |
Lämmi |
Kypsen |
|
|
nen |
tys |
nys |
|
Kuumuuden kestävyys jopa 200 °C 3) |
X |
X |
X |
-- |
Pahvi, paperi |
X |
-- |
-- |
-- |
|
|
|
|
|
Talouskelmu |
X |
-- |
-- |
-- |
|
|
|
|
|
Paistopussi mikroaaltouunin kestä |
X |
X |
X |
-- |
vällä sulkijalla 3) |
|
|
|
|
Metalliset paistoalustat (esim. emali, |
-- |
-- |
-- |
X |
valurauta) |
|
|
|
|
Uunivuoat, musta lakka tai silikoni |
-- |
-- |
-- |
X |
päällysteiset 3) |
|
|
|
|
Leivinpelti |
-- |
-- |
-- |
X |
|
|
|
|
|
Ruskistusastiat (esim. ruskistuspan |
-- |
X |
X |
-- |
nu tai -lautanen) |
|
|
|
|
Valmisruoat pakkauksissa 3) |
X |
X |
X |
X |
1)Ei hopeisia, kultaisia, platinatai metallilevyjä/-koristeita
2)Ilman kvartsitai metalliosia tai metallia sisältäviä lasitteita
3)Noudata valmistajan ohjeita maksimilämpötilaan liittyen.
X sopiva
--sopimaton
5.2Mikroaaltouunin kytkeminen toimintaan ja pois toiminnasta
HUOMIO!
Älä anna mikroaaltouunin toimia, jos sen sisällä ei ole ruokaa.
1.Paina toimintopainiketta.
2.Aseta haluamasi toiminto kääntämällä asetuskytkintä.
3.Vahvista painamalla toimintopainiketta.
4.Aseta aika kääntämällä asetuskytkintä.
5.Vahvista ja käynnistä mikroaaltouuni painamalla 
 .
.
Mikroaaltouunin kytkeminen pois toiminnasta:
•Odota, että mikroaaltouuni kytkeytyy automaattisesti pois päältä, kun aika päättyy.
•Avaa luukku. Mikroaaltouuni pysähtyy automaattisesti. Sulje luukku ja paina

 jatkaaksesi kypsennystä. Tarkista ruoka tämän lisätoiminnon avulla.
•paina painiketta  .
.
Kun mikroaaltouuni kytkeytyy automaattisesti pois päältä, laitteesta kuuluu äänimerkki.

SUOMI 27
5.3 Tehon asetustaulukko
Tehoasetus |
Likimääräinen tehoprosentti |
Teho |
P100 |
100 % |
800 W |
P80 |
80 % |
640 W |
P50 |
50 % |
400 W |
P30 |
30 % |
240 W |
P10 |
10 % |
80 W |
Lisätoiminnot |
|
|
|
|
|
Tehoasetus |
Toimintotila |
|
|
Grilli |
|
G |
Suuri grilli |
|
|
Yhdistelmätoiminto |
|
C – 1 |
55 % Mikroaalto, 45 % Grilli |
|
C – 2 |
36 % Mikroaalto, 64 % Grilli |
|
|
|
|
5.4 Pikakäynnistys
Toiminta-aika on enintään 99 minuuttia.
Paina 
 mikroaaltouunin kytkemiseksi toimintaan 60 sekunnin ajaksi täydellä teholla.
Keittoaika kasvaa 60 sekunnilla jokaisella painikkeen painalluksella.
•Käännä asetuskytkintä vastapäivään valmiustilassa kypsennysajan asettamiseksi,
paina sitten painiketta 
 mikroaaltouunin kytkemiseksi toimintaan täydellä teholla.
5.5Sulatus
Valittavissa on 2 sulatustilaa:
•Sulatus painon mukaan 
•Ajastettu sulatus 

Älä käytä painon mukaan toimivaa sulatusta, jos ruoka on otettu pakastimesta yli 20 minuuttia sitten tai kun kyseessä on pakastettu valmisruoka.
Voit käyttää painon mukaan toimivaa sulatusta 100 g - 2000 g ruokamäärään.
Sulata alle 200 g ruokaa asettamalla se pyörivän alustan reunalle.
1.Paina  sulattaaksesi painon
mukaan tai 
 ajastettua sulatusta varten.
2.Aseta paino tai aika kääntämällä asetuskytkintä.
Painon mukaan tapahtuvassa sulatuksessa aika asetetaan automaattisesti.
3.Vahvista ja käynnistä mikroaaltouuni painamalla 
 .
.
Loading...