


 Loading...
|
|
Dell SonicWALL Network Security Appliances |
|
|
|
NETWORK SECURITY |
|
NSA 5600 / 4600 / 3600 |
|
|
|
Getting Started Guide
For localized product information, see page 48.
|
|
|
|
|
Para informação localizada do produto, veja página 50.
Notes, Cautions, and Warnings
NOTE: A NOTE indicates important information that helps you make better use of your system.
CAUTION: A CAUTION indicates potential damage to hardware or loss of data if instructions are not followed.
WARNING: A WARNING indicates a potential for property damage, personal injury, or death.
© 2014 Dell Inc. All rights reserved.
Trademarks: Dell™, the DELL logo, SonicWALL™, and all other SonicWALL product and service names and slogans are trademarks of Dell, Inc. Other product and company names mentioned herein may be trademarks and/or registered trademarks of their respective companies and are the sole property of their respective manufacturers.
2014 – 04 P/N 232-002214-51 Rev. A
| 1

In this Guide
The Dell SonicWALL NSA 5600/4600/3600 appliances are designed to be the most scalable, reliable, and best performing multifunction appliances in their class.
This Getting Started Guide provides instructions for basic installation and configuration of the Dell SonicWALL NSA 5600/4600/3600.
Chapter 1 |
Sections Include |
Introduction to the NSA Appliances, page 5 |
• NSA 5600/4600/3600 Package Contents, page 6 |
|
• The Front Panel, page 7 |
|
• The Back Panel, page 8 |
|
• Using this Getting Started Guide, page 9 |
|
|
|
|
Chapter 2 |
Sections Include |
|
|
Configuring the Appliance, page 11 |
• Determining the WAN Type, page 12 |
|
• System Requirements, page 12 |
|
• Recording Configuration Information, page 13 |
|
• Initial Setup, page 14 |
|
• Troubleshooting Your Connections, page 19 |
|
|
2 | In this Guide
Chapter 3 |
Sections Include |
|
|
Registering, Licensing, and Upgrading, page 21 |
• Using MySonicWALL, page 22 |
|
• Creating a MySonicWALL Account, page 22 |
|
• Registration Overview, page 23 |
|
• Registering in SonicOS, page 23 |
|
• Alternative Registration Options, page 24 |
|
• Security Services and Software, page 25 |
|
• Activating & Managing Licenses Using MySonicWALL, page 26 |
|
• Upgrading Firmware, page 27 |
|
|
|
|
Chapter 4 |
Sections Include |
|
|
Deployment Scenarios, page 31 |
• Advanced Deployment Scenarios, page 32 |
|
• Configuring NAT Mode Gateway, page 36 |
|
• Configuring a Stateful HA Pair, page 37 |
|
• Configuring L2 Bridge Mode, page 43 |
|
|
Additional Information
The following sections provide additional information for the Dell SonicWALL NSA 5600/4600/3600 appliances.
•Support and Training Options, page 45
•Rack Mounting Instructions, page 51
•Product Safety and Regulatory Information, page 57
In this Guide | 3
4 | In this Guide

Introduction to the NSA Appliances 1
In this Section:
This section describes the items shipped with the Dell SonicWALL NSA 5600/4600/3600 appliance, provides front and rear illustrations of the NSA appliance, and includes a flow diagram illustrating the steps for setting up the appliance.
•NSA 5600/4600/3600 Package Contents, page 6
•The Front Panel, page 7
•The Back Panel, page 8
•Using this Getting Started Guide, page 9
| 5
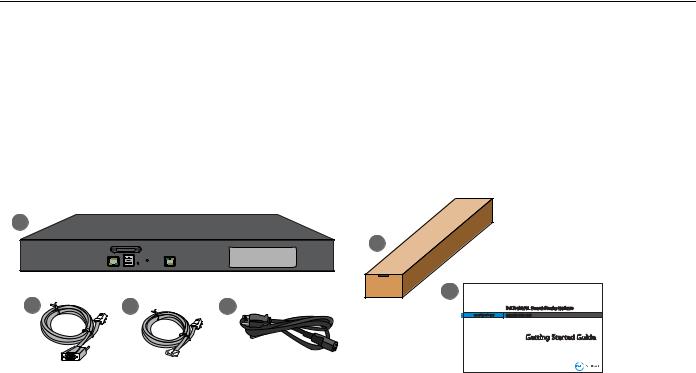
NSA 5600/4600/3600 Package Contents
Before you begin the setup process, verify that your package contains the following items:
1.One Dell SonicWALL NSA 5600/4600/3600 appliance
2.One Rack Mounting Kit
3.One serial CLI cable
4.One Ethernet cable
5.One power cord*
6.One Dell SonicWALL NSA 5600/4600/3600 Getting Started Guide
*The included power cord is approved for use only in specific countries or regions. Before using a power cord, verify that it is rated and approved for use in your location. The power cord is for AC mains installation only. See Safety and Regulatory Information for more information.
1
10GE |
|
|
|
|
1GE |
|
|
|
2 |
X16 |
X14 |
X12 |
X10 |
X8 |
X6 |
X4 |
X2 |
X0 |
|
|
|
SDHC |
|
|
|
|
|
|
|
|
|
SonicWALL NSA 5600 |
CONSOLE |
MGMT |
X17 |
X15 |
X13 |
X11 |
X9 |
X7 |
X5 |
X3 |
X1 |
3 |
4 |
5 |
6 |
|
|
Dell SonicWALL Network Security Appliance |
NETWORK SECURITY |
NSA 5600 / 4600 / 3600 |
|
Getting Started Guide |
Missing Items? If any items are missing from your package, contact Dell SonicWALL Support: Web: http://www.sonicwall.com/us/Support.html
Email: customer_service@sonicwall.com
6 | NSA 5600/4600/3600 Package Contents
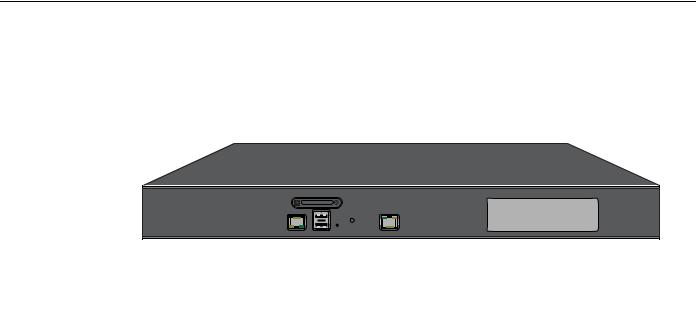
The Front Panel
SDHC Port |
|
||
Secure Digital High-Capacity (SDHC) |
USB Ports (2) |
||
port for future use |
|||
For 3G/4G/Analog modem adaptor support |
|||
|
|
||
Console Port |
|
Management Port (1 GE) |
|
Access the SonicOS Command Line
1 Gigabit Ethernet Management Interface
Interface (CLI) via the enclosed serial CLI cable
10GE |
|
|
|
|
1GE |
|
|
|
X16 |
X14 |
X12 |
X10 |
X8 |
X6 |
X4 |
X2 |
X0 |
SDHC |
M0 |
ALARM |
TEST |
PWR |
SonicWALL NSA 5600 |
CONSOLE |
MGMT |
X17 |
X15 |
X13 |
X11 |
X9 |
X7 |
X5 |
X3 |
X1 |
|
Reset Button |
|
|
|
X0-X11 (1 GE) |
|
|
|
|
|
|||
Press and hold for several seconds to |
|
|
|
|||
set the appliance into Safe Mode. |
|
|
|
High-speed copper |
||
|
|
|
|
|
Gigabit Ethernet ports |
|
LED Indicators |
|
|
X12-X15 (1 GE SFP) |
|||
Power: Blue: Indicates power supply is operating correctly |
|
|
1 Gigabit Ethernet hot-pluggable SFP |
|||
Yellow: Indicates power supply is disconnected |
|
|
interfaces for high-speed fiber or |
|||
Test: Quick Blinking Yellow: Initializing |
|
|
copper Ethernet communication |
|||
Slow Blinking Yellow: SafeMode |
|
|
X16-X17 (10 GE SFP+) |
|||
Solid Yellow: Test mode |
|
|
||||
Alarm: Indicates alarm activity in Red LED |
|
|
10 Gigabit Ethernet hot-pluggable ports |
|
||
M0: Indicates Expansion Module 0 activity in Red LED |
|
|
|
|
|
|
The Front Panel | 7

The Back Panel
Fans (2)
Dual auto-throttling fans for system temperature control
I o
Power Supply
Provides power to the Dell SonicWALL Expansion Bay appliance by plugging in the AC adaptor and
switching the appliance on
For Dell SonicWALL-approved expansion modules
Note: See Safety and Regulatory Information, page 58 for important additional information on power supply requirements for the Dell SonicWALL NSA 5600/4600/3600 appliance.
8 | The Back Panel

Using this Getting Started Guide
The following flow chart illustrates the necessary steps in the process of getting started with your new Dell SonicWALL NSA 5600/4600/ 3600 appliance.
Configuration Process
Verify |
|
|
Start Up |
|
|
Perform Initial |
Pre-Configuration |
|
|
Management |
|
|
|
|
|
|
|
Setup |
||
Requirements |
|
|
Computer |
|
|
|
|
|
|
|
|
||
|
|
|
|
|
|
|
Registration, Licensing, and Deployment Process
Create a |
|
Register |
|
|
Complete |
|
MySonicWALL |
|
|
Appliance in |
|
|
Deployment |
|
|
|||||
Account |
|
SonicOS |
|
|
Configuration |
|
|
|
|
|
|
|
|
Using this Getting Started Guide | 9
10 | Using this Getting Started Guide

Configuring the Appliance 2
In this Section:
This section provides an overview of available WAN types, a section to record configuration information, and initial setup information and procedures.
•Determining the WAN Type, page 12
•System Requirements, page 12
•Recording Configuration Information, page 13
•Initial Setup, page 14
•Connecting to the Internet, page 17
•Troubleshooting Your Connections, page 19
11
Determining the WAN Type
Before configuring your NSA appliance, you will need to determine the type of WAN connection your setup will use. SonicOS supports the following types:
•Static—Configures the appliance for a network that uses static IP addresses.
•DHCP—Configures the appliance to request IP settings from a DHCP server on the Internet.
•PPPoE—Point-to-Point Protocol over Ethernet (PPPoE) is typically used with a DSL modem. If your ISP requires desktop software, a username, and password, select NAT with PPPoE mode.
•PPTP—Point-to-Point Tunneling Protocol (PPTP) is used for encrypted connections to a remote server. PPTP typically supports older Microsoft Windows implementations requiring tunneling connectivity.
•L2TP—Layer 2 Tunneling Protocol (L2TP) uses IPsec to connect to a L2TP server and encrypts all data transmitted from the client to the server. It does not encrypt network traffic to other destinations. If L2TP is not available in the Setup Wizard, you can configure it later in the SonicOS management interface.
Note: For more information regarding other supported WAN types such as Wire Mode or Tap Mode, refer to the SonicOS Administrator’s Guide.
System Requirements
Before beginning the setup process, verify that you have:
•An Internet connection
•A Web browser supporting Java Script and HTTP uploads.
|
Accepted Browser |
Browser Version Number |
|
|
|
|
Internet Explorer |
8.0 and higher |
|
|
|
|
Chrome |
18.0 and higher |
|
|
|
|
Firefox |
16.0 and higher |
|
|
|
|
Safari |
5.0 and higher |
|
|
|
12 | Determining the WAN Type

Recording Configuration Information
Use this section to record your configuration information. Be sure to keep for future reference.
The default MGMT interface IP address is 192.168.1.254.
Registration Information
Serial Number: |
Record the serial number found on |
|
the bottom panel of your |
|
Dell SonicWALL appliance. |
|
|
Authentication Code: |
Record the authentication code found |
|
on the bottom panel of your |
|
Dell SonicWALL appliance. |
|
|
Networking Information
LAN IP Address: |
Select a static IP address for your |
|
Dell SonicWALL appliance that is |
_____._____._____._____ |
within the range of your local network. |
|
(default is 192.168.168.168) |
Subnet Mask: |
Record the subnet mask for the local |
|
network. Client devices connecting |
_____._____._____._____ |
through the appliance are assigned IP |
|
addresses in this network. |
|
(default is 192.168.168.0) |
|
|
Ethernet WAN IP Address:
_____._____._____._____
Select a static IP address for your Ethernet WAN. This setting only applies if you are already using an ISP that assigns a static IP address.
Administrator Information
Admin Name: |
Select an administrator account name. |
|
(default is admin) |
|
|
Admin Password: |
Select an administrator password. |
|
(default is password) |
|
|
Internet Service Provider (ISP) Information
Record the following information about your current Internet service:
If you are |
No information is usually required. However, |
connecting with |
some providers may require a Host Name: |
DHCP |
|
|
_________________________________ |
|
|
If you are |
IP Address: _____._____._____._____ |
connecting with |
Subnet Mask:_____._____._____._____ |
Static IP |
Default Gateway: _____._____._____._____ |
|
Primary DNS: _____._____._____._____ |
|
DNS 2 (optional): _____._____._____._____ |
|
DNS 3 (optional): _____._____._____._____ |
|
|
Recording Configuration Information | 13
Initial Setup
The diagram below illustrates how to connect your management computer to the Dell SonicWALL NSA 5600/4600/3600 appliance for initial setup.
Dell SonicWALL Appliance
|
|
|
10GE |
|
|
|
1GE |
|
|
|
|
|
|
X14 |
X12 |
X10 |
X8 |
X6 |
X4 |
X2 |
X0 |
|
|
SDHC |
|
|
|
|
|
|
|
|
SonicWALL NSA 5600 |
CONSOLE |
MGMT |
X15 |
X13 |
X11 |
X9 |
X7 |
X5 |
X3 |
X1 |
120V AC (U.S.)
MGMT
Management Computer
14 | Initial Setup
This section provides initial configuration information and instructions for connecting your Dell SonicWALL NSA 5600/ 4600/3600 appliance. See the following sections:
•Connecting the MGMT Port, page 15
•Applying Power to the NSA 5600/4600/3600, page 15
•NSA 5600/4600/3600 LED Activity, page 15
•Using the Setup Wizard, page 16
Connecting the MGMT Port
1.Using the provided Ethernet cable, connect one end of the cable to the computer you are using to manage the
Dell SonicWALL NSA appliance.
2.Connect the other end of the Ethernet cable to the MGMT port on your Dell SonicWALL NSA appliance.
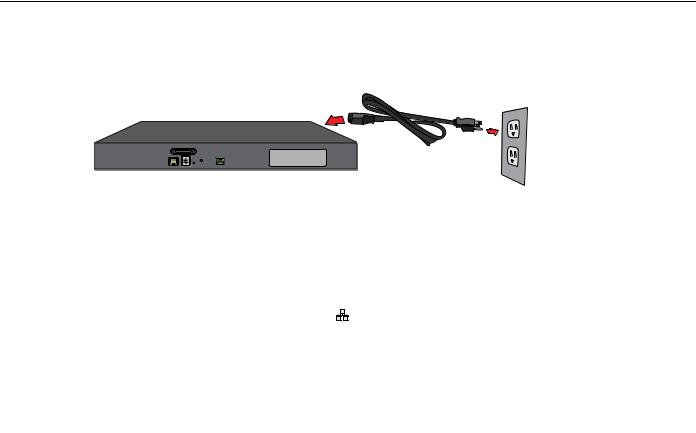
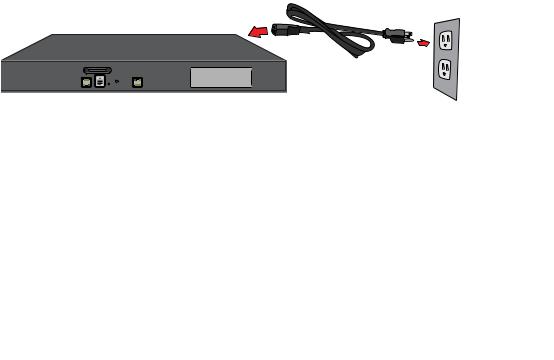
Applying Power to the NSA 5600/4600/3600
Connect the AC power cord from the Dell SonicWALL NSA appliance into an appropriate power outlet.
For further information regarding power requirements, refer to Product Safety and Regulatory Information, page 57 of this document.
NSA 5600/4600/3600 LED Activity
The Power LEDs on the front panel illuminate blue when the appliance is powered on.
The Test LED or Alarm LED may illuminate and blink while the appliance performs a series of diagnostic tests. When these LEDs are no longer illuminated and the Power LEDs remain steadily lit, the Dell SonicWALL NSA 5600/4600/3600 appliance is ready for configuration. This typically occurs within a few minutes of connecting the power.
If the Test or Alarm LEDs remain lit after the NSA 5600/4600/ 3600 has completed powering on, restart the appliance by disconnecting the power, waiting 1 minute, then connecting the power again.
For a connected MGMT or X0 - X11 port, the Link LED for the port illuminates green or amber depending on the link throughput speed, indicating an active connection:
•Amber indicates 1 Gbps
•Green indicates 100 Mbps
•A unlit left LED with the right LED lit indicates 10 Mbps
Initial Setup | 15
Using the Setup Wizard
When you are ready to begin initial setup, configure your management computer with a static IP address on the 192.168.1.0/24 subnet, such as 192.168.1.20. This allows your computer to connect to SonicOS via the MGMT interface.
Note: Be sure to disable pop-up blocking software, or set your Web browser to allow pop-ups and cookies.
To access the SonicOS management interface, follow the steps listed:
1.With your computer connected to the appliance MGMT port, start your Web browser and navigate to the default MGMT interface IP address: <http://192.168.1.254>.
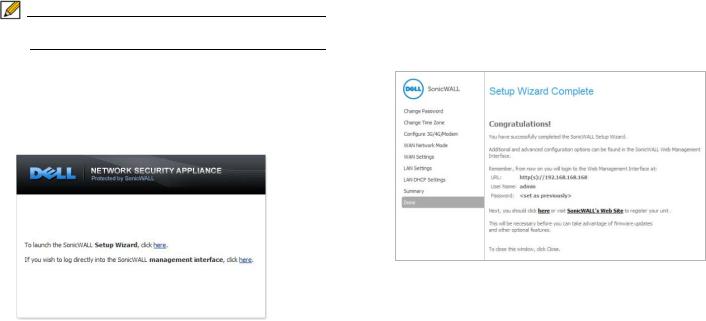
2.Launch the Dell SonicWALL Setup Wizard by clicking the first Here link. This wizard helps you quickly configure the Dell SonicWALL appliance to secure your Internet connection.
3.Follow the on-screen prompts to complete the Dell SonicWALL Setup Wizard.
4.A Setup Wizard Summary page displays at the end of the wizard. Verify the information you’ve entered is correct, then click Apply.
5.Once completed, a Setup Wizard Completion notice displays.
6.Click Close.
7.Continue to Connecting to the Internet, page 17 to connect the appliance for Internet access and then refer to Registering, Licensing, and Upgrading, page 21 to begin the registration process.
16 | Initial Setup
Connecting to the Internet
After initial setup is complete, connect the LAN and WAN interfaces for access to external networks or the Internet. You cannot reach the Internet or other WAN destinations while connected to the MGMT interface. For Internet access, connect to X0 or another configured LAN interface.
Note: Internet connectivity is needed for the recommended product registration process.
Connecting the LAN Port
1.Connect one end of an Ethernet cable to your computer or to your local network switch or other networking device.
2.Connect the other end of the Ethernet cable to the X0 (LAN) port on your Dell SonicWALL NSA appliance.
Connecting the WAN Port
1.Connect one end of an Ethernet cable to your Internet connection.
If you have a router, DSL modem, or cable modem, connect the Ethernet cable to a LAN port on the router or modem.
2.Connect the other end of the Ethernet cable to the X1 (WAN) port on your Dell SonicWALL NSA appliance.
Testing Your Internet Connection
Use the following steps to test your WAN connection:
1.After you exit the Setup Wizard, connect your computer to the X0 (LAN) port.
2.Point your browser to the X0 IP address configured during initial setup, or to the default <http://192.168.168.168>.
3.When the log in page appears, log into the SonicOS management interface as admin, using the configured password or the default, password.
4.Open a command prompt window on your computer and enter the command: ping sonicwall.com
5.Open another Web browser and navigate to: <http://www.sonicwall.com>.
If you can view the Dell SonicWALL home page, you have configured your Dell SonicWALL NSA 5600/4600/3600 correctly. If you cannot view the Dell SonicWALL home page, try one of these solutions:
•Renew your management station DHCP address or restart your management station to accept new network settings from the DHCP server in the Dell SonicWALL appliance.
•Restart your Internet router to communicate with the DHCP client in the Dell SonicWALL appliance.
Note: WAN connectivity issues are unrelated to completion of the MySonicWALL Registration process.
Connecting to the Internet | 17
Internet Access
The diagram below illustrates how to connect your computer to the Dell SonicWALL NSA 5600/4600/3600 appliance for Internet access.
Dell SonicWALL Appliance
|
|
|
10GE |
|
|
|
1GE |
|
|
|
|
|
|
|
X16 |
X14 |
X12 |
X10 |
X8 |
X6 |
X4 |
X2 |
X0 |
|
|
SDHC |
|
|
|
|
|
|
|
|
|
SonicWALL NSA 5600 |
CONSOLE |
MGMT |
X17 |
X15 |
X13 |
X11 |
X9 |
X7 |
X5 |
X3 |
X1 |
120V AC (U.S.)
X0
X0 (LAN)
X1
X1 (WAN) 
Internet
18 | Connecting to the Internet

Troubleshooting Your Connections
Use the suggestions in this section to troubleshoot your MGMT and LAN connections.
Troubleshooting Your MGMT Connection
If you cannot connect to the Dell SonicWALL NSA 5600/4600/ 3600 or the Setup Wizard does not display, consider the following:
•Did you correctly enter the Dell SonicWALL NSA 5600/4600/ 3600 management IP address beginning with “http://” or “https://” in your Web browser?
•Did you try restarting your management station while it is connected to the Dell SonicWALL appliance?
•Are the Local Area Connection settings on your computer set to a static IP address on the 192.168.1.0/24 subnet?
•Is the Ethernet cable connected to your computer and to the MGMT port on your appliance?
•Is the connector clip on your network cable properly seated in the port of the security appliance?
Troubleshooting Your LAN Connection
If you do not see the SonicOS log in prompt when you point your browser to the X0 (LAN) IP address, consider the following:
•Did you correctly enter the IP address for the Dell SonicWALL NSA 5600/4600/3600 X0 interface into your Web browser, beginning with “http://” or “https://”?
•Did you try restarting your management station while it is connected to the Dell SonicWALL appliance?
•Are the Local Area Connection settings on your computer set to one of the following?:
•Obtain an IP address automatically using DHCP
•A static IP address on the default LAN subnet (192.168.168.0/24)
•A static IP address on the configured LAN subnet if you changed it during initial setup
•Do you have the Ethernet cable connected to your computer and to the X0 (LAN) port on your appliance?
•Is the connector clip on your network cable properly seated in the port of the security appliance?
Troubleshooting Your Connections | 19
Loading...