


 Loading...
Dell™ PowerVault™
MD3200 and MD3220
RAID Enclosures
Getting Started
With Your System
Guide de mise en route
Introducao ao uso do sistema
Pasos iniciales con el sistema

Dell™ PowerVault™
MD3200 and MD3220
RAID Enclosures
Getting Started
With Your System
Regulatory Model Series E03J and E04J

Notes, Cautions, and Warnings
NOTE: A NOTE indicates important information that helps you make better use of your computer.
CAUTION: A CAUTION indicates potential damage to hardware or loss of data if instructions are not followed.
WARNING: A WARNING indicates a potential for property damage, personal injury, or death.
____________________
Information in this document is subject to change without notice. © 2010 Dell Inc. All rights reserved.
Reproduction of these materials in any manner whatsoever without the written permission of Dell Inc. is strictly forbidden.
Trademarks used in this text: Dell, the DELL logo, and PowerVault are trademarks of Dell Inc.; Microsoft and Windows Server are either trademarks or registered trademarks of Microsoft Corporation in the United States and/or other countries; Red Hat and Red Hat Enterprise Linux are registered trademarks of Red Hat, Inc. in the United States and other countries; SUSE is a registered trademark of Novell, Inc. in the United States and other countries; VMware is a registered trademark of VMware, Inc. in the United States and/or other jurisdictions.
Other trademarks and trade names may be used in this document to refer to either the entities claiming the marks and names or their products. Dell Inc. disclaims any proprietary interest in trademarks and trade names other than its own.
Regulatory Model Series E03J and E04J
February 2010 |
P/N VC9TD Rev. A00 |

Contents
Before You Begin . . . . . . . . . . . . . . . . . . . . . |
5 |
Other Documentation and Media You May Need . . . . . 5 |
|
Supported Operating Systems . . . . . . . . . . . . . . . |
6 |
Installation and Configuration. . . . . . . . . . . . . . . |
7 |
Unpacking the System . . . . . . . . . . . . . . . . |
7 |
Installing the Rails and System in a Rack . . . . . . |
7 |
Connecting the Power Cable(s) . . . . . . . . . . . |
8 |
Securing the Power Cable(s) . . . . . . . . . . . . . |
8 |
Cabling Your Expansion Enclosure . . . . . . . . . . |
9 |
Turning On the Enclosure. . . . . . . . . . . . . . . |
9 |
Cabling Your Direct-Attached Hosts . . . . . . . . |
10 |
Installing the Bezel . . . . . . . . . . . . . . . . . |
11 |
Installing the MD Storage Software . . . . . . . . |
11 |
Enabling Premium Features (Optional) . . . . . . . |
12 |
Locating Your Service Tag . . . . . . . . . . . . . . . . |
12 |
NOM Information (Mexico Only) . . . . . . . . . . . . |
13 |
Technical Specifications . . . . . . . . . . . . . . . . |
13 |
Contents 3

4 Contents

Before You Begin
Before setting up your Dell™ PowerVault™ MD32xx RAID enclosure,
you must consider certain best practices to ensure that your RAID enclosure operates at maximum efficiency and offers full redundancy (if required).
•Throughout the network, always use a Category 5e (or higher) Ethernet cable.
•Before connecting any cables between the host server and storage array, physically label each port and connector.
•Always follow proper power-up and power-down procedures when cycling power across the network. You must also ensure that critical network components are on separate power circuits.
Other Documentation and Media You May Need
WARNING: See the safety and regulatory information that shipped with your system. Warranty information may be included within this document or as a separate document.
NOTE: All PowerVault MD32xx documents are available at support.dell.com/manuals.
•The rack documentation included with your rack solution describes how to install your system into a rack.
•The Owner’s Manual provides information about system features and describes how to troubleshoot the system and install or replace system components.
•The Deployment Guide provides information about installing and configuring the software and hardware.
•The CLI Guide provides information about using the command line interface (CLI) to configure and manage your storage array.
Getting Started With Your System |
|
5 |
|

•The SMI-S Programmer’s Guide provides information about using the SMI-S provider and SMI-S programming.
•Any media that ships with your system that provides documentation and tools for configuring and managing your system, including those pertaining to the operating system, system management software, system updates, and system components that you purchased
with your system.
NOTE: Always check for updates on support.dell.com/manuals and read the updates first because they often supersede information in other documents.
Supported Operating Systems
•Microsoft® Windows Server®
•Red Hat® Enterprise Linux®
•SUSE® Linux Enterprise Server
•VMware®
NOTE: For the latest information on all the supported operating system versions, see the Support Matrix at support.dell.com/manuals.
6 |
Getting Started With Your System |
Installation and Configuration
WARNING: Before performing the following procedure, review the safety instructions that came with the system.
Unpacking the System
Unpack your system and identify each item with the packing list that shipped with your system.
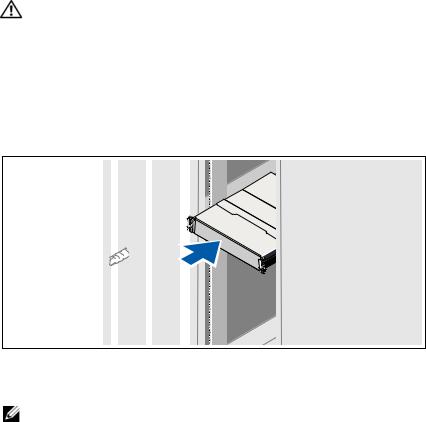
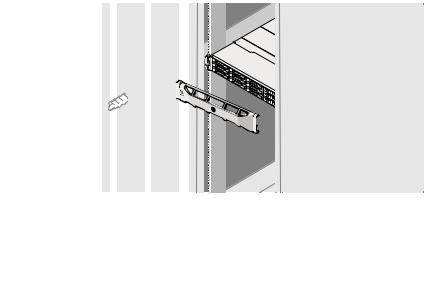
Installing the Rails and System in a Rack
Assemble the rails and install the system in the rack following the safety instructions and the rack installation instructions provided with your system.
NOTE: To balance the weight load, it is recommended that you install the PowerVault MD32xx at the bottom of the rack and the PowerVault MD12xx expansion enclosures above it.
Getting Started With Your System |
|
7 |
|

Connecting the Power Cable(s)
Ensure that the power switch is in the OFF position before connecting the power cables. Connect the system’s power cable(s) to the system.
Securing the Power Cable(s)
Secure the cable(s) firmly to the bracket using the provided strap.
Plug the other end of the power cables into a grounded electrical outlet or a separate power source such as an uninterrupted power supply (UPS) or a power distribution unit (PDU). Each power supply must be connected to a separate power circuit.
8 |
Getting Started With Your System |
Cabling Your Expansion Enclosure
PowerVault MD12xx 


 expansion enclosure 2


 (optional)


PowerVault MD12xx expansion enclosure 1 (optional)
PowerVault MD32xx
RAID enclosure
Turning On the Enclosure
Getting Started With Your System |
|
9 |
|

Turn on the components in the following order:
1 MD12xx expansion enclosures (if used)
NOTE: Before turning on the RAID enclosure, ensure that the expansion enclosure status LED is blue.
2 MD32xx RAID enclosure
NOTE: Before turning on the host server(s), ensure that the RAID enclosure status LED is blue.
3 Host server(s)
Cabling Your Direct-Attached Hosts
Server 1 |
Server 2 |
Server 3 |
Server 4 |
|
PowerVault MD32xx |
|
|
|
RAID enclosure |
|
|
|
|
|
Corporate, public, |
|
|
|
or private network |
10 |
Getting Started With Your System |
Installing the Bezel
Install the bezel (optional).
Installing the MD Storage Software
NOTE: For detailed instructions about installing the MD storage software, setting up the enclosure, and the post-installation tasks, see the Deployment Guide.
The MD Storage Manager application configures, manages, and monitors the storage array.
1Insert the resource media.
2Select Install MD32xx Storage Software.
3Install the MD Storage Manager software. Select one of the following installation options:
•Full (recommended)—This package installs core software and providers. It includes the necessary host-based storage agent, SAS HBA driver, multipath driver, MD Storage Manager,
and providers.
•Host Only—This package includes the host-based storage agent, SAS HBA driver, and multipath drivers.
•Management Station—This package includes the MD Storage Manager and providers.
•Custom—This option allows you to select specific components.
Getting Started With Your System |
|
11 |
|
4Reboot each host server.
5Start the MD Storage Manager and discover the array(s).
6Perform the remaining post-installation tasks.
NOTE: The MD Storage Manager software installer automatically installs the required drivers, initiators, and operating system patches/hotfixes. All the drivers are also available at support.dell.com.
Enabling Premium Features (Optional)
If you ordered premium features, follow the instructions on the Premium Features Card to install the additional features.
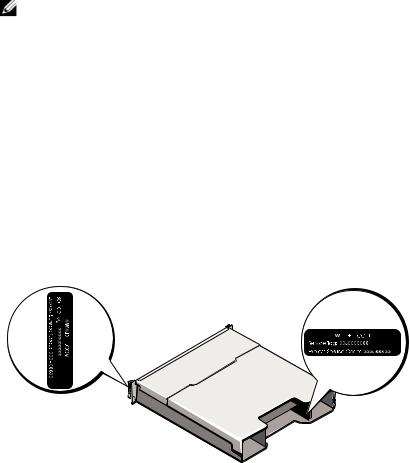
Locating Your Service Tag
Your system is identified by a unique Express Service Code and Service Tag number. The Express Service Code and Service Tag are found on the front of the system and at the back of the system next to the RAID controller modules. This information is used by Dell to route support calls to the appropriate personnel.
12 |
Getting Started With Your System |
NOM Information (Mexico Only)
The following information is provided on the device described in this document in compliance with the requirements of the official Mexican standards (NOM):
Importer:
Model number: |
E03J and E04J |
Supply voltage: |
100–240 V CA |
Frequency: |
50/60 Hz |
Current consumption: |
8.6 A |
Technical Specifications
Drives
PowerVault MD3200 |
Up to twelve 3.5-inch SAS hot-swappable |
|
hard drives (3.0 Gbps and 6.0 Gbps) |
PowerVault MD3220 |
Up to twenty four 2.5-inch SAS |
|
hot-swappable hard drives (3.0 Gbps and |
|
6.0 Gbps) |
|
|
RAID Controller Modules |
|
|
|
RAID controller modules |
• One or two hot-swappable modules with |
|
temperature sensors |
|
• 2 GB of cache per controller |
Getting Started With Your System |
|
13 |
|

Back-Panel Connectors (Per RAID Controller Module)
SAS connectors |
• Four SAS IN ports to connect hosts |
|
• One SAS OUT port for expansion to an |
|
additional PowerVault MD12xx enclosure |
|
NOTE: SAS connectors are SFF-8088 |
|
compliant. |
Serial connector |
One 6-pin mini-DIN connector |
|
NOTE: For technical support use only. |
Management Ethernet connector |
One 100/1000 Base-T port Ethernet for |
|
out-of-band management of the enclosure |
|
|
Expansion |
|
|
|
PowerVault MD32xx |
Supports a maximum of 96 hard drives with |
|
any combination of PowerVault MD1200 or |
|
PowerVault MD1220 expansion enclosures. |
|
NOTE: You cannot use more than seven |
|
expansion enclosures. |
|
Redundant path connectivity provides |
|
redundant data paths to each hard drive. |
|
|
Backplane Board |
|
|
|
Connectors |
• 12 or 24 SAS hard-drive connectors |
|
• Two power supply/cooling fan |
|
module connectors |
|
• Two sets of RAID controller module |
|
connectors |
|
• One control panel connector for front LEDs |
|
and system identification button |
Sensors |
Two temperature sensors |
14 |
Getting Started With Your System |

LED Indicators
Front panel |
• One two-color LED indicator for |
|
system status |
|
• Two single-color LED indicators for power |
|
and enclosure mode |
|
NOTE: The enclosure mode LED is not |
|
applicable to the PowerVault MD32xx RAID |
|
enclosure. |
Hard-drive carrier |
• One single-color activity LED |
|
• One two-color LED status indicator per |
|
drive |
Power supply/cooling fan |
Three LED status indicators for power supply |
|
status, power supply/fan fault, and AC status |
RAID controller module |
Six single-color LEDs: |
|
• One battery fault |
|
• One cache active |
|
• One controller fault |
|
• One controller power |
|
• One system identification |
|
• One management Ethernet activity |
|
Six two-color LEDs: |
|
• Four SAS IN link or fault |
|
• One SAS OUT link or fault |
|
• One management Ethernet link speed |
Getting Started With Your System |
|
15 |
|

Switch
System identification button |
Located on the front control panel. |
|
This button is used to locate a system |
|
within a rack. |
Enclosure mode switch |
Located on the front of the system. |
|
This switch is not applicable to the |
|
PowerVault MD32xx RAID enclosure. |
Password reset switch |
Located on the back-panel of the RAID |
|
controller module. This switch is used to |
|
reset the storage array password. |
|
|
Power Supplies |
|
|
|
AC power supply (per power supply) |
|
Wattage |
600 W |
Voltage |
100–240 VAC (8.6 A–4.3 A) |
Heat dissipation |
100 W |
Maximum inrush current |
Under typical line conditions and over the |
|
entire system ambient operating range, |
|
the inrush current may reach a maximum of |
|
55 A per power supply for 10 ms or less. |
|
|
Available Hard Drive Power (Per Slot) |
|
|
|
PowerVault MD3200 |
25 W |
PowerVault MD3220 |
12 W |
|
|
RAID Controller Module Power (Per Slot) |
|
|
|
Maximum power consumption |
100 W |
|
|
Physical |
|
|
|
PowerVault MD3200 |
|
Height |
8.68 cm (3.41 inches) |
Width |
44.63 cm (17.57 inches) |
Depth |
60.20 cm (23.70 inches) |
16 |
Getting Started With Your System |

Physical (continued)
Weight (maximum configuration) |
29.30 kg (64.6 lb) |
Weight (empty) |
8.84 kg (19.5 lb) |
PowerVault MD3220 |
|
Height |
8.68 cm (3.41 inches) |
Width |
44.63 cm (17.57 inches) |
Depth |
54.90 cm (21.61 inches) |
Weight (maximum configuration) |
24.22 kg (53.4 lb) |
Weight (empty) |
8.61 kg (19 lb) |
Environmental
NOTE: For additional information about environmental measurements for specific system configurations, see www.dell.com/environmental_datasheets.
Temperature |
|
Operating |
10° to 35°C (50° to 95°F) with a maximum |
|
temperature gradation of 10°C per hour |
|
NOTE: For altitudes above 2950 feet, |
|
the maximum operating temperature |
|
is derated 1ºF/550 ft. |
Storage |
–40° to 65°C (–40° to 149°F) with |
|
a maximum temperature gradation |
|
of 20°C per hour |
Relative humidity |
|
Operating |
20% to 80% (noncondensing) with |
|
a maximum humidity gradation |
|
of 10% per hour |
Storage |
5% to 95% (noncondensing) |
Maximum vibration |
|
Operating |
0.25 G at 3–200 Hz for 15 min |
Storage |
0.5 G at 3–200 Hz for 15 min |
Getting Started With Your System |
|
17 |
|

Environmental (continued)
Maximum shock
Operating |
One shock pulse in the positive z axis |
|
(one pulse on each side of the system) of |
|
31 G for 2.6 ms in the operational orientation |
Storage |
Six consecutively executed shock pulses |
|
in the positive and negative x, y, and z axes |
|
(one pulse on each side of the system) |
|
of 71 G for up to 2 ms |
Altitude |
|
Operating |
–16 to 3048 m (–50 to 10,000 ft) |
|
NOTE: For altitudes above 2950 feet, |
|
the maximum operating temperature |
|
is derated 1ºF/550 ft. |
Storage |
–16 to 10,600 m (–50 to 35,000 ft) |
Airborne Contaminant Level |
|
Class |
G2 or lower as defined by ISA-S71.04-1985 |
18 |
Getting Started With Your System |
Boîtiers Raid
Dell™ PowerVault™
MD3200 et MD3220
Guide de mise en route
Modèle réglementaire séries E03J et E04J

Remarques, précautions et avertissements
REMARQUE : une REMARQUE indique des informations importantes qui peuvent vous aider à mieux utiliser votre ordinateur.
PRÉCAUTION : une PRÉCAUTION vous avertit d'un risque d'endommagement du matériel ou de perte de données en cas de non-respect des instructions données.
AVERTISSEMENT : un AVERTISSEMENT vous avertit d’un risque d'endommagement du matériel, de blessure corporelle ou de mort.
____________________
Les informations que contient ce document sont sujettes à modification sans préavis. © 2010 Dell Inc. Tous droits réservés.
La reproduction de ce document, de quelque manière que ce soit, sans l'autorisation écrite de Dell Inc. est strictement interdite.
Marques utilisées dans ce texte : Dell, le logo DELL, et PowerVault sont des marques de Dell Inc. ; Microsoft et Windows Server sont des marques ou des marques déposées de Microsoft Corporation aux États-Unis et/ou dans d'autres pays ; Red Hat et Red Hat Enterprise Linux sont des marques déposées de Red Hat, Inc. aux États-Unis et dans d'autres pays ; SUSE est une marque déposée de Novell, Inc. aux États-Unis et dans d'autres pays ; VMware est une marque déposée de VMware, Inc. aux États-Unis et/ou dans d'autres juridictions.
D'autres marques commerciales et noms de marque peuvent être utilisés dans ce document pour faire référence aux entités se réclamant de ces marques et de ces noms ou de leurs produits. Dell Inc. dénie tout intérêt propriétaire vis-à-vis des marques et des noms de marque autres que les siens.
Modèle réglementaire séries E03J et E04J
Février 2010 |
N/P VC9TD Rév. A00 |
Table des matières
Avant de commencer . . . . . . . . . . . . . . . . . . |
23 |
Autres documents et supports dont vous pourrez |
|
avoir besoin . . . . . . . . . . . . . . . . . . . . . . . |
23 |
Systèmes d'exploitation pris en charge. . . . . . . . . |
24 |
Installation et configuration . . . . . . . . . . . . . . . |
25 |
Déballage du système . . . . . . . . . . . . . . . |
25 |
Installation des rails et du système dans un |
|
rack . . . . . . . . . . . . . . . . . . . . . . . . . |
25 |
Branchement du ou des câbles |
|
d'alimentation. . . . . . . . . . . . . . . . . . . . |
26 |
Fixation du ou des câbles d'alimentation . . . . . |
26 |
Câblage du boîtier d'extension . . . . . . . . . . . |
27 |
Mise sous tension du boîtier . . . . . . . . . . . . |
27 |
Câblage des hôtes à connexion directe . . . . . . |
28 |
Installation du cadre . . . . . . . . . . . . . . . . |
29 |
Installation du logiciel MD Storage . . . . . . . . |
29 |
Activation des fonctions premium (En option) . . . |
30 |
Identification du numéro de service . . . . . . . . . . |
30 |
Informations NOM (Mexique uniquement) . . . . . . . |
31 |
Caractéristiques techniques . . . . . . . . . . . . . . |
31 |
Table des matières |
|
21 |
|
Loading...