


 Loading...
Dell OptiPlex 5250 All-In-One
Owner's Manual
Regulatory Model: W14B
Regulatory Type: W14B002

Примечания, предостережения и предупреждения
ПРИМЕЧАНИЕ: Пометка ПРИМЕЧАНИЕ указывает на важную информацию, которая поможет использовать данное изделие более эффективно.
ПРЕДОСТЕРЕЖЕНИЕ: Пометка ПРЕДОСТЕРЕЖЕНИЕ указывает на потенциальную опасность повреждения оборудования или потери данных и подсказывает, как этого избежать.
ПРЕДУПРЕЖДЕНИЕ: Пометка ПРЕДУПРЕЖДЕНИЕ указывает на риск повреждения оборудования, получения травм или на угрозу для жизни.
© Корпорация Dell или ее дочерние компании, 2017. Все права защищены. Dell, EMC и другие товарные знаки являются товарными знаками корпорации Dell Inc. или ее дочерних компаний. Другие товарные знаки могут быть товарными знаками соответствующих владельцев.
2017 - 02
Rev. A00

Contents
1 Работа с компьютером............................................................................................................................... |
7 |
Подготовка к работе с внутренними компонентами компьютера.......................................................... |
7 |
Инструкции по технике безопасности...................................................................................................... |
7 |
Рекомендуемые инструменты.................................................................................................................. |
8 |
Выключение компьютера......................................................................................................................... |
8 |
Выключение компьютера (Windows 7)............................................................................................................... |
8 |
Выключение компьютера (Windows 10).............................................................................................................. |
8 |
После работы с внутренними компонентами компьютера.................................................................... |
9 |
Важная информация................................................................................................................................. |
9 |
2 Извлечение и установка компонентов.................................................................................................. |
10 |
Стойка....................................................................................................................................................... |
10 |
Removing the stand................................................................................................................................................... |
10 |
Installing the stand...................................................................................................................................................... |
11 |
Cable cover........................................................................................................................................................................ |
11 |
Removing the cable cover.......................................................................................................................................... |
11 |
Installing the cable cover............................................................................................................................................ |
11 |
Задняя крышка......................................................................................................................................... |
12 |
Removing the back cover.......................................................................................................................................... |
12 |
Installing the back cover............................................................................................................................................ |
13 |
Speaker cover................................................................................................................................................................... |
13 |
Removing the speaker cover..................................................................................................................................... |
13 |
Installing the speaker cover....................................................................................................................................... |
15 |
Жесткий диск............................................................................................................................................ |
15 |
Removing the hard drive assembly.......................................................................................................................... |
15 |
Installing the hard drive assembly............................................................................................................................. |
16 |
Оптический дисковод.............................................................................................................................. |
16 |
Removing the optical drive assembly....................................................................................................................... |
16 |
Installing the optical drive assembly......................................................................................................................... |
17 |
System board shield......................................................................................................................................................... |
18 |
Removing the system board shield........................................................................................................................... |
18 |
Installing the system board shield............................................................................................................................. |
18 |
Модуль памяти......................................................................................................................................... |
19 |
Removing the memory module................................................................................................................................. |
19 |
Installing the memory module................................................................................................................................... |
19 |
Твердотельный накопитель (SSD)........................................................................................................................... |
20 |
Removing the SSD card............................................................................................................................................ |
20 |
Installing the SSD card.............................................................................................................................................. |
20 |
Батарейка типа "таблетка"...................................................................................................................... |
21 |
Removing the coin cell battery................................................................................................................................. |
21 |
Installing the coin cell battery.................................................................................................................................... |
21 |
Плата WLAN................................................................................................................................................................... |
22 |
Removing the WLAN card........................................................................................................................................ |
22 |
Contents |
3 |

|
Installing the WLAN card.......................................................................................................................................... |
22 |
|
Радиатор.................................................................................................................................................. |
23 |
|
Removing the heat sink ............................................................................................................................................ |
23 |
|
Installing the heat sink............................................................................................................................................... |
23 |
|
Динамик.................................................................................................................................................... |
24 |
|
Removing the speaker module................................................................................................................................. |
24 |
|
Installing the speaker module................................................................................................................................... |
25 |
|
Панель дисплея....................................................................................................................................... |
25 |
|
Removing the display panel...................................................................................................................................... |
25 |
|
Installing the display panel......................................................................................................................................... |
26 |
|
Chassis frame................................................................................................................................................................... |
27 |
|
Removing the chassis frame..................................................................................................................................... |
27 |
|
Installing the chassis frame....................................................................................................................................... |
29 |
|
Блок питания........................................................................................................................................... |
30 |
|
Removing the Power Supply Unit (PSU)................................................................................................................ |
30 |
|
Installing the Power Supply Unit (PSU).................................................................................................................. |
32 |
|
VESA mount bracket....................................................................................................................................................... |
32 |
|
Removing the VESA mount bracket........................................................................................................................ |
32 |
|
Installing the VESA mount bracket.......................................................................................................................... |
33 |
|
Converter board............................................................................................................................................................... |
33 |
|
Removing the converter board................................................................................................................................ |
33 |
|
Installing the converter board................................................................................................................................... |
34 |
|
Системный вентилятор........................................................................................................................... |
35 |
|
Removing the system fan......................................................................................................................................... |
35 |
|
Installing the system fan........................................................................................................................................... |
35 |
|
Intrusion switch................................................................................................................................................................ |
36 |
|
Removing the intrusion switch................................................................................................................................. |
36 |
|
Installing the intrusion switch.................................................................................................................................... |
37 |
|
Power and On-Screen Display (OSD) buttons board.................................................................................................. |
37 |
|
Removing the power and On-Screen Display (OSD) buttons board................................................................... |
37 |
|
Installing the power and OSD buttons board.......................................................................................................... |
38 |
|
Процессор................................................................................................................................................ |
38 |
|
Removing the processor........................................................................................................................................... |
38 |
|
Installing the processor............................................................................................................................................. |
39 |
|
Системная плата..................................................................................................................................... |
40 |
|
Removing the system board..................................................................................................................................... |
40 |
|
Installing the system board....................................................................................................................................... |
43 |
|
System board layout.................................................................................................................................................. |
44 |
|
3 M.2 Intel Optane Memory Module 16 GB..................................................................................................... |
45 |
|
Overview........................................................................................................................................................................... |
45 |
|
Intel®OptaneTM Memory Module Driver Requirements........................................................................................... |
45 |
|
Installing M.2 Intel Optane Memory Module 16 GB..................................................................................................... |
45 |
|
Product specifications..................................................................................................................................................... |
46 |
|
Environmental Conditions............................................................................................................................................... |
48 |
|
Troubleshooting................................................................................................................................................................ |
48 |
4 |
Contents |
|

4 Технология и компоненты...................................................................................................................... |
50 |
Storage options................................................................................................................................................................ |
50 |
Hard drives................................................................................................................................................................. |
50 |
Solid State Drives (SSD)........................................................................................................................................... |
50 |
Определение жесткого диска в Windows 10.................................................................................................... |
51 |
Entering BIOS setup................................................................................................................................................... |
51 |
Memory configurations.................................................................................................................................................... |
51 |
Проверка системной памяти в Windows 10 и Windows 7 ............................................................................. |
51 |
DDR4.................................................................................................................................................................................. |
51 |
Key Specifications...................................................................................................................................................... |
52 |
DDR4 Details............................................................................................................................................................... |
53 |
5 Настройка системы.................................................................................................................................. |
54 |
Функция Boot Sequence (Последовательность загрузки)...................................................................... |
54 |
Клавиши навигации................................................................................................................................ |
55 |
Параметры настройки системы............................................................................................................. |
55 |
Параметры настройки системы............................................................................................................. |
55 |
General screen options.............................................................................................................................................. |
55 |
System configuration screen options...................................................................................................................... |
56 |
Security screen options............................................................................................................................................. |
58 |
Параметры экрана безопасной загрузки.......................................................................................... |
59 |
Параметры расширений Intel Software Guard................................................................................................. |
60 |
Performance screen options.................................................................................................................................... |
60 |
Параметры экрана управления потреблением энергии.................................................................. |
61 |
POST behavior screen options................................................................................................................................. |
62 |
Параметры экрана поддержки виртуализации................................................................................ |
63 |
Параметры экрана обслуживания.................................................................................................... |
63 |
Параметры экрана журнала системы............................................................................................... |
64 |
Updating the BIOS .......................................................................................................................................................... |
64 |
Обновление BIOS с использованием флэш-накопителя USB........................................................................ |
65 |
Системный пароль и пароль программы настройки............................................................................ |
65 |
Назначение системного пароля и пароля программы настройки.................................................. |
66 |
Удаление и изменение существующего системного пароля или пароля настройки системы..... |
66 |
6 Поиск и устранение неполадок.............................................................................................................. |
68 |
Диагностика расширенной предзагрузочной оценки системы (ePSA)........................................................ |
68 |
Запуск диагностики ePSA..................................................................................................................................... |
68 |
Power supplybuilt in self test (BIST).......................................................................................................................... |
68 |
Step to confirm that PSU is Defective.................................................................................................................... |
69 |
Power supply.................................................................................................................................................................... |
69 |
Встроенная проверка ЖК-дисплея (BIST)............................................................................................................ |
69 |
Запуск проверки BIST в пользовательских режимах........................................................................ |
71 |
Переключение экранного меню......................................................................................................... |
71 |
ePSA............................................................................................................................................................................. |
71 |
7 Technical specifications............................................................................................................................... |
73 |
Contents |
5 |

Processors........................................................................................................................................................................ |
73 |
Memory specifications..................................................................................................................................................... |
74 |
Video specifications......................................................................................................................................................... |
74 |
Audio specifications......................................................................................................................................................... |
74 |
Communication specifications........................................................................................................................................ |
75 |
Cards specifications......................................................................................................................................................... |
75 |
Display specifications....................................................................................................................................................... |
75 |
Drives specifications........................................................................................................................................................ |
75 |
Port and connector specifications................................................................................................................................. |
75 |
Параметры питания................................................................................................................................ |
76 |
Технические характеристики камеры (дополнительно)....................................................................... |
76 |
Технические характеристики подставки................................................................................................ |
76 |
Physical specifications..................................................................................................................................................... |
76 |
Environmental specifications.......................................................................................................................................... |
77 |
8 Обращение в компанию Dell................................................................................................................... |
78 |
6 Contents
1
Работа с компьютером
Подготовка к работе с внутренними компонентами компьютера
Во избежание повреждения компьютера выполните следующие шаги, прежде чем приступать к работе с внутренними компонентами компьютера.
1Соблюдение Инструкций по технике безопасности обязательно.
2 Чтобы не поцарапать крышку компьютера, работы следует выполнять на плоской и чистой поверхности. 3 Следуйте инструкциям в разделе Выключение компьютера.
4Отсоедините от компьютера все сетевые кабели.
ПРЕДОСТЕРЕЖЕНИЕ: При отсоединении сетевого кабеля необходимо сначала отсоединить его от компьютера, а затем от сетевого устройства.
5Отсоедините компьютер и все внешние устройства от электросети.
6Нажмите и не отпускайте кнопку питания, пока компьютер не подключен к электросети, чтобы заземлить системную плату.
7Снимите крышку.
ПРИМЕЧАНИЕ: Во избежание электростатического разряда следует заземлиться, надев антистатический браслет или периодически прикасаясь к неокрашенной металлической поверхности, одновременно касаясь разъема на задней панели компьютера.
Инструкции по технике безопасности
Следуйте этим инструкциям, чтобы исключить повреждение компьютера и для вашей собственной безопасности. Если не указано иное, то каждая процедура, предусмотренная в данном документе, подразумевает соблюдение следующих условий.
•прочитаны указания по технике безопасности, прилагаемые к компьютеру;
•Для замены компонента или установки отдельно приобретенного компонента выполните процедуру снятия в обратном порядке.
ПРЕДУПРЕЖДЕНИЕ: Отсоедините компьютер от всех источников питания перед снятием крышки компьютера или панелей. После окончания работы с внутренними компонентами компьютера, установите все крышки, панели и винты на место, перед тем как, подключить компьютер к источнику питания.
ПРЕДУПРЕЖДЕНИЕ: Перед началом работы с внутренними компонентами компьютера прочитайте инструкции по технике безопасности, прилагаемые к компьютеру. Дополнительные сведения о рекомендациях по технике безопасности содержатся на начальной странице раздела о соответствии нормативным требованиям по адресу: www.Dell.com/regulatory_compliance.
ПРЕДОСТЕРЕЖЕНИЕ: Большинство видов ремонта может выполнять только квалифицированный специалист. Пользователь может осуществлять поиск и устранение неисправностей и простой ремонт только в том случае, если это рекомендуется в документации на изделие Dell, инструкциями интерактивной справки или службой поддержки компании Dell. На ущерб, вызванный неавторизованным обслуживанием, гарантия не
распространяется. Прочтите и выполняйте инструкции по технике безопасности, поставляемые с устройством.
ПРЕДОСТЕРЕЖЕНИЕ: Во избежание электростатического разряда следует заземлиться. Для этого можно надеть заземляющий браслет или периодически прикасаться одновременно к неокрашенной металлической поверхности и одному из разъемов на задней панели компьютера.
Работа с компьютером |
7 |
ПРЕДОСТЕРЕЖЕНИЕ: Бережно обращайтесь с компонентами и платами. Не дотрагивайтесь до компонентов и контактов платы. Держите плату за края или за металлическую монтажную скобу. Держите такие компоненты, как процессор, за края, а не за контакты.
ПРЕДОСТЕРЕЖЕНИЕ: При отсоединении кабеля беритесь за разъем или специальную петлю на нем. Не тяните за кабель. У некоторых кабелей имеются разъемы с фиксирующими лапками; перед отсоединением кабеля такого типа нажмите на фиксирующие лапки. При разъединении разъемов старайтесь разносить их по прямой линии, чтобы не погнуть контакты. А перед подсоединением кабеля убедитесь в правильной ориентации и соосности частей разъемов.
ПРИМЕЧАНИЕ: Цвет компьютера и некоторых компонентов может отличаться от цвета, указанного в этом документе.
Рекомендуемые инструменты
Для выполнения процедур, описанных в этом документе, требуются следующие инструменты:
•маленькая шлицевая отвертка;
•Крестовая отвертка № 1
•небольшая пластиковая палочка
Выключение компьютера
Выключение компьютера (Windows 7)
ПРЕДОСТЕРЕЖЕНИЕ: Во избежание потери данных сохраните и закройте все открытые файлы и выйдите из всех открытых программ перед выключением компьютера.
1Нажмите кнопку Пуск.
2Щелкните Завершение работы.
ПРИМЕЧАНИЕ: Убедитесь, что компьютер и все подключенные к нему устройства выключены. Если компьютер и подключенные устройства не выключились автоматически при завершении работы операционной системы, нажмите и не отпускайте кнопку питания примерно 6 секунды, пока они не выключатся.
Выключение компьютера (Windows 10)
ПРЕДОСТЕРЕЖЕНИЕ: Во избежание потери данных сохраните и закройте все открытые файлы и выйдите из всех открытых программ перед выключением компьютера.
1Нажмите или коснитесь  .
.
2Нажмите или коснитесь  , а затем нажмите или коснитесь кнопки Завершение работы.
ПРИМЕЧАНИЕ: Убедитесь, что компьютер и все подключенные к нему устройства выключены. Если компьютер и подключенные устройства не выключились автоматически при завершении работы операционной системы, нажмите и не отпускайте кнопку питания примерно 6 секунды, пока они не выключатся.
8 Работа с компьютером

После работы с внутренними компонентами компьютера
После завершения любой процедуры замены не забудьте подключить все внешние устройства, платы и кабели, прежде чем включать компьютер.
1Установите на место крышку.
2Подсоедините к компьютеру все телефонные или сетевые кабели.
ПРЕДОСТЕРЕЖЕНИЕ: Чтобы подсоединить сетевой кабель, сначала подсоедините его к сетевому устройству, а затем к компьютеру.
3 Подключите компьютер и все внешние устройства к электросети.
4Включите компьютер.
5При необходимости проверьте исправность работы компьютера, запустив программу ePSA Diagnostics (Диагностика ePSA).
Важная информация
ПРИМЕЧАНИЕ: Не используйте сенсорный экран в пыльных, жарких местах и при условиях повышенной влажности.
ПРИМЕЧАНИЕ: Перепады температуры могут привести к образованию конденсата на внутренней поверхности стекла экрана. Этот эффект исчезнет через некоторое время и не повлияет на обычное использование экрана.
Работа с компьютером |
9 |
2
Извлечение и установка компонентов
В этом разделе приведены подробные сведения по извлечению и установке компонентов данного компьютера.
Стойка
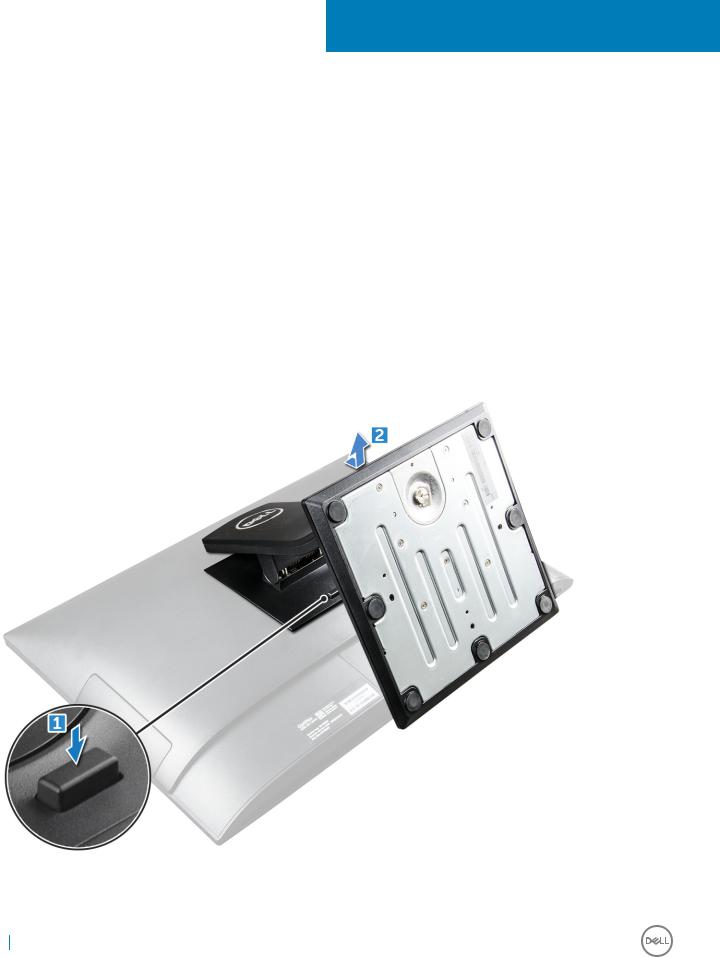
Removing the stand
1Follow the procedure in Before working inside your computer.
2 Place the computer on a flat surface with the display facing downward.
3To remove the stand:
aPress the tab on the cover to release the stand [1].
bLift the stand upward [2].

 NOTE: There are optional stands available but they will attach in a similar manner.
10 Извлечение и установка компонентов
Installing the stand
1 Align the stand and slide it on the back of the computer.
2Press the stand down till it snaps in.
3Follow the procedure in After working inside your computer.
Cable cover
Removing the cable cover
1 Follow the procedure in Before working inside your computer.
2Remove the stand.
3To remove the cable cover:
aRemove the screw that secures the cable cover to the computer [1].
bPush the release tabs to release the cable cover [2].
cLift the cable cover away from the computer [3].
Installing the cable cover
1 Align the notches on the cable cover to the holes on the computer and press the cable cover until it snaps in. 2 Tighten the screw to secure the cable cover to the computer.
3Install the stand.
Извлечение и установка компонентов |
11 |
4Follow the procedure in After working inside your computer.
Задняя крышка
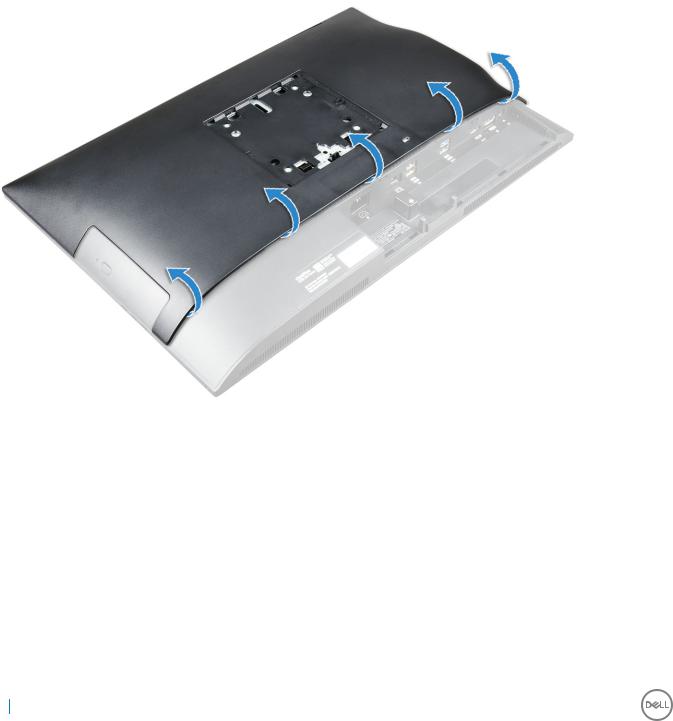
Removing the back cover
1 Follow the procedure in Before working inside your computer.
2Remove the:
astand
bcable cover
3Pry the edges of the back cover from the bottom to release it from the computer.
4Lift the back cover from the computer.
12 Извлечение и установка компонентов
Installing the back cover
1 Align the notches on the back cover to the holes on the computer, and press the back cover until it snaps in.
2Install the:
acable cover
bstand
3Follow the procedure in After working inside your computer.
Speaker cover
Removing the speaker cover
1 Follow the procedure in Before working inside your computer.
2Remove the:
astand
bcable cover
cback cover
3Remove the screws that secure the speaker cover to the computer.
Извлечение и установка компонентов |
13 |
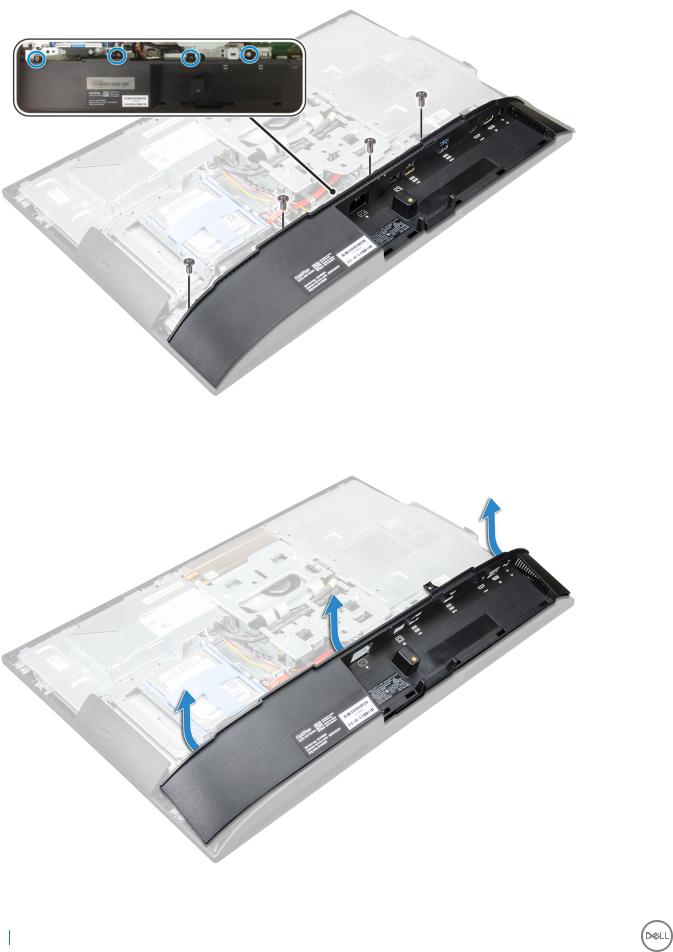
4Pull and remove the speaker cover from the computer.

 NOTE: To avoid damage to the back cover, release it from the pull tabs.
14 Извлечение и установка компонентов
Installing the speaker cover
1 Align and push the speaker cover to pop tabs into its position on the back of the computer. 2 Tighten the screws to secure the speaker cover to the computer.
3Install the:
aback cover
bcable cover
cstand
4Follow the procedure in After Working Inside Your Computer.
Жесткий диск
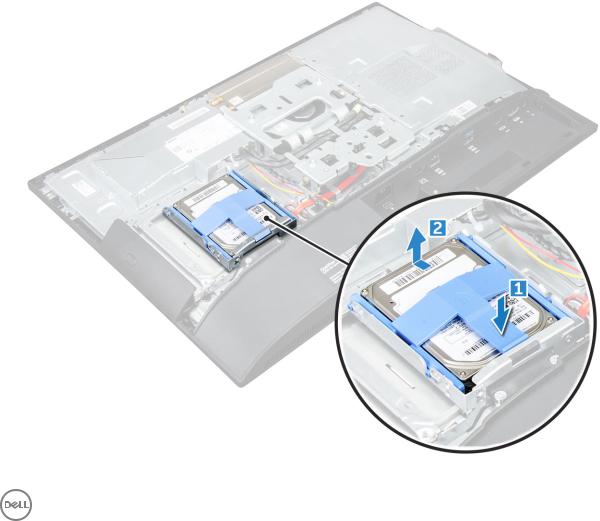
Removing the hard drive assembly
1 Follow the procedure in Before working inside your computer.
2Remove the:
astand
bback cover
3To remove the hard drive assembly:
aPress the tab on the bracket, and slide the hard-drive assembly until the tabs are released from either side of the assembly [1].
bSlide the hard-drive assembly upwards to remove it from the computer [2].
Извлечение и установка компонентов |
15 |
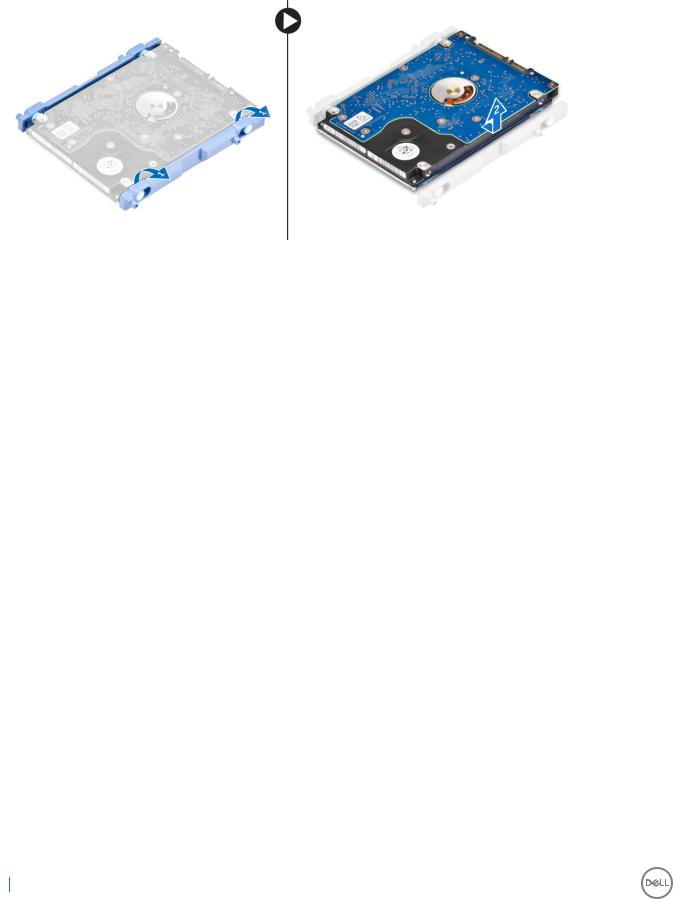
4To remove the hard drive bracket:
aPry the edges of the bracket to release the hard drive [1].
bSlide the hard drive and lift it away from the bracket [2].
Installing the hard drive assembly
1Align the hard drive until the notches are aligned and the hard drive is secured in the bracket.
2Place the hard drive onto the hard drive cage until the notches are aligned, then slide the Hard Drive assembly until the tab locks into the cage.
3Install the:
aback cover
bstand
4Follow the procedure in After working inside your computer.
Оптический дисковод
Removing the optical drive assembly
1 Follow the procedure in Before working inside your computer.
2Remove the:
astand
bback cover
3To remove the optical drive assembly:
aPress the securing tab at the base of the drive to release the optical drive assembly [1].
bSlide the optical drive assembly to remove it away from the computer [2].
16 Извлечение и установка компонентов
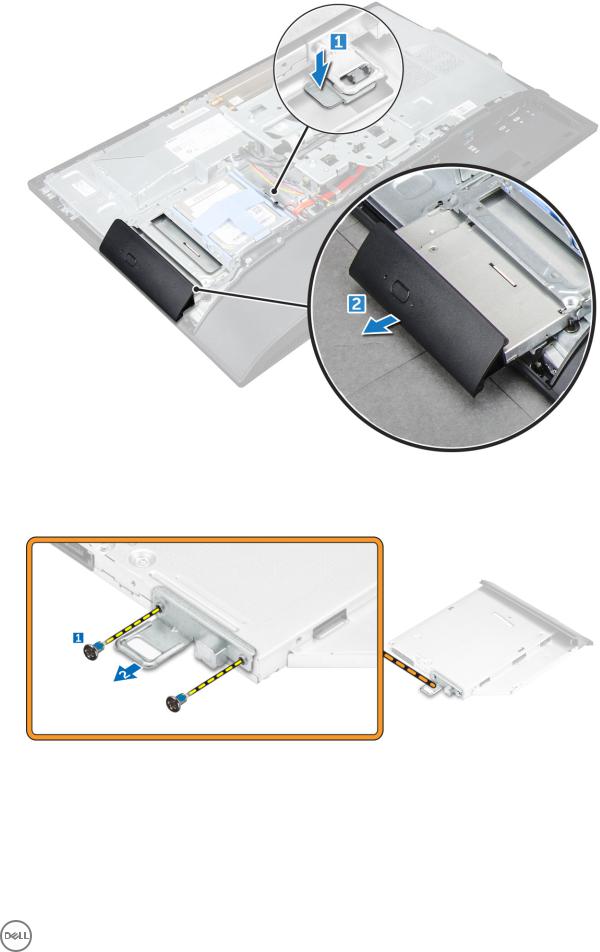
4To remove the optical drive bracket:
aRemove the screws that secure the optical drive bracket [1].
bRemove the bracket away from the optical drive [2].
Installing the optical drive assembly
1 Place the bracket to align the screw holders on the optical drive.
2Tighten the screws to secure the bracket to the optical drive.
3 Insert the optical drive assembly into the drive slot, until it snaps in.
4Install the:
Извлечение и установка компонентов |
17 |
aback cover
bstand
5Follow the procedure in After working inside your computer.
System board shield
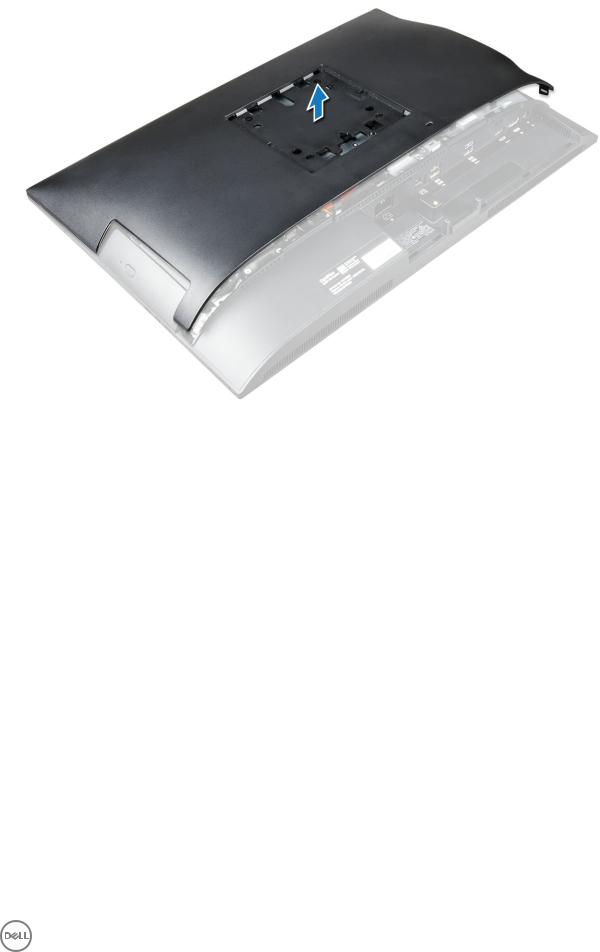
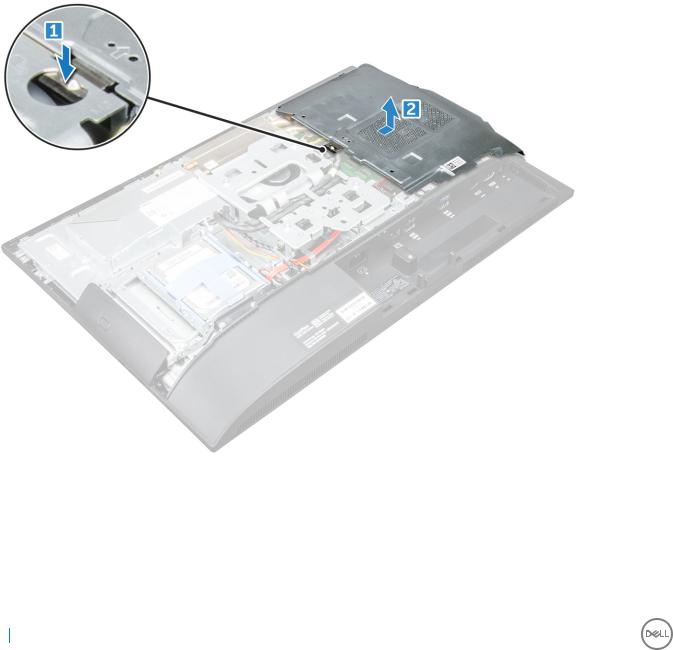
Removing the system board shield
1 Follow the procedure in Before working inside your computer.
2Remove the:
astand
bback cover
3To remove the system board shield:
aPress the securing tab to release the system board shield from the slots on the computer [1].
bSlide the system board shield away from the computer [2].
Installing the system board shield
1 Align and slide the system board shield until it snaps in.
2Install the:
aback cover
bstand
18 Извлечение и установка компонентов

3Follow the procedure in After working inside your computer.
Модуль памяти
Removing the memory module
1 Follow the procedure in Before working inside your computer.
2Remove the:
astand
bback cover
csystem board shield
3To remove the memory module:
aPry the retention clips away from the memory module until it pops up [1].
bLift the memory module from the connector [2].
Installing the memory module
1 Insert the memory module on the memory connector until the clips secure the memory module.
2Install the:
asystem board shield
bback cover
cstand
3Follow the procedure in After working inside your computer.
Извлечение и установка компонентов |
19 |

Твердотельный накопитель (SSD)
Removing the SSD card
1 Follow the procedure in Before working inside your computer.
2Remove the:
astand
bback cover
csystem board shield
3To remove the SSD card:
aRemove the screw that secures the SSD card to the computer [1].
bLift the SSD card away from the connector [2].
Installing the SSD card
1Insert the SSD card into the connector.
2 Tighten the screw to secure the SSD card to the system board.
3Install the:
asystem board shield
bback cover
cstand
4Follow the procedure in After working inside your computer.
20 Извлечение и установка компонентов
Батарейка типа "таблетка"
Removing the coin cell battery
1 Follow the procedure in Before working inside your computer.
2Remove the:
astand
bback cover
csystem board shield
3Press the latch to release the coin cell battery and remove it from the computer.
Installing the coin cell battery
1 Insert the coin cell battery into the slot on the system board until it fits securely.
2Install the:
asystem board shield
bback cover
cstand
3Follow the procedure in After working inside your computer.
Извлечение и установка компонентов |
21 |
Плата WLAN
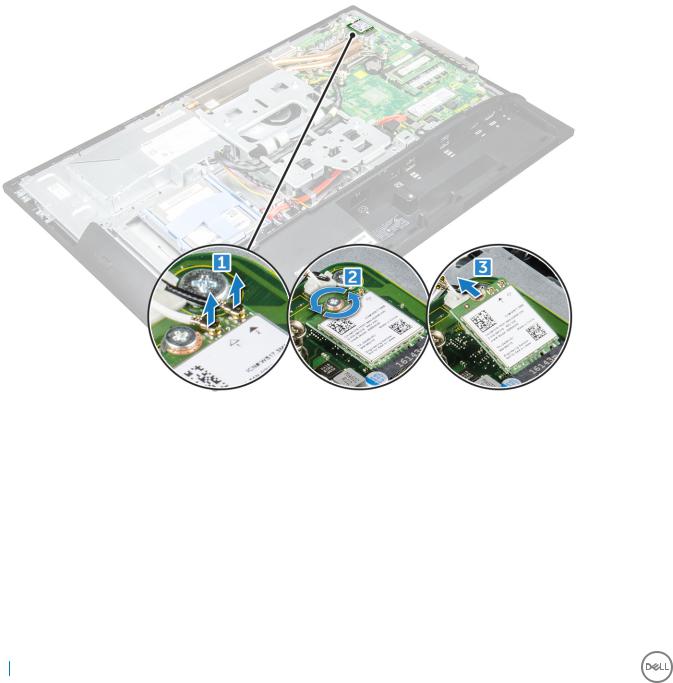
Removing the WLAN card
1 Follow the procedure in Before working inside your computer.
2Remove the:
astand
bback cover
csystem board shield
3To remove the WLAN card:
aDisconnect the antenna cables from the connectors on the WLAN card [1].
bRemove the screw that secures the WLAN card to the system board [2].
cHold the WLAN card and pull it from the connector on the system board [3].
Installing the WLAN card
1Align the WLAN card to the connector on the system board.
2 Tighten the screw to secure the WLAN card to the system board. 3 Connect the antenna cables to the connectors on the WLAN card.
4Install the:
asystem board shield
bback cover
cstand
5Follow the procedure in After working inside your computer.
22 Извлечение и установка компонентов
Радиатор
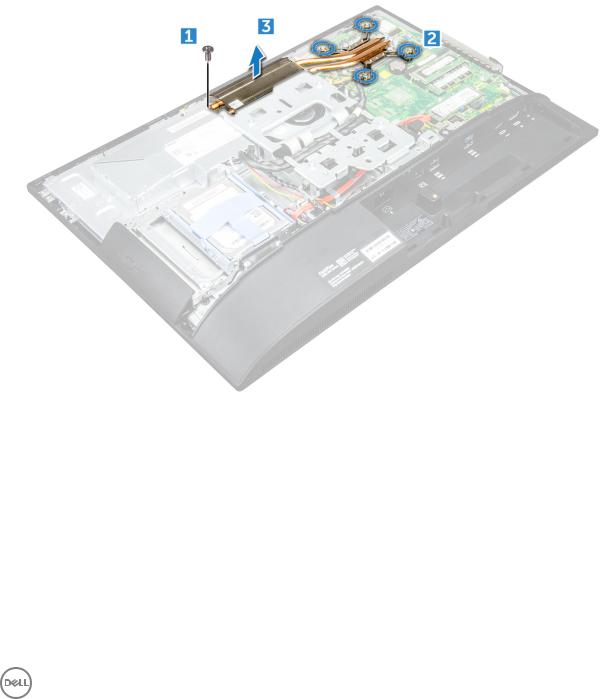
Removing the heat sink
1 Follow the procedure in Before working inside your computer.
2Remove the:
astand
bback cover
csystem board shield
3To remove the heat sink:
aRemove the screws that secure the heat sink to the chassis [1, 2].
bLift the heat sink away from the computer [3].
Installing the heat sink
1Align and place the heat sink in the slot.
2 Tighten the screws to secure the heat sink to the computer.
3Install the:
asystem board shield
bback cover
cstand
4Follow the procedure in After working inside your computer.
Извлечение и установка компонентов |
23 |
Динамик
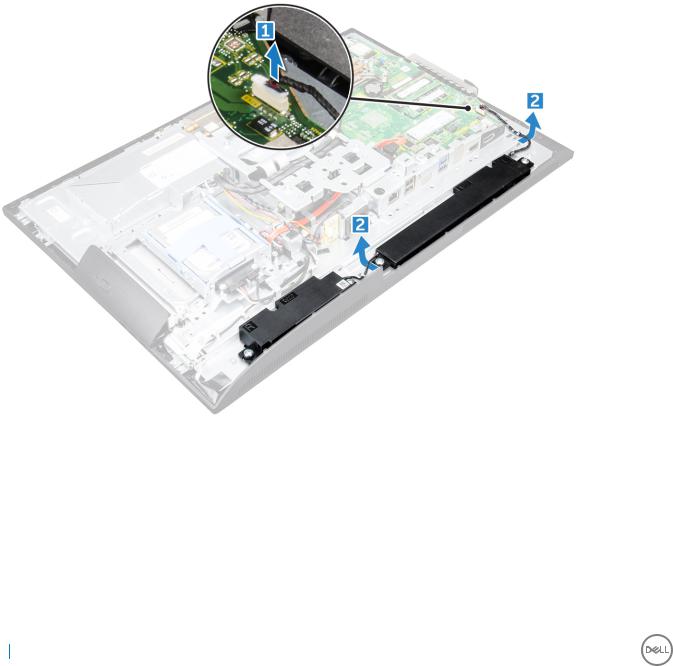
Removing the speaker module
1 Follow the procedure in Before working inside your computer.
2Remove the:
astand
bback cover
ccable cover
dspeaker cover
esystem board shield
3To release the speaker module:
aDisconnect the speaker cable from the connector on the system board [1].
bUnthread the speaker cables from the retention clips [2].
4To remove the speaker module:
aRemove the screws that secure the speaker module to the chassis [1].
bLift the speaker module and remove it from the chassis [2].
24 Извлечение и установка компонентов
Loading...