


 Loading...
Latitude 5175/5179
User’s Guide
Regulatory Model: T04E
Regulatory Type: T04E001

Notes, cautions, and warnings
NOTE: A NOTE indicates important information that helps you make better use of your tablet.
CAUTION: A CAUTION indicates either potential damage to hardware or loss of data and tells you how to avoid the problem.
WARNING: A WARNING indicates a potential for property damage, personal injury, or death.
Copyright © 2015 Dell Inc. All rights reserved. This product is protected by U.S. and international copyright and intellectual property laws. Dell™ and the Dell logo are trademarks of Dell Inc. in the United States and/or other jurisdictions. All other marks and names mentioned herein may be trademarks of their respective companies.
Updated - 2015 - 11
Rev. A00

Contents |
|
1 Tablet features........................................................ |
6 |
2 Setting up your tablet............................................... |
10 |
Charging your tablet.................................................... |
10 |
Turning on your tablet.................................................. |
11 |
Inserting the micro-SIM card........................................... |
11 |
Removing the micro-SIM card.......................................... |
12 |
Inserting the microSD card............................................. |
13 |
Removing the microSD card............................................ |
14 |
Using the headset....................................................... |
14 |
3 Using your tablet..................................................... |
16 |
Turning off your tablet................................................. |
16 |
Using the power button on the Start screen................... |
16 |
Using the power button............................................ |
16 |
Turning off the screen.................................................. |
17 |
Using the power button on the Start screen................... |
17 |
Using the power button............................................ |
17 |
Start screen.............................................................. |
17 |
Wi-Fi....................................................................... |
18 |
Turning Wi-Fi on or off............................................ |
18 |
Connecting to a network.......................................... |
18 |
Mobile broadband setting.............................................. |
18 |
Bluetooth................................................................. |
18 |
Turning Bluetooth on or off ...................................... |
18 |
Pairing with Bluetooth-enabled devices........................ |
19 |
Screen orientation....................................................... |
19 |
Locking or unlocking the screen orientation................... |
19 |
Adjusting screen brightness............................................ |
19 |
Auto adjust.......................................................... |
20 |
Synchronizing your tablet.............................................. |
20 |
3

Restoring your operating system...................................... |
20 |
Resetting your tablet.............................................. |
21 |
Gestures................................................................... |
21 |
4 Keyboards and Pens................................................. |
24 |
Latitude 11 Slim Keyboard............................................. |
24 |
Connecting your tablet............................................ |
24 |
Disconnecting your tablet......................................... |
26 |
Tilt.................................................................... |
27 |
Dell Active Pen holder............................................. |
27 |
Latitude 11 Keyboard................................................... |
28 |
Features.............................................................. |
28 |
Connecting your tablet............................................ |
29 |
Disconnecting your tablet......................................... |
31 |
Charging the keyboard............................................. |
31 |
Using the mini Active Pen......................................... |
33 |
Charging the mini Active Pen..................................... |
34 |
5 Entering BIOS setup program...................................... |
36 |
With keyboard........................................................... |
36 |
Without keyboard....................................................... |
36 |
6 Specifications......................................................... |
37 |
7 Troubleshooting...................................................... |
41 |
Battery.................................................................... |
41 |
Network................................................................... |
42 |
Touchscreen.............................................................. |
43 |
Tablet..................................................................... |
43 |
Pen......................................................................... |
44 |
8 Getting help .......................................................... |
45 |
Self-help resources...................................................... |
45 |
4

9 Contacting Dell....................................................... |
46 |
10 Locating your Service Tag and Express Service Code....... |
47 |
5
1
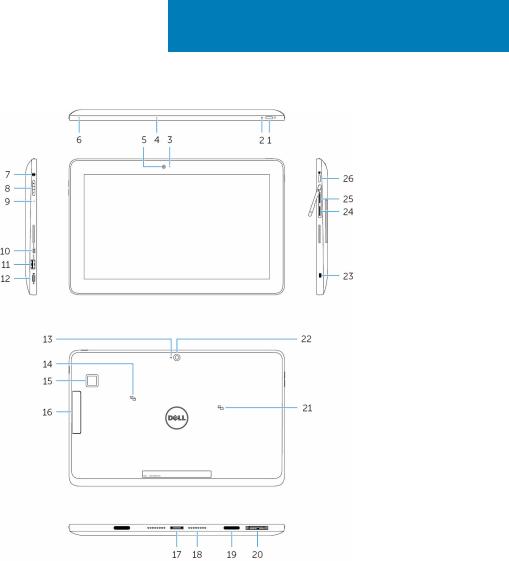
Tablet features
Feature |
|
|
|
1. Power button |
• Press and hold for 2 seconds to turn on the |
|
|
|
tablet if it is turned off. |
|
• Press to turn on if it is in a sleep state. |
Tablet features |
6 |

Feature
•Press to turn off the screen.
NOTE: Press the Power button and Windows button together to access the lock/logout menu.
NOTE: The tablet can be configured to enable beep sound during start up. To enable this feature, enter the BIOS setup program, and under Post Behavior select
Enable Sign of Life Indication. For more information, see
Entering BIOS setup program.
2. |
Power and battery-charge |
Solid |
Power adapter is connected and the |
|
|
status light |
white |
tablet is charging. |
|
|
|
Amber |
Tablet is running on battery and the |
|
|
|
|
battery has less than 10% charge. |
|
|
|
|
|
NOTE: If you try turning on the |
|
|
|
|
|
|
|
|
|
tablet when the battery charge |
|
|
|
|
is critically low, the status light |
|
|
|
|
blinks amber in sequence of |
|
|
|
|
three on/off cycles indicating |
|
|
|
|
that the tablet cannot be turned |
|
|
|
|
on with this charge level. |
|
|
Off |
• Power adapter is connected and |
|
|
|
|
||
|
|
|
the battery is fully charged. |
|
|
|
|
• Tablet is running on battery and |
|
|
|
|
the battery has more than 5% |
|
|
|
|
charge. |
|
|
|
|
• Tablet is in standby or turned off. |
|
3. |
Camera-status light |
Turns on when the camera is in use. |
||
4. |
Microphone |
Provides sound input for audio recording, voice |
||
|
|
calls, and so on. |
||
5. |
Front camera |
Allows you to video chat, capture photos, and |
||
|
|
record videos. |
||
6. |
Microphone |
Provides sound input for audio recording, voice |
||
|
|
calls, and so on. |
||
Tablet features |
7 |

Feature
7. Headset port |
Connect a headphone, a microphone, or a |
|
headphone and microphone combo (headset). |
8.Volume-control buttons (2) Press to increase or decrease the volume.
9. |
Microphone |
Provides sound input for audio recording, voice |
|
|
|
calls, and so on. |
|
10. |
Micro-HDMI port |
Connect a TV or another HDMI-in enabled device. |
|
|
|
Provides video and audio output. |
|
11. |
USB 3.0 port |
Connect peripherals such as storage devices, |
|
|
|
printers, and so on. |
|
12. |
USB 3.0 and power- |
Connect a power adapter to provide power to |
|
|
adapter port (USB-C) |
your tablet and charge the battery. Connect |
|
|
|
peripherals such as storage devices, printers, |
|
|
|
displays and so on. |
|
|
|
|
NOTE: Appropriate converters (sold |
|
|
|
|
|
|
|
separately) are required to connect |
|
|
|
standard USB, HDMI and DisplayPort |
|
|
|
devices. |
13. |
Microphone |
Provides sound input for audio recording, voice |
|
|
|
calls, and so on. |
|
14. |
NFC-sensor area |
Allows NFC-enabled devices to communicate with |
|
|
|
your tablet. |
|
|
|
• Latitude 5175 - optional |
|
|
|
• Latitude 5179 - shipped with the system |
|
15. |
Fingerprint reader |
Press your finger on the fingerprint reader to log |
|
|
(Latitude 5179 only) |
in to your tablet. The fingerprint reader allows |
|
|
|
your tablet to recognize your fingerprints as a |
|
|
|
passcode. |
|
|
|
|
NOTE: You must configure the fingerprint |
|
|
|
|
|
|
|
reader to register your finger print and |
|
|
|
enable access. |
16. |
Smart-card reader |
Insert your smart card into the reader to log in to |
|
|
(Latitude 5179 only) |
your tablet. The smart-card reader is used for |
|
|
|
user authentication. |
|
17. |
Docking connector |
Allows docking to the docking station. |
|
Tablet features |
8 |

Feature
18. |
Docking pins |
Allows docking to the keyboard dock. |
19. |
Docking slots (2) |
Allows docking to the keyboard dock. |
20. |
Service Tag label |
Provides the Service Tag and Express Service |
|
|
Code needed for contacting Dell. |
21. |
NFC-sensor area (Latitude |
Allows NFC-enabled devices to communicate with |
|
5179 only) |
your tablet. |
22. |
Rear camera |
Allows you to video chat, capture photos, and |
|
|
record videos. |
23. |
Security-cable slot |
Connects a security cable to prevent |
|
|
unauthorized movement of your tablet. |
24.Micro-SIM card slot
25.MicroSD-card slot
26.Windows button
Insert a micro-SIM card to connect to a mobile broadband network.
Insert a microSD card to expand the storage capacity. Your tablet supports a microSD card with capacity up to 128 GB.
•Press to open the Windows Start menu or the Start screen.
•Press for quick access to the most recently used app or most recently used screen.
•Press Windows + Power button to enable Ctrl +Alt+Del function.
Tablet features |
9 |

2
Setting up your tablet
WARNING: Before you begin any of the procedures in this section, read the safety information that shipped with your tablet. For additional best practices information, go to www.dell.com/regulatory_compliance.
Topics:
•Charging your tablet
•Turning on your tablet
•Inserting the micro-SIM card
•Removing the micro-SIM card
•Inserting the microSD card
•Removing the microSD card
•Using the headset
Charging your tablet
CAUTION: Charge the battery in an ambient temperature of 0°C to 35°C (32°F to 95°F).
CAUTION: Use only the supplied power adapter to charge your tablet. Using unauthorized power adapters or cables may severely damage your tablet.

 NOTE: The battery may not be fully charged when you unpack your tablet.
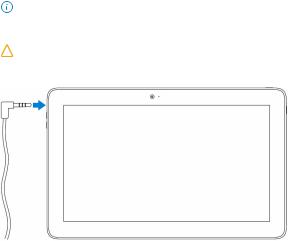
1Connect the power cable into the power adapter.
2Connect the power adapter to the power-adapter port on the tablet.
3Connect the power adapter to an electrical outlet and charge the tablet until the battery is fully charged.
Setting up your tablet |
10 |
NOTE: A fully discharged battery takes up to 3 hours to fully charge when your tablet is not in use.
Turning on your tablet
When you turn on the tablet for the first time, you must finish Windows setup to start using your tablet. For more information, see the Quick Start Guide that shipped with your tablet.
1Press and hold the power button for 2 seconds to turn on your tablet. The lock screen is displayed.
2Swipe up from the bottom of the display to switch to the login screen.
3Enter password to log in to Windows.
 NOTE: If the login screen is not enabled, the Start screen is displayed after the lock screen.
The tablet is ready for use when the Windows Start screen is displayed.
Inserting the micro-SIM card
1Open the slot cover and locate the micro-SIM card slot.
Setting up your tablet |
11 |
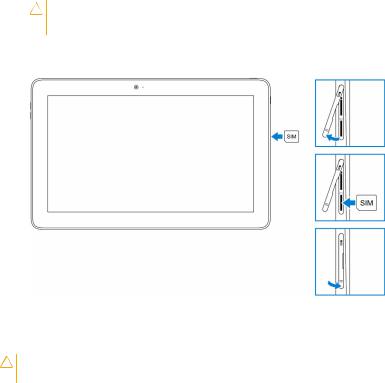
CAUTION: Ensure that the micro-SIM card is aligned as shown in the image.
2 Insert the micro-SIM card into the card slot until it locks into place.
3Close the slot cover.
Removing the micro-SIM card
CAUTION: Removing the micro-SIM card while it is in use may cause data loss or result in application errors.
1Open the slot cover.
2Press the micro-SIM card inward and release it. The micro-SIM card pops out.
3 Slide the micro-SIM card out of the slot.
4Close the slot cover.
Setting up your tablet |
12 |

Inserting the microSD card
1Open the slot cover and locate the microSD card slot.
CAUTION: Ensure that the microSD card is aligned as shown in the image.
2 Insert the microSD card into the card slot until it locks into place.
3Close the slot cover.
Setting up your tablet |
13 |

Removing the microSD card
CAUTION: Removing the microSD card while it is in use may cause data loss or result in application errors.
1Tap All Settings  → Devices → Connected devices.
2Under Connected devices, tap the SD Card and then tap Remove device.
 NOTE: If a warning message appears stating the microSD card cannot be removed, ensure all data transfers involving the microSD card are complete.
A message appears that the microSD card can be safely removed.
3Open the slot cover.
4Press the microSD card inward and release it. The microSD card pops out.
5 Slide the microSD card out of the slot.
6Close the slot cover.
Using the headset
WARNING: Listening to loud music for an extended period of time can lead to hearing loss.
Setting up your tablet |
14 |
Connect a headset, headphones, microphone, or other audio equipment to the headset port of your tablet.
1 |
Connect headset to the headset port on the tablet. |
|
2 |
Wear the headset and adjust the volume to a comfortable level. Adjust the |
|
|
microphone to an optimal level when using voice-enabled applications. |
|
|
|
NOTE: When you connect an audio device to the headset port, the |
|
|
|
|
|
integrated speaker on your tablet is muted automatically. |
|
|
CAUTION: To prevent damaging your headset when disconnecting it |
|
|
|
|
|
from the tablet, pull the connector and not the cable. |
|
|
|
Setting up your tablet |
15 |
Loading...