


Dell™ Latitude™ C800 User's Guide
About Your Computer
What You Need to Know
Features and Options
Front View
Setup and Operation
Using Your Computer
Connecting Devices
Passwords and Security
Traveling With Your Computer
Removing and Replacing Parts
Powering Your Computer
AC Adapter and Battery
Conserving Power
Using the System Setup Program
Model PP01X
Reinstalling Software
Solving Problems
Finding Solutions
Dell Diagnostics
Understanding Error Messages
Getting Help
Help Overview
Contacting Dell
Technical Specifications
Additional Information
Regulatory Notices
Warranty and Return Policy
Notes, Notices, and Cautions
NOTE: A NOTE indicates important information that helps you make better use of your computer.
NOTICE: A NOTICE indicates either potential damage to hardware or loss of data and tells you how to avoid the problem.
CAUTION: A CAUTION indicates a potentially hazardous situation which, if not avoided, may result in minor or moderate injury.
Information in this document is subject to change without notice. © 2000–2001 Dell Computer Corporation. All rights reserved.
Reproduction in any manner whatsoever without the written permission of Dell Computer Corporation is strictly forbidden.
Trademarks used in this text: Dell, Dimension, Dell Precision, Latitude, Inspiron, OptiPlex, ExpressCharge, HyperCool, DellWare, TrueMobile, and AccessDirect are trademarks of Dell Computer Corporation; Microsoft, Windows, Windows NT, and MS-DOS are registered trademarks of Microsoft Corporation; 3Com is a registered trademark of 3Com Corporation; Intel and Pentium are registered trademarks of Intel Corporation; GeForce2 Go is a trademark of NVIDIA Corporation; ENERGY STAR is a registered trademark of the U.S. Environmental Protection Agency. As an ENERGY STAR partner, Dell has determined that this product meets the ENERGY STAR guidelines for energy efficiency.
Other trademarks and trade names may be used in this document to refer to either the entities claiming the marks and names or their products. Dell disclaims any proprietary interest in trademarks and trade names other than its own.
The following product notice applies to the Macrovision Corporation product that is included with the DVD-ROM drive:
This product incorporates copyright protection technology that is protected by method claims of certain U.S. patents and other intellectual property rights owned by Macrovision Corporation and other rights owners. Use of this copyright protection technology must be authorized by Macrovision Corporation and is intended for home and other limited viewing uses only unless otherwise authorized by Macrovision Corporation. Reverse engineering or disassembly is prohibited.
937XK A02 05 Jun 2001
Back to Contents Page
AC Adapter and Battery: Dell™ Latitude™ C800 User's Guide
About the AC Adapter |
Checking the Battery Charge |
Connecting the AC Adapter |
Battery Warnings |
About the Batteries |
Charging the Battery |
Replacing a Battery in the Battery Bay |
Detecting Battery Problems |
Installing a Battery in the Modular Bay |
Battery Disposal |
|
|
About the AC Adapter
•You can connect the AC adapter with your computer either turned on or off.
•The AC adapter works with electrical outlets worldwide. However, power connectors vary among countries. Before you use AC power in a foreign country, you may need to obtain a new power cable designed for use in that country.
•If the computer is connected to a Dell docking device, you can run the computer on AC power by connecting the AC adapter to the docking device.
NOTE: If you are running your computer on AC power with a battery installed, the AC adapter charges the battery (if needed) and then maintains the battery's charge.
NOTICE: To avoid overheating the AC adapter when powering the computer or charging the battery, use the AC adapter in a ventilated area, such as on a desktop or on the floor. Do not use the AC adapter in a poorly ventilated environment, such as inside a carrying case.
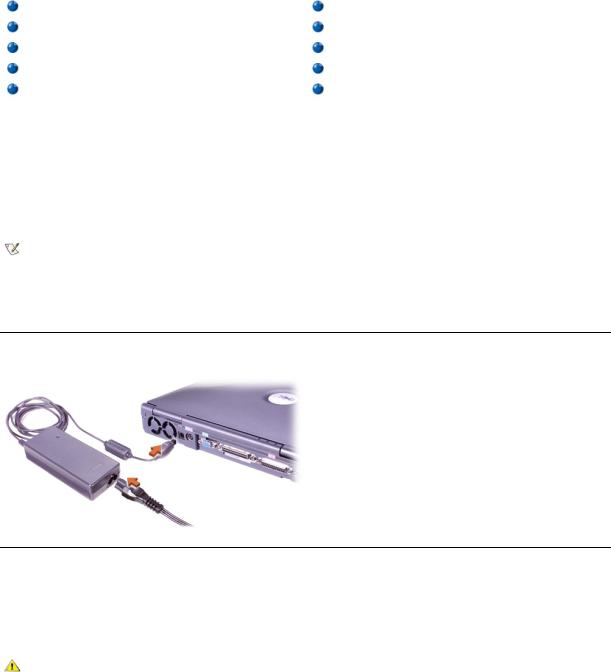
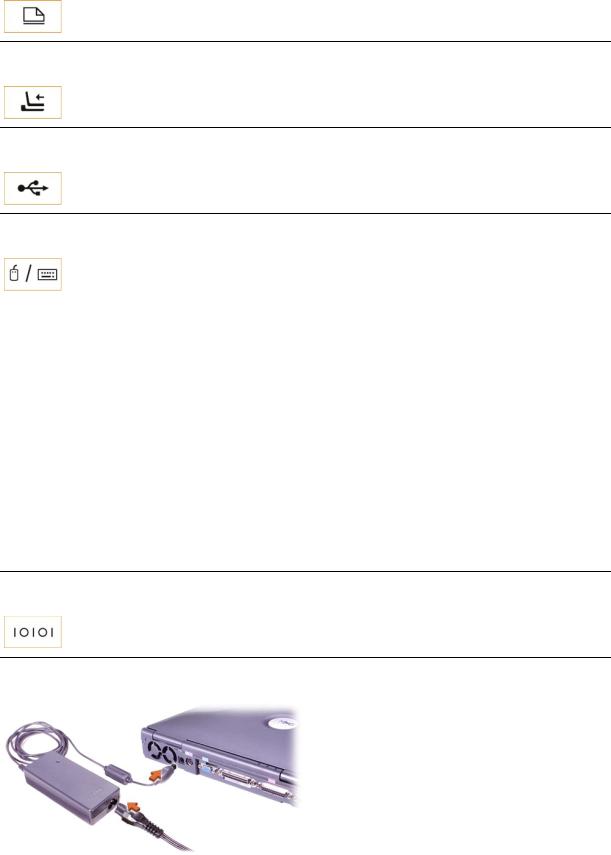
Connecting the AC Adapter
About the Batteries
•A partially charged lithium-ion battery comes standard in the battery bay, and provides power when an electrical outlet is not available. Dell recommends that you charge your battery to full capacity before using it to power the computer. For information on conserving battery power, see "Conserving Power."
•To increase battery life, install a second battery in the modular bay.
CAUTION: Do not puncture, disassemble, or incinerate the computer's battery. The battery may present a fire or chemical burn hazard if mistreated. Do not expose the battery to temperatures above 60° Celsius (C) (140° Fahrenheit [F]). Keep the battery away from children. Handle damaged or leaking batteries with extreme care. If the battery is damaged, electrolyte may leak from the cells and cause personal injury.
•With a single fully charged, 8-cell lithium-ion battery, you can expect about 2–4 hours of battery life; with two fully charged lithium-ion batteries, 4–8 hours of battery life. Actual performance depends on the power management features and application programs you use.
•When two batteries are installed, the computer draws power from the battery with the higher capacity until both batteries are at the same charge level. Then it draws power from both. The AC adapter first charges the battery in the battery bay.
•The integrated charge gauge lets you check a battery’s charge before you insert it into the computer.

•The battery’s self-test capability alerts you to battery conditions such as low charge.
•The battery has a life span of around 400 discharge/charge cycles, provided it is charged at normal room temperature.
•When you activate standby mode, the computer can run on a fully-charged battery for approximately one week.
•If you are going to store the computer, disconnect all devices and turn off the computer. Remove the battery when you store your computer for an extended period of time. A battery will drain when not in use during prolonged storage. After a long storage period, recharge the battery fully before you attempt to run your computer from the battery.
•Do not dispose lithium ion batteries with common household waste products. See "Battery Disposal" for more information.
•Lithium-ion batteries are longer lived than conventional batteries and do not require replacement as often. You can charge the lithium ion battery whenever you like without fear of reducing its charge capacity. You do not need to drain a lithium ion battery completely before recharging it.
Replacing a Battery in the Battery Bay
CAUTION: Using the wrong battery type may present a risk of fire or explosion. Replace the battery only with the same or equivalent type purchased from Dell. You can use your computer's battery in any Latitude C-Family computer except for the Latitude CS or CSx computers. Do not attempt to use the battery in CS or CSx computers, and do not use a battery from those computers in your computer.
NOTICE: To avoid data loss, do not replace a battery while the computer is turned on unless the computer is connected to an electrical outlet or a second battery is installed.
NOTICE: Only use lithium ion batteries in your computer. The computer does not support nickel-metal hydride (NiMH) batteries.
Before installing a new battery, check the battery's charge by pressing the battery test button. The battery gauge will not light if the battery is completely drained.
To replace a battery in the battery bay:
1.Save your work and close all open files and application programs.
2.If the computer is docked, undock it.
3.If the modular bay contains a battery, go to step 5.
NOTICE: If you choose to replace the battery with the computer in standby or hibernate mode, you have up to 2 minutes to complete the battery replacement. After 2 minutes, the computer shuts down and you will lose any unsaved data.
4.If the only battery in the computer is in the battery bay and that is the battery you want to replace, either connect the computer to an electrical outlet or preserve your data in one of these ways:
•Use standby mode.
•Use hibernate mode.
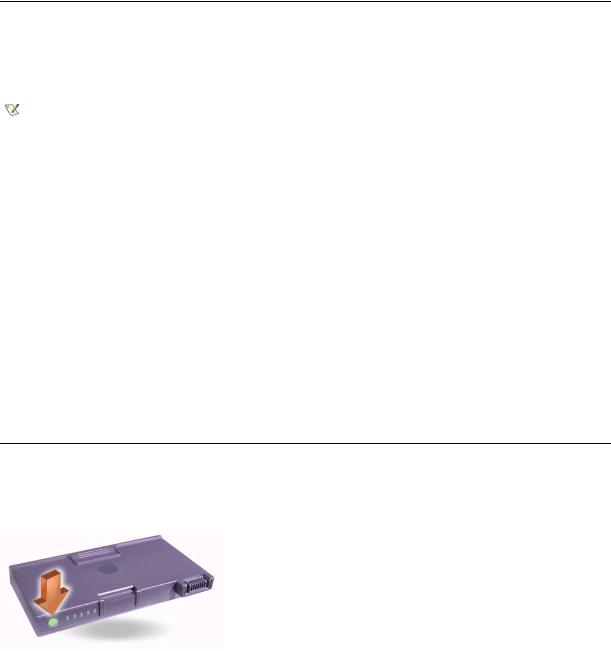
5.Close the computer display, turn the computer over, and remove the battery.
6.Slide the new battery firmly into the battery bay. You should hear a click when the battery is fully seated.
7.Depending on the power management mode the computer is in, press the power button or open the display to resume normal operation.
You can also install a second battery in the modular bay.
Installing a Battery in the Modular Bay
NOTICE: To avoid data loss, do not replace a battery while the computer is turned on unless the computer is connected to an electrical outlet or a second battery is installed.
NOTICE: Only use lithium ion batteries in your computer. The computer does not support nickel-metal hydride (NiMH) batteries.
NOTE: The following procedure applies only if you are replacing a storage module that has been operating in the modular bay. If you are installing a battery into an empty modular bay, you can hot swap the battery (insert the battery while the computer is on).
1.Save your work and close all open files and application programs.
2.If the computer is docked, undock it.
3.If your computer does not have BayManager, go to step 4.
If your computer is running Microsoft® Windows® Me with BayManager installed, perform the following steps and then go to step 6:
a.Double-click the  icon in the Windows system tray. The BayManager window appears.
b.Click the Remove/Swap button.
4.Preserve your data in one of these ways and then go to step 5:
•Use standby mode.
•Use hibernate mode.
5.Remove any device that may be installed in the modular bay.
6.Slide the new battery firmly into the modular bay. You should hear a click when the battery is fully seated.
7.If your computer is running Windows Me with BayManager, click OK. Then click OK to close the BayManager window.
8.Depending on the power management mode the computer is in, press the power button or open the display to resume normal operation.
Checking the Battery Charge
Press the battery test button next to the lights. The number of lights that appear shows an estimate of the remaining battery charge.
Battery Charge Gauge and Test Button
Lights |
Charge Remaining (%) or Description |
|
|
|
|
|
|
|
5 |
81–100 |
|
|
|
|
4 |
61–80 |
|
|
|
|
|
|
|
3 |
41–60 |
|
|
|
|
|
|
|
2 |
21–40 |
|
|
|
|
|
|
|
1 |
1–20; recharge the battery before using it |
|
|
|
|
|
|
|
0 |
Completely drained or permanent failure |
1 |
|
|
|
|
|
|
|
|
|
Rapid blinking |
Temporary or recoverable failure such as overheating2 |
|
|
|
|

1If you install a failed battery, the  light flashes amber rapidly. To purchase a new battery, call Dell or go to the Dell website at http://www.dell.com. Dispose of the old battery properly.
2Allow a hot battery to cool for several minutes before checking the charge level again.
Battery Warnings
NOTICE: When you see a low-battery warning, save your work immediately. Then replace the battery or connect your computer to an electrical outlet.
NOTICE: To avoid losing data (and possibly corrupting data areas on your hard-disk drive), save your work immediately after a second low-battery warning. Then connect your computer to an electrical outlet, or place the computer in standby mode. If the battery runs completely out of power, the computer shuts off without properly closing any open files.
Warning (If AC adapter is |
|
|
|
not attached) |
Light |
Remaining Battery Life |
Computer Response |
|
|
|
|
|
|
|
|
First low-battery |
Blinking amber |
About 15 minutes |
If no further activity occurs, enters hibernate mode and |
|
|
|
turns off computer. If the computer has no hibernate file, |
|
|
|
enters standby mode. |
|
|
|
|
|
|
|
|
Second low-battery |
Steady amber |
About 5 minutes |
If no further activity occurs, enters hibernate mode. If |
|
|
|
there is no hibernate file, enters standby mode. |
|
|
|
If already in standby mode when second low-battery |
|
|
|
warning occurs, enters hibernate mode immediately. If |
|
|
|
hibernate mode has been disabled, reenters standby |
|
|
|
mode. |
|
|
|
|
|
|
|
|
|
|
|
|
Charging the Battery
•Each time you connect the computer to an electrical outlet or install a battery in a computer that is connected to an electrical outlet, the computer checks the battery's charge. If needed, the computer uses Dell ExpressCharge™ technology to charge the battery.
•If the computer is off and connected to an electrical outlet, ExpressCharge technology charges a fully discharged battery in about one hour.
Otherwise, charge times depend on which devices you are using and which programs you are running.
•The  light remains steady green during charging.
•The  light starts blinking when the charge cycle is complete. While the
  light is blinking, the AC adapter provides a trickle charge to bring the battery to full capacity. The
  light continues to blink until you remove the battery or disconnect the computer from its electrical outlet.
•If two batteries are installed in the computer, the AC adapter first charges the battery in the battery bay, then the battery in the modular bay.
NOTICE: If the battery is hot from being used in your computer or being in a hot environment, follow these precautions:
•A hot battery will not charge when you connect the AC adapter to the computer. This feature is important because charging a hot battery shortens the battery’s life span and may damage the battery and the computer.
•The battery is too hot to start charging if the  light flashes alternately green and amber. If this occurs while the computer is connected to an electrical outlet, disconnect the computer from the outlet and allow the computer and the battery to return to room temperature. Then reconnect the computer to its electrical outlet and continue charging the battery.
•If the computer is not allowed to return to room temperature, the battery stops charging before it reaches full capacity.
NOTE: You can leave the battery in the computer as long as you like. The battery's integrated circuitry prevents the battery from overcharging.
Detecting Battery Problems
To avoid installing a defective battery in your computer, check the battery's charge by pressing the battery test button. The battery gauge light will not light if the battery is completely drained. A battery problem may prevent the battery from being charged to its full potential and can lead to unpredictable operation.
 Light After Installing a
Battery
Alternately green and amber
Problem
Battery too hot to charge
Action
Turn off the computer, and let the battery and computer cool to room temperature.

Amber for 4 seconds after:
•connecting or disconnecting AC adapter
or
• pressing the power button
Rapidly amber
Defective battery
Defective battery
Replace the battery. Call Dell or go to the Dell website at http://www.dell.com.
Replace the battery. Call Dell or go to the Dell website at http://www.dell.com
Battery Disposal
When your battery no longer holds a charge, call your local waste disposal agency or environmental agency for advice on disposing of it. To purchase a new battery, call Dell or go to the Dell website at http://www.dell.com.
CAUTION: If your battery is damaged, or if it no longer holds a charge, dispose of it promptly and properly. Do not dispose of it along with household waste. Call your local waste disposal agency or environmental agency for advice on disposing of the battery.
Back to Contents Page
Back to Contents Page
Connecting Devices: Dell™ Latitude™ C800 User's Guide
Back View |
Serial Devices |
Left Side View |
AC Adapter |
Right Side View |
Infrared Sensor |
External Monitor |
Modem |
Parallel Devices |
Network |
Docking Devices |
TV and Digital Audio |
USB Devices |
Audio Devices |
Mouse, External Keyboard, and External Numeric Keypad |
IEEE 1394 Devices |
|
|
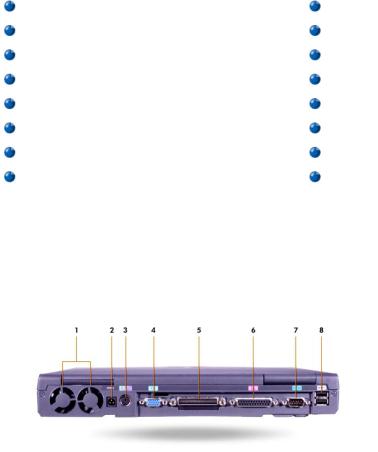
Back View
NOTICE: When disconnecting external devices from the back of the computer, wait 5 seconds after turning off the computer before you disconnect a device to avoid possible damage to the system board.
NOTICE: To avoid overheating the computer, do not place any objects close to an air intake or fan, and do not allow any objects to cover up an intake or fan.
1 |
Fans |
5 |
Docking connector |
2 |
AC power connector |
6 |
Parallel connector |
3 |
PS/2 connector (for mouse, keyboard, or keypad) |
7 |
Serial connector |
4 |
Video connector |
8 |
USB connectors |
|
|
|
|
Left Side View
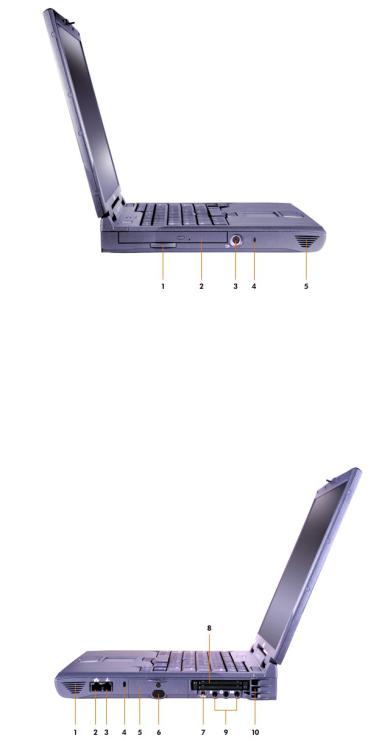
1 |
Fixed optical drive pull-tab |
4 |
Security cable slot |
2 |
Fixed optical drive |
5 |
Speaker |
3 |
S-video TV-out connector |
|
|
|
|
|
|
Right Side View
NOTICE: To avoid overheating the computer, do not place any objects close to an air intake or fan, and do not allow any objects to cover up an intake or fan.
1 |
Speaker |
6 |
IR sensor |
2 |
Optional network connector |
7 |
IEEE 1394 connector |
3 |
Optional modem connector |
8 |
PC Card slots |
4 |
Security cable slot |
9 |
Audio connectors |
5 |
Hard drive bay |
10 |
Air intake |
|
|
|
|

External Monitor
You can attach an external monitor to the video connector.
If you are running the Microsoft® Windows® Me operating system in dual-display mode, you can use an external monitor as an extension of your display.
NOTICE: Do not place the monitor directly on top of your portable computer, even if it is closed. Doing so can crack the computer case and the display.
1.Make sure that the external monitor is turned off. Set the monitor on a monitor stand, desktop, or other level surface near your computer.
2.Connect the external monitor's video cable to the computer.
Be sure to tighten all the screws on the video cable connector(s) to eliminate radio frequency interference (RFI).
3.Connect your external monitor to a grounded electrical outlet. If the monitor's power cable is not permanently attached to the monitor, connect it to the monitor.
Using an External Monitor
When an external monitor is connected to the computer, the video image appears on the external monitor's screen when you boot your computer.
Press 
 to switch the video image to the next display in the following sequence: the computer's display, the display and external monitor simultaneously, or an external monitor. Press <Scroll Lock><F8> on an external keyboard if the External Hot Key option is enabled in the system setup program.
If the external monitor is turned off when you boot your computer, the computer still sends the video image to the external monitor, but you will not see an image on either the computer's display or the external monitor. To see an image, turn on the external monitor or switch the video image to the computer’s display.
NOTE: If you are using your external monitor at a resolution greater than the display supports, the simultaneous display feature is disabled.
Using an External Monitor in Dual-Display Mode
With the Microsoft Windows Me operating system, you can use an external monitor as an extension of your display.
1.Connect the external monitor, TV, or projector.
2.Click the Start button, point to Settings, and then click Control Panel. (If you are running Windows 2000, double-click Control Panel.)
3.In the Control Panel window, double-click the Display icon.
4.In the Display Properties window, click the Settings tab.
5.Change the Colors option to 256 Color or High Color (16 bit).
6.Change the Screen Area to the appropriate size for your display.
7.Click the Advanced... button.
8.In the RAGE MOBILITY video driver properties window, select the Displays tab.
9.Click the Monitor button.
The dual-display option is activated.
10.Click Yes when prompted to restart your system.
11.When the system has restarted, open the Display icon in the Control Panel.
12.Click the Settings tab.
13.Click the display that is grayed out. When asked if you want to enable the display, click Yes, and then click Apply.
Parallel Devices
You can attach a parallel device (usually a printer) to the parallel connector.
Docking Devices
You can attach a Dell docking device to the docking connector. For information on docking your computer, see the documentation that came with your docking device.
USB Devices
You can attach USB-compatible devices such as a mouse, keyboard, printer, or scanner to a USB connector.
Mouse, External Keyboard, and External Numeric Keypad
You can attach a mouse, 101or 102-key keyboard, or numeric keypad to the Personal System/2 (PS/2) connector.
Mouse
If the Pointing Device option in the system setup program is set to Touch Pad-PS/2 Mouse (the default), you can use both the DualPoint device and an external PS/2-compatible mouse if one is attached. If you disconnect the mouse, to use the advanced features of the DualPoint device, you must shut down the computer or enter standby mode and then resume. If you do not do this, the DualPoint device resumes operation in standard
PS/2 mode, which means that many of the configuration features are disabled.
If you are using a PS/2-compatible mouse that is not made by Microsoft and the mouse does not work properly, reboot the computer. If the mouse still does not work, install the drivers from the floppy disk or CD that came with the mouse and reboot the computer.
External Keyboard
You can use the computer's keyboard and an external keyboard at the same time. When you attach a keyboard to the computer, the embedded numeric keypad is automatically disabled.
On an external keyboard, the <Scroll Lock> key acts the same way as the <Fn> key on the computer’s keyboard (if the External Hot Key option is enabled in the system setup program).
External Numeric Keypad
When you attach an external numeric keypad to the computer, the numeric keypad on the computer keyboard is automatically disabled. The lights on the integrated keyboard track the operation of an external numeric keypad.
Serial Devices
You can attach a serial device, such as a serial mouse, to the serial connector.
AC Adapter
You can attach the AC adapter to the AC adapter connector. The AC adapter converts AC power to the DC power required by the computer.
You can connect the AC adapter with your computer turned either on or off.
The AC adapter works with electrical outlets worldwide. However, power connectors vary among countries. Before using AC power in a foreign country, you may need to obtain a new power cable designed for use in that country.
Infrared Sensor
The computer’s infrared (IR) sensor lets you transfer files from your computer to another IR-compatible device without using cable connections. When you receive your computer, the IR sensor is disabled. You can enable the IR sensor using the system setup program.
To transfer files after you enable the IR sensor:
1.Point the computer’s IR sensor directly at the compatible device’s IR sensor. IR devices transmit data in a 30-degree cone of IR light up to a distance of 1 meter (m) (3.3 feet [ft]).
2.Start the data communications software on both devices, and then begin to transfer files. Read the documentation that came with your compatible device to make sure that you operate the device correctly.
NOTE: Make sure that books, papers, or other objects do not come between the two IR devices and that the two devices are aligned and within the 30-degree cone.
Using the IR Sensor
•The IR sensor is compatible with Infrared Data Association (IrDA) 1.1 (Fast IR) and 1.0 (Slow IR) standards.
•The default address of the IR port is COM3. If the address causes resource conflicts with other devices, remap the address of the IR sensor.
•When the computer is connected to a Dell docking device, the IR sensor on the computer is automatically disabled.
•For more information about using an IR device, see the documentation that came with your operating system.
Modem
If you ordered the optional internal modem, plug in the telephone line to the modem connector.
NOTICE: Do not confuse the modem and network connectors on your computer. Do not plug a telephone line into the network connector.
For information on using the modem, see the online modem documentation supplied with your computer. To access the documentation, doubleclick the Dell Documents icon on the Windows desktop, click System Information, and then click Communications.
Network
If you ordered the optional network adapter, plug in the network line to the network connector.
NOTICE: Do not confuse the modem and network connectors on your computer. Do not plug a telephone line into the network connector.
For information on using the network adapter, see the online network adapter documentation supplied with your computer. To access the documentation, double-click the Dell Documents icon on the Windows desktop, click System Information, and then click Communications.
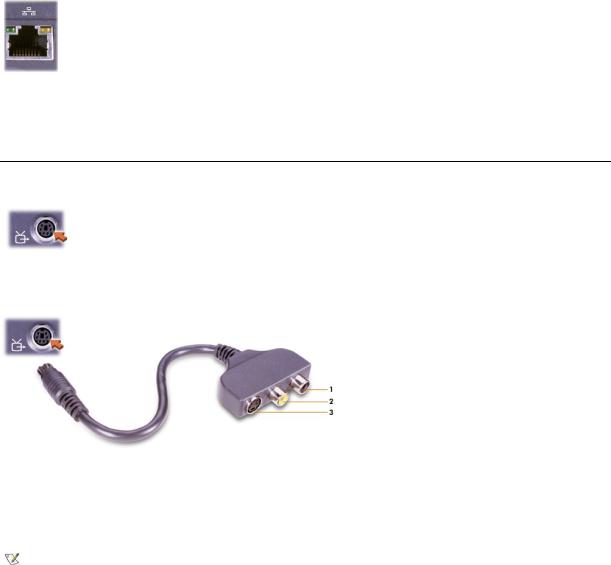
TV and Digital Audio
If your TV has an S-video cable, you can plug it directly into the S-video TV-out connector.
If your TV has a composite cable, use the TV/digital audio adapter cable that came with your computer to connect your TV to the computer. Make sure you attach the composite video cable to the composite connector of the TV/digital audio adapter cable. See the user manual that came with your television for instructions on connecting a composite cable or an S-video device.
1Digital audio connector
2Composite video connector
3S-video connector
After you connect the television to the computer, you must also enable the television in your display settings.
NOTE: If you connect a television to your computer, you might need to change the display resolution to 800 x 600 pixels. See Adjusting the Picture for instructions.
Changing ATI Video Card Display Settings
If your computer has an ATI video card installed, follow these steps to enable the television in your display settings:
1.Open the Control Panel window, double-click the Display icon, click the Settings tab, and then click the Advanced button.
2.Click the Displays tab.
3.Click the upper-left corner of the TV button to enable the television.
4.OK.
Connecting S/PDIF Devices
To connect a digital audio device with a S/PDIF connector, attach the S/PDIF cable to the digital audio connector on the TV/digital audio adapter cable. See the user manual that came with your S/PDIF device for instructions.
If you want to use a S/PDIF device and TV simultaneously:
1.Connect the S/PDIF cable to the digital audio connector on the TV/digital audio adapter cable.
2.Connect the S-video or composite cable to the S-video or composite connector on the TV/digital audio adapter cable.
3.Connect the TV/digital audio adapter cable to the S-video TV-out connector on the computer.
Adjusting the Picture
If an error message notifies you that the current resolution and color depth are using too much memory and preventing DVD playback, adjust the display properties:
1.Open theControl Panel window, and then double-click the Display icon.
2.In the Display Properties window, click the Settings tab.
3.Click and drag the bar in Screen area and change the setting to 800 by 600 pixels by moving the bar to the left or right.
4.Click the pull-down menu under Colors, and then click High Color (16 bit).
5.Click OK.
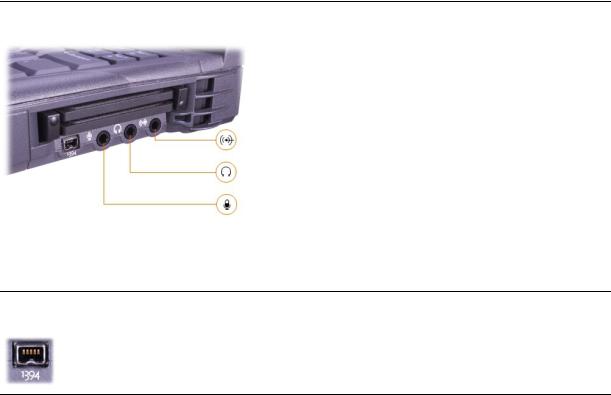
Audio Devices
You can attach headphones or speakers to the  connector, a microphone to the
  connector, and record/playback devices such as cassette players and CD players to the
  connector.
You can control the sound on your computer through the volume icon on the Windows taskbar, the system setup program, and key combinations.
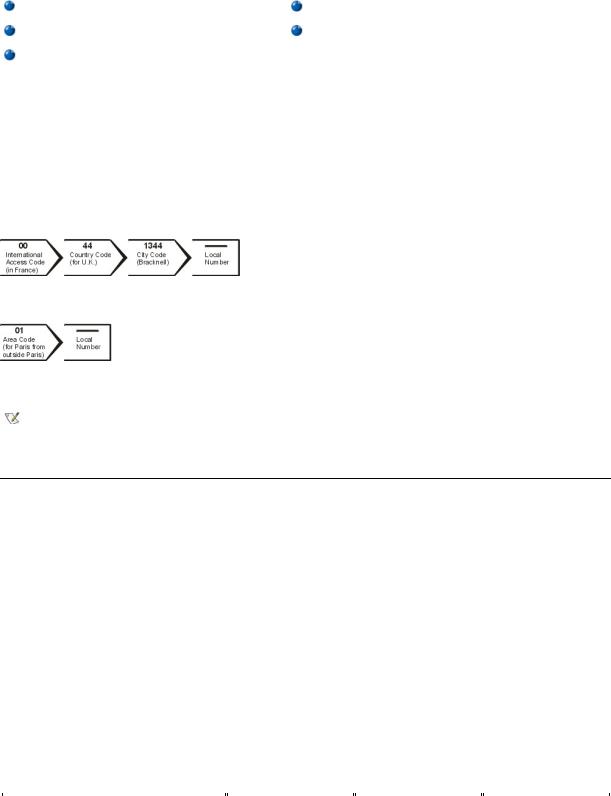
IEEE 1394 Devices
You can attach devices that require high-speed transfer rates, such as video cameras, to the IEEE 1394 connector.
Back to Contents Page
Back to Contents Page
Contacting Dell: Dell™ Latitude™ C800 User's Guide
Overview |
Europe Contact Numbers |
International Dialing Codes |
Asia and Other Regions Contact Numbers |
Americas Contact Numbers |
|
|
|
Overview
When you need to contact Dell, use the telephone numbers, codes, and electronic addresses provided in the following sections. "International Dialing Codes" provides the various codes required to make long-distance and international calls. "Americas Contact Numbers," "Europe Contact Numbers," and "Asia and Other Regions Contact Numbers" provide local telephone numbers, area codes, toll-free numbers, and e-mail addresses, if applicable, for each department or service available in various countries around the world.
If you are making a direct-dialed call to a location outside of your local telephone service area, determine which codes to use (if any) in "International Dialing Codes," in addition to the local numbers provided in the other sections.
For example, to place an international call from Paris, France to Bracknell, England, dial the international access code for France followed by the country code for the U.K., the city code for Bracknell, and then the local number as shown in the following illustration:
To place a long-distance call within your own country, use area codes instead of international access codes, country codes, and city codes. For example, to call Paris, France from Montpellier, France, dial the area code plus the local number as shown in the following illustration:
The codes required depend on where you are calling from as well as the destination of your call; in addition, each country has a different dialing protocol. If you need assistance in determining which codes to use, contact a local or an international operator.
NOTES: Toll-free numbers are for use only within the country for which they are listed. Area codes are most often used to call long distance within your own country (not internationally)—in other words, when your call originates in the same country you are calling.
Have your Express Service Code ready when you call. The code helps Dell's automated-support telephone system direct your call more efficiently.
International Dialing Codes
Click a listed country to obtain the appropriate contact numbers.
|
International Access |
|
|
Country (City) |
Code |
Country Code |
City Code |
|
|
|
|
|
|
|
|
Australia (Sydney) |
0011 |
61 |
2 |
|
|
|
|
|
|
|
|
Austria (Vienna) |
900 |
43 |
1 |
|
|
|
|
|
|
|
|
Belgium (Brussels) |
00 |
32 |
2 |
|
|
|
|
|
|
|
|
Brazil |
0021 |
55 |
51 |
|
|
|
|
|
|
|
|
Brunei |
— |
673 |
— |
|
|
|
|
|
|
|
|
Canada (North York, Ontario) |
011 |
— |
Not required |
|
|
|
|
|
|
|
|
Chile (Santiago) |
— |
56 |
2 |
|
|
|
|
China (Xiamen) |
— |
86 |
592 |
|
|
|
|
|
|
|
|
Czech Republic (Prague) |
00 |
420 |
2 |
|
|
|
|
|
|
|
|
Denmark (Horsholm) |
00 |
45 |
Not required |
|
|
|
|
|
|
|
|
Finland (Helsinki) |
990 |
358 |
9 |
|
|
|
|
|
|
|
|
France (Paris) (Montpellier) |
00 |
33 |
(1) (4) |
|
|
|
|
|
|
|
|
Germany (Langen) |
00 |
49 |
6103 |
|
|
|
|
Hong Kong |
001 |
852 |
Not required |
|
|
|
|
|
|
|
|
Ireland (Cherrywood) |
16 |
353 |
1 |
|
|
|
|
|
|
|
|
Italy (Milan) |
00 |
39 |
02 |
|
|
|
|
|
|
|
|
Japan (Kawasaki) |
001 |
81 |
44 |
|
|
|
|
|
|
|
|
Korea (Seoul) |
001 |
82 |
2 |
|
|
|
|
|
|
|
|
Luxembourg |
00 |
352 |
— |
|
|
|
|
|
|
|
|
Macau |
— |
853 |
Not required |
|
|
|
|
|
|
|
|
Malaysia (Penang) |
00 |
60 |
4 |
|
|
|
|
|
|
|
|
Mexico (Colonia Granada) |
95 |
52 |
5 |
|
|
|
|
|
|
|
|
Netherlands (Amsterdam) |
00 |
31 |
20 |
|
|
|
|
|
|
|
|
New Zealand |
00 |
64 |
— |
|
|
|
|
|
|
|
|
Norway (Lysaker) |
00 |
47 |
Not required |
|
|
|
|
Poland (Warsaw) |
011 |
48 |
22 |
|
|
|
|
|
|
|
|
Portugal |
00 |
35 |
— |
|
|
|
|
|
|
|
|
Singapore (Singapore) |
005 |
65 |
Not required |
|
|
|
|
|
|
|
|
South Africa (Johannesburg) |
09/091 |
27 |
11 |
|
|
|
|
|
|
|
|
Spain (Madrid) |
00 |
34 |
91 |
|
|
|
|
|
|
|
|
Sweden (Upplands Vasby) |
00 |
46 |
8 |
|
|
|
|
|
|
|
|
Switzerland (Geneva) |
00 |
41 |
22 |
|
|
|
|
|
|
|
|
Taiwan |
002 |
886 |
— |
|
|
|
|
|
|
|
|
Thailand |
001 |
66 |
— |
|
|
|
|
|
|
|
|
U.K. (Bracknell) |
010 |
44 |
1344 |
|
|
|
|
|
|
|
|
U.S.A. (Austin, Texas) |
011 |
1 |
Not required |
|
|
|
|
|
|
|
|
|
|
|
|
Americas Contact Numbers
|
|
|
Local Number or |
Country (City) |
Department Name or Service |
Area Code |
Toll-Free Number |
|
|
|
|
|
|
|
|
Brazil |
Customer Support, Technical Support |
|
toll free: 0800 90 3355 |
|
|
|
|
|
|
|
|
|
Sales |
|
toll free: 0800 90 3366 |
|
|
|
|
|
|
|
|
|
Web site: http://www.dell.com/br |
|
|
|
|
|
|
|
|
|
|
Canada |
Automated Order-Status System |
|
toll free: 1-800-433-9014 |
(North York, Ontario) |
|
|
|
|
|
|
|
|
AutoTech (Automated technical support) |
|
toll free: 1-800-247-9362 |
|
|
|
|
|
|
|
|
|
Customer Care (From outside Toronto) |
|
toll free: 1-800-387-5759 |
|
|
|
|
|
|
|
|
|
Customer Care (From within Toronto) |
416 |
758-2400 |
|
|
|
|
|
|
|
|
|
Customer Technical Support |
|
toll free: 1-800-847-4096 |
|
|
|
|
|
|
|
|
|
Sales (Direct Sales—from outside Toronto) |
|
toll free: 1-800-387-5752 |
|
|
|
|
|
|
|
|
|
Sales (Direct Sales—from within Toronto) |
416 |
758-2200 |
|
|
|
|
|
|
|
|
|
Sales (Federal government, education, and medical) |
|
toll free: 1-800-567-7542 |
|
|
|
|
|
|
|
|
|
Sales (Major Accounts) |
|
toll free: 1-800-387-5755 |
|
|
|
|
|
|
|
|
|
TechFax |
|
toll free: 1-800-950-1329 |
|
|
|
|
|
|
|
|
Chile |
Sales, Customer Support, and Technical Support |
|
toll free: 1230-020-4823 |
(Santiago) |
|
|
|
NOTE: Customers in |
|
|
|
Chile call the U.S.A. for sales, customer, and technical assistance
Latin America |
Customer Technical Support (Austin, Texas, U.S.A.) |
512 |
728-4093 |
NOTE: Customers in Latin |
|
|
|
|
|
|
|
Customer Service (Austin, Texas, U.S.A.) |
512 |
728-3619 |
|
America call the U.S.A. for |
|
|
|
|
|
|
|
sales, customer, and |
Fax (Technical Support and Customer Service) |
512 |
728-3883 |
technical assistance. |
(Austin, Texas, U.S.A.) |
|
|
|
|
|
|
|
|
|
|
|
Sales (Austin, Texas, U.S.A.) |
512 |
728-4397 |
|
|
|
|
|
|
|
|
|
SalesFax (Austin, Texas, U.S.A.) |
512 |
728-4600 |
|
|
|
728-3772 |
|
|
|
|
Mexico
NOTE: Customers in Mexico call the U.S.A. for access to the Automated Order-Status System and AutoTech.
U.S.A.
(Austin, Texas)
Automated Order-Status System (Austin, Texas, U.S.A.) |
512 |
728-0685 |
|
|
|
|
|
|
AutoTech (Automated technical support) (Austin, Texas, |
512 |
728-0686 |
U.S.A.) |
|
|
|
|
|
|
|
|
Customer Technical Support |
525 |
228-7870 |
|
|
|
|
|
|
Sales |
525 |
228-7811 |
|
|
toll free: 91-800-900-37 |
|
|
toll free: 91-800-904-49 |
|
|
|
|
|
|
Customer Service |
525 |
228-7878 |
|
|
|
|
|
|
Main |
525 |
228-7800 |
|
|
|
|
|
|
Automated Order-Status System |
|
toll free: 1-800-433-9014 |
|
|
|
|
|
|
AutoTech (for portable and desktop computers) |
|
toll free: 1-800-247-9362 |
|
|
|
Dell Home and Small Business Group (for portable and desktop computers):
Customer Technical Support (Return Material
Authorization Numbers)
Customer Technical Support
(Home sales purchased via http://www.dell.com)
Customer Service
(Credit Return Authorization Numbers)
toll free: 1-800-624-9896
toll free: 1-877-576-3355
toll free: 1-800-624-9897
National Accounts (systems purchased by established Dell national accounts [have your account number handy], medical institutions, or value-added resellers [VARs]):
Customer Service and Technical Support (Return |
|
toll free: 1-800-822-8965 |
Material Authorization Numbers) |
|
|
|
|
|
Public Americas International (systems purchased by governmental agencies [local, state, or federal] or educational institutions):
Customer Service and Technical Support (Return |
|
toll free: 1-800-234-1490 |
Material Authorization Numbers) |
|
|
|
|
|
|
|
|
Dell Sales |
|
toll free: 1-800-289-3355 |
|
|
toll free: 1-800-879-3355 |
|
|
|
|
|
|
Spare Parts Sales |
|
toll free: 1-800-357-3355 |
|
|
|
|
|
|
DellWare™ |
|
toll free: 1-800-753-7201 |
|
|
|
|
|
|
Desktop and Portable Fee-Based Technical Support |
|
toll free: 1-800-433-9005 |
|
|
|
|
|
|
Server Fee-Based Technical Support |
|
toll free: 1-800-967-0765 |
|
|
|
|
|
|
Sales (Catalogs) |
|
toll free: 1-800-426-5150 |
|
|
|
|
|
|
Fax |
|
toll free: 1-800-727-8320 |
|
|
|
|
|
|
TechFax |
|
toll free: 1-800-950-1329 |
|
|
|
|
|
|
Dell Services for the Deaf, Hard-of-Hearing, or Speech- |
|
toll free: 1-877-DELLTTY |
Impaired |
|
(1-877-335-5889) |
|
|
|
|
|
|
Switchboard |
512 |
338-4400 |
|
|
|
Europe Contact Numbers
Country (City)
Austria
(Vienna)
NOTE: Customers in Austria call Langen, Germany for Technical Support and Customer Care.
Belgium (Brussels)
Czech Republic
(Prague)
Denmark
(Horsholm)
NOTE: Customers in Denmark call Sweden for fax technical support.
Finland
(Helsinki)
France
Department Name or Service |
Area Code |
|
|
|
|
Switchboard |
01 |
|
|
Home/Small Business Sales |
01 |
|
|
|
|
Home/Small Business Sales Fax |
01 |
|
|
|
|
Home/Small Business Customer Care |
01 |
|
|
|
|
Preferred Accounts/Corporate Customer Care |
|
|
|
|
|
Home/Small Business Technical Support |
01 |
|
|
|
|
Preferred Accounts/Corporate Technical Support |
|
|
|
|
|
Web site: http://support.euro.dell.com |
|
|
|
|
|
E-mail: tech_support_central_europe@dell.com |
|
|
|
|
|
Technical Support |
02 |
|
|
|
|
Customer Care |
02 |
|
|
|
|
Home/Small Business Sales |
|
|
|
|
|
Corporate Sales |
02 |
|
|
|
|
Fax |
02 |
|
|
|
|
Switchboard |
02 |
|
|
|
|
Web site: http://support.euro.dell.com |
|
|
|
|
|
E-mail: tech_be@dell.com |
|
|
|
|
|
Technical Support |
02 |
|
|
|
|
Customer Care |
02 |
|
|
|
|
Fax |
02 |
|
|
|
|
TechFax |
02 |
|
|
|
|
Switchboard |
02 |
|
|
|
|
Web site: http://support.euro.dell.com |
|
|
|
|
|
E-mail: czech_dell@dell.com |
|
|
|
|
|
Technical Support |
|
|
|
|
|
Relational Customer Care |
|
|
|
|
|
Home/Small Business Customer Care |
|
|
|
|
|
Switchboard |
|
|
|
|
|
Fax Technical Support (Upplands Vasby, Sweden) |
46 |
|
|
|
|
Fax Switchboard |
|
|
|
|
|
Web site: http://support.euro.dell.com |
|
|
|
|
|
E-mail: den_support@dell.com |
|
E-mail Support for Servers: |
|
Nordic_server_support@dell.com |
|
|
|
|
|
Technical Support |
09 |
|
|
|
|
Technical Support Fax |
09 |
|
|
|
|
Relational Customer Care |
09 |
|
|
|
|
Home/Small Business Customer Care |
09 |
|
|
|
|
Fax |
09 |
|
|
|
|
Switchboard |
09 |
|
|
|
|
Web site: http://support.euro.dell.com |
|
|
|
|
|
E-mail: fin_support@dell.com |
|
|
|
|
|
Home and Small Business |
|
Local Number or Toll-Free Number
491 040
795676-02
795676-05
795676-03
0660-8056
795676-04
0660-8779
481 92 88
481 91 19
toll free: 0800 16884
481 91 00
481 92 99
481 91 00
22 83 27 27
22 83 27 11
22 83 27 14
22 83 27 28
22 83 27 11
45170182
45170184
32875505
45170100
859005594
45170117
253 313 60
253 313 81
253 313 38
693 791 94
253 313 99
253 313 00

(Paris/Montpellier) |
|
|
|
|
Technical Support |
0825 |
387 270 |
||
|
||||
|
|
|
|
|
|
|
|
|
|
|
Customer Care |
0825 |
823 833 |
|
|
|
|
|
|
|
|
|
|
|
|
Fax |
0825 |
004 701 |
|
|
|
|
|
|
|
|
|
|
|
|
Switchboard |
0825 |
004 700 |
|
|
|
|
|
|
|
|
|
|
|
|
Switchboard (Alternative) |
04 |
99 75 40 00 |
|
|
|
|
|
|
|
|
|
|
|
|
Sales |
0825 |
004 700 |
|
|
|
|
|
|
|
|
|
|
|
|
Web site: http://support.euro.dell.com |
|
|
|
|
|
|
|
|
|
|
|
|
|
|
E-mail: web_fr_tech@dell.com |
|
|
|
|
|
|
|
|
|
|
|
|
|
|
Corporate |
|
|
|
|
|
|
|
|
|
|
|
|
|
|
Technical Support |
0825 |
004 719 |
|
|
|
|
|
|
|
|
|
|
|
|
Customer Care |
0825 |
338 339 |
|
|
|
|
|
|
|
|
|
|
|
|
Fax |
01 |
55 94 71 01 |
|
|
|
|
|
|
|
|
|
|
|
|
Switchboard |
01 |
55 94 71 00 |
|
|
|
|
|
|
|
|
|
|
|
|
Sales |
01 |
55 94 71 00 |
|
|
|
|
|
|
|
|
|
|
|
|
Web site: http://support.euro.dell.com |
|
|
|
|
|
|
|
|
|
|
|
|
|
|
E-mail: web_fr_tech@dell.com |
|
|
|
|
|
|
|
|
|
|
|
|
|
Germany |
Technical Support |
06103 |
766-7200 |
|
(Langen) |
|
|
|
|
|
|
|
||
Home/Small Business Customer Care |
|
0180-5-224400 |
||
|
|
|||
|
|
|
|
|
|
Global Segment Customer Care |
06103 |
766-9570 |
|
|
|
|
|
|
|
|
|
|
|
|
Preferred Accounts Customer Care |
06103 |
766-9420 |
|
|
|
|
|
|
|
|
|
|
|
|
Large Accounts Customer Care |
06103 |
766-9560 |
|
|
|
|
|
|
|
|
|
|
|
|
Public Accounts Customer Care |
06103 |
766-9555 |
|
|
|
|
|
|
|
|
|
|
|
|
Switchboard |
06103 |
766-7000 |
|
|
|
|
|
|
|
|
|
|
|
|
Web site: http://support.euro.dell.com |
|
|
|
|
|
|
|
|
|
|
|
|
|
|
E-mail: tech_support_central_europe@dell.com |
|
|
|
|
|
|
|
|
|
|
|
|
|
Ireland |
Technical Support |
|
0870 908 0800 |
|
(Cherrywood) |
|
|
|
|
|
|
|
||
Home User Customer Care |
01 |
204 4095 |
||
|
||||
|
|
|
|
|
|
|
|
|
|
|
Small Business Customer Care |
01 |
204 4026 |
|
|
|
|
|
|
|
Corporate Customer Care |
01 |
204 4003 |
|
|
|
|
|
|
|
|
|
|
|
|
Sales |
01 |
286 0500 |
|
|
|
|
|
|
|
|
|
|
|
|
SalesFax |
01 |
204 0144 |
|
|
|
|
|
|
|
|
|
|
|
|
Fax |
|
0870 907 5590 |
|
|
|
|
|
|
|
|
|
|
|
|
Switchboard |
01 |
286 0500 |
|
|
|
|
|
|
|
|
|
|
|
|
Web site: http://support.euro.dell.com |
|
|
|
|
|
|
|
|
|
|
|
|
|
|
E-mail: dell_direct_support@dell.com |
|
|
|
|
|
|
|
|
|
|
|
|
|
Italy |
Home and Small Business |
|
|
|
(Milan) |
|
|
|
|
|
|
|
||
Technical Support |
02 |
577 826 90 |
||
|
||||
|
|
|
|
|
|
Customer Care |
02 |
696 821 14 |
|
|
|
|
|
|
|
|
|
|
|
|
Fax |
02 |
696 821 13 |
|
|
|
|
|
|
|
|
|
|
|
|
Switchboard |
02 |
696 821 11 |
|
|
|
|
|
|
|
|
|
|
|
|
Web site: http://support.euro.dell.com |
|
|
|
|
|
|
|
|
|
|
|
|
|
|
E-mail: web_it_tech@dell.com |
|
|
|
|
|
|
|
|
|
|
|
|
|
|
Corporate |
|
|
|
|
|
|
|
|
|
|
|
|
|
|
Technical Support |
02 |
577 826 90 |
|
|
|
|
|
|
|
|
|
|
|
|
Customer Care |
02 |
577 825 55 |
|
|
|
|
|
|
|
|
|
|
|
|
Fax |
02 |
575 035 30 |
|
|
|
|
|
|
|
|
|
|

|
Switchboard |
|
|
|
|
|
Web site: http://support.euro.dell.com |
|
|
|
|
|
|
|
|
E-mail: web_it_tech@dell.com |
|
|
|
|
|
|
|
Luxembourg |
Technical Support (Brussels, Belgium) |
|
|
|
|
|
|
|
NOTE: Customers in |
Home/Small Business Sales (Brussels, Belgium) |
|
|
||
|
||
Luxembourg call Belgium |
Corporate Sales (Brussels, Belgium) |
|
for sales, customer, and |
|
|
|
||
Customer Care (Brussels, Belgium) |
||
technical assistance. |
||
|
||
|
|
|
|
Switchboard (Brussels, Belgium) |
|
|
|
|
|
|
|
|
Fax (Brussels, Belgium) |
|
|
|
|
|
|
|
|
Web site: http://support.euro.dell.com |
|
|
|
|
|
|
|
|
E-mail: tech_be@dell.com |
|
|
|
|
|
|
|
Netherlands |
Technical Support |
|
(Amsterdam) |
|
|
|
||
Customer Care |
||
|
||
|
|
|
|
|
|
|
Home/Small Business Sales |
|
|
|
|
|
|
|
|
Home/Small Business Sales Fax |
|
|
|
|
|
|
|
|
Corporate Sales |
|
|
|
|
|
|
|
|
Corporate Sales Fax |
|
|
|
|
|
|
|
|
Fax |
|
|
|
|
|
|
|
|
Switchboard |
|
|
|
|
|
|
|
|
Web site: http://support.euro.dell.com |
|
|
|
|
|
|
|
|
E-mail: tech_nl@dell.com |
|
|
|
|
|
|
|
Norway |
Technical Support |
|
(Lysaker) |
|
|
|
||
Relational Customer Care |
||
|
||
NOTE: Customers in |
|
|
|
||
Home/Small Business Customer Care |
||
Norway call Sweden for fax |
|
|
|
||
technical support. |
Switchboard |
|
|
|
|
|
Fax Technical Support (Upplands Vasby, Sweden) |
|
|
|
|
|
|
|
|
Fax Switchboard |
|
|
|
|
|
|
|
|
Web site: http://support.euro.dell.com |
|
|
|
|
|
|
|
|
E-mail: nor_support@dell.com |
|
|
E-mail Support for Servers: |
|
|
Nordic_server_support@dell.com |
|
|
|
|
|
|
|
Poland |
Technical Support |
|
(Warsaw) |
|
|
|
||
Customer Care |
||
|
||
|
|
|
|
|
|
|
Sales |
|
|
|
|
|
|
|
|
Switchboard |
|
|
|
|
|
Fax |
|
|
|
|
|
|
|
|
Web site: http://support.euro.dell.com |
|
|
|
|
|
|
|
|
E-mail: pl_support@dell.com |
|
|
|
|
|
|
|
Portugal |
Technical Support |
|
|
|
|
|
|
|
|
Customer Care |
|
|
|
|
|
|
|
|
Sales |
|
|
|
|
|
|
|
|
Switchboard |
|
|
|
|
|
|
|
|
Fax |
|
|
|
|
|
|
|
|
E-mail es_support@dell.com |
|
|
|
|
|
|
02
02
02
02
02
02
020
020
020
020
020
020
020
00
22
22
22
22
22
35
34
35
577 821
481 92 88
toll free: 080016884
481 91 00
481 91 19
481 91 00
481 92 99
581 8838
581 8740
toll free: 0800-0663
682 7171
581 8818
686 8003
686 8003
581 8818
671 16882
671 17514
231 62298
671 16800
46 08 590 05 594
671 16865
57 95 700
57 95 999
57 95 999
57 95 999
57 95 998
800 834 077
800 300 415 or 800 834 075
800 300 410 or 800 300 411 or 800 300 412
or 351 214 220 710
917 229 200
121 424 01 12

Spain |
Home and Small Business |
|
|
|
(Madrid) |
|
|
|
|
|
|
|
||
Technical Support |
|
902 100 130 |
||
|
|
|||
|
|
|
|
|
|
|
|
|
|
|
Customer Care |
|
902 118 540 |
|
|
|
|
|
|
|
|
|
|
|
|
Sales |
|
902 118 541 |
|
|
|
|
|
|
|
|
|
|
|
|
Fax |
|
902 118 539 |
|
|
|
|
|
|
|
|
|
|
|
|
Web site: http://support.euro.dell.com |
|
|
|
|
|
|
|
|
|
|
|
|
|
|
E-mail: web_esp_tech@dell.com |
|
|
|
|
|
|
|
|
|
|
|
|
|
|
Corporate |
|
|
|
|
|
|
|
|
|
|
|
|
|
|
Technical Support |
|
902 100 130 |
|
|
|
|
|
|
|
|
|
|
|
|
Customer Care |
|
902 118 546 |
|
|
|
|
|
|
|
|
|
|
|
|
Switchboard |
91 |
722 92 00 |
|
|
|
|
|
|
|
|
|
|
|
|
Fax |
91 |
722 95 83 |
|
|
|
|
|
|
|
|
|
|
|
|
Web site: http://support.euro.dell.com |
|
|
|
|
|
|
|
|
|
|
|
|
|
|
E-mail: web_esp_tech@dell.com |
|
|
|
|
|
|
|
|
|
|
|
|
|
Sweden |
Technical Support |
08 |
590 05 199 |
|
(Upplands Vasby) |
|
|
|
|
|
|
|
||
Relational Customer Care |
08 |
590 05 642 |
||
|
||||
|
|
|
|
|
|
|
|
|
|
|
Home/Small Business Customer Care |
08 |
587 70 527 |
|
|
|
|
|
|
|
|
|
|
|
|
Fax Technical Support |
08 |
590 05 594 |
|
|
|
|
|
|
|
|
|
|
|
|
Sales |
08 |
590 05 185 |
|
|
|
|
|
|
|
|
|
|
|
|
Web site: http://support.euro.dell.com |
|
|
|
|
|
|
|
|
|
|
|
|
|
|
E-mail: swe_support@dell.com |
|
|
|
|
E-mail Support for Latitude™ and Inspiron™: Swe- |
|
|
|
|
nbk_kats@dell.com |
|
|
|
|
E-mail Support for OptiPlex™ : |
|
|
|
|
Swe_kats@dell.com |
|
|
|
|
E-mail Support for Servers: |
|
|
|
|
Nordic_server_support@dell.com |
|
|
|
|
|
|
|
|
|
|
|
|
|
Switzerland |
Technical Support (Home and Small Business) |
|
0844 811 411 |
|
(Geneva) |
|
|
|
|
|
|
|
||
Technical Support (Corporate) |
|
0844 822 844 |
||
|
|
|||
|
|
|
|
|
|
|
|
|
|
|
Customer Care (Home and Small Business) |
|
0848 802 202 |
|
|
|
|
|
|
|
|
|
|
|
|
Customer Service (Corporate) |
|
0848 821 721 |
|
|
|
|
|
|
|
|
|
|
|
|
Switchboard |
022 |
799 01 01 |
|
|
|
|
|
|
|
|
|
|
|
|
Fax |
022 |
799 01 90 |
|
|
|
|
|
|
|
|
|
|
|
|
Web site: http://support.euro.dell.com |
|
|
|
|
|
|
|
|
|
|
|
|
|
|
E-mail: swisstech@dell.com |
|
|
|
|
|
|
|
|
|
|
|
|
|
U.K. |
Technical Support (Corporate/Preferred |
0870 |
908 0500 |
|
(Bracknell) |
Accounts/PAD [1000+ employees]) |
|||
|
|
|||
|
|
|
|
|
|
Technical Support (Direct/PAD and General) |
0870 |
908 0800 |
|
|
|
|
|
|
|
|
|
|
|
|
Global Accounts Customer Care |
01344 |
723186 |
|
|
|
|
|
|
|
|
|
|
|
|
Corporate Customer Care |
0870 |
908 0500 |
|
|
|
|
|
|
|
|
|
|
|
|
Preferred Accounts (500-5000 employees) |
01344 |
723 196 |
|
|
Customer Care |
|||
|
|
|
||
|
|
|
|
|
|
|
|
|
|
|
Central Government Customer Care |
01344 |
723 193 |
|
|
|
|
|
|
|
|
|
|
|
|
Local Government Customer Care |
01344 |
723 194 |
|
|
|
|
|
|
|
|
|
|
|
|
Home/Small Business Sales |
0870 |
907 4000 |
|
|
|
|
|
|
|
|
|
|
|
|
Home/Small Business Customer Care |
0870 |
906 0010 |
|
|
|
|
|
|
|
|
|
|
|
|
Corporate/Public Sector Sales |
01344 |
860 456 |
|
|
|
|
|
|
|
|
|
|
|
|
Web site: http://support.euro.dell.com |
|
|
|
|
|
|
|
|
|
|
|
|
|
|
|
|
|

 E-mail: dell_direct_support@dell.com
Asia and Other Regions Contact Numbers
Country (City)
Australia
(Sydney)
Brunei
NOTE: Customers in Brunei call Malaysia for customer assistance.
China
(Xiamen)
Hong Kong
NOTE: Customers in Hong Kong call Malaysia for customer assistance.
Japan
(Kawasaki)
Department Name or Service |
Area Code |
|
|
|
|
Home and Small Business |
|
|
|
|
|
Government and Business |
|
|
|
|
|
Preferred Accounts Division (PAD) |
|
|
|
|
|
Customer Care |
|
|
|
|
|
Corporate Sales |
|
|
|
|
|
Transaction Sales |
|
|
|
|
|
Fax |
|
|
|
|
|
Customer Technical Support |
|
(Penang, Malaysia) |
|
|
|
|
|
Customer Service |
|
(Penang, Malaysia) |
|
|
|
|
|
Transaction Sales |
|
(Penang, Malaysia) |
|
|
|
|
|
Technical Support |
|
|
|
|
|
Customer Experience |
|
|
|
|
|
Home and Small Business |
|
|
|
|
|
Preferred Accounts Division |
|
|
|
|
|
Large Corporate Accounts |
|
|
|
|
|
Technical Support |
|
|
|
|
|
Customer Service (Penang, Malaysia) |
|
|
|
|
|
Transaction Sales |
|
|
|
|
|
Corporate Sales |
|
|
|
Technical Support (Server) |
|
|
|
|
|
Technical Support (Dimension™ and Inspiron) |
|
Technical Support Outside of Japan (Dimension |
|
and Inspiron) |
81-44 |
|
|
|
|
Technical Support (Dell Precision™, OptiPlex, and |
|
Latitude) |
|
|
81-44 |
Technical Support Outside of Japan (Dell Precision, |
|
OptiPlex, and Latitude) |
|
|
|
|
|
Customer Care |
044 |
|
|
|
|
24-Hour Automated Order Status Service |
044 |
|
|
|
|
Home and Small Business Group Sales |
044 |
|
|
|
|
Individual User Sales |
044 |
|
|
|
|
Business Sales Division (up to 400 employees) |
044 |
|
|
|
|
Government, Educational, and Medical Sales |
044 |
|
|
|
|
Preferred Accounts Division Sales (over 400 |
044 |
employees) |
|
|
|
|
|
Dell Global Japan |
044 |
|
|
|
|
Large Corporate Accounts Sales (over 3500 |
044 |
employees) |
|
|
|
|
|
Faxbox Service |
044 |
|
|
|
|
Switchboard |
044 |
|
|
|
|
Web site: http://support.jp.dell.com |
|
|
|
|
|
Local Number or Toll-Free Number
1-300-65-55-33
toll free: 1-800-633-559
toll free: 1-800-060-889
toll free: 1-800-819-339
toll free: 1-800-808-385
toll free: 1-800-808-312
toll free: 1-800-818-341
633 4966
633 4949
633 4955
toll free: 800 858 2437
toll free: 800 858 2060
toll free: 800 858 2222
toll free: 800 858 2062
toll free: 800 858 2999
toll free: 800 96 4107
633 4949
toll free: 800 96 4109
toll free: 800 96 4108
toll free: 0120-1984-35
toll free: 0120-1982-26
520-1435
toll free: 0120-1984-33
556-3894
556-4240
556-3801
556-3344
556-3344
556-3344
556-1469
556-3433
556-3469
556-3430
556-3490
556-4300

Korea
(Seoul)
Macau
NOTE: Customers in Macau call Malaysia for customer assistance.
Malaysia
(Penang)
New Zealand
Singapore
(Singapore)
NOTE: Customers in Singapore call Malaysia for customer assistance.
South Africa
(Johannesburg)
Southeast Asian/Pacific Countries
(excluding Australia, Brunei, China, Hong Kong, Japan, Korea, Macau, Malaysia, New Zealand, Singapore, Taiwan, and Thailand—refer to individual listings for these countries)
Taiwan
Thailand
NOTE: Customers in Thailand call Malaysia for customer assistance.
Technical Support |
|
toll free: 080-200-3800 |
|
|
|
Sales |
|
toll free: 080-200-3600 |
|
|
|
|
|
|
Customer Service (Penang, Malaysia) |
|
toll free: 604-633-4949 |
|
|
|
|
|
|
Customer Service (Seoul, Korea) |
|
080-200-3800 |
|
|
|
|
|
|
Fax |
|
2194-6202 |
|
|
|
|
|
|
Switchboard |
|
2194-6000 |
|
|
|
|
|
|
Technical Support |
|
toll free: 0800 582 |
|
|
|
|
|
|
Customer Service (Penang, Malaysia) |
|
633 4949 |
|
|
|
|
|
|
Transaction Sales |
|
toll free: 0800 581 |
|
|
|
|
|
|
Technical Support |
|
toll free: 1 800 888 298 |
|
|
|
|
|
|
Customer Service |
04 |
633 4949 |
|
|
|
|
|
|
Transaction Sales |
|
toll free: 1 800 888 202 |
|
|
|
|
|
|
Corporate Sales |
|
toll free: 1 800 888 213 |
|
|
|
|
|
|
Home and Small Business |
|
0800 446 255 |
|
|
|
|
|
|
Government and Business |
|
0800 444 617 |
|
|
|
|
|
|
Sales |
|
0800 441 567 |
|
|
|
|
|
|
Fax |
|
0800 441 566 |
|
|
|
|
|
|
Technical Support |
|
toll free: 800 6011 051 |
|
|
|
|
|
|
Customer Service (Penang, Malaysia) |
04 |
633 4949 |
|
|
|
|
|
|
Transaction Sales |
|
toll free: 800 6011 054 |
|
|
|
|
|
|
Corporate Sales |
|
toll free: 800 6011 053 |
|
|
|
|
|
|
Technical Support |
011 |
709 7710 |
|
|
|
|
|
|
Customer Care |
011 |
709 7707 |
|
|
|
|
|
|
Sales |
011 |
709 7700 |
|
|
|
|
|
|
Fax |
011 |
706 0495 |
|
|
|
Switchboard |
011 |
709 7700 |
|
|
|
|
|
|
Web site: http://support.euro.dell.com |
|
|
|
|
|
|
|
|
E-mail: dell_za_support@dell.com |
|
|
|
|
|
|
|
|
Customer Technical Support, Customer Service, |
|
60 4 633-4810 |
and Sales (Penang, Malaysia) |
|
|
|
|
|
Technical Support |
|
toll free: 0080 60 1225 |
|
|
|
|
|
|
Technical Support (Servers) |
|
toll free: 0080 60 1256 |
|
|
|
|
|
|
Customer Service (Penang, Malaysia) |
|
633 4949 |
|
|
|
|
|
|
Transaction Sales |
|
toll free: |
|
|
0080 651 228/0800 33 556 |
|
|
|
|
|
|
Corporate Sales |
|
toll free: |
|
|
0080 651 227/0800 33 555 |
|
|
|
|
|
|
Technical Support |
|
toll free: 088 006 007 |
|
|
|
|
|
|
Customer Service (Penang, Malaysia) |
|
633 4949 |
|
|
|
|
|
|
Sales |
|
toll free: 088 006 009 |
|
|
|
Back to Contents Page

Back to Contents Page
Dell™ Diagnostics: Dell Latitude™ C800 User's Guide
When to Use the Dell Diagnostics |
Advanced Testing |
Features of the Dell Diagnostics |
Confirming the System Configuration Information |
Starting the Dell Diagnostics |
|
|
|
When to Use the Dell Diagnostics
Whenever a major component or device in your computer does not function properly, you may have a component failure. If you are experiencing a problem with your computer, Dell recommends that you perform the checks in "Finding Solutions" and run the Dell Diagnostics before you call Dell for technical assistance.
As long as the microprocessor and the input and output components of your computer (the display, keyboard, and floppy drive) are working, you can use the Dell Diagnostics. Running the Dell Diagnostics may help you to resolve the problem yourself quickly without having to contact Dell for assistance.
If you are experienced with computers and know what component(s) you need to test, simply select the appropriate diagnostic test group(s) or subtest(s). If you are unsure about how to begin diagnosing a problem, see "Starting the Dell Diagnostics" and "Advanced Testing."
Features of the Dell Diagnostics
The Dell Diagnostics helps you check your computer's hardware without any additional equipment and without destroying any data. By using the diagnostics, you can have confidence in your computer's operation. And if you find a problem you cannot solve by yourself, the diagnostic tests can provide you with important information you will need when talking to Dell's service and support personnel. If you are experiencing a problem with your computer, Dell recommends that you perform the checks in "Finding Solutions" and run the Dell Diagnostics before you call Dell for technical assistance.
NOTICE: Use the Dell Diagnostics to test only your Dell computer. Using this program with other computers may cause incorrect computer responses or result in error messages.
The diagnostic test groups or subtests also have these helpful features:
•Options that let you perform quick checks or extensive tests on one or all devices
•An option that allows you to choose the number of times a test group or subtest is repeated
•The ability to display test results or to save them in a file
•Options to temporarily suspend testing if an error is detected, or to terminate testing when an adjustable error limit is reached
•Extensive online Help screens that describe the tests and how to run them
•Status messages that inform you whether test groups or subtests were completed successfully
•Error messages that appear if any problems are detected
Starting the Dell Diagnostics
NOTE: Dell recommends that print these procedures before you begin.
1.Turn off the computer.
2.Undock the computer if you have it docked.
3.Turn on the computer.
4.Press <F2> at the start of the boot routine to access the system setup menu.
NOTE: Write down your current boot sequence in the event you want to restore it after running the Dell Diagnostics.
5. Select the following boot sequence.
NOTE: You can only boot from a CD, CD-RW, or DVD drive installed as a fixed optical drive. You cannot boot from one of these modules installed in the modular bay.
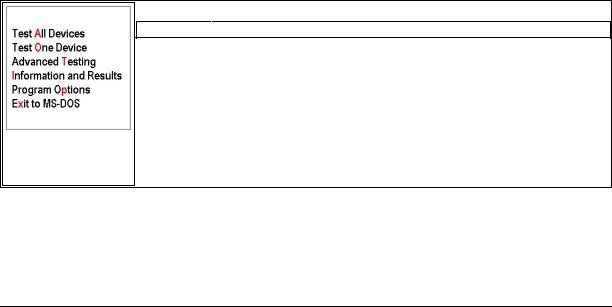
•Boot First Device: Diskette Drive
•Boot Second Device: CD/DVD/CD-RW Drive
•Boot Third Device: Internal HDD
6.Insert the Dell ResourceCD into the CD drive.
7.Turn the computer off.
8.Turn the computer on. The computer starts and automatically begins to run the Dell Diagnostics.
9.When you have completed running diagnostics, remove the ResourceCD from the CD drive.
To change the boot sequence, repeat steps 1 through 6, customizing the boot sequence to fit your needs. Then restart your computer.
When you start the diagnostics, the Dell logo screen appears, followed by a message telling you that the diagnostics is loading. After the diagnostics loads, the Diagnostics Menu appears.
To select an option from this menu, highlight the option and press <Enter>, or press the key that corresponds to the highlighted letter in the option you choose.
Diagnostics Menu
Option |
Function |
|
|
Test All Devices 
 Performs extensive diagnostic tests or quick diagnostic tests on all devices.
Test One |
Performs extensive diagnostic tests or quick diagnostic tests on one device after you select it |
Device |
from a list of device groups. After you select Test One Device, press <F1> for more |
|
information about a test. |
|
|
|
|
Advanced |
Allows you to modify the parameters of a test and select a group of tests to perform. You can |
Testing |
access online Help for more information about Advanced Testing. |
|
|
|
|
Information and |
Provides test results, test errors, version numbers of the subtests used by the Dell |
Results |
Diagnostics, and additional help on the Dell Diagnostics. |
|
|
|
|
Program |
Allows you to change the settings of the Dell Diagnostics. |
Options |
|
|
|
|
|
Exit to MS-DOS |
Exits to the MS-DOS® prompt. |
|
|
For a quick check of your computer, select Quick Tests from the Test All Devices or Test One Device option. Quick Tests runs only the subtests that do not require user interaction and that do not take a long time to run. Dell recommends that you choose Quick Tests first to increase the odds of tracing the source of the problem quickly.
For a thorough check of your computer, select Extended Tests from the Test All Devices option.
To check a particular area of your computer, select Extended Tests from the Test One Device option, or select the Advanced Testing option to customize your test(s).
Advanced Testing
When you select Advanced Testing from the Diagnostics Menu, the following screen appears listing the diagnostic test device groups and devices of the selected device group, and it allows you to select categories from a menu. Press the arrow keys or <Page Up> and <Page Down> keys to navigate the screen.
Advanced Testing Main Screen
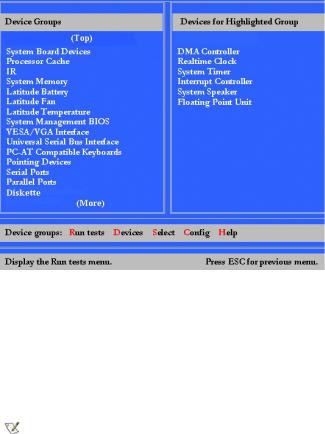
Information in the Advanced Testing screen is presented as follows:
•On the left side of the screen, the Device Groups area lists the diagnostic test groups in the order they will run if you select All from the Run tests menu category. Press the upor down-arrow key to highlight a test device group.
•On the right side of the screen, the Devices for Highlighted Group area lists the computer's currently detected hardware and some of the relevant settings.
•Two lines at the bottom of the screen make up the menu area (see "Advanced Testing Help Menu"). The first line lists the categories you can select; press the leftor right-arrow key to highlight a menu category. The second line gives information about the category currently highlighted.
NOTE: The options displayed on your screen should reflect the hardware configuration of your computer.
Advanced Testing Help Menu
For more information on using the Advanced Testing option:
1.Press <h>.
2.Highlight the Help category and press <Enter>, or press the key that corresponds to the highlighted letter in the category you choose.
Advanced Testing Help Categories
Help |
|
Category |
Description |
|
|
|
|
Menu |
Provides descriptions of the main menu screen area, the Device Groups, and the different diagnostic menus and commands and |
|
instructions on how to use them. |
|
|
|
|
Keys |
Explains the functions of the all of the keystrokes that can be used in Dell Diagnostics. |
|
|
|
|
Device |
Describes the test group that is presently highlighted in the Device Groups list on the main menu screen. It also provides reasoning |
Group |
for using some tests. |
|
|
|
|
Device |
Describes the function and purpose of the highlighted device in the Device Groups. For example, the following information |
|
appears when you select the Device Help category for Diskette in the Device Groups list: |
|
Diskette Drive A |
|
The floppy drive device reads and writes data to and from floppy disks. Floppy disks are flexible recording media, sometimes |
|
contained in hard shells. Floppy disk recording capacities are small and access times are slow relative to hard disk drives, but |
|
they provide a convenient means of storing and transferring data. |
|
|
|
|
Test |
Provides a thorough explanation of the test procedure of each highlighted test group subtest. An example of the Diskette subtest |
|
floppy drive Seek Test is as follows: |
|
Diskette Drive A - floppy drive Seek Test |
|
This test verifies the drive's ability to position its read/write heads. The test |
|
operates in two passes: first, seeking from the beginning to ending cylinders |

|
inclusively, and second, seeking alternately from the beginning to ending cylinders with |
|
convergence towards the middle. |
|
|
|
|
Versions |
Lists the version numbers of the subtests that are used by the Dell Diagnostics. |
|
|
|
|
|
|
Confirming the System Configuration Information
When you boot your computer from your ResourceCD, the diagnostics checks your system configuration information and displays it in the Device Groups area on the main screen.
The following sources supply this configuration information for the diagnostics:
•The system configuration information settings (stored in nonvolatile random-access memory [NVRAM]) that you selected while using the system setup program
•Identification tests of the microprocessor, the video controller, the keyboard controller, and other key components
•Basic input/output system (BIOS) configuration information temporarily saved in RAM
Do not be concerned if the Device Groups area does not list the names of all the components or devices you know are part of your computer. For example, you may not see a printer listed, although you know one is attached to your computer. Instead, the printer is listed as a parallel port. The computer recognizes the parallel port as LPT1, which is an address that tells the computer where to send outgoing information and where to look for incoming information. Because your printer is a parallel communications device, the computer recognizes the printer by its LPT1 address and identifies it as a parallel port. You can test your printer connection in the Parallel Ports tests.
Back to Contents Page

Back to Contents Page
Reinstalling Software: Dell™ Latitude™ C800 User's Guide
 Installing Drivers and Utilities
 Installing the Asset Tag Utility
 Installing the Internal Modem and Network Adapter Drivers (Optional)
NOTES: Dell recommends that you print these procedures before you begin.
You may need administrator privileges to perform some of the procedures in this section. Dell recommends that you check with your network administrator before performing the procedures.
Installing Drivers and Utilities
The Dell Drivers and Utilities CD for your computer contains drivers for operating systems that may not be on your computer. Verify that the driver you are loading is under your operating system subdirectory.
You can also access and download new drivers, system tools, and documentation from Dell's technical support page at http://support.dell.com. For more information on using the operating system installed on your computer by Dell, see the operating system user's guide that came with your computer.
NOTICE: Before you reinstall drivers, make sure that your computer is undocked.
To install a driver or utility from your Drivers and Utilities CD, perform the following steps:
1.Save your work in all open programs.
2.Insert your Drivers and Utilities CD into the CD or DVD drive.
In most cases, the CD should start running automatically. If it does not, start Microsoft® Windows® Explorer, click your CD drive directory to display the CD contents, and then click the Start.htm file.
3.Click a language button to select your preferred user interface language.
The System Software screen appears, displaying a list of operating systems (Software by Operating System) and an All Software category.
4.Under Software by Operating System, click your operating system to display a list of drivers, a Utilities subdirectory, and a
Documentation subdirectory.
5.Click the type of driver (for example, Audio) or the utility you want to install. A link appears for the specific driver or utility used by your computer.
6.Click the link to display the Languages screen.
7.Click your preferred language for the driver or utility (if available) or click Multiple.
8.At the driver information screen, do one of the following:
•Click the Install button (if present) to start the automatic installation. At the dialog box, select Run this program from its current location and then follow the screen prompts to complete the installation.
•If no Install button is present, automatic installation is not an option. For installation instructions, either go to the appropriate procedure below or click the Extract button, follow the extracting instructions, and read the readme file.
NOTE: If instructed to navigate to the driver files, click the CD directory on the driver information screen to display the files associated with that driver.
Installing the Asset Tag Utility
1.Insert the Drivers and Utilities CD.
2.Double-click the My Computer icon on your desktop.
3.Double-click the icon for your CD or DVD drive.
4.Double-click the folder for your operating system.

5.Double-click the folder for the utilities.
6.Copy the Asset Tag utility on the Drivers and Utilities CD to the c:\dell\util directory on your hard drive.
To use the utility, see "Assigning an Asset Tag."
Installing the Internal Modem and Network Adapter Drivers (Optional)
If you ordered the internal modem, you need to reinstall the modem driver.
If you ordered the combination modem/network adapter, you need to reinstall both the modem and network adapter drivers.
To install a modem or network adapter driver, use the appropriate procedure in this section, depending on your operating system.
Installing the Modem or Network Adapter Driver for Windows 2000
1.Save your work and insert your Drivers and Utilities CD.
2.Click the Start button, point to Settings, and double-click Control Panel.
3.In the Control Panel window, double-click the System icon.
4.In the System Properties window, click the Hardware tab.
5.Click the Device Manager... button, and look beneath Other Devices.
If you are installing a modem driver, click PCI Simple Communications Controller. If you are installing a network adapter, click Ethernet Controller.
6.From the pull-down menu, click Action, and select Properties.
7.Click the Reinstall Driver button, and click Next.
8.Verify that Search for a suitable driver for my device (Recommended) is selected, and click Next.
9.Verify that CD-ROM drives is selected, and click Next.
10.When the search is complete and the appropriate driver found, click Next.
11.Click Finish to complete installation of the modem driver.
Installing the Modem or Network Adapter Driver for Windows Me
1.Save your work and insert your Drivers and Utilities CD.
2.Click the Start button, point to Settings, and click Control Panel.
3.In the Control Panel window, double-click the System icon.
NOTE: To see the System icon, you may need to click the View all control panel options link at the left side of the screen.
4.In the System Properties window, click the Device Manager tab, and look beneath Other Devices.
If you are installing a modem, click PCI Communication Device.
If you are installing a network adapter, click PCI Ethernet Controller.
5.Click the Properties button.
6.Click the Reinstall Driver button.
7.Verify that Automatic search for a better driver (Recommended) is selected, and click Next. If you are installing a network adapter, click Finish, and then click Yes to restart the computer.
If you are installing a modem, perform the following steps:
a.In the Select Other Driver window, look under the Location column for a path containing WINME.
b.Under Device Description, click on the name corresponding to the WINME line, and click OK to confirm.
c.Click Finish, and then click Yes to restart the computer.

Installing Network Adapter Drivers for Windows NT®
NOTE: Check with your network administrator about how to set up the Microsoft TCP/IP Properties window for your computer before performing the following procedure.
1.Save your work in all open application programs.
2.Insert the Drivers and Utilities CD into the CD or DVD drive.
3.Click the Start button, and then click Run.
4.In the Run window, type the following line:
x:\start.htm
where x is your CD drive letter.
5.Click to select the appropriate language.
6.Click All Software.
7.Under Name, click the link to the device you are installing.
8.Under Installation Instructions, make a note of the path in the CD Directory link. For example:
comm.\R18322
9.Click the CD Directory link.
10.Double-click Drivers.
11.Double-click Lan.
12.Double-click NT_Softex_APM.
13.Double click setup.exe.
14.When the installation is complete, click No, I will restart my computer later.
15.Click Finish.
16.Click the Start button, point to Settings, and click Control Panel.
17.In the Control Panel window, double-click the Network icon.
18.In the Network window, click Adapters.
19.Click the Add... button, and then click the Have Disk... button.
20.In the Have Disk window, type the following line:
x:\path\Drivers\LAN\Win95_NT
where x is your CD drive letter and path is the path in the CD Directory link.
21.Click OK.
22.Verify that the correct device to be installed is highlighted and click OK.
23.In the Setup window, click OK.
24.In the Network window, click Close.
25.In the Microsoft TCP/IP Properties window, select the device you are installing in the Adapters field. Complete the IP address information as directed by your network administrator. Click OK.
26.Click Yes to restart your computer with the Drivers and Utilities CD in the CD or DVD drive.
Installing Internal Modem Drivers for Windows NT

1.If you have not already done so, perform steps 2 through 14 under Installing Network Adapter Drivers to install Advanced Power Management (APM) support.
2.After the computer restarts, click the Start button, and then click Run.
3.In the Run window, type the following line:
x:\start.htm
where x is your CD drive letter.
4.Click to select the appropriate language.
5.Click All Software.
6.Under Name, click the link to the device you are installing.
7.Click the CD Directory link.
8.Double-click Drivers.
9.Double-click Modem.
10.Double-click NT.
11.Double-click MdmSetup.
12.Double-click setup.exe.
13.In the Modem Setup window, click the Install button.
14.In the Mini-PCI Winmodem window, click OK to confirm the highlighted COM Port number.
Back to Contents Page
 Loading...