


Table of Contents |
|
|
1 |
Turning the Power on and off ........................................................ |
2 |
|
Turning the Power on ........................................................................................ |
2 |
|
Turning the Power off ....................................................................................... |
3 |
2 |
Paper ............................................................................................. |
4 |
|
Compatible Paper Types and Paper Feed Methods .......................................... |
4 |
|
Incompatible Paper............................................................................................ |
6 |
|
Printable Areas .................................................................................................. |
7 |
|
Storing Paper ..................................................................................................... |
8 |
3 |
Loading Paper ............................................................................... |
9 |
4 |
Paper Jams (How to Remove Jammed Paper) ................................... |
13 |
|
Locating Jammed Paper .................................................................................. |
13 |
|
Procedures for Removing Paper Jams ............................................................ |
14 |
|
After the Paper Jam has been Removed ......................................................... |
20 |
5 |
Canceling Printing ....................................................................... |
22 |
|
Canceling Operations Currently in Progress (Soft Reset) ................................... |
22 |
|
Canceling All Operations (Hard Reset) .................................................................. |
23 |
6 |
Checking Operation..................................................................... |
24 |
|
Test Print ......................................................................................................... |
24 |
1
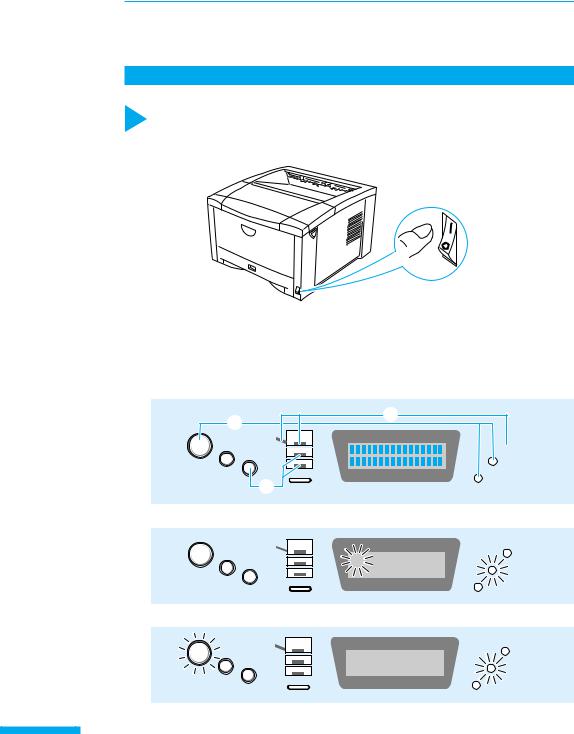
1 Turning the Power on and off
Printing is enabled as soon as you turn on the power. Please note that all data will be lost when you turn off the printer. The instructions below show the correct way to turn the printer on and off.
Turning the Power on
Follow the instructions below to turn the power on.
How to turn the power on
1Press the power switch on the lower right side of the front panel to turn on the printer.
Press the power switch to the“ ” position.
The display fills with the■ symbol and the printer runs a check on the operation panel indicators as shown below.
q , ,
w , paper tray, upper paper cassette
e Middle paper cassette, lower paper cassette,


|
|
|
|
|
The number in the message and the indicator flash.
|
02 |
|
|
||
|
|
|
|
|
|
|
|
The and indicators flash and printing is enabled.
|
|
|
|
00 A4 |
|
|
||
|
|
|
|
|
|
|
|
2

Turning the Power off
Follow the instructions below to turn off the printer. Always check that there is no printing
data remaining in the printer’s memory before you turn off the printer.
•If the power is turned off when the indicator is on, any printing data remaining in the printer’s memory is lost. Press the key while off-line to output any important printing data before turning off the power.
•Do not turn off the power when the printer is starting up.
How to turn the power off
1 Check that the indicator is off.
2Press the power switch on the lower right side of the front panel to turn off the printer.
Press the power switch to the“○”position.
Power saving (Panel off mode)
The printer uses an on-demand fixing method so the power used when the printer is in stand-by mode is negligible. However the printer will turn off all operation panel indicators except for the indicator (panel off mode) to save power if no operations are carried out and no data is sent from the computer for a set time.
The panel off mode is automatically canceled if data is sent from the computer or an operation panel key is pressed.
You can set the panel off mode time-out from the menu.
3

2 Paper
Use the correct paper in order to get the best performance from your printer. Using incompatible paper can lead to reduced printing quality and paper jamming.
Compatible Paper Types and Paper Feed Methods
Paper compatible for the paper cassette
You can load the following standard size paper into the paper cassette.
Paper type |
Size (Weight) |
Max. sheet no. |
Output sheet no. |
|
Plain paper |
A3, A4, A5, B4, B5 (64-90 g/m2) |
approx. 250 |
approx. 150 |
|
/64 g/m2 |
||||
|
|
|
||
Secondary original |
|
|
|
|
drawing paper |
A3, A4, B4, B5 |
approx. 250 |
1 |
|
(Tracing paper) |
|
|
|
• You can load Ledger-, Legal-, Letterand Executive-size paper into the optional L-shaped paper cassette.
Paper compatible for the paper tray
You can load the following sizes of paper into the paper tray.
Paper type |
Size (Weight) |
Max. sheet no. |
Output sheet no. |
|
Plain paper |
width: 100-297 mm, |
approx. 100 |
approx. 150 |
|
length: 148-432 mm (64-90 g/m2) |
/64 g/m2 |
|||
|
|
|||
Thick paper |
width: 100-297 mm, |
approx. 50 |
approx. 150 |
|
length: 148-432 mm (90-128 g/m2) |
/128 g/m2 |
|||
|
|
|||
Secondary original |
|
|
|
|
drawing paper |
A3, A4, B4, B5 |
approx. 100 |
1 |
|
(Tracing paper) |
|
|
|
|
Transparencies |
A4 (Canon domestic LBP |
approx. 50 |
approx. 100 |
|
transparencies: 8.7 g) |
||||
|
|
|
||
Label sheet |
A4 (Canon domestic label sheet: 7.8 g) |
approx. 40 |
approx. 100 |
4
Label sheet
• The following types of label sheet can cause paper jams that are hard to remove or damage the printer. Do not use sheet that has adhesive surfaces exposed or sheet from which labels have been removed to leave the lower surface exposed.
Transparencies
• Transparencies may be difficult to separate from each other. Take several sheets and loosen them by flexing them several times before loading them into the printer.
Secondary original drawing paper (Tracing paper)
• Sheets of tracing paper may be difficult to separate from each other. Take several sheets and loosen them by flexing them several times before loading them into the printer.
•Check which side of the paper is face up and which side is face down. When you load tracing paper into the paper cassette, load it so that the face-up side is face down. When you load tracing paper into the paper tray, load it so that the face-up side is face up.
•When you first open a packet of tracing paper, the paper could be warped. Before loading the paper into the printer, leave it in its packaging for a while to allow it to straighten out.
•Remove each sheet of tracing paper from the output tray as soon as it is outputted to prevent paper jams.
If you want to use recycled paper in the duplex unit
If you use recycled paper that has been stored in extremely humid conditions such as during the wet season or in a room without air-conditioning during summer this could cause the paper to crease or bend at the corners.
If this happens, it should be dealt with in the following ways.
Leave the paper in an air-conditioned room for two hours before using itTurn the paper over so that the other side is facing up when you load the
paper into the printer
If the paper still creases or bends at the corners after you have tried the above solutions, use new paper.
5

Incompatible Paper
In order to avoid paper jams and damaging the printer, do not use the following kinds of paper.
Paper that jams easily
•Paper that is too thick or too thin
•Non-standard size paper
•Wet or damp paper
•Torn paper
•Coarse or extremely smooth paper
•Label sheet with binder holes, serrated paper
•Curled paper, creased paper
•Specially coated paper
•Label sheet with labels that peel off easily
•Paper which has already been used for photocopying or laser printing (reverse side also incompatible)
Heat-sensitive paper
•Paper with ink that melts, burns or gives off toxic vapours in the heat of the fixing assembly (approx. 150 )
•Thermal paper
•Color paper with a processed surface
•Specially coated paper
•Paper with adhesive on it
Paper that can cause printer malfunction or damage
•Carbon paper
•Paper with staples, clips, ribbons or tape attached
•Paper which has already been used for photocopying or laser printing (reverse side also incompatible)
Paper on which toner cannot fix easily
•Coarse paper such as pulp paper and Japanese writing paper
•Paper with rough fibers
•Specially coated paper
6
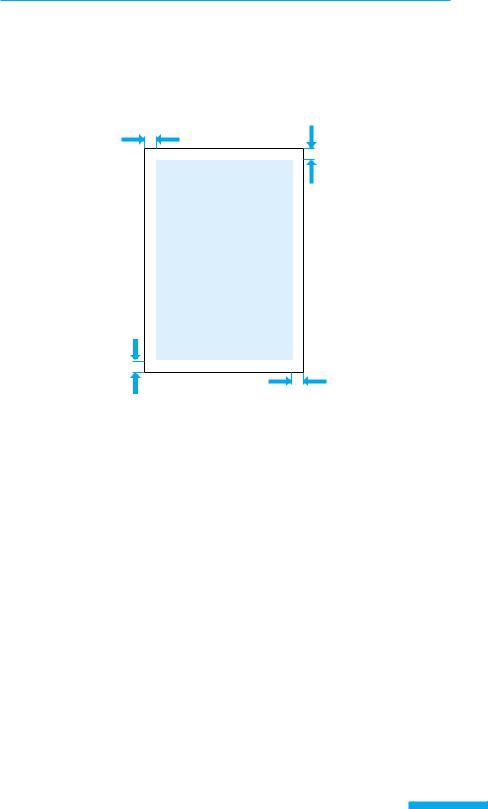
Printable Areas
The areas that can be printed on the paper are given below.
●Plain paper, thick paper, tracing paper, transparencies, label sheet
Plain paper, thick paper, tracing paper, transparencies, and label sheet can be printed in areas with a minimum margin of 5 millimeters.
5 mm
5 mm
5 mm
5 mm
7
 Loading...