


Before You Start |
7 |
Legal Notices |
8 |
Legal Limitations on the Usage of Your Product and the Use of Images |
10 |
Using the e-Manual |
11 |
How to Use the e-Manual |
12 |
Operating Environment |
13 |
Installing the e-Manual |
14 |
Uninstalling the e-Manual |
18 |
Screen Layout of the e-Manual |
21 |
Top Page |
22 |
Topic Page |
24 |
Site Map |
25 |
Search Method |
26 |
Viewing the e-Manual |
27 |
Disclaimers |
29 |
Copyright |
30 |
Trademarks |
31 |
Third Party Software |
32 |
Important Safety Instructions |
33 |
Installation |
34 |
Power Supply |
35 |
Handling |
36 |
Maintenance and Inspections |
38 |
Consumables |
40 |
Others |
41 |
About This Printer |
42 |
Printer Specifications |
43 |
System Requirements for Printing |
46 |
Introduction of the Optional Accessories |
47 |
Names and Dimensions of Each Part |
48 |
Control Panel |
51 |
Printer Status Window |
53 |
Energy-saving Mode |
55 |
Sleep Mode |
56 |
Auto Shutdown |
57 |
Introduction of the Utilities |
59 |
Cautions for Handling the Printer |
61 |
Consumables |
62 |
Maintenance |
63 |
Toner Cartridge Replacement |
64 |
Attention (Toner Cartridge) |
65 |
Before Replacing the Toner Cartridge |
67 |
Replacing the Toner Cartridge |
69 |
Storing Toner Cartridges |
72 |
Moving the Printer |
73 |
Cleaning the Printer |
76 |
Cleaning the Inside of the Printer |
77 |
Cleaning the Outside of the Printer |
79 |
Attention (Cleaning) |
81 |
Location of the Serial Number |
82 |
Printer Installation |
83 |
Attention (Printer Installation) |
84 |
Confirming the Supplied Accessories and Checking the Installation Site |
86 |
Removing the Packing Materials |
88 |
Installing the Printer |
93 |
Installing the Paper Feeder |
95 |
Driver Installation |
99 |
Installing the Printer Driver |
100 |
Easy Installation |
102 |
Connecting the Printer and Computer |
105 |
Easy Installation (USB Connection) |
108 |
Easy Installation (LAN Connection) |
111 |
Easy Installation (via the Print Server) |
117 |
After Installation |
121 |
Installing with Plug and Play |
123 |
Uninstalling the Printer Driver |
126 |
Starting the Uninstaller from [Control Panel] |
132 |
Basic Printer Operations |
133 |
Usable Paper |
134 |
Precautions for Paper |
136 |
Printable Area |
138 |
Paper Loading and Output |
139 |
Loading Paper in the Paper Drawer |
141 |
Attention (Paper Drawer) |
144 |
Registering the Paper Size |
145 |
Loading Paper in the Multi-purpose Tray |
147 |
Attention (Multi-purpose Tray) |
150 |
Basic Printing Procedure |
151 |
Attention (Basic Printing) |
155 |
How to Use Help |
156 |
Canceling a Job |
158 |
Canceling a Print Job Using the Print Queue |
159 |
Canceling a Print Job Using the Printer Status Window |
161 |
Canceling a Print Job Using the Cancel Job Key |
162 |
Checking the Printer Status |
163 |
Printing on Various Types of Paper |
164 |
Printing on Plain Paper, Heavy Paper, or Index Card |
165 |
Printing on Transparencies |
166 |
Printing on Labels |
167 |
Printing on Envelopes |
168 |
Printing on Custom Size Paper |
170 |
Loading Custom Size Paper |
171 |
Registering a Custom Paper Size |
174 |
Paper Loading Orientation |
176 |
Useful Printing Functions |
177 |
Displaying the Setting Screen |
178 |
1-sided Printing and 2-sided Printing |
180 |
Attention (1-sided Printing and 2-sided Printing) |
183 |
Scaling Print Output |
184 |
Layout Printing (N-page Print) |
186 |
Printing an Image Larger than A4 (Poster Printing) |
188 |
Booklet Printing |
190 |
Adding a Watermark to a Document to Be Printed (Watermark Printing) |
193 |
Adding, Editing, or Deleting a Watermark |
195 |
Printing Borders, the Printing Date, and so on |
198 |
Combining Data before Printing |
200 |
Changing the Output Method According to the Print Data or Number of Copies |
204 |
Printing Data with Different Orientations in the Same Data |
205 |
Printing with a Gutter |
207 |
Selecting the Paper Output Method |
209 |
Printing with the Page 180 Degrees Rotated |
211 |
Selecting Paper for Each Page |
213 |
Adjusting the Image Quality or Grayscale |
215 |
Performing Printing Appropriate for Particular Print Data |
216 |
Correcting Rough-Textured Images |
217 |
Adjusting the Toner Density |
219 |
Printing with Brightness and Contrast Adjusted |
221 |
Registering the Printing Preferences |
223 |
Changing the Default Values for Printing Preferences |
224 |
Saving Frequently Used Printing Preferences (Adding/Editing/Deleting a "Profile") |
225 |
Selecting a "Profile" |
229 |
Configuring the Network Settings (Sharing the Printer) |
230 |
Checking Your Printing Environment |
231 |
If You Use the Printer by Direct Connection |
232 |
Installing the Printer Driver (LAN Connection) |
233 |
Setting the IP Address |
234 |
Setting the IP Address Using NetSpot Device Installer |
235 |
Setting the IP Address Using the ARP/PING Command |
240 |
Setting the IP Address Using the Printer Status Window |
242 |
Setting a Port and Installing the Printer Driver |
244 |
Changing the Network Settings for the Printer |
257 |
Configuring the Protocol Settings |
258 |
Attention (Protocol Settings) |
264 |
Changing the Network Transmission Speed or Transfer Mode |
265 |
Initializing the Network Settings |
267 |
Initializing Using the Remote UI |
268 |
Initializing Using FTP Client |
270 |
Initializing Using NetSpot Device Installer |
272 |
Initializing Using the Reset Button |
274 |
Network Setting Items |
275 |
When Changing the IP Address (Changing the Port) |
280 |
Values for Setting a Port |
284 |
If You Use the Printer in the Print Server Environment |
285 |
Configuring the Print Server |
287 |
Checking the Settings of Your Network |
292 |
Installation on Clients |
294 |
Installing from the Printer Folder |
295 |
Installing from [Windows Explorer] |
301 |
Managing the Printer |
302 |
Software That Can Be Used for Managing the Printer |
303 |
Remote UI |
304 |
Starting the Remote UI |
305 |
Attention (Remote UI) |
308 |
Enabling the Remote UI |
309 |
Screen Layout of the Remote UI (Details on Each Setting Page) |
311 |
Displaying or Changing Support Links |
316 |
Changing the Display Language of the Remote UI |
319 |
FTP Client |
321 |
NetSpot Device Installer |
323 |
Installing NetSpot Device Installer |
325 |
Using NetSpot Device Installer |
329 |
Uninstalling NetSpot Device Installer |
331 |
Managing Print Jobs |
332 |
Attention (Job Manager) |
334 |
Checking the Printer Settings |
335 |
Setting the Administrator Password |
337 |
Specifying the Device Name or Administrator Information |
339 |
Security Settings |
341 |
Restricting the Users Who Can Print |
342 |
Restricting the Users Who Can Monitor/Change the Settings Using the SNMP Protocol 346 |
|
Restricting the Users Who Can Perform Multicast Discovery |
351 |
Restricting the Users Who Can Access |
355 |
Restricting the FTP Access from End-Users |
358 |
Obtaining the Security Access Logs |
360 |
Checking the Security Access Logs |
363 |
Troubleshooting |
365 |
Printing Cannot Be Performed |
366 |
Printing Cannot Be Performed (USB Connection) |
367 |
Printing Cannot Be Performed (LAN Connection) |
370 |
Printing Cannot Be Performed (via the Print Server) |
374 |
The Print Server for Connection Cannot Be Found |
377 |
The Shared Printer Cannot Be Accessed |
378 |
The Printer Takes a Long Time to Start the Print Job |
379 |
You Cannot Turn the Printer ON |
380 |
All the Indicators on the Network Interface Are Off |
381 |
You Cannot Install the Printer Driver |
382 |
The Printer Is Not Recognized Automatically (Easy Installation) |
383 |
The Printer Cannot Be Searched for (Auto Setup) |
384 |
You Cannot Uninstall the Printer Driver |
385 |
Starting the Uninstaller from the CD-ROM |
386 |
Uninstalling the USB Class Driver |
389 |
The Printer Driver Settings Cannot Be Changed |
392 |
"Profiles" Cannot Be Selected or Edited |
393 |
The Status of the Paper Feeder Cannot Be Obtained Automatically |
395 |
Paper Jams |
397 |
Attention (Paper Jams) |
398 |
Clearing Paper Jams (Multi-purpose Tray) |
400 |
Clearing Paper Jams (Paper Drawer) |
401 |
Clearing Paper Jams (Duplex Unit) |
402 |
Clearing Paper Jams (Inside the Output Area) |
405 |
Clearing Paper Jams (Inside the Front Cover) |
406 |
The Alarm Indicator Is On/Blinking |
409 |
A Message Appears in the Printer Status Window |
412 |
Poor Printout Results |
417 |
Paper Curls |
419 |
Paper Creases |
420 |
White Streaks (Lines) Appear |
421 |
Printing Is Uneven |
422 |
Printed Pages Have White Specks |
423 |
Toner Stain or Toner Peeling Occurs |
424 |
The Printed Paper Has Smudge Marks |
425 |
The Printed Paper Has Vertical Streaks |
426 |
Smudge Marks of Spattering Toner Appear around the Text or Patterns |
427 |
The Back of the Printed Paper Has Smudge Marks |
428 |
The Overall Print Result Is Dark |
429 |
Residual Images Appear on Non-printed Areas |
430 |
White Dust Is Attached to the Printed Transparencies |
431 |
The Overall Print Result Is Faint |
432 |
Colored Lines and Text Appear Faded |
433 |
The Printing Position Is Skewed |
434 |
A Portion of the Page Is Not Printed |
435 |
Data Is Reduced and Printed |
436 |
The Next Page Is Printed from Halfway across the Previous Page |
437 |
Blank Paper Is Output (Nothing Is Printed on the Paper) |
438 |
The Overall Surface of the Paper Is Printed in Black Completely |
439 |
The Printout Is Different from What Is Displayed on Screen |
440 |
The Flap of the Printed Envelope Sticks |
441 |
Multiple Sheets of Paper Are Fed at a Time |
442 |
Appendix |
443 |
Basic Operations/Various Information for Windows |
444 |
Office Locations |
451 |
For Windows 8 Users |
452 |

07K5-000
Before You Start
 Legal Notices
 Legal Limitations on the Usage of Your Product and the Use of Images
 Using the e-Manual
07K5-001
Legal Notices
Product Name
Safety regulations require the product's name to be registered.
In some regions where this product is sold, the following name(s) in parentheses ( ) may be registered instead.
LBP6310dn (F161900)
EMC requirements of EC Directive
This equipment conforms with the essential EMC requirements of EC Directive. We declare that this product conforms with the EMC requirements of EC Directive at nominal mains input 230 V, 50 Hz although the rated input of the product is 220 to 240 V, 50/60 Hz. Use of shielded cable is necessary to comply with the technical EMC requirements of EC Directive.
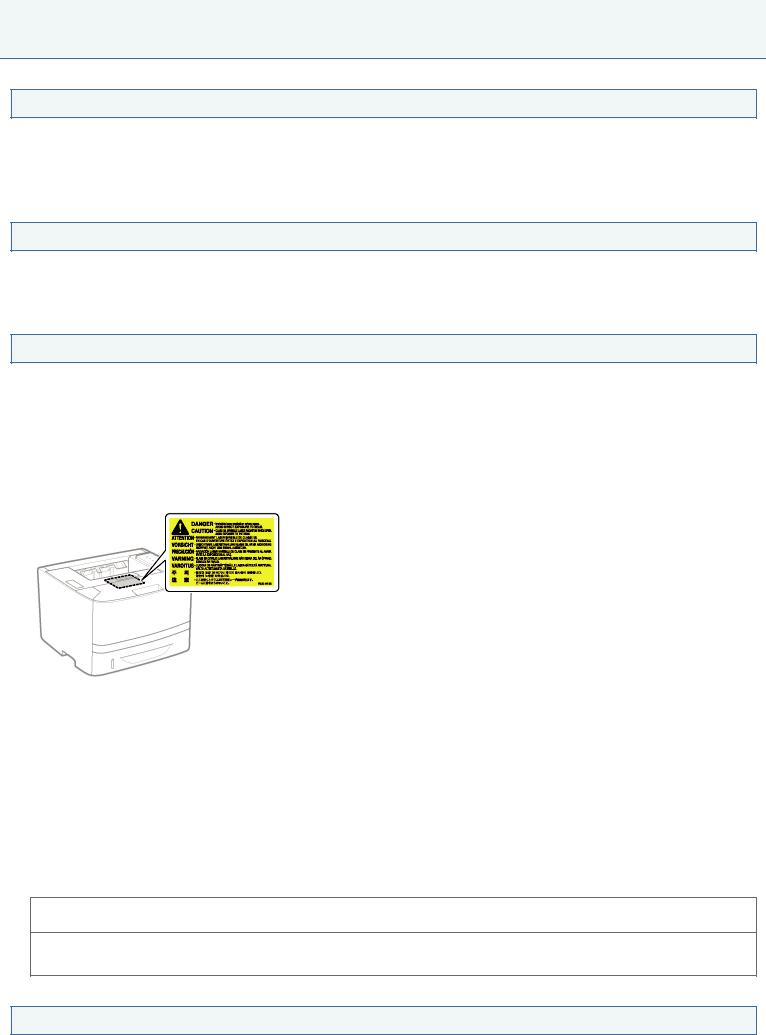
Laser Safety
This product is certified as a Class 1 laser product under IEC60825-1:2007 and EN60825-1:2007. This means that the product does not produce hazardous laser radiation.
Since radiation emitted inside the product is completely confined within protective housings and external covers, the laser beam cannot escape from the machine during any phase of user operation. Do not remove protective housings or external covers, except as directed by the equipment's manuals.
The label shown below is attached to the laser scanner unit inside the machine.
CLASS 1 LASER PRODUCT
LASER KLASSE 1
APPAREIL À LASER DE CLASSE 1
APPARECCHIO LASER DI CLASSE 1
PRODUCTO LÁSER DE CLASE 1
APARELHO A LASER DE CLASSE 1
LUOKAN 1 LASER-TUOTE
LASERPRODUKT KLASS 1
 CAUTION
Use of controls, adjustments, or performance of procedures other than those specified in this manual may result in hazardous radiation exposure.
International ENERGY STAR Program
As an ENERGY STAR® Partner, Canon Inc. has determined that this product meets the ENERGY STAR Program for energy efficiency.
The International ENERGY STAR Office Equipment Program is an international program that promotes energy saving through the use of computers and other office equipment.
The program backs the development and dissemination of products with functions that effectively reduce energy consumption. It is an open system in which business proprietors can participate voluntarily.
The targeted products are office equipment, such as computers, displays, printers, facsimiles, and copiers. The standards and logos are uniform among participating nations.
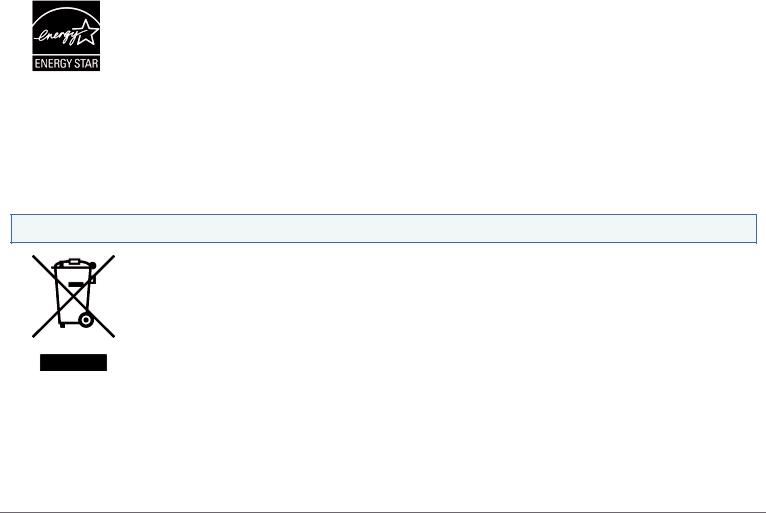
WEEE Directive
European Union (and EEA) only.
This symbol indicates that this product is not to be disposed of with your household waste, according to the WEEE Directive (2002/96/EC) and your national law. This product should be handed over to a designated collection point, e.g., on an authorized one-for-one basis when you buy a new similar product or to an authorized collection site for recycling waste electrical and electronic equipment (EEE). Improper handling of this type of waste could have a possible negative impact on the environment and human health due to potentially hazardous substances that are generally associated with EEE. At the same time, your cooperation in the correct disposal of this product will contribute to the effective usage of natural resources. For more information about where you can drop off your waste equipment for recycling, please contact your local city office, waste authority, approved WEEE scheme or your household waste disposal service. For more information regarding return and recycling of WEEE products, please visit www.canon-europe.com/environment.
(EEA: Norway, Iceland and Liechtenstein)

07K5-002
Legal Limitations on the Usage of Your Product and the Use of Images
Using your product to scan, print or otherwise reproduce certain documents, and the use of such images as scanned, printed or otherwise reproduced by your product, may be prohibited by law and may result in criminal and/or civil liability. A non-exhaustive list of these documents is set forth below. This list is intended to be a guide only. If you are uncertain about the legality of using your product to scan, print or otherwise reproduce any particular document, and/or of the use of the images scanned, printed or otherwise reproduced, you should consult in advance with your legal advisor for guidance.
Paper Money
Travelers Checks
Money Orders
Food Stamps
Certificates of Deposit
Passports
Postage Stamps (canceled or uncanceled)
Immigration Papers
Identifying Badges or Insignias
Internal Revenue Stamps (canceled or uncanceled)
Selective Service or Draft Papers
Bonds or Other Certificates of Indebtedness
Checks or Drafts Issued by Governmental Agencies
Stock Certificates
Motor Vehicle Licenses and Certificates of Title
Copyrighted Works/Works of Art without Permission of Copyright Owner
07K5-003
Using the e-Manual
Even if you do not have the supplied CD-ROM at hand, you can view the e-Manual any time if you install it on your computer beforehand.
For the efficient use of the e-Manual, you can use several search tools to find the desired content.
 How to Use the e-Manual
Operating Environment
Installing the e-Manual
Uninstalling the e-Manual
 Screen Layout of the e-Manual
Top Page
Topic Page
Site Map
Search Method
 Viewing the e-Manual
<To find the desired content>
Selecting between the category icons
From the top page, select a category icon you want.  "Top Page"
Searching from the site map
On the site map, you can view the list of whole sections of the e-Manual sorted by category. You can directly display sections in a category.
 "Site Map"
Whole text search function
You can search by keyword in the e-Manual. You can display the desired description from the search results by entering a keyword you want to search. This function supports AND search.
 "Search Method"

07K5-004
How to Use the e-Manual
Click the following links to see the system requirements to use the e-Manual and how to install/uninstall the e-Manual.
 Operating Environment
 Installing the e-Manual
 Uninstalling the e-Manual

07K5-005
Operating Environment
You need a Web browser to use the e-Manual. Operation of the following Web browsers is guaranteed.
Internet Explorer 6.0/7.0/8.0/9.0
FireFox 2.x/3.x/4.x/5.x/6.x/7.x/8.x/9.x/10.x/11.x
 NOTE
NOTE
Enabling the script function
Enable the script function for a Web browser before using the e-Manual.
07K5-006
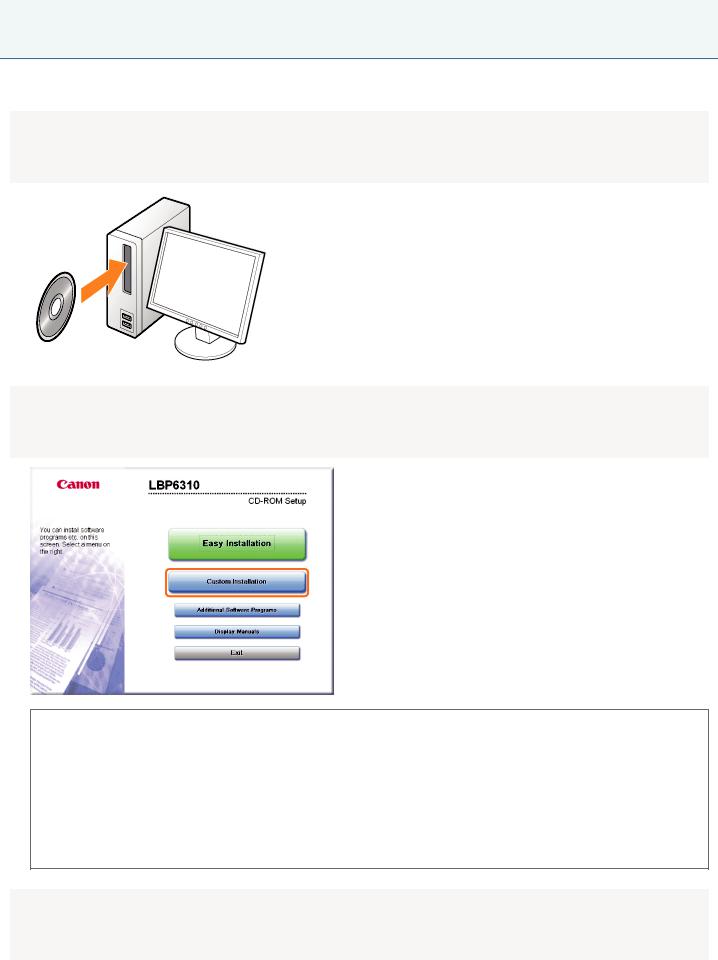
Installing the e-Manual
Install the e-Manual included in the supplied CD-ROM on your computer using the following procedure.
1
Insert the supplied CD-ROM "User Software" into the CD-ROM drive of your computer.
2
Click [Custom Installation].
 If the above screen does not appear
 "Basic Operations/Various Information for Windows"
 If the [AutoPlay] dialog box appears
Click [Run AUTORUN.EXE].
 If the [User Account Control] dialog box appears
Click [Continue] or [Yes].
3
Perform the following procedure.
(1)Clear the [Printer Driver] check box.
(2)Click [Install].
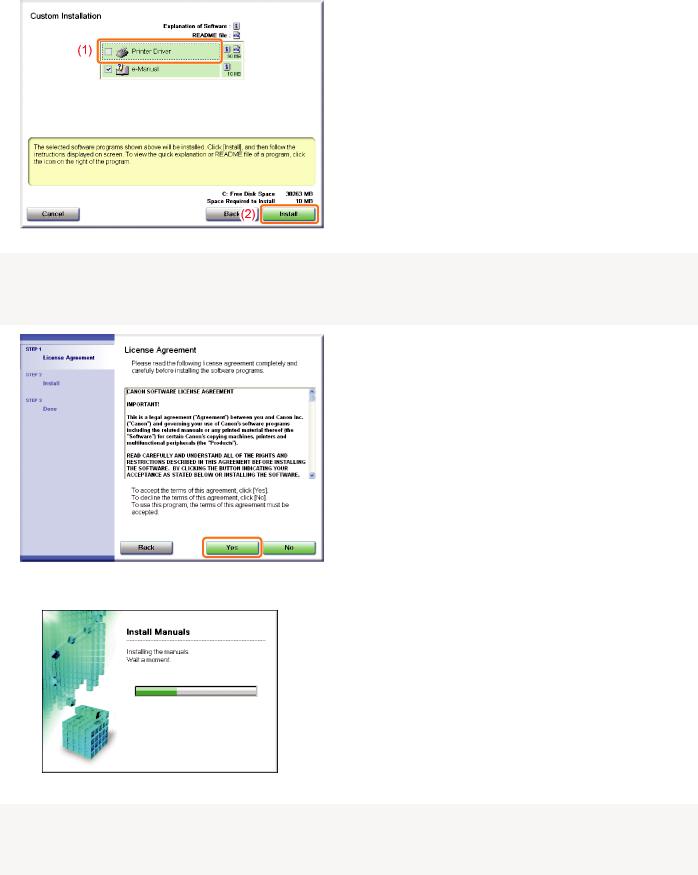
4
Read the contents of License Agreement, and then click [Yes].
The installation starts.
Wait until the following screen disappears. (It may take a long time to install the e-Manual.)
5
Click [Next].
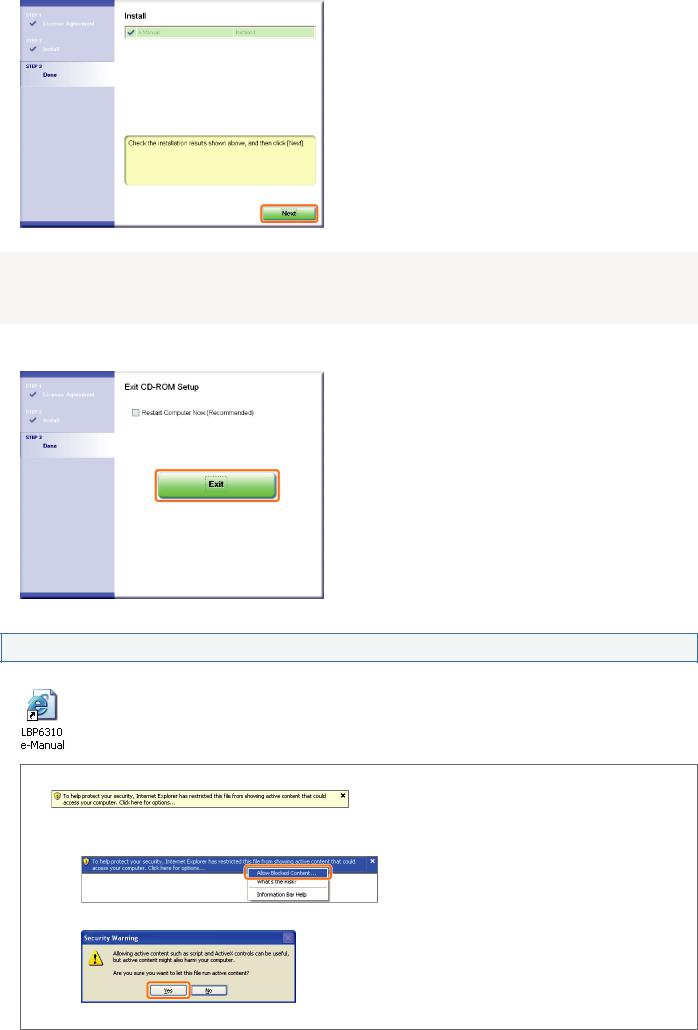
6
Click [Exit].
 When the following screen appears, you can remove the CD-ROM.
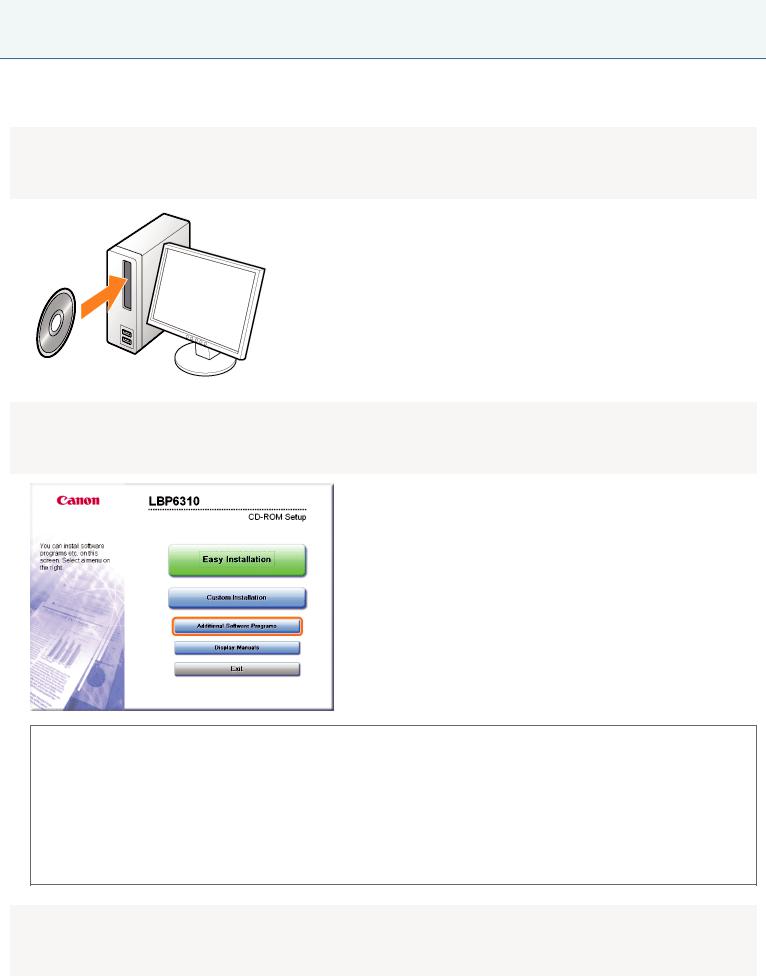
Displaying the e-Manual
Double-click [LBP6310 e-Manual] created on the desktop.
 When a security protection message appears
Perform the following procedure.
1.Click the information bar, and then select [Allow Blocked Content] from the pop-up menu.
2.Click [Yes].

 NOTE
NOTE
Displaying the e-Manual directly from the CD-ROM
You can also display the e-Manual directly from the CD-ROM without installing it in the computer you are using.
1.Insert the supplied CD-ROM "User Software" into the CD-ROM drive of your computer.
2.Click [Display Manuals].
3.Click [ ] button next to [e-Manual].
 Depending on the operating system you are using, a security protection message is displayed. Allow the contents to be displayed.
07K5-007
Uninstalling the e-Manual
The process of removing the e-Manual to restore the computer to the same state as before the e-Manual was installed is referred to as uninstallation. To uninstall the e-Manual, perform the following procedure.
1
Insert the supplied CD-ROM "User Software" into the CD-ROM drive of your computer.
2
Click [Additional Software Programs].
 If the above screen does not appear
 "Basic Operations/Various Information for Windows"
 If the [AutoPlay] dialog box appears
Click [Run AUTORUN.EXE].
 If the [User Account Control] dialog box appears
Click [Continue] or [Yes].
3
Click [Start] in [Manual Uninstaller].

4
Click [Uninstall] to start the uninstallation.
Please wait a moment until the uninstallation is complete. (It may take a long time to uninstall the printer driver.)
5
Click [Exit].
6
Click [Back].
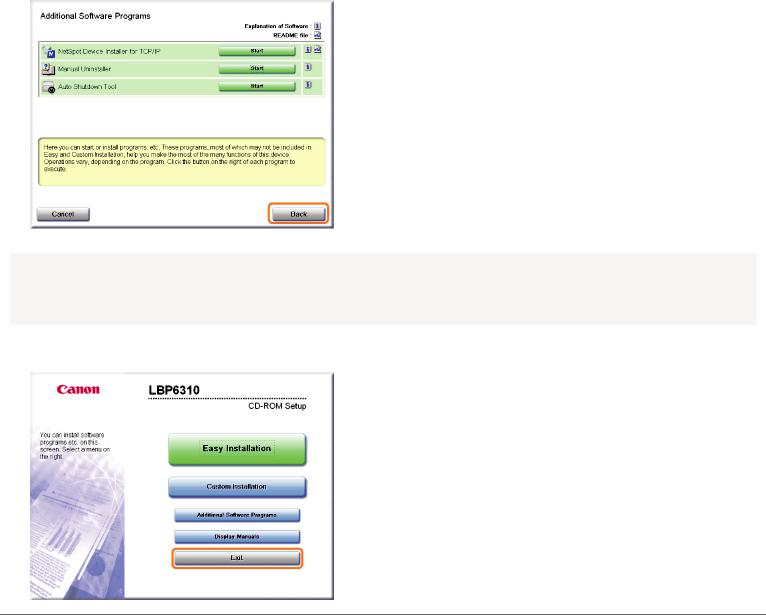
7
Click [Exit].
 When the following screen appears, you can remove the CD-ROM.
07K5-09H
Screen Layout of the e-Manual
This section describes the screen layout of the e-Manual.
The page displayed right after the e-Manual starts is called "Top Page" and the manual description is called "Topic Page" in this section.
"Site map" is displayed from [Site map] which is located on the upper right of the e-Manual. The search panel is used to make search through the e-Manual.
The screen layout is different for each page, so click the following links to see the instruction.
 Top Page
 Topic Page
 Site Map
 Search Method

07K5-09J
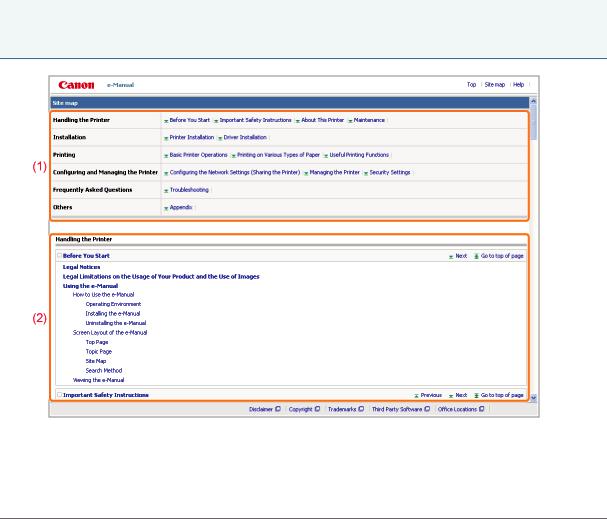
Top Page
(1)[Handling the Printer]
This section describes the precautions and maintenance methods for handling the printer, and so on.
(2)[Printing]
This section describes a variety of printing methods, such as basic printing and advanced one that uses the various printing functions.
How to load paper is also described here.
(3)[Configuring and Managing the Printer]
This section describes how to specify the network settings, how to manage the printer, and so on.
(4)[Frequently Asked Questions]
Frequently asked questions are featured.
For details on the solutions for the other problems, see [Troubleshooting].
(5)[Installation]
This section describes how to install this printer, how to install the printer driver, and so on.
(6)[Search]
The search panel is displayed by entering keyword(s) and clicking [  ]. For details, see "Search Method."
(7)[Top]
The top page of the e-Manual is displayed.
(8)[Site map]
The entire contents of the e-Manual are displayed.
(9)[Help]
How to use the e-Manual is displayed.
(10)[Disclaimers]
The disclaimers are displayed.
(11)[Copyright]
The information of copyrights is displayed.
(12)[Trademarks]
The trademarks are displayed.
(13)[Third Party Software]

The information about the third party software is displayed.
(14)[Office Locations]
Inquiries for this printer are displayed.

07K5-09K
Topic Page
(1)Chapter contents
This is the list of chapter contents. Clicking each item displays the description in the topic page.
Click [  ] to expand a menu, and click [
  ] to collapse a menu.
Alternatively, click [  Expand all] to expand all menus, and click [
  Collapse all] to collapse all menus.
(2)Topic page
The descriptions of each item are displayed.
The current location of the displayed topic is displayed at the upper left of the topic page. Click a link to move to a higher level.
(3)[Chapter] menu
You can select a different chapter from the pull-down menu.
(4)[Contents] tab
Click to display the chapter contents panel.
(5)[Search] tab
Click to display the search panel. For details, see "Search Method."
(6)[  ]
]
Click to display or hide the chapter contents panel/search panel.
(7)[  Previous]/[
  Next]
Next]
Click to move to the previous or next topic.
(8)[Print this topic]
Prints only the topic page currently displayed.
(9)[Print all]
Prints all the contents in a chapter.
07K5-09L
Site Map
(1)Categories
Shows the chapters of the e-Manual. Click an item to view the detailed list of the chapter.
(2)Whole contents
Shows the all chapters and sections of the e-Manual. Click an item to view the contents.

07K5-09R
Search Method
(1)Search
Entering a character string in [Search] on the top page or in the [Keyword] text box on the search panel and then clicking [  ] displays the search results.
The AND search is available in the e-Manual so you can refine the search results by entering two or more keywords. When entering keywords, enter a space between the keywords.
Example: "Toner Replacement" (if you want to display pages which include words, "Toner" and "Replacement")
(2)Search result
The search results for a keyword are displayed.
If there are more than 10 search results, you can see the other results by clicking [  ], [
], [  ], or the number which is located below the result.
(3)[Search options]
Click to display the search options.
The search options can be used to specify the chapter to search, case sensitivity, and whether to differentiate between oneand two-byte characters.
Click [Search with these conditions] to search with the specified conditions.

07K5-00E
Viewing the e-Manual
Symbols Used in the e-Manual
The following are descriptions of warnings and cautions used in the e-Manual to explain handling restrictions, precautions, and instructions that should be observed for your safety.
 WARNING
Indicates a warning concerning operations that may lead to death or injury to persons if not performed correctly. To use the machine safely, always pay attention to these warnings.
 CAUTION
Indicates a caution concerning operations that may lead to injury to persons if not performed correctly. To use the machine safely, always pay attention to these cautions.
 IMPORTANT
Indicates operational requirements and restrictions. Be sure to read these items carefully to operate the machine correctly, and avoid damage to the machine or property.
 NOTE
NOTE
Indicates a clarification of an operation, or contains additional explanations for a procedure. Reading these notes is highly recommended.
Indicates an operation that must not be performed. Read these items carefully, and make sure not to perform the described operations.
Keys and Buttons Used in This Manual
The following are examples of how control panel keys and on-screen buttons are depicted in the e-Manual.
Type |
Depiction in the e-Manual |
|
Example |
|
|
|
|
Control panel keys |
[Key icon] + (Key name) |
[ |
] (Cancel Job) |
Buttons on |
|
|
|
computer operation |
[Button name and so on] |
[OK] |
|
screen and so on |
|
|
|
|
|
|
|
Screenshots Used in the e-Manual
The contents of the screenshots used in the e-Manual are the default settings.
Depending on the system configuration, the contents of the screenshots may partly differ.
 The functions of the printer driver may be changed due to upgrade.
Illustrations Used in the e-Manual
The illustrations of the toner cartridge used in the e-Manual are those for the Canon Cartridge 719.
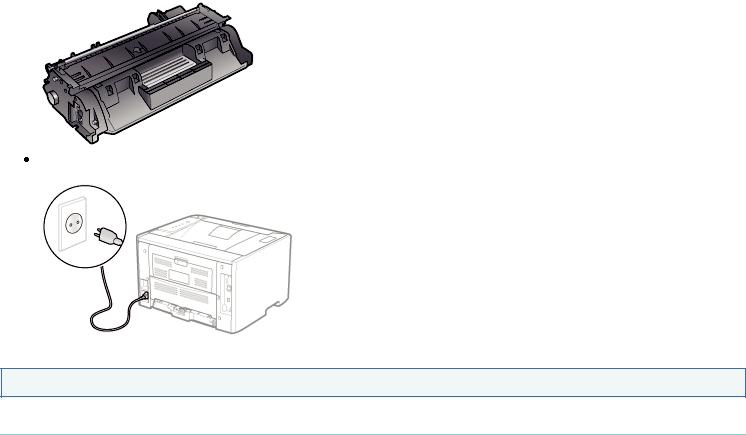
Although the power cord used in this manual is as the one in the following illustration, the form of the power cord may differ depending on the country or region.
Abbreviations Used in the e-Manual
Abbreviations of Operating Systems
In the e-Manual, operating systems are abbreviated as follows.
|
Microsoft Windows XP operating system |
Windows XP |
|
|
Microsoft Windows Vista operating system |
Windows Vista |
|
|
Microsoft Windows 7 operating system |
Windows 7 |
|
|
Microsoft Windows Server 2003 operating system |
Windows Server 2003 |
|
|
Microsoft Windows Server 2008 operating system |
Windows Server 2008 |
|
|
Microsoft Windows operating system |
Windows |
|
|
|
|
|

07K5-00F
Disclaimers
The information in this manual is subject to change without notice.
CANON INC. MAKES NO WARRANTY OF ANY KIND WITH REGARD TO THIS MATERIAL, EITHER EXPRESS OR IMPLIED, EXCEPT AS PROVIDED HEREIN, INCLUDING WITHOUT LIMITATION, THEREOF, WARRANTIES AS TO MARKETABILITY, MERCHANTABILITY, FITNESS FOR A PARTICULAR PURPOSE OF USE OR AGAINST INFRINGEMENT OF ANY PATENT. CANON INC. SHALL NOT BE LIABLE FOR ANY DIRECT, INCIDENTAL, OR CONSEQUENTIAL DAMAGES OF ANY NATURE, OR LOSSES OR EXPENSES RESULTING FROM THE USE OF THIS MATERIAL.

07K5-00H
Copyright
Copyright 2012 by Canon Inc. All rights reserved.
No part of this publication may be reproduced or transmitted in any form or by any means, electronic or mechanical, including photocopying and recording, or by any information storage or retrieval system without the prior written permission of Canon Inc.
 Loading...