


MULTIMEDIA PROJECTOR
User’s Manual
Guide Basic
Guide Advanced
Information Other
Safety Instructions
Before Use
Installation Procedure
Connection Procedure
Projection Procedure
Convenient Features
Using Menus
Menu Configuration
Menu Settings
Using the Projector on a Network
Advanced Projection
Maintenance
Product Specifications
Troubleshooting
ENG
How to Use This Manual
Thank you for purchasing a Canon projector.
The 4K600STZ/4K601STZ/4K600Z/4K601Z Multimedia Projector is a highperformance laser projector capable of projecting high-resolution computer screens and high-quality digital images on a large screen.
This Manual
This is the user’s manual for the 4K600STZ/4K601STZ/4K600Z/4K601Z Multimedia Projector (hereafter, “projector”). The “Basic Guide” section describes installation and basic use of the projector. Descriptions of menus and how to connect the projector to a network are given in the “Advanced Guide” section. Read this manual thoroughly to make the most of your projector. Installation of the projector should be performed by a qualified technician, if possible. Contact the Canon Customer Support Center for further information.
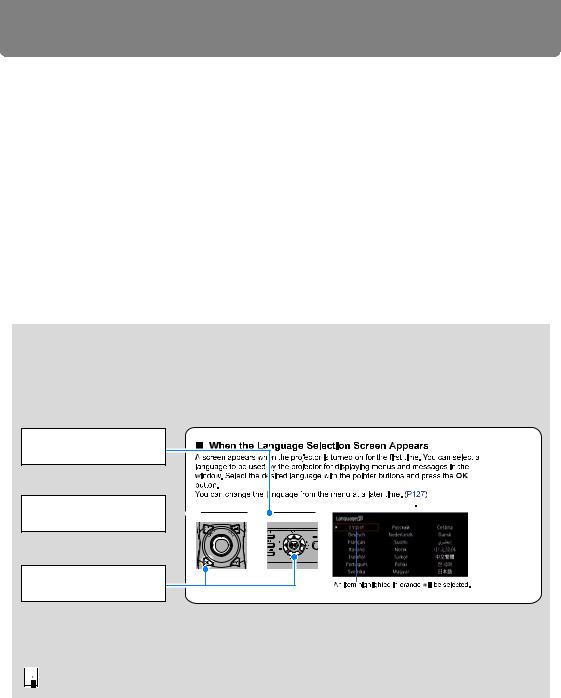
Symbols of Button Operations
The projector can be operated using the buttons on the remote control or on the side of the projector.
In this document, the button’s operations are shown as below.
Operation of buttons on side of projector
Remote control button 


 operation


Indicate the buttons to be pressed
Symbols Used in This Manual
Sections labeled with these symbols give the following kinds of information.  Indicates precautions and information to note when using the projector.
2

Table of Contents |
|
How to Use This Manual............... |
2 |
Projector Highlights...................... |
4 |
Safety Instructions........................ |
6 |
Safety Symbols in this Manual ........... |
12 |
Precautions for Use ............................. |
13 |
Power Supply ....................................... |
13 |
Installation and Use ............................. |
14 |
Laser Light Source .............................. |
16 |
Remote Control Batteries.................... |
18 |
Handling................................................ |
19 |
For Safe Use ................................ |
20 |
Carrying and Installation..................... |
20 |
Before Installation....................... |
21 |
Precautions When Carrying/Shipping |
|
the Projector......................................... |
21 |
Precautions for Installation................. |
21 |
Open Source Software ............... |
26 |
Before Use ................................... |
27 |
Included Accessories .......................... |
27 |
Part Names ........................................... |
28 |
Preparing the Remote Control............ |
35 |
Basic Guide ............................ |
37 |
Installation Procedure ................ |
38 |
Setting Up the Projector...................... |
38 |
Relationship between Image Size and |
|
Projecting Distance ............................. |
40 |
Lens Shift Function ............................. |
43 |
Connection Procedure ............... |
45 |
Connecting a Computer ...................... |
45 |
Connecting AV Equipment.................. |
46 |
4K Projection........................................ |
47 |
Plugging the Projector In .................... |
52 |
Projection Procedure.................. |
53 |
Step 1 Turn the Projector On .............. |
53 |
Step 2 Select an Input Signal.............. |
56 |
Step 3 Adjust the Image ...................... |
58 |
Step 4 Select an Aspect Ratio (Screen |
|
Aspect) Matching the Screen.............. |
64 |
Step 5 Adjusting Keystone |
|
Distortion .............................................. |
65 |
Step 6 Select the Image Quality (Image |
|
Mode) .................................................... |
68 |
Step 7 Turn the Projector Off.............. |
71 |
Convenient Features................... |
72 |
Advanced Guide .................... |
75 |
Using Menus................................ |
76 |
Menu Configuration ............................. |
76 |
Basic Menu Operations ....................... |
77 |
Menu Configuration .................... |
80 |
Menu Settings.............................. |
93 |
Input settings ....................................... |
93 |
Image adjustment ................................ |
98 |
Install settings.................................... |
107 |
System settings ................................. |
118 |
Network settings ................................ |
136 |
Wireless LAN (Wi-Fi).......................... |
139 |
Completing Projector Settings ......... |
140 |
Checking Projector Information ....... |
155 |
Using the Projector on a |
|
Network ...................................... |
157 |
Completing Computer Settings for a |
|
Network Connection .......................... |
157 |
Setting Up the Network ..................... |
160 |
Controlling the Projector from a |
|
Computer ............................................ |
181 |
Advanced Projection................. |
183 |
Projecting from Multiple Projectors at |
|
Once (Edge Blending) ....................... |
183 |
Advanced Registration to Adjust |
|
Projected Images ............................... |
187 |
Adjusting Peripheral Focus .............. |
191 |
Other Information ................ |
193 |
Maintenance............................... |
194 |
Cleaning the Projector....................... |
194 |
Replacing the Air Filter...................... |
194 |
Product Specifications ............. |
197 |
Displayed Test Patterns .................... |
197 |
Supported Signal Types.................... |
198 |
Specifications..................................... |
202 |
Troubleshooting........................ |
208 |
LED Indicator Details......................... |
208 |
Symptoms and Solutions.................. |
209 |
Index........................................... |
214 |
Option......................................... |
216 |
3

Projector Highlights
4K Model With a High-Definition, 4096 x 2400 LCOS Panel
Outstanding projection resolution of up to 4096 x 2400 is possible, using three 0.76 inch liquid crystal on silicon (LCOS) panels in conjunction with dual highperformance image processors and a new 4K-compatible wide zoom lens.
Bright Yet Compact, With a Laser Light Source
A bright (6,000 lumen) 4K projector that is also compact, at 559 x 624 x 201 mm (22.0 x 24.6 x 7.9 in., W x D x H). Features a laser light source that lasts longer than traditional mercury lamps.
Supports Fully Digital Input
Compatible with HDMI: 2 (4K / Deep Color / HDCP2.2), the projector enables 4K projection (up to 4096 x 2160 at 60 Hz) via a single HDMI cable when connected to equipment such as a Blu-ray player/recorder. 4K projection from multiple input terminals — two for HDMI and four for DVI — is also supported, using a multi-input feature.
Peripheral Focus Adjustment
Image focus can be adjusted on the edges of the screen, enabling use in dome projection.
Edge Blending
Blend the overlapping edges of images from multiple projectors to make the overall image more seamless.
High-Precision Image Registration
Precise correction of red, green, or blue misalignment in different areas of the screen is possible by color and area.
Superior Video Viewing Experience
Refinements in motion blur reduction make video projection more enjoyable to watch.
Fixed Brightness Feature
When the projector is used for a long time, its brightness gradually declines. This feature pre-sets the brightness of the first use to a lower level, and then automatically adjusts the output of the light source so that the same brightness level is maintained.
4

Projector Highlights
Expanded Dynamic Range
Ready for High Dynamic Range (HDR) content, the projector offers an expanded range of image luminance to preserve detail in highlights and shadows.
Scheduling
Automate projector tasks according to your schedules. Turn the projector on or off, switch input signals, and more.
Wi-Fi Connectivity (4K600STZ/4K600Z)
In addition to wired LAN connectivity, the projector also supports Wi-Fi.
In Projector Access Point (PJ AP) mode, the projector can be connected to up to five computers without using a wireless access point.
Quiet Mode
This feature reduces laser output from the light source to less than half and lowers the speed of the cooling fan to reduce noise.
Canon Service Tool for PJ (Canon ST) (4K600STZ/ 4K600Z)
This iOS application is used to establish a Wi-Fi connection with the projector, and enables remote control operations and projector status management easily. Connect the projector as an access point (P137), or connect the projector using an existing access point (P137). A password (P163) is required when using Canon ST.
5
Safety Instructions
Before installing and operating the projector, read this manual thoroughly. This projector provides many convenient features and functions. Operating the
projector properly enables you to manage those features and maintain it in good condition for many years to come.
Improper operation may result in not only shortening the product life, but also malfunctions, fire hazards, or other accidents.
If your projector does not seem to be operating properly, read this manual again, check operations and cable connections, and try the solutions in the “Troubleshooting” section in the back of this manual. If the problem still persists, contact the Canon Customer Support Center.
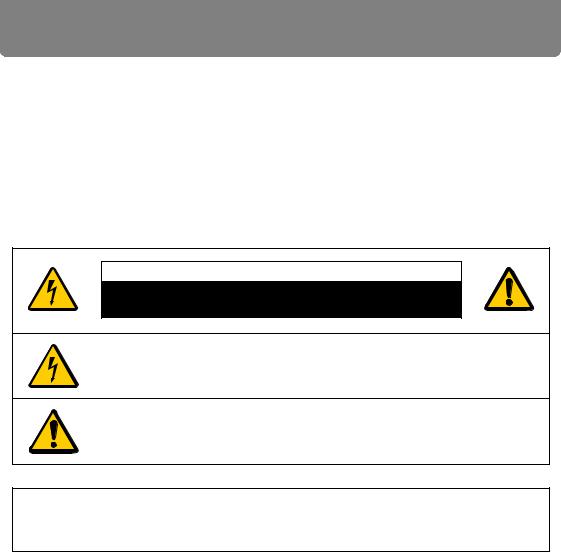
CAUTION
RISK OF ELECTRIC SHOCK
DO NOT OPEN
THIS SYMBOL INDICATES THAT DANGEROUS VOLTAGE CONSTITUTING A RISK OF ELECTRIC SHOCK IS PRESENT WITHIN THIS UNIT.
THIS SYMBOL INDICATES THAT THERE ARE IMPORTANT OPERATING AND MAINTENANCE INSTRUCTIONS FOR THIS UNIT IN THE OWNER’S MANUAL.
CAUTION
Not for use in a computer room as defined in the Standard for the Protection of Electronic Computer / Data Processing Equipment, ANSI / NFPA 75.
6

Safety Instructions
 Safety Precautions
WARNING:
•THIS APPARATUS MUST BE GROUNDED.
•TO REDUCE THE RISK OF FIRE OR ELECTRIC SHOCK, DO NOT EXPOSE THIS APPLIANCE TO RAIN OR MOISTURE.
•This projector produces intense light from the projection lens. Do not stare directly into the lens, otherwise eye damage could result. Be especially careful that children do not stare directly into the beam.
•Install the projector in a proper position. Otherwise it may result in a fire hazard.
•Do not cover the ventilation slots on the projector. Heat build-up can reduce the service life of your projector, and can also be dangerous.
•If the projector is unused for an extended time, unplug the projector from the power outlet.
•Do not project the same image for a long time.
An afterimage may remain on the LCD panels due to the characteristics of the panels of the projector.
 CAUTION ON HANGING FROM THE CEILING
When hanging the projector from the ceiling, clean the air intake vents and top of the projector periodically with a vacuum cleaner. If you leave the projector unclean for a long time, the cooling fans can be clogged with dust, and it may cause a breakdown or a disaster.
DO NOT SET THE PROJECTOR IN GREASY, WET, OR SMOKY CONDITIONS SUCH AS IN A KITCHEN TO PREVENT A BREAKDOWN OR A DISASTER. IF THE PROJECTOR COMES IN CONTACT WITH OIL OR CHEMICALS, IT MAY BECOME DETERIORATED.
Instructions Safety
7

Safety Instructions
■ READ AND KEEP THIS OWNER’S MANUAL FOR LATER
USE.
All the safety and operating instructions should be read before beginning to operate the product.
Read all of the instructions given here and retain them for later use. Unplug this projector from the AC power supply before cleaning. Do not use liquid or aerosol cleaners on the projector. Use a damp cloth for cleaning.
Follow all warnings and instructions marked on the projector.
For added protection of the projector during a lightning storm, or when it is left unattended or unused for long periods of time, unplug it from the wall outlet. This will prevent damage due to lightning and power surges.
Do not expose this unit to rain or use near water... for example, in a wet basement,
near a swimming pool, etc...
Do not use attachments not recommended by the manufacturer as they may result in hazards.
Do not place this projector on an unstable cart, stand, or table. The projector may fall, causing serious injury to a child or adult, and serious damage to the projector. Use only with a cart or stand recommended by the manufacturer, or sold with the projector. Wall or shelf mounting should be carried out in accordance with the manufacturer’s directions, and should use a mounting kit approved by the manufacturers.
An appliance and cart combination should be moved with care. Sudden stops, excessive force, and uneven surfaces may cause the appliance and cart combination to overturn.
Slots and openings in the rear and front of the cabinet are provided  for ventilation, to insure reliable operation of the equipment and to protect it from overheating.
The openings should never be covered with cloth or other materials, and the bottom opening should not be blocked by placing the projector on a bed, sofa, rug, or other similar surface. This projector should never be placed near or over a radiator or heat register.
This projector should not be placed in a built-in installation such as a book case unless proper ventilation is provided.
8

Safety Instructions
Never push objects of any kind into this projector through cabinet slots as they may touch dangerous voltage points or short out parts that could result in a fire or electric shock. Never spill liquid of any kind onto the projector.
Do not install the projector near the ventilation duct of air-conditioning equipment.
This projector should be operated using only the type of power source indicated on the marking label. If you are not sure of the type of power supplied, contact the Canon Customer Support Center or local power company.
Do not overload wall outlets and extension cords as this can result in fire or electric shock. Do not allow anything to rest on the power cord. Do not locate this projector where the cord may be damaged by people walking on it.
Do not attempt to service this projector yourself as opening or removing covers may expose you to dangerous voltages or other hazards. Refer all servicing to qualified service personnel.
Unplug this projector from the wall outlet and refer servicing to qualified service personnel under the following conditions:
a.When the power cord or plug is damaged or frayed.
b.If liquid has been spilled into the projector.
c.If the projector has been exposed to rain or water.
d.If the projector does not operate normally after following the operating instructions. Adjust only those controls that are covered in the operating instructions as improper adjustment of other controls may result in damage and will often require extensive work by a qualified technician to restore the projector to normal operating condition.
e.If the projector has been dropped or the cabinet has been damaged.
f.When the projector exhibits a distinct change in performance-this indicates a need for servicing.
When replacement parts are required, be sure the service technician uses replacement parts specified by the manufacturer that have the same characteristics as the original parts. Unauthorized substitutions may result in fire, electric shock, or injury.
Upon completion of any service or repairs to this projector, ask the service technician to perform routine safety checks to determine that the projector is in safe operating condition.
Instructions Safety
9
Safety Instructions
AC Power Cord Requirement
The AC Power Cord supplied with this projector meets the requirements for use in the country you purchased it.
AC Power Cord for the United States and Canada: |
|
|
|
|
|
The AC Power Cord used in the United States and Canada is |
|
|
listed by the Underwriters Laboratories (UL) and certified by |
|
|
the Canadian Standard Association (CSA). |
Ground |
|
The AC Power Cord has a grounding-type AC line plug. This is |
|
|
|
|
|
a safety feature to ensure the plug fits into the power outlet. Do |
|
|
not try to tamper with this safety feature. Should you be unable |
|
|
to insert the plug into the outlet, contact your electrician. |
|
|
|
|
|
THE SOCKET-OUTLET SHOULD BE INSTALLED NEAR THE EQUIPMENT AND EASILY ACCESSIBLE.
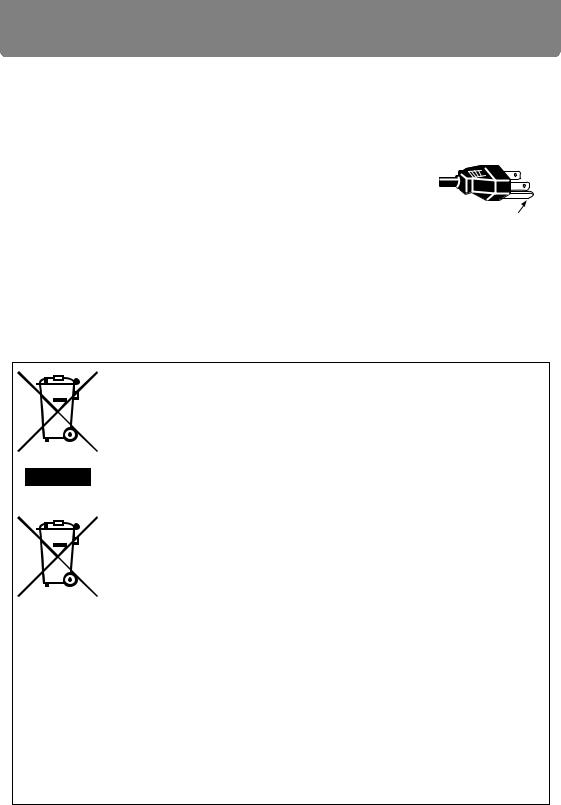
Only for European Union and EEA (Norway, Iceland and
Liechtenstein)
These symbols indicate that this product is not to be disposed of with your household waste, according to the WEEE Directive (2012/ 19/EU), the Battery Directive (2006/66/EC) and/or national legislation implementing those Directives.
If a chemical symbol is printed beneath the symbol shown above, in accordance with the Battery Directive, this indicates that a heavy metal (Hg = Mercury, Cd = Cadmium, Pb = Lead) is present in this battery or accumulator at a concentration above an applicable threshold specified in the Battery Directive.
This product should be handed over to a designated collection point, e.g., on an authorized one-for-one basis when you buy a new similar product or to an authorized collection site for recycling waste electrical and electronic equipment (EEE) and batteries and accumulators. Improper handling of this type of waste could have a possible impact on the environment and human health due to potentially hazardous substances that are generally associated with EEE. Your cooperation in the correct disposal of this product will contribute to the effective usage of natural resources.
For more information about the recycling of this product, please contact your local city office, waste authority, approved scheme or your household waste disposal service or visit www.canon-europe.com/weee, or www.canon-europe.com/battery.
10
Safety Instructions
Federal Communication Commission Notice
This device complies with Part 15 of the FCC Rules. Operation is subject to the following two conditions:
1.This device may not cause harmful interference, and
2.This device must accept any interference received, including interference that may cause undesired operation.
Note: This equipment has been tested and found to comply with the limits for a Class A digital device, pursuant to Part 15 of the FCC Rules. These limits are designed to provide reasonable protection against harmful interference when the equipment is operated in a commercial environment. This equipment generates, uses, and can radiate radio frequency energy and, if not installed and used in accordance with the instruction manual, may cause harmful interference to radio communications. Operation of this equipment in a residential area is likely to cause harmful interference in which case the user will be required to correct the interference at his own expense. The cable with a ferrite core provided with the projector must be used with this equipment in order to comply with Class A of the FCC Rules. Use of a shielded cable is required to comply with Class A of FCC Rules. Do not make any changes or modifications to the equipment unless otherwise specified in the instructions. If such changes or modifications should be made, you could be required to stop operation of the equipment.
Warning:
This is a class A product. In a domestic environment this product may cause radio interference in which case the user may be required to take adequate measures. The cable with a ferrite core provided with the projector must be used with this equipment in order to comply with Class A .
Use of a shielded cable is required to comply with Class A .
Instructions Safety
11
Safety Instructions
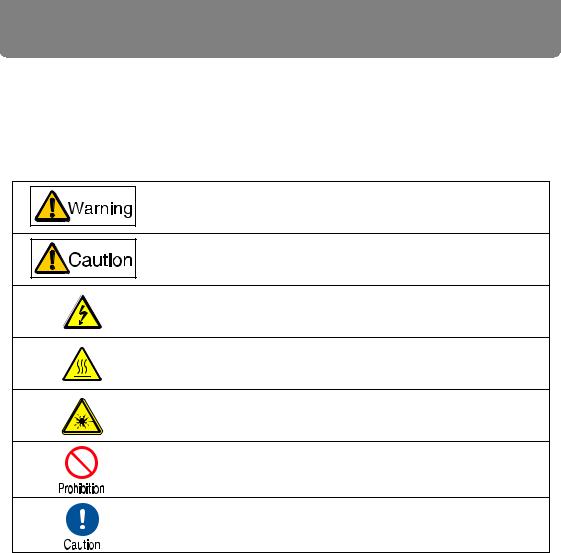
Safety Symbols in this Manual
This section describes the safety symbols used in this manual. Important projector safety information is identified by the following symbols. Always observe the safety information by these symbols.
Denotes the risk of death or serious injury from improper handling if the information is not observed. To ensure safe use, always observe this information.
Denotes the risk of injury from improper handling if the information is not observed. To ensure safe use, always observe this information.
Denotes the risk of electric shock from improper handling if the information is not observed. To ensure safe use, always observe this information.
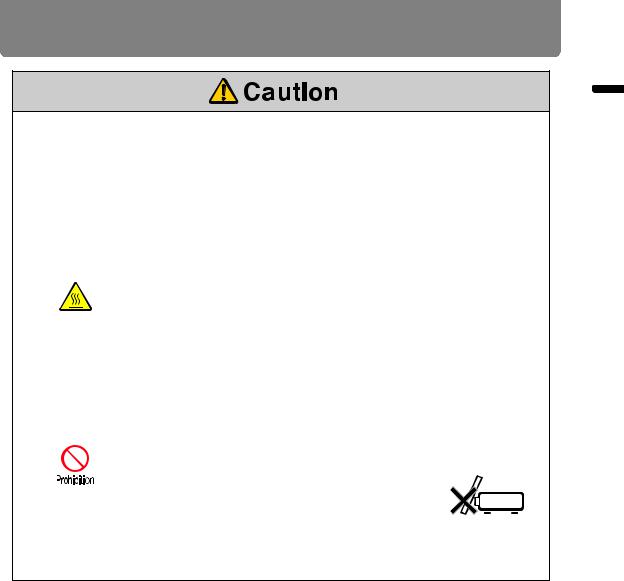
Denotes the risk of burns from improper handling if the information is not observed. To ensure safe use, always observe this information.
Denotes the risk of eye injury from laser emission if usage restrictions are not observed.
Denotes prohibited actions.
Denotes required actions or information that must be observed.
12
Safety Instructions
Precautions for Use
As this section contains important safety-related information, be sure to read the following carefully beforehand in order to use your projector correctly and safely.
Power Supply
During installation, keep the projector plug easily accessible so that the projector can be unplugged immediately if necessary, or keep a circuit breaker within reach.
If the following situations occur, turn the power off, remove the power plug from the power outlet and contact the Canon Customer Support Center. Failure to do so could cause a fire or result in an electric shock.
•If smoke is emitted
•If an unusual smell or noise is emitted
•If water or other liquid has entered the projector
• If metal or any other foreign material has entered the projector
•If the projector is knocked over or dropped and the cabinet is damaged
Pay attention to the following points regarding the power source, power plug and handling of the connector. Failure to do so may cause a fire or electric shock.
•Do not place any objects on the power cord and do not allow it to become trapped under the projector.
•Do not cover the power cord with a carpet.
•Do not modify or excessively bend, twist, pull, wind, or bundle the power cord.
•Keep the power cord away from heaters and other sources of heat.
• Do not use a damaged power cord. If the power cord is damaged, purchase a replacement from your dealer.
•Do not use any power source with a voltage other than the voltage indicated (AC 100–240 V).
•Do not insert any metal objects into the contact parts of the power plug or connector.
•The power cord included with this projector is for use exclusively with this product. Do not use this cord for other products.
Instructions Safety
13
Safety Instructions
Pay attention to the following points regarding the power source, power plug and handling of the connector. Failure to do so may cause a fire or electric shock.
• Do not remove the power plug or connector with wet hands.
•Insert the power plug and connector securely up to the base. Additionally, do not use a damaged power plug or an outlet that is loose.
•Do not pull the power cord and be sure to hold the power plug or connector when removing. Incorrect handling may damage the power cord.
•Before using an extension cord, check carefully to avoid
exceeding the cord’s rated capacity.
• Periodically inspect the power plug and outlet and remove any dust or dirt from between the plug and the outlet.
•Do not touch the projector itself, the power cord, or the cable if lightening strikes.
•Do not move the projector until you have switched off the power, removed the power plug from the power outlet and unplugged any other cables.
•Unplug the projector before cleaning or maintenance.
Installation and Use
Pay attention to the following points regarding installation and handling of the projector. Failure to do so may cause a fire, electric shock or personal injury.
• Do not use the projector where it might get wet, such as outdoors or by bathtubs or showers.
• Do not place containers containing a liquid on top of the projector.
•Do not remove the cabinet from the projector or disassemble it. The interior of the projector contains high-voltage components as
well as parts that are hot. If inspection, maintenance or repair is required, contact the Canon Customer Support Center.
• Do not disassemble or modify the projector (including consumable parts) or the remote control.
14

Safety Instructions
Pay attention to the following points regarding installation and handling of the projector. Failure to do so may cause a fire, electric shock or personal injury.
•Do not install the projector in a location that is damp or dusty, or where there is a lot of oily smoke or steam.
•Make sure to implement anti-fall measures such as an anti-fall wire when installing the projector in high places, for example, installing it on the ceiling.
•Do not look directly into the exhaust vents during use.
•Do not insert any object into vents in the projector, such as the air intake vent or exhaust vents.
•Do not place a pressurized can in front of the exhaust vents. The pressure of the contents of the can may increase due to heat from the exhaust vents and this could result in an explosion.
•When cleaning off dust or dirt from projector parts such as the lens or filter, never use any spray that is flammable. Internal parts that become hot may ignite and cause a fire.
•Do not use adhesives, lubricants, oils, or alkaline detergents for maintenance of the projector.
•As strong light beams are emitted while the
projector is in use, do not look directly into the 

 projector lens. Doing so could cause an eye

injury. Pay particular attention to prevent small children from doing so.
•Light from the projector is classified as Risk Group 2 (RG2) according to IEC 62471-5:2015.
•If children may approach the projector or touch it, always ensure the projector is used under adult supervision.
•Do not hold or install optical instruments (such as magnifying glasses, reflectors, or glasses) in the path of light from the projector. If projected light is refracted or reflected and enters people’s eyes, it may result in eye injury.
•Do not lift the projector alone. Have at least one assistant.
•When setting the projector on a high surface for projection, be sure the surface is flat and stable.
•Do not use the projector on a soft surface such as carpet or sponge mat, etc.
•For ceiling mounting or other installation work, request service from a qualified technician or the Canon Customer Support Center. Poor installation work could result in an accident.
Instructions Safety
15

Safety Instructions
Laser Light Source
•The projector is designated as a Class 1 laser product according to IEC/ EN 60825-1:2014.
•The equipment is designated as a Class 3R laser product according to IEC/ EN 60825-1:2007.
•Complies with FDA performance standards for laser products except for deviations pursuant to Laser Notice No. 50, dated June 24, 2007.
•Laser parameters
Wavelength: 450 nm – 460 nm
Maximum power: 144 W
Beam divergence: 2°
•The projector incorporates a laser module. Disassembly or modification is dangerous and must not be attempted.
•Operate and adjust the projector only as described in this manual. Incorrect
operation or adjustment poses a risk of exposure to potentially hazardous laser light.
•Do not use when damaged. Even if the projector is used as described in this manual, failure to discontinue use when it is damaged (as indicated by
screen abnormalities) may result in fire, electric shock, or eye injury from laser light.
•The Laser module is equipped in this product. Use of controls or adjustments or performance of procedures other than those specified herein may result in hazardous radiation exposure.
•For assistance when disposing of the projector, contact the Canon Customer
Support Center. Do not disassemble the projector yourself when disposing of it.
Explanatory and warning labels are located in the following positions on the projector.
16

Safety Instructions
Instructions Safety
17
Safety Instructions
Remote Control Batteries
Pay attention to the following points regarding handling of batteries. Failing to do so could result in a fire or personal injury.
•Do not heat, short circuit or disassemble the batteries, or place them in a fire.
•Do not attempt to recharge the batteries that are included with the remote
control.
•Remove the batteries when they are flat or when the remote control will not be used for a long period of time.
•When replacing the batteries, replace both at the same time. Also, do not use two batteries of a different type at the same time.
• Insert the batteries with the + and - terminals in the correct directions.
•If any liquid from inside the batteries leaks out and contacts your skin, be sure to wash the liquid off thoroughly.
18
Safety Instructions
Handling
Pay attention to the following points regarding installation and handling of the projector.
•If the projector will not be used for a long period of time, be sure to remove the power plug from the power outlet to ensure safety. Failure to do so presents a risk of fire if dust accumulates on the plug or outlet.
•Do not touch parts of the cabinet around and above the exhaust vents, which may become hot during projection. Pay particular
attention in preventing young children from touching these parts. Additionally, do not place any metal objects around or above the exhaust vents. Such objects may become hot from the projector, which may result in burns or other injury.
•Do not place any heavy objects on top of the projector or sit / stand on it. Pay particular attention to prevent small children from doing so. The projector may be knocked over and this could result in damage or a personal injury.
•Do not place the projector on an unstable or slanted surface. Doing so may cause the projector to fall or be knocked over and could result in a personal injury.
•Do not place any objects in front of the lens
during projection. Also, do not start projection with the lens cap on. Doing so could cause a fire.
•The lens is moved by a motor up, down, left, and right in response to the lens shift function. Do not touch the lens when it is moving. There is the risk of injury.
Instructions Safety
19
For Safe Use
Carrying and Installation
Pay attention to the following points when carrying or transporting the projector.
•This projector is a precision instrument. Do not knock it over or subject it to impacts. Doing so may cause a malfunction.
•Retract the adjustable feet before moving the projector. Leaving the feet extended may cause damage.
•Do not touch the lens with bare hands. Any smudges or fingerprints on the
lens may affect image quality.
•Protection of the projector cannot be guaranteed if used packaging or shockabsorbent materials are reused. Fragments from shock-absorbent material may also enter the interior of the projector which could cause a malfunction.
Pay attention to the following points when installing or using the projector.
•Be careful of condensation.
If the projector is abruptly taken to a warmer location, or if the room temperature rises abruptly, moisture in the air may condense on the lens and mirror, causing the image to become blurred. In this case, wait a while and make sure the moisture has evaporated before resuming use.
•Do not install the projector in a location where the temperature is high or low. Doing so may cause a malfunction. The temperature range for operation and storage are as follows.
Operating temperature: 0°C to 45°C (32°F to 113°F) Humidity: up to 85%
Storage temperature: -20°C to 60°C (-4°F to 140°F)
•When using the projector at an altitude of 2,300 m (7,548') or higher: From the projector menu, set [High altitude] to [On]. (P112)
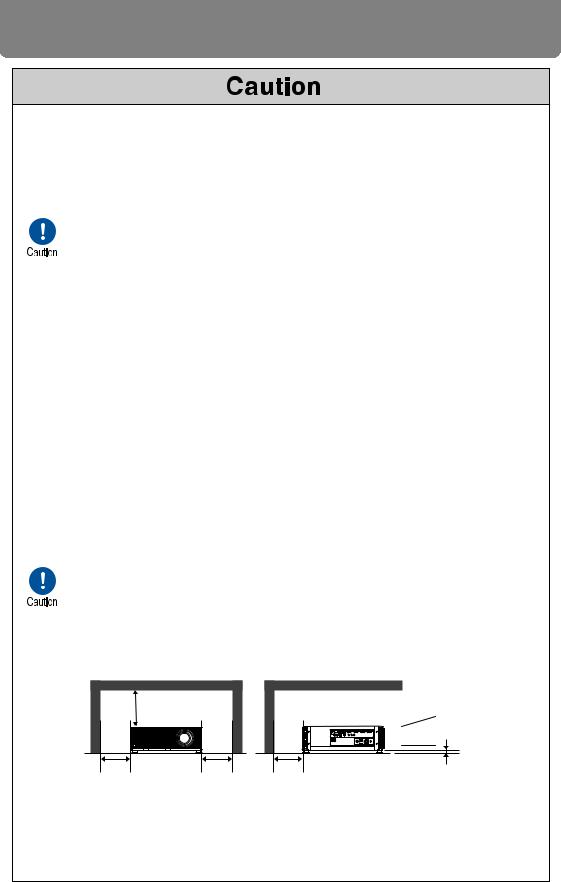
•Do not block the air intake or exhaust vents. Blocking the vents may trap heat inside the projector, which may shorten the useful life of optical components or other parts and damage the projector.
•Install the projector leaving at least 50 cm (1.6') between air intake/exhaust vents and walls on each side of the projector. Leave a gap of at least 2 cm (0.8") from the bottom of the projector. There is an air intake underneath the projector. Failure to leave enough space may trap heat inside the projector and damage it.
At least |
|
|
50 cm (1.6') |
|
|
|
|
At least |
At least |
At least |
2 cm (0.8") |
At least |
||
50 cm (1.6') |
50 cm (1.6') |
50 cm (1.6') |
•Do not place any objects on top of the projector that may change shape or color due to heat.
•Do not install the projector near high-voltage electrical power lines or an electrical power source.
20
Before Installation
Precautions When Carrying/Shipping the
Projector
Note the following precautions when carrying or shipping the projector.
•Disconnect the cables connected to the projector. Carrying the projector with the cables attached may cause an accident.
•Retract the adjustable feet. Leaving the feet extended when the projector is moved may cause damage.
• Do not expose the projector to strong impact or vibration.
•The projector is heavy and should not be carried alone. Have at least one assistant.
Precautions for Installation
Be sure to read “Safety Instructions” and “For Safe Use” (P6 – P20). Also take the following precautions during installation.
•Do not strike the projector or subject it to impact. Doing so may cause a malfunction.
•Do not install the projector standing on one side or in other
unsteady positions. The projector may be damaged if it tips over.
■Do Not Use in the Following Environments
•Locations with excessive humidity, dust, oily smoke or tobacco smoke
Adhesion to the lens, mirrors or other optical parts may reduce image quality.
•Near high-voltage power lines or sources of electrical power
This may cause malfunction.
• On soft surfaces such as carpets or cushioned mats
Heat may build up inside the projector and damage it.
•Locations with excessive temperature or humidity
This may damage the projector. Acceptable ranges for operating and storage temperature and humidity are as follows.
Operating temperature |
Operating humidity |
Storage temperature |
0°C (32°F) – 45°C (113°F) |
Up to 85% |
-20°C (-4°F) – 60°C (140°F) |
Installation Before
21
Before Installation
■ Do Not Touch the Lens with Bare Hands
Do not touch the lens with bare hands. Any smudges or fingerprints on the lens may affect image quality.
■ Allow a 30 Min. Warm Up before Focus Adjustment (P59), if Possible
Immediately after startup, the heat of the light source may prevent stable focus. When adjusting focus, it is also helpful to use the test pattern (10) (P117, P197).
■ Install at a Sufficient Distance from Walls and Other Obstructions
If the air intake or exhaust vent is blocked, heat will accumulate inside the projector, possibly resulting in a shortened projector lifetime or a malfunction. Similarly, do not install in narrow, enclosed spaces with poor ventilation. Install in a wellventilated location. Ensure a minimum clearance of 50 cm (1.6') above, on both sides, and behind the projector, as shown below. Also ensure a minimum clearance of 2 cm (0.8") below the projector.
Air intake vent
Exhaust vent
Air intake vent
■ Be Careful of Condensation
If the temperature of the room rises suddenly, moisture in the air may condense on the projector lens and mirror, causing the image to become blurred. Wait until the condensation has evaporated for the image projected to return to normal.
■ At Altitudes above 2,300 m (7,545.8'), Adjust the Settings
Projector settings must be adjusted when using the projector at altitudes of 2,300 m (7,545.8') or higher. Specifically, refer to instructions for [High altitude] (P112) in the [Install settings] menu.
22
Before Installation
■ When Using Mounted on the Ceiling
When using the projector mounted on the ceiling or installed in a high location, clean around the air intake and exhaust vents periodically. Dust that accumulates in intake or exhaust vents may impair ventilation, raising the temperature inside and posing a risk of damage or fire. Use a vacuum cleaner or similar means to remove dust from the intake vent and exhaust vent.
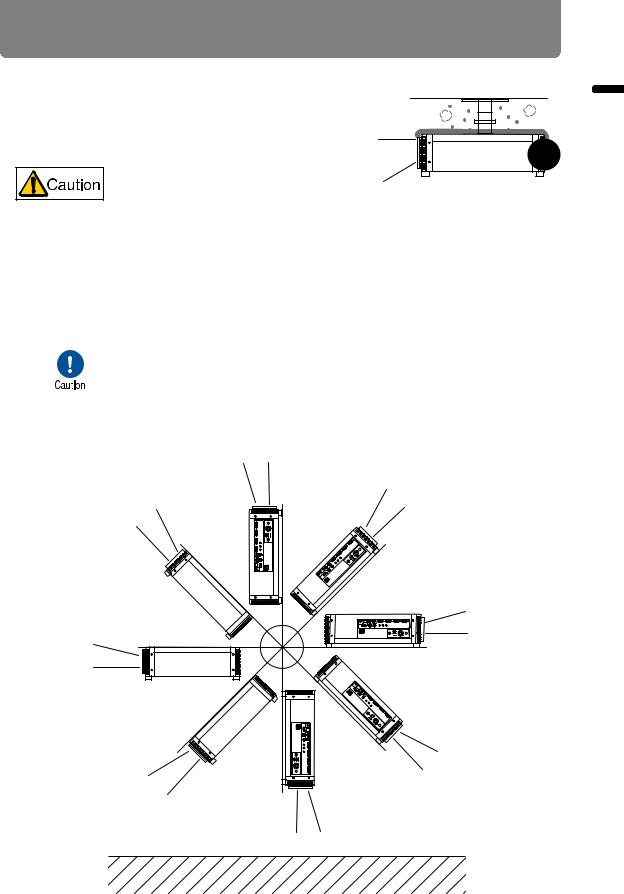
■Installation to Project Up, Down, or at an Angle
•Projection is possible upward, downward, or in a variety of directions, but do not block the air intake and exhaust vents. In particular, always ensure a minimum clearance of 2 cm (0.8") from the air intake vent on the bottom of the projector.
•There are no options for installing the projector other than the
ceiling attachment.
•When mounting the projector on the ceiling, it is more convenient to install the projector right-side up, with the adjustable feet facing down.
Installation Before
23

Before Installation
■ Precautions for Portrait (Upright) Installation
• Do not block the air intake or exhaust vents. In particular, because there is an air intake vent on the bottom, always ensure a minimum clearance of 2 cm (0.8") from the bottom.
• Note that no mounting brackets or similar accessories for portrait installation are available.
■ Light Source
The projector uses laser as a light source. The laser has the following characteristic.
Factors such as long-term use and environmental changes may affect image quality. You can counteract changes in brightness from hours of use or the ambient temperature by performing [Light source calibration] in [Calibration] (P134).
24

Before Installation
Copyright Notice
Please note that enlarging or reducing the size of an image for commercial purposes or public presentation may infringe on the legally protected copyright or the copyright holder of the original material.
Ensure Network Security
Take measures to ensure network security. Note that Canon is not liable in any way for direct or indirect loss from network security incidents, such as unauthorized access.
Before use, configure projector, computer, and network security settings appropriately.
•Set up the projector for connections only within your protected network, behind a firewall or the like, instead of direct Internet connections.
•When using the projector in a wireless network, also configure the Wi-Fi security settings.
•Change the Wi-Fi security key on a regular basis.
About Trademarks
•Ethernet is a registered trademark of Xerox Corporation.
•Microsoft and Windows are registered trademarks or trademarks of Microsoft Corporation in the United States and / or other countries.
•Mac, Mac OS and Macintosh are trademarks of Apple Inc., registered in the United States and / or other countries.
•HDMI, the HDMI logo and High-Definition Multimedia Interface are trademarks or registered trademarks of HDMI Licensing, LLC.
•PJLink is a registered trademark of JBMIA and pending trademark in some countries.
•PJLink is a registered trademark, or an application has been submitted for trademark, in Japan, the United States and / or other countries or regions.
•AMX is a registered trademark of Harman International Industries, Inc.
•Crestron®, Crestron RoomView®, and Crestron Connected™ are registered trademarks of Crestron Electronics, Inc.
•Wi-Fi is a registered trademark of the Wi-Fi Alliance.
•Wi-Fi Certified, WPA, WPA2, and the Wi-Fi Certified logo are used in reference to methods of configuration developed by the Wi-Fi Alliance.
•All other trademarks are the property of their respective owners.
Installation Before
25

Open Source Software
The product contains Open Source Software modules. For details, download the compressed archive file containing the User’s manual from the Canon website. Extract the contents of the compressed archive file and refer to the “ThirdPartySoftware.pdf” (third-party software license) file in the [LICENSE] folder. Each module’s license conditions are also available in the same folder.
■ Software under the GNU General Public License Version 2
Contained programs are free software; you can redistribute them and/or modify them under the terms of the GNU General Public License attached to each copy of the program.
Each program is distributed in the hope that it will be useful, but WITHOUT ANY WARRANTY; without even the implied warranty of MERCHANTABILITY or FITNESS FOR A PARTICULAR PURPOSE. Please see “NO WARRANTY” and “NO SUPPORT” stated below. For more detail, please see full text of the GNU General Public License.
NO WARRANTY
BECAUSE THE PROGRAM IS LICENSED FREE OF CHARGE, THERE IS NO WARRANTY FOR THE PROGRAM, TO THE EXTENT PERMITTED BY APPLICABLE LAW. EXCEPT WHEN OTHERWISE STATED IN WRITING THE COPYRIGHT HOLDERS AND/OR OTHER PARTIES PROVIDE THE PROGRAM “AS IS” WITHOUT WARRANTY OF ANY KIND, EITHER EXPRESSED OR IMPLIED, INCLUDING, BUT NOT LIMITED TO, THE IMPLIED WARRANTIES OF MERCHANTABILITY AND FITNESS FOR A PARTICULAR PURPOSE. THE ENTIRE RISK AS TO THE QUALITY AND PERFORMANCE OF THE PROGRAM IS WITH YOU. SHOULD THE PROGRAM PROVE DEFECTIVE, YOU ASSUME THE COST OF ALL NECESSARY SERVICING, REPAIR OR CORRECTION.
IN NO EVENT UNLESS REQUIRED BY APPLICABLE LAW OR AGREED TO IN WRITING WILL ANY COPYRIGHT HOLDER, OR ANY OTHER PARTY WHO MAY MODIFY AND/OR REDISTRIBUTE THE PROGRAM AS PERMITTED ABOVE, BE LIABLE TO YOU FOR DAMAGES, INCLUDING ANY GENERAL, SPECIAL, INCIDENTAL OR CONSEQUENTIAL DAMAGES ARISING OUT OF THE USE OR INABILITY TO USE THE PROGRAM (INCLUDING BUT NOT LIMITED TO LOSS OF DATA OR DATA BEING RENDERED INACCURATE OR LOSSES SUSTAINED BY YOU OR THIRD PARTIES OR A FAILURE OF THE PROGRAM TO OPERATE WITH ANY OTHER PROGRAMS), EVEN IF SUCH HOLDER OR OTHER PARTY HAS BEEN ADVISED OF THE POSSIBILITY OF SUCH DAMAGES.
NO SUPPORT
Canon Inc., and all its subsidiaries or its dealers do not make any support service regarding the source code. Canon Inc., and all its subsidiaries or its dealers shall not respond to any questions or enquiries, from you or any other customers, regarding the source code.
26
Before Use
Included Accessories
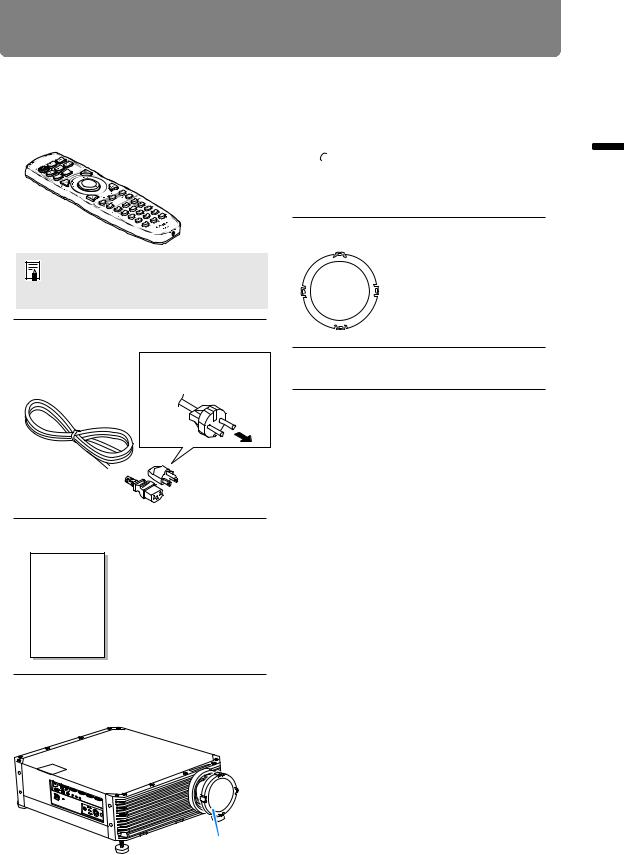
Before use, make sure the following items are included in the package.
• Remote control (part No.: RS-RC05)
The remote control can also be used in a wired connection with the projector. (P36)
• Power cord (1.8 m / 5.9')
For Continental
Europe
For the U.S.A. 


and Canada
• Batteries for the remote control (AA size x2)

 BeforeUse • Lens cap
• Warranty Card
• Important Information
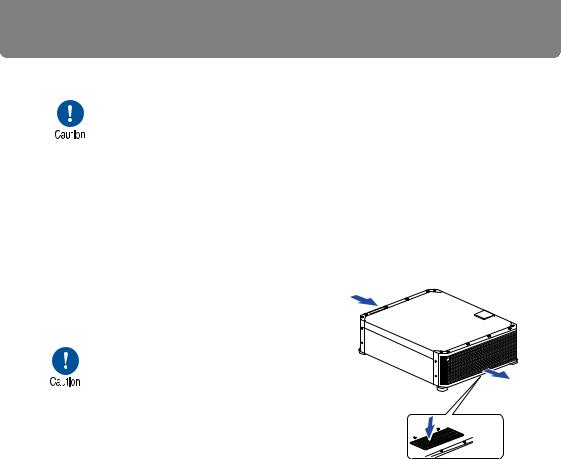
■ Lens Cap
Always remove the lens cap before projection. Accidentally leaving the lens cap on during projection may distort the lens cap and damage the projector.
Lens cap
27
Before Use
Part Names
Projector
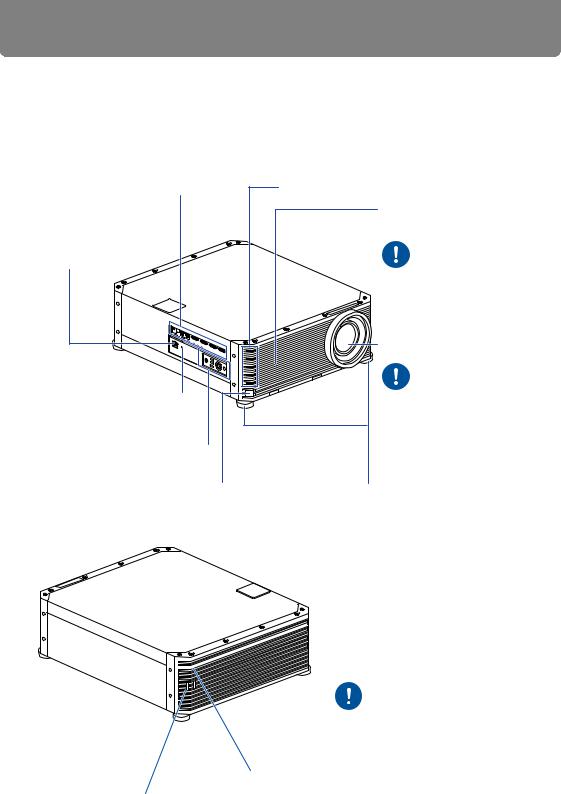
■ Front Side
Terminals and connectors (P32)
Power cord connector (P52)
Anti-theft lock hole
An anti-theft wire cable (not included) can be connected.
Side control (P29)
Infrared remote receiver (P36)
LED indicators (P30)
Air intake vent Air filter (P194)
Do not block the air intake.


 Doing so may cause a malfunction.
Projection lens
Always remove the lens cap before


 projection.
Failure to do so may cause a malfunction.
Adjustable feet (P38)
■ Rear Side
 Exhaust vent
Do not block the air exhaust. Doing so may 
 cause a malfunction.
Infrared remote receiver (P36)
Security bar
A wire or cable can be attached to deter theft.
An opening of 2 mm (0.078") is provided for threading the wire.
28
Before Use
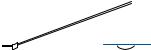
■ Bottom
Air intake vent
Use Before
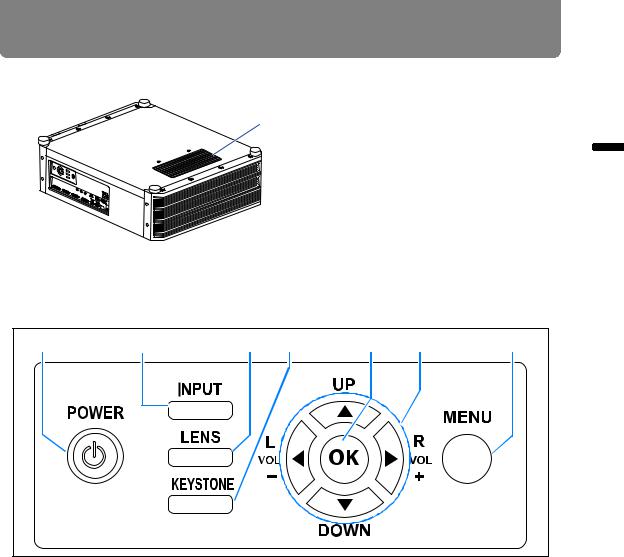
Side Control
(1) |
(2) |
(3) |
(4) |
(5) |
(6) |
(7) |
(1)POWER button (P53, P71)
Turns the projector on or off.
(2)INPUT button (P56)
Switches the input signal.
(3)LENS button (P59)
Each time the button is pressed, the adjustment window changes, from focus (P59) to zoom (image size) (P60) to lens shift (image position) (P62).
To adjust the image, use the [ ] / [
] / [ ] or [
 ] / [
] / [ ] buttons.
After the focus adjustment window, the marginal focus adjustment window is also displayed for adjusting focus of image edges (P191), depending on the [Marginal focus] setting (P113).
(4)KEYSTONE button (P65)
Corrects keystone distortion.
(5)OK button (P78)
Determines the item selected from the menu.
(6)Pointer / VOL buttons (P77)
Up, down, left, or right in menu navigation or other operations. Adjust the sound volume.
[ ] VOL– button: Decreases the volume.
[ ] VOL+ button: Increases the volume.
(7)MENU button (P76)
Displays a menu on the screen.
29

Before Use
LED Indicators
The projector status is shown by the LED indicators (off / lit / flashing).
• POWER (green) |
: Illuminated during projection. |
|
Otherwise, flashes in the following |
|
situations. |
|
• As the projector transitions from |
|
standby to projection |
|
• While the light source is off in power |
|
management mode |
• STAND BY (red) |
: Illuminated during standby mode. |
|
Otherwise, flashes in the following |
|
situations. |
|
• As the projector transitions from |
|
projection to standby |
|
• While the light source is off in power |
|
management mode |
• WARNING (red) |
: Lights up or flashes when an error |
|
occurs. |
• LIGHT (orange) |
: Lights up or flashes when a problem |
|
occurs with the light source. |
• TEMP (red) |
: Lights up or flashes when the internal |
|
temperature is high. |
|
|
30
 Loading...