


MULTIMEDIA PROJECTOR
User’s Manual
Safety Instructions
Before Use
Installation Procedure
Basic |
Connection Procedure |
|
|
Guide |
Projection Procedure |
|
Convenient Features
Using Menus
|
|
Advanced |
Menu Configuration |
|
|
|
|
|
|
Guide |
Menu Description |
|
|
|
|
|
|
|
Advanced Projection |
|
|
|
Maintenance |
|
|
|
|
|
|
Other |
|
|
|
||
|
|
|
|
|
|
Information |
Product Specifications |
|
|
|
|
|
|
|
Troubleshooting |
|
|
|
|
ENG
How to Use This Manual
Thank you for purchasing a Canon projector.
The WUX6500 Multimedia Projector is a high-performance projector that is capable of projecting a high-resolution computer screen and high-quality digital image on a large screen.
This Manual
This is the user’s manual for WUX6500 Multimedia Projectors (hereafter, “projector”). The “Basic Guide” section describes installation and basic use of the projector. Descriptions of menus and how to connect the projector to a network are given in the “Advanced Guide” section. Read this manual thoroughly to make the most of your projector. We recommend requesting installation by a qualified technician or the Canon Customer Support Center.
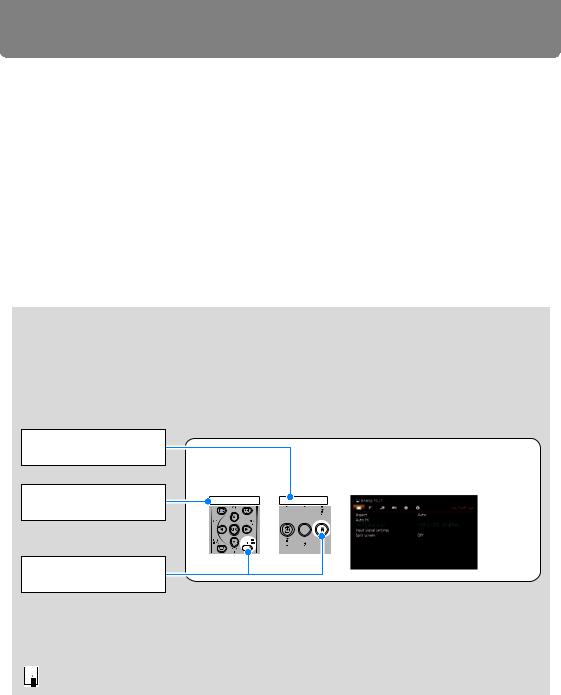
Symbols of Button Operations
The projector can be operated using the buttons on the remote control or on the side of the projector. The remote control allows you to operate all functions of the projector.
In this document, the button’s operations are shown as below.
Operation of buttons on side of projector
Remote control button operation
Indicate the buttons to be pressed
Selecting Screen Aspect
Select the correct aspect ratio for the screen which is used.
1 Press the MENU button to display the menu window.
Remote control |
Projector |
Symbols Used in This Manual
Sections labeled with these symbols give the following kinds of information.  Indicates precautions and information to note when using the projector.
2

Table of Contents |
|
How to Use This Manual............... |
2 |
Projector Highlights...................... |
5 |
Safety Instructions........................ |
7 |
Safety Precautions................................. |
8 |
CAUTION ON HANGING FROM THE |
|
CEILING .................................................. |
8 |
AC Power Cord Requirement.............. |
11 |
Federal Communication Commission |
|
Notice .................................................... |
12 |
Precautions for Use ............................. |
14 |
Installation and Handling |
|
Precautions .......................................... |
15 |
Precautions on the Lamp .................... |
17 |
Precautions for the Batteries of the |
|
Remote Control .................................... |
18 |
For Safe Use ................................ |
20 |
Before Installation....................... |
22 |
Precautions When Carrying/Shipping |
|
the Projector......................................... |
22 |
Precautions for Installation................. |
22 |
Open Source Software ............... |
27 |
Before Use ................................... |
28 |
Included Accessories .......................... |
28 |
Part Names ........................................... |
29 |
Projector ............................................... |
29 |
Side Control.......................................... |
30 |
LED Indicators...................................... |
31 |
Input Terminal ...................................... |
33 |
Remote Control .................................... |
35 |
Preparing the Remote Control............ |
37 |
Basic Guide ............................ |
39 |
Installation Procedure ................ |
40 |
Setting Up the Projector...................... |
40 |
Relationship Between Image Size and |
|
Projecting Distance ............................. |
43 |
Lens Shift Function ............................. |
47 |
Connection Procedure ............... |
49 |
Connecting a Computer ...................... |
49 |
Connecting AV Equipment.................. |
51 |
Plugging the Projector In .................... |
52 |
Projection Procedure.................. |
53 |
Step 1 Turn the Projector On .............. |
53 |
Step 2 Select an Input Signal.............. |
56 |
Step 3 Adjust the Image ...................... |
57 |
Step 4 Select an Aspect Ratio (Screen |
|
Aspect) Matching the Screen.............. |
63 |
Step 5 Adjusting Keystone |
|
Distortion .............................................. |
67 |
Step 6 Select the Image Quality (Image |
|
Mode) .................................................... |
70 |
Step 7 Turn the Projector Off.............. |
71 |
Convenient Features................... |
72 |
Adjusting the Volume .......................... |
74 |
Muting the Sound................................. |
74 |
Zooming Part of an Image................... |
75 |
Advanced Guide .................... |
77 |
Using Menus................................ |
78 |
Menu Configuration ............................. |
78 |
Basic Menu Operations ....................... |
79 |
Menu Configuration .................... |
81 |
Menu Description ........................ |
90 |
Input settings ....................................... |
90 |
Image adjustment ................................ |
96 |
Install settings.................................... |
104 |
System settings ................................. |
116 |
Network settings ................................ |
127 |
Completing Projector Settings ......... |
129 |
Completing Computer Settings ........ |
136 |
Checking Projector Information ....... |
156 |
Advanced Projection................. |
157 |
Projecting Images on a USB Flash |
|
Drive .................................................... |
157 |
Description of USB File Browser...... |
159 |
Selecting an Image for Projection .... |
160 |
Operating the Projected Image......... |
160 |
Running a Slideshow of Data Saved in a |
|
USB Flash Memory ............................ |
161 |
Split-Screen Display .......................... |
161 |
Projecting from Multiple Projectors at |
|
Once (Edge Blending) ....................... |
162 |
Other Information ................ |
169 |
Maintenance............................... |
170 |
Cleaning the Projector and the Air |
|
Filter .................................................... |
170 |
Cleaning the Air Filter........................ |
171 |
Replacing the Air Filter...................... |
172 |
Replacing the Lamp........................... |
173 |
Replacement Lamp ............................ |
175 |
3

Table of Contents |
|
Lamp Replacement Procedure ......... |
176 |
Installing / Removing the Lens |
|
Unit ...................................................... |
178 |
Product Specifications ............. |
183 |
Relationship between Aspect and |
|
Screen Aspect .................................... |
183 |
Displayed Test Patterns .................... |
187 |
Supported Signal Types.................... |
188 |
Troubleshooting........................ |
198 |
LED Indicator Details......................... |
198 |
Symptoms and Solutions.................. |
199 |
Index........................................... |
205 |
Option ........................................ |
207 |
4
Installation and Handling Precautions Précautions d’installation et de manipulation Precauciones de instalación y manejo Hinweise zur Aufstellung und Handhabung
Precauzioni relative all’installazione e a come si maneggia il proiettore
Voorzorgsmaatregelen voor installatie en behandeling
Forsigtighedsregler ved installation og håndtering Försiktighetsåtgärder vid montering och hantering Asennusta ja käsittelyä koskevat varotoimet
YT1-7519-000 |
©CANON INC. 2017 |
|
|
Guarde este documento junto con la “Información importante” |
|
SPA |
||
|
(folleto) y las “Instrucciones de uso” (CD-ROM). |
|
 Advertencia
Precauciones de instalación y manejo
•No instale el proyector en un lugar húmedo o donde haya polvo, humo de tabaco o grasa. De hacerlo, los componentes ópticos como la lente y el espejo podrían ensuciarse, afectando a la calidad de imagen. Además, la grasa puede degradar el plástico, lo cual podría causar el desprendimiento del proyector montado en el techo respecto de su montura.
•No utilice adhesivos, lubricantes, aceites o detergentes alcalinos para el mantenimiento del proyector. Tales sustancias podrían adherirse al plástico y deteriorarlo, lo que podría causar la caída del proyector si está montado en el techo.
•Al instalar el proyector en lugares elevados, como por ejemplo en el techo, asegúrese de tomar medidas contra la caída del aparato,
Atención |
tales como el uso de un cable de sujeción. |
|
|
|
|
|
Conservare questo documento insieme a “Informazioni importanti” |
|
ITA |
||
(opuscolo) e al “Manuale d’uso” (CD-ROM). |
||
|
 Avvertenza
Precauzioni relative all’installazione e a come si maneggia il proiettore
•Non installare il proiettore in luoghi umidi o in presenza di grandi quantitativi di polvere, fumo oleoso o fumo di tabacco. In caso contrario, si potrebbe provocare la contaminazione dei componenti ottici quali l’obiettivo e lo specchio, e provocare il deterioramento della qualità
dell’immagine. Inoltre, l’olio può degradare la plastica, il che potrebbe risultare nella caduta di un proiettore montato a soffitto dal suo attacco.
• Non utilizzare adesivi, lubrificanti, oli o detergenti alcalini per la manutenzione del proiettore. Potrebbero aderire alla plastica e deteriorarla, con la possibilità di causare la caduta del proiettore, qualora sia montato a soffitto.
•Quando si intende installare il proiettore in ubicazioni elevate, ad esempio quando si intende installarlo sul soffitto, accertarsi di
Attenzione |
implementare misure di prevenzione delle cadute, ad esempio un |
|
cavo metallico anticaduta. |
|
Store this document together with the “Important Information” |
ENG |
|
|
(booklet) and the “User’s Manual” (CD-ROM). |
|
|
|
|
Installation and Handling Precautions
•Do not install the projector in a location that is damp, or where there is a lot of dust, oily smoke or tobacco smoke. Doing so could cause contamination of optical components such as the lens and the mirror and may result in deterioration of image quality. In addition, oil can
degrade the plastic, which could result in a ceiling-mounted projector falling from its mounting.
• Do not use adhesives, lubricants, oils, or alkaline detergents for maintenance of the projector. They could adhere to the plastic and deteriorate it, possibly resulting in the projector falling if it is ceilingmounted.
•Make sure to implement anti-fall measures such as an anti-fall wire when installing the projector in high places, for example, installing it
on the ceiling.
|
Conservez ce document avec les « Informations importantes » |
FRA |
|
|
(livret) et le « Mode d’emploi » (CD-ROM). |
 Avertissement
Précautions d’installation et de manipulation
•N’installez pas le projecteur dans un endroit humide ou très poussiéreux, ou dans lequel il serait exposé à des fumées contenant des particules de graisse ou de tabac. Les composants optiques, comme l’objectif ou le miroir, pourraient être contaminés, et la qualité de l’image en serait altérée. De plus, l’huile peut détériorer le
plastique, ce qui pourrait provoquer la chute du projecteur monté au plafond.
•N’utilisez pas de colle, de lubrifiants, d’huiles ou de détergents alcalins pour l’entretien du projecteur. Ils pourraient se coller au plastique et l’endommager, ce qui pourrait provoquer la chute du projecteur s’il est monté au plafond.
•Veillez à mettre en place des mesures antichute telles qu’un câble antichute lors de l’installation du projecteur en hauteur, par exemple
Attention |
au plafond. |
|
Bewahren Sie dieses Dokument zusammen mit „Wichtige Informa- |
GER |
|
|
tionen“ (Broschüre) und dem „Benutzerhandbuch“ (CD-ROM) auf. |
 Warnung
Hinweise zur Aufstellung und Handhabung
•Stellen Sie den Projektor nicht an einem Ort auf, an dem er Feuchtigkeit, Staub, starken Öldünsten oder Zigarettenrauch ausgesetzt ist. Andernfalls könnten die optischen Bauteile (Objektiv, Spiegel) verschmutzt werden, was zu einer Verschlechterung der Bildqualität führen würde. Darüber hinaus kann Öl den Kunststoff zersetzen. Dies kann dazu führen,
dass ein an der Decke montierter Projektor aus seiner Halterung fällt.
• Verwenden Sie keine Klebstoffe, Schmiermittel, Öle oder alkalische Reinigungsmittel für die Wartung des Projektors. Sie könnten an dem Kunststoff anhaften und ihn beschädigen. Dies kann dazu führen, dass der Projektor herunterfällt, wenn er an einer Decke montiert ist.
•Achten Sie darauf, dass der Projektor bei der Montage in einer hohen Position (z. B. an der Decke) gegen Absturz gesichert wird (z.
Vorsicht |
B. mit einem Drahtseil). |
|
Bewaar dit document samen met het boekje „Belangrijke |
NLD |
|
|
informatie” en de „Gebruikershandleiding” (CD-ROM). |
 Waarschuwing
Voorzorgsmaatregelen voor installatie en behandeling
•Installeer de projector niet in een vochtige of stoffige ruimte of op een plaats met vettige rook of tabaksrook. Dit kan verontreiniging van de optische componenten zoals de lens en de spiegel veroorzaken en kan verslechtering van de beeldkwaliteit tot gevolg hebben. Daarnaast kunnen vet en olie het kunststof aantasten waardoor een
projector die aan het plafond is bevestigd, zou kunnen vallen.
• Gebruik voor het onderhoud van de projector geen hechtmiddelen, smeerolie, andere olie of alkalische schoonmaakmiddelen. Deze blijven mogelijk achter op het kunststof, waardoor dit wordt aangetast. Hierdoor zou de projector kunnen vallen als deze aan het plafond is gemonteerd.
•Zorg ervoor dat u valpreventiemaatregelen neemt, bijvoorbeeld door een veiligheidskabel te gebruiken, als u de projector op een hoge
Voorzichtig plaats installeert, bijvoorbeeld aan het plafond.

|
Opbevar dette dokument sammen med ”Vigtige oplysninger” |
DEN |
|
|
(hæfte) og ”Brugervejledningen” (CD-ROM). |
 Advarsel
Forsigtighedsregler ved installation og håndtering
•Undlad at installere projektoren et sted, der er fugtigt, eller hvor der er meget støv, oliedampe eller cigaretrøg. Ellers kan det resultere
i, at de optiske dele, som f.eks. linsen og spejlet, kontamineres, og billedkvaliteten forringes. Desuden kan olie nedbryde plastikken, hvilket kan medføre, at en loftsmonteret projektor falder ned fra sin montering.
• Undlad at bruge klæbestoffer, smøremidler, olier eller alkaliske rengøringsmidler til at vedligeholde projektoren. De kan sætte sig fast på plastikken og forringe den og muligvis medføre, at projektoren falder ned, hvis den er monteret i loftet.
•Sørg for at benytte forholdsregler til forebyggelse af fald, for eksempel en sikkerhedsline, når projektoren monteres på
Forsigtig |
højtliggende steder, for eksempel når den monteres i loftet. |
|
|
|
|
|
Säilytä tämä asiakirja yhdessä tuotteiden ”Tärkeää tietoa” |
|
FIN |
||
(kirjanen) ja ”Käyttöopas” (CD-ROM) kanssa. |
||
|
 Varoitus
Asennusta ja käsittelyä koskevat varotoimet
•Älä aseta projektoria paikkaan, joka on kostea, jossa on paljon pölyä, öljyistä savua tai tupakansavua. Se saattaa johtaa optisten osien, kuten objektiivin ja peilin likaantumiseen, sekä saattaa heikentää kuvan laatua. Lisäksi öljy voi heikentää muovia,
mikä voi aiheuttaa kattoon asennetun projektorin putoamisen kiinnityksestään.
• Älä käytä liimoja, voiteluaineita, öljyjä tai emäksisiä puhdistusaineita projektorin huoltamisessa. Ne voivat kiinnittyä muoviin ja heikentää sitä, mikä voi johtaa projektorin putoamiseen, jos se on kiinnitetty kattoon.
•Varmista, että teet kaikki putoamisen estävät toimenpiteet, kuten putoamisen estävä vaijeri, kun asennat projektorin korkealle,
Huomio |
esimerkiksi asennat sen kattoon. |
|
|
|
[ ( )] [ (CD-ROM)] |
KOR |
|
|
. |
|
|
|
|
•,
.
. .
•, ,
.
.
•( : ).
|
Förvara det här dokumentet tillsammans med ”Viktig information” |
SWE |
|
|
(häfte) och ”Användarhandbok” (CD-ROM). |
 Varning
Försiktighetsåtgärder vid montering och hantering
•Montera inte projektorn på en plats som är fuktig eller där det finns mycket damm, oljig rök eller tobaksrök. Detta kan förorena optiska
komponenter, t.ex. lins och spegel, och kan leda till försämrad bildkvalitet. Dessutom kan olja bryta ned plasten, vilket kan leda till att projektorn faller ned från sitt fäste om den är takmonterad.
• Använd inte lim, smörjmedel, oljor eller alkaliska rengöringsmedel vid underhållet av projektorn. Sådana ämnen kan klibba fast på plasten och bryta ned eller på annat sätt skada den, vilket eventuellt kan leda till att projektorn faller ned om den är takmonterad.
•Använd alltid en fallskyddskabel eller vidtag andra fallskyddsåtgärder när du monterar projektorn på högt uppsatta
Observera |
platser, till exempel vid montering i taket. |
CHI “ CD-ROM)
• 雾的地方。否则可能会污染光学部件(
)
•
•( )
FOR “ ” “ CD_ROM
•
• ,
•
JPN CDROM)

•

Projector Highlights
High-Resolution LCOS Projection
Projection at 1920x1200 (WUXGA), thanks to high-resolution reflective liquid crystal on silicon (LCOS) panels.
HDBaseT Input
The projector supports HDBaseT, a next-generation connectivity standard. HDBaseT offers a convenient connection for carrying high-quality video and audio signals equivalent to HDMI across distances up to 100 m over a single LAN cable. This port can also be used to connect the projector to a network.
(P50, P51, P120, P121, P127)
|
|
HDMI cable, etc. |
HDBaseT terminal |
LAN cable |
HDBaseT transmitter |
(CAT5e or better; |
shielded; not included)
Lens Shift
Lens shift enables motorized image repositioning up, down, left, or right (P47) for greater freedom in installation.
Motorized Zoom and Focus Adjustment
Efficient setup using motorized zoom and focus adjustment.
Five Lens Units Available
Choose the optimal lens unit for the projection distance or purpose.
5

Projector Highlights
Split-Screen Display
Splits the screen for projection of two separate input signals at once. (P161)
Edge Blending
Blend the overlapping edges of images from multiple projectors to make the overall image more seamless. (P162)
Networked Multi-Projection (NMPJ)
Project images from multiple computers via a network connection.
For details on Networked Multi-Projection (NMPJ), refer to the NMPJ user’s manual.
LAN
6

Safety Instructions
Before installing and operating the projector, read this manual thoroughly. This projector provides many convenient features and functions. Operating the
projector properly enables you to manage those features and maintain it in good condition for many years to come.
Improper operation may result in not only shortening the product life, but also malfunctions, fire hazards, or other accidents.
If your projector does not seem to be operating properly, read this manual again, check operations and cable connections, and try the solutions in the “Troubleshooting” section in the back of this manual. If the problem still persists, contact the Canon Customer Support Center.
CAUTION
RISK OF ELECTRIC SHOCK
DO NOT OPEN
CAUTION: TO REDUCE THE RISK OF ELECTRIC SHOCK, DO NOT REMOVE COVER (OR BACK). NO USER-SERVICEABLE PARTS INSIDE EXCEPT LAMP REPLACEMENT. REFER SERVICING TO QUALIFIED SERVICE PERSONNEL.
THIS SYMBOL INDICATES THAT DANGEROUS VOLTAGE CONSTITUTING A RISK OF ELECTRIC SHOCK IS PRESENT WITHIN THIS UNIT.
THIS SYMBOL INDICATES THAT THERE ARE IMPORTANT OPERATING AND MAINTENANCE INSTRUCTIONS FOR THIS UNIT IN THE OWNER’S MANUAL.
CAUTION
Not for use in a computer room as defined in the Standard for the Protection of Electronic Computer / Data Processing Equipment, ANSI / NFPA 75.
Instructions Safety
7
Safety Instructions
 Safety Precautions
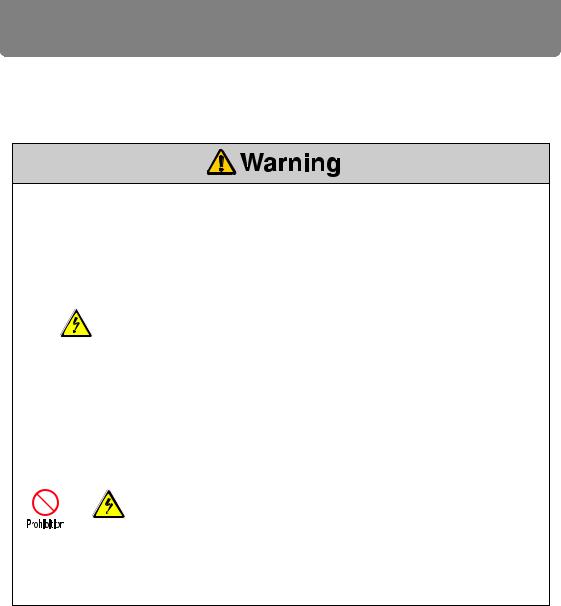
WARNING:
•THIS APPARATUS MUST BE GROUNDED.
•TO REDUCE THE RISK OF FIRE OR ELECTRIC SHOCK, DO NOT EXPOSE THIS APPLIANCE TO RAIN OR MOISTURE.
•This projector produces intense light from the projection lens. Do not stare directly into the lens, otherwise eye damage could result. Be especially careful that children do not stare directly into the beam.
•Install the projector in a proper position. Otherwise it may result in a fire hazard.
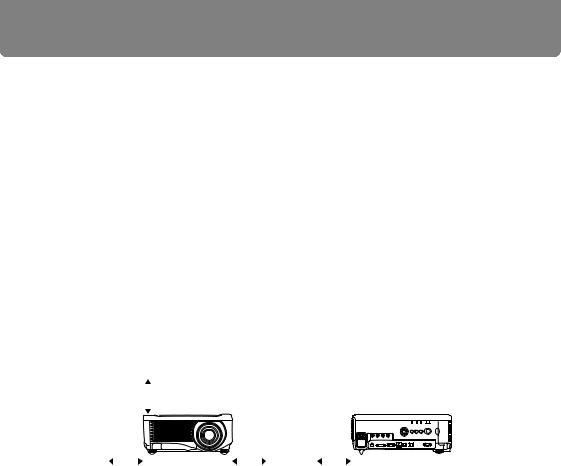
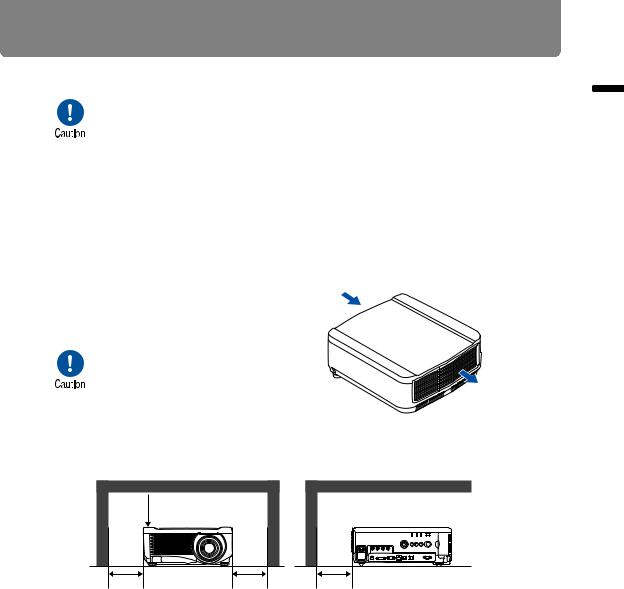
•Allowing the proper amount of space on the top, sides, and rear of the projector cabinet is critical for proper air circulation and cooling of the unit. The diagrams shown here indicates the minimum space required. If the projector is to be built into a compartment or similarly enclosed, these minimum distances must be maintained.
|
|
|
|
|
SIDE and TOP |
|
|
|
|
|
|
|
|
|
REAR |
|||||
|
|
|
|
|
|
|
|
|
|
|
|
|
|
|
|
|
|
|
|
|
|
|
|
|
|
|
|
|
|
|
|
|
|
|
|
|
|
|
|
|
|
|
|
|
|
|
|
At least |
|
|
|
|
|
|
|
|
|
|
|
|||
|
|
|
|
|
|
|
|
|
|
|
|
|
|
|
|
|
||||
|
|
|
|
|
|
50 cm (1.6') |
|
|
|
|
|
|
|
|
|
|
|
|||
|
|
|
|
|
|
|
|
|
|
|
|
|
|
|
|
|
|
|
|
|
|
|
|
|
|
|
|
|
|
|
|
|
|
|
|
|
|
|
|
|
|
|
|
|
|
|
|
|
|
|
|
|
|
|
|
|
|
|
|
|
|
|
At least |
At least |
At least |
50 cm (1.6') |
50 cm (1.6') |
50 cm (1.6') |
•Do not cover the ventilation slots on the projector. Heat build-up can reduce the service life of your projector, and can also be dangerous.
•If the projector is unused for an extended time, unplug the projector from the power outlet.
•Do not project the same image for a long time.
An afterimage may remain on the LCD panels due to the characteristics of the panels of the projector.
 CAUTION ON HANGING FROM THE CEILING
When hanging the projector from the ceiling, clean the air intake vents and top of the projector periodically with a vacuum cleaner. If you leave the projector unclean for a long time, the cooling fans can be clogged with dust, and it may cause a breakdown or a disaster.
DO NOT SET THE PROJECTOR IN GREASY, WET, OR SMOKY CONDITIONS SUCH AS IN A KITCHEN TO PREVENT A BREAKDOWN OR A DISASTER. IF THE PROJECTOR COMES IN CONTACT WITH OIL OR CHEMICALS, IT MAY BECOME DETERIORATED.
8
Safety Instructions
■ READ AND KEEP THIS OWNER’S MANUAL FOR LATER
USE.
All the safety and operating instructions should be read before beginning to operate the product.
Read all of the instructions given here and retain them for later use. Unplug this projector from the AC power supply before cleaning. Do not use liquid or aerosol cleaners on the projector. Use a damp cloth for cleaning.
Follow all warnings and instructions marked on the projector.
For added protection of the projector during a lightning storm, or when it is left unattended or unused for long periods of time, unplug it from the wall outlet. This will prevent damage due to lightning and power surges.
Do not expose this unit to rain or use near water... for example, in a wet basement,
near a swimming pool, etc...
Do not use attachments not recommended by the manufacturer as they may result in hazards.
Do not place this projector on an unstable cart, stand, or table. The projector may fall, causing serious injury to a child or adult, and serious damage to the projector. Use only with a cart or stand recommended by the manufacturer, or sold with the projector. Wall or shelf mounting should be carried out in accordance with the manufacturer’s directions, and should use a mounting kit approved by the manufacturers.
An appliance and cart combination should be moved with care. Sudden stops, excessive force, and uneven surfaces may cause the appliance and cart combination to overturn.
Slots and openings in the rear and front of the cabinet are provided  for ventilation, to insure reliable operation of the equipment and to protect it from overheating.
The openings should never be covered with cloth or other materials, and the bottom opening should not be blocked by placing the projector on a bed, sofa, rug, or other similar surface. This projector should never be placed near or over a radiator or heat register.
This projector should not be placed in a built-in installation such as a book case unless proper ventilation is provided.
Instructions Safety
9

Safety Instructions
Never push objects of any kind into this projector through cabinet slots as they may touch dangerous voltage points or short out parts that could result in a fire or electric shock. Never spill liquid of any kind onto the projector.
Do not install the projector near the ventilation duct of air-conditioning equipment.
This projector should be operated using only the type of power source indicated on the marking label. If you are not sure of the type of power supplied, contact the Canon Customer Support Center or local power company.
Do not overload wall outlets and extension cords as this can result in fire or electric shock. Do not allow anything to rest on the power cord. Do not locate this projector where the cord may be damaged by people walking on it.
Do not attempt to service this projector yourself as opening or removing covers may expose you to dangerous voltages or other hazards. Refer all servicing to qualified service personnel.
Unplug this projector from the wall outlet and refer servicing to qualified service personnel under the following conditions:
a.When the power cord or plug is damaged or frayed.
b.If liquid has been spilled into the projector.
c.If the projector has been exposed to rain or water.
d.If the projector does not operate normally after following the operating instructions. Adjust only those controls that are covered in the operating instructions as improper adjustment of other controls may result in damage and will often require extensive work by a qualified technician to restore the projector to normal operating condition.
e.If the projector has been dropped or the cabinet has been damaged.
f.When the projector exhibits a distinct change in performance-this indicates a need for servicing.
When replacement parts are required, be sure the service technician uses replacement parts specified by the manufacturer that have the same characteristics as the original parts. Unauthorized substitutions may result in fire, electric shock, or injury.
Upon completion of any service or repairs to this projector, ask the service technician to perform routine safety checks to determine that the projector is in safe operating condition.
10

Safety Instructions
AC Power Cord Requirement
The AC Power Cord supplied with this projector meets the requirements for use in the country you purchased it.
AC Power Cord for the United States and Canada: |
|
|
|
|
|
The AC Power Cord used in the United States and Canada is |
|
|
listed by the Underwriters Laboratories (UL) and certified by |
|
|
the Canadian Standard Association (CSA). |
Ground |
|
The AC Power Cord has a grounding-type AC line plug. This is |
|
|
|
|
|
a safety feature to ensure the plug fits into the power outlet. Do |
|
|
not try to tamper with this safety feature. Should you be unable |
|
|
to insert the plug into the outlet, contact your electrician. |
|
|
|
|
|
THE SOCKET-OUTLET SHOULD BE INSTALLED NEAR THE EQUIPMENT AND EASILY ACCESSIBLE.
For the U.S. and Canada, LAMP (S) INSIDE THIS PRODUCT CONTAIN MERCURY AND MUST BE RECYCLED OR DISPOSED OF ACCORDING TO LOCAL, MUNICIPAL, STATE, PROVINCIAL, OR FEDERAL LAWS. For lamp recycling and disposal information please call 1-800-OK-CANON for the U.S. and Canada.
Only for European Union and EEA (Norway, Iceland and
Liechtenstein)
These symbols indicate that this product is not to be disposed of with your household waste, according to the WEEE Directive (2012/ 19/EU), the Battery Directive (2006/66/EC) and/or national legislation implementing those Directives.
If a chemical symbol is printed beneath the symbol shown above, in accordance with the Battery Directive, this indicates that a heavy metal (Hg = Mercury, Cd = Cadmium, Pb = Lead) is present in this battery or accumulator at a concentration above an applicable threshold specified in the Battery Directive.
This product should be handed over to a designated collection point, e.g., on an authorized one-for-one basis when you buy a new similar product or to an authorized collection site for recycling waste electrical and electronic equipment (EEE) and batteries and accumulators. Improper handling of this type of waste could have a possible impact on the environment and human health due to potentially hazardous substances that are generally associated with EEE. Your cooperation in the correct disposal of this product will contribute to the effective usage of natural resources.
For more information about the recycling of this product, please contact your local city office, waste authority, approved scheme or your household waste disposal service or visit www.canon-europe.com/weee, or www.canon-europe.com/battery.
Instructions Safety
11

Safety Instructions
Federal Communication Commission Notice
This device complies with Part 15 of the FCC Rules. Operation is subject to the following two conditions:
1.This device may not cause harmful interference, and
2.This device must accept any interference received, including interference that may cause undesired operation.
Note: This equipment has been tested and found to comply with the limits for a Class A digital device, pursuant to Part 15 of the FCC Rules. These limits are designed to provide reasonable protection against harmful interference when the equipment is operated in a commercial environment. This equipment generates, uses, and can radiate radio frequency energy and, if not installed and used in accordance with the instruction manual, may cause harmful interference to radio communications. Operation of this equipment in a residential area is likely to cause harmful interference in which case the user will be required to correct the interference at his own expense. The cable with a ferrite core provided with the projector must be used with this equipment in order to comply with Class A of the FCC Rules. Use of a shielded cable is required to comply with Class A of FCC Rules. Do not make any changes or modifications to the equipment unless otherwise specified in the instructions. If such changes or modifications should be made, you could be required to stop operation of the equipment.
Warning:
This is a class A product. In a domestic environment this product may cause radio interference in which case the user may be required to take adequate measures. The cable with a ferrite core provided with the projector must be used with this equipment in order to comply with Class A .
Use of a shielded cable is required to comply with Class A .
12

Safety Instructions
Safety Symbols in this Manual
This section describes the safety symbols used in this manual. Important projector safety information is identified by the following symbols. Always observe the safety information by these symbols.
Denotes the risk of death or serious injury from improper handling if the information is not observed. To ensure safe use, always observe this information.
Denotes the risk of injury from improper handling if the information is not observed. To ensure safe use, always observe this information.
Denotes the risk of electric shock from improper handling if the information is not observed. To ensure safe use, always observe this information.
Denotes the risk of burns from improper handling if the information is not observed. To ensure safe use, always observe this information.
Denotes prohibited actions.
Denotes required actions or information that must be observed.
Instructions Safety
13
Safety Instructions
Precautions for Use
As this section contains important safety-related information, be sure to read the following carefully beforehand in order to use your projector correctly and safely.
During installation, keep the projector plug easily accessible so that the projector can be unplugged immediately if necessary, or keep a circuit breaker within reach.
If the following situations occur, turn the power off, remove the power plug from the power outlet and contact the Canon Customer Support Center. Failure to do so could cause a fire or result in an electric shock.
•If smoke is emitted
•If an unusual smell or noise is emitted
•If water or other liquid has entered the projector
• If metal or any other foreign material has entered the projector
•If the projector is knocked over or dropped and the cabinet is damaged
Pay attention to the following points regarding the power source, power plug and handling of the connector. Failure to do so may cause a fire or electric shock.
•Do not place any objects on the power cord and do not allow it to become trapped under the projector.
•Do not cover the power cord with a carpet.
•Do not modify or excessively bend, twist, pull, wind, or bundle the power cord.
• Keep the power cord away from heaters and other sources of heat.
•Do not use a damaged power cord. If the power cord is damaged, purchase a replacement from your dealer.
•The power cord included with this projector is for use exclusively with this product. Do not use this cord for other products.
14

Safety Instructions
Pay attention to the following points regarding the power source, power plug and handling of the connector. Failure to do so may cause a fire or electric shock.
•Do not use any power source with a voltage other than the voltage indicated (AC 100–240 V).
•Do not pull the power cord and be sure to hold the power plug or
connector when removing. Incorrect handling may damage the power cord.
•Do not insert any metal objects into the contact parts of the power plug or connector.
• Do not remove the power plug or connector with wet hands.
•Insert the power plug and connector securely up to the base. Additionally, do not use a damaged power plug or an outlet that is
loose.
• When using an extension cord, do not exceed the cord’s rated capacity.
•Periodically inspect the power plug and outlet and remove any dust or dirt from between the plug and the outlet.
Installation and Handling Precautions
Pay attention to the following points regarding installation and handling of the projector. Failure to do so may cause a fire, electric shock or personal injury.
•Do not use the projector where it might get wet, such as outdoors or by bathtubs or showers.
• Do not place containers containing a liquid on top of the projector.
• Do not touch the projector itself, the power cord, or the cable if lightening strikes.
•Do not move the projector until you have switched off the power, removed the power plug from the power outlet and unplugged any other cables.
• Unplug the projector before cleaning or maintenance.
•Before you attach or replace a lens unit, be sure to unplug the power plug of the projector from the power outlet.
Instructions Safety
15
Safety Instructions
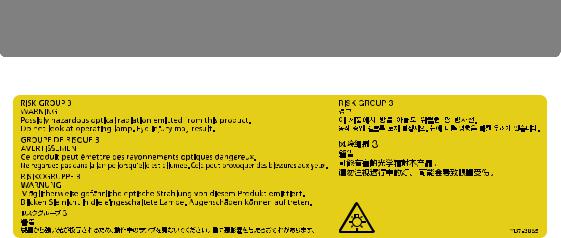
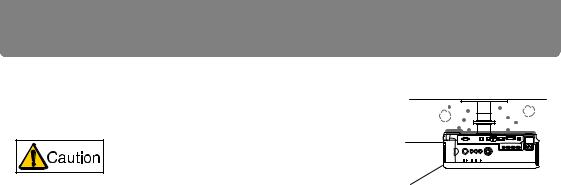
RISK GROUP 3 (RG3) label
16
Safety Instructions
Pay attention to the following points regarding installation and handling of the projector. Failure to do so may cause a fire, electric shock or personal injury.
•Do not remove the cabinet from the projector or disassemble it. The interior of the projector contains high-voltage components as well as parts that are hot. If inspection, maintenance or repair is required, contact the Canon Customer Support Center.
• Do not disassemble or modify the projector (including consumable parts) or the remote control.
•Do not look directly into the exhaust vents during use.
•Do not insert any object into vents in the projector, such as the air intake vent or exhaust vents.
•Do not place a pressurized can in front of the exhaust vents. The pressure of the contents of the can may increase due to heat from the exhaust vents and this could result in an explosion.
•When cleaning off dust or dirt from projector parts such as the lens or filter, never use any spray that is flammable. Internal parts that become hot may ignite and cause a fire.
•Light from the projector is classified as
Risk Group 3 (RG3) according to 

 IEC 62471:2006.
•Possibly hazardous optical radiation emitted
from this product. Do not look at operating lamp. Eye injury may result. Pay particular attention to prevent small children from doing so.
•When setting the projector on a high surface for projection, be sure the surface is flat and stable.
•Do not use the projector on a soft surface such as carpet or sponge mat, etc. Doing so could cause heat to build up inside the projector and this could result in a fire.
•For ceiling mounting precautions, refer to the installation manual included with the ceiling mount (sold separately).
•When hanging the projector from a ceiling, put the projector down on the floor or a workbench before attaching or replacing the lens unit. Failure to do so could result in parts falling off the projector and may cause an accident or personal injury.
Precautions on the Lamp
This projector uses a high-pressure mercury lamp, which must be handled carefully and correctly as described below.
The mercury lamp has the following characteristics.
•The lamp will gradually become darker over time.
•Impact, abrasion, or use of worn-out lamps may cause lamps to rupture (accompanied by a loud noise) or burn out.
•Lamps are more likely to rupture after the lamp replacement message is displayed (see “Replacing the Lamp” (P173)). Replace the lamp with a new one as soon as possible.
•Useful life of lamps varies widely from lamp to lamp and depending on the environment of use. Some lamps may fail or rupture soon after they are first used.
Instructions Safety
17

Safety Instructions
Note the following precautions during lamp replacement or when a lamp has ruptured. Failure to do so could result in an electric shock, personal injury or burns.
•Before replacing the lamp, always unplug the projector and wait at least one hour.
•If the lamp ruptures, dust and gas (containing mercury vapor) may come out of the exhaust vents. If this happens, immediately open the windows and
doors to provide ventilation to the room. Ruptured lamps may scatter shards of glass inside the projector. Contact the qualified technician or Canon Customer Support Center for cleaning and inspection of the projector interior and lamp replacement.
•If you accidentally inhale gas from the lamp or get any pieces in your eyes or mouth, consult a doctor immediately.
Note the following precautions when replacing lamps that stop working. Failure to do so could result in personal injury.
•If illumination suddenly stops, either when you turn the projector on or after it has been on for a while, the lamp may have ruptured. In this case, never attempt to replace the lamp by yourself. Always request service from the Canon Customer Support Center.
• With ceiling-mounted projectors, the lamp may fall out when you open the lamp cover, or during replacement. During replacement, stand to the side of the lamp cover, not directly under it.
Precautions for the Batteries of the Remote Control
Pay attention to the following points regarding handling of batteries. Failing to do so could result in a fire or personal injury.
•Do not heat, short circuit or disassemble the batteries, or place them in a fire.
•Do not attempt to recharge the batteries that are included with the remote
control.
•Remove the batteries when they are flat or when the remote control will not be used for a long period of time.
•When replacing the batteries, replace both at the same time. Also, do not use two batteries of a different type at the same time.
• Insert the batteries with the + and - terminals in the correct directions.
•If any liquid from inside the batteries leaks out and contacts your skin, be sure to wash the liquid off thoroughly.
18
Safety Instructions
Pay attention to the following points regarding installation and handling of the projector.
•If the projector will not be used for a long period of time, be sure to remove the power plug from the power outlet to ensure safety. Failure to do so presents a risk of fire if dust accumulates on the plug or outlet.
•Parts of the cabinet around and above the exhaust vents may become hot during projection. Touching these areas during operation could cause burns to the hands. Pay particular attention in preventing young children from touching these parts. Additionally, do not place any metal objects around or above the exhaust vents. Due to the heat from the projector, doing so could cause an accident or personal injury.
•Do not place the projector where it may be exposed to oily smoke or steam, such as near kitchen counters or humidifiers. Doing so may cause fire or electric shock.
•Do not place any heavy objects on top of the projector or sit / stand on it. Pay particular attention to prevent small children from doing so. The projector may be knocked over and this could result in damage or a personal injury.
•Do not place the projector on an unstable or slanted surface.
Doing so may cause the projector to fall or be knocked over and could result in a personal injury.
•Do not place any objects in front of the lens during projection. Doing so could cause a fire.
• Presenters in front of the projector should stand where the light does not seem too bright,
and where their shadow does not fall on the screen.
•The projector is provided with a lens shift function to move the lens up, down, left, and right using the motor. Do not touch the lens while it is moving. Touching the lens when it is moving may result in personal injury.
•Before replacing the lens unit, wait at least one hour after the projector is turned off to allow the projector to cool thoroughly. Failure to do so could result in a burn or injury.
When handling the lamp, pay attention to the following points.
•Lamps are more likely to rupture once the lamp replacement message has been displayed. Replace the lamp with a new one as soon as possible.
•Be sure not to handle the lamp immediately after it has been used. Be sure to switch off the power and wait for approximately
1 hour for the lamp and the projector to cool down sufficiently. Failure to do so could result in a burn or personal injury due to heat from the lamp or projector.
•Be prepared by keeping a spare lamp.
•Dispose of used mercury lamps in accordance with local regulations.
Instructions Safety
19
For Safe Use
Pay attention to the following points when carrying or transporting the projector.
•This projector is a precision instrument. Do not knock it over or subject it to impacts.
•When carrying or holding up the projector after attaching the lens unit, be sure not to hold the lens. Doing so may cause damage to the lens unit.
•Protection of the projector cannot be guaranteed if used packaging or shockabsorbent materials are reused. Fragments from shock-absorbent material may also enter the interior of the projector which could cause a malfunction.
•If transportation is necessary, the lens unit should be removed before transporting the projector. If the projector is subjected to excessive impacts
during transportation, the lens unit may be damaged.
•Disconnect the cables connected to the projector. Carrying the projector while the cables are attached may cause an accident.
•Retract the adjustable feet before moving the projector. Leaving the feet extended may cause damage.
•Do not touch the lens with bare hands. Doing so may result in deterioration of image quality.
20

For Safe Use
Pay attention to the following points when installing or using the projector.
•Be careful of condensation.
If the projector is abruptly taken to a warmer location, or if the room temperature rises abruptly, moisture in the air may condense on the lens and mirror, causing the image to become blurred.
•Do not install the projector in a location where the temperature is high or low. Doing so may cause a malfunction. Ranges for the environment of use and storage are as follows.
•Environment of use: 0°C (32°F) to 40°C (104°F), up to 85% RH
•Storage temperature: -30°C (-22°F) to 60°C (140°F)
•When using the projector at altitudes above 2,300 m (7,545.8'), or when projecting upward or downward:
Adjust projector installation settings from the menu (P108). Failure to adjust the settings may shorten the lamp life or damage the lamp.
•Do not install the projector facing the wrong direction. Install the projector so that it is not tilted left or right by more than 10°. (P25)
•Do not block the air intake or exhaust vents. Blocking the vents may trap heat inside the projector, which may shorten the useful life of optical components or other parts and damage the projector.
•Install the projector leaving at least 50 cm (1.6') between air intake/exhaust vents and walls. Failure to do so may trap heat inside the projector and damage it.
•Do not place any objects on top of the projector that may change shape or color due to heat.
•Do not install the projector in a location that is damp, or where there is a lot of dust, oily smoke or tobacco smoke. Doing so could cause contamination of optical components such as the lens and the mirror and may result in deterioration of image quality.
•Do not install the projector near high-voltage electrical power lines or an electrical power source.
•Clean the air filter regularly. (P171) Dust that accumulates inside over long periods without cleaning may eventually damage the projector or affect picture quality.
Use Safe For
21
Before Installation
Precautions When Carrying/Shipping the
Projector
Prepare the projector as described below before carrying it.
•Disconnect the cables connected to the projector. Carrying the projector with the cables attached may cause an accident.
•Retract the adjustable feet before moving the projector. Leaving
the feet extended may cause damage.
• Do not subject the projector to strong impacts or vibrations.
Precautions for Installation
Be sure to read “Safety Instructions” and “For Safe Use” (P7 – P21). Also take the following precautions during installation.
•Do not strike the projector or subject it to impact. Doing so may cause a malfunction.
•Do not stand the projector vertically, lean it against another
object, or otherwise place it in an unstable state. The projector may be damaged if it tips over.
■Do Not Use in the Following Environments
•Locations with excessive humidity, dust, oily smoke or tobacco smoke
Adhesion to the lens, mirrors or other optical parts may reduce image quality.
•Near high-voltage power lines or sources of electrical power
This may cause malfunction.
•On soft surfaces such as carpets or cushioned mats
This may cause a fire or damage the projector.
•Locations with excessive temperature or humidity
This may damage the projector. Acceptable ranges for operating and storage temperature and humidity are as follows.
*Operating temperature and humidity applies to when the projector is projecting or in standby mode.
Operating temperature |
Operating humidity |
Storage temperature |
0°C (32°F) – 40°C (104°F) |
Up to 85% |
-30°C (-22°F) – 60°C (140°F) |
22
Before Installation
■Do Not Touch the Lens with Bare Hands
•Do not touch the lens with bare hands. Any smudges or fingerprints on the lens may affect image quality.
■Allow a 30 Min. Warm Up before Focus Adjustment (P59), if Possible
The focus position may not stabilize immediately after startup, due to lamp heat. When adjusting focus, it is also helpful to use the test pattern (10) (P115, P187).
■ Install at a Sufficient Distance from Walls and Other Obstructions
If the air intake or exhaust vent is blocked, heat will accumulate inside the projector, possibly resulting in a shortened projector lifetime or a malfunction.
Similarly, do not install in narrow, enclosed spaces with poor ventilation. Install in a well-ventilated location.
Ensure a minimum clearance of 50 cm (1.6 ft.) above, on both sides, and behind the projector, as shown below.
 At least
50 cm (1.6')
50cmà»è„ |
At least |
At least |
At least |
50 cm (1.6') |
50 cm (1.6') |
50 cm (1.6') |
■ Be Careful of Condensation
If the temperature of the room rises suddenly, moisture in the air may condense on the projector lens and mirror, causing the image to become blurred. Wait until the condensation has evaporated for the image projected to return to normal.
■ At Altitudes above 2,300 m (7,545.8'), Adjust the Settings
Projector settings must be adjusted when using the projector at altitudes of 2,300 m (7,545.8') or higher. Specifically, refer to instructions for [Fan mode] (P108) in the [Install settings] menu.
Installation Before
23
Before Installation
■ When Using Mounted on the Ceiling
When the projector is used mounted on the ceiling or installed in a high location, it is necessary to periodically clean the air intake and exhaust vents, and the area around the air filter. Dust that accumulates in intake or exhaust vents may impair ventilation, raising the temperature inside and posing a risk of damage or fire. Use a vacuum cleaner or similar means to remove dust from the intake vent and exhaust vent.
24

Before Installation
■Install Facing in the Correct Direction
•The projector can be installed facing any direction, as shown below. However, projection upward or downward may shorten the useful life of the lamp. [Install settings] of the projector must also be adjusted.
•For upward or downward projection, refer to instructions for
[Vertical projection] (P108) in the [Install settings] menu.
•Do not attempt to install the projector for upward or downward projection by yourself. Always request installation by a qualified technician or the Canon Customer Support Center.
10° 10°
Upward projection:
Inclination of the projector should be no more than 10° from the vertical axis.*
10°
10°
If installing the projector on the floor or hanging from the ceiling, the left / right inclination of the projector should be no more than 10°.*
10° 10°
Downward projection:
Inclination of the projector should be no more than 10° from the vertical axis.*
Do not use the projector standing on its side. This may damage the lamp.*
* Failure to do so may damage the lamp.
There are no options for installing the projector other than the ceiling attachment.
Installation Before
25

Before Installation
Copyright Notice
Please note that enlarging or reducing the size of an image for commercial purposes or public presentation may infringe on the legally protected copyright or the copyright holder of the original material.
Ensure Network Security
Take measures to ensure network security. Note that Canon is not liable in any way for direct or indirect loss from network security incidents, such as unauthorized access.
Before using the projector, configure the appropriate projector, computer, and network security settings.
Install the projector in a network protected by a firewall or other security measures. Do not connect it directly to the Internet.
About Trademarks
•Ethernet is a registered trademark of Xerox Corporation.
•Microsoft, Windows, Windows Vista, Windows 7, Windows 8, Windows 8.1 and Windows 10 are registered trademarks or trademarks of Microsoft Corporation in the United States and / or other countries.
•Mac, Mac OS and Macintosh are trademarks of Apple Inc., registered in the United States and / or other countries.
•HDMI, the HDMI logo and High-Definition Multimedia Interface are trademarks or registered trademarks of HDMI Licensing, LLC.
•PJLink is a registered trademark of JBMIA and pending trademark in some countries.
•PJLink is a registered trademark, or an application has been submitted for trademark, in Japan, the United States and / or other countries or regions.
•AMX is a trademark of AMX Corporation.
•Crestron®, Crestron RoomView®, and Crestron Connected™ are registered trademarks of Crestron Electronics, Inc.
•HDBaseT™ and the HDBaseT Alliance logo are trademarks of the HDBaseT Alliance.
•All other trademarks are the property of their respective owners.
26

Open Source Software
The product contains Open Source Software modules. For details, refer to the thirdparty software license file “Third-Party Software” in the License folder of the user’s manual CD-ROM. Each module’s license conditions are also available in the same folder.
■ Software under the GNU General Public License Version 2
Contained programs are free software; you can redistribute them and/or modify them under the terms of the GNU General Public License attached to each copy of the program.
Each program is distributed in the hope that it will be useful, but WITHOUT ANY WARRANTY; without even the implied warranty of MERCHANTABILITY or FITNESS FOR A PARTICULAR PURPOSE. Please see “NO WARRANTY” and “NO SUPPORT” stated below. For more detail, please see full text of the GNU General Public License.
NO WARRANTY
BECAUSE THE PROGRAM IS LICENSED FREE OF CHARGE, THERE IS NO WARRANTY FOR THE PROGRAM, TO THE EXTENT PERMITTED BY APPLICABLE LAW. EXCEPT WHEN OTHERWISE STATED IN WRITING THE COPYRIGHT HOLDERS AND/OR OTHER PARTIES PROVIDE THE PROGRAM “AS IS” WITHOUT WARRANTY OF ANY KIND, EITHER EXPRESSED OR IMPLIED, INCLUDING, BUT NOT LIMITED TO, THE IMPLIED WARRANTIES OF MERCHANTABILITY AND FITNESS FOR A PARTICULAR PURPOSE. THE ENTIRE RISK AS TO THE QUALITY AND PERFORMANCE OF THE PROGRAM IS WITH YOU. SHOULD THE PROGRAM PROVE DEFECTIVE, YOU ASSUME THE COST OF ALL NECESSARY SERVICING, REPAIR OR CORRECTION.
IN NO EVENT UNLESS REQUIRED BY APPLICABLE LAW OR AGREED TO IN WRITING WILL ANY COPYRIGHT HOLDER, OR ANY OTHER PARTY WHO MAY MODIFY AND/OR REDISTRIBUTE THE PROGRAM AS PERMITTED ABOVE, BE LIABLE TO YOU FOR DAMAGES, INCLUDING ANY GENERAL, SPECIAL, INCIDENTAL OR CONSEQUENTIAL DAMAGES ARISING OUT OF THE USE OR INABILITY TO USE THE PROGRAM (INCLUDING BUT NOT LIMITED TO LOSS OF DATA OR DATA BEING RENDERED INACCURATE OR LOSSES SUSTAINED BY YOU OR THIRD PARTIES OR A FAILURE OF THE PROGRAM TO OPERATE WITH ANY OTHER PROGRAMS), EVEN IF SUCH HOLDER OR OTHER PARTY HAS BEEN ADVISED OF THE POSSIBILITY OF SUCH DAMAGES.
NO SUPPORT
Canon Inc., and all its subsidiaries or its dealers do not make any support service regarding the source code. Canon Inc., and all its subsidiaries or its dealers shall not respond to any questions or enquiries, from you or any other customers, regarding the source code.
Software Source Open
27
Before Use
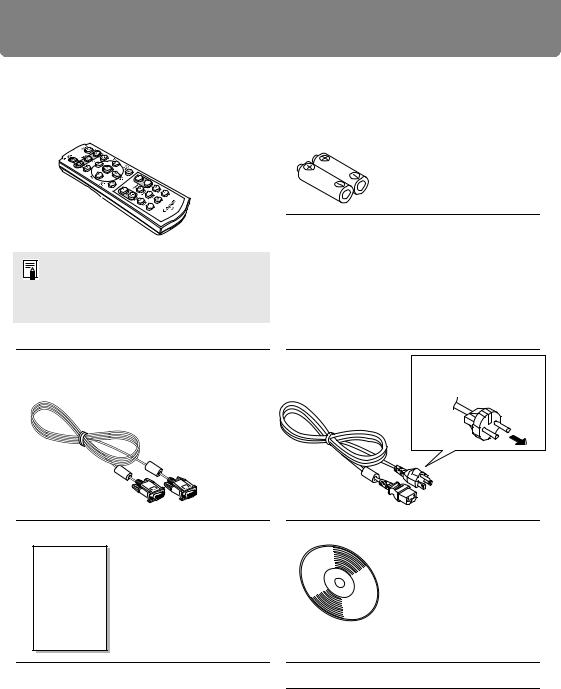
Included Accessories
Before use, make sure the following items are included in the package.
• Remote control |
• Batteries for the remote control |
(AAA size x2)
(part No.: RS-RC04)
Optional remote controls are also available (RS-RC05). The RS-RC05 can also be used as a wired remote. (P38)
• Computer cable (1.8 m / 5.9') |
• Power cord |
For Continental |
|
Europe |
|||
(mini D-sub 15-pin / mini D-sub 15-pin) |
(1.8 m / 5.9') |
||
|
|
For the U.S.A. |
|
and Canada |
• Important Information |
• User’s Manual (CD-ROM) |
• Warranty Card
28
 Loading...