


 Loading...
Laser Beam Printer
USER'S GUIDE

Contents
Turning the Printer ON/OFF . . . . . . . . . . . . . . . . . . . . . . . . . . . . . . . . . . . . . . . . . 2
Turning the Printer ON . . . . . . . . . . . . . . . . . . . . . . . . . . . . . . . . . . . . . . . . . . . . . . . . . . 2
Turning the Printer OFF . . . . . . . . . . . . . . . . . . . . . . . . . . . . . . . . . . . . . . . . . . . . . . . . . 3
Online and Offline . . . . . . . . . . . . . . . . . . . . . . . . . . . . . . . . . . . . . . . . . . . . . . . . |
5 |
Placing the Printer Online . . . . . . . . . . . . . . . . . . . . . . . . . . . . . . . . . . . . . . . . . . . . . . . . |
5 |
Placing the Printer Offline . . . . . . . . . . . . . . . . . . . . . . . . . . . . . . . . . . . . . . . . . . . . . . . . |
6 |
Paper Requirements . . . . . . . . . . . . . . . . . . . . . . . . . . . . . . . . . . . . . . . . . . . . . . |
7 |
Usable Paper. . . . . . . . . . . . . . . . . . . . . . . . . . . . . . . . . . . . . . . . . . . . . . . . . . . . . . . . . . 7
Paper Size/Type . . . . . . . . . . . . . . . . . . . . . . . . . . . . . . . . . . . . . . . . . . . . . . . . . . . . . . . .8
Abbreviations of Paper Sizes . . . . . . . . . . . . . . . . . . . . . . . . . . . . . . . . . . . . . . . . . . . . .14
Printable Area . . . . . . . . . . . . . . . . . . . . . . . . . . . . . . . . . . . . . . . . . . . . . . . . . . . . . . . . 14
Unusable Paper. . . . . . . . . . . . . . . . . . . . . . . . . . . . . . . . . . . . . . . . . . . . . . . . . . . . . . . 16
Paper Capacity of Paper Source . . . . . . . . . . . . . . . . . . . . . . . . . . . . . . . . . . . . . . . . . . 17
Paper Capacity of the Output Trays. . . . . . . . . . . . . . . . . . . . . . . . . . . . . . . . . . . . . . . . 18
Loading Paper in the Paper Cassette . . . . . . . . . . . . . . . . . . . . . . . . . . . . . . . . |
19 |
When Loading Standard Size Paper . . . . . . . . . . . . . . . . . . . . . . . . . . . . . . . . . . . . . . . 19 When Loading Custom Size Paper (Non-Standard Size Paper) . . . . . . . . . . . . . . . . . . 27
Loading Paper in the Multi-purpose Tray . . . . . . . . . . . . . . . . . . . . . . . . . . . . . . 36
When Loading Paper (Other than Postcards and Envelopes). . . . . . . . . . . . . . . . . . . . 36 When Loading Postcards or Envelopes . . . . . . . . . . . . . . . . . . . . . . . . . . . . . . . . . . . . 43
Paper Jams . . . . . . . . . . . . . . . . . . . . . . . . . . . . . . . . . . . . . . . . . . . . . . . . . . . . |
50 |
Paper Jam Area . . . . . . . . . . . . . . . . . . . . . . . . . . . . . . . . . . . . . . . . . . . . . . . . . . . . . . |
53 |
Procedure for Clearing Paper Jams . . . . . . . . . . . . . . . . . . . . . . . . . . . . . . . . . . . . . . . |
54 |
Replacing the Toner Cartridge . . . . . . . . . . . . . . . . . . . . . . . . . . . . . . . . . . . . . . |
75 |
When < > Appears . . . . . . . . . . . . . . . . . . . . . . . . . . |
75 |
Replacing the Toner Cartridge . . . . . . . . . . . . . . . . . . . . . . . . . . . . . . . . . . . . . . . . . . . |
76 |
Canceling a Job . . . . . . . . . . . . . . . . . . . . . . . . . . . . . . . . . . . . . . . . . . . . . . . . . 86
Confirming the Printer Features . . . . . . . . . . . . . . . . . . . . . . . . . . . . . . . . . . . . . 87
Service Call Display . . . . . . . . . . . . . . . . . . . . . . . . . . . . . . . . . . . . . . . . . . . . . . 89
Message List . . . . . . . . . . . . . . . . . . . . . . . . . . . . . . . . . . . . . . . . . . . . . . . . . . . 91
1
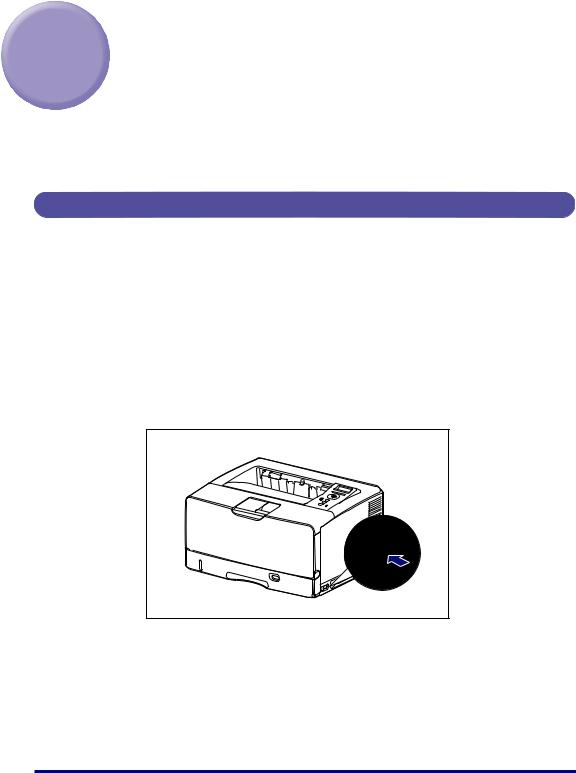
Turning the Printer ON/OFF
The printer can be turned ON/OFF using the power switch on the right side of the printer body. Be sure to observe the following instructions in order to prevent unexpected problems.
Turning the Printer ON
In order to use this printer, you should press " " of the power switch to turn the printer ON. After running a self-diagnostic test on the printer unit and optional accessories, the printer will be ready to print.
 IMPORTANT
Do not turn the power ON immediately after turning it OFF. If you want to turn the printer ON again after turning it OFF, wait at least 10 seconds after turning the printer OFF before turning it ON again.
1 Press " " of the power switch on the printer.
The indicators and display on the control panel come on, and the printer initiates a self-diagnostic test on the printer unit and optional accessories.
2
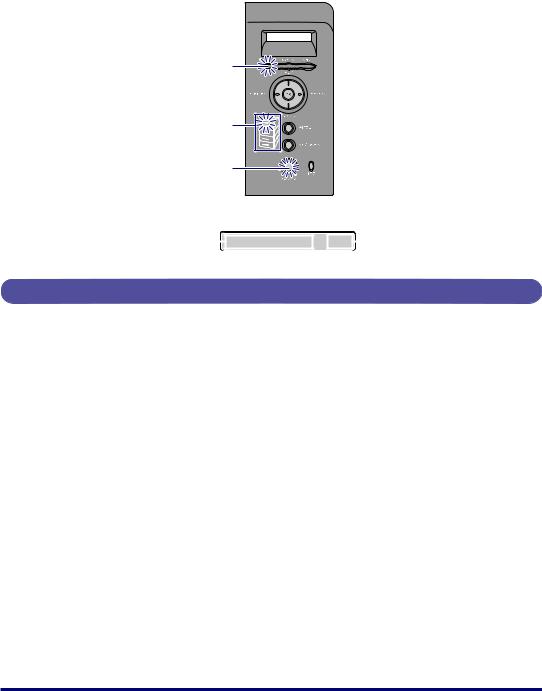
If no abnormality is found during the self-diagnostic test, the
indicator and Paper Source indicator for the currently selected paper source come on, <00 >, <00 LIPS>, or <00 ESC/P> appears in the display, and the printer is ready to print.
Indicator
Paper Source Indicators
Indicator
The following information is displayed in the display.
Printable and not |
|
00 |
|
|
A4 |
|
Size of paper in the currently |
|
|
||||||
processing print data |
|
|
|
|
|
selected paper source |
|
Turning the Printer OFF
Turn the printer OFF using the following procedure.
 IMPORTANT
•If the printer is used on a network, make sure that it is not printing data from another computer before turning the power OFF.
•If you turn the printer OFF when the indicator is on, all the print data remaining in the printer memory will be erased. If there is any necessary print data remaining in the printer, wait until it is output, or press [ ] in the offline state and then select <> to output the data before turning the printer OFF.
•Do not turn the power OFF when the printer is in any of the following status:
-While the printer is in the middle of printing
-While the printer is running a self-diagnostic test immediately after turning the power ON
-While a message informing you that the NVRAM is being initialized or being written is displayed
-While <02 > is displayed
3
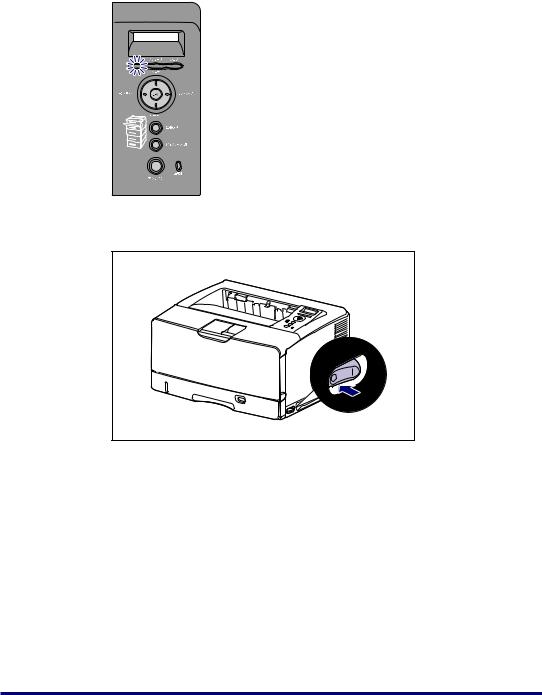
1 Make sure that the indicator is off.
Off
2 Press " " of the power switch on the printer.
4

Online and Offline
When the printer can receive data from the computer and print the data, the printer is in the state of "Online", and when the printer is disconnected with the computer and cannot receive data, the printer is in the state of "Offline".
To perform the settings for each menu using the control panel, switch the printer status as follows:
O: The status that you can enter the menu -: The status that you cannot enter the menu
|
When the printer is online |
When the printer is offline |
|
|
|
Menu |
O* |
O |
|
|
|
Menu |
O |
O |
|
|
|
Menu |
O |
O |
|
|
|
Menu |
O |
- |
|
|
|
Menu |
O |
- |
|
|
|
* You cannot specify the settings in the options when the printer is in the online status.
Placing the Printer Online
When printing from the computer, the printer has to be online. Before printing, make sure that the printer is online. If not, place the printer online using the following procedure. The printer comes online automatically after you turn it ON.
1 Press [ ].
The indicator comes on, and the printer is ready to print.
 IMPORTANT
When an error is occurring in the printer (when the indicator is on, or the number in the message blinks), the printer does not come online. Eliminate the cause of the error before you place the printer online.
5
 NOTE
NOTE
If the printer has entered the sleep mode 1 or sleep mode 2, the indicator is off even when the printer is online, and only the
indicator are on. If the printer has entered the sleep mode 3, only the indicator is on. If the printer receives data while it is in the sleep mode, the mode is released, the indicator comes on, and the printer is ready to print. However, if the printer has entered the sleep mode 3, the mode is not released even after the printer receives data from the computer connected by a USB cable.
Placing the Printer Offline
To configure the printer so that it does not receive data from the computer or specify the settings for all the options in the menu, place the printer offline using the following procedure.
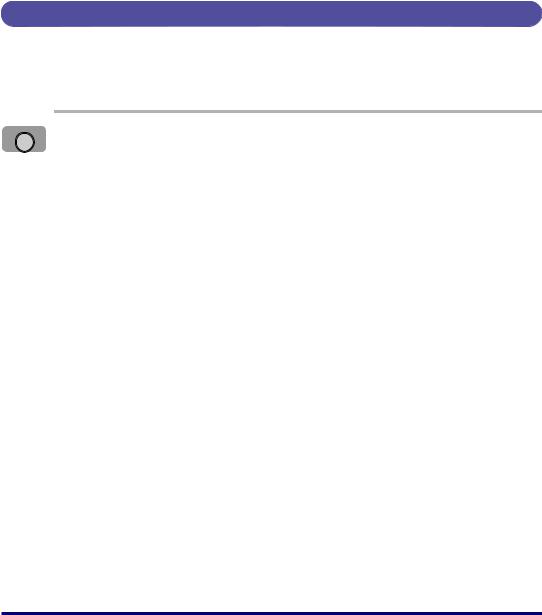
1 Press [ ].
The indicator goes off, allowing you to specify the settings on the control panel.
 IMPORTANT
This printer comes online automatically if left in the offline state for five minutes or longer. However, when an error is occurring in the printer (when the indicator is on, or the number in the message blinks), or while you are performing any setting, such as selecting the menu functions or a paper source, or when specifying the paper size, the printer does not come online.
6

Paper Requirements
Usable Paper
To ensure optimum performance, use only paper that falls within the specifications in the following lists. Using inappropriate paper may result in deterioration in print quality or paper jams.
 IMPORTANT
•Print speed may drop depending on the settings for the paper orientation, paper size, paper type and total print pages.
•When continuously printing the paper of A4 size (297.0 mm wide) or smaller, the safety function that prevents damages caused by heat may slow the print speed down in stages. (The print speed may be as slow as approximately 1.9 pages/minute.)
7
Paper Size/Type
The following shows the paper sizes that can be used with this printer. The symbol " " indicates the paper that can be used for 1-sided printing and automatic 2-sided printing using the optional duplex unit, the symbol "
 " indicates the paper that can be used for only 1-sided printing, and the symbol "-" indicates the paper that cannot be used.
|
|
|
|
|
|
|
|
|
|
|
|
Paper Source |
|
|
|
|
|
|||||||||
|
|
|
|
|
|
|
|
|
|
|
|
|
|
|
|
|
|
|
|
|
|
|
|
|
|
|
|
Paper Type |
Multi- |
Cassette |
Cassette 2 |
Cassette 3*1 |
Cassette 4*1 |
||||||||||||||||||||
|
purpose |
|||||||||||||||||||||||||
|
|
1 |
|
(Optional) |
(Optional) |
(Optional) |
||||||||||||||||||||
|
|
Tray |
|
|||||||||||||||||||||||
|
|
|
|
|
|
|
|
|
|
|
|
|
|
|
|
|
|
|
|
|
|
|||||
|
|
|
|
|
|
|
|
|
|
|
|
|
|
|
|
|
|
|
|
|
|
|
|
|
|
|
Plain paper |
|
|
|
|
|
|
|
|
|
|
|
|
|
|
|
|
|
|
|
|
|
|
|
|
|
|
(60 - 90 g/m2) |
|
|
|
|
|
|
|
|
|
|
|
|
|
|
|
|
|
|
|
|
|
|
|
|
|
|
|
|
|
|
|
|
|
|
|
|
|
|
|
|
|
|
|
|
|
|
|
|
|
|
|
||
|
A5*2 |
|
|
|
|
|
|
|
|
|
|
|
|
|
|
|
|
|
|
|
|
|
|
|
|
|
|
|
|
|
|
|
|
|
|
|
|
|
|
|
|
|
|
|
|
|
|
|
|
|
|
|
|
|
B5*2 |
|
|
|
|
|
|
|
|
|
|
|
|
|
|
|
|
|
|
|
|
|
|
|
|
|
|
|
|
|
|
|
|
|
|
|
|
|
|
|
|
|
|
|
|
|
|
|
|
|
|
|
|
|
|
|
|
|
|
|
|
|
|
|
|
|
|
|
|
|
|
|
|
|
|
|
|
|
|
|
|
A4 |
|
|
|
|
|
|
|
|
|
|
|
|
|
|
|
|
|
|
|
|
|
|
|
|
|
|
|
|
|
|
|
|
|
|
|
|
|
|
|
|
|
|
|
|
|
|
|
|
|
|
|
|
|
|
|
|
|
|
|
|
|
|
|
|
|
|
|
|
|
|
|
|
|
|
|
|
|
|
|
|
B4*3 |
|
|
|
|
|
|
|
|
|
|
|
|
|
|
|
|
|
|
|
|
|
|
|
|
|
|
|
|
|
|
|
|
|
|
|
|
|
|
|
|
|
|
|
|
|
|
|
|
|
|
|
|
|
|
|
|
|
|
|
|
|
|
|
|
|
|
|
|
|
|
|
|
|
|
|
|
|
|
|
|
A3*3 |
|
|
|
|
|
|
|
|
|
|
|
|
|
|
|
|
|
|
|
|
|
|
|
|
|
|
|
|
|
|
|
|
|
|
|
|
|
|
|
|
|
|
|
|
|
|
|
|
|
|
|
|
|
|
|
|
|
|
|
|
|
|
|
|
|
|
|
|
|
|
|
|
|
|
|
|
|
|
|
|
Letter |
|
|
|
|
|
|
|
|
|
|
|
|
|
|
|
|
|
|
|
|
|
|
|
|
|
|
|
|
|
|
|
|
|
|
|
|
|
|
|
|
|
|
|
|
|
|
|
|
|
|
|
|
|
|
|
|
|
|
|
|
|
|
|
|
|
|
|
|
|
|
|
|
|
|
|
|
|
|
|
|
Executive*2 |
|
|
|
|
|
|
|
|
|
|
|
|
|
|
|
|
|
|
|
|
|
|
|
|
|
|
|
|
|
|
|
|
|
|
|
|
|
|
|
|
|
|
|
|
|
|
|
|
|
|
|
|
|
|
|
|
|
|
|
|
|
|
|
|
|
|
|
|
|
|
|
|
|
|
|
|
|
|
|
|
Legal*3 |
|
|
|
|
|
|
|
|
|
|
|
|
|
|
|
|
|
|
|
|
|
|
|
|
|
|
|
|
|
|
|
|
|
|
|
|
|
|
|
|
|
|
|
|
|
|
|
|
|
|
|
|
|
|
|
|
|
|
|
|
|
|
|
|
|
|
|
|
|
|
|
|
|
|
|
|
|
|
|
|
Ledger (11 x 17)*3 |
|
|
|
|
|
|
|
|
|
|
|
|
|
|
|
|
|
|
|
|
|
|
|
|
|
|
|
|
|
|
|
|
|
|
|
|
|
|
|
|
|
|
|
|
|
|
|
|
|
|
|
|
|
|
|
|
|
|
|
|
|
|
|
|
|
|
|
|
|
|
|
|
|
|
|
|
|
|
|
|
Custom paper size |
|
|
*4 |
|
|
*5 |
|
|
*6 |
|
|
*6 |
|
|
*6 |
||||||||||
|
|
|
|
|
|
|||||||||||||||||||||
|
|
|
|
|
|
|
|
|
|
|
|
|
|
|
|
|
|
|
|
|
|
|
|
|
|
|
|
Postcard*3 |
|
|
|
|
|
- |
|
- |
|
- |
|
- |
|
||||||||||||
|
|
|
|
|
|
|
|
|
|
|||||||||||||||||
|
100.0 mm x 148.0 mm |
|
|
|
|
|
|
|
|
|
||||||||||||||||
|
|
|
|
|
|
|
|
|
|
|
|
|
|
|
|
|
|
|
|
|
|
|
|
|
|
|
|
|
|
|
|
|
|
|
|
|
|
|
|
|
|
|
|
|
|
|
|
|
|
|
|
|
|
|
Reply postcard*2 |
|
|
|
|
|
- |
|
- |
|
- |
|
- |
|
||||||||||||
|
|
|
|
|
|
|
|
|
|
|||||||||||||||||
|
148.0 mm x 200.0 mm |
|
|
|
|
|
|
|
|
|
||||||||||||||||
|
|
|
|
|
|
|
|
|
|
|
|
|
|
|
|
|
|
|
|
|
|
|
|
|
|
|
|
|
|
|
|
|
|
|
|
|
|
|
|
|
|
|
|
|
|
|
|
|
|
|
|
|
|
|
4 on 1 postcard*2 |
|
|
|
|
|
- |
|
- |
|
- |
|
- |
|
||||||||||||
|
|
|
|
|
|
|
|
|
|
|||||||||||||||||
|
200.0 mm x 296.0 mm |
|
|
|
|
|
|
|
|
|
||||||||||||||||
|
|
|
|
|
|
|
|
|
|
|
|
|
|
|
|
|
|
|
|
|
|
|
|
|
|
|
|
|
|
|
|
|
|
|
|
|
|
|
|
|
|
|
|
|
|
|
|
|
|
|
|
|
|
8
|
|
|
|
|
|
|
|
Paper Source |
|
|
|
|
|
|
|
|
|
|
|
|
|
|
Paper Type |
Multi- |
Cassette |
Cassette 2 |
Cassette 3*1 |
Cassette 4*1 |
||||
|
purpose |
|||||||||
|
|
1 |
(Optional) |
(Optional) |
(Optional) |
|||||
|
|
Tray |
||||||||
|
|
|
|
|
|
|||||
|
|
|
|
|
|
|
|
|
|
|
Heavy paper |
|
|
|
|
|
|
|
|
|
|
(91 - 199 g/m2) |
|
|
|
|
|
- |
- |
- |
- |
|
|
|
|
|
|
||||||
|
A5 - Ledger (11 x 17) |
|
|
|
|
|
|
|
|
|
|
|
|
|
|
|
|
|
|
|
|
|
Custom paper size |
|
|
*4 |
- |
- |
- |
- |
||
|
|
|||||||||
|
|
|
|
|
|
|
|
|
|
|
|
Postcard*3 |
|
|
|
|
|
- |
- |
- |
- |
|
|
|
|
|
|
|||||
|
100.0 mm x 148.0 mm |
|
|
|
|
|
||||
|
|
|
|
|
|
|
|
|
|
|
|
|
|
|
|
|
|
|
|
|
|
|
Reply postcard*2 |
|
|
|
|
|
- |
- |
- |
- |
|
|
|
|
|
|
|||||
|
148.0 mm x 200.0 mm |
|
|
|
|
|
||||
|
|
|
|
|
|
|
|
|
|
|
|
|
|
|
|
|
|
|
|
|
|
|
4 on 1 postcard*2 |
|
|
|
|
|
- |
- |
- |
- |
|
|
|
|
|
|
|||||
|
200.0 mm x 296.0 mm |
|
|
|
|
|
||||
|
|
|
|
|
|
|
|
|
|
|
|
|
|
|
|
|
|
|
|
|
|
Transparency A4 |
|
|
|
|
|
- |
- |
- |
- |
|
|
|
|
|
|
||||||
|
|
|
|
|
|
|
|
|
|
|
Label A4 |
|
|
|
|
|
- |
- |
- |
- |
|
|
|
|
|
|
||||||
|
|
|
|
|
|
|
|
|
|
|
Postcard*3 |
|
|
|
|
|
- |
- |
- |
- |
|
|
|
|
|
|
||||||
100.0 mm x 148.0 mm |
|
|
|
|
|
|||||
|
|
|
|
|
|
|
|
|
||
|
|
|
|
|
|
|
|
|
|
|
Reply postcard*2 |
|
|
|
|
|
- |
- |
- |
- |
|
|
|
|
|
|
||||||
148.0 mm x 200.0 mm |
|
|
|
|
|
|||||
|
|
|
|
|
|
|
|
|
||
|
|
|
|
|
|
|
|
|
|
|
4 on 1 postcard*2 |
|
|
|
|
|
- |
- |
- |
- |
|
|
|
|
|
|
||||||
200.0 mm x 296.0 mm |
|
|
|
|
|
|||||
|
|
|
|
|
|
|
|
|
||
|
|
|
|
|
|
|
|
|
|
|
Envelope*3 |
|
|
|
|
|
|
|
|
|
|
|
YOUGATA No. 4 |
|
|
|
|
|
- |
- |
- |
- |
|
|
|
|
|
|
|||||
|
105.0 mm x 235.0 mm |
|
|
|
|
|
||||
|
|
|
|
|
|
|
|
|
|
|
|
|
|
|
|
|
|
|
|
|
|
|
YOUGATA No. 2 |
|
|
|
|
|
- |
- |
- |
- |
|
|
|
|
|
|
|||||
|
114.0 mm x 162.0 mm |
|
|
|
|
|
||||
|
|
|
|
|
|
|
|
|
|
|
|
|
|
|
|
|
|
|
|
|
|
|
KAKUGATA No. 2 |
|
|
|
|
|
- |
- |
- |
- |
|
|
|
|
|
|
|||||
|
240.0 mm x 332.0 mm |
|
|
|
|
|
||||
|
|
|
|
|
|
|
|
|
|
|
|
|
|
|
|
|
|
|
|
|
|
*1 Cassette 3 and Cassette 4 can be installed only in LBP3970. *2 Paper can be loaded only in landscape orientation.
*3 Paper can be loaded only in portrait orientation.
9
*4 You can load paper of the following custom paper sizes.
-When loading paper in portrait orientation: Width 90.0 to 312.0 mm; Length 148.0 to 470.0 mm
-When loading paper in landscape orientation (only when LIPS LX Printer Driver is used): Width 148.0 to 312.0 mm; Length 148.0 to 312.0 mm
You can perform automatic 2-sided printing on paper (plain paper) of the following custom paper sizes.
-When loading paper in portrait orientation: Width 210.0 to 297.0 mm; Length 210.0 to 431.8 mm
-When loading paper in landscape orientation (only when LIPS LX Printer Driver is used): Width 210.0 to 297.0 mm; Length 148.0 to 297.0 mm
*5 You can load paper of the following custom paper sizes.
-When loading paper in portrait orientation: Width 210.0 to 297.0 mm; Length 210.0 to 431.8 mm* * If the paper width is 279.5 to 297.0 mm, the paper length should be 210.0 to 420.0 mm.
-When loading paper in landscape orientation (only when LIPS LX Printer Driver is used): Width 210.0 to 297.0 mm; Length 148.0 to 297.0 mm
*6 You can load paper of the following custom paper sizes.
-When loading paper in portrait orientation: Width 210.0 to 297.0 mm; Length 210.0 to 431.8 mm
-When loading paper in landscape orientation (only when LIPS LX Printer Driver is used): Width 210.0 to 297.0 mm; Length 148.0 to 297.0 mm
■Plain Paper
This printer can print plain paper at sizes of A3, B4, A4, B5, A5, Ledger (11 x 17), Legal, Letter, Executive, Postcard, Reply postcard, 4 on 1 postcard, and custom paper sizes that weighs between 60 and 90 g/m2.
Plain paper can be loaded in the paper cassettes and multi-purpose tray. Also, paper at sizes of A3, B4, A4, B5, A5, Ledger (11 x 17), Letter, Legal, Executive, and paper of the following custom paper sizes are available for automatic 2-sided printing.
When loading paper in portrait orientation: Width 210.0 to 297.0 mm; Length 210.0 to 431.8 mm
When loading paper in landscape orientation (only when LIPS LX Printer Driver is used): Width 210.0 to 297.0 mm; Length 148.0 to 297.0 mm
■Heavy Paper
This printer can print heavy paper at sizes of A3, B4, A4, B5, A5, Ledger (11 x 17), Legal, Letter, Executive, Postcard, Reply postcard, 4 on 1 postcard, and custom paper sizes that weighs between 91 and 199 g/m2. Heavy paper can be loaded in the multi-purpose tray, and is available only for 1-sided printing.
■Transparency
This printer can print A4 size transparencies. Transparencies can be loaded in the multi-purpose tray.
 IMPORTANT
•Use "A4 size transparencies for LBP recommended by Canon". "A4 size transparencies for LBP recommended by Canon" weighs 8.7 g per sheet.
•Thoroughly fan the transparencies before loading them as they may stick to each other.
■Label
This printer can print A4 size labels. Labels can be loaded in the multi-purpose tray.
10
 IMPORTANT
•Use "A4 size labels recommended by Canon". "A4 size labels recommended by Canon" weighs 7.8 g per sheet.
•Do not use the labels in the following conditions. Using inappropriate labels may result in paper jams that are difficult to clear or may result in damage to the printer.
-Peeled labels or partly used labels
-Coated labels that are easily peeled off from the backing sheet
-Labels with uneven adhesive
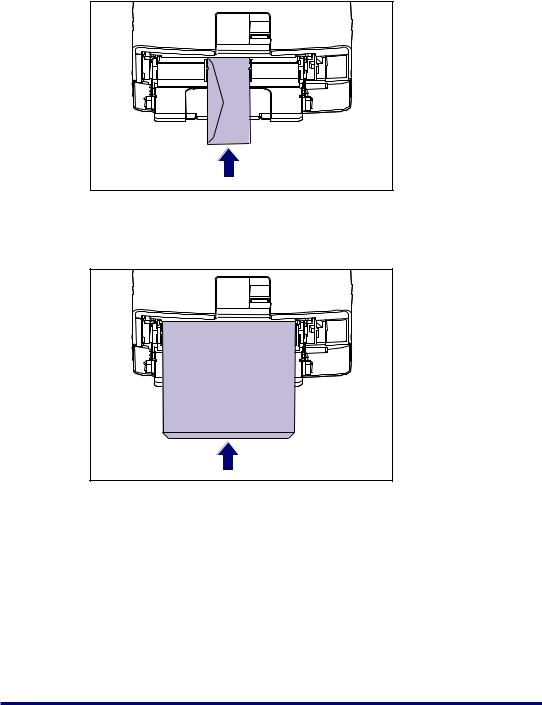
■Postcard/Reply postcard/4 on 1 postcard
This printer can print postcards, reply postcards, 4 on 1 postcards, and 4 on 1 postcards recommended by Canon. Load postcards, reply postcards, and 4 on 1 postcards in the multi-purpose tray with the printing side facing up.
 IMPORTANT
•Printing inappropriate size postcards (other than Postcard, Reply postcard, 4 on 1 postcard, and 4 on 1 postcard recommended by Canon) may result in deterioration in print quality or paper jams.
•You cannot print reply postcards with folds.
•If the post cards are curled, flatten the curls by warping them in the opposite direction before loading them.
•Postcards and reply postcards for ink jet printers cannot be printed.
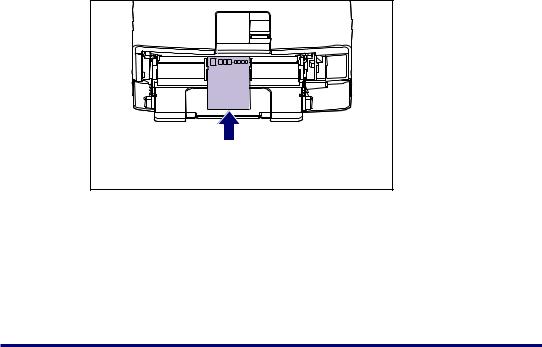
•Postcards cannot be loaded in landscape orientation. Be sure to load them in portrait
orientation with the printing side facing up. ( : Feeding direction)
11
•Reply postcards and 4 on 1 postcards cannot be loaded in portrait orientation. Be sure to
load them in landscape orientation with the printing side facing up. ( : Feeding direction)
•Printing speed drops when printing postcards, replay postcards, or 4 on 1 postcards.
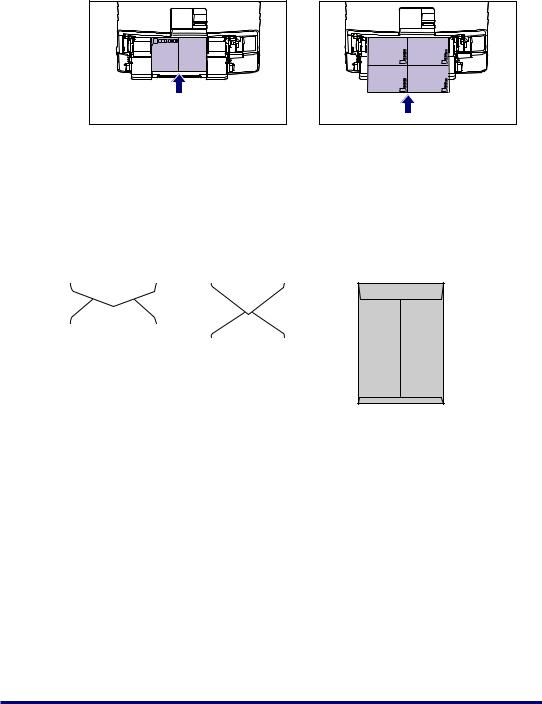
■Envelope
The envelopes that can be used with this printer are YOUGATA No. 4, YOUGATA No. 2, and KAKUGATA No. 2 with the following structures only. Load the envelopes with the address side (non-glued side) facing up in the multi-purpose tray.
|
|
|
|
KAKUGATA No. 2 |
|
|
|
|
240 mm×332 mm |
YOUGATA No. 4 |
|
YOUGATA No. 2 |
Envelope K-201G for |
|
105 mm×235 mm |
|
114 mm×162 mm |
Canon LBP/recommended |
|
|
|
|
|
|
|
|
|
|
|
|
|
|
|
|
*You cannot use envelopes at sizes of YOUGATA No. 4 and YOUGATA No. 2 that have a flap on the short edge.
 IMPORTANT
•Do not use the following types of envelopes. Using inappropriate envelopes may result in paper jams that are difficult to clear or may result in damage to the printer.
-Envelopes with fasteners or snaps
-Envelopes with address windows
-Envelopes with adhesive on the surface
-Wrinkled or creased envelopes
-Poorly manufactured envelopes in which the glued parts are uneven
-Irregularly-shaped envelopes
•Before loading the envelopes, flatten the stack of envelopes to release any remaining air, and press the fold lines along the edges tight.
•Do not print on the reverse side (glued side) of envelopes.
12
•When loading envelopes at a size of YOUGATA No. 4 or YOUGATA No. 2, load them so
that the flap is toward the left of the printer when viewed from the front. ( : Feeding direction)
•When loading envelopes of the KAKUGATA No. 2 size, leave the flaps open and load them so that the bottom of the envelopes is toward the back of the printer when viewed
from the front.
( : Feeding direction)
• Printing speed drops when printing envelops.
 NOTE
NOTE
When printing envelopes, they may be creased.
13
Abbreviations of Paper Sizes
The following shows the abbreviations of paper sizes that are marked on the paper cassette:
Paper Size |
Abbreviations on the Paper Cassette |
|
|
Ledger (11 x 17) |
11 x 17 |
|
|
Legal |
LGL |
|
|
Letter |
LTR |
|
|
Executive |
EXEC |
|
|
Custom paper size |
Custom |
|
|
Printable Area
The following shows the printable area of this printer: However, if you have selected the [Print with Upper Left of Sheet as Starting Point] check box in the [Finishing Details] dialog box in the LIPS printer driver, you can extend the printable area to near the edges of the paper. For more details, see Help of the printer driver.
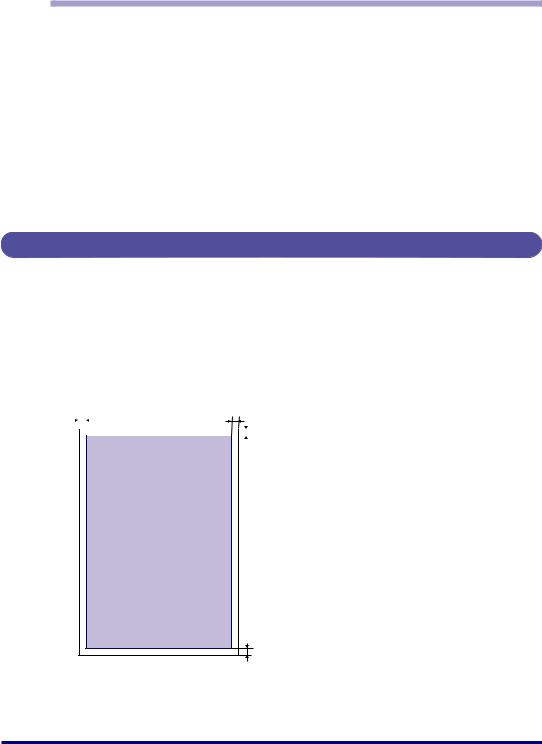
■Plain Paper/Heavy Paper/Transparency/Label
You cannot print on any area within 5 mm of the edges of paper.
5 mm |
5 mm |
||||||||||
|
|
|
|
|
|
|
|
|
|
|
5 mm |
|
|
|
|
|
|
|
|
|
|
|
|
|
|
|
|
|
|
|
|
|
|
|
|
|
|
|
|
|
|
|
|
|
|
|
|
|
|
|
|
|
|
|
|
|
|
|
|
5 mm
14
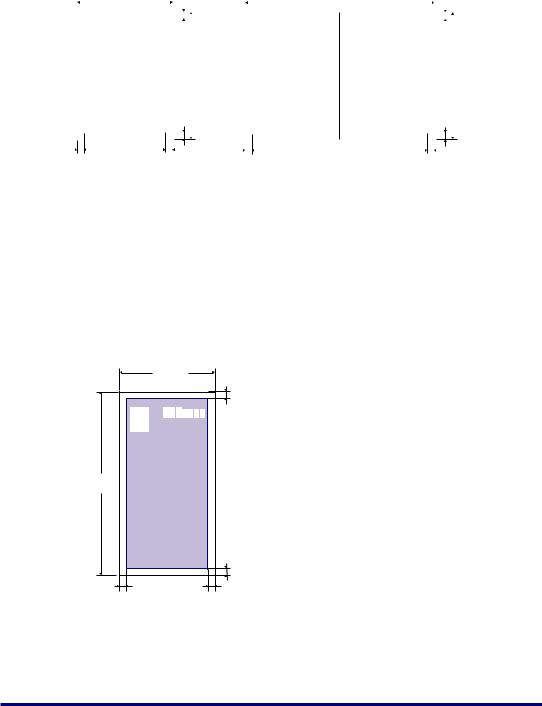
■Postcard/Reply Postcard/4 on 1 Postcard
You cannot print on any area within 5 mm of the edges of a postcard.
|
|
|
100 mm |
|
|
5 mm |
|
|
|
200 mm |
|
|
5 mm |
||||||||
|
|
|
|
|
|
|
|
|
|||||||||||||
|
|
|
|
|
|
|
|
|
|
|
|
|
|
||||||||
|
|
|
|
|
|
|
|
|
|
|
|
|
|
|
|
|
|
|
|
|
|
|
|
123-4567 |
|
|
|
|
|
|
|
|
123-4567 |
|
|
|
|
|
|
|
|||
|
|
|
|
|
|
|
|
|
|
|
|
|
|
|
|
||||||
|
|
|
|
|
|
|
|
|
|
|
|
|
|
|
|
|
|
|
|
||
|
|
|
|
|
|
|
|
|
|
|
|
|
|
|
|
||||||
|
○○○ |
|
|
|
|
|
|
|
○○○ |
|
|
|
|
|
|
||||||
|
|
148 mm |
|
|
148 mm |
||||||||||||||||
|
|
|
|
|
|
|
|
|
|
|
|
||||||||||
|
|
|
|
|
|
|
|
|
|
|
|
|
|
|
|
|
|
|
|
|
|
|
|
|
|
|
|
|
|
|
|
|
|
|
|
|
|
|
|
|
|
|
|
|
|
|
|
|
|
5 mm |
|
|
|
|
|
5 mm |
5 mm |
5 mm |
5 mm |
5 mm |
|||||||||
 IMPORTANT
You may not obtain the optimum print quality when printing postcard data with no margin. It is recommended that you specify the size of the data a little smaller than the printable area for the postcard size.
■Envelope
You cannot print on any area within 10 mm of the edges of an envelope.
You may have to change the printable area before printing, depending on the application you use.
(Sample: Envelope YOUGATA No. 4)
105 mm
10 mm
235 mm
10 mm
10 mm |
10 mm |
 IMPORTANT
When you print envelopes, a part of the printed zip code may be missing. In this case, you can print the envelopes without any part of the zip code missing by selecting the [Print with Upper Left of Sheet as Starting Point] check box or [Expand Print Region and Print] check box.
15

Unusable Paper
To avoid problems such as paper jams and other malfunctions, the following types of paper should never be used:
 IMPORTANT
•Paper that jams easily
-Paper that is too thick or too thin
-Irregularly-shaped paper
-Wet or moist paper
-Torn or damaged paper
-Rough, extremely smooth, or glossy paper
-Paper with binding holes or perforations
-Curled or creased paper
-Specially coated paper (coated paper for ink jet printers, etc.)
-Labels with backing sheet that is easily peeled off
-Paper that has already been printed by a copy machine or another laser printer (The reverse side of the paper is also unusable. Using the multi-purpose tray, however, you can perform 2-sided printing manually on the other side of previously printed paper. You cannot print on the printed side again.)
-Paper with jagged edges
-Wrinkled paper
-Paper with the corners folded
•Paper that changes its quality at a high temperature
-Paper that contains ink that melts, burns, evaporates or emits harmful gases at a temperature lower than the heating temperature (approx. 270 °C) of the fixing unit
-Heat-sensitive paper
-Treated color paper
-Specially coated paper (coated paper for ink jet printers, etc.)
-Paper with adhesive on the surface
•Paper that causes printer malfunctions or damages the printer
-Carbon paper
-Paper with staples, clips, ribbons or tapes
-Paper that has already been printed by a copy machine or another laser printer (The reverse side of the paper is also unusable. Using the multi-purpose tray, however, you can perform 2-sided printing manually on the other side of previously printed paper. You cannot print on the printed side again.)
•Paper that is difficult for the toner to fix onto
-Paper with rough surfaces
-Specially coated paper (coated paper for ink jet printers, etc.)
-Paper containing thick fibers
16

Paper Capacity of Paper Source
|
|
Paper Source |
|
|
||
Paper Type |
|
|
|
|
|
|
Multi-purpose |
|
Cassette 2 |
Cassette 3* |
Cassette 4* |
||
|
Cassette 1 |
|||||
|
tray |
(Optional) |
(Optional) |
(Optional) |
||
|
|
|||||
|
|
|
|
|
|
|
Plain paper |
Approx. 100 |
Approx. 250 |
Approx. 500 |
Approx. 500 |
Approx. 500 |
|
(Ex. 64 g/m2) |
sheets |
sheets |
sheets |
sheets |
sheets |
|
|
|
|
|
|
|
|
Heavy paper |
Approx. 50 |
- |
- |
- |
- |
|
(Ex. 128 g/m2) |
sheets |
|||||
|
|
|
|
|||
|
|
|
|
|
|
|
Transparency |
Approx. 50 |
- |
- |
- |
- |
|
sheets |
||||||
|
|
|
|
|
||
|
|
|
|
|
|
|
Label |
Approx. 40 |
- |
- |
- |
- |
|
sheets |
||||||
|
|
|
|
|
||
|
|
|
|
|
|
|
Postcard |
Approx. 40 |
- |
- |
- |
- |
|
sheets |
||||||
|
|
|
|
|
||
|
|
|
|
|
|
|
Reply postcard |
Approx. 40 |
- |
- |
- |
- |
|
sheets |
||||||
|
|
|
|
|
||
|
|
|
|
|
|
|
4 on 1 postcard |
Approx. 40 |
- |
- |
- |
- |
|
sheets |
||||||
|
|
|
|
|
||
|
|
|
|
|
|
|
4 on 1 postcard |
Approx. 40 |
|
|
|
|
|
recommended by |
- |
- |
- |
- |
||
sheets |
||||||
Canon |
|
|
|
|
||
|
|
|
|
|
||
|
|
|
|
|
|
|
Envelope |
Approx. 10 |
- |
- |
- |
- |
|
sheets |
||||||
|
|
|
|
|
||
|
|
|
|
|
|
|
* Cassette 3 and Cassette 4 can be installed only in LBP3970.
Paper Capacity of the Output Trays
|
|
Output Trays* |
|
|
Paper Type |
|
|
|
|
Output Tray |
Sub-output Tray |
|
|
|
|
|
Plain paper (Ex. 64 g/m2) |
Approx. 250 sheets |
Approx. 50 sheets |
|
|
|
|
|
Heavy paper (Ex. 128 g/m2) |
Approx. 150 sheets |
Approx. 30 sheets |
|
|
|
|
|
Transparency |
Approx. 100 sheets |
1 sheet |
|
|
|
|
|
Label |
Approx. 100 sheets |
Approx. 20 sheets |
|
|
|
|
|
Postcard |
Approx. 100 sheets |
Approx. 20 sheets |
|
|
|
|
|
|
|
|
17

|
Output Trays* |
||
Paper Type |
|
|
|
|
Output Tray |
Sub-output Tray |
|
|
|
|
|
Reply postcard |
Approx. 100 sheets |
Approx. 20 sheets |
|
|
|
|
|
4 on 1 postcard |
Approx. 100 sheets |
Approx. 20 sheets |
|
|
|
|
|
4 on 1 postcard recommended |
Approx. 100 sheets |
Approx. 20 sheets |
|
by Canon |
|||
|
|
||
|
|
|
|
Envelope |
Approx. 50 sheets |
Approx. 10 sheets |
|
|
|
|
|
* Actual paper capacity varies depending on the installation environment and paper type.
18
Loading Paper in the Paper Cassette
Load paper in the paper cassette. The paper loading methods are different between standard size paper and custom size paper. Therefore, load paper properly using the following procedures.
•When Loading Standard Size Paper (See p. 19)
•When Loading Custom Size Paper (Non-Standard Size Paper) (See p. 27)
 IMPORTANT
For more details on the usable paper, see "Usable Paper," on p. 7.
 NOTE
NOTE
Load paper in the optional 250-sheet universal cassette UC-67D in the same manner as you load paper in Cassette 1.
Load paper in the optional 500-sheet universal cassette UC-67KD in the same manner as you load paper in Cassette 2, 3, and 4.
When Loading Standard Size Paper
Perform the following procedure to load standard size paper.
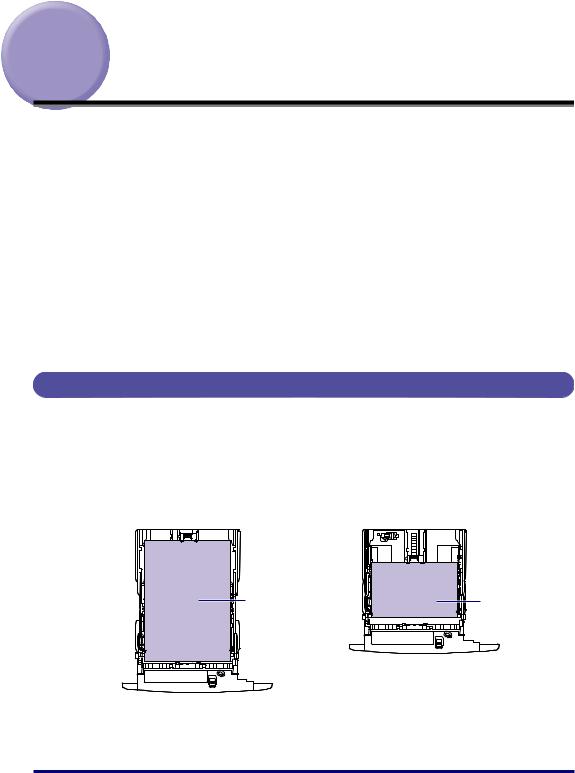
Load paper in portrait or landscape orientation. Depending on the size of the paper to be loaded, the loading orientation differs as follows:
• Cassette 1
Portrait orientation |
Landscape orientation |
||||||||||||
|
|
|
|
|
|
|
|
|
|
|
|
|
|
|
|
|
|
|
|
|
|
|
|
|
|
|
|
|
|
|
|
|
|
|
|
|
|
|
|
|
|
|
|
|
|
|
|
|
|
|
|
|
|
|
|
|
|
|
|
|
|
|
|
|
|
|
|
|
|
Ex. A3 |
Ex. A4 |
Paper that can be loaded in landscape orientation:
A4, B5, A5, Letter, Executive
Paper that can be loaded in portrait orientation:
A3, B4, A4R, Ledger (11 x 17), Legal, LetterR
19

• Cassette 2, 3, and 4
Portrait orientation |
Landscape orientation |
Ex. A3 |
Ex. A4 |
Paper that can be loaded in portrait orientation: A3, B4, A4R, Ledger (11 x 17), Legal, LetterR
Paper that can be loaded in landscape orientation: A4, B5, A5, Letter, Executive
1 Pull out the paper cassette.
Cassette 1
Pull out the paper cassette gently until it stops A.
A |
Cassette 2, 3, and 4
Pull out the paper cassette gently until it stops A.
A |
Raise the front side of the paper cassette and remove it from the printer B.
B |
Hold the grips (A) with both hands, raise the front side of the paper cassette slightly B, and then pull it out completely C as shown in the figure.
C |
(A) |
B |
20
 CAUTION
Be sure to take the paper cassette out of the printer before loading paper. If paper is loaded while the paper cassette is partially pulled out, the paper cassette may drop or the printer may become damaged resulting in personal injury.
 IMPORTANT
•The paper cassette cannot be pulled out horizontally. If you try to pull it out forcefully, this may result in damage to the paper cassette.
•Hold the paper cassette with both hands securely because the cassette is heavy.
•Place the removed paper cassette on a flat and stable surface.
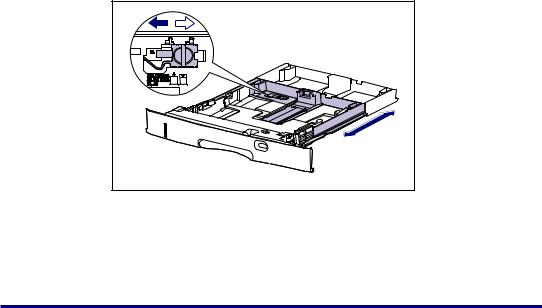
2 When changing the size of the paper to be loaded, adjust the length of the paper cassette and change the positions of the paper guides.
●When loading paper in Cassette 1, adjust the length of the paper cassette according to the paper to be loaded.
When loading paper at sizes of A4, B5, A5, Letter, and Executive, shorten the paper cassette.
When loading paper at sizes of A3, B4, A4R, Ledger (11 x 17), Legal, and LetterR, extend the paper cassette.
To adjust the length of the paper cassette, align the lock release lever with "  " to release the lock, slide the paper cassette by holding the rear portion of the paper cassette, and then align the lock release lever with "
  " to lock the cassette.
21
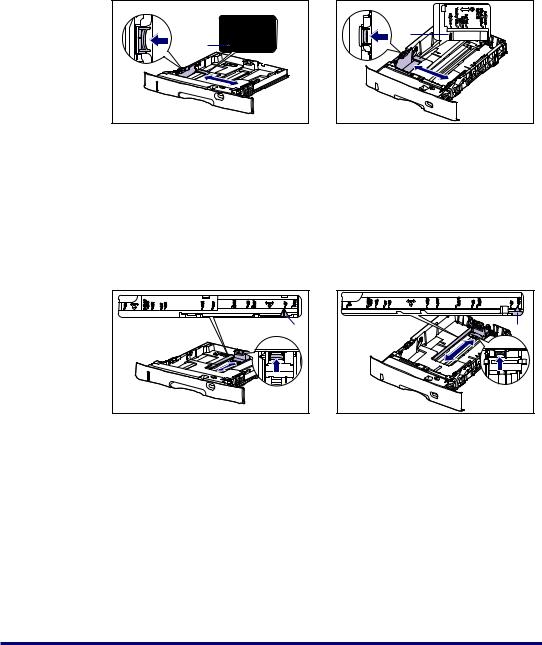
●While holding the lock release lever of the side paper guides, slide the guides to the size mark for the paper to be loaded.
The side paper guides move together. Align the position of (A) with the size mark for the paper to be loaded.
Cassette 1 |
Cassette 2, 3, and 4 |
(A)
(A)
 IMPORTANT
Do not use the "16K" and "8.5 x 13" position.
●While holding the lock release lever of the rear paper guide, slide the guide to the size mark for the paper to be loaded.
Align the position of (A) with the size mark for the paper to be loaded.
Cassette 1
(A) |
Cassette 2, 3, and 4 |
E |
(A) |
 IMPORTANT
Do not use the "16K" and "8.5 x 13" position.
22
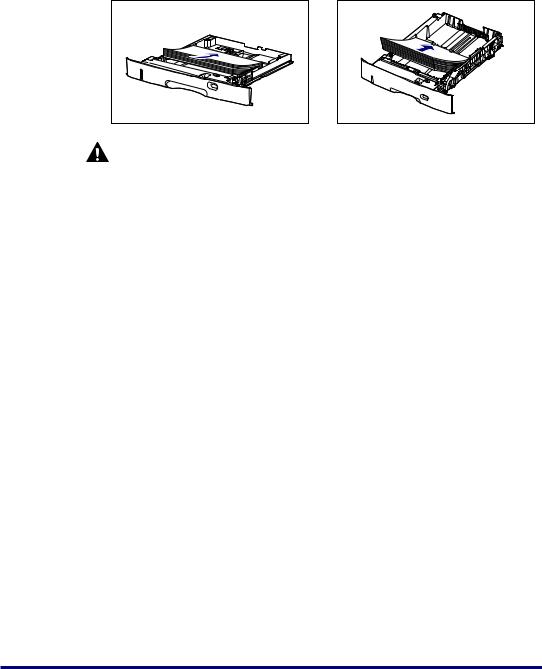
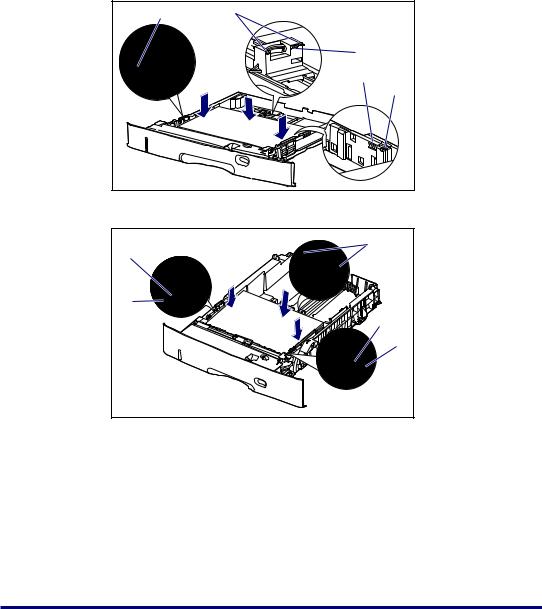
3 Load the paper stack so that the rear edge is aligned with the paper guide.
Cassette 1 |
Cassette 2, 3, and 4 |
CAUTION |
When loading paper, take care not to cut your hands with the edges of the paper.
 IMPORTANT
•Be sure to check if the paper guide is at the position of the size of the loaded paper. If the paper guide is set at a wrong position, this may result in misfeeds.
•If you use paper that has been poorly cut, multiple sheets of paper may be fed at once. In this case, fan the paper thoroughly, and then align the edges of the stack on a hard, flat surface.
 NOTE
NOTE
To print letterhead paper or paper printed with a logo, load the paper in the proper orientation according to the following instructions:
(  : Feeding direction)
23
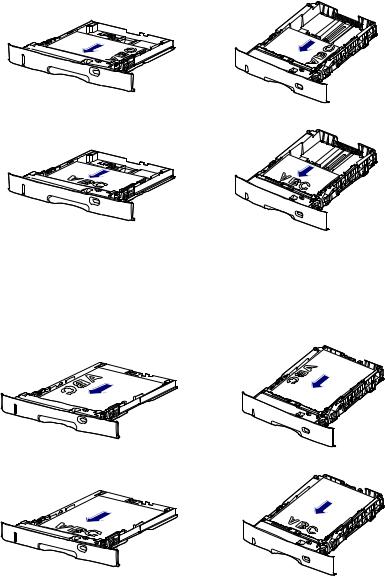
-When loading paper at a size of A4, B5, A5, Letter, or Executive in landscape orientation, load the paper so that the printing side is facing down, as shown in the following figures.
Cassette 1 |
|
Cassette 2, 3, and 4 |
|
|
|
|
|
|
|
|
|
|
|
|
|
|
|
|
|
|
|
|
|
|
|
|
|
|
|
|
|
|
|
|
|
|
|
|
|
-When loading paper at a size of A3, B4, A4R, Ledger (11 x 17), Legal, or LetterR in portrait orientation, load the paper so that the printing side is facing down, as shown in the following figures.
|
Cassette 1 |
|
Cassette 2, 3, and 4 |
|
|
|
|
|
|
|
|
|
|
|
|
|
|
|
|
|
|
|
|
|
|
|
|
|
|
|
|
|
|
|
|
|
|
|
|
|
|
|
|
|
|
|
|
|
|
|
|
|
|
|
|
|
|
|
|
24
4 Hold down the paper as shown in the figure, make sure that the paper stack does not exceed the load limit marks (A), and then set it under the hooks (B) on the paper guides.
Make sure that there is sufficient space between the hooks of the paper guides and the paper stack. If there is no sufficient space, slightly reduce the amount of paper.
Cassette 1
(B) |
(B) |
|
(A) |
|
(A) |
|
(B) |
Cassette 2, 3, and 4 |
|
(B) |
(A) |
(B) |
(A) |
(B) |
 IMPORTANT
The paper capacity of Cassette 1 is approximately 250 sheets of plain paper (64 g/ m2), and that of Cassette 2, 3, and 4 is approximately 500 sheets of plain paper (64 g/m2). Be sure that the paper stack does not exceed the load limit marks on the paper guides. If the paper stack exceeds the load limit marks, this may result in misfeeds.
25
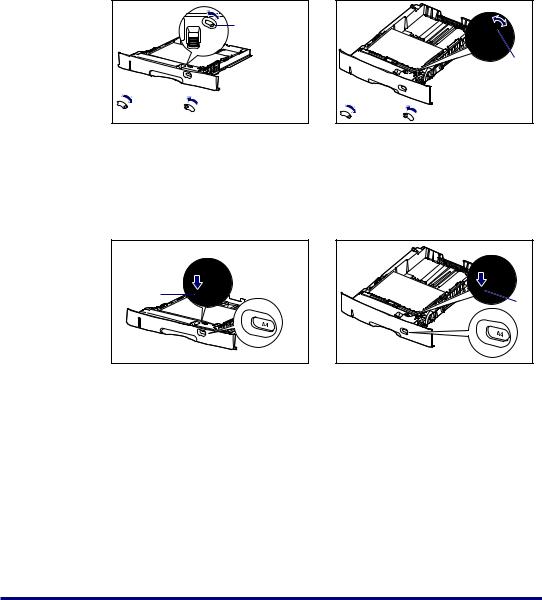
5 When changing the size of the paper to be loaded, set the paper size setting switch and paper size register dial to the size of the loaded paper.
●Holding the tab of the paper size setting switch, set the paper size setting switch (A) to the size of the loaded paper.
Cassette 1
|
(A) |
A3, B4, A4, |
Ledger (11 x 17), Legal, Letter, |
A4R, B5, A5 |
LetterR, Executive, Custom Paper |
|
Size |
Cassette 2, 3, and 4 |
|
|
(A) |
A3, B4, A4, |
Ledger (11 x 17), Legal, Letter, |
A4R, B5, A5 |
LetterR, Executive, Custom Paper Size |
●Adjust the paper size register dial (B) to set the dial to the size of the loaded paper.
Cassette 1 |
Cassette 2, 3, and 4 |
(B) |
|
|
(B) |
 IMPORTANT
•Make sure that the paper size the paper size register dial is indicating corresponds with the size of the loaded paper before setting the paper cassette in the printer. If the paper size that the paper size register dial is indicating does not correspond with the size of the loaded paper, this may result in printer malfunction.
•Do not use the "16K" and "8.5 x 13" position.
26
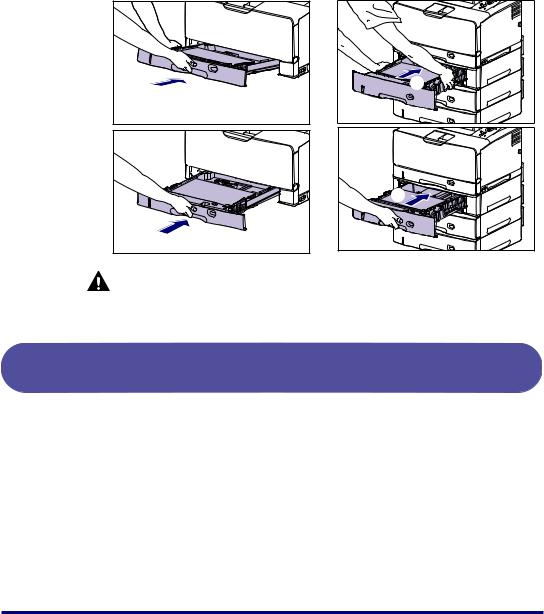
6 Set the paper cassette in the printer at an angle as shown in the figure A, then push it into the printer or paper feeder gently and horizontally B.
Push the paper cassette into the printer firmly until the front side of the paper cassette is flush with the front surface of the printer.
Cassette 1
A |
B |
CAUTION |
Cassette 2, 3, and 4 |
A |
B |
When setting the paper cassette in the printer, be careful not to catch your fingers.
When Loading Custom Size Paper (Non-Standard Size
Paper)
Perform the following procedure to load custom size paper.
 IMPORTANT
• You can load paper of the following custom paper sizes.
- When loading paper in portrait orientation: Width 210.0 to 297.0 mm; Length 210.0 to 431.8 mm*
* When loading paper that is 279.5 to 297.0 mm wide in Cassette 1, the paper length should be 210.0 to 420.0 mm.
- When loading paper in landscape orientation (only when LIPS LX Printer Driver is used): Width 210.0 to 297.0 mm; Length 148.0 to 297.0 mm
• When custom size paper is loaded, specify the setting for < N N=1 2 3* 4*> as follows.
* Can be specified only with LBP3970.
27
-When the paper is loaded in landscape orientation (only when LIPS LX Printer Driver is used): < >
-When the paper is loaded in portrait orientation: < R>
•When you change the orientation of the loaded custom size paper frequently, it is convenient if you set < N N=1 2 3* 4* > to < >. When <N N=1 2 3* 4* > is set to < >, you do not need to change the setting for < N N=1 2 3* 4* > each time you change the paper orientation. However, if you specify < >, make sure that the size of the loaded paper matches the paper size specified in the printer driver before printing. If they do not match, the printer may stop printing, displaying the message <41 >, or a paper jam may occur. Be sure to check if the paper size specified in the printer driver matches the size of the paper loaded in the paper cassette before using the printer. However, if < J> is set to < >, the printer prints without checking the paper size even when the paper size specified in the printer driver and the size of the paper loaded in the paper cassette do not match.
*Can be specified only with LBP3970.
•When custom size paper is printed from LIPS LX Printer Driver, you can load the paper either in portrait or landscape orientation. However, when you are printing custom size paper of its long edges 297.0 mm or less with < N N=1 2 3 4 > set to < >, load the paper in landscape orientation. When you are not printing from LIPS LX Printer Driver, load the paper in portrait orientation.
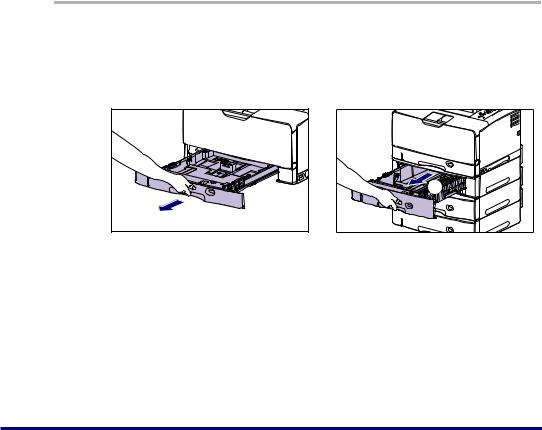
1 Pull out the paper cassette.
Cassette 1
Pull out the paper cassette gently until it stops A.
A |
Cassette 2, 3, and 4
Pull out the paper cassette gently until it stops A.
A |
28
Loading...