


Table of Contents |
|
|
1 |
Turning the Power on and off ........................................................ |
2 |
|
Turning the Power on ........................................................................................ |
2 |
|
Turning the Power off ....................................................................................... |
3 |
2 |
Paper ............................................................................................. |
4 |
|
Compatible Paper .............................................................................................. |
4 |
|
Incompatible Paper............................................................................................ |
6 |
|
Printable Areas .................................................................................................. |
7 |
3 |
Printing from the Paper Cassette .................................................. |
8 |
4 |
Paper Jams (How to Remove Jammed Paper) ................................... |
12 |
|
Removing Jammed Paper................................................................................ |
13 |
5 |
Canceling Printing ....................................................................... |
35 |
|
Outputting the Data (Forced Printing) ..................................................................... |
35 |
|
Canceling Operations Currently in Progress (Soft Reset) ................................... |
37 |
|
Canceling All Operations (Hard Reset) .................................................................. |
38 |
6 |
Checking Operations ................................................................... |
39 |
|
Test Print ......................................................................................................... |
39 |
|
Status Print ...................................................................................................... |
41 |
1
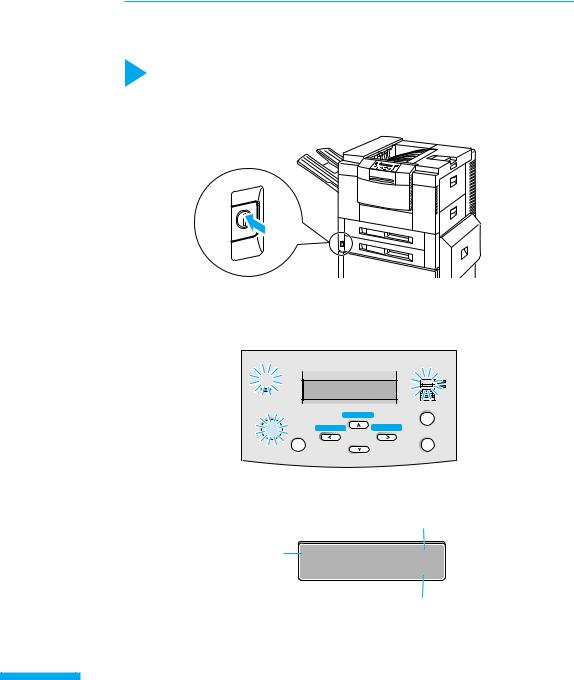
1 Turning the Power on and off
When you turn the power on, the status of the printer and optional device(s) is checked before printing is enabled. When the power is turned off, all of the printing data in the memory is lost. Always check that the indicator is off before turning the power off in order to avoid deleting important printing data by accident or deleting printing data from another computer when connected to a network.
Turning the Power on
To turn on the power follow the instructions below.
1 Press the power button on the printer.
▼ The power button will now be in a pressed-down state.
The operation panel indicators and the display comes on and the status of the printer and optional
device(s) is self-diagnosed.
▼If the results of the self-diagnosis are normal, the indicator, theindicator and the selected paper feed indicator come on and printing is enabled when the message [00 ] appears on the display.

00 A4

|
|
|
|
|
|||
|
|||
|
|
|
|
|
|
|
|
|
/ |
||
The following information appears on the display.
|
Currently selected |
|
paper feed size |
Printing enabled, no |
00 A4 |
printing data being |
|
processed |
|
|
Currently selected |
|
output tray |
2
Turning the Power off
To turn off the power follow the instructions below.
• If the printer is connected to a network, check that other computers are not printing before you turn off the power.
• If you turn off the power when the indicator is on, any printing data remaining in the printer’s memory will be lost. Go off-line, press the key to output the printing data and then turn off the power. (→p. 35)
• Do not turn off the printer while printing.
• Do not turn off the printer during the self-diagnosis carried out immediately after turning the power on.
1 Check that the indicator is off.
|
|
00 |
A4 |
|
|
||
Off |
|
|
|
|
|
||
|
|
|
|
|
|
|
|
|
|
||
|
|
||
|
|
|
|
|
|
|
|
|
|
/ |
|
2Press the power button on the printer. ▼The power button will pop up.
Power saving (Sleep mode)
The printer can be set to sleep mode in order to reduce the power consumed. When the printer is set to sleep mode, all of the indicators except the indicator go off if no operations are carried out and no data is sent from the computer for a set time.
The sleep mode is automatically canceled if data is sent from the computer or an operation panel key is pressed.
The sleep mode is set using the menu function.
3

2 Paper
The printer has three possible paper sources, the paper cassette, the paper tray and the 2000sheet paper deck (option). The paper that can be loaded will differ according to the paper source. Make sure that you load the proper paper type into the respective holders.
Compatible Paper
Use the correct paper in order to get the best performance from your printer. Using incompatible paper can lead to reduced printing quality and paper jamming.
●Standard status
Paper source |
Paper type |
Size |
Weight (g/m2) |
Max. sheet no. |
|
Upper cassette |
Plain paper |
A4, B4, Letter, Legal |
64-105 |
approx. 500 |
|
(64 g/m2) |
|||||
|
|
|
|
||
Lower cassette |
Plain paper |
A4, B4, A3, Letter, Legal, |
64-105 |
approx. 500 |
|
|
|
Ledger |
|
(64 g/m2) |
|
Paper tray |
Plain paper |
width: 100-297 mm |
64-105 |
approx. 100 |
|
|
|
length 190.5-432 mm |
|
(64 g/m2) |
|
|
Thick paper |
width: 100-297 mm |
106-128 |
approx. 50 |
|
|
|
length 190.5-432 mm |
|
(128 g/m2) |
|
|
Transparencies |
A4 (Canon domestic LBP |
|
approx. 50 |
|
|
|
transparencies: 8.7 g) |
|
|
|
|
Label sheet |
A4 (Canon domestic label |
|
approx. 40 |
|
|
|
sheet: 7.8 g) |
|
|
●When using optional devices
Paper source |
Paper type |
Size |
Weight (g/m2) |
Max. sheet no. |
|
Optional lengthwise |
Plain paper |
B5 lengthwise |
64-105 |
approx. 500 |
|
upper (B5) cassette |
(64 g/m2) |
||||
|
|
|
|||
Optional lengthwise |
Plain paper |
A5 lengthwise |
64-105 |
approx. 500 |
|
upper (A5) cassette |
(64 g/m2) |
||||
|
|
|
|||
2000-sheet paper deck |
Plain paper |
A4, B4, A3, Letter, |
64-105 |
approx. 2,000 |
|
(PD-82) |
|
Legal, Ledger |
|
(64 g/m2) |
● Plain paper
You can use plain paper of 100-297 mm width, 190.5-432 mm length and 64-105 g/m2 weight with this printer. This includes A5-, B5-, A4-, B4, A3, Executive, Letter, Legal and Ledgersize paper. You can load standard-size plain paper into the paper cassette and 2000-sheet paper deck (except A5, B5 and Executive-size). Paper of other sizes should be loaded into the paper tray. Attaching the optional duplex unit allows you to automatically duplex print on plain paper.
4

● Thick paper
You can use thick paper of 100-297 mm width, 190.5-432 mm length and 106-128 g/m2 weight with this printer. This includes A5-, B4-, A3-, Letter-, Legaland Ledger-size paper. Thick paper should be loaded into the paper tray.
● Label sheet
A4-size label sheet can be used in this printer.
Do not use the following types of label sheet. If a sheet type that does not conform to specifications is used, paper jams that are hard to remove may occur or printer malfunctions may be caused.
•Sheet with labels that are likely to peel off, or sheet on which part of the labels have been used.
•Coated sheet that can easily peel off from the backing sheet.
•Label sheet with some adhesive surfaces exposed.
●Transparencies
A4-size transparencies can be used in this printer.
• Since transparencies are likely to be difficult to separate, use them after fanning them one sheet at a time.
•When outputting transparencies face up, remove each transparency from the tray as it is output. If you leave the transparencies on the tray, they will roll up, and a paper jam will occur.
5

Incompatible Paper
In order to avoid paper jams and damaging the printer, do not use the following types of paper.
Paper that jams easily
•Paper that is too thick or too thin
•Non-standard size paper
•Wet or damp paper
•Torn paper
•Coarse or extremely smooth paper
•Paper with binder holes, serrated paper
•Curled paper, creased paper
•Paper with special coatings on it (such as coatings especially for ink jet printers)
•Label sheet with labels that peel off easily
•Paper that has already been used for photocopying or laser printing (reverse side also incompatible)
Heat-sensitive paper
•Paper with ink that melts, burns or gives off toxic vapors in the heat of the fixing assembly (approx. 180 )
•Thermal paper
•Color paper with a processed surface
•Specially coated paper (such as coatings especially for ink jet printers)
•Paper with adhesive on it
Paper that can cause printer malfunction or damage
•Carbon paper
•Paper with staples, clips, ribbons or tape attached Paper on which toner cannot fix easily
•Coarse paper such as pulp paper and Japanese writing paper, paper with rough fibers
•Paper with special coatings on it (such as coatings especially for ink jet printers)
6
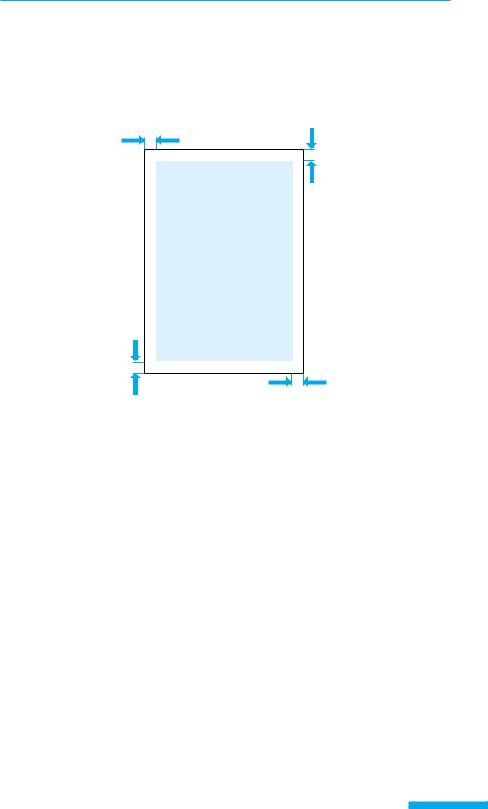
Printable Areas
The areas that can be printed on the paper are given below.
● Plain paper, thick paper, transparencies, label sheet
Plain paper, thick paper, transparencies and label sheet can be printed in areas with a
minimum margin of 5 millimeters.
5 mm
5 mm
5 mm
5 mm
7
3 Printing from the Paper Cassette
The paper cassette holds up to 500 sheets (64 g/m2) of plain paper (60-105 g/m2). Different sizes of paper can be loaded into upper cassette and lower cassette to allow operations in which the paper source is automatically switched.
Loading paper into upper cassette, lower cassette or the optional lengthwise upper cassette is done in the same way. Follow the instructions below to load paper correctly.
 The following precautions should be taken to prevent paper jams.
• Standard form paper other than plain paper, such as transparencies or label sheet and non-standard form paper cannot be loaded.
•Do not load paper that is creased or severely curled.
•Do not touch the black rubber pad on the paper cassette. This will cause a paper feed malfunction.
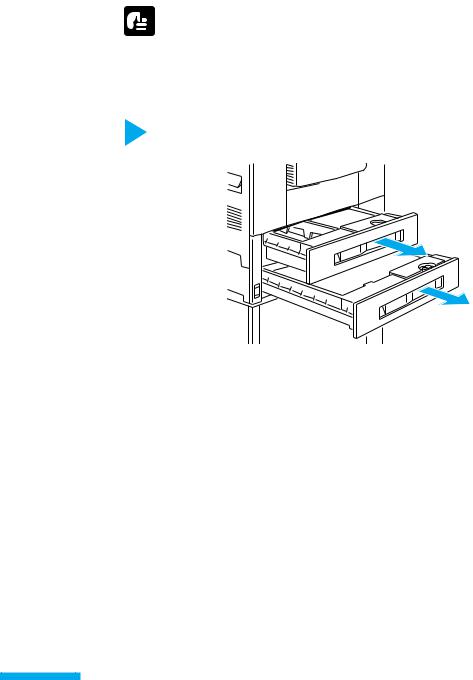
1Check that the indicator is not flashing, pull the handle of the paper cassette that you want to load to pull out the paper cassette.
8
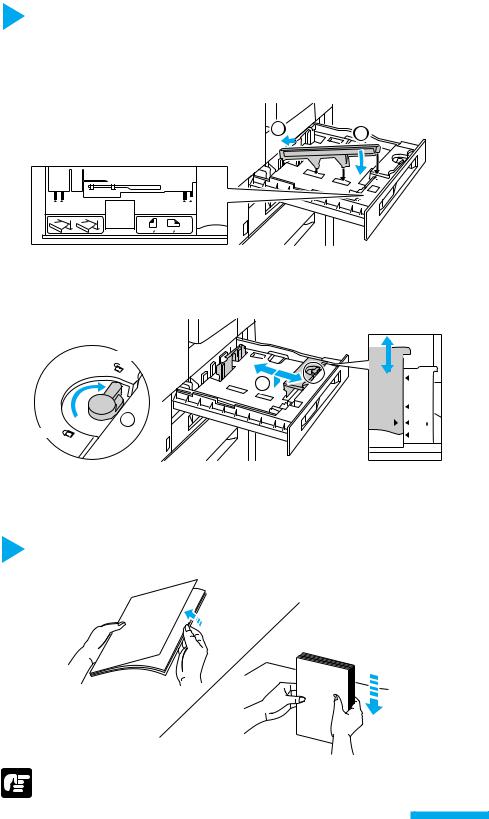
2Line up the paper size guides with the marks indicating the size of the paper you want to load.
Paper size guides are located on the left and right sides of the paper cassette tray, at the front and back. Lift the front of the left paper size guide and remove the guide from the paper cassette, then line up the guide with the mark indicating the new paper size.
Fix the new paper size by inserting the paper |
1 |
|
size guide into the groove indicating the new |
2 |
paper size.
B4 |
LGL |
LTR A4 |
|
LTR A4 |
LGL B4 |
Turn the lock lever of the right paper size guide to the right to unlock it q, then line up the guide with the mark indicating the new paper size w. After you have done this, turn the lock lever to the left to lock the paper size guide into position.
Unlock
LGL
2
|
B4 |
1 |
LTR/11 17 |
Lock |
A4/A3 |
Lock Lever
If you move the front paper size guide to line it up with the paper size mark on the right side of the paper cassette, this will also adjust the rear paper size guide.
3Fan the paper, then straighten the edges.
Set the paper on a flat surface to line up its edges.
• If the paper is not straightened before loading, this could lead to a paper feed malfunction or paper jam.
9
4Place the left side of the stack against the paper size guide that shows the paper limit mark, with the surface to be printed facing down.
A4and Letter-size paper must be placed widthwise in the cassette.
The paper cassette can hold approximately 500 sheets of plain paper (64 g/m2). Make sure that the stack is not higher than the paper limit mark on the cassette.
Paper limit mark
•If the paper is loaded so that it feeds widthwise like A4or Letter-size paper, the inside edge will be the paper’s leading edge.
ABC
Feed directon
•If the paper is loaded so that it feeds lengthwise like B4or A3-size paper, the top edge of the paper will be the leading edge.
ABC
Feed direction
10
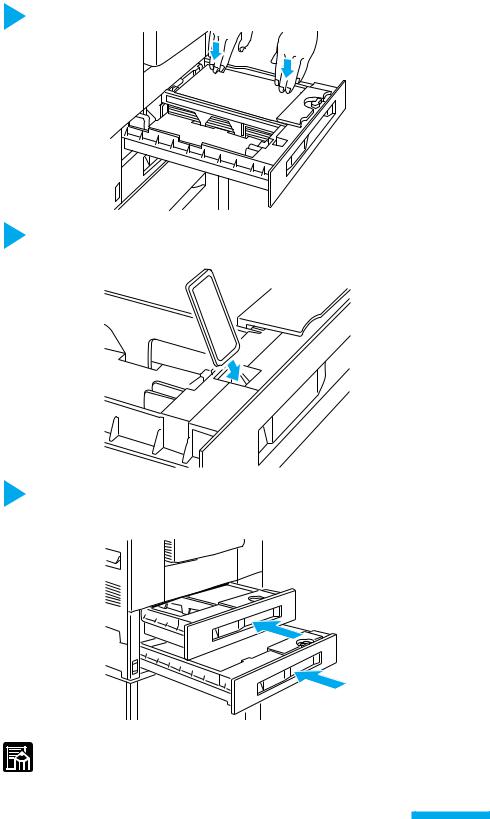
5 Press the paper down under the clips on the rear and front guides.
6Insert the paper size card that conforms with the paper size to be loaded into the paper size card holder on the front left surface of the paper cassette.
B4
A4
7 Push the paper cassette all the way in until it locks into position with a clicking sound.
When the paper cassette is locked into position and the power is on, the sound of the printer in operation will be heard. Printing automatically resumes when the message [ ] appears on the display.
•You can place A5and B5-size paper lengthwise in the paper casette if you are using an optional lengthwise upper paper cassette. Contact your authorized local dealer for more details on optional equipment.
11
4 Paper Jams
(How to Remove Jammed Paper)
If a paper jam occurs inside the printer for any reason during printing, an alarm sounds and the message [13 ] appears on the display.
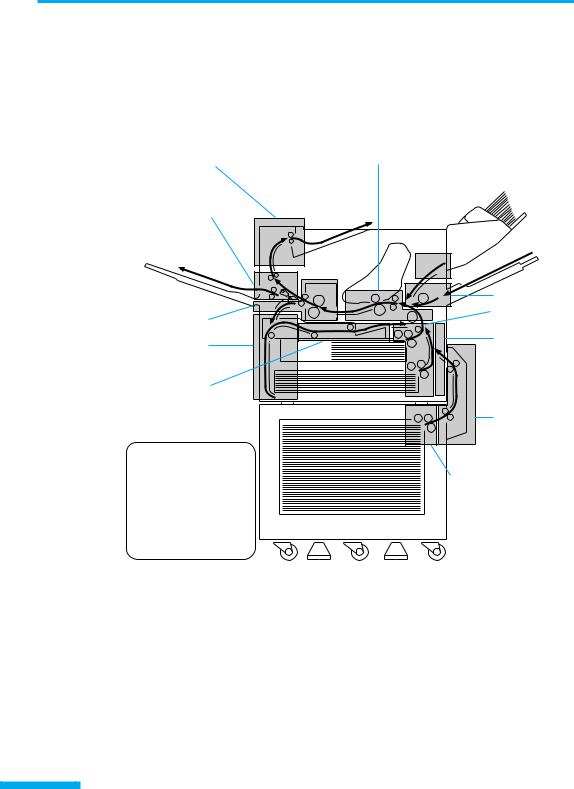
Paper passes through the printer by the route indicated in the diagram below. The locations indicated in the diagram are places where paper jams most commonly occur. If a paper jam occurs, check the position of the jam as given in the message and remove the jam as shown in the diagram below.
Transfer Charging Area
Output Tray Area
Output Sub-Tray
Area
|
Paper Tray Area |
|
Left Cover Area |
Paper Cassette |
|
Area |
||
|
||
Duplex Unit |
Right Cover |
|
Area |
||
Area (Option) |
||
|
Front Cover
Area
Paper Deck
Cover Area (Option)
Standard Paper
Delivery Route
2000-sheet Paper Deck Paper Delivery  Area (Option)
Route when Optional Equipment is attached
12
 Loading...