


K10158

This manual is provided for information purposes only. All information
included herein is subject to change without notice. Canon is not
responsible for any damages, direct or indirect, arising from or related
to use of this manual.
© 1999 Canon Inc. All rights reserved. Printed in Japan.
Trademark Notice:
Canon and BJ, BJC, and Bubble Jet are trademarks of Canon Inc.
Microsoft, Windows, the Windows Logo and MS-DOS are registered
trademarks of Microsoft Corporation in the US and other countries.
Other brand and product names may be trademarks or registered
trademarks of their respective companies.

■
FCC Regulations
Color Bubble Jet Printer, Model K10158
This device complies with Part 15 of the FCC Rules. Operation is
subject to the following two conditions: (1) This device may not cause
harmful interference, and (2) this device must accept any interference
received, including interference that may cause undesired operation.
Note: This equipment has been tested and found to comply with the
limits for class B digital device, pursuant to Part 15 of the FCC Rules.
These limits are designed to provide reasonable protection against
harmful interference in a residential installation. This equipment
generates, uses and can radiate radio frequency energy and, if not
installed and used in accordance with the instructions, may cause
harmful interference to radio communications. However, there is no
guarantee that interference will not occur in a particular installation. If
this equipment does cause harmful interference to radio or television
reception, which can be determined by turning the equipment off and
on, the user is encouraged to try to correct the interference by one or
more of the following measures:
• Reorient or relocate the receiving antenna.
• Increase the separation between the equipment and receiver.
• Connect the equipment into an outlet on a circuit different from that
to which the receiver is connected.
• Consult the dealer or an experienced radio/TV technician for help.
Use of Canon Cable BIFC-50 provided with the printer is required to
comply with class B limits in Subpart B of Part 15 of FCC Rules.
Do not make any changes or modifications to the equipment unless
otherwise specified in the manual. If such changes or modifications
should be made, you could be required to stop operation of the
equipment.
Canon U.S.A. Inc.
One Canon Plaza, Lake Success, NY 11042, U.S.A.
Tel No. (516) 328-5600
1

■
Canadian Radio Interference Regulations
This digital apparatus does not exceed the Class B limits for radio noise
emissions from digital apparatus as set out in the interference-causing
equipment standard entitled “Digital Apparatus”, ICES-003 of the
Industry and Science Canada.
Cet appareil numérique respecte les limites de bruits radioélectriques
applicables aux appareils numériques de Classe B prescrites dans la
norme sur le matériel brouilleur: “Appareils Numériques”, NMB-003
édictée par l’Industrie et Sciences Canada.
■
International ENERGY STAR®Program
As an ENERGY STAR®Printer, Canon Inc. has determined that this
product meets the ENERGY STAR®guidelines for efficiency.
The International ENERGY STAR®Office Equipment
Program is a global program that promotes energy saving
through the use of computer and other office equipment. The
program backs the development and dissemination of
products with functions that effectively reduce energy
consumption. It is an open system in which businesses can
participate voluntarily. The targeted products are office
equipment such as computers, monitors, printers, faxes and
copiers. Their standards and logos are uniform among
participating nations.
2

■
Table of Contents
Chapter 1 Introduction.....................................................................................6
How to use this manual.....................................................................6
Conventions ................................................................................7
Features and benefits ........................................................................8
Compact portable design.............................................................8
Excellent print quality and speed in both colour and black and
white ........................................................................................8
Options and supplies.........................................................................9
BJ Cartridges and ink cartridges.................................................9
Print media................................................................................11
Power supply.............................................................................12
Available options ......................................................................13
Chapter 2 Setting Up the Printer ..................................................................14
Selecting a location for your printer...............................................14
Examining the printer .....................................................................15
Front view .................................................................................15
Rear view ..................................................................................17
Operation panel.........................................................................17
Installing the battery pack...............................................................19
Connecting the printer to your computer........................................22
Connecting the parallel interface ..............................................22
Setting up the IrDA wireless interface......................................23
Attaching the AC adapter ...............................................................26
To connect the AC adapter........................................................26
Switching the printer on and off.....................................................27
Installing the BJ Cartridge..............................................................28
Choosing which BJ Cartridge to use.........................................28
BJ Cartridge guidelines.............................................................29
BJ Cartridge installation............................................................30
Performing a test print ....................................................................33
Installing and using printer drivers.................................................36
Installing a printer driver for Windows 98/Windows 95/
Windows 3.1..........................................................................36
Installing a printer driver for DOS applications........................36
Selecting a DOS printer driver from your software
application..............................................................................37
Chapter 3 Paper Handling.............................................................................38
Selecting paper types......................................................................38
Plain paper.................................................................................38
Special media............................................................................39
Envelopes..................................................................................39
Loading paper and other media ......................................................40
Chapter 4 Performing Test Prints.................................................................45
Starting the test prints.....................................................................45
Sample test prints............................................................................47
Demonstration...........................................................................47
Printer settings...........................................................................48
3
Table of Contents

Ripple pattern............................................................................48
Nozzle Check Pattern................................................................49
Font Sample ..............................................................................49
Hexadecimal dump test.............................................................50
Chapter 5 Colour Printing and Black-and-White Printing........................51
Switching between colour printing and black-and-white printing .51
Printing with Windows .............................................................51
Printing with DOS applications ................................................51
Preparing your printer...............................................................52
Changing the BJ Cartridges ......................................................52
Printing with a colour BJ Cartridge................................................57
The benefits of colour printing..................................................57
Selecting the print media...........................................................57
Understanding your software application’s capabilities...........58
Matching Colours displayed on your monitor with printouts...59
Colour and cost .........................................................................61
Chapter 6 Maintaining the Printer ...............................................................62
Recharging and replacing the battery pack.....................................62
Recharging the battery pack......................................................62
Replacing the battery pack........................................................64
Replacing ink cartridges .................................................................66
Handling ink cartridges.............................................................66
Examining the ink cartridges ....................................................67
Replacing an ink cartridge ........................................................68
Replacing BJ cartridges..................................................................72
Installing the Color Image Scanner Cartridge IS-12 ......................73
Removing the BJ Cartridge.......................................................73
Installing the Scanner Cartridge................................................75
Removing the Scanner Cartridge..............................................76
Cleaning the printer ........................................................................78
Before you start cleaning ..........................................................78
Cleaning inside and outside the printer.....................................79
Cleaning the print head .............................................................80
Preparing the printer for travel or storage.......................................81
Chapter 7 Troubleshooting............................................................................83
Check List.......................................................................................83
Errors indicated by the CHARGE/ERROR lamp...........................84
Clearing paper jams........................................................................86
Operational problems......................................................................87
Print quality problems.....................................................................89
White streaks, dots missing, or irregular dots...........................89
Colour printing problems................................................................92
Other printing problems..................................................................94
Where to Find More Help...............................................................97
4
Table of Contents

Appendix A Paper Specifications......................................................................99
Paper size........................................................................................99
Paper type .......................................................................................99
Paper weight ...................................................................................99
Printing area..................................................................................100
Paper and special media..........................................................100
Envelopes................................................................................101
Appendix B Code Pages and Character Sets.................................................102
Code pages....................................................................................102
Character sets................................................................................108
BJ mode...................................................................................108
LQ mode .................................................................................111
Appendix C Printer Command Summaries...................................................114
Entering a setup string in Lotus 1-2-3 ..........................................114
BJ mode command summary........................................................115
Basic control codes .................................................................116
ESCape sequence codes..........................................................116
Alternate Graphics Mode (AGM) codes.................................119
Miscellaneous control codes...................................................119
ESCape sequence code for colour printing.............................120
LQ mode command summary ......................................................120
Basic control codes .................................................................120
ESCape sequence codes..........................................................121
ESCape sequence code for colour printing.............................124
Appendix D Options and Supplies..................................................................125
Consumables.................................................................................125
Paper and special media................................................................126
Available options..........................................................................126
Appendix E Infrared Communications..........................................................127
System Requirements ...................................................................127
Before Installing the IR Communications Driver Version 2.0.....127
Appendix F Specifications...............................................................................130
Printer Specifications....................................................................130
Appendix G Interface Specifications ..............................................................134
Parallel interface...........................................................................134
IrDA interface...............................................................................134
Glossary..............................................................................................................135
Index...................................................................................................................146
5
Table of Contents

Chapter 1
Introduction
Congratulations on your purchase of the Canon BJC-50 Bubble Jet
Printer. We appreciate you choosing this printer to meet your printing
needs. The BJC-50 is compact, lightweight, and offers excellent colour
print quality. We hope you will be satisfied with this advanced Bubble
Jet technology.
■
How to use this manual
The user’s manual contains basic information about the printer, such as
initial setup procedures, basic operation, the use of supplies and options,
daily maintenance, troubleshooting, character sets, printer commands,
and so on. Read this manual carefully in order to get the most out of
your printer. The manual consists of eight sections.
Chapter 1 Introduction
Introduces the features, options, and supplies available for the printer.
Chapter 2 Setting Up the Printer
Gives instructions for setting up the printer and managing the printer
features. It also describes the printer’s components and gives advice on
caring for your printer.
Chapter 3 Paper Handling
Explains how to select the appropriate paper or special media and how
to load paper into the printer. It also gives precautions necessary for
handling print media.
Chapter 4 Performing Test Prints
Explains how to perform all the test prints.
Chapter 5 Colour Printing and Black-and-White Printing
Provides helpful hints on getting optimum results for colour printing
with the Color BJ Cartridge BC-11e and for black-and-white printing
with the Black BJ Cartridge BC-10.
6
Chapter 1 Introduction

Chapter 6 Maintaining the Printer
Explains how to replace ink cartridges and BJ Cartridges, clean the print
head and printer, and describes the proper procedures for printer
transportation and storage. Also describes installation of the optional
Color Image Scanner Cartridge IS-12.
Chapter 7 Troubleshooting
Gives detailed instructions for solving common problems. If you have
any difficulties, refer to this section.
Appendices
Lists paper specifications, character set tables, printer commands,
accessories and specifications.
Conventions
This manual employs the following conventions to alert you to
information that will help you use the printer safely and efficiently.
CAUTIONS ABOUT ACTIONS THAT COULD DAMAGE YOUR
HARDWARE OR SOFTWARE.
Advice or suggestions.
(☞12) A number preceded by this mark and enclosed in parentheses tells you
the page number where you can find more information about the
previous sentence or paragraph.
Read this first!
As you unpack the box check each item against this sheet to make sure
that you have everything. This sheet also shows you how to remove the
tape and packing material from the printer.
Quick Start Guide
The Quick Start Guide summarises the steps for setting up the printer
and installing the Windows printer driver. If you are familiar with
computers and printers, follow the steps in this illustrated guide to get
set up as quickly as possible.
7
Chapter 1 Introduction
1

■
Features and benefits
This section summarises the features and benefits of the BJC-50.
Compact portable design
The printer’s extremely compact design and light weight allow it to fit
easily into a briefcase. Despite its small size the printer has full colour
printing capability on plain paper and a variety of other media. The
rechargeable lithium-ion battery pack allows you to operate the printer
without connecting the AC adapter. The battery pack will print up to
100 pages of normal black text at 1,500 characters per page.
Excellent print quality and speed in both colour
and black and white
With the Windows Printer Driver, your printer can print colour at 720 x
360 dpi (horizontal x vertical) resolution. In addition, the new Color BJ
Cartridge BC-11e can generate two sizes of ink droplets. This feature
delivers superior print quality, especially with graphic images.
High quality ink
The BJ Cartridges contain high quality inks. The Black BJ Cartridge
BC-10 is used for black-and-white printing and the Color BJ Cartridge
BC-11e is used for colour printing. An advanced ink formula eliminates
many problems common to ink jet printers. These inks are not easily
affected by light. They dry quickly, look great on plain paper, and are
extremely smudge-resistant.
Quiet printing
The BJC-50’s non-impact printing operates quietly.
Simple maintenance
The BJC-50 uses removable print head units so it needs little
maintenance. The Color BJ Cartridge BC-11e has three main parts: a
colour ink cartridge, a black ink cartridge, and a print head unit. The
Black BJ Cartridge BC-10 has two main parts: one black ink cartridge
and a print head unit.
8
Chapter 1 Introduction

Wireless Connection
The BJC-50 has a built-in infra-red IrDA interface which enables a
wireless interface with a suitably equipped computer. If your computer
has an IrDA interface, this gives improved portability.
Scanner feature
By switching the black or colour BJ Cartridge with the optional Color
Image Scanner Cartridge IS-12, you can turn the printer into a colour
image scanner.
■
Options and supplies
Canon offers the following options and supplies. Whenever you need
any of these replaceable items, contact a local Canon Authorised
Dealer or your Canon marketing representative.
BJ Cartridges and ink cartridges
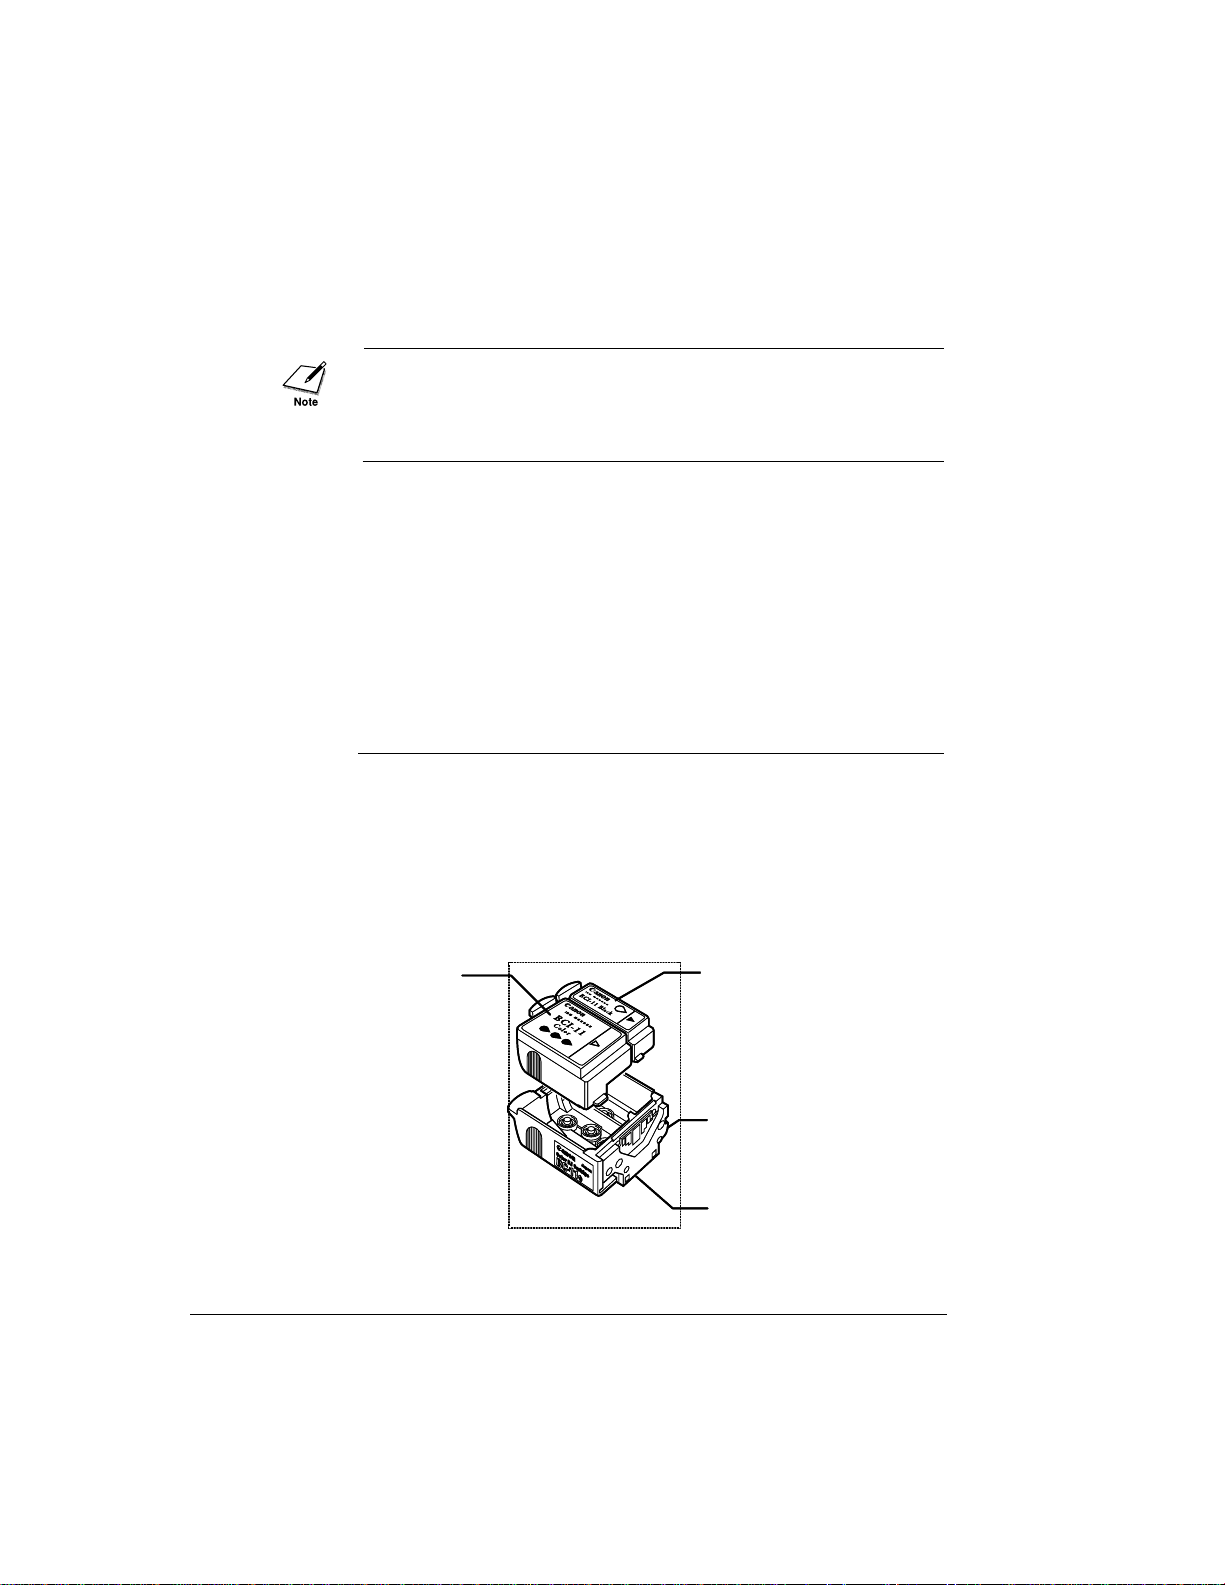
Color BJ Cartridge BC-11e
This cartridge incorporates a Bubble Jet print head unit and two
replaceable ink cartridges: BCI-11 Color and BCI-11 Black as
described below.
• BCI-11 Black: This is a replacement for the black ink cartridge used
in the Color BJ Cartridge BC-11e.
• BCI-11 Color: This is a replacement for the three-colour ink
cartridge used in the Color BJ Cartridge BC-11e.
9
Chapter 1 Introduction
1
Ink Cartridge BCI-11 Black
Ink Cartridge
BCI-11 Color
Print head unit
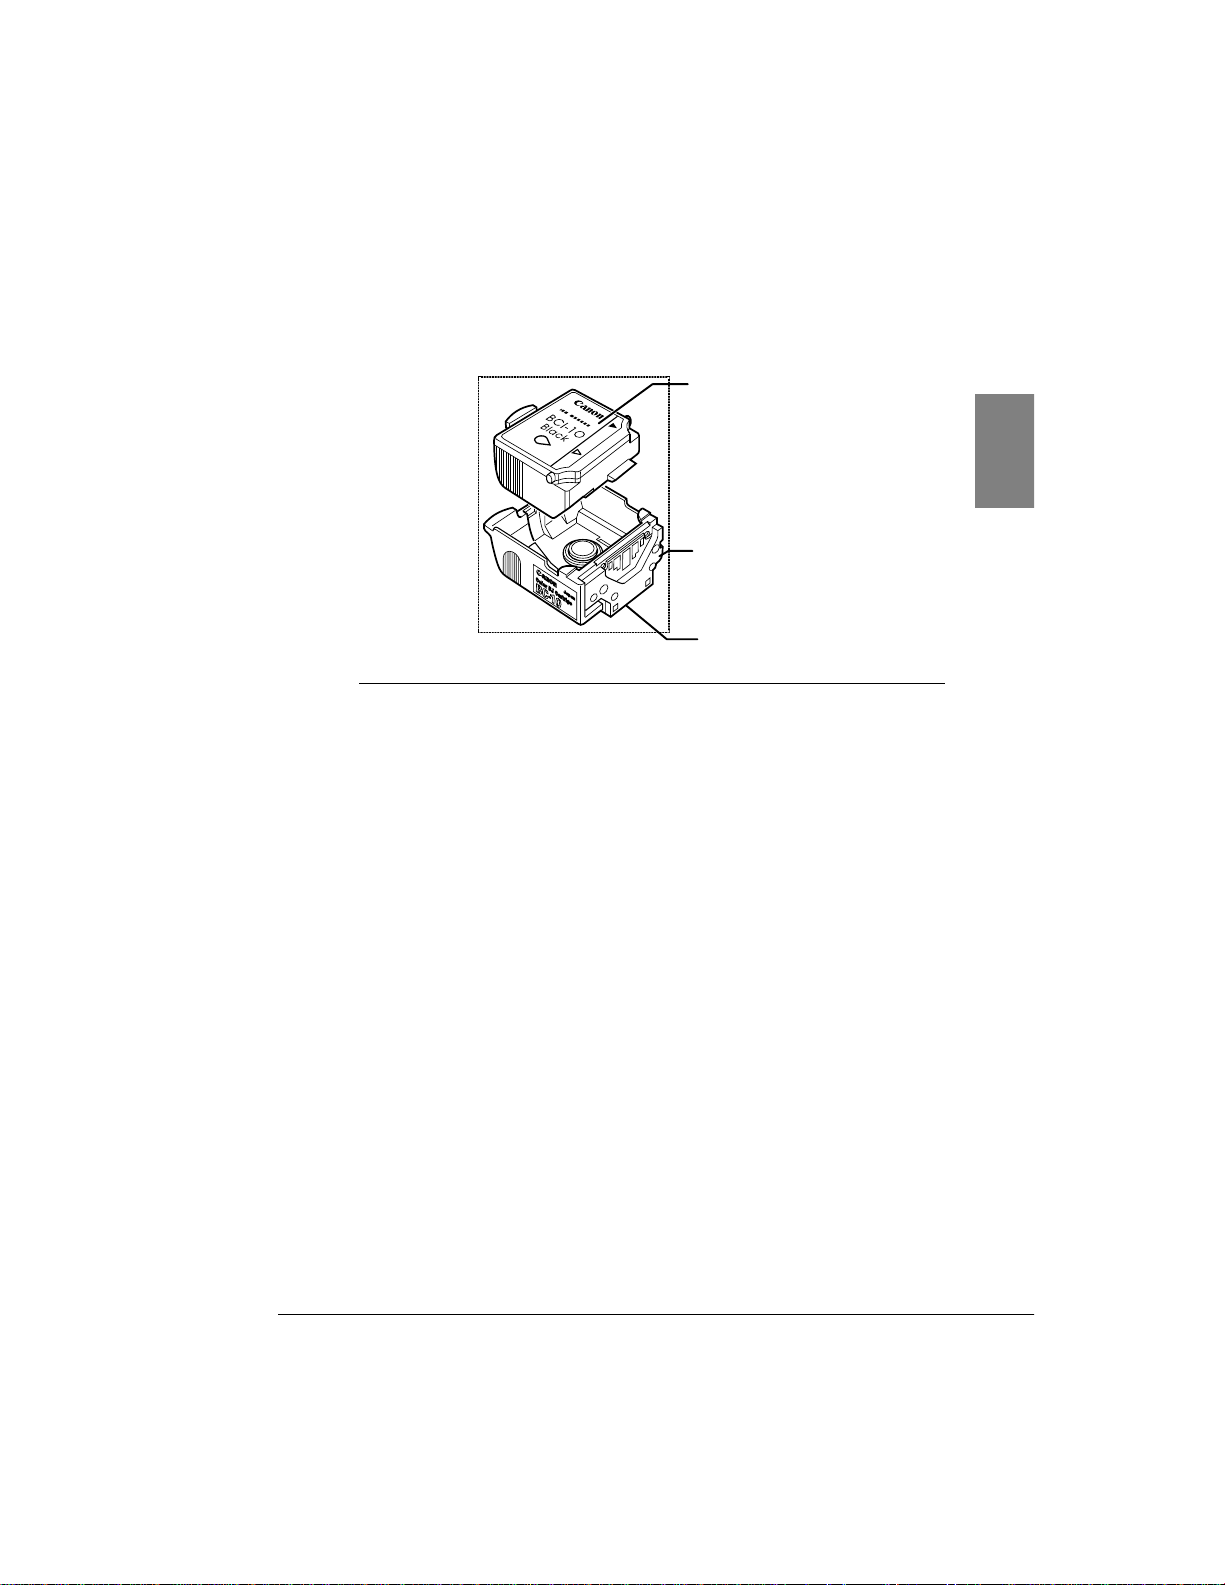
Black BJ Cartridge BC-10
This cartridge contains both a print head unit and replaceable black ink
cartridge. This cartridge is more cost-effective for black-and-white
printing and enables faster output.
• BCI-10 Black: This is a replacement for the black ink cartridge used
in the Black BJ Cartridge BC-10.
BJ Cartridge Storage Container SB-10
This is an optional extra storage container, like the one you received
with your printer, for storing a partially used Color BJ Cartridge BC11e or Black BJ Cartridge BC-10.
Color Image Scanner Cartridge IS-12
This optional Scanner Cartridge turns your printer into a colour scanner.
To use the printer as a scanner, you must have the optional Color Image
Scanner Cartridge IS-12, Windows 98/Windows 95 or Windows NT
4.0, and a Canon Printer Cable BIFC-50 (the IrDA interface is not
recommend for this function) to connect the printer and the computer.
The Color Image Scanner Cartridge IS-12 drops into the position
normally occupied by the BJ Cartridge.
You must install and use the IS Scan 1.20 scanner driver (supplied with
the printer) or higher. Earlier versions of this scanner driver do not work
correctly with the BJC-50.
10
Chapter 1 Introduction
Ink Cartridge BCI-10 Black
Print head unit

Print media
To extend the capabilities of your printer, Canon offers several types of
special print media.
High Resolution Paper HR-101
Use this coated high-grade matt paper to achieve stunning photo
images. The coating used on this paper is of a unique formula that
ensures full compatibility with your Canon colour inks. Use this paper
for crisp colour on a high-quality, non-glossy paper. A4 and Letter
sizes are available.
Bubble Jet Paper LC-301
Specially designed for Canon Colour Bubble Jet printers, this paper
produces sharp and vivid colour output with a more natural appearance.
This water-resistant plain paper has been developed by Canon for
optimum colour printing. This excellent value paper offers an affordable
alternative to plain paper for everyday use. A4 and Letter sizes are
available.
Transparencies CF-102
Transparencies (also called Over Head Projection film or OHP film)
will produce crisp and professional images and text for overhead
presentations. Other transparencies may either not feed correctly into
the printer or not allow the inks to dry properly leading to running and
smearing of the colours. Canon overhead transparencies are specially
designed to avoid these problems. A4 and Letter sizes are available.
Back Print Film BF-102
This unique Glossy Film allows you to print extremely high quality
colour photographic images and graphics. It can be viewed either using
rear illumination, such as a light box, or as a regular print. Back Print
Film is a mylar translucent sheet. When viewed with a light box, Back
Print Film provides a sharp, bright, and vivid presentation of
photographs, portraits, and graphics. It is great for trade show displays
and other special presentations. A4 and Letter sizes are available.
Glossy Photo Paper GP-301
The printer can produce sharp and vivid colour output on this highgrade Glossy Paper because this medium is water resistant and is fully
compatible with Canon colour inks. Use this paper for your printed
output that requires crisp colour rendering on a high-quality Glossy
Paper. A4 and Letter sizes are available.
11
Chapter 1 Introduction
1

Glossy Photo Cards FM-101
Glossy Photo Cards FM-101 have detachable edges that you can
remove after printing so that prints look like borderless photographs.
This media is ideal for printing items such as invitation cards. Feed
paper using the optional Auto Sheet Feeder ASF-50. For detailed
instructions about using this media, refer to the instruction sheet
provided with each packet of Glossy Photo Cards FM-101.
High Gloss Film HG-101
The printer produces sharp and brilliant colour output on this high grade
gloss film. High Gloss Film is fully compatible with your Canon colour
inks. Use this film for trade show displays or other special
presentations. You can gain sharper and more vivid colour output with
High Gloss Film than with Coated Paper or Glossy Paper. A4 and
Letter sizes are available.
Fabric Sheet FS-101 (241 x 356 mm)
This Fabric Sheet is specially designed for Canon Bubble Jet printers.
Use this printable white, cotton fabric to produce your own embroidery
designs, pillows, appliqués, and so on. For detailed instructions about
using this medium, refer to the instruction sheet provided with each
packet of Fabric Sheet FS-101.
T-Shirt Transfer TR-201 (216 x 279 mm) (TR-101 in the U.S.)
T-Shirt Transfers can be used to transfer a design onto cotton or
polyester cotton-blend fabric. For detailed instructions about using this
medium, refer to the instruction sheet provided with each packet of TShirt Transfers TR-201. T-Shirt Transfers are available in A4 or A3
sizes, but only the A4 size can be used with this printer.
Power supply
Canon Li-Ion Battery LB-50
A rechargeable, replaceable battery pack is installed inside the printer to
power the printer without a mains supply. To recharge the battery pack,
just connect the AC adapter. The battery pack will recharge while the
printer is on or off.
Universal AC Adapter AD-360U
This universal adapter can be used to supply power to the printer from
any power source and to recharge the battery pack. Use this AC adapter
when travelling to countries where the AC power differs from your
country. A power cord appropriate for your country comes with the
universal adapter.
12
Chapter 1 Introduction

Available options
The following options are available for use with this printer. For details,
contact your local Canon Authorised Dealer or Canon marketing
representative.
Canon Auto Sheet Feeder ASF-50
This optional sheet feeder can be easily and quickly installed on the
front of the printer and allows you to stack and feed more than one sheet
at a time for multi-sheet print jobs.
Color Image Scanner Cartridge IS-12
Turns your printer into a colour scanner.
BJ Cartridge Storage Container SB-10
Use to store partially used BJ Cartridges.
13
Chapter 1 Introduction
1

Chapter 2
Setting Up the Printer
This chapter describes how to set up the BJC-50. It offers guidelines on
finding a suitable location for the printer, explains how to unpack the
printer, and gives an overview of the printer’s components. Even if you
have already set up the printer by following the instructions in the Quick
Start Guide, read this section to become familiar with the parts of the
printer and how to use them more efficiently.
■
Selecting a location for your printer
Carefully read the following instructions before setting up your printer
in order to choose the best location.
• Choose a flat, sturdy surface with enough space to feed paper into the
front of the printer and to handle paper output at the back of the
printer.
• Avoid excessive heat or humidity, and avoid direct sunlight. Place
the printer where the temperature is stable and comfortable.
• Do not leave the printer in a vehicle, where it may be exposed to
extremely high temperatures.
14
Chapter 2 Setting Up the Printer
• Do not install the printer near devices which contain magnets or
generate magnetic fields.
• Do not subject the printer to strong physical shock or vibration.
• Keep the printer clean. Dust accumulation can prevent proper
functioning of the printer.
• Do not place objects on the top of the printer.
• The top cover and front cover should be closed when the printer is not
being used.
■
Examining the printer
Familiarise yourself with the printer’s parts and functions as described
below.
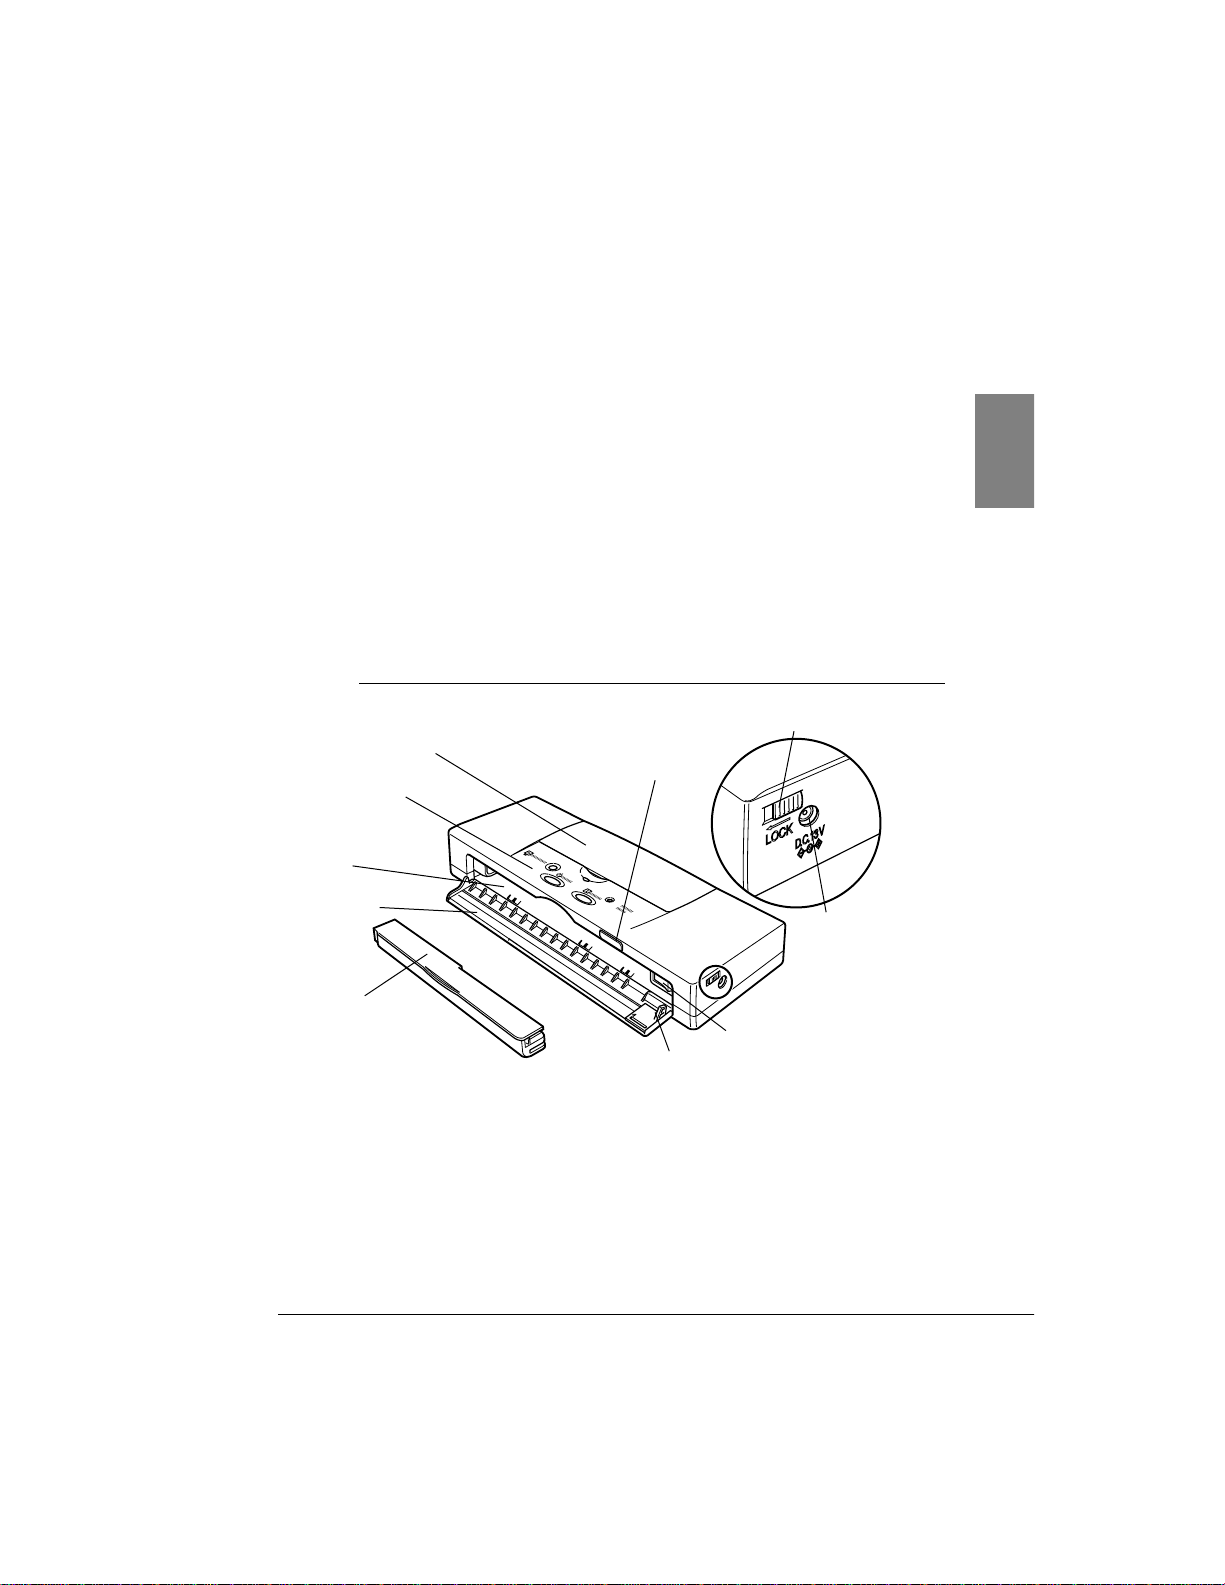
Front view
Top cover
Covers the paper and BJ Cartridge during printing. The top cover
should remain closed unless you are changing BJ Cartridges or
replacing an ink cartridge.
15
Chapter 2 Setting Up the Printer
2
Top cover
Operation panel
Auto Sheet Feeder
ASF-50 (option)
connector
Power
connector
Power lock switch
Battery pack
Battery pack release
Front cover
(open)
Feed slot
Paper Guide

Operation panel
Allows you to operate some functions.
Auto Sheet Feeder ASF-50 connector
Connects the optional Auto Sheet Feeder ASF-50 to the printer.
Power connector
Connects the printer to the AC adapter.
Power lock switch
After the power lock switch is slid to the right, you can press the
POWER button to switch the printer on and off. After the power lock
switch is slid to the left, you cannot switch the printer on, even if you
press the POWER button. This prevents the printer from being
switched on accidentally while it is being transported. Before
transporting the printer, always slide the power lock switch to the left.
Otherwise, leave the power lock switch at the right position so you can
operate the POWER button normally to switch the printer on and off.
Battery pack
The Canon Li-Ion Battery LB-50 provides power to the printer when
the AC adapter is not connected. When the AC adapter is connected, the
printer is powered from the AC adapter. When the battery pack requires
recharging, the CHARGE/ERROR lamp will start flashing green. To
recharge the battery pack, connect the AC adapter to the printer and to a
power outlet. When the battery pack is fully charged, the
CHARGE/ERROR lamp will go off.
Battery pack release
Push to the right to release the battery pack so you can remove it. Do
not remove the battery pack unless you are going to store the printer for
a prolonged period (three months or more).
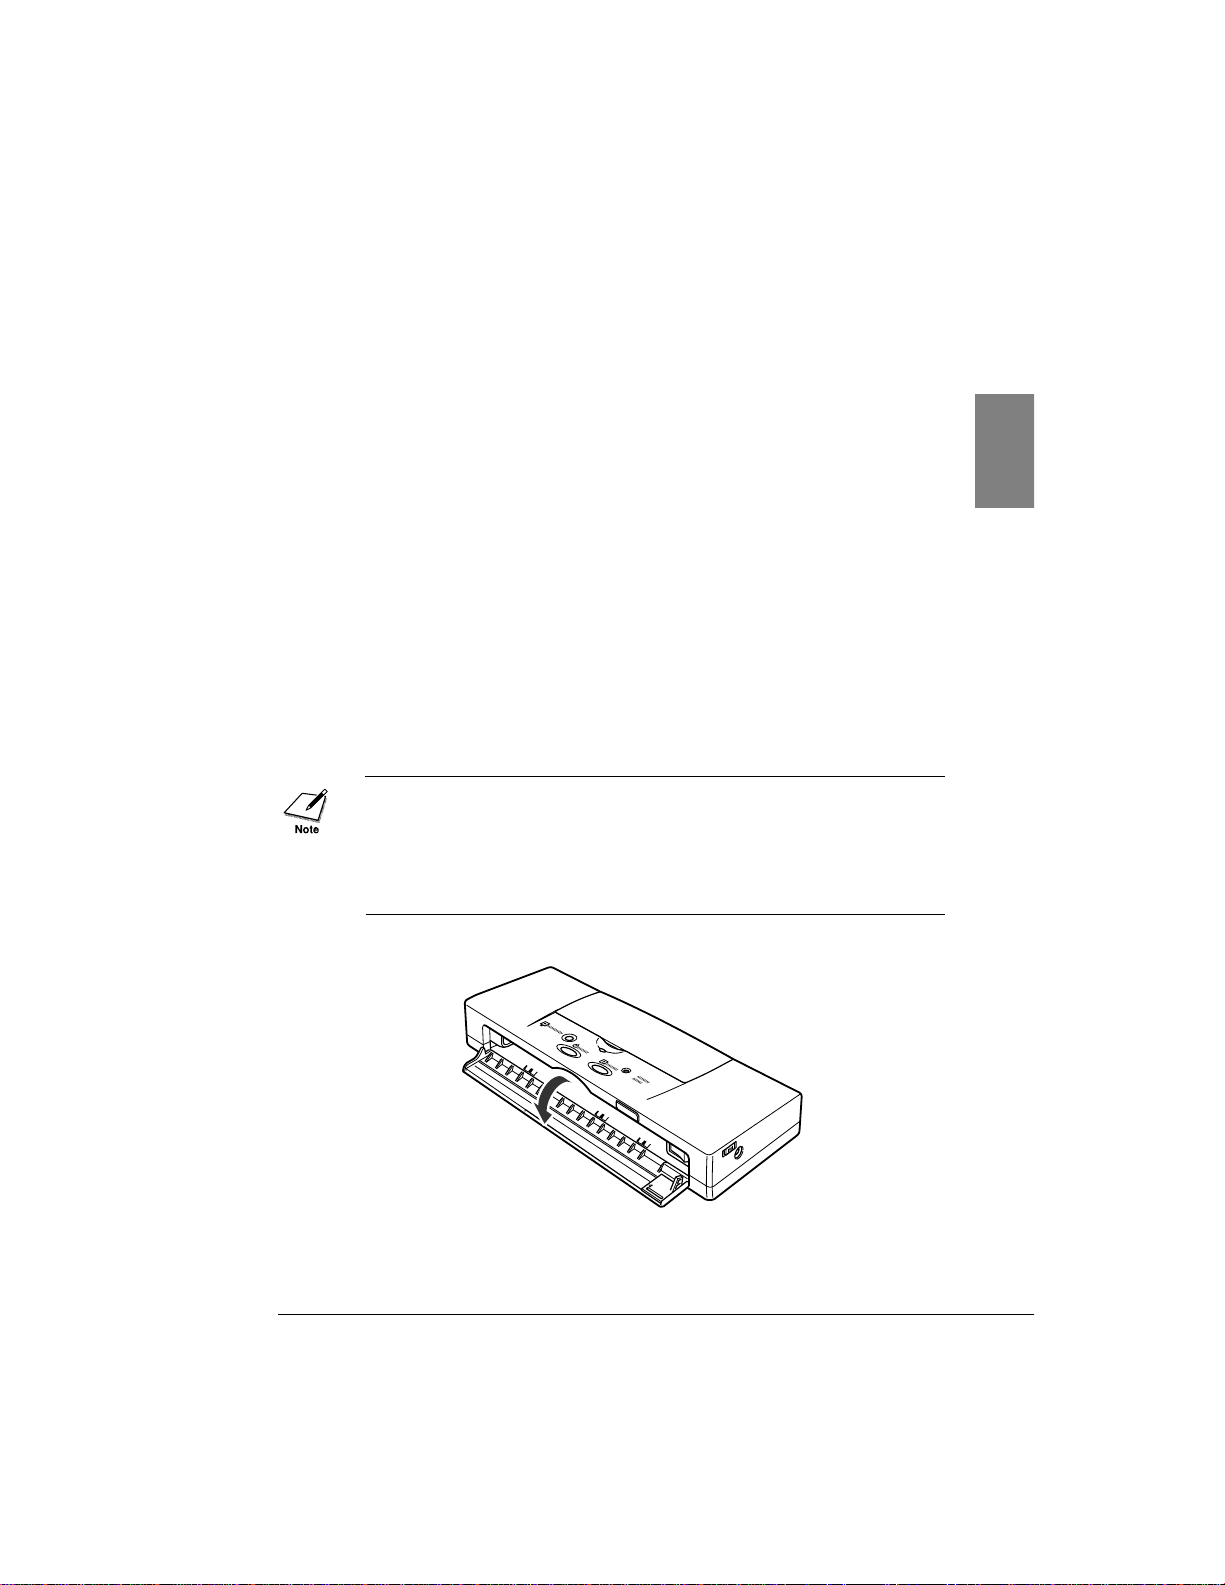
Front cover
When closed, covers the battery pack. Folds down so you can feed
paper and other media to the printer. Open the front cover only when
you are feeding paper or other media into the printer.
Feed slot
Allows you to feed one sheet of paper or other media for printing.
Always align the left edge of the sheet with the left side of the feed slot.
16
Chapter 2 Setting Up the Printer
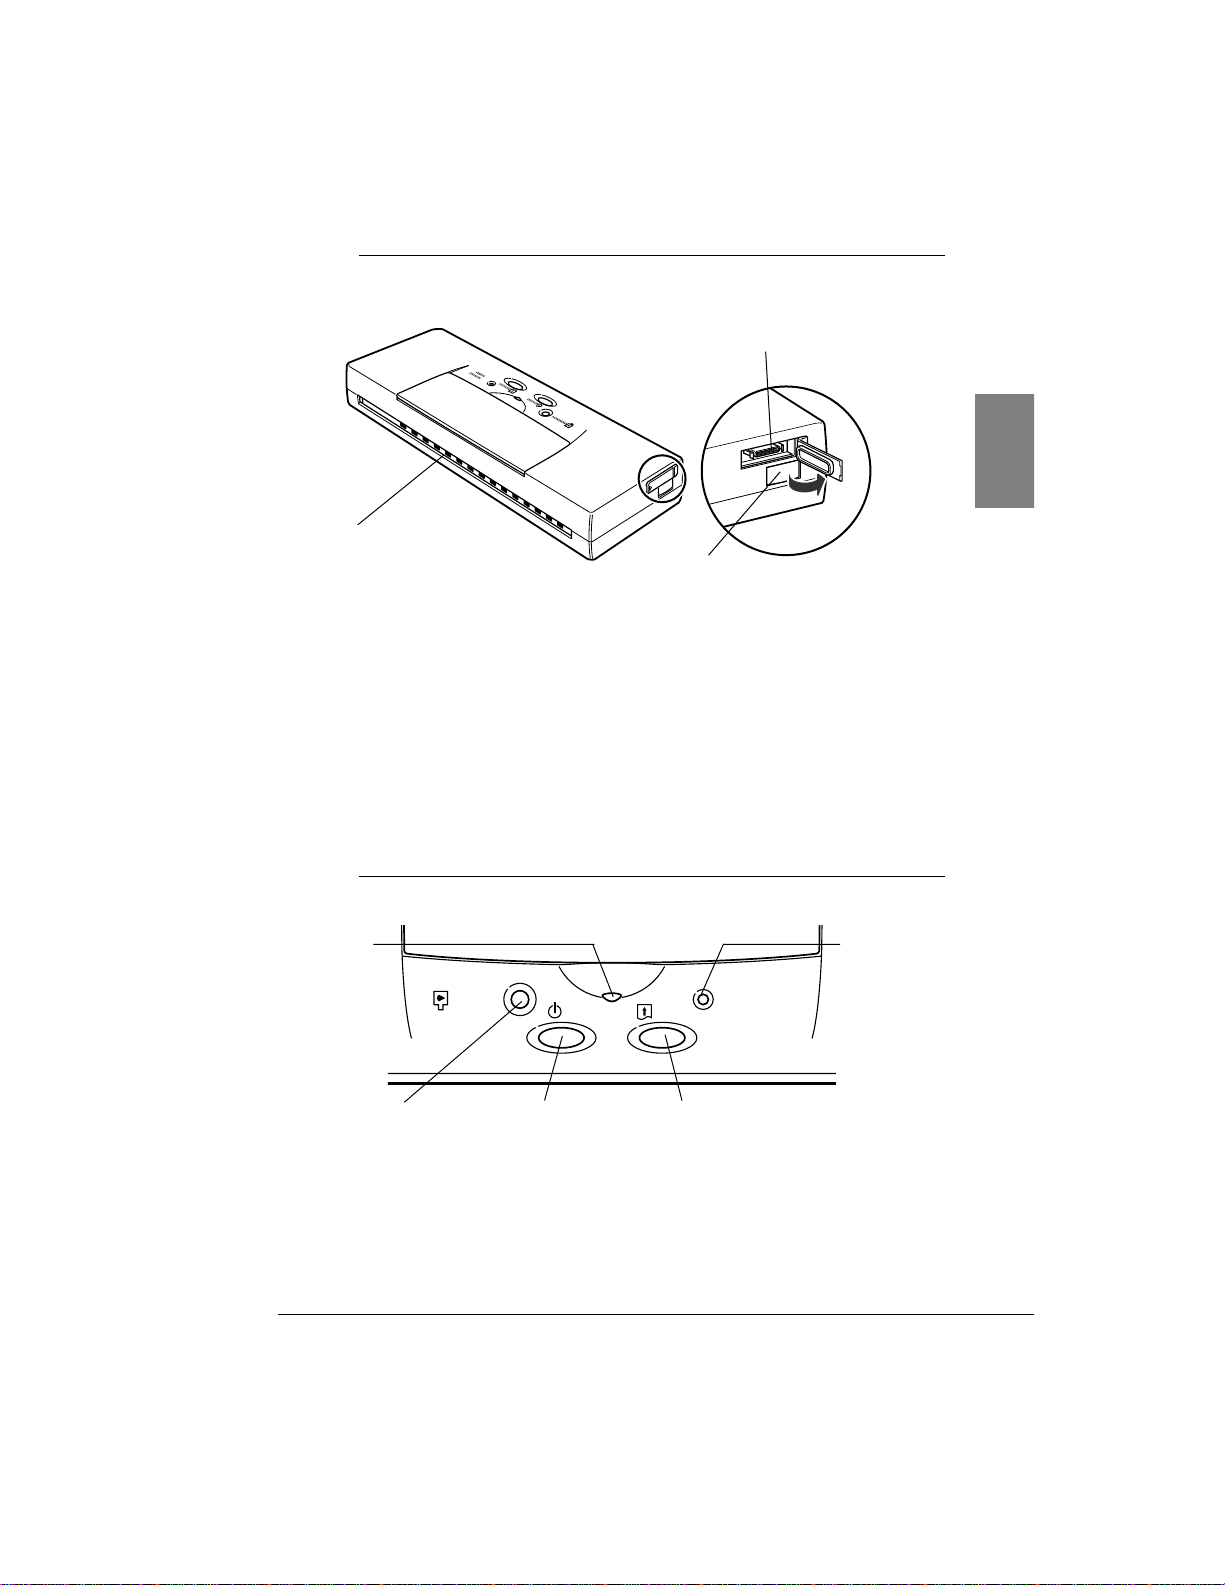
Rear view
Paper output slot
Ejects paper after it is printed. Place the printer on a flat clean surface
with enough space to support printed sheets as they are ejected.
Parallel interface connector
Connects the printer to the computer via the Canon Printer Cable
BIFC-50.
IrDA interface
Provides wireless connection between the printer and a computer
equipped with an IrDA interface.
Operation panel
CARTRIDGE button
Press to move the cartridge holder to the centre for switching BJ
Cartridges or replacing ink cartridges.
CARTRIDGE
POWER
ERROR
CHARGE
RESUME
17
Chapter 2 Setting Up the Printer
2
Paper output slot
Half-pitched parallel
interface connector
IrDA interface
CARTRIDGE button
POWER button
POWER
lamp
RESUME button
CHARGE/
ERROR
lamp

POWER button
Press to switch the printer on and off. You can also use the POWER
button to start test prints by holding down the POWER button after you
switch the printer on. Count the number of beeps then release to select
the type of test print you want to perform. (☞45)
POWER lamp
Flashes for a few moments after power on and then lights and stays on
to indicate that the printer is ready for normal operation.
The POWER lamp flashes in the following situations:
• During print head cleaning after you switch the printer on. The print
head is cleaned automatically every time you switch on the printer.
When the POWER lamp stops flashing, print head cleaning is
finished and the printer is ready for operation.
• During print head cleaning or flushing started from the operation
panel with the RESUME button, from the Windows printer driver.
• When the last page of a print job does not print.
• While you are performing routine print head maintenance such as
replacing an ink cartridge, replacing a BJ Cartridge, changing BJ
Cartridges, or replacing the BJ Cartridge with the Color Image
Scanner Cartridge IS-12.
RESUME button
Press to cancel errors and warnings. The RESUME button also
performs these important functions:
• Error recovery. After an error occurs, press once to return the printer
to the normal operation mode.
• Paper Feed. If the POWER lamp is flashing to signal that data
remains to be printed, insert a sheet of paper in the printer and press
RESUME once to print the remaining page of data.
Do not press the RESUME button when there is no paper in the feed
slot.
• Print head cleaning. Press and hold down the RESUME button for
two seconds until the printer beeps twice then release to start print
head cleaning. The POWER lamp flashes during print head cleaning.
(☞80)
18
Chapter 2 Setting Up the Printer
• Print head flushing. Press and hold down the RESUME button for
over two seconds until the printer beeps three times then release to
start print head flushing. The POWER lamp flashes during print head
flushing. (☞80)
CHARGE/ERROR lamp
When the printer is off and the AC adapter is connected to the printer
and plugged into the power mains, the CHARGE/ERROR lamp lights
and stays on while the battery pack inside the printer is recharging.
After the battery pack is fully charged, this lamp will go off.
When the printer is on, the CHARGE/ERROR lamp lights or flashes
orange when an error occurs. Remove the cause of the error then press
RESUME to resume normal operation. The first time you switch on the
printer, the empty cartridge holder will move to the centre. The
CHARGE/ERROR lamp will flash once and the printer will beep to
remind you to install a BJ Cartridge.
■
Installing the battery pack
Follow this procedure to install the battery pack in the printer.
Install only a Canon Li-Ion Battery LB-50 battery pack. You must install
the battery pack and leave it installed in the printer, even if you intend to
use the printer only with the AC adapter. If the battery pack is not
installed when you switch on the printer, the CHARGE/ERROR lamp will
light orange and the printer will beep six times.
1.
Open the front cover.
2.
If you are installing a new battery pack, remove the battery pack
from its package.
19
Chapter 2 Setting Up the Printer
2
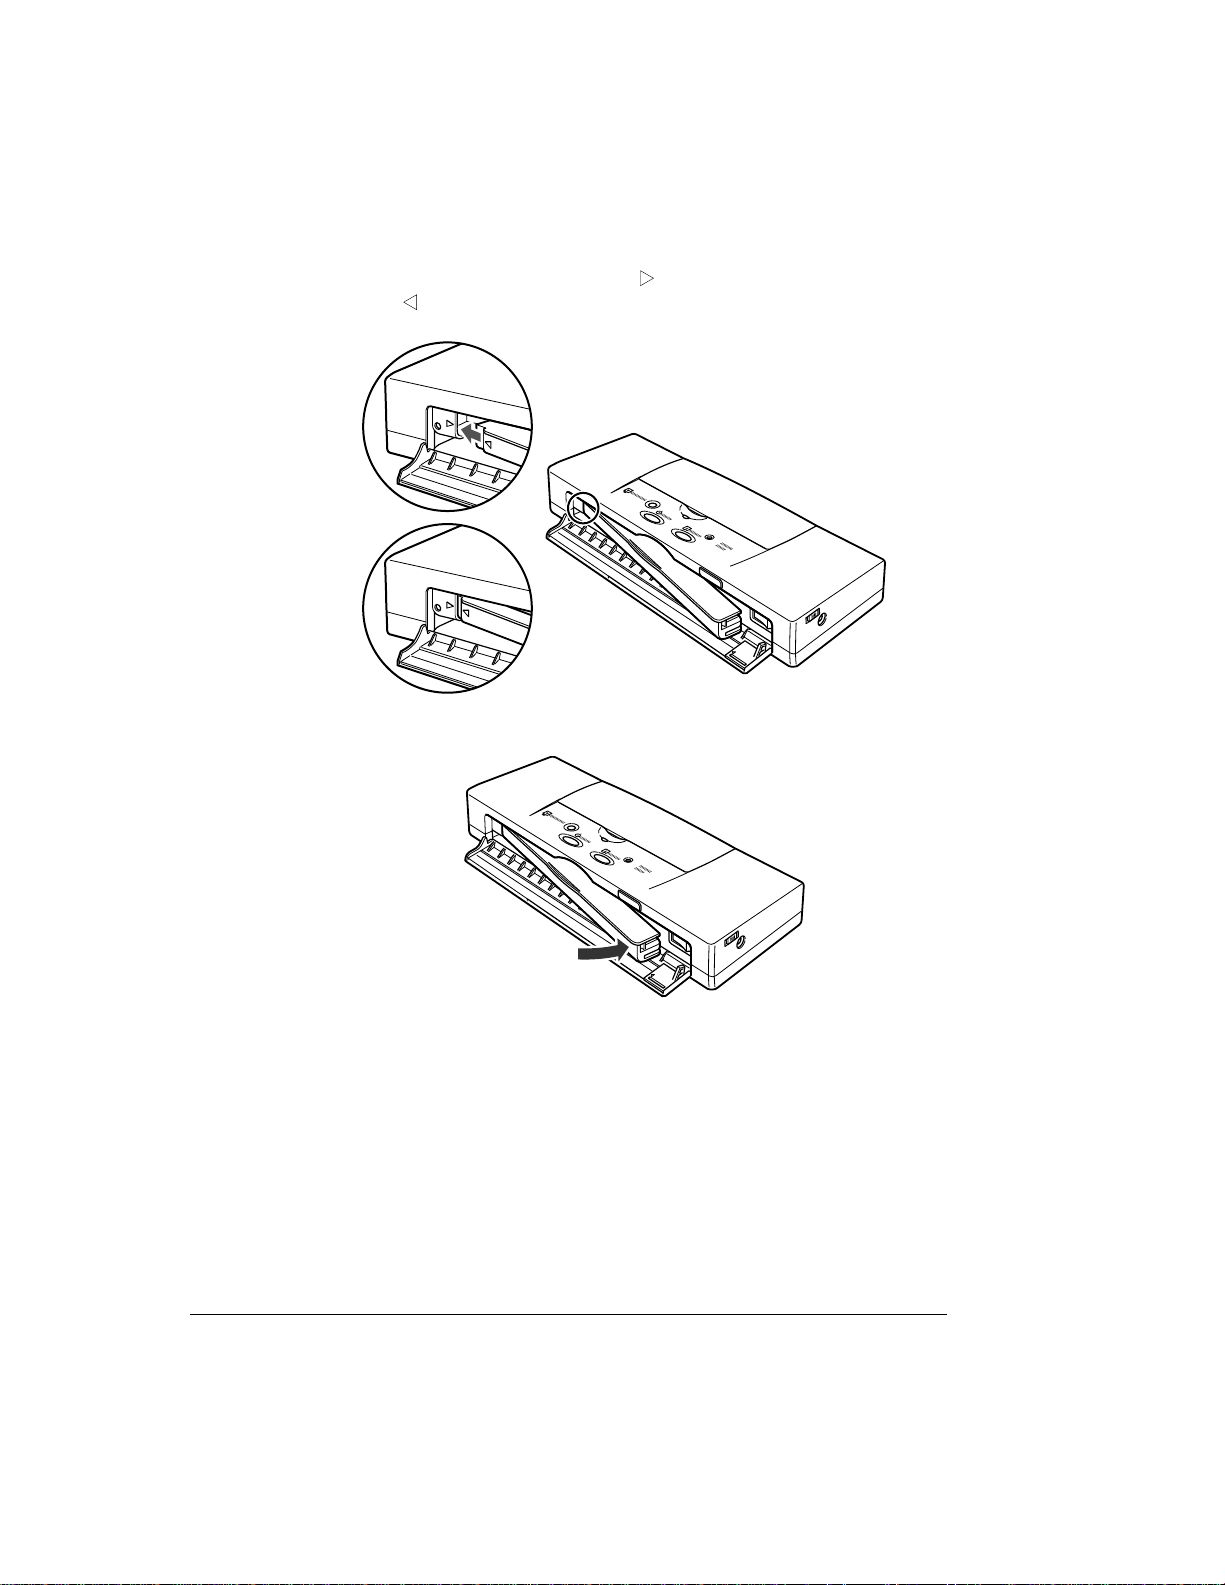
3.
Align the mark on the printer ( ) with the mark on the battery pack
( ) and insert the left end of the battery pack into the printer at a
slight angle.
4.
Push in on the right side of the battery pack to lock it in place.
5.
Close the front cover.
20
Chapter 2 Setting Up the Printer

FOLLOW THESE GUIDELINES WHEN STORING AND HANDLING
THE BATTERY PACK:
• A battery pack is not charged when purchased. You must charge the
battery pack for about 4 to 6 hours for it to reach full charge.
• For best results, use the battery pack at room temperature. At low
temperatures the capacity of the battery pack is diminished and it will
print fewer sheets between recharging sessions.
• Never attempt to recharge the battery pack with any device other than
the Universal AC Adapter AD-360U supplied with this printer.
• To avoid personal injury from an explosion, never expose the battery
pack to an open flame and never attempt to incinerate an old battery
pack.
• Used battery packs should be disposed of according to environmental
regulations in your country. For details, contact your Canon Authorised
Dealer or Canon representative.
• To avoid damaging the contacts on the corner of the battery pack,
avoid touching them with any metal object like a tool, jewellery, the
surface of a metal table, etc. Damaged contacts could cause leaking
and serious burns.
• To avoid personal injury from corrosive liquids, never attempt to
disassemble the battery pack.
• If any liquid from a leaking or broken battery pack gets into your eyes,
flush your eyes immediately with clean water and contact a physician.
• Never attempt to connect the battery pack directly to mains (house)
current or to a cigarette lighter socket in an automobile.
• Never attempt to use this battery pack for any purpose other than as a
power source for this printer.
• Never store a battery pack in a location above room temperature.
• Remove the battery pack immediately and contact your Canon
Authorised Dealer or Canon Representative if the battery pack shows
any signs of warping, releasing a strange odour, leaking fluid, or
overheating. However, do not be concerned if the battery pack feels
slightly warm during recharging; this is perfectly normal.
• If you intend to store the printer for a prolonged period (3 months or
more), remove the battery pack. Store the printer and battery pack in a
dust-free location away from direct sunlight.
• Always handle the battery pack with care to avoid dropping it and
damaging its casing and contacts.
21
Chapter 2 Setting Up the Printer
2
■
Connecting the printer to your computer
This printer is equipped with two interfaces. In addition to a parallel
interface, the printer also has a built-in IrDA interface for wireless
connection to a host computer equipped with an IrDA interface.
Connecting the parallel interface
A parallel interface port is provided for connection to IBM compatible
PC computers.
Follow the procedure below to connect the printer to the host computer
with the BIFC-50 printer cable.
To connect this printer to a computer via the parallel interface ports, you
must use the Canon Printer Cable BIFC-50 provided with this printer.
1.
Make sure the printer and computer are switched off.
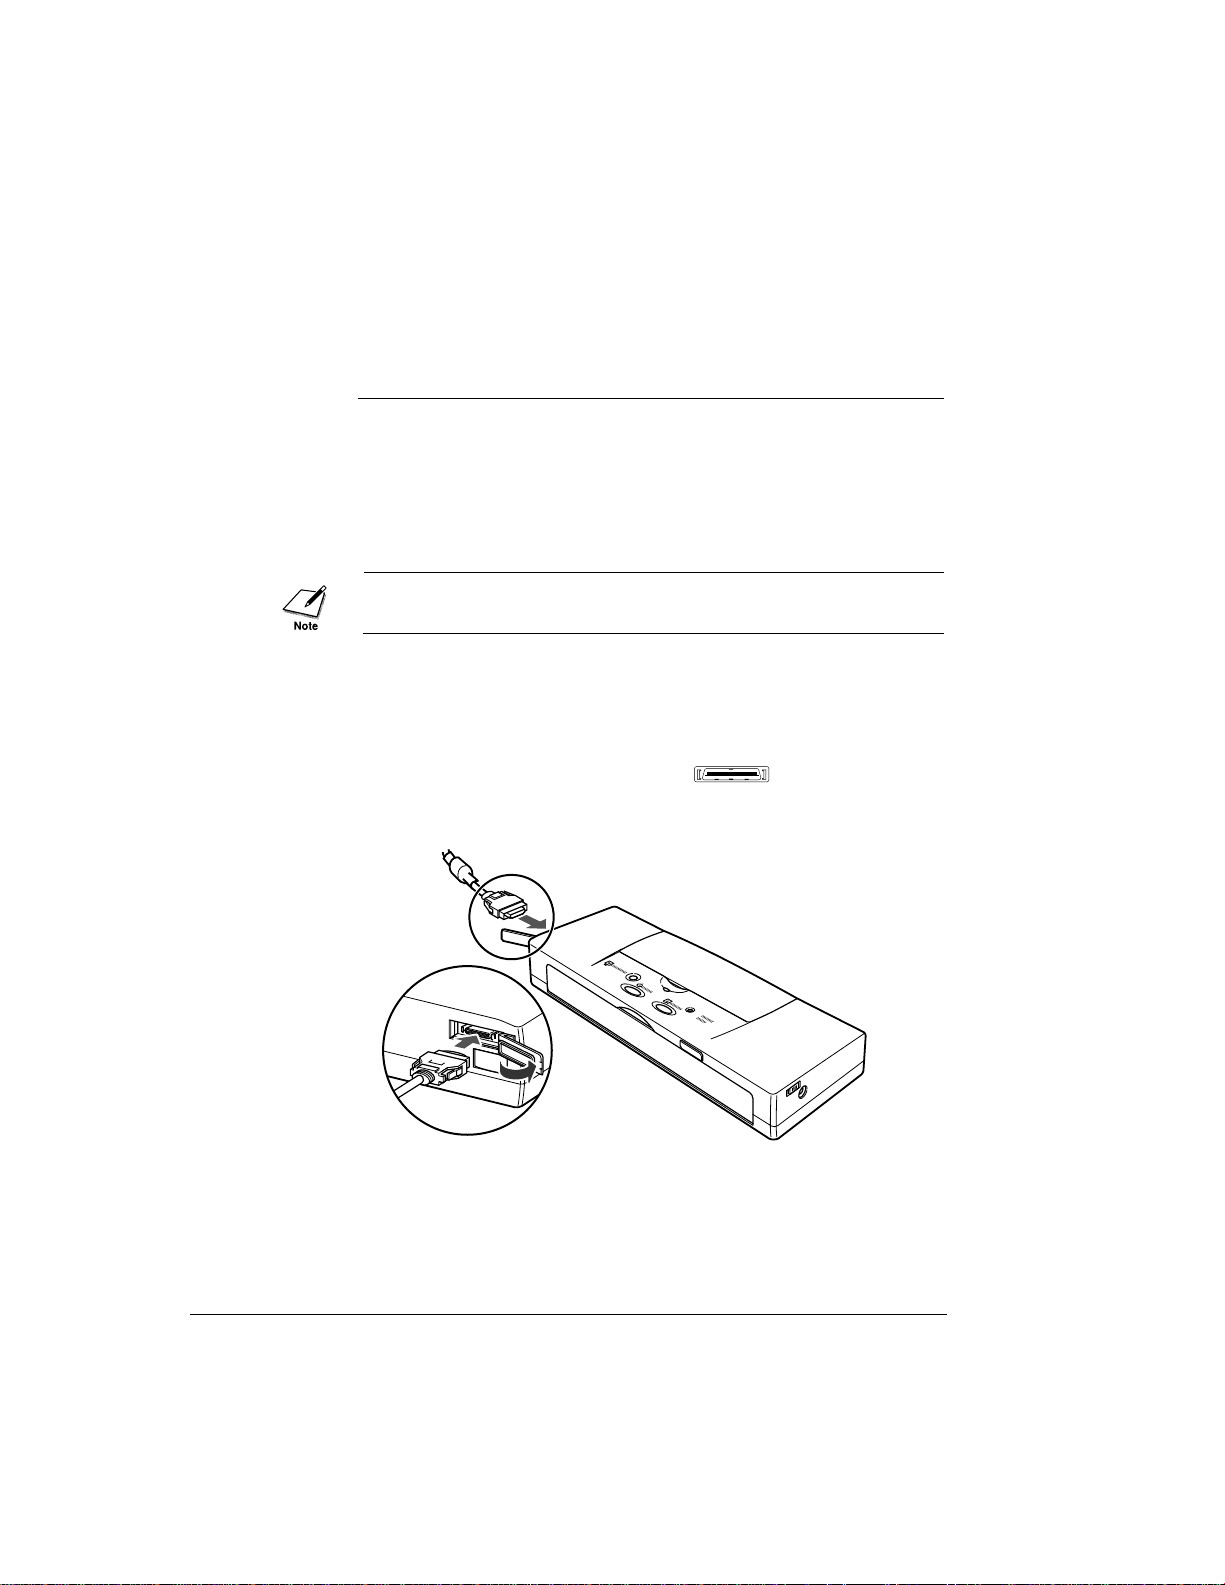
2.
Connect the small end of the BIFC-50 printer cable to the parallel
interface connector on the left side of the printer. Carefully match
the shape of the small D-connectors ( ) on the end of the
cable with the connector on the printer then push gently to connect
the cable to the printer.
22
Chapter 2 Setting Up the Printer

3.
Connect the large end of the BIFC-50 printer cable to the back of
the computer. Turn the screws on both sides of the connector to
fasten it securely.
Setting up the IrDA wireless interface
This printer is equipped with an IrDA 1.0 compatible infra-red wireless
communication interface port (115.2 kbps). The IrDA interface is very
popular among notebook or laptop computer users because no cable
connection between the printer and computer is required.
In order to use the IrDA wireless interface, your computer must be
equipped with an IrDA interface and have an Microsoft IR Comm
Driver (infra-red driver) Ver. 2.0 for Windows 95 installed. For other
reguirements, please see Appendix E.
Even if your computer has an IrDA interface port, you still may not be
able to use the Microsoft IR Comm Driver Ver. 2.0. To determine
whether your computer IrDA interface supports Microsoft IR Comm
Driver Ver. 2.0, contact the Help Desk of your computer manufacturer.
23
Chapter 2 Setting Up the Printer
2
Follow this procedure to set up the printer for data transfer via the IrDA
interface
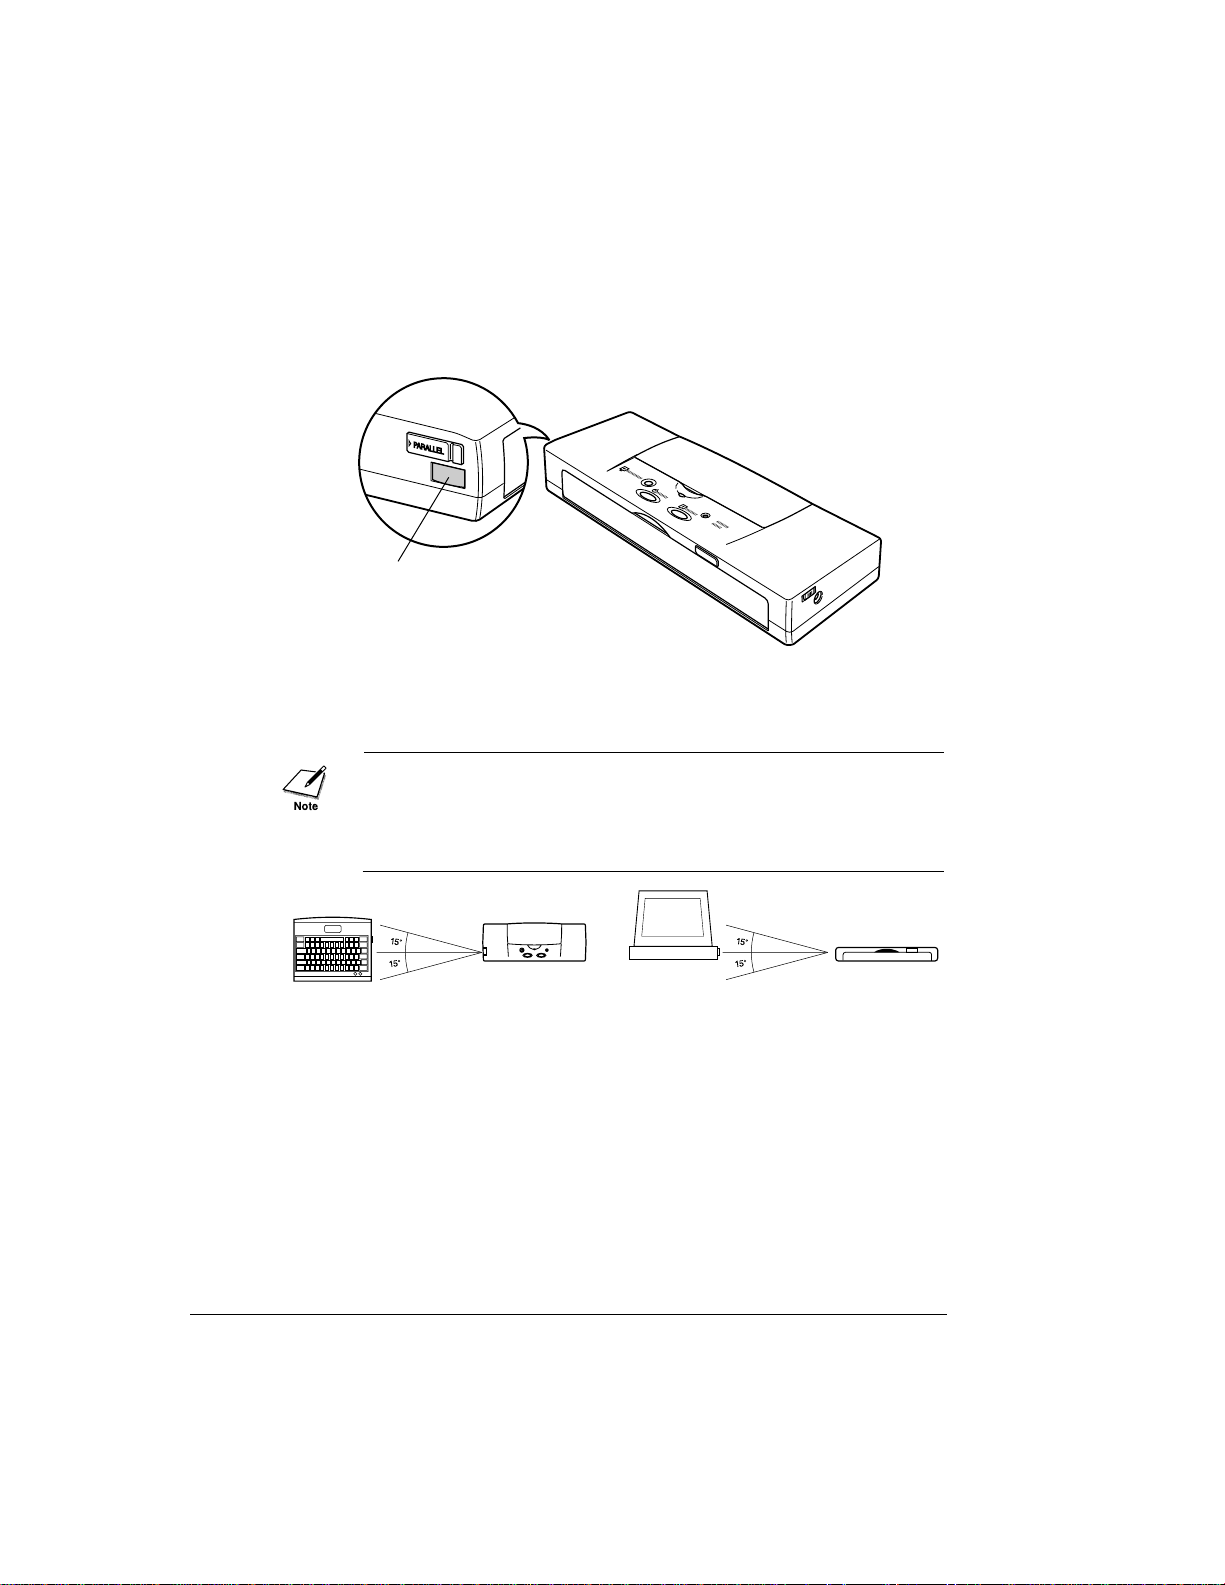
1.
The printer IrDA interface is on the left side of the printer, below the
parallel interface connector.
2.
Locate the IrDA interface on the computer. Arrange the printer so
the IrDA interface ports are facing one another.
The IrDA interface ports must face one another and be approximately
level, within a range of 15 degrees left or right, 15 degrees up or down
and not more than 1 metre (3 ft.) apart.*
*May vary depending on the specific computer, PDA, and communication protocol used.
The following conditions may reduce the reception range of the
IrDA interface.
• If another IrDA device is attached.
• If another infra-red device, like a set of wireless headphones or a
remote controller, for example, is broadcasting in the same area.
• If the IrDA port is exposed to sunlight, fluorescent light, or any
other strong light source like a large torch.
• If the IrDA port is not clean. Clean it with a soft, dry cloth if the
port is smudged or dirty.
24
Chapter 2 Setting Up the Printer
IrDA interface

3.
Make sure the computer is set up for IrDA operation.
To use IrDA successfully, make sure the following conditions are
satisfied:
• You must use Windows 95.
• Make sure the infra-red driver Microsoft IR Comm Driver Ver.
2.0 has been installed.
• Make sure a COM port has been selected for IrDA with the Printer
Wizard. Allocation of a port for an IrDA wireless interface may
depend on the computer you are using. Usually COM4 can be
selected as an external serial (COM) communications port. For
details about how your system configuration, refer to your
computer manual.
• Make sure the BJC-50 is selected as the default printer with the
BJC-50 printer driver.
• Only the Microsoft IR Comm Driver Ver. 2.0 can be used as the
IrDA driver for the BJC-50. Other IrDA drivers cannot be used.
• The IrDA interface cannot detect the printer status and reset the
printer. If communication between the printer and computer is
interrupted and the print job is stopped, the printer is initialised
automatically. (The buffer memory of the printer is cleared and
the paper is ejected.)
25
Chapter 2 Setting Up the Printer
2

■
Attaching the AC adapter
Read the following precautions before attaching the AC adapter.
Use only the Universal AC Adapter AD-360U supplied with the printer.
• Always use the AC adapter indoors, never outdoors.
• In case of trouble (smoke, odd smells, etc.), unplug the AC adapter
immediately.
• Do not place anything in front of your power outlet that may obstruct
your access to the power supply or put pressure on the AC adapter or
its cord.
• When unplugging the AC adapter, always remove it by pulling the
connector, never by pulling the cord.
• Do not unplug the AC adapter until you have switched off the printer.
After you switch off the printer if the CHARGE/ERROR lamp
flashes green, this means the battery pack power is low. Leave the AC
adapter connected to the printer and plugged into a power outlet so
the battery pack can be recharged. While the battery pack is charging,
the CHARGE/ERROR lamp lights and remains on until the battery
pack is fully charged. (The time required for recharging is four to six
hours.) When the CHARGE/ERROR lamp goes off, the battery pack
is fully charged.
USE ONLY THE AC ADAPTER SUPPLIED WITH THE PRINTER. DO
NOT USE AC ADAPTERS FOR OTHER CANON BJ PRINTERS OR
ADAPTERS INTENDED FOR USE WITH OTHER ELECTRONIC
DEVICES.
To connect the AC adapter
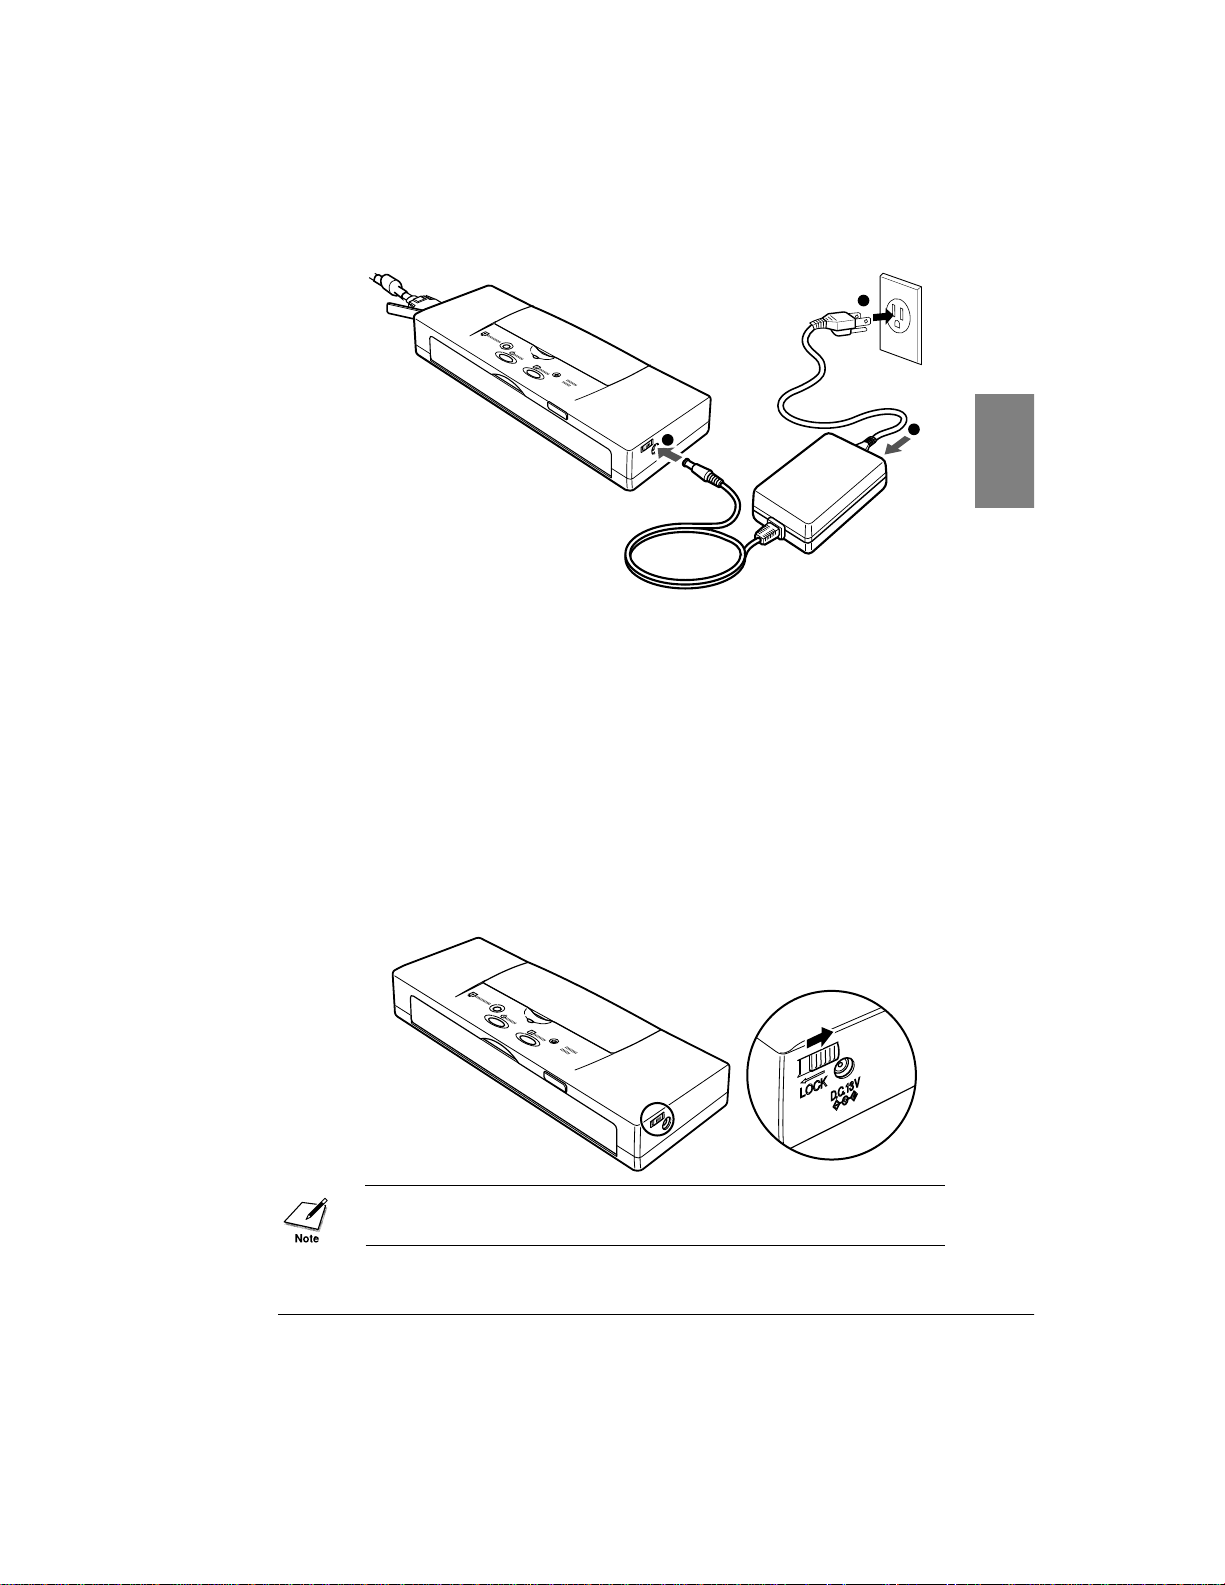
1.
Connect the power cord ➊to the AC adapter.
2.
Insert the DC plug ➋into the printer.
3.
Insert the power cord ➌into a power source.
26
Chapter 2 Setting Up the Printer
• If the printer is not switched on and the battery requires
recharging, the CHARGE/ERROR lamp will light green and
remain on to indicate that the battery pack is recharging.
• To recharge the battery pack, switch off the printer and connect
the AC adapter if it is not already connected. When the battery
pack is fully charged, the CHARGE/ERROR lamp will go off.
(☞62)
■
Switching the printer on and off
1.
Before you switch the printer on, check the power lock switch on the
right side of the printer. If the power lock switch is in the left
position, slide it to the right.
When the power lock switch is in the left position, it locks the power
switch off so it cannot be switched on accidentally during transportation.
2
1
3
27
Chapter 2 Setting Up the Printer
2
2.
To switch the printer on, press the POWER button.
3.
To switch the printer off, press the POWER button.
The printer has an energy saving Auto Power Off feature which will
power off the printer automatically if the printer remains idle for 30
minutes. To turn this feature off, or to set the idle time interval, open the
printer driver and adjust these settings on the Control tab.
■
Installing the BJ Cartridge
This printer is shipped with a colour and black BJ Cartridge one of
which must be installed before you can use the printer. Each BJ
Cartridge contains removable ink cartridges and a print head unit which
releases the ink.
The Color BJ Cartridge BC-11e is mainly for colour printing and the
Black BJ Cartridge BC-10 is for monochrome printing. Select the
cartridge based on your print job (colour or monochrome).
Choosing which BJ Cartridge to use
Color BJ Cartridge BC-11e
Use this cartridge for printing in colour. Use the BC-11e whenever you
want to produce brilliant colour output. Do not waste the black ink
cartridge of this colour BJ Cartridge by printing drafts of black-andwhite text documents. Use the colour BJ Cartridge only for printing
colour.
28
Chapter 2 Setting Up the Printer
Ink Cartridge
BCI-11 Color
When the colour ink
runs out, replace
only this ink
cartridge.
Ink Cartridge
BCI-11 Black
When the black ink
runs out, replace only
this ink cartridge.
Print head unit
Print head
Color BJ Cartridge BC-11e
Black BJ Cartridge BC-10
Use this cartridge for printing in black and white for draft output. When
the BC-10 is installed your output will print faster. The BC-10 is also
more cost effective for monochrome printing because it can print more
pages per cartridge than the BC-11e.
BJ Cartridge guidelines
Canon manufactures several types of BJ Cartridges, but you must use
only the BJ Cartridges designed for this printer. To ensure the best
performance with the BJC-50, use only Canon Color BJ Cartridge BC11e or Canon Black BJ Cartridge BC-10. Canon cannot guarantee your
print quality if you use any other type of BJ Cartridge.
To avoid drying out the ink, clogging the print head, or ink leakage,
follow these simple precautions:
• Do not unpack a BJ Cartridge until you are ready to use it.
• Keep the BJ Cartridge out of the reach of children. If spilled, the ink
is difficult to clean.
• Install the BJ Cartridge in the printer immediately after removing the
protective cap and protective tape.
• Never shake a BJ Cartridge.
• Never attempt to disassemble a BJ Cartridge.
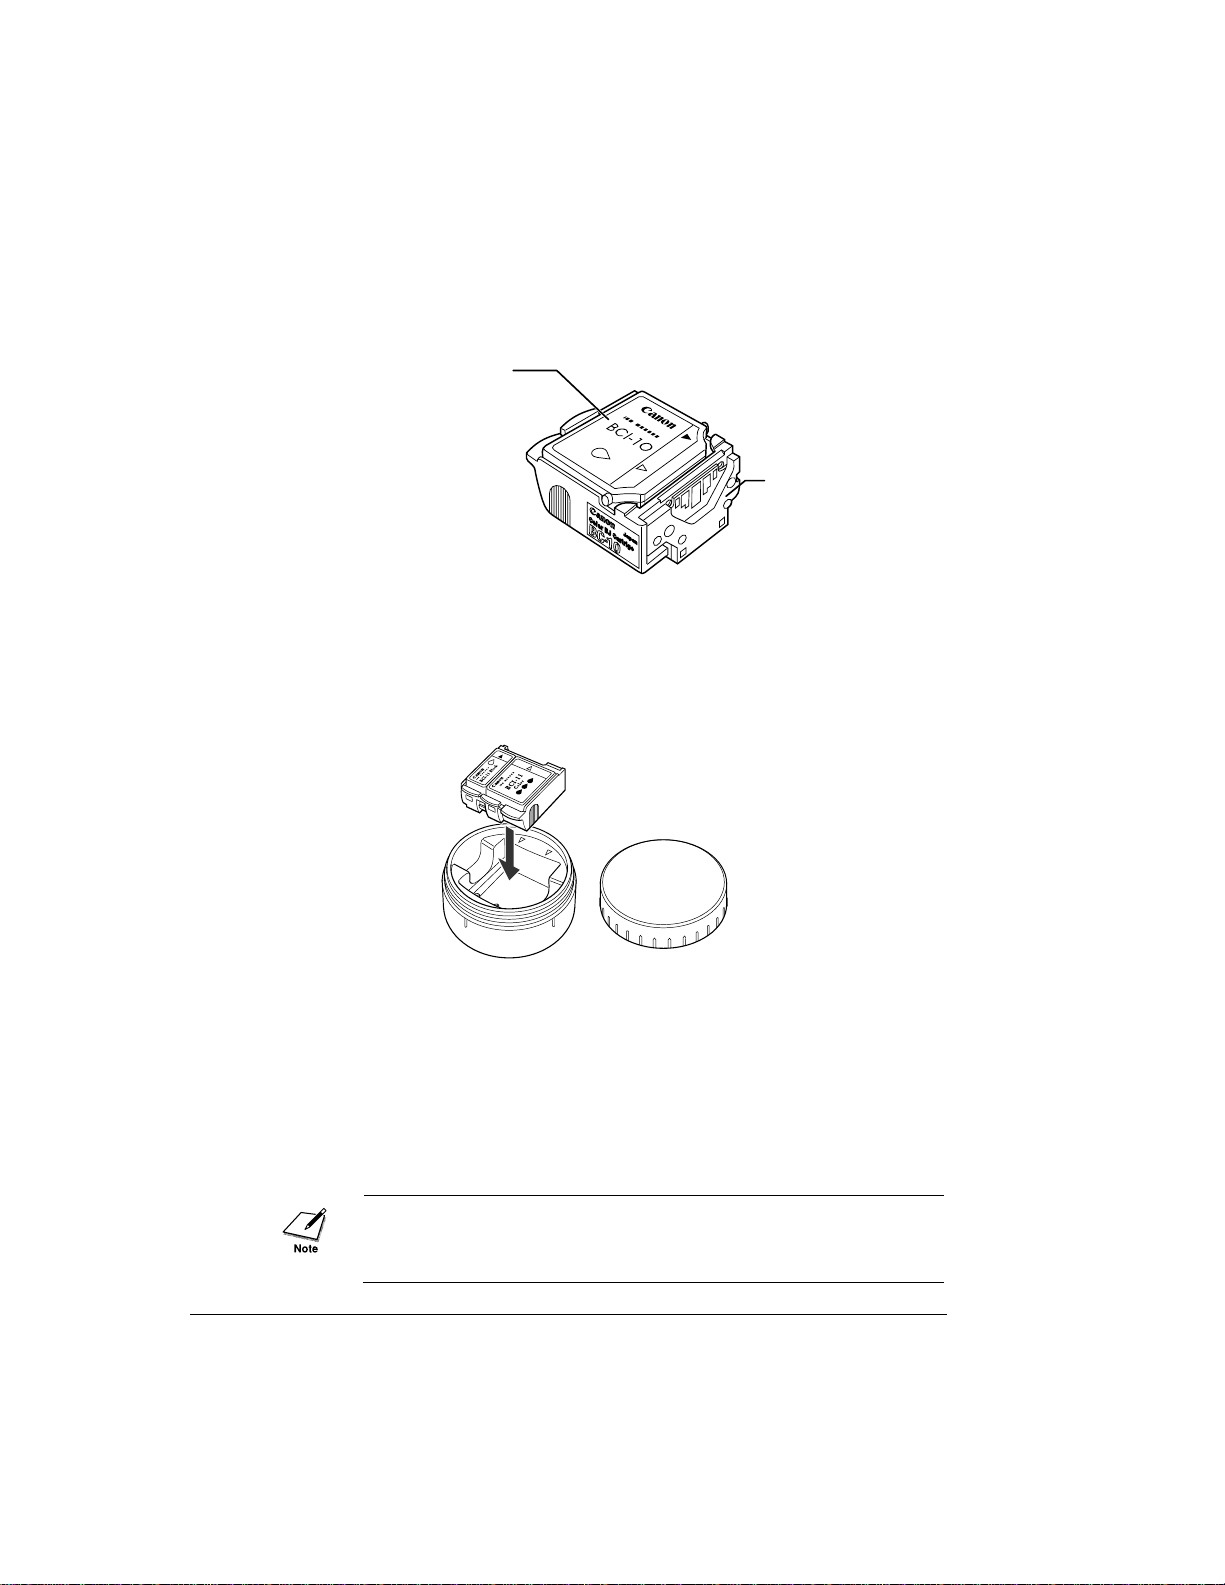
• Never place a BJ Cartridge on a table with the print head facing
down.
• The BJ Cartridge must be installed in the printer or be stored in the BJ
Cartridge Storage Container SB-10. If the print head is left uncapped,
the print head may dry out.
29
Chapter 2 Setting Up the Printer
2
Black BJ Cartridge BC-10
Ink Cartridge
BCI-10 Black
When the black ink runs
out, replace only this ink
cartridge.
Print head unit
Print head
 Loading...