


TES 711..
en |
Operating instructions |
nl |
Gebruiksaanwijzing |
fr |
Notice d’utilisation |
cs |
Návod k použití |
it |
Istruzioni per l’uso |
ru |
Инструкция по |
|
|
|
эксплуатации |
en |
...................................................................................................................................7 |
fr ................................................................................................................................. |
29 |
it ................................................................................................................................. |
52 |
nl ................................................................................................................................. |
76 |
cs ................................................................................................................................. |
99 |
ru ............................................................................................................................... |
121 |
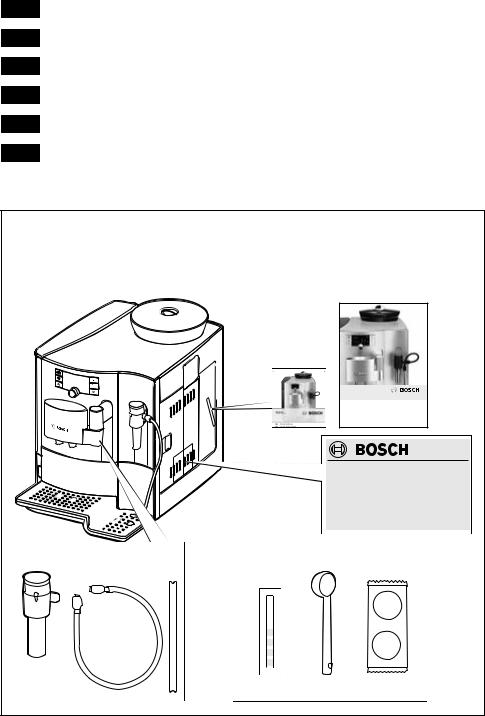
Included in delivery (see page 7) / Contenu de l’emballage (voir page 31) Contenuto della confezione (ved. pagina 53) / Leveringsomvang (zie pagina 77)
Rozsah dodávky (informace naleznete na straně 101)
Объем поставки (см. стр. 122)
1 |
2 |
|
|
3 |
|
|
|
||
|
TES 711.. |
|
|
|
|
da |
Brugsanvisning |
fi |
Käyttöohje |
|
no |
Bruksanvisning |
es |
Instrucciones de uso |
|
sv |
Bruksanvisning |
pt |
Instruções de serviço |
E-Nr. ……… FD… …
4
5 6 7
A |
|
5a 5b 5c |
|
||
2 |
8 |
|
3 |
7 |
|
4 |
4 |
|
15 6
16 17
12 
11
 18
18
10 |
19 |
9 
20
1
23 
25 
24 
B
13
14
27
11
C |
D |
24 23
 26
26
10a  c b
c b
d
25

E |
|
|
I |
|
|
|
|
22 |
II |
|
|
21 |
21b |
21a |
III |
|
IV |

6
Table of Contents
Included in delivery...................................... |
7 |
Overview..................................................... |
7 |
Before using for the first time...................... |
8 |
Controls....................................................... |
9 |
––Power on / off switch O / I.......................... |
9 |
––Customising button á............................. |
9 |
––Service programmes button à................. |
9 |
––Rotary knob.............................................. |
9 |
––Selection buttons < and >..................... |
9 |
––Display................................................... |
10 |
––Start button............................................ |
10 |
––j button and settings.............................. |
10 |
––Adjusting the grinding unit...................... |
11 |
––Display settings...................................... |
12 |
––Customising........................................... |
13 |
––Child-proof lock...................................... |
14 |
Menu settings............................................ |
15 |
––Coffee temp. ......................................... |
15 |
––Hot Water temp...................................... |
15 |
––Language .............................................. |
15 |
––Profile exit.............................................. |
15 |
––Auto off after .......................................... |
15 |
––Contrast................................................. |
15 |
––Water hardness..................................... |
15 |
––Water filter............................................. |
16 |
––Transport. lock ...................................... |
16 |
––Factory reset.......................................... |
16 |
Preparation using coffee beans................. |
17 |
Preparation using ground coffee............... |
18 |
Preparing milk froth and warm milk........... |
18 |
Dispensing hot water................................. |
19 |
Maintenance and daily cleaning................ |
19 |
––Cleaning the milk system....................... |
19 |
––Cleaning the brewing unit...................... |
20 |
Service Programmes ................................ |
21 |
––Cleaning the milk system....................... |
21 |
––Descaling............................................... |
22 |
––Cleaning................................................. |
23 |
––Calc‘n‘Clean........................................... |
23 |
Tips on energy saving............................... |
24 |
Frost protection......................................... |
25 |
Storing accessories................................... |
25 |
Accessories............................................... |
25 |
Disposal..................................................... |
25 |
|
en |
Guarantee................................................. |
25 |
Simple troubleshooting.............................. |
26 |
Technical specifications............................. |
28 |
Safety instructions
Please read the operating instructions carefully and keep them for future reference!
This fully automatic espresso machine is designed for preparation of small amounts of coffee for domestic use or for use in non-commercial, householdlike environments, such as staff kitchens in shops, offices, agricultural and other small businesses or for use by guests at bed-and-breakfast establishments, small hotels and similar residential facilities.
¡¡Risk of electric shock!
Connect and operate the appliance only in accordance with the specifications on the rating label.
Do not use if either the power cord or the appliance is damaged.
Use indoors at room temperature only. This appliance is not intended for use by persons (including children) with reduced physical, sensory or mental capabilities, or lack of experience and knowledge, unless they have been given supervision or instruction concerning use of the appliance by a person responsible for their safety.
Keep children away from the appliance. Children should be supervised to ensure that they do not play with the appliance.
In the event of malfunction, unplug the appliance immediately.
To avoid potential hazards, repairs such as replacing a damaged cord should only be performed by our service personnel.
Never immerse the appliance or power cord in water.
Do not reach into the grinding unit.
Use the appliance only in frost-free rooms.
Robert Bosch Hausgeräte GmbH

en |
|
|
|
|
7 |
The milk frother 10 for milk and hot water |
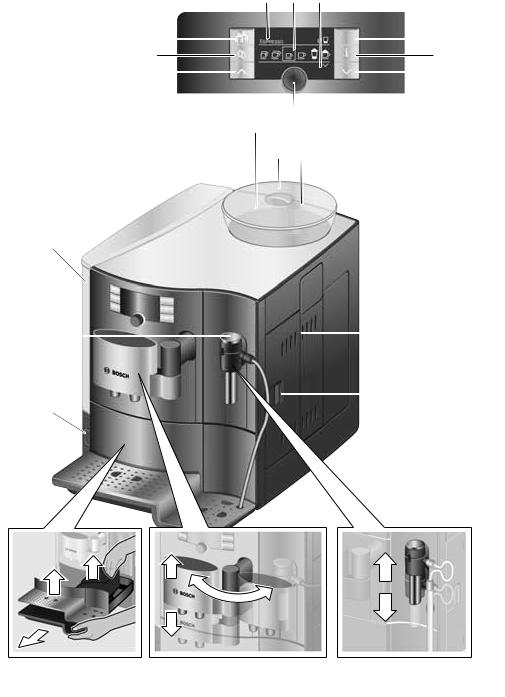
Overview |
||||
¡¡Risk of scalding! |
|
|
|
|
|
gets very hot. After use, allow to cool down |
(Figures A, B, C, D and E on the fold-out |
||||
first before touching. |
pages) |
|
|
||
Included in delivery |
1 |
Power on / off switch O / I |
|||
2 |
Customising button á |
||||
|
|
3 |
Service programmes button à |
||
(see overview image at the start of the |
4 |
Selection buttons < > |
|||
instructions) |
5 |
Display |
|||
|
|
|
a) Status line |
||
1.Fully. |
automatic espresso |
|
b) Selection line |
||
machine TES711 |
6 |
c) Navigation line |
|||
2.Quick reference guide |
Rotary knob for display settings |
||||
3.Instruction manual |
7 |
Info menu button j |
|||
4.Milk frother |
8 |
start. |
button (drinks / programmes) |
||
5.Water hardness testing strip |
9 |
Coffee. |
outlet |
||
6.Measuring spoon |
10 |
height-adjustable and swivelling |
|||
7.Cleaning tablets |
.Milk frother |
||||
|
|
|
height-adjustable and removable. |
||
|
|
|
(milk / hot water) |
||
|
|
|
a) Upper part |
||
|
|
|
b) Lower part |
||
|
|
|
c) Tube |
||
|
|
11 |
d) Milk pipe |
||
|
|
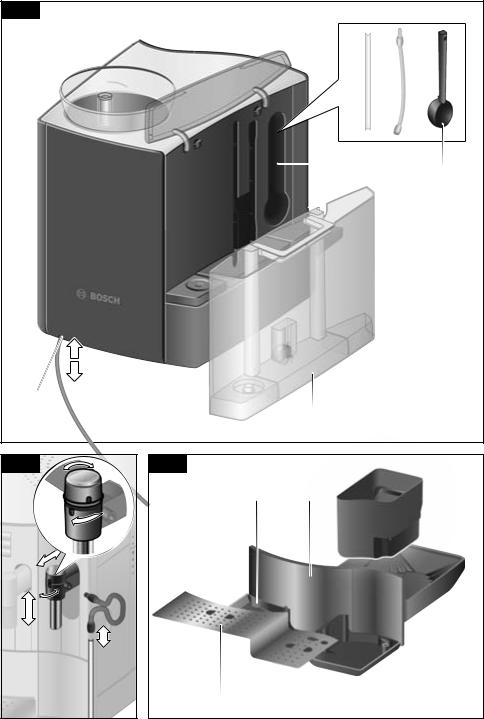
Removable water tank |
|||
|
|
12 |
Lid for water tank |
||
|
|
13 |
.Storage compartments |
||
|
|
|
(measuring spoon and milk frother |
||
|
|
14 |
accessories) |
||
|
|
.Measuring spoon |
|||
|
|
15 |
(insertion aid for water filter) |
||
|
|
Bean container |
|||
|
|
16 |
Aroma cover |
||
|
|
17 |
Selector for grind setting |
||
|
|
18 |
.Drawer (ground coffee / cleaning tablet) |
||
|
|
19 |
Door to brewing unit |
||
|
|
20 |
Door opener |
||
|
|
21 |
Brewing unit |
||
|
|
|
a) Sliding button |
||
|
|
22 |
b) Lock |
||
|
|
.Storage compartment for quick |
|||
|
|
23 |
reference guide |
||
|
|
Drip tray panel |
|||
|
|
24 |
Drip tray |
||
|
|
25 |
Cup stand |
||
|
|
26 |
Coffee grounds container |
||
|
|
27 |
Cable storage compartment |
||
TES711 | 04/2012
8
Dear Coffee Connoisseur,
Congratulations on purchasing this fully automatic espresso machine from Bosch. Please also note the enclosed quick reference guide. .
It can be kept in the special storage compartment 22 until it is needed.
Before using for the first time
General
Fill the water tank with fresh, cold, uncarbonated water only, and preferably use only beans for fully automatic coffee and espresso machines. Do not use coffee beans that have been glazed, caramelised or treated with other additives containing sugar, since they will block the brewing unit.
The water hardness setting can be adjusted on this appliance. The factory default setting for the water hardness is 4. Check the water hardness with the enclosed test strip. If a value other than water hardness 4 is displayed, change the setting on the appliance accordingly after switching on (see “Menu settings” ‒ “WATER HARDNESS”).
Switching on the appliance
●●Place the fully automatic espresso machine on a flat, water-resistant surface that can take its weight.
Important: Only use the appliance in frost-free rooms. If the appliance has been transported or stored at temperatures below 0 °C, wait at least 3 hours before operation.
●●Pull the power cord out of the storage compartment 27 and plug in. Adjust the length of the cable by pushing it back in or pulling it out. The easiest way to do this is to place the appliance so that its back is flush with the edge of the counter and either pull the cable downward or push it upward.
en
●●Lift the lid of the water tank 12. ●●Remove and rinse the water tank 11 and fill it with fresh cold water. .
Do not fill above the “max” mark. ●●Replace the water tank 11 and push it firmly downward into place.
●●Close the lid of the water tank 12 again. ●●Fill the bean container 15 with coffee beans.
●●Press the power switch 1 O / I. The start button 8 lights up and the different languages appear in the display 5.
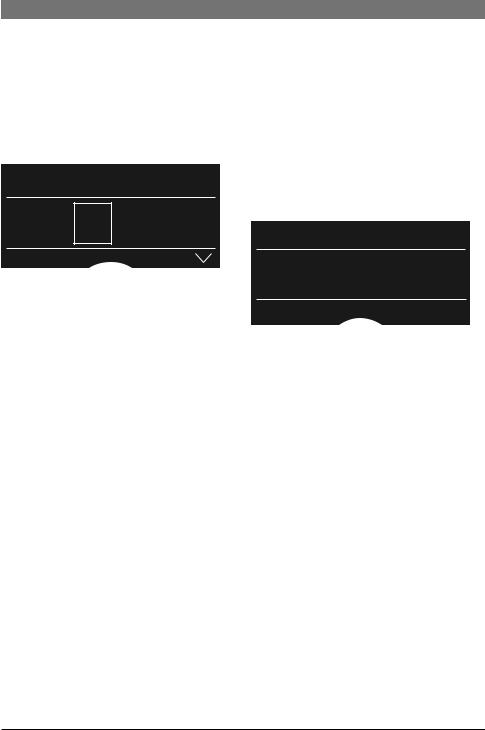
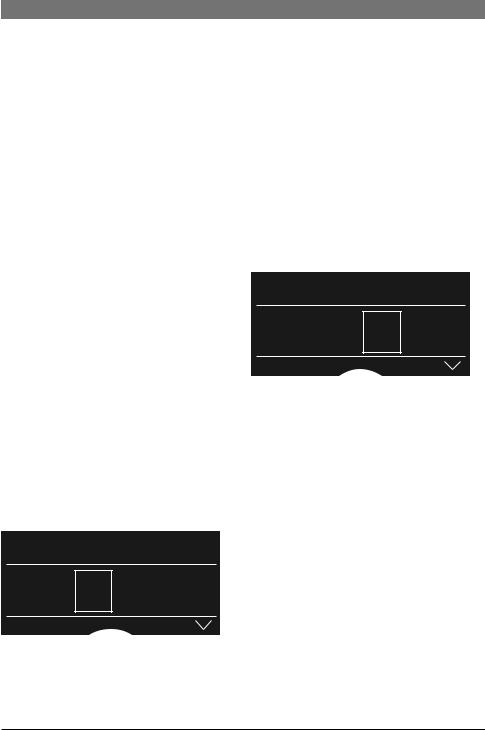
●●Use the buttons < and > 4 to select the language in which you want the display texts to appear. .
LANGUAGE
ENGLISH |
START |
PYCCKий |
|
NEDERLANDS |
|
The selected language is highlighted by a frame. The following languages can be selected:
.
ENGLISH Русский
NEDERLANDS FRANÇAIS
ITALIANO SVENSKA
ESPAÑOL POLSKI
Українська MAGYAR
TÜRKÇE DANSK
NORSK SUOMI
PORTUGUÊS čEšTINA
ΕλληνικA
●●Press the start button 8. The language you selected is saved.
Robert Bosch Hausgeräte GmbH

en
●●The brand logo lights up in the display 5. The appliance now heats up and rinses. Some water will run out of the coffee outlet 9. The appliance is ready for use when the symbols for selecting the type of coffee preparation appear in the display 5.
ESPRESSO ËÍ
 à À Á Å Æ
Note: The factory settings of the fully automatic espresso machine are programmed for optimal performance. The appliance switches off automatically after 1 hour (see “Menu settings” ‒ “AUTO OFF AFTER”).
N.B.: If the appliance is being used for the first time, a service program has been run, or the appliance has not been operated for a long period, the first beverage will not have the full aroma and should not be consumed.
When using the espresso machine for the first time, you will achieve a suitably thick and stable “crema” only after the first few cups have been dispensed.
9
Controls
Power on / off switch O / I
The power on / off switch 1 O / I is used to switch the appliance on or off. The appliance rinses automatically when it is switched on and off.
The rinsing process does not take place if: ●●it is still warm when switched on. ●●there was no coffee drawn before switching off.
The appliance is ready for use when the symbols for drink selection and the start button 8 light up on the display 5.
Customising button á
The appliance provides the option of saving and calling up customised settings for coffee drinks. Please refer to the section escribed in “Customising” for information on how to save and call up these settings.
Service programmes button à
Press the à button 3 briefly to call up the selection of service programmes. Please run the programme as described in “Service Programmes”.
Press and hold to activate or deactivate the child-proof lock, see “Child-proof lock”.
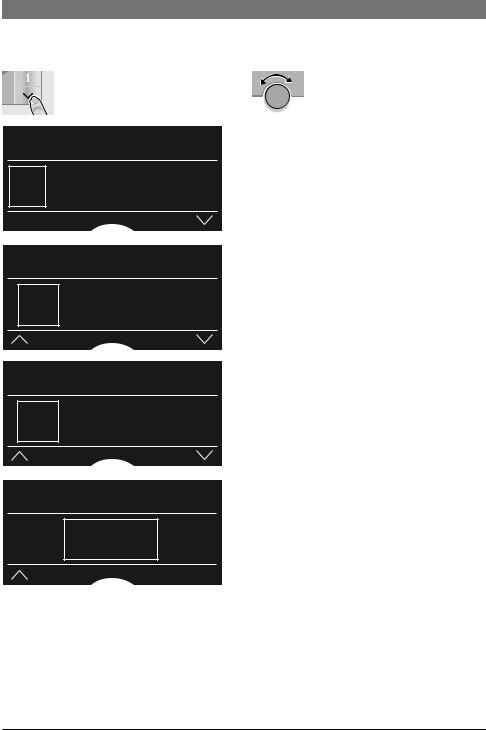
Rotary knob
Turn the knob 6 to the left or right to navigate through the display 5, or to adjust parameters in the menu.
Selection buttons < and >
Press the selection buttons < and > 4 to navigate up and down through the menu levels (navigation line 5c).
TES711 | 04/2012
10
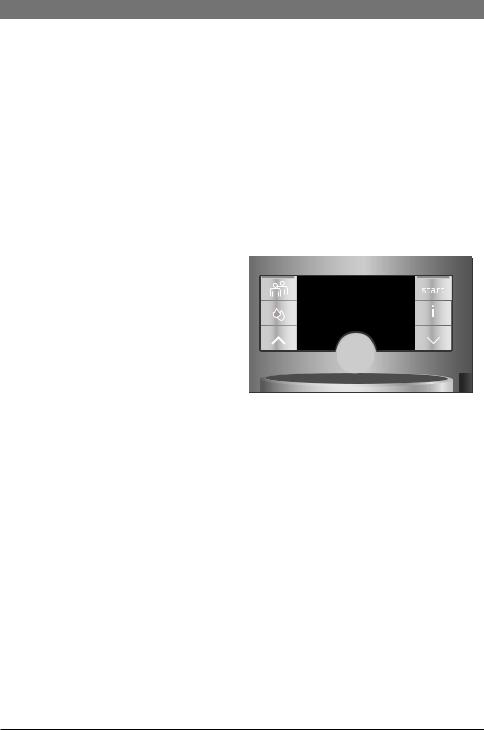
Display
The display 5 uses symbols to indicate the selection options, coffee strength and per-cup quantity, and uses texts to indicate settings, ongoing processes and messages. The rotary knob 6 and selection buttons 4 can be used to change settings. The selected setting is highlighted by a frame.
ESPRESSO ËËÍ 5a
 à À Á Å Æ 5b
5c
The status line 5a in the display 5 shows the name of the type of drink, along with the strength setting, e.g. 55 and per-cup quantity, e.g. . The selection line 5b shows symbols for drink selection.
The arrows in the navigation line 5c indicate the direction in which more menu levels can be found.
Please refer to “Displays” for more detailed information.
Start button
Press the start button 8 to begin drink preparation or to start a service programme. Press the start button 8 again during drink preparation to cut the dispensing process short.
en
j button and settings
Use the j button 7 to display information
(press briefly) and adjust settings (hold down for at least 3 seconds).
Displaying information
The Info menu displays how many drinks have been dispensed since the fully automatic espresso machine was first put into operation.
●●Press the j button 7 briefly.
INFO
NO. OF COFFEES |
11 |
NO. OF MILK MIXES |
15 |
AMOUNT HOT WATER |
2L |
Press the j button 7 again briefly to return to drink selection. If no button is pressed for about 10 seconds the appliance automatically switches back to drink selection mode.
Adjusting settings
See “Menu settings”.
Robert Bosch Hausgeräte GmbH
en
Adjusting the grinding unit
The rotary selector 17 adjusts the grind settings from coarse to fine.
¡¡Warning!
Adjust the grinding unit only while it is running! Otherwise the appliance may be damaged. Do not reach into the grinding unit.
●●While the grinding unit is running, adjust the rotary selector 17 from fine (a: Turn anticlockwise) to coarse (b: Turn clockwise) as required.
ab
11
Displays
Display messages
Various messages are shown on the display 5.
Information
For example:
PLEASE WAIT
Prompts
For example:
Note: The new setting will not become apparent until after the second cup of coffee.
Tip: For dark roast coffee beans, choose a finer grind, for lighter beans a coarser grind.
PLEASE SHORT RINSE
MILK SYSTEM START
TES711 | 04/2012
12
Display settings
Selection options
ESPRESSO ËËÍ
À Á Å Æ È É
ESPRESSO |
|
ËÍ |
5 |
55 |
555 |
ESPRESSO |
|
ËÍ |
Ð Ò
ESPRESSO |
ËÍ |
Î ± 0 ml |
|
en
Programme selection
|
|
|
 2 ESPRESSO |
à 2 COFFEE |
|
À ESPRESSO |
Á COFFEE |
|
Å MACCHIATO |
Æ CAPPUCCINO |
|
È MILK FROTH |
É WARM MILK |
|
Ê HOT WATER |
|
|
Coffee strength (only for coffee drinks)
|
|
aromaDouble Shot |
|
5 |
= very mild |
2x |
5 |
55 |
= mild |
|
|
555 |
= normal. |
2x |
555 |
5555 |
= strong |
2x 55555 |
|
55555 |
= very strong |
||
Per-cup quantity (only for coffee drinks)
Î Ð Ò
small medium large
Select your personal per-cup quantity
Robert Bosch Hausgeräte GmbH

en
aromaDouble Shot
The longer the coffee is brewed, the more bitter substances and undesired aromas are released. This has a negative effect on the taste and makes the coffee less easily digestible. So for extra strong coffee the TES711 has a special aromaDouble Shot function. When half the quantity has been prepared, coffee is ground and brewed again so that only the pleasant, aromatic flavours are released. The aromaDouble Shot function can be selected for all coffee drinks except À with a small per-cup quantity, Â and Ã.
Select your personal per-cup quantity
The preset per-cup quantity Î, Ð or Ò can be individually adjusted to the size of the cup in use by turning the rotary knob 6. The per-cup quantity can be adjusted according to the drink selected, e.g. Á. An arrow in the Ò symbol in the top right-hand corner of the display indicates whether the per-cup quantity was increased or decreased. If you set À, for example, the adjustment of the per-cup quantity in ml, and in the case of a milk-based coffee drinks, for example Æ, the adjustment of the per-cup quantity including the volume of milk (froth) in ml, is indicated.
Important: The selected amount in ml is an approximate value and can vary significantly as a result of crema forming, the grind setting or the type of milk used, etc.
13
Customising
You can store up to 6 user profiles in the customising menu. The required coffee and hot water temperatures are saved in the user profiles.
Storing or changing the user
●●Hold down the á button 2 for at least 3 seconds..
The menu appears:.
USER SETTINGS
USER 1 |
START |
USER 2 |
|
USER 3 |
|
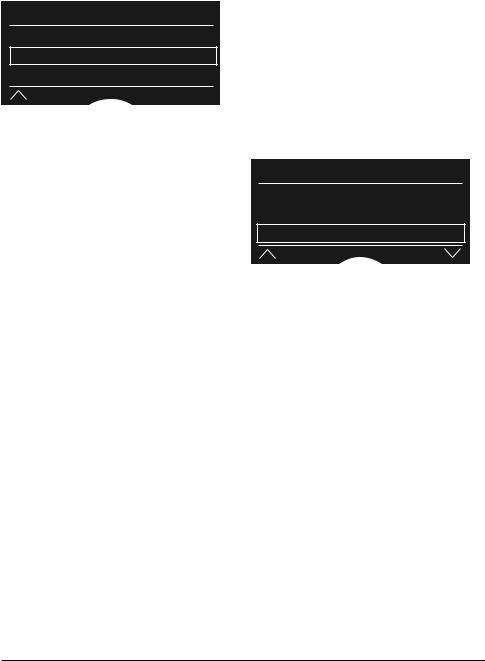
●●Select the required user using the arrow button and press the start button 8. The following selection appears in the display:.
USER SETTINGS: USER 1
EDIT NAME |
START |
DELETE NAME |
|
COFFEE TEMP. |
|
●●To change the user name, use the arrow button to go to EDIT NAMESTART and
press the start button 8.
The input field appears in the display:.
USER 1: D _ _ _ _ _
â_ABCDEFGHIJKLMNO PQRSTUV W X YZ01234 56789Д Е ЖАИЙЦТШЬЩ
TES711 | 04/2012
14 |
en |
●●Turn the rotary knob 6 to select a letter or number.
●●Confirm by pressing the start button 8.
There are 6 characters available for the user name.
Symbol â means delete.
●●Either complete all of the fields or press the start button 8 repeatedly until EDIT NAME START appears in the display again. The entry is saved.
Information: The entry can be overwritten at any time.
To delete the user, use the arrow button to select DELETE NAME START and press
the start button 8.
Saving temperatures
●●Use the arrow button to select .
COFFEE TEMP. or HOT WATER TEMP..
●●Turn the rotary knob 6 to select the required setting.
●●Press the á button 2. ●●The settings are saved.
Calling up a user profile
●●Press the á button 2 briefly. The user profile menu appears:.
SELECT A PROFILE
ROBERT USER 2 USER 3
●●Turn the rotary knob 6 to select a user profile and press the start button 8. The drink selection menu appears:
MACCHIATO ËËÍ
ROBERT À Á Å Æ
●●Set the drink, coffee strength etc. (see “Display settings” – “Programme selection”).
●●Dispense a drink (see “Preparation using coffee beans”).
●●The selected settings are saved. ●●Press the á button 2 to exit the customised menu.
Information: If you wish the appliance to exit the menu automatically, you can set this as described under “Menu settings”.
Child-proof lock
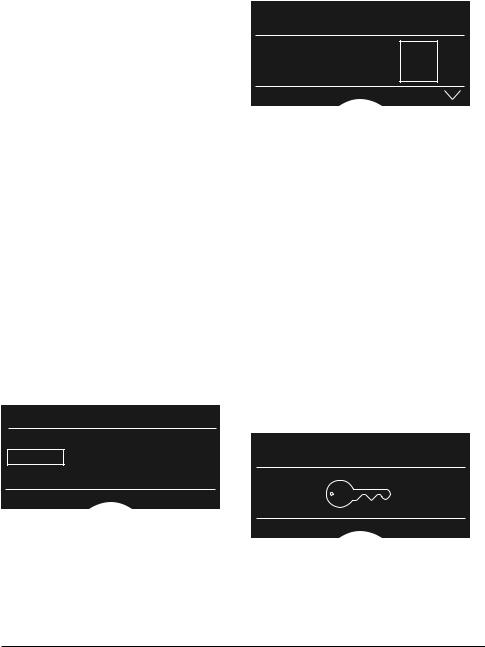
The appliance can be locked to protect children from scalding and burning. ●●Hold down the à button 3 for at least 3 seconds. The display 5 shows a key: the child-proof lock is activated.
It is no longer possible to operate the appliance..
ESPRESSO |
ËÍ |
●●To deactivate the child-proof lock, hold down the à button 3 for at least 3 seconds. The key disappears from the display 5.
Robert Bosch Hausgeräte GmbH
en
Menu settings
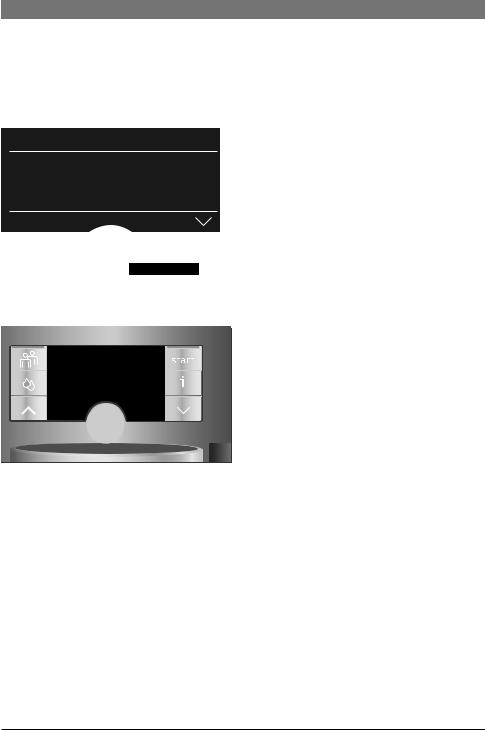
●●Hold the j button 7 down for at least 3 seconds.
The different setting options are now displayed.
SETTINGS
LANGUAGE |
ENGLISH |
COFFEE TEMP. |
|
HOT WATER TEMP. |
|
In the following operating instructions, each new setting begins with j 3 sec. + >  followed by an exact description.
The different setting options can be selected with the < and > buttons 4.
SETTINGS
WATER HARDNESS
WATER FILTER START
TRANSPORT. LOCK
N.B.: The changes you have made are saved automatically. It is not necessary to confirm them additionally.
j 3 sec. + >  COFFEE TEMP.
●●Turn the rotary knob 6 to set the coffee temperature. The setting applies to all types of preparation except the customised settings under “Customising”.
j 3 sec. + >  HOT WATER TEMP.
●●Turn the rotary knob 6 to set the temperature. The setting applies to all types of preparation except the customised settings under “Customising”.
15
j 3 sec. + >  LANGUAGE
●●Turn the knob 6 to select the required language.
j 3 sec. + >  PROFILE EXIT
●●Here you can set whether the appliance should exit the customising function automatically AUTO or manually MANUALLY.
j 3 sec. + >  AUTO OFF AFTER
●●Turn the knob 6 to enter the time span after which the appliance should automatically switch off following drink preparation.
A time between 5 minutes and 8 hours can be set.
j 3 sec. + >  CONTRAST
The display 5 contrast can be set from –10 to +10. The factory setting is +0.
●●Enter the required setting with the knob 6.
j 3 sec. + >  WATER HARDNESS
●●Turn the knob 6 to select the required water hardness 1, 2, 3 or 4.
Note: It is important to set the water hardness correctly, so that the appliance indicates accurately when the descaling programme should be run. The factory setting for the water hardness is 4.
You can check the water hardness using the enclosed test strip or by asking your local water supplier.
●●Dip the test strip in the water briefly and check the result after 1 minute.
Level |
Water hardness |
|
|
German (°dH) |
French (°fH) |
1 |
1-7 |
1-13 |
2 |
8-14 |
14-25 |
3 |
15-21 |
26-38 |
4 |
22-30 |
39-54 |
TES711 | 04/2012

16
j 3 sec. + >  WATER FILTER
Before a new water filter is used, it must be rinsed.
●●To do this, press the water filter firmly into the water tank 11 with the aid of the measuring spoon 14. Fill the water tank with water up to the “max” mark. ●●Turn the knob 6 to select START and
press the start button 8.
● PLACE 0.5 L CONTAINER UNDER MILK FROTHER START
●●Place a container with a capacity of 0.5 litres under the milk frother 10. ●●Press the start button 8. Water will now flow through the filter to rinse it.
●●Next, empty the container. The appliance is ready to use once more.
Note: Rinsing the filter simultaneously activates the setting for the “change filter” display.
You can find detailed information about the water filter in the enclosed filter instructions.
The filter is no longer effective when the CHANGE FILTER display appears, or at the latest after 2 months. It needs to be replaced for reasons of hygiene and so that there is no build-up of limescale (this could damage the appliance).
Replacement filters can be obtained from retailers (TCZ7003) or from customer serv-
ice (467873). If no new filter is used, turn the WATER FILTER setting to NO.
en
Note: If the appliance has not been used for a prolonged period (e.g.vacation) the filter should be rinsed before the appliance is used again. To do this, simply dispense a cup of hot water.
j 3 sec. + >  TRANSPORT. LOCK
●●To avoid damage from low temperatures during transport and storage, the appliance must be completely emptied first.
Information: The appliance must be ready for use and the water tank 11 filled.
●●Press the start button 8. The appliance automatically empties the pipe system and switches off.
●●Empty the water tank 11 and the drip tray 24.
j 3 sec. + >  FACTORY RESET
You can cancel your own settings and reactivate the factory settings.
●●To activate the factory settings, press the start button 8.
Note: The appliance can also be reset to the factory settings using a combination of buttons. The appliance must be switched off fully.
●●Hold down the < and > buttons 4 and the on / off switch 1 O / I at the same time for at least 5 seconds. Press the start button 8. The factory settings are now reactivated.
Robert Bosch Hausgeräte GmbH
en
Preparation using coffee beans
This fully automatic espresso machine grinds beans freshly for each brew. If possible, use only beans for fully automatic coffee and espresso machines. For optimal quality, deep-freeze the beans or store in a cool place in sealed containers. Coffee beans can be ground while frozen.
Important: Fill the water tank 11 with fresh, cold water every day. The tank 11 should always contain sufficient water for operating the appliance.
Different coffee drinks can be prepared quite simply at the press of a button.
N.B.: With some settings the coffee is prepared in two stages (see “aromaDouble Shot”). Wait until the procedure is fully completed.
Drink preparation without milk
The appliance must be ready for use. ●●Place the pre-warmed cup(s) under the coffee outlet 9.
●●Select the required espresso or coffee by turning the knob 6.
The display 5 shows the selected drink along with the setting for coffee strength and the per-cup quantity for this drink.
ESPRESSO ËÍ
 à À Á Å Æ
You can change the settings (see “Controls”) or call up and customise settings (see “Customising”).
●●Press the start button 8.
17
The coffee is brewed and then dispensed into the cup(s).
Drink preparation with milk
The appliance must be ready for use. ●●Place the pipe 10d of the milk frother 10 in a milk container.
●●Swivel the coffee outlet 9 to the right until it clicks into place.
●●Place the pre-warmed cup or glass under the coffee outlet 9 and milk frother 10. ●●Select the required “Macchiato” Å or “Cappuccino” Æ by turning the knob 6. The display 5 shows the selected drink along with the setting for coffee strength and the per-cup quantity for this drink.
CAPPUCCINO ËÍ
À Á Å Æ È É
You can change the settings (see “Controls”) or call up and customise settings (see “Customising”).
●●Press the start button 8.
First milk is delivered into the cup or glass. Then the coffee is brewed and dispensed into the cup or glass.
Important: Dried milk residue is difficult to remove, so the milk frother 10 must be cleaned with lukewarm water immediately after use (see “Cleaning the milk system”).
TES711 | 04/2012

18
Preparation using ground coffee
This fully automatic espresso machine can also be operated with ground coffee (not instant coffee powder).
N.B.: The aromaDouble Shot function cannot be used when coffee is prepared using ground coffee.
Drink preparation without milk
●●Select À or Á by turning the knob 6. ●●Place the pre-warmed cup(s) under the coffee outlet 9.
●●Open the drawer 18 by pressing. ●●Pour in no more than 2 level measuring spoons 14 of ground coffee.
¡¡Warning!
Do not use whole beans or instant coffee.
●●Close the drawer 18. ●●Press the start button 8.
The coffee is brewed and then dispensed into the cup(s).
N.B.: Repeat the procedure for another cup of coffee. If no coffee is taken within 90 seconds, the brewing chamber empties automatically to avoid overfilling. The appliance rinses.
Drink preparation with milk
●●Turn the knob 6 to select “Macchiato” Å or “Cappuccino” Æ.
●●Place the pipe 10d of the milk frother 10 in a milk container.
●●Swivel the coffee outlet 9 to the right until it clicks into place.
●●Place the pre-warmed cup or glass under the coffee outlet 9 and milk frother 10. ●●Open the drawer 18 by pressing. ●●Pour in no more than 2 level measuring spoons 14 of ground coffee.
en
¡¡Warning!
Do not use whole beans or instant coffee.
●●Close the drawer 18. ●●Press the start button 8.
First milk is delivered into the cup or glass. Then the coffee is brewed and dispensed into the cup or glass.
Important: Dried milk residue is difficult to remove, so the milk frother 10 must be cleaned with lukewarm water immediately after use (see “Cleaning the milk system”).
N.B.: Repeat the procedure for another coffee / milk drink. If no coffee is taken within 90 seconds, the brewing chamber empties automatically to avoid overfilling. The appliance rinses.
Preparing milk froth and warm milk
¡¡Risk of burns!
The milk frother 10 gets very hot. After use, allow to cool down first before touching.
The appliance must be ready for use. ●●Place the pipe 10d of the milk frother 10 in a milk container.
●●Place the pre-warmed cup or glass under the outlet of the milk frother 10. ●●Select the required setting .
“Milk froth” È or “Warm milk” É by turning the knob 6.
●●Press the start button 8. Milk froth or warm milk flows from the outlet of the milk frother 10 for about 40 or 60 seconds respectively.
●●Press the start button 8 again to cut the process short.
Note: When preparing warm milk you may hear a whistling sound. This is caused by the milk frother 10 for technical reasons.
Robert Bosch Hausgeräte GmbH
en |
19 |
Tip: For optimal milk froth quality, use cold milk with a fat content of at least 1.5 % if possible.
Important: Dried milk residue is difficult to remove, so the milk frother 10 must be cleaned with lukewarm water immediately after use (see “Cleaning the milk system”).
Dispensing hot water
¡¡Risk of burns!
The milk frother 10 gets very hot. After use, allow to cool down first before touching. The appliance must be ready for use. ●●Place the pre-warmed cup or glass under the outlet of the milk frother 10. ●●Select the required setting for “Hot water” Ê by turning the knob 6.
●●Press the start button 8. Hot water runs out of the milk frother outlet 10 for about 40 seconds.
●●Press the start button 8 again to cut the process short.
N.B.: It is possible to set the temperature of the hot water (see “Menu settings”).
Maintenance and daily cleaning
¡¡Risk of electric shock!
Unplug the appliance before cleaning it. Never immerse the appliance in water. Do not use a steam cleaner.
●●Wipe the outside of the appliance with a soft, damp cloth. Do not use abrasive cloths or cleaning agents.
●●Always remove any limescale, coffee, milk or descaling fluid residue immediately. Such residue can cause corrosion. ●●Rinse the water tank 11 and the brewing unit 21 with water only.
●●The drip tray panel 23 should only be wiped gently with a damp cloth.
Do not put it in the dishwasher.
●●Remove cup stand 25. Pull the drip tray 24 with the coffee grounds container 26 forward and out, then empty and clean them. All the parts can also be cleaned in the dishwasher.
●●Remove drawer 18 and clean.
●●Clean the measuring spoon 14 and the aroma cover 16 by hand or in the dishwasher.
●●Wipe out the inside of the appliance (tray holders).
Important: Drip tray for coffee outlet 24 and coffee grounds container 26 should be emptied and cleaned daily to prevent mould from developing.
N.B.: If the appliance is cold when switched on, or if it is switched off after dispensing coffee, it rinses automatically.
Important: If the appliance has not been used for a prolonged period of time (e.g. after a vacation), clean the entire appliance thoroughly, including the milk system 10 and brewing unit 21.
Cleaning the milk system
Important: The milk system 10 must be cleaned immediately after use!
The milk system 10 can be pre-cleaned automatically (see “Service Programmes”) or cleaned manually.
TES711 | 04/2012
20 |
en |
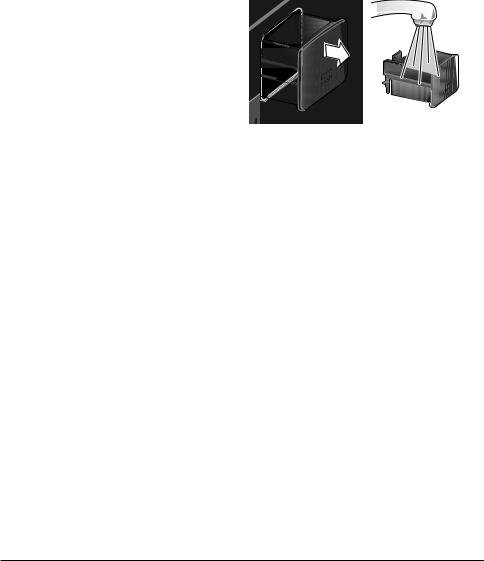
Dismantling the milk system 10 for cleaning: ●●Pull the milk system 10 forward out of the appliance.
●●Turn the upper part (10a) in an anti-clock- wise direction and remove from the lower part (10b).
●●Clean the individual parts with detergent solution and a soft cloth.
●●Rinse all parts with clear water and dry them.
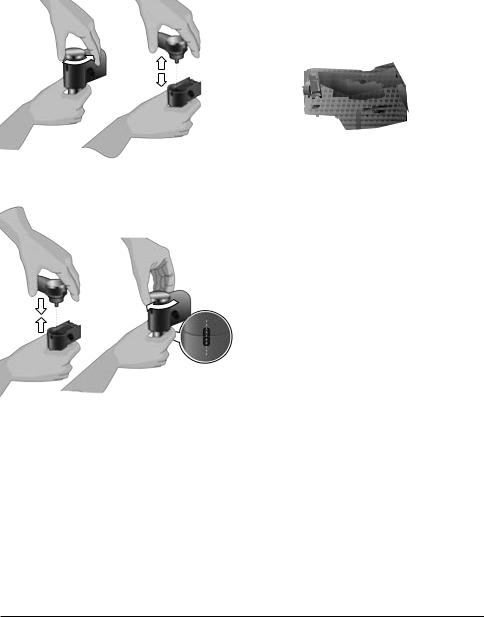
●●Put all the parts back together, making sure the markings are overlapping. The milk frother can then be clicked back into place in the appliance.
Note: All the parts of the milk frother 10 can also be put in the dishwasher.
Cleaning the brewing unit
(refer also to the quick reference guide) In addition to the automatic cleaning programme, the brewing unit 21 should be removed regularly for cleaning.
●●Switch the appliance off completely at the power on / off switch 1 O / I; no buttons are lit.
●●Slide the door opener 20 to the right and open the door 19 to the brewing unit 21. ●●Slide the red lock 21b on the brewing unit 21 completely to the left.
●●Press the red button 21a, grasp the brewing unit 21 by the recessed grips (Fig. E) and remove carefully.
●●Rinse the brewing unit 21 thoroughly under running water..
●●Hold the brewing unit sieve under the running water..
Important: Clean without detergent and do not place in the dishwasher.
●●Wipe out the inside of the appliance thoroughly with a damp cloth and remove any coffee residues.
●●Allow the brewing unit 21 and the inside of the appliance to dry.
●●Reinsert the brewing unit 21 fully into the appliance.
●●Slide the red lock 21b fully to the right and close the door 19.
Robert Bosch Hausgeräte GmbH
en
Service Programmes
Tip: Refer also to the quick reference guide in the storage compartment 22.
At regular intervals, the display 5 shows the
following texts:
SHORT RINSE MILK SYSTEM SERVICE - DESCALE or SERVICE - CLEAN or SERVICE - CALC‘N‘CLEAN.
The appliance should be cleaned or descaled immediately using the corresponding pro-
gramme. You have the option of combining
the processes DESCALING and CLEANING
with the CALC‘N‘CLEAN function (see “Calc‘n‘Clean”).
If the service programme is not run as instructed, the appliance may be damaged.
¡¡Warning!
Each time you run the service program, you should follow the instructions for using the descaling and cleaning agents.
Never interrupt the service program! Do not drink the liquids!
Never use vinegar, vinegar-based products, citric acid or citric acid-based products! Never put descaling tablets or other descaling agents in the ground coffee drawer or the drawer for cleaning tablets 18!
Specially developed descaling and cleaning tablets are available from retailers or customer service.
Order number |
Retail |
Customer |
|
|
service |
Cleaning . |
TCZ6001 |
310575 |
tablets |
|
|
Descaling. |
TCZ6002 |
310967 |
tablets |
|
|
21
Cleaning the milk system
Duration: approx. 1 minute
CLEANING AND SERVICE
SHORT RINSE
MILK SYSTEM |
START |
CALC‘N‘CLEAN |
|
The milk system 10 can be pre-cleaned automatically.
●●Press the à button 3.
SHORT RINSE MILK SYSTEM START
●●Press the start button 8.
PLACE GLASS UNDER FROTHER,
PLACE SUCTION PIPE IN GLASS START
●●Place an empty glass under the milk system 10 and put the end of the pipe 10d in the glass.
●●Press the start button 8. The appliance now fills the glass automatically with water and draws it in again through the pipe 10d for cleaning. The rinse procedure stops automatically after about 1 minute. ●●Now empty the glass and clean the pipe
10d.
In addition to this, clean the milk system thoroughly at regular intervals (by hand or in the dishwasher).
TES711 | 04/2012

22
Descaling
Duration: approx. 30 minutes.
CLEANING AND SERVICE
DESCALE START
CLEAN
The start button 8 flashes while the different descaling processes are running. The figures on the top right indicate the progress of the programme.
Important: If there is a filter in the water tank 11, it needs to be removed before the service programme is run.
●●Press the à button 3.
DESCALE START
●●Press the start button 8; the display 5 will guide you through the programme.
EMPTY DRIP TRAY
REPLACE DRIP TRAY
●●Empty drip tray 24 and replace.
PLACE 0.5 L CONTAINER UNDER MILK FROTHER START
●●Place a container with a capacity of 0.5 litres under the milk frother 10. ●●Press the start button 8.
Note: If the water filter is activated, the display will prompt you to remove the filter,
then press the start button 8 again.
REMOVE FILTER START
ADD 0.5 L WATER AND DESCALER START
●●Pour lukewarm water into the empty water tank 11 up to the “0.5” litre mark and dissolve 2 Bosch descaling tablets in it.
en
●●Press the start button 8. The descaling programme will now run for about
20 minutes.
DESCALING
NOT ENOUGH DESCALING FLUID. REFILL FLUID START
Note: If there is not enough descaling solution in the water tank 11, the corresponding prompt is displayed. Pour in descaling solution and press start 8 again.
CLEAN AND REFILL WATER TANK START
●●Rinse the water tank 11 and refill it with fresh water up to the “max” mark. ●●Press the start button 8. The descaling programme now runs for about 1 minute
and rinses the appliance.
DESCALING
EMPTY DRIP TRAY
REPLACE DRIP TRAY
●●Empty drip tray 24 and replace.
Replace the filter if one is being used. . The appliance has completed descaling and is ready for use again.
Important: Wipe down the appliance using a soft, damp cloth to immediately remove any descaler residue. Such residue can cause corrosion.
Robert Bosch Hausgeräte GmbH
en |
|
|
23 |
|
Cleaning |
|
EMPTY DRIP TRAY |
|
|
Duration: approx. 8 minutes. |
|
REPLACE DRIP TRAY |
|
|
CLEANING AND SERVICE |
●●Empty drip tray 24 and replace. |
|||
The appliance is ready for use again. |
||||
DESCALE |
|
|||
START |
|
|
||
CLEAN |
Calc‘n‘Clean |
|
||
|
|
Duration: approx. 36 minutes. |
||
|
|
Calc‘n‘Clean combines the separate func- |
||
|
|
tions of descaling and cleaning. If both |
||
The start button 8 flashes while the differ- |
programmes are due to be run soon, the |
|||
espresso machine automatically suggests |
||||
ent cleaning processes are running. |
this service programme. |
|
||
The figures on the top right indicate the |
|
|
||
progress of the programme. |
|
CLEANING AND SERVICE |
||
●●Fill the water tank 11 up to the “max” |
SHORT RINSE |
|
||
mark. |
|
|
||
●●Hold the j button 7 down for at least |
MILK SYSTEM |
|
||
3 seconds. |
|
CALC‘N‘CLEAN |
START |
|
|
|
|||
CLEAN START |
|
|
|
|
●●Press the start button 8; the display 5 will |
The start button 8 flashes while the differ- |
|||
guide you through the programme. |
||||
EMPTY DRIP TRAY |
|
ent Calc‘n‘Clean processes are running. |
||
|
The figures on the top right indicate the |
|||
REPLACE DRIP TRAY |
|
progress of the programmes. |
||
●●Empty drip tray 24 and replace. The ap- |
Important: If there is a filter in the water |
|||
pliance rinses twice. |
|
|||
POSITION SWIVEL ARM |
|
tank 11, it needs to be removed before the |
||
|
service programme is run. |
|
||
●●Swivel the coffee outlet 9 to the left until it |
●●Press the à button 3. |
|
||
clicks into place. |
|
|
||
CLEANING |
|
CALC‘N‘CLEAN START |
|
|
OPEN DRAWER |
|
|
||
|
●●Press the start button 8; the display 5 will |
|||
●●Open the drawer 18 by pressing. |
guide you through the programme. |
|||
INSERT BOSCH CLEANING TABLET AND |
EMPTY DRIP TRAY |
|
||
CLOSE DRAWER |
|
REPLACE DRIP TRAY |
|
|
●●Drop a Bosch cleaning tablet in the draw- |
●●Empty drip tray 24 and replace. |
|||
er 18 and close. |
|
●●Swivel the coffee outlet 9 to the right until |
||
PRESS START |
|
it clicks into place. |
|
|
|
●●Place a container with a capacity of at |
|||
●●Press the start button 8. The cleaning |
least 1 litre under the milk frother 10. |
|||
programme will now run for about |
●●Press the start button 8. The appliance |
|||
7 minutes. |
|
rinses twice. |
|
|
CLEANING |
|
CLEANING |
|
|
TES711 | 04/2012

24 |
en |
OPEN DRAWER |
Important: Wipe down the appliance using |
●●Open the drawer 18 by pressing. |
a soft, damp cloth to immediately remove |
INSERT BOSCH CLEANING TABLET AND |
any descaler residue. Such residue can |
cause corrosion. |
|
CLOSE DRAWER |
N.B.: If one of the service programmes is |
●●Drop a Bosch cleaning tablet in the draw- |
|
er 18 and close. |
interrupted, e.g. by a power outage, pro- |
|
ceed as follows: |
Note: If the water filter is activated, the |
●●Rinse the water tank 11 and refill it with |
display 5 will prompt you to remove the filter |
fresh water up to the “max” mark. |
and press the start button 8 again. |
●●Press the start button 8. The cleaning |
REMOVE FILTER START |
programme now runs for about 3 minutes, |
and rinses the appliance. |
|
ADD 0.5 L WATER AND DESCALER |
CLEANING |
START |
EMPTY DRIP TRAY |
●●Pour lukewarm water into the empty wa- |
|
ter tank 11 up to the “0.5” litre mark and |
REPLACE DRIP TRAY |
dissolve 2 Bosch descaling tablets in it. |
●●Empty drip tray 24 and replace. |
●●Press the start button 8. The descaling
programme now runs for about 20 minutes. The appliance is ready for use again.
DESCALING
NOT ENOUGH DESCALING FLUID. |
Tips on energy saving |
REFILL FLUID START |
|
Note: If there is not enough descaling solu- |
––The display has a dimming function that |
tion in the water tank 11, the corresponding |
switches on automatically when the ap- |
prompt is displayed. Pour in descaling solu- |
pliance is not in use. The display is il- |
tion and press start 8 again. |
luminated dimly. Press any button or the |
CLEAN AND REFILL WATER TANK |
rotary knob to brighten the display illumi- |
nation again. |
|
START |
––If the appliance is not being used, switch |
●●Rinse the water tank 11 and refill it with |
it off at the power on / off switch 1 O / I on |
fresh water up to the “max” mark. |
the front. |
●●Press the start button 8. The descaling |
––If possible, do not interrupt coffee or milk |
programme now runs for about 1 minute |
froth dispensing. Cutting the coffee or |
more, followed by the cleaning pro- |
milk froth dispensing process short re- |
gramme for about 7 minutes, and rinses |
sults in higher energy consumption and in |
the appliance. |
more residual water collecting in the drip |
DESCALING |
tray. |
CLEANING |
––Descale the appliance regularly to avoid |
EMPTY DRIP TRAY |
a build-up of limescale. Limescale residue |
results in higher energy consumption. |
|
REPLACE DRIP TRAY |
|
●●Empty drip tray 24 and replace. |
|
Replace the filter if one is being used.. |
|
The appliance has completed descaling and |
|
cleaning and is ready for use again. |
|
Robert Bosch Hausgeräte GmbH

en
Frost protection
¡¡To avoid damage from low temperatures during transport and storage, the appliance must be completely emptied first.
See “Menu settings” ‒ “TRANSPORT. LOCK”
Storing accessories
The espresso machine has special compartments for storing the accessories and quick reference guide inside the appliance. ●●To store the measuring spoon 14, milk pipe 10d and tube 10c, remove the water tank 11 and insert the parts in the shaped recesses 13.
The quick reference guide has its own compartment by the brewing unit 21.
●●Open the door 19 to the brewing unit. ●●Stow away the quick reference guide in the storage compartment 22 provided for the purpose.
●●Close the doors to the brewing unit 19 again.
Accessories
The following accessories can be obtained from retailers and customer service.
Order . |
Retail |
Customer. |
number |
|
service |
Cleaning |
TCZ6001 |
310575 |
tablets |
|
|
Descaling |
TCZ6002 |
310967 |
tablets |
|
|
Water filters |
TCZ7003 |
467873 |
Care set |
TCZ7004 |
570351 |
Milk container |
TCZ7009 |
674992 |
(insulated) |
|
|
25
Disposal A
This appliance is labelled in accordance with the European Directive 2002/96/EG relating to waste electrical and electronic equipment – WEEE. The directive provides the framework for the EU-wide take-back and disposal of end-of-life appliances. Please ask your specialist retailer about current disposal facilities.
Guarantee
The guarantee conditions for this appliance are as defined by our representative in the country in which it is sold. Details regarding these conditions can be obtained from the dealer from whom the appliance was purchased. The bill of sale or receipt must be produced when making any claim under the terms of this guarantee.
Right of modification reserved.
TES711 | 04/2012

26 |
|
en |
|
Simple troubleshooting |
|
|
|
|
|
|
|
Problem |
Cause |
Solution |
|
Display shows |
Beans are not falling into |
Gently tap the bean con- |
|
REFILL BEAN CONTAINER |
the grinding unit (beans too |
tainer 15. |
|
although the bean container |
oily). |
Change the type of coffee if |
|
15 is full, or the grinding unit |
|
necessary. When the bean |
|
does not grind the beans. |
|
container 15 is empty, wipe it |
|
|
|
with a dry cloth. |
|
No hot water dispensed. |
The milk frother 10 or its |
|
holder is soiled. |
Clean the milk frother 10 or its holder (see “Cleaning the milk system”).
Too little or no milk froth or. the milk frother 10 does not draw the milk in.
The milk frother 10 or its |
Clean the milk frother 10 or |
holder is soiled. |
its holder (see “Cleaning the |
|
milk system”). |
Milk unsuitable for frothing. |
Use low-fat milk (1.5 % fat). |
|
|
The milk frother 10 is not |
Moisten and assemble the |
correctly assembled. |
milk frother parts; the two |
|
marks must be lined up one |
|
above the other. |
Build-up of limescale in the appliance.
Descale the appliance using two descaling tablets, if necessary repeat the procedure.
The selected per-cup quantity is not reached. Coffee dispensing slows to a trickle or stops completely.
Coffee is ground too finely. |
Adjust the grinding unit to a |
Pre-ground coffee is too |
coarser setting. Use coarser |
fine. |
pre-ground coffee. |
Build-up of limescale in the |
Descale the appliance. |
appliance. |
|
Coffee has no “crema”. |
Unsuitable type of coffee. |
Use a type of coffee with a |
|
|
higher proportion of robusta |
|
|
beans. |
|
The beans are no longer |
Use fresh beans. |
|
fresh. |
|
|
The grinding setting is not |
Adjust grinding setting to |
|
suitable for the beans. |
fine. |
Coffee is too “acidic”. |
The grinding setting is too |
Adjust the grinding unit to a |
|
coarse or the pre-ground |
finer setting or use finer pre- |
|
coffee is too coarse. |
ground coffee. |
|
Unsuitable type of coffee. |
Use a darker roast. |
Coffee is too “bitter”. |
The grinding setting is too |
Adjust the grinding unit to a |
|
fine or the pre-ground coffee |
coarser setting or use coars- |
|
is too fine. |
er pre-ground coffee. |
|
Unsuitable type of coffee. |
Change type of coffee used. |
If you are unable to solve the problem, please call the hotline!
You will find the telephone numbers at the back of these instructions.
Robert Bosch Hausgeräte GmbH

en |
|
27 |
|
|
Simple troubleshooting |
|
|
||
|
|
|
|
|
Problem |
Cause |
Solution |
|
|
Display shows |
The appliance has a fault. |
Please call the hotline. |
||
ERROR |
|
|
|
|
PLEASE CONTACT |
|
|
|
|
HOTLINE |
|
|
|
|
The water filter does not |
The water filter is not mount- |
Firmly press the water filter |
||
stay in position in the water |
ed correctly. |
straight down into the tank |
||
tank 11. |
|
connection. |
|
|
Display shows |
Water tank has been in- |
Insert the water tank cor- |
||
CHECK WATER TANK |
correctly inserted or the |
rectly or rinse the water filter |
||
|
|
new water filter has not |
according to instructions and |
|
|
|
been rinsed according to |
then switch on. |
|
|
|
instructions. |
|
|
The coffee grounds are not |
The grinding setting is too |
Adjust the grinding unit to |
||
compact and are too wet. |
fine or too coarse, or not |
a coarser or finer setting, |
||
|
|
enough ground coffee has |
or use 2 level measuring |
|
|
|
been used. |
spoons of ground coffee. |
|
Display shows . |
|
Brewing unit is soiled. |
Clean brewing unit. |
|
CLEAN BREWING UNIT |
|
Too much pre-ground coffee |
Clean brewing unit.. |
|
|
|
in the brewing unit. |
(Pour in no more than 2 |
|
|
|
|
level measuring spoons of |
|
|
|
|
ground coffee). |
|
|
|
The brewing unit’s |
Clean brewing unit (see |
|
|
|
mechanism is stiff. |
“Maintenance and daily |
|
|
|
|
cleaning”). |
|
Coffee or milk froth quality varies considerably.
Build-up of limescale in the appliance.
Descale the appliance with two descaling tablets as described in the instructions.
Water dripped onto the inner Drip tray removed too early. floor of the appliance when
the drip tray was removed.
Wait a few seconds after the last drink was dispensed before removing the drip tray.
If you are unable to solve the problem, please call the hotline!
You will find the telephone numbers at the back of these instructions.
TES711 | 04/2012

28 |
|
en |
Technical specifications |
|
|
Electrical connection (voltage/frequency) |
|
220-240 V / 50-60 Hz |
|
||
Heating output |
|
1700 W |
Maximum pump pressure, static |
|
15 bar |
Maximum water tank capacity (without filter) |
|
2.1 l |
Maximum bean container capacity |
|
>250 g |
Cable length |
|
100 cm |
Dimensions (H x B x D) |
|
394 x 296 x 456 mm |
Weight, unfilled |
|
11–13 kg |
Type of grinding unit |
|
Ceramic |
|
|
|
Robert Bosch Hausgeräte GmbH

fr |
|
Sommaire |
|
Contenu de l’emballage............................. |
30 |
Présentation.............................................. |
30 |
Avant la première utilisation...................... |
31 |
Eléments de commande............................ |
32 |
––Interrupteur électrique O / I..................... |
32 |
––Touche á Personnalisation................... |
32 |
––Touche à |
|
Programmes de maintenance................ |
32 |
––Bouton rotatif......................................... |
32 |
––Touches de sélection < et >................ |
32 |
––Ecran..................................................... |
33 |
––Touche start........................................... |
33 |
––Touche j réglages.................................. |
33 |
––Régler la finesse de la mouture............. |
34 |
––Réglages de l’écran .............................. |
35 |
––Personnalisation.................................... |
36 |
––Sécurité enfants..................................... |
37 |
Réglages menu......................................... |
38 |
––Temp. du café........................................ |
38 |
––Temp. eau chaude................................. |
38 |
––Langue .................................................. |
38 |
––Profile .................................................... |
38 |
––AR auto dans ........................................ |
38 |
––Contraste............................................... |
38 |
––Dureté eau............................................. |
38 |
––Filtre eau................................................ |
39 |
––Sécurité Trans........................................ |
39 |
––Réglages usine...................................... |
39 |
Préparation avec du café en grains........... |
40 |
Préparation à partir de café moulu ........... |
41 |
Préparer de la mousse . |
|
de lait et du lait chaud............................... |
42 |
Préparer de l’eau chaude.......................... |
42 |
Entretien et nettoyage quotidien................ |
42 |
––Nettoyage du mousseur de lait.............. |
43 |
––Nettoyer l’unité de percolation............... |
44 |
Programmes de maintenance .................. |
44 |
––Nettoyage du mousseur de lait.............. |
45 |
––Détartrage.............................................. |
45 |
––Nettoyage............................................... |
46 |
––Calc‘n‘Clean........................................... |
47 |
Conseils pour économiser l’énergie.......... |
48 |
Protection contre le gel.............................. |
48 |
Rangement des accessoires..................... |
48 |
Accessoires............................................... |
49 |
Mise au rebut............................................. |
49 |
|
29 |
Garantie..................................................... |
49 |
Caractéristiques techniques...................... |
49 |
Eliminer soi-même les problèmes . |
|
simples ..................................................... |
50 |
Consignes de sécurité
Lire attentivement le mode d’emploi, se conformer à ses indications et le conserver à portée de la main !
Cette machine Espresso tout automatique est conçue pour la préparation de quantités usuelles, dans le cadre d’un foyer ou d’un usage non-commercial de type domestique. Citons par ex. les cuisines du personnel dans les commerces, bureaux, exploitations agricoles et établissements artisanaux ainsi que les clients de pensions, petits hôtels et toute autre résidence de type similaire.
¡¡Risque de choc électrique !
Pour le raccordement et l’utilisation de la machine, respecter impérativement les indications figurant sur la plaque signalétique. N’utiliser la machine que si le cordon électrique et la machine ne présentent aucun dommage.
N’utiliser la machine qu’à l’intérieur de locaux, à température ambiante.
Ne pas confier l’appareil à des enfants ou à des personnes aux capacités sensorielles ou intellectuelles diminuées ou ne disposant pas d’une expérience ou d’une connaissance suffisante, sauf si elles le font sous surveillance ou si elles ont bénéficié préalablement d’une information à propos de la manipulation de l’appareil de la part de la personne responsable de leur sécurité. Eloignez les enfants de l’appareil.
Bien surveiller les enfants afin de les empêcher de jouer avec l’appareil.
TES711 | 04/2012

30 |
|
|
|
fr |
En cas de défaut, débrancher immédiatement |
Présentation |
|||
le cordon électrique. Les réparations sur la |
(Figures A, B, C, D et E sur les pages |
|||
machine, par ex. le remplacement du cordon |
||||
électrique, doivent être effectuées unique- |
dépliantes) |
|||
ment par notre Service après-vente afin d’éli- |
1 |
Interrupteur électrique O / I |
||
miner tous les risques. Ne jamais plonger la |
2 |
Touche á Personnalisation |
||
machine ou le cordon électrique dans l’eau. |
3 |
Touche à Programmes de maintenance |
||
Ne pas glisser les doigts à l’intérieur du |
4 |
Touches de sélection < > |
||
moulin. |
|
|
5 |
Ecran |
Utiliser la machine uniquement dans des |
|
a) Ligne d’état |
||
locaux à l’abri du gel. |
|
.b) Ligne de sélection |
||
¡¡Risque de brûlure ! |
6 |
c) Ligne de navigation |
||
Bouton rotatif pour réglages à l’écran |
||||
Le mousseur lait 10 devient brûlant. Après |
7 |
Touche j (menu Info) |
||
utilisation, bien laisser refroidir la buse |
8 |
Touche start (boissons / programmes) |
||
avant de la saisir. |
9 |
.Bec verseur du café |
||
|
|
|
10 |
réglable en hauteur et pivotant |
Contenu de l’emballage |
.Mousseur de lait |
|||
|
réglable en hauteur et amovible. |
|||
|
|
|
|
(production de mousse de lait / eau |
(voir l’illustration figurant au début du |
|
chaude) |
||
présent |
Mode d’emploi) |
|
a) partie supérieure |
|
1.Machine à café TES711 |
|
b) partie inférieure |
||
2.Mémento |
|
|
c) flexible |
|
3.Mode d’emploi |
11 |
d) tube mousseur |
||
4.Mousseur lait |
Réservoir d’eau amovible |
|||
5.Bandelette. |
pour déterminer la |
12 |
Couvercle du réservoir d’eau |
|
dureté de l’eau |
13 |
.Logements (cuillère-dose et accessoire |
||
6.Cuillère-dose |
14 |
mousseur lait) |
||
7.Pastilles de nettoyage |
Cuillère-dose (sert de poignée pour |
|||
|
|
|
15 |
.placer le filtre d’eau) |
|
|
|
Bac à café |
|
|
|
|
16 |
Couvercle préservateur d’arôme |
|
|
|
17 |
Sélecteur de réglage de finesse de |
|
|
|
18 |
mouture |
|
|
|
.Tiroir à café |
|
|
|
|
19 |
(café en poudre / pastille de nettoyage) |
|
|
|
Volet de la chambre de percolation |
|
|
|
|
20 |
Ouvre-volet |
|
|
|
21 |
Unité de percolation |
|
|
|
|
a) Bouton poussoir |
|
|
|
22 |
b) Verrouillage |
|
|
|
Logement du Mémento |
|
|
|
|
23 |
Panneau des bacs collecteurs |
|
|
|
24 |
Bac collecteur |
|
|
|
25 |
Grille |
|
|
|
26 |
Récipient pour marc de café |
|
|
|
27 |
Logement du cordon électrique |
Robert Bosch Hausgeräte GmbH
 Loading...