


TES 506..
en |
Operating instructions |
pl |
Instrukcja obsługi |
fr |
Notice d’utilisation |
cz |
Návod k použití |
nl |
Gebruiksaanwijzing |
ru |
Инструкция по |
|
|
|
эксплуатации |
TES506_1RW.indb 1 |
16.06.2011 13:50:54 |

en |
English |
2 |
|
|
|
fr |
Français |
20 |
|
|
|
nl |
Nederlands |
39 |
|
|
|
pl |
Polski |
58 |
|
|
|
cz |
Čeština |
77 |
|
|
|
ru |
Русский |
96 |
|
|
|
2 3
1
E-Nr. ……… FD… …
4
5 6 7
TES506_1RW.indb 2 |
16.06.2011 13:50:55 |
A
18
17
16
15
14
13
12
11
10
9
8
1 |
2 3 |
4 |
 5
5
 6
6
7
TES506_1RW.indb 3 |
16.06.2011 13:51:01 |

B
19
22 |
|
20 |
|
|
|
21 |
|
|
|
|
|
C |
6e |
D |
8a |
|
|
||
|
|
|
8b |
6d |
|
|
|
6a |
|
|
8d |
6b |
|
|
|
|
6c |
8c |
|
|
|
||
|
|
|
TES506_1RW.indb 4 |
16.06.2011 13:51:03 |

 5c
5c
5a 


 5b
5b
5d

 5e
5e
|
|
|
|
|
TES506_1RW.indb 5 |
16.06.2011 13:51:04 |
|||

2 |
|
en |
Table of Contents |
|
Dear Coffee Connoisseur. |
Included in delivery |
3 |
Congratulations on purchasing this fully |
automatic espresso machine from Bosch. |
||
Overview..................................................... |
3 |
These instructions describe various models |
Controls ...................................................... |
4 |
with different features. |
− Power on/off switch O/ I .......................... |
4 |
Please also note the enclosed quick refer- |
− dbutton ................................................ |
4 |
ence guide. It can be kept in the special |
− eoff / J button........................................ |
4 |
storage compartment (5c) until it is needed. |
− H / G button.......................................... |
4 |
|
− start button ............................................. |
4 |
|
− “Coffee strength” rotary knob .................. |
4 |
Safety instructions |
− “Drink selection” rotary knob ................... |
4 |
|
− Rotary selector for warm milk/milk froth.. |
5 |
Please read the operating instructions |
Display messages ...................................... |
5 |
carefully and keep them for future refer- |
AromaDouble Shot ..................................... |
5 |
ence. Please pass on these manuals to |
Before using for the first time...................... |
5 |
the new owner if you sell the appliance. |
Water ilter .................................................. |
7 |
This fully automatic espresso machine |
Menu settings ............................................. |
7 |
is designed for preparation of small |
− Shut off............................................... |
8 |
amounts of coffee for domestic use or |
− Filter..................................................... |
8 |
for use in non-commercial, household- |
− Start Calc‘n‘Clean .......................... |
8 |
like environments, such as staff kitchens |
− Temp....................................................... |
8 |
in shops, ofices, agricultural and other |
− Language............................................. |
8 |
small businesses or for use by guests at |
− Water hardness............................... |
8 |
bed-and-breakfast establishments, small |
− Drink counter ................................... |
8 |
hotels and similar residential facilities. |
Adjusting the grinding unit .......................... |
8 |
¡ Risk of electric shock |
Preparation using coffee beans.................. |
9 |
|
Preparation using ground coffee ................ |
9 |
Connect and operate the appliance only in |
Dispensing hot water................................ |
10 |
accordance with the speciications on the |
Preparing milk froth and warm milk .......... |
10 |
rating label. |
Maintenance and daily cleaning ............... |
11 |
Do not use if either the power cord or the |
− Cleaning the milk system ...................... |
11 |
appliance is damaged. |
− Cleaning the brewing unit...................... |
12 |
Use indoors at room temperature only. |
Tips on energy saving .............................. |
13 |
This appliance is not intended for use by |
Service Programmes................................ |
13 |
persons (including children) with reduced |
− Descaling .............................................. |
14 |
physical, sensory or mental capabilities, or |
− Cleaning................................................ |
14 |
lack of experience and knowledge, unless |
− Calc‘n‘Clean.......................................... |
15 |
they have been given supervision or in- |
Frost protection......................................... |
16 |
struction concerning use of the appliance by |
Accessories .............................................. |
16 |
a person responsible for their safety. |
Disposal.................................................... |
16 |
Keep children away from the appliance. |
Guarantee................................................. |
16 |
Children should be supervised to ensure |
Simple troubleshooting............................. |
17 |
that they do not play with the appliance. |
Technical data........................................... |
19 |
In the event of malfunction, unplug the ap- |
|
|
pliance immediately. |
|
|
To avoid potential hazards, repairs such as |
|
|
replacing a damaged cord should only be |
|
|
performed by our service personnel. |
Robert Bosch Hausgeräte GmbH
TES506_1RW.indb 2 |
16.06.2011 13:51:05 |

en |
|
3 |
|
Never immerse the appliance or power cord |
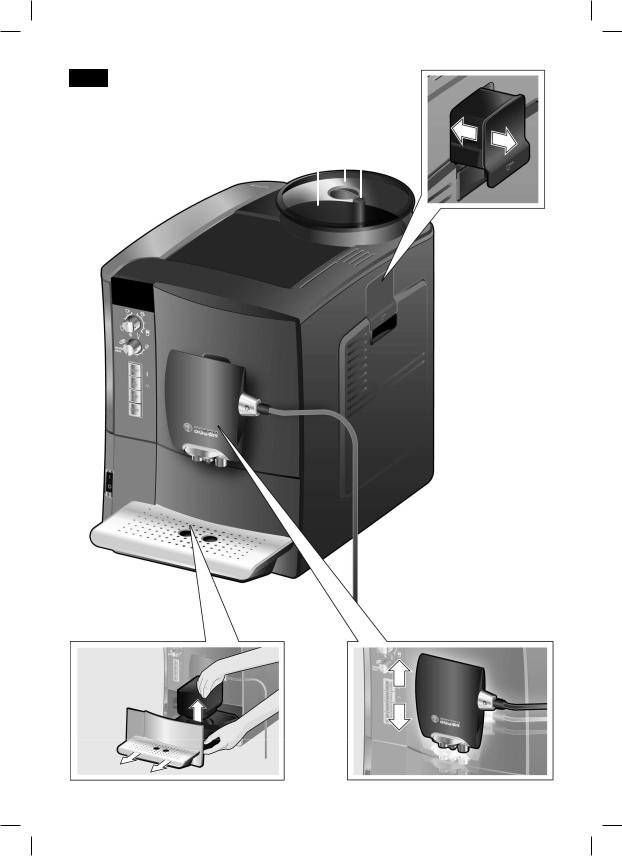
Overview |
||
in water. |
Figures A, B, C, D and E |
||
Do not reach into the grinding unit. |
|||
Use the appliance only in frost-free rooms. |
1 |
Bean container |
|
¡ Risk of scalding |
|||
2 |
Aroma cover |
||
The milk frother outlet (6a) gets very hot. |
3 |
Selector for grind setting |
|
After use, allow to cool down irst before |
4 |
Drawer |
|
touching. |
|
(ground coffee/cleaning tablet) |
|
Use this appliance only after the milk frother |
5 |
Brewing unit (Fig. E) |
|
(6) has been fully assembled and installed. |
|
a) Brewing unit |
|
¡ Risk of suffocation |
|
b) Door |
|
|
c) Storage compartment for quick |
||
Do not allow children to play with packaging |
|
reference guide |
|
material. |
|
d) Push button |
|
|
|
e) Lock |
|
|
6 |
Milk frother (Fig. C) |
|
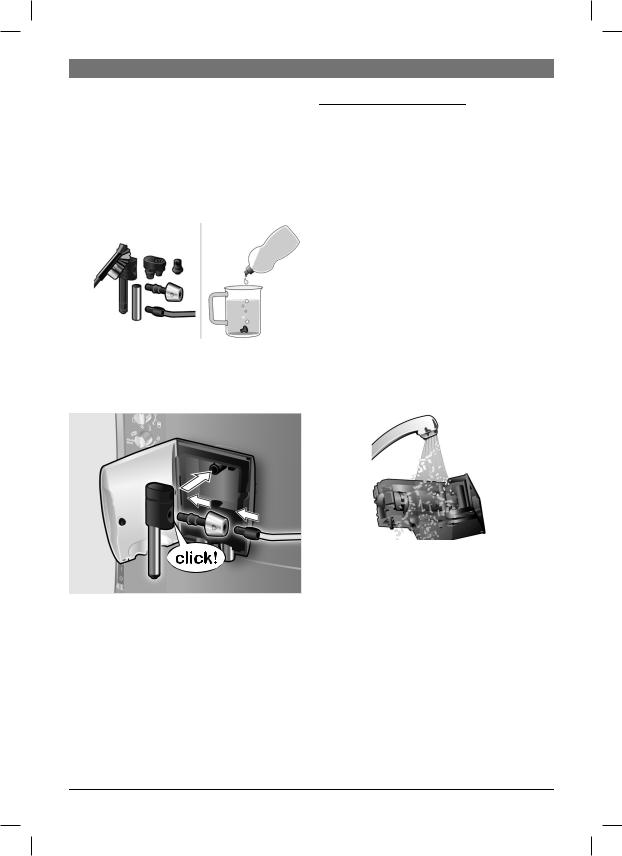
Included in delivery |
|
a) Outlet |
|
|
b) Rotary selector for warm milk/ |
||
See the illustration at the beginning of this |
|
milk froth |
|
instruction manual. |
|
c) Milk tube |
|
|
|
d) Upper part |
|
1 Fully automatic espresso machine |
7 |
e) Air nozzle |
|
TES506 |
Coffee outlet, height-adjustable |
||
2 Quick reference guide |
8 |
Drip tray (Fig. D) |
|
3 Instruction manual |
|
a) Drip tray panel |
|
4 Milk frother |
|
b) Coffee grounds container |
|
5 Water hardness testing strip |
|
c) Drip tray for coffee outlet |
|
6 Measuring spoon |
|
d) Grate for coffee outlet |
|
7 Grease (tube) |
9 |
Power on/off switch O/ I |
|
|
10 |
start button |
|
|
11 |
dbutton |
|
|
12 |
H / G button |
|
|
13 |
eoff / J button |
|
|
14 |
“Coffee strength” rotary knob |
|
|
15 |
“Drink selection” rotary knob |
|
|
16 |
Display |
|
|
17 |
Removable water tank |
|
|
18 |
Lid for water tank |
|
|
19 |
Measuring spoon |
|
|
20 |
(insertion aid for water ilter) |
|
|
Water ilter |
||
|
21 |
Storage compartment for |
|
|
22 |
measuring spoon |
|
|
Power cable with storage compartment |
||
TES506.. 06/2011
TES506_1RW.indb 3 |
16.06.2011 13:51:05 |

4
Controls
Power on/off switch O/ I
The power switch O / I (9) is used to switch the appliance on or to switch it off fully (power supply off).
Important: Before switching off, run the cleaning programme or use the eoff / J button (13) to switch off.
dbutton
Press the dbutton (11) to prepare two cups of the selected drink at the same time. The button can be activated for drinks without milk and without the AromaDouble Shot function.
eoff / J button
When the eoff / J button (13) is pressed briel y, the appliance rinses and switches off. Pressing and holding down the eoff / J button (13) displays the user settings or starts the descaling and cleaning function.
H / G button
Press the H / G button (12) to generate steam for preparing milk froth or warm milk. This button is also used to dispense hot water.
start button
Press the start button (10) to begin drink preparation or to start a service programme. Press the start button (10) again during drink preparation to cut the dispensing process short.
en
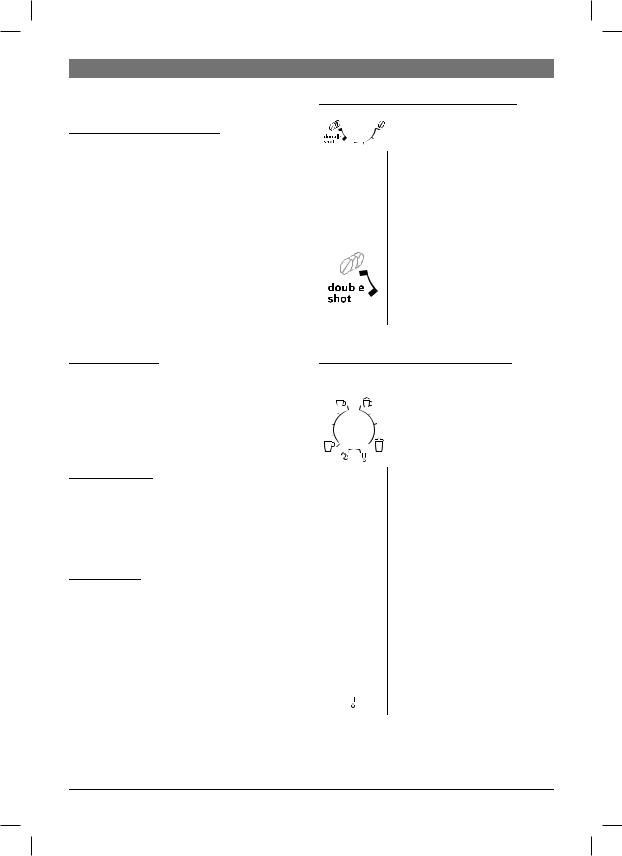
“Coffee strength” rotary knob
|
|
This rotary knob (14) is used |
|
|
to set the coffee strength. |
h |
Very mild |
|
|
|
Mild |
to |
Normal |
|
|
|
Strong |
g |
DoubleShot strong+ |
|
|
|
DoubleShot strong++ |
|
|
With these coffee strengths |
|
|
the coffee is brewed in 2 |
|
|
stages. See “AromaDouble |
|
|
|
|
|
Shot” on page 5. |
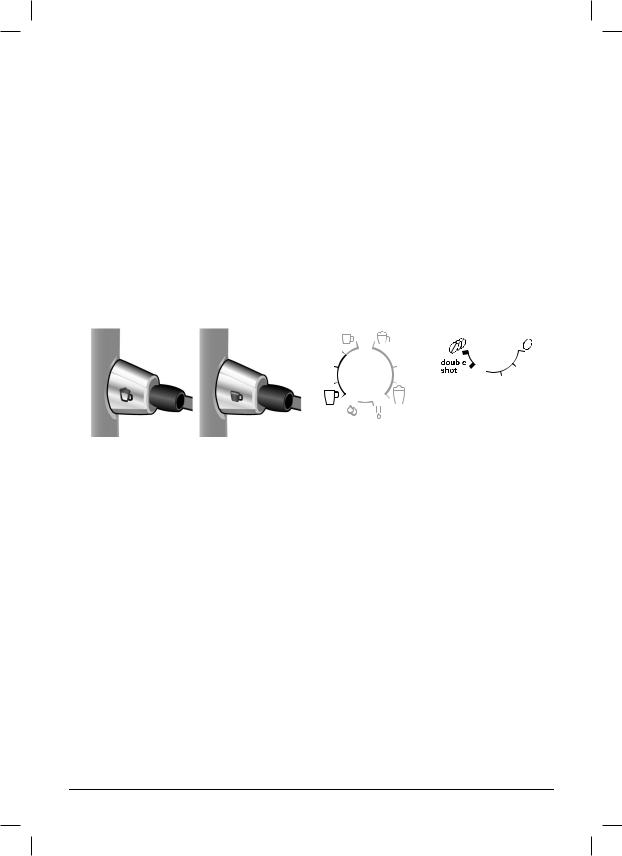
“Drink selection” rotary knob
|
|
|
This rotary knob (15) is used |
|
|
|
to select the required drink |
|
|
|
and the per-cup quantity. It |
|
|
|
is also used to change user |
|
|
|
|
|
|
|
settings. |
|
|
|
Coffee-based drinks without |
|
|
|
|
a |
milk: |
||
Small Espresso |
|||
to |
Espresso |
||
Small Café Crème |
|||
c |
Café Crème |
||
Large Café Crème |
|||
|
|
|
|
|
|
|
Coffee-based drinks with |
m |
milk: |
||
Small Cappuccino |
|||
to |
Large Cappuccino |
||
Small Macchiato |
|||
n |
Macchiato |
||
Large Macchiato |
|||
|
|
|
|
e |
Rinse machine |
||
|
|
|
|
|
|
|
|
|
|
|
Rinse milk system |
|
|
|
|
N.B.: If a drink is selected that cannot be
prepared, Invalid combination appears
in the display. Change the coffee strength or the selected drink.
Robert Bosch Hausgeräte GmbH
TES506_1RW.indb 4 |
16.06.2011 13:51:05 |
en |
5 |
|||
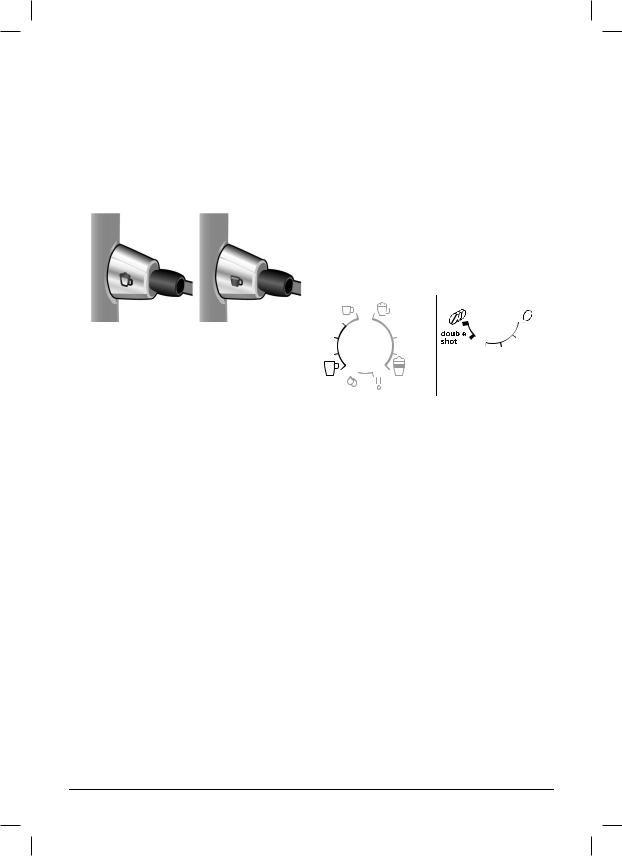
Rotary selector for warm milk/milk froth |
|
AromaDouble Shot |
||
To dispense milk froth – for example for a |
||||
|
|
|||
latte macchiato or cappuccino – turn the j |
The longer the coffee is brewed, the more |
|||
symbol to the front. |
bitter substances and undesired aromas |
|||
To dispense warm milk, turn the isymbol |
are released. This has a negative effect on |
|||
to the front. |
the taste and makes the coffee less easily |
|||
To dispense hot water, set the rotary selec- |
digestible. So for extra strong coffee the |
|||
tor to the horizontal position. |
TES506 has a special AromaDouble Shot |
|||
|
|
function. When half the quantity has been |
||
|
|
prepared, coffee is ground and brewed |
||
|
|
again so that only the pleasant, aromatic |
||
|
|
scents are released. |
||
|
|
The AromaDouble Shot function is activated |
||
|
|
with the following settings: |
||
|
|
|
|
|
|
|
|
|
|
Display messages
The display (16) shows not only the current operating status, but also various messages that give you status information or let you know when you need to take action. As soon as you have taken the necessary action, the message disappears and the menu for drink selection is displayed again.
Before using for the irst time
General
Fill the water tank with fresh, cold, uncarbonated water only, and preferably use only beans for fully automatic coffee and espresso machines. Do not use coffee beans that have been glazed, caramelised or treated with other additives containing sugar, since they will block the brewing unit.
The water hardness setting can be adjusted on this appliance. The factory default setting for the water hardness is 4. Check the water hardness with the enclosed test strip. If the check reveals a value other than 4, change the setting on the appliance accord-
ingly after switching on (see “Menu settings”
Water hardness on page 8).
TES506.. 06/2011
TES506_1RW.indb 5 |
16.06.2011 13:51:05 |

6
Switching on the appliance
1.Place the fully automatic espresso machine on a l at, water-resistant surface that can take its weight. Make sure that the machine’s ventilation slots remain unobstructured.
2.Pull the power cord out of the storage compartment (22) and plug in. Adjust the length of the cable by pushing it back in or pulling it out. The easiest way to do this is to place the appliance so that its back is l ush with the edge of the counter and either pull the cable downward or push it upward.
3.Install the milk frother. Operate the machine only after the milk frother (6) has been fully assembled and installed.
4.Lift the lid of the water tank (18).
5.Remove and rinse the water tank (17) and i ll it with fresh cold water.
Do not i ll above the max mark.
6.Replace the water tank (17) and push it i rmly downward into place.
7.Close the lid of the water tank (18) again.
8.Fill the bean container (1) with coffee beans. (For preparation using ground coffee, see “Preparation using ground coffee” on page 9.)
9.Press the power switch O / I (9). The display (16) shows the menu for setting the display language.
en
10.Select the required display language with the upper rotary knob (15). The fol-
lowing languages are available:
English Nederlands Français Italiano Svenska Español Polski Magyar Türkçe Dansk Norsk Suomi Português Čeština ελληνικα български русский
11.Place a receptacle under outlet (6a).
12.Press the start button (10). The language you selected is saved.
The appliance heats up and rinses. Some water will run out of the coffee outlet. When the drink selection menu is shown in the display, the appliance is ready for use.
Switching off the appliance
If the appliance has not been used for an hour, it rinses automatically and then
switches off (time span can be programmed, see “Menu settings” Shut off on page 8).
Exception: The appliance switches off without rinsing if only hot water or steam were dispensed.
To switch the appliance off manually before this, press the eoff / J button (13). The appliance rinses and switches off.
N.B.: If the appliance is being used for the i rst time, a service program has been run, or the appliance has not been operated for a long period, the i rst beverage will not have the full aroma and should not be consumed.
When using the espresso machine for the first time, you will achieve a suitably thick and stable “crema” only after the first few cups have been dispensed.
After extended use, water droplets may form on the ventilation slots. This is normal.
Robert Bosch Hausgeräte GmbH
TES506_1RW.indb 6 |
16.06.2011 13:51:06 |
en |
7 |
Water ilter
A water i lter can prevent scale buildup. Before a new water i lter is used, it must be rinsed. To do this, proceed as follows:
1.Press the water i lter (20) i rmly into the water tank with the aid of the measuring spoon (19).
2.Fill the water tank (17) with water up to the max mark.
3.Press and hold the eoff / J button (13) for at least three seconds. The menu opens.
4.Press the eoff / J button (13) repeat-
edly until the display shows No / Old
filter.
5.Select Activate filter with the upper rotary knob (15).
6.Press the start button (10).
7.Place a receptacle with a capacity of 0.5 litres under the outlet (6a).
8.Press the start button (10).
9.Water will now l ow through the i lter to rinse it.
10.Empty the container.
The appliance is ready to use once more.
Note: Rinsing the i lter simultaneously activates the setting for the Change filter!
display.
The i lter is no longer effective when the Change filter! display appears, or at
the latest after 2 months. It needs to be replaced for reasons of hygiene and so that there is no build-up of limescale (this could damage the appliance). Replacement i lters can be obtained from retailers (TCZ7003) or
from customer service (467873). If no new i lter is used, turn the filter setting to
No / Old.
Note: You can use the i lter indicator to mark the month in which you inserted the
i lter. You can also mark the month in which you will need to replace the i lter next (at the latest after two months).
Note: If the appliance has not been used for a prolonged period (e.g. vacation) the
i lter should be rinsed before the appliance is used again. To do so, dispense a cup of hot water and pour it away.
Menu settings
You can adapt the appliance to your individual needs in the menu settings.
1.Hold the eoff / J button (13) down for at least 3 seconds.
2.Press the eoff / J button (13) repeatedly until the required menu item appears in the display.
3.Select the required setting with the upper rotary knob (15).
4.Coni rm by pressing the start button (10).
To leave the menu without making any changes, turn the rotary selector to Exit and press the start button (10).
TES506.. 06/2011
TES506_1RW.indb 7 |
16.06.2011 13:51:07 |

8
You can set the following:
Shut off: Here you can set the time span after which the appliance automatically switches off following the last drink preparation. A time between 15 minutes and 4 hours can be set. The default time is 1 hour, but this can be shortened to save energy.
Filter: Here you can set whether a water ilter is being used. If a water ilter is not being used, turn the setting to No / Old. If a
water ilter is being used, turn the setting to Activate filter. New water ilters have to
be rinsed before use (see “Water ilter” on page 7).
Start Calc‘n‘Clean: The service programmes (Calc‘n‘Clean / descaling /
cleaning) can be selected manually here.
Press the start button (10) and run the selected programme (see “Service Programmes” on page 13).
Temp.: The brewing temperature (high / middle / low) can be set here.
Language: The display language can be set here.
Water hardness: The water hardness setting can be adjusted on this appliance. It is important to set the water hardness correctly, so that the appliance indicates accurately when the descaling programme should be run. The factory setting for the water hardness is 4.
You can check the water hardness using the enclosed test strip or by asking your local water supplier.
Dip the test strip briely in water, gently shake off any drips, and check the result after one minute.
en
Level |
Water hardness |
|
|
German (°dH) |
French (°fH) |
1 |
1-7 |
1-13 |
2 |
8-14 |
14-25 |
3 |
15-21 |
26-38 |
4 |
22-30 |
39-54 |
Drink counter: This displays how many drinks have been dispensed since the appliance was irst put into operation.
Adjusting the grinding unit
The rotary selector (3) adjusts the grind settings from coarse to ine.
Warning
Adjust the grinding unit only while it is running! Otherwise the appliance may be damaged. Do not reach into the grinding unit.
●While the grinding unit is running, adjust the rotary selector (3) from ine (a: Turn anticlockwise) to coarse (b: Turn clockwise) as required.
a |
b |
Note: The new setting will not become apparent until after the second cup of coffee.
Tip: For dark roast coffee beans, choose a iner grind, for lighter beans a coarser grind.
Robert Bosch Hausgeräte GmbH
TES506_1RW.indb 8 |
16.06.2011 13:51:07 |

en
Preparation using coffee beans
This fully automatic espresso machine grinds beans freshly for each brew.
The appliance must be ready for use. To prepare a coffee-based drink with milk, irst insert the milk tube into a milk container and turn the rotary selector (6b) to “Milk froth” j.
Important: Dried milk residue is dificult to remove, so the milk frother (6) must be
cleaned with lukewarm water immediately after use and rinse using the Rinse milk system programme (see page 11).
Tip: If possible, use only beans for fully automatic coffee and espresso machines. For optimal quality, deep-freeze the beans or store in a cool place in sealed containers. Coffee beans can be ground while frozen.
Important: Fill the water tank (17) with fresh water every day. The tank (17) should always contain suficient water for operating the appliance.
Preparation
1.Place the pre-warmed cup(s) under the coffee outlet (7).
Tip: For a small espresso, always preheat the cup, e.g. using hot water.
2.Select the required coffee and the required per-cup quantity by turning the upper rotary knob (15). The selected coffee and the per-cup quantity are shown in the display.
3.Select the required coffee strength by turning the lower rotary knob (14). The selected coffee strength is shown in
the display. To prepare two cups at the same time, press the dbutton (11)
(only for drinks without milk and without the AromaDouble Shot function).
4.Press the start button (10).
9
The coffee is brewed and then dispensed into the cup(s).
N.B.: With some settings the coffee is prepared in two stages (see “AromaDouble Shot” on page 5). Wait until the procedure is fully completed.
Press the start button (10) again to cut the brewing process short.
Preparation using ground coffee
This fully automatic espresso machine can also be operated with ground coffee (not instant coffee powder).
The appliance must be ready for use. To prepare a coffee-based drink with milk, irst insert the milk tube into a milk container and turn the rotary selector (6b) to “Milk froth” j.
N.B.: The AromaDouble Shot function cannot be used when coffee is prepared using ground coffee.
Important: Dried milk residue is dificult to remove, so the milk frother (6) must be
cleaned with lukewarm water immediately after use and rinse using the Rinse milk system programme (see page 11).
Important: Fill the water tank (17) with fresh water every day. The tank (17) should always contain suficient water for operating the appliance.
Preparation
1.Open the drawer (4).
2.Pour in no more than 2 level measuring spoons of ground coffee.
Warning: Do not use whole beans or instant coffee.
3.Close the drawer (4).
TES506.. 06/2011
TES506_1RW.indb 9 |
16.06.2011 13:51:07 |

10
4.Select the required drink by turning the upper rotary knob (15) (only one cup possible).
5.Press the start button (10).
The coffee is brewed and then dispensed into the cup.
N.B.: Repeat the procedure for another cup of coffee. If no coffee is taken within 90 seconds, the brewing chamber empties automatically to avoid overi lling. The appliance rinses.
Dispensing hot water
¡ Risk of burns
The milk frother (6) gets very hot. Hold the milk frother (6) by the plastic part only.
The appliance must be ready for use.
1.Place the pre-warmed cup or glass under the outlet of the milk frother (6).
2.Set the rotary selector (6b) to the horizontal position.
3.Press and hold the H / G button (12) for approx. 3 seconds. The appliance heats up. Hot water runs out of the milk frother outlet (6) for about 40 seconds.
4.Press the H / G button (12) again to cut the process short.
en
Preparing milk froth and warm milk
¡ Risk of burns
The milk frother (6) gets very hot. Hold the milk frother (6) by the plastic part only.
Tip: You can foam the milk i rst and then dispense coffee, or foam the milk separately and pour it onto the coffee.
The appliance must be ready for use.
1.Place a pre-warmed cup under outlet (6a).
2.Insert the milk tube (6c) into a milk container.
3.Turn the rotary selector (6b) to “Milk froth” jor “Warm milk” i.
4.Press the H / G button (12).
The H / G button (12) l ashes and the appliance now heats up for approx. 20 seconds.
¡ Risk of burns
Milk froth or warm milk comes out of the milk frother (6) at high pressure. Splashes of milk can scald. Do not touch the outlet (6a) or aim it at anyone.
5.End the process by pressing the H / G button (12).
Tip: For optimal milk froth quality, use cold milk with a fat content of at least 1.5 % if possible.
Robert Bosch Hausgeräte GmbH
TES506_1RW.indb 10 |
16.06.2011 13:51:07 |

en |
11 |
Important: Dried milk residue is difi cult to remove, so the milk frother (6) must be
cleaned with lukewarm water immediately after use and rinse using the Rinse milk system programme (see page 11).
Maintenance and daily cleaning
¡ Risk of electric shock
Unplug the appliance before cleaning it. Never immerse the appliance in water. Do not use a steam cleaner.
●Wipe the outside of the appliance with a soft, damp cloth.
●Do not use abrasive cloths or cleaning agents.
●Always remove any limescale, coffee, milk or descaling l uid residue immediately. Such residue can cause corrosion.
●Pull the drip tray (8c) with the coffee grounds container (8b) forward and out. Remove the panel (8a) and the grate (8d). Empty and clean the drip tray and coffee grounds container.
●Remove drawer (4) and clean.
●Do not put the following items in the dishwasher: cover of the storage compartment (5c), drip tray panel (8a), drawer (4), brewing unit (5a).
●The following items are dishwasher-safe: drip tray for coffee outlet (8c), coffee grounds container (8b), grate for coffee outlet (8d), aroma cover (2) and measuring spoon (19).
●Wipe out the inside of the appliance (tray holders and drawer).
Important: Drip tray for coffee outlet (8c) and coffee grounds container (8b) should be emptied and cleaned daily to prevent mould from developing.
N.B.: If the appliance is cold when switched on with the power switch O / I (9) or if it switches off automatically after coffee has been dispensed, it rinses automatically. In other words the system cleans itself.
Important: If the appliance has not been used for a prolonged period of time (e.g. after a vacation), clean the entire appliance thoroughly, including the milk system and brewing unit.
Cleaning the milk system
If the milk system was not cleaned after
milk has been dispensed, after a certain amount of time the message Rinse milk system! will appear on the display.
Clean the milk system immediately after use! To clean, leave the rotary selector (6b) in the same position it was in when last used.
To pre-clean the milk system automatically:
1.Select f by turning the rotary knob (15).
2.Place a tall, empty container under the outlet (6a).
3.Push the outlet as close as possible to the container.
4.Place the end of the milk tube (6c) into the container.
5.Press the start button (10).
The machine automatically releases water into the container and vacuums it up again via the milk tube to rinse the milk system.
The rinse procedure stops automatically after about 1 minute.
6.Empty the container and clean the milk tube (6c).
In addition to this, clean the milk system thoroughly at regular intervals (by hand or in the dishwasher).
TES506.. 06/2011
TES506_1RW.indb 11 |
16.06.2011 13:51:07 |
12
Dismantling the milk system for cleaning:
1.Pull the milk frother (6) forward out of the appliance.
2.Dismantle the milk frother into its individual parts (6a) to (6d) (see igure C at the start of the operating instructions).
3.Clean the individual parts with a detergent solution and a soft brush. If necessary, soak in a warm detergent solution.
4.Rinse all parts with clear water and dry them.
5.Reassemble all the parts and replace fully in the appliance.
¡ Risk of scalding
Use this appliance only after the milk frother
(6) has been fully assembled and installed.
en
Cleaning the brewing unit
Clean the brewing unit regularly!
To pre-clean the brewing unit automatically:
1.Select eby turning the rotary knob (15).
2.Place an empty glass under outlet (6a).
3.Press the start button (10).
The appliance rinses.
In addition to the automatic cleaning programme, the brewing unit (5a) should be removed regularly for cleaning. (See igure E at the start of the operating instructions.)
1.Switch the appliance off at the power on/off switch O/I (9). No buttons are lit.
2.Open the door (5b) to the brewing unit.
3.Slide the red lock (5e) on the brewing unit completely to the left.
4.Press the red button (5d), grasp the brewing unit by the recessed grips and remove carefully.
5.Rinse the brewing unit (5a) thoroughly under running water.
Important: Do not clean with detergent or other cleaning agents and do not put it in the dishwasher.
6.Wipe out the inside of the appliance thoroughly with a damp cloth and remove any coffee residues.
7.Allow the brewing unit (5a) and the inside of the appliance to dry.
8.Reinsert the brewing unit (5a) fully into the appliance.
9.Slide the red lock (5e) fully to the right and close the door (5b).
Robert Bosch Hausgeräte GmbH
TES506_1RW.indb 12 |
16.06.2011 13:51:08 |

en
N.B.: After cleaning thoroughly, the seals of the brewing unit should be greased regularly for optimal care. Apply a thin layer of the special grease intended for this purpose (Order No. 311368) all around the seals.
Tips on energy saving
●The fully automatic espresso machine switches off automatically after one hour (factory setting). The default time of one
hour can be shortened (see “Menu settings” Shut off on page 8).
●Switch off the fully automatic espresso
machine when not in use. To do this, press the eoff / J button (13). The appliance rinses and switches off.
●If possible, do not interrupt coffee or milk froth dispensing. Cutting the coffee or milk froth dispensing process short results in higher energy consumption and in more residual water collecting in the drip tray.
●Descale the appliance regularly to avoid a build-up of limescale. Limescale residue results in higher energy consumption.
13
Service Programmes
Tip: Refer also to the quick reference guide in the storage compartment (5c).
Depending on usage, the following messages will appear on the display at certain intervals:
Descale required!
or
Clean required!
or
Calc‘n‘Clean required!
The appliance should be cleaned or descaled immediately using the corresponding programme. You also have the option of combining both processes with the Calc‘n‘Clean function (see “Calc‘n‘Clean” on page 15). If the service programme is not run as instructed, the appliance may be damaged.
Warning
Each time you run the service programme, you should follow the instructions for using the descaling and cleaning agents. Please observe the safety instructions on the packaging of the cleaning agent.
Never interrupt the service programme! Do not drink the liquids!
Never use vinegar, vinegar-based products, citric acid or citric acid-based products! Never put descaling tablets or other descaling agents in the ground coffee drawer or the drawer for cleaning tablets (4)!
Specially developed descaling and cleaning tablets are available from retailers or customer service.
TES506.. 06/2011
TES506_1RW.indb 13 |
16.06.2011 13:51:08 |

14
Order number |
|
Retail |
|
Customer |
|
|
|||
|
|
|
|
service |
Cleaning |
|
TCZ6001 |
|
310575 |
tablets |
|
|
|
|
Descaling |
|
TCZ6002 |
|
310967 |
tablets |
|
|
|
|
en
Fill descaler
Press start
●Pour lukewarm water into the empty water tank (17) up to the 0,5l mark and dissolve 2 Bosch descaling tablets in it.
●Press the start button (10).
Important: If there is a ilter in the water tank (17), it needs to be removed before the service programme is run.
Descaling
Duration: approx. 25 minutes.
Important: If there is a ilter in the water tank (17), it needs to be removed before the descaling programme is run.
If the message Descale required! ap-
pears on the display, press the eoff / J button (13) for 3 seconds and then press the start button (10). The descaling programme will start.
To descale the appliance before being prompted, press the eoff / J button (13) for at least 3 seconds. Then press the eoff / J
button (13) briely twice. Turn the upper rotary knob (15) until Start descaling
appears in the display. To start the descaling procedure, press the start button (10). The display will guide you through the programme.
Empty drip tray Insert drip tray
● Empty drip tray (8) and replace them.
N.B.: If the water ilter (20) is activated, the display will prompt you to remove the ilter (20) and then press the start button (10) again. Remove the ilter now if you have not already done so. Press the start button (10).
Place container
Press start
●Place a receptacle with a capacity of at least 0.5 litres under the outlet (6a).
●Press the start button (10).
Descale in progress
The descaling programme will now run for about 20 minutes.
Clean / Fill water tank
Press Start
●Rinse the water tank (17) and reill it with fresh water up to the max mark.
●Press the start button (10).
Descale in progress
The descaling programme now runs for about 3 minutes and rinses the appliance.
Empty drip tray Insert drip tray
● Empty drip tray (8) and replace them. Replace the ilter if one is being used. The appliance has completed descaling and is ready for use again.
Cleaning
Duration: approx. 10 minutes.
If the message Clean required! appears on the display, press the eoff / J button (13) for 3 seconds and then press the start button (10).
The cleaning programme will start.
To clean the appliance before being prompted, press the eoff / J button (13) for at least 3 seconds. Then press the eoff / J
button (13) briely twice. Turn the upper rotary knob (15) until Start cleaning
Robert Bosch Hausgeräte GmbH
TES506_1RW.indb 14 |
16.06.2011 13:51:09 |

en
appears in the display. To start the cleaning procedure, press the start button (10). The display will guide you through the programme.
Empty drip tray Insert drip tray
● Empty drip tray (8) and replace them.
Cleaning in progress
The appliance rinses twice.
Open drawer
● Open the drawer (4).
Fill cleaner
●Drop a Bosch cleaning tablet in the drawer (4) and close.
Cleaning in progress
The cleaning programme will now run for about 8 minutes.
Empty drip tray Insert drip tray
● Empty drip tray (8) and replace them. The appliance has inished cleaning is ready for use again.
Calc‘n‘Clean
Duration: approx. 35 minutes.
Calc‘n‘Clean combines the separate functions of descaling and cleaning. If both programmes are due to be run soon, the espresso machine automatically suggests this service programme.
Important: If there is a ilter in the water tank (17), it needs to be removed before the service programme is run.
If the message Calc‘n‘Clean required!
appears on the display, press the eoff / J button (13) for 3 seconds and then press the start button (10). The service programme will start.
15
To run Calc‘n‘Clean before being prompted, press the eoff / J button (13) for at least 3 seconds. Then press the eoff / J but-
ton (13) briely twice. Turn the upper rotary
knob (15) until Start Calc‘n‘Clean
appears in the display. To start Calc‘n‘Clean, press the start button (10).
The display will guide you through the programme.
Empty drip tray Insert drip tray
● Empty drip tray (8) and replace them.
Calc‘n‘Clean in progress
The appliance rinses twice.
Open drawer
● Open the drawer (4).
Fill cleaner
●Drop a Bosch cleaning tablet in the drawer (4) and close.
N.B.: If the water ilter (20) is activated, the display will prompt you to remove the ilter (20) and then press the start button (10) again. Remove the ilter now if you have not already done so. Press the start button (10).
Fill descaler
Press start
●Pour lukewarm water into the empty water tank (17) up to the 0,5l mark and dissolve 2 Bosch descaling tablets in it.
●Press the start button (10).
Place container
Press start
●Place a receptacle with a capacity of at least 1 litre under the outlet (6a).
●Press the start button (10).
Calc‘n‘Clean in progress
The descaling programme will now run for about 22 minutes.
TES506.. 06/2011
TES506_1RW.indb 15 |
16.06.2011 13:51:09 |

16
Clean / Fill water tank
Press Start
●Rinse the water tank (17) and reill it with fresh water up to the max mark.
●Press the start button (10).
Calc‘n‘Clean in progress
The descaling programme now runs for about 10 minutes and rinses the appliance.
Empty drip tray Insert drip tray
● Empty drip tray (8) and replace them. Replace the ilter if one is being used. The appliance has inished cleaning is ready for use again.
en
Accessories
The following accessories can be obtained from retailers and customer service.
Order |
Retail |
Customer |
number |
|
service |
Cleaning |
TCZ6001 |
310575 |
tablets |
|
|
Descaling |
TCZ6002 |
310967 |
tablets |
|
|
Water filters |
TCZ7003 |
467873 |
Milk container |
TCZ7009 |
674992 |
(insulated) |
|
|
Grease (tube) |
– |
311368 |
|
|
|
Frost protection
¡To avoid damage from low temperatures during transport and storage, the appliance must be completely emptied irst.
Note: The appliance must be ready for use and the water tank (17) illed.
1.Place a large receptacle under outlet (6a).
2.Press the H / G button (12) and allow the appliance to steam for about 15 seconds.
3.Switch the appliance off at the power on/off switch O/ I (9).
4.Empty the water tank (17) and the drip tray (8).
Disposal A
Dispose of packaging in an environmen- tally-friendly manner. This appliance is labelled in accordance with the European Directive 2002/96/EG relating to waste electrical and electronic equipment – WEEE. The directive provides the framework for the EU-wide take-back and disposal of end-of- life appliances. Please ask your specialist retailer about current disposal facilities.
Guarantee
The guarantee conditions for this appliance are as deined by our representative in the country in which it is sold. Details regarding these conditions can be obtained from the dealer from whom the appliance was purchased. The bill of sale or receipt must be produced when making any claim under the terms of this guarantee.
Right of modiication reserved.
Robert Bosch Hausgeräte GmbH
TES506_1RW.indb 16 |
16.06.2011 13:51:09 |
en |
|
17 |
|
Simple troubleshooting |
|
||
|
|
|
|
Problem |
Cause |
Solution |
|
Display shows |
Beans are not falling into |
Gently tap the bean con- |
|
Refill beans! although |
the grinding unit |
tainer (1). |
|
the bean container (1) is full, |
(beans too oily). |
Change the type of coffee if |
|
or the grinding unit does not |
|
necessary. |
|
grind the beans. |
|
When the bean container |
|
|
|
(1) is empty, wipe it with a |
|
|
|
dry cloth. |
|
|
|
|
|
No hot water dispensed. |
The milk frother (6) is soiled. |
Clean the milk frother (6), |
|
|
|
see “Maintenance and daily |
|
|
|
cleaning”. |
|
|
|
|
|
Too little or no milk froth |
The milk frother (6) is soiled. |
Clean the milk frother (6), |
|
or |
|
see “Maintenance and daily |
|
the milk frother (6) does not |
|
cleaning”. |
|
draw the milk in. |
|
|
|
Build-up of limescale in the |
Descale the appliance. |
||
|
|||
|
appliance. |
|
|
|
|
|
|
|
Milk unsuitable for frothing. |
Use low-fat milk (1.5 % fat). |
|
|
|
|
|
|
The milk frother (6) is not |
Wet the milk frother parts |
|
|
correctly assembled. |
and press together irmly. |
|
|
|
|
|
Coffee dispensing slows to |
Coffee is ground too inely. |
Adjust the grinding unit to a |
|
a trickle or stops completely. |
Pre-ground coffee is too |
coarser setting. Use coarser |
|
|
ine. |
pre-ground coffee. |
|
|
Build-up of limescale in the |
Descale the appliance. |
|
|
appliance. |
|
|
|
|
|
|
Coffee has no “crema”. |
Unsuitable type of coffee. |
Use a type of coffee with a |
|
|
|
higher proportion of robusta |
|
|
|
beans. |
|
|
|
|
|
|
The beans are no longer |
Use fresh beans. |
|
|
fresh. |
|
|
|
|
|
|
|
The grinding setting is not |
Adjust grinding setting to |
|
|
suitable for the beans. |
ine. |
|
|
|
|
|
Coffee is too “acidic”. |
The grinding setting is too |
Adjust the grinding unit to a |
|
|
coarse or the pre-ground |
iner setting or use iner pre- |
|
|
coffee is too coarse. |
ground coffee. |
|
|
Unsuitable type of coffee. |
Use a darker roast. |
|
If you are unable to solve the problem, please call the hotline.
TES506.. 06/2011
TES506_1RW.indb 17 |
16.06.2011 13:51:09 |

18 |
|
en |
|
Simple troubleshooting |
|
||
|
|
|
|
Problem |
Cause |
Solution |
|
Coffee is too “bitter”. |
The grinding setting is too |
Adjust the grinding unit to a |
|
|
ine or the pre-ground cof- |
coarser setting or use coars- |
|
|
fee is too ine. |
er pre-ground coffee. |
|
|
Unsuitable type of coffee. |
Change type of coffee used. |
|
|
|
|
|
Display shows |
The appliance has a fault. |
Please call the hotline. |
|
Error |
|
|
|
Call hotline. |
|
|
|
|
|
|
|
The water filter (20) does |
The water filter (20) is not |
Firmly press the water filter |
|
not stay in position in the |
mounted correctly. |
(20) straight down into the |
|
water tank (17). |
|
tank connection. |
|
|
|
|
|
The coffee grounds are not |
The grinding setting is too |
Adjust the grinding unit to |
|
compact and are too wet. |
fine or too coarse, or not |
a coarser or finer setting, |
|
|
enough ground coffee has |
or use 2 level measuring |
|
|
been used. |
spoons of ground coffee. |
|
|
|
|
|
Display shows |
Brewing unit (5) is soiled. |
Clean brewing unit (5). |
|
Clean brewing unit. |
|
|
|
Too much pre-ground cof- |
Clean brewing unit (5). |
||
|
|||
|
fee in the brewing unit (5). |
(Pour in no more than 2 |
|
|
|
level measuring spoons of |
|
|
|
ground coffee). |
|
|
The brewing unit’s |
Remove the brewing unit |
|
|
mechanism is stiff. |
and treat with a special |
|
|
|
grease intended for this pur- |
|
|
|
pose (Order No. 311368), |
|
|
|
see “Maintenance and daily |
|
|
|
cleaning”. |
|
Coffee or milk froth quality varies considerably.
Build-up of limescale in the appliance.
Descale the appliance with two descaling tablets as described in the instructions.
Water dripped onto the inner floor of the appliance when the drip tray (8) was removed.
Drip tray (8) removed too early.
Wait a few seconds after the last drink was dispensed before removing the drip tray (8).
If you are unable to solve the problem, please call the hotline.
Robert Bosch Hausgeräte GmbH
TES506_1RW.indb 18 |
16.06.2011 13:51:09 |

en |
|
19 |
Simple troubleshooting |
|
|
|
|
|
Problem |
Cause |
Solution |
Display shows |
Brewing unit (5) is missing |
Switch off the appliance with |
Insert brewing unit. |
or was not recognised. |
the brewing unit (5) in place, |
|
|
wait three seconds and |
|
|
switch on the appliance. |
|
|
|
Restore the unit to its |
You changed some settings |
Turn off the unit with the |
original factory settings |
and want to discard them. |
power on/off switch O / I (9). |
(“Reset”). |
|
Press and hold the eoff / |
J (13) and the H (12) button and turn the appliance on with the power on/off switch O / I (9). Conirm by pressing the start button start (10). The factory settings are now activated.
If you are unable to solve the problem, please call the hotline.
Technical data
Power connection (voltage/frequency) |
220-240 V / 50-60 Hz |
Heater wattage |
1600 W |
Maximum static pump pressure |
15 bar |
Maximum water tank capacity (without filter) |
1.7 liters |
Maximum capacity of the coffee bean container |
300 grams |
Length of power cable |
100 cm |
Dimensions (H x W x D) |
385 x 280 x 479 mm |
Weight, empty |
9.3 kg |
Type of grinding unit |
Ceramic |
TES506.. 06/2011
TES506_1RW.indb 19 |
16.06.2011 13:51:09 |

20
Sommaire
Contenu de l’emballage............................ |
21 |
Présentation ............................................. |
21 |
Eléments de commande........................... |
22 |
− Interrupteur électrique O/I .................... |
22 |
− Touche d............................................ |
22 |
− Touche eoff / J..................................... |
22 |
− Touche H / G ...................................... |
22 |
− Touche start.......................................... |
22 |
− Sélecteur rotatif « Arôme du café »....... |
22 |
− Sélecteur rotatif « Sélection de la |
|
boisson »............................................... |
22 |
− Sélecteur rotatif Lait chaud/ |
|
Mousse de lait....................................... |
23 |
Messages à l’écran................................... |
23 |
AromaDouble Shot ................................... |
23 |
Avant la première utilisation ..................... |
23 |
Filtre eau................................................... |
25 |
Réglages menu ........................................ |
26 |
− Arrêt .................................................. |
26 |
− Filtre................................................... |
26 |
− Démarrer Calc‘n‘Clean ............... |
26 |
− Temp..................................................... |
26 |
− Langue................................................ |
26 |
− Eau Dureté........................................ |
26 |
− Compteur de boissons ................. |
26 |
Régler la inesse de la mouture................ |
27 |
Préparation avec du café en grains.......... |
27 |
Préparation à partir de café moulu ........... |
28 |
Préparer de l’eau chaude ......................... |
28 |
Préparer de la mousse |
|
de lait et du lait chaud............................... |
29 |
Entretien et nettoyage quotidien............... |
29 |
− Nettoyage du mousseur de lait ............. |
30 |
− Nettoyer l’unité de percolation............... |
31 |
Conseils pour économiser l’énergie ......... |
32 |
Programmes de maintenance .................. |
32 |
− Détartrage ............................................. |
33 |
− Nettoyage.............................................. |
33 |
− Calc‘n‘Clean.......................................... |
34 |
Protection contre le gel............................. |
35 |
Accessoires .............................................. |
35 |
Mise au rebut ........................................... |
35 |
Garantie.................................................... |
35 |
Eliminer soi-même les problèmes simples 36
Caractéristiques techniques ..................... |
38 |
fr
Chère amatrice de café, cher amateur de café.
Félicitation pour avoir choisi la cafetière Bosch.
Ce mode d’emploi décrit différents modèles qui se différencient par leur niveau d’équipement.
Veuillez également tenir compte du Mémento fourni.
Un logement (5c) a été prévu pour le conserver à portée de main dans la machine.
Consignes de sécurité
Lire attentivement le mode d’emploi, se conformer à ses indications et le conserver à portée de la main ! Si vous remettez l’appareil à un tiers, veuillez-y joindre les notices.
Cette machine Espresso tout automatique est conçue pour la préparation de quantités usuelles, dans le cadre d’un foyer ou d’un usage non-commercial de type domestique. Citons par ex. les cuisines du personnel dans les commerces, bureaux, exploitations agricoles et établissements artisanaux ainsi que les clients de pensions, petits hôtels et toute autre résidence de type similaire.
¡ Risque de choc électrique !
Pour le raccordement et l’utilisation de la machine, respecter impérativement les indications igurant sur la plaque signalétique. N’utiliser la machine que si le cordon électrique et la machine ne présentent aucun dommage.
N’utiliser la machine qu’à l’intérieur de locaux, à température ambiante.
Ne pas conier l’appareil à des enfants ou à des personnes aux capacités sensorielles ou intellectuelles diminuées ou ne disposant pas d’une expérience ou d’une connaissance sufisante, sauf si elles le font sous surveillance ou si elles ont bénéicié préalablement d’une information à propos de la manipulation de l’appareil de
Robert Bosch Hausgeräte GmbH
TES506_1RW.indb 20 |
16.06.2011 13:51:09 |

fr |
|
|
21 |
la part de la personne responsable de leur |
Présentation |
|
|
sécurité. |
Figures A, B, C, D et E |
|
|
Bien surveiller les enfants ain de les em- |
|
||
pêcher de jouer avec l’appareil. |
1 |
|
|
En cas de défaut, débrancher immédiate- |
Bac à café |
|
|
ment le cordon électrique. Les réparations |
2 |
Couvercle préservateur d’arôme |
|
sur la machine, par ex. le remplacement du |
3 |
Sélecteur de réglage de inesse de |
|
cordon électrique, doivent être effectuées |
4 |
mouture |
|
uniquement par notre Service après-vente |
Tiroir à café |
|
|
ain d’éliminer tous les risques. Ne jamais |
|
(café en poudre/pastille de nettoyage) |
|
plonger la machine ou le cordon électrique |
5 |
Unité de percolation (igure E) |
|
dans l’eau. |
|
a) Unité de percolation |
|
Ne pas glisser les doigts à l’intérieur du |
|
b) Volet |
|
moulin. |
|
c) Logement du Mémento |
|
Utiliser la machine uniquement dans des |
|
d) Bouton poussoir |
|
locaux à l’abri du gel. |
|
e) Verrouillage |
|
¡ Risque de brûlure ! |
6 |
Mousseur lait (igure C) |
|
|
a) Embout |
|
|
L’embout (6a) du mousseur de lait devient |
|
b) Sélecteur rotatif Lait chaud/ |
|
brûlant. Après utilisation, bien laisser re- |
|
Mousse de lait |
|
froidir la buse avant de la saisir. |
|
c) Flexible Lait |
|
N’utilisez la machine que lorsque le mous- |
|
d) Partie supérieure |
|
seur de lait (6) est entièrement monté et |
7 |
e) Buse à air |
|
installé. |
Bec verseur du café, |
|
|
|
|
réglable en hauteur |
|
¡ Risque d’étouffement ! |
8 |
Bac collecteur (igure D) |
|
Ne pas laisser les enfants jouer avec les |
|
a) Support des bacs collecteurs |
|
emballages. |
|
b) Récipient pour marc de café |
|
|
|
c) Bac collecteur du bec verseur du café |
|
|
|
d) Grille bec verseur du café |
|
Contenu de l’emballage |
9 |
Interrupteur électrique O / I |
|
10 |
Touche start |
|
|
Voir l’illustration igurant au début du |
11 |
Touche d |
|
présent Mode d’emploi. |
12 |
Touche H / G |
|
|
13 |
Touche eoff / J |
|
1 Machine à café TES506 |
14 |
Sélecteur rotatif « Arôme du café » |
|
2 Mémento |
15 |
Sélecteur rotatif « Sélection de la |
|
3 Mode d’emploi |
16 |
boisson » |
|
4 Mousseur lait |
Ecran |
|
|
5 Bandelette pour déterminer la |
17 |
Réservoir d’eau amovible |
|
dureté de l’eau |
18 |
Couvercle du réservoir d’eau |
|
6 Cuillère-dose |
19 |
Cuillère-dose (sert de poignée pour |
|
7 Graisse (tube) |
20 |
placer le iltre d’eau) |
|
|
Filtre eau |
|
|
|
21 |
Logement de la cuillère-dose |
|
|
22 |
Cordon électrique et logement |
|
|
|
|
|
|
|
TES506.. |
06/2011 |
TES506_1RW.indb 21 |
16.06.2011 13:51:09 |
22
Eléments de commande
Interrupteur électrique O / I
L’interrupteur réseau O / I (9) permet de mettre en marche et d’arrêter entièrement la machine (alimentation électrique coupée).
Important : Avant d’arrêter la machine, lancer un programme de rinçage ou bien utiliser la touche eoff / J (13).
Touche d
Appuyer sur la touche d(11) pour préparer simultanément deux tasses de la boisson sélectionnée. La touche est utilisable pour les boissons sans lait et sans fonction
AromaDouble Shot.
Touche eoff / J
Appuyer brièvement sur la touche eoff / J
(13) pour effectuer un rinçage et arrêter la machine. Appuyer de manière prolongée sur la touche eoff / J (13) pour afi cher les réglages utilisateur ou pour lancer un cycle de détartrage et de nettoyage.
Touche H / G
Appuyer sur la touche H / G (12) pour produire de la vapeur, nécessaire pour la production de mousse de lait ou de lait chaud. Cette touche permet également de prélever de l’eau chaude.
Touche start
Appuyer sur la touche start (10) pour lancer la préparation d’une boisson ou pour effectuer un programme de Service.
Pour réduire la quantité de boisson appuyer de nouveau sur la touche start (10) en cours de préparation.
fr
Sélecteur rotatif « Arôme du café »
|
Le sélecteur rotatif (14) sert |
|
à régler l’arôme du café. |
h |
Très doux |
|
Doux |
àNormal Fort
g |
DoubleShot fort + |
|
|
|
DoubleShot fort ++ |
|
|
Avec ces réglages de |
|
|
l’arôme, le café est préparé |
|
|
en 2 étapes. Voir point |
|
|
|
|
|
« AromaDouble Shot » à |
|
|
page 23. |
Sélecteur rotatif « Sélection de la
boisson »
|
|
Le sélecteur (15) permet de |
|
|
sélectionner la boisson et |
|
|
la quantité. Il permet aussi |
|
|
de modii er les réglages de |
|
|
|
|
|
l’utilisateur. |
a |
|
Boisson café sans lait : |
|
Petit espresso |
|
à |
|
Espresso |
|
Petit café crème |
|
c |
|
Café crème |
|
Grand café crème |
|
|
|
|
m |
|
Boisson café avec lait : |
|
Petit cappuccino |
|
|
|
Grand cappuccino |
àPetit macchiato
n |
Macchiato |
Grand macchiato |
|
|
|
e |
Rinçage machine |
|
|
|
|
|
Rinçage syst. lait |
Robert Bosch Hausgeräte GmbH
TES506_1RW.indb 22 |
16.06.2011 13:51:09 |
fr |
23 |
|||||
Remarque : lorsqu’il est sélectionné une |
AromaDouble Shot |
|||||
boisson impossible à préparer, l’écran af- |
|
|
|
|
|
|
i che Combinaison non valide. Modi- |
Plus la percolation du café dure longtemps, |
|||||
i er l’arôme du café ou la sélection de la |
plus les substances amères et les arômes |
|||||
boisson. |
indésirables sont prononcés. Cela a un effet |
|||||
Sélecteur rotatif Lait chaud/ |
négatif sur le goût et rend le café moins |
|||||
digeste. La TES506 dispose donc d’une |
||||||
Mousse de lait |
|
fonction spéciale, AromaDouble Shot pour |
||||
Pour prélever de la mousse de lait – par |
préparer un café très fort. Une fois que |
|||||
exemple pour préparer du Latte Macchiato |
la moitié de la quantité a été préparée, la |
|||||
ou un Cappuccino – tourner le symbole j |
machine moud de nouveau du café et ef- |
|||||
vers l’avant. |
fectue une percolation. Cela permet de ne |
|||||
Pour prélever du lait chaud, tourner le sym- |
développer que les arômes parfumés et |
|||||
bole ivers l’avant. |
très digestes du café. |
|||||
Pour prélever de l’eau chaude, placer le |
Pour activer la fonction AromaDouble Shot, |
|||||
sélecteur horizontalement. |
procéder comme indiqué ci-après : |
|||||
|
|
|
|
|
|
|
|
|
|
|
|
|
|
|
|
|
|
|
|
|
|
|
|
|
|
|
|
Messages à l’écran
En plus de l’état de fonctionnement actuel, l’écran (16) afi che également différents messages qui correspondent à des informations d’état ou qui vous demandent d’intervenir. Dès que vous avez effectué l’opération nécessaire, le message disparaît et le menu de sélection des boissons s’afi che de nouveau.
Avant la première utilisation
Généralités
N’utiliser que de l’eau pure et froide, sans gaz carbonique, et de préférence un mélange de café adapté, pour espresso ou machine à café. Ne pas employer des grains de café avec glaçage, des grains caramélisés ou enrobés d’une substance sucrée quelconque ; ils encrassent et obturent l’unité de passage.
Sur cette machine, il existe un réglage de la dureté de l’eau. En usine, la machine est réglée sur la dureté 4. Se servir de la bandelette fournie pour déterminer la dureté de l’eau.
Si le contrôle donne une valeur différente de 4, il faut programmer la machine en
conséquence après la mise en service (Voir Eau Dureté point « Réglages menu »,
page 26).
TES506.. 06/2011
TES506_1RW.indb 23 |
16.06.2011 13:51:09 |

24 |
|
|
fr |
|
Mise en service de la machine |
10. A l’aide du sélecteur (15), choisir la |
|||
1. |
Placer la machine à café sur un plan |
langue d’afi chage souhaitée. Les |
||
|
horizontal, sufi samment solide pour |
langues suivantes sont disponibles : |
||
|
supporter son poids et résistant à l’eau. |
English |
Nederlands |
|
|
Assurez-vous que la fente de ventilation |
Français |
Italiano |
|
|
de la machine n’est pas obstruée. |
Svenska |
Español |
|
2. |
Extraire du logement (22) la longueur |
Polski |
Magyar |
|
|
de cordon électrique nécessaire et |
Türkçe |
Dansk |
|
|
brancher dans une prise. Pour ajuster la |
Norsk |
Suomi |
|
|
longueur du cordon, il sufi t de le tirer ou |
Português |
Čeština |
|
|
de le repousser à l’intérieur. Pour cela, |
ελληνικα |
български |
|
|
placer la machine sur un bord de table, |
русский |
|
|
|
par ex., et tirer le câble vers le bas ou |
11. Placer un récipient sous l’embout (6a). |
||
|
le pousser vers le haut. |
12. Appuyer sur la touche start (10). La |
||
3. |
Installez le mousseur de lait. N’utilisez la |
langue sélectionnée est enregistrée. |
||
|
machine que lorsque le mousseur de lait |
|
|
|
|
(6) est entièrement monté et installé. |
La machine chauffe et effectue un rinçage. |
||
|
|
|
Un peu d’eau s’écoule à partir du bec ver- |
|
|
|
|
||
|
|
|
seur du café. Lorsque la sélection de bois- |
|
|
|
|
son apparaît à l’écran, la machine est prête |
|
|
|
|
à fonctionner. |
|
|
|
|
Arrêter la machine |
|
|
|
|
Lorsque la machine est restée inutilisée du- |
|
|
|
|
rant une heure, elle effectue automatique- |
|
|
|
|
ment un rinçage et s’arrête (durée réglable, |
|
|
|
|
||
4. |
Rabattre vers le haut le couvercle du |
voir Arrêt point « Réglages menu », page |
||
|
réservoir d’eau (18). |
26). |
|
|
5. |
Retirer le réservoir d’eau (17), le rincer |
Exception : lorsque vous avez prélevé de |
||
|
et le remplir d’eau froide. Ne pas dé- |
l’eau chaude ou de la vapeur, la machine |
||
|
passer le repère max. |
s’arrête sans effectuer de nettoyage. |
||
6. |
Placer le réservoir d’eau (17) bien verti- |
|
|
|
|
cal et appuyer pour le faire descendre. |
Pour arrêter la machine manuellement, ap- |
||
7. |
Refermer le couvercle du réservoir |
puyer sur la touche eoff / J (13). La ma- |
||
|
d’eau (18). |
chine effectue un rinçage et s’arrête. |
||
8. |
Remplir de café en grains le bac à |
Remarque : lors de la première utilisation |
||
|
café (1). (Pour la préparation à partir de |
|||
|
café moulu, voir point « Préparation à |
de la machine ou après un programme de |
||
|
partir de café moulu », page 28.) |
service ou encore après une longue période |
||
9. |
Appuyer sur l’interrupteur électrique |
d’inutilisation, la première tasse préparée |
||
|
O/ I (9). L’écran (16) afi che le menu de |
n’a pas encore son plein arôme. Il ne faut |
||
|
réglage de la langue d’afi chage. |
donc pas la boire. |
|
|
Une fois effectuée la mise en service de la machine, la présence d’une mousse dense et i ne sur le café n’est obtenue qu’après avoir préparé plusieurs tasses.
Robert Bosch Hausgeräte GmbH
TES506_1RW.indb 24 |
16.06.2011 13:51:10 |

fr |
25 |
Après une utilisation extensive, il peut se former des gouttelettes d’eau sur les fentes de ventilation. C’est un phénomène normal.
Filtre eau
L’utilisation d’un i ltre à eau peut diminuer la formation de dépôts calcaires.
Avant d’utiliser un nouveau i ltre à eau il faut tout d’abord effectuer un rinçage. Pour cela, procéder comme indiqué ci-après.
1.En s’aidant de la cuillère dose (19), bien insérer le i ltre à eau (20) dans le réservoir d’eau.
2.Remplir d’eau le réservoir (17) jusqu’au repère max.
3.Maintenez appuyé le bouton eoff / J
(13) durant au moins trois secondes. Le menu s’ouvre.
4.Appuyez plusieurs fois sur le bouton eoff / J (13) jusqu’à ce que l’écran af-
i che Sans/ancien filtre.
5.A l’aide du sélecteur du haut (15), choi-
sir Activer filtre.
6.Appuyer sur la touche start (10).
7.Placer un récipient d’une contenance de 0,5 litre sous l’embout (6a).
8.Appuyer sur la touche start (10).
9.L’eau traverse le i ltre pour le rincer.
10.Ensuite, vider le récipient.
La machine est de nouveau prête à fonctionner.
Info : le rinçage du i ltre a activé le réglage pour l’afi chage du changement de i ltre.
Au moment où s’afi che Remplacer filtre ! ou bien au bout de 2 mois, au plus
tard, le i ltre n’est plus efi cace. Pour des raisons d’hygiène et pour éviter l’entartrage de la machine (ce qui provoque des dommages), il faut remplacer le i ltre.
Les i ltres de rechange sont disponibles dans le commerce (TZ70003) ou peuvent être commandés auprès du Service Cli-
entèle (467873). Si l’on n’utilise pas un nouveau i ltre, il faut régler filtre sur Sans/
ancien.
Info : l’indicateur de i ltre vous permet d’indiquer le mois où vous avez placé le
i ltre. Vous pouvez aussi préciser le mois où vous devrez le remplacer (au plus tard au bout de deux mois).
Info : si la machine n’est pas utilisée durant une période prolongée (par ex. congés), il faut que le i ltre utilisé soit rincé avant utilisation. Pour cela, prélever une tasse d’eau chaude et en jeter le contenu.
TES506.. 06/2011
TES506_1RW.indb 25 |
16.06.2011 13:51:11 |

26
Réglages menu
Vous pouvez adapter votre machine de manière individuelle à l’aide des réglages menu.
1.Maintenir appuyée la touche eoff / J
(13)au moins 3 secondes.
2.Appuyer plusieurs fois sur la touche
eoff / J (13) jusqu’à ce que l’option de menu souhaitée s’afiche à l’écran.
3.A l’aide du sélecteur du haut (15), choisir le réglage souhaité.
4.Conirmer avec la touche start (10). Pour quitter le menu sans enregistrer
les modiications, placer le sélecteur sur Quitter et appuyer sur la touche
start (10).
Vous pouvez effectuer les réglages suivants :
Arrêt : Vous pouvez régler ici l’intervalle de temps à l’issue duquel la machine s’arrête automatiquement après la préparation de la dernière boisson. La plage de réglage est de 15 minutes à 4 heures. Le réglage par défaut est 1 heure, cette valeur peut être diminuée ain de permettre des économies d’énergie.
Filtre : Vous pouvez indiquer ici si vous utilisez ou non un iltre à eau avec la ma-
chine. Si vous n’utilisez pas de iltre, sélectionnez le réglage Sans/ancien. Si vous
utilisez un iltre, sélectionnez le réglage Activer filtre. Avant de placer un nou-
veau iltre à eau, rincez celui-ci (voir point « Filtre eau » à page 25).
Démarrer Calc‘n‘Clean : Vous
pouvez ici sélectionner manuellement les programmes de service (Calc‘n‘Clean /
détartrage / nettoyage). Appuyer
sur la touche start (10) et effectuer le programme sélectionné (voir point
« Programmes de maintenance » à page 32).
fr
Temp. : Vous pouvez régler ici la température de percolation (élevée / moyenne /
basse).
Langue : Vous pouvez régler ici la langue d’afichage.
Eau Dureté : Il est possible, sur cette machine, de régler la dureté de l’eau. Le réglage correct de la dureté de l’eau est important car il permet à la machine d’indiquer le moment où un détartrage est nécessaire. En usine, la dureté de l’eau est réglée sur 4. La dureté de l’eau peut être déterminée à l’aide de la bandelette fournie ou être demandée au Service des Eaux local. Plonger brièvement la bandelette dans l’eau, la secouer légèrement et attendre une minute pour lire le résultat.
Niveau |
Dureté de l’eau |
|
|
Allemagne |
France (°fH) |
|
(°dH) |
|
1 |
1-7 |
1-13 |
2 |
8-14 |
14-25 |
3 |
15-21 |
26-38 |
4 |
22-30 |
39-54 |
Compteur de boissons : Il est pos-
sible d’aficher ici le nombre des boissons préparées depuis la mise en service de la machine.
Robert Bosch Hausgeräte GmbH
TES506_1RW.indb 26 |
16.06.2011 13:51:11 |
 Loading...