


BMW DVD Rear Seat Entertainment System For your driving enjoyment.
CN1013887ID
This page will be blank (inside front cover)
CN1013887ID

!Important Safety Precautions
This manual provides important information that will help you safely operate the BMW DVD Rear Seat Entertainment System. Please read it completely before using the system. Failure
to follow the cautions or instructions in this manual could result in a severe personal injury accident and/or damage to the system.
It is always important to operate your vehicle in a safe manner and to avoid distractions while driving. Under certain driving conditions, you may need to turn the Rear Seat Entertainment System ‘OFF’ to avoid distraction and to focus all of your attention on the driving task.
Do not operate any function that diverts your attention from safely driving your vehicle. Any function that requires your prolonged attention should only be performed after coming to a complete stop in a safe location.
Maintain audio volume at a level where you can still hear outside sounds while driving. Failure to do so may result in an accident, or failure to hear emergency vehicles.
To avoid draining the vehicle battery, do not operate the system more than 15 minutes without starting the engine.
Halt use immediately if a problem occurs. Failure to do so may cause personal injury or damage to the product. Return to the nearest BMW Center for repair.
CN1013887ID
–1–

Welcome
Congratulations on your purchase! BMW’s DVD Rear Seat Entertainment System is a sophisticated product designed to provide many hours of video enjoyment for rear seat passengers.
Thorough review of this owner’s manual prior to operation will provide the best performance and help explain the simple requirements for proper care.
BMW of North America, LLC
Note: Due to the expertise required to properly install BMW’s DVD Rear Seat Entertainment System, BMW highly recommends that a BMW Center perform the installation. Proper wiring, component placement, and adjustment are essential for optimum system performance.
CN1013887ID
–2–

Table of Contents
Important Safety Precautions . . . . . . . . . . . . . . |
1 |
DVD Basic Operation . . . . . . . . . . . . . . . . . . . . |
21-33 |
Welcome . . . . . . . . . . . . . . . . . . . . . . . . . . . . . . |
2 |
DVD Advanced Operation . . . . . . . . . . . . . . . . . |
34-41 |
Table of Contents . . . . . . . . . . . . . . . . . . . . . . . |
3 |
System Remote Control Layout and Operation |
42-49 |
System Description . . . . . . . . . . . . . . . . . . . . . . |
4-5 |
Headphone Control Layout and Operation . . . . |
50-53 |
Quick Reference Guide . . . . . . . . . . . . . . . . . . . |
6 |
Optional Accessories . . . . . . . . . . . . . . . . . . . . . |
54 |
Monitor Control Layout . . . . . . . . . . . . . . . . . . . |
8-9 |
Troubleshooting . . . . . . . . . . . . . . . . . . . . . . . . . |
55-58 |
Monitor Operation . . . . . . . . . . . . . . . . . . . . . . . |
10-19 |
Care and Maintenance . . . . . . . . . . . . . . . . . . . |
59 |
DVD Control Layout . . . . . . . . . . . . . . . . . . . . . |
20 |
Specifications . . . . . . . . . . . . . . . . . . . . . . . . . . |
60-61 |
CN1013887ID
–3–

System Description
DVD Player
Head Restraint |
System Remote |
Infrared Wireless |
with LCD |
Control |
Headphones |
CN1013887ID
–4–

System Description
The BMW DVD Rear Seat Entertainment System consists of the following:
•Head restraints with wide-screen 7˝ LCD Monitors (x2)
•DVD Player
•Wireless System Remote Control
•Infrared Wireless Headphones (x2)
•Owner’s manual
CN1013887ID
–5–

Quick Reference Guide
Following these steps will allow quick access to the functions of BMW’s DVD Rear Seat Entertainment System.
Please refer to complete Owner’s Manual for additional and more detailed information.
1.Turn vehicle ignition key to Position 1 (Steering Unlocked), Position 2 (Ignition ON), or Position 3 (Engine Start).
Note: System will not function in vehicle ignition key Position 0 (Steering Lock).
2.Press POWER buttons on Monitors. (Red LEDs located adjacent to the power buttons will illuminate.) Monitors may also be switched ‘ON’ using the Monitor POWER button on System Remote Control. (Refer to page 43, Figure 1, ‘Monitor POWER’)
3.Press Audio/Video SOURCE button on Monitors until ‘AV 1’ mode is selected, (Refer to page 9, Figure 2, ‘Audio/Video SOURCE’) The ‘SEL’ button on System Remote Control may also be used to change sources. (Refer to page 43, Figure 2, ‘SEL’)
4.Press POWER button on DVD Player. (Control button backlighting will be illuminated.) DVD Player may also be switched ‘ON’ using the DVD POWER button on System Remote Control. (Refer to page 45, Figure 11, ‘DVD POWER’)
5.Insert DVD into DVD Player in center console if a disc is not currently loaded. (Refer to page 21, Figure 10, ‘Loading Discs’)
6.Press PLAY button on System Remote Control to start DVD play. (Refer to page 45, Figure 14, ‘PLAY/PAUSE’)
7.Press POWER buttons on headphones. Set headphone channel A/B as appropriate. (Refer to page 51 ‘Headphones Control Layout and Operation’)
CN1013887ID
–6–

Notes
CN1013887ID
–7–

Monitor Control Layout
CN1013887ID
–8–
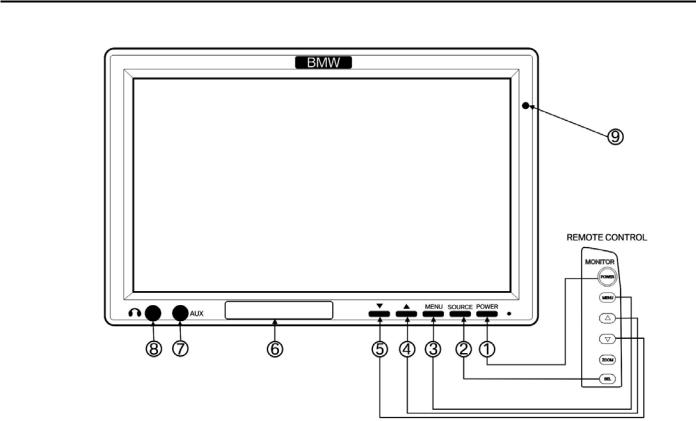
Monitor Control Layout
1 POWER |
6 INFRARED LED TRANSMITTER |
|
2 SOURCE (SEL on System Remote Control) |
(for wireless headphones) |
|
|
||
AV 1 |
(DVD Player) |
7 AUX Input Jack (AV 2) |
AV 2 |
(Monitor AUX Input) |
8 HEADPHONE JACK |
AV 3 |
(Optional Global AUX Input Jack) |
|
3 MENU |
9 INFRARED REMOTE SENSOR |
|
• CONTRAST |
(receives signals from System Remote Control) |
|
•BRIGHTNESS
•COLOR
•TINT
•SHARPNESS
•Screen MODE
(ZOOM on System Remote Control)
•WIDE SCREEN
•ZOOM SCREEN
•NORMAL SCREEN
•RESET DEFAULT
4s (UP)
5t(DOWN)
CN1013887ID
–9–

Monitor Operation
CN1013887ID
–10–

Monitor Operation
Control function operations for the LCD Monitors are also controllable from corresponding buttons on the System Remote Control. Monitor control functions are displayed on-screen for 3 seconds when operated.
Notes:
•Under cold temperature conditions, monitors may lose contrast temporarily, however contrast will return to normal after a short warm-up period.
•It is normal for a very small number of monitor’s pixels to be off. This is unavoidable even with high precision manufacturing processes.
1POWER – Switches Monitor ‘ON/OFF’ with vehicle ignition key in Position 1 (Steering Unlocked), Position 2 (Ignition ON) or Position 3 (Engine Start).
Performance Note:
Monitors may be adjusted by a BMW Center to default to one of three power start-up modes:
•‘SCREEN OFF’ – Monitor will default to a power-off condition as vehicle is restarted.
•‘SCREEN ON’ – Monitor will default to a poweron condition as vehicle is restarted.
•‘SCREEN AUTO’– Monitor will default to last power on/off condition that existed when vehicle was shut down. (SCREEN AUTO is factory-set power start-up mode.)
2 Audio/Video SOURCE – (Marked SEL on System Remote Control) Each monitor may be independently cycled between three audio/video sources:
AV 1 |
AV 2 |
AV 3 |
Note: Audio/video sources must be compatible with standard NTSC composite video outputs
• AV 1 : DVD Player (vehicle mounted)
CN1013887ID
–11–

Monitor Operation
CN1013887ID
–12–

Monitor Operation
•AV 2 : Monitor AUX input jack (Figure 7). Permits viewing of auxiliary sources such as portable DVD players, game stations, video cameras, etc., on each individual monitor.
Note: Connection requires optional Auxiliary Input Adapter Cable, Part Number 84 11 0 392 065.
•AV 3 : Optional Global AUX input jack, (center console mounted). Permits viewing of auxiliary sources such as portable DVD players, game stations, video cameras, etc., on each monitor individually, or both monitors simultaneously.
Note: Connection requires optional AV 3 Global Auxiliary Input Jack, Part Number 84 11 0 392 068, and Auxiliary Input Adapter Cable Part Number 84 11 0 392 065.
3 Monitor MENU – Cycles between basic Monitor control functions:
|
CONTRAST |
|
BRIGHTNESS |
|
COLOR |
|
TINT |
|
|
|
|
|
|
||||
|
|
|
|
|
|
|
|
|
RESET 
 MODE
MODE 
 SHARPNESS
Adjust by pressing the Monitor tDOWN or s UP buttons:
•CONTRAST: Adjusts picture contrast.
•BRIGHTNESS: Adjusts picture brightness.
•COLOR: Adjusts picture color balance.
•TINT: Adjusts picture tint.
•SHARPNESS: Adjusts picture sharpness.
CN1013887ID
–13–
Monitor Operation
CN1013887ID
–14–

Monitor Operation
•SCREEN – (Monitor ZOOM on System Remote Control).
o WIDE SCREEN: Expands a ‘Full Frame’ formatted DVD to fit entire monitor. Proportionally stretches a ‘Widescreen’ formatted DVD to fit the entire width of monitor, (leaving black stripes at top and bottom of the monitor).
o ZOOM SCREEN: Expands a ‘Full Frame’ formatted DVD (4:3) to fit entire monitor by stretching only left and right side video information. Similarly stretches a ‘Widescreen’ formatted DVD, (leaving black stripes at top and bottom of the monitor).
o NORMAL SCREEN: Displays any format DVD without modification. Playing a ‘Full Frame’ formatted DVD will show black stripes at left and right sides of the monitor. Playing a ‘Widescreen’ formatted DVD will show black stripes on all sides of the monitor.
Note: Thickness of black stripes displayed will vary according to the aspect ratio the original theatrical release was recorded in.
Performance Note:
To have a ‘Full Frame’ formatted DVD fill the entire monitor, set SCREEN (Monitor ZOOM on System Remote Control) to WIDE SCREEN or ZOOM SCREEN according to preference.
To have most ‘Widescreen’ formatted DVDs fill the entire monitor, set SCREEN (Monitor ZOOM on System Remote Control) to ZOOM SCREEN, and DVD ZOOM (on System Remote Control) to ZOOM 1 level. (Refer to page 47, Figure 23 ‘DVD ZOOM’).
RESET DEFAULT – Resets all monitor control functions to default (center point) settings.
CN1013887ID
–15–

Monitor Operation
CN1013887ID
–16–

Monitor Operation
4 s UP - Two functions are accessible using this button on Monitor or System Remote Control:
•Increases volume for a universal wired headphone (not supplied with system), plugged into monitor HEADPHONE JACK (Figure 8).
•When used in conjunction with Monitor MENU
button (Figure 3), s UP button increases the selected control function.
5 tDOWN - Two functions are accessible using this button on Monitor or System Remote Control:
•Decreases volume for a universal wired headphone (not supplied with system), plugged into the monitor HEADPHONE JACK (Figure 8).
•When used in conjunction with Monitor MENU
button (Figure 3), tDOWN button decreases the selected control function.
6 Infrared LED WINDOW – Contains infrared light emitting diodes that transmit audio signals to the wireless headphones.
Performance Note:
IR transmission is a line-of-sight signal; therefore this window must remain unobstructed at all times. The LED’s normally emit a soft red glow.
7 A/V 2 AUX Input Jack - Monitor-mounted auxiliary input jack permits viewing of auxiliary sources such as portable DVD units, game stations, video cameras, etc., on each individual monitor. Selectable using SOURCE buttons on Monitors, or SEL button on System Remote Control.
Note: Connection requires optional
Auxiliary Input Adapter Cable, Part
Number 84 11 0 392 065.
CN1013887ID
–17–

Monitor Operation
CN1013887ID
–18–
Monitor Operation
8 Wired HEADPHONE JACK – Permits connection of a universal wired headphone. Wired headphone
volume is adjusted using s UP and tDOWN buttons (Figures 4 and 5).
Note: Requires universal wired headphones with 3.5 mm stereo phone jack (not supplied with system).
9 INFRARED REMOTE SENSOR – Receives signals from System Remote Control.
Performance Note:
IR transmission is a line-of-sight signal; therefore this sensor must remain unobstructed at all times.
CN1013887ID
–19–
 Loading...