

Page 1

K
Service Source
Sheet Feeder
LaserWriter Pro 600/630 Sheet Feeder,
LaserWriter 16/600 PS Sheet Feeder
Page 2
K
Service Source
Basics
Sheet Feeder
Page 3
Basics About This Manual - 1
About This Manual
This manual covers the Take
Apart, Additional Procedures, and Adjustments for
the sheet feeder. Refer to
the main printer manuals
for all other information.
Sheet Feeder
Page 4

Basics Compatibility - 2
Compatibility
Note: The LaserWriter Pro 600/630 feeder is not
compatible with the LaserWriter Pro 16/600 PS printer,
but the LaserWriter Pro 16/600 PS feeder is compatible
with the LaserWriter Pro 600/630 printer. Unless noted
otherwise, all parts and procedures contained in this manual
do apply to both versions.
You can tell the two feeders apart in two distinct ways:
1 By comparing controller board serial numbers: The
LaserWriter Pro 600/630 sheet feeder controller
board has the vendor number "RG5-0541" imprinted on
it. The LaserWriter 16/600 PS sheet feeder controller
board bears the number "RG5-1086."
2 By comparing serial numbers: Numbers starting with
JBD00001 denote feeders for use only with the Pro
Page 5

Basics Compatibility - 3
600/630. Numbers starting with LBJ00001 denote
feeders for use on both generations of printer.
Page 6

K
Service Source
T ak e Apart
Sheet Feeder
Page 7
Take Apart Controller Board - 1
Controller Board
No preliminary steps are
Controller
Board
required before you begin
this procedure.
Note:
See "Circuit Board
Diagrams" in Basics in the
main printer manual for
layout of board.
Page 8
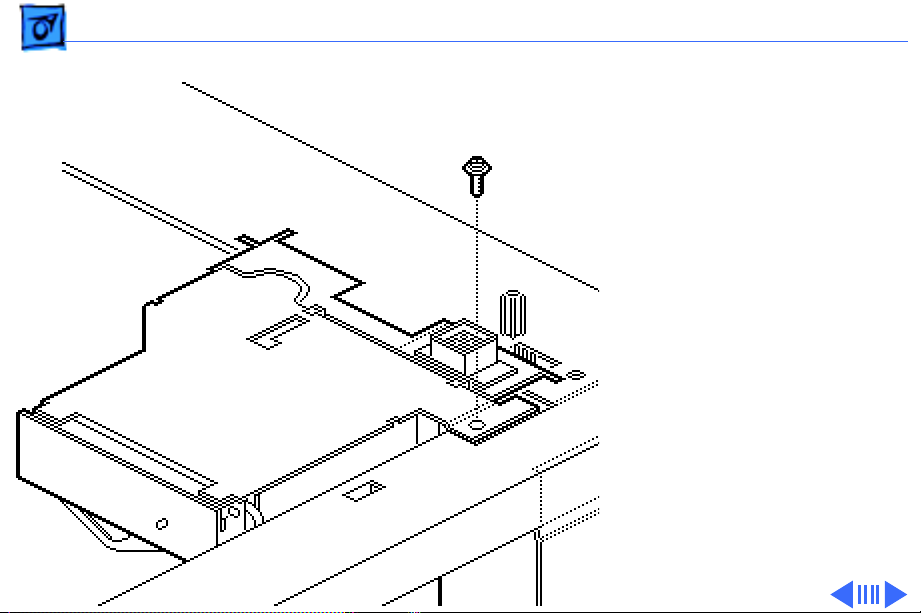
Take Apart Controller Board - 2
1 Remove the single black
Cover
Screw
screw that secures the
controller block cover.
Page 9
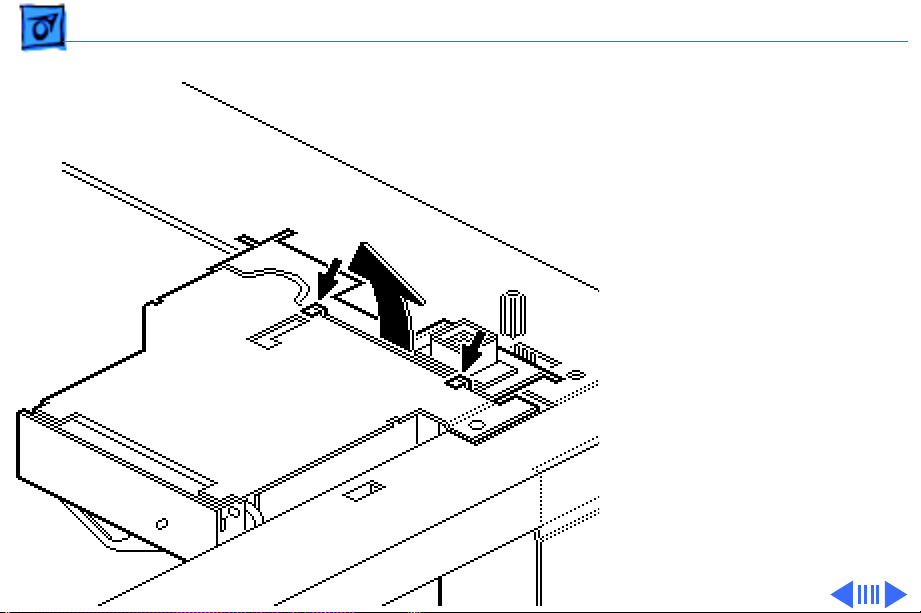
Take Apart Controller Board - 3
2 Release the two flex tabs
and swing the cover
upward.
Tab
Tab
Page 10
Take Apart Controller Board - 4
3 Cut the cable tie (if
present) and disconnect
the three cables from the
Controller
Board
J853
J852
J851
controller board.
Page 11

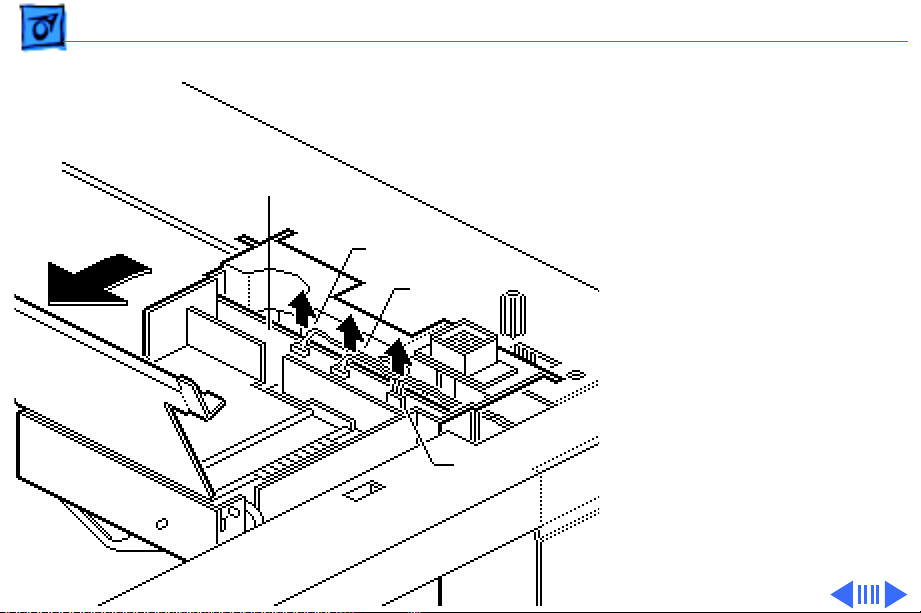
Take Apart Controller Board - 5
4
Note:
There is a flex tab
near the bottom that
hooks into a slot in the
controller board. An
arch-shaped hole on the
inside face of the
controller block housing
Flex
Tab
Slot
provides access to the
flex tab.
5 Release the flex tab and
carefully slide out the
board.
Tab Access Below
Page 12
Take Apart Controller Block - 6
Controller Block
No preliminary steps are
Controller
Block
required before you begin
this procedure.
Note:
The controller block
is available from Apple but
it does not include the lid or
controller board. Save these
two parts if you are
replacing the controller
block. None of the other
parts contained in the
controller block is
available separately.
Page 13

Take Apart Controller Block - 7
1 Remove the single black
Cover
Screw
screw that secures the
controller cover.
Page 14

Take Apart Controller Block - 8
2 Release the two flex tabs
and swing the cover
upward.
Tab
Tab
Page 15

Take Apart Controller Block - 9
3 Cut the cable tie (if
present) and disconnect
the three cables from the
Controller
Board
J853
J852
J851
controller board.
Page 16

Take Apart Controller Block - 10
4
Note:
One screw and two
flex tabs attach the
Flex
Tab
controller block to the
feeder. The flex tabs are
located on the sides of the
Screw
block about an inch
from the top surface.
Remove the single screw
near the base that
secures the block to the
feeder.
Flex
Tab
Page 17

Take Apart Controller Block - 11
5 Release the two flex tabs
Left Tab
(Hidden)
and slide the block up
and out of the feeder.
Right
Tab
Replacement Note:
Take
care not to damage the
cassette microswitch
springs.
Page 18

Take Apart Pickup Roller - 12
Pickup Roller
No preliminary steps are
required before you begin
this procedure.
1 Pinch the clip on the
pickup roller and slide
the roller off the shaft.
Pickup Roller
Page 19

Take Apart Pickup Roller - 13
Replacement Note:
There is a fixed dowel pin in the pickup roller shaft. You
must rotate the pickup roller into alignment with this pin
before the roller can slide all the way onto the shaft.
Install the pickup roller as illustrated on the label on top
surface of the drive block. A conspicuous grinding sound
coming from the sheet feeder may be due to improper
positioning of the pickup roller.
Page 20

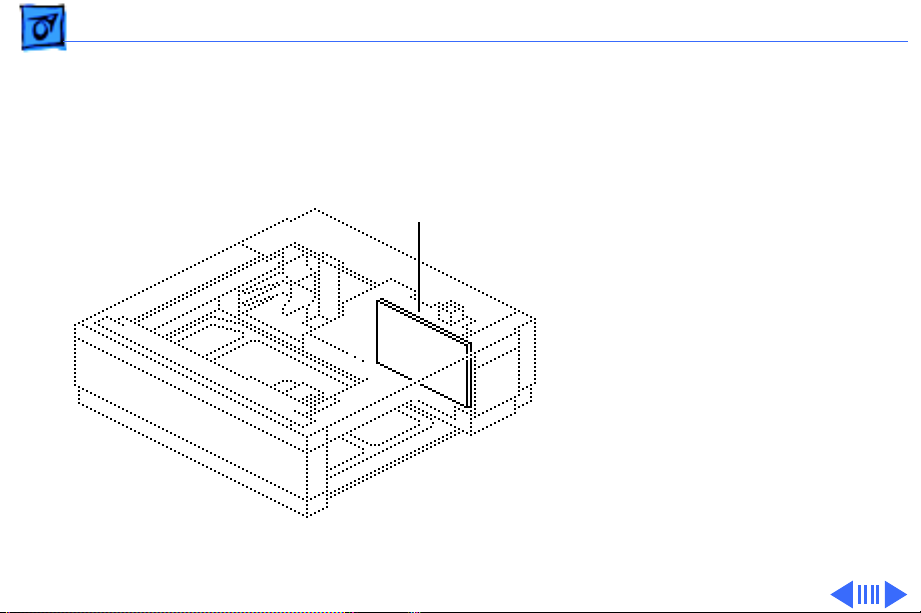
Take Apart Right Cover - 14
Right Cover
No preliminary steps are
required before you begin
Right
Cover
this procedure.
Note:
The right cover is
held in place by three hidden
fixed tabs along the outside
face (1,2, & 3 on the next
page), two flex tabs (4, 5)
along the inside face, and one
flex tab (6) at the right end
of the cover.
1 Work your fingertips
under the edge of the
right cover at the tab 1
location, pull the face
Page 21

Take Apart Right Cover - 15
outward firmly, and
release the cover.
2 Reposition your hand and
repeat for tabs 2 and 3.
3 Release flex tabs 4 and 5
and lift the cover from
the sheet feeder.
45
Right Cover
123
6
Page 22

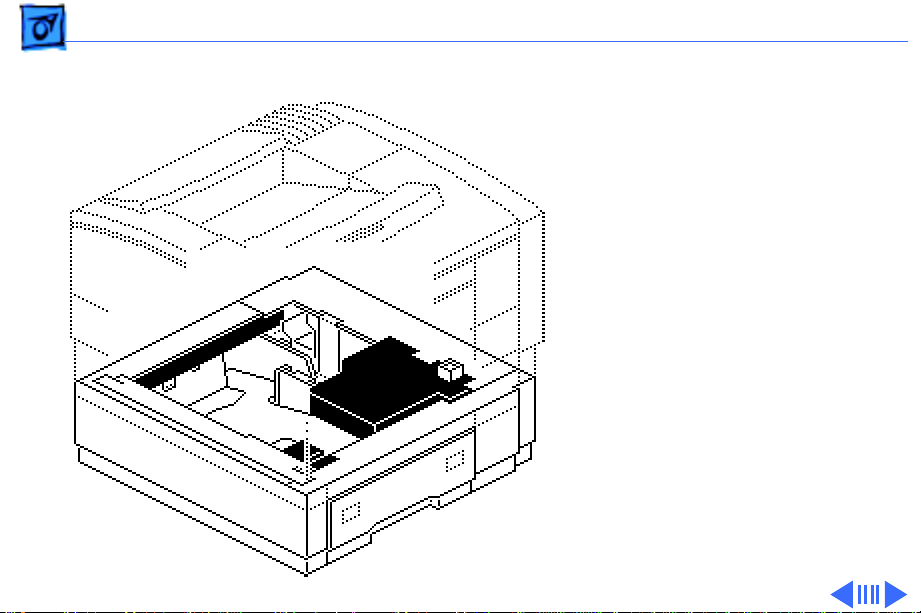
Take Apart Drive Block - 16
Drive Block
Before you begin, remove
the right cover.
Drive Block
Note:
Refer to the following
take-apart topics for
disassembly of the drive
block:
– Motor Assembly
– Pickup Solenoid
– Feeder Rollers
Page 23

Take Apart Drive Block - 17
1 Remove the single black
Cover
Screw
screw that secures the
controller block cover.
Page 24

Take Apart Drive Block - 18
2 Release the two flex tabs
and swing the cover
upward.
Tab
Tab
Page 25

Take Apart Drive Block - 19
3 Cut the cable tie (if
present) and disconnect
the two cables that run
Controller
Board
J853
J852
Right
Frame
across the right frame to
the drive block.
Page 26

Take Apart Drive Block - 20
4 Remove the cables from
the channel in the right
frame.
Page 27

Take Apart Drive Block - 21
5 Remove the two screws
and lift the drive block
out of the sheet feeder.
1
Replacement Note:
There are two pins and a
ground spring on the
bottom of the drive block
in addition to the two
Drive Block
positioning pins on the
top. Be careful to seat
all of them before
reinstalling the drive
block.
2
Page 28

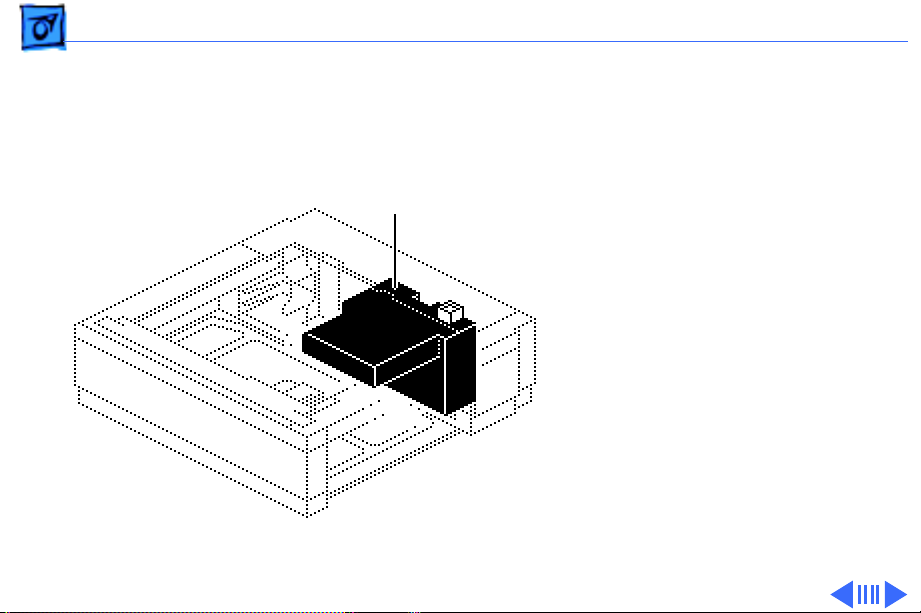
Take Apart Motor Assembly/Pickup Solenoid - 22
Motor Assembly/ Pickup Solenoid
Before you begin, remove
the following:
• Right cover
• Drive block
Note:
The motor assembly
consists of a mounting
plate, the motor, and two
transfer gears. None of the
assembly subcomponents is
available from Apple.
Motor Assembly and
Pickup Solenoid
Page 29

Take Apart Motor Assembly/Pickup Solenoid - 23
1 Remove the four screws.
1-3
4
three screws at 1, 2, and
Replacement Note:
The
3 are are stepped
machine screws. Do not
2
substitute the screws at
these locations.
4
1
3
Page 30

Take Apart Motor Assembly/Pickup Solenoid - 24
2 Remove the E-ring and
the shim washer and pull
off the 22/48T gear.
22/48T
Gear
E-Ring
and Shim
Page 31

Take Apart Motor Assembly/Pickup Solenoid - 25
3 Remove the motor
assembly from the drive
block.
Note:
There is a plastic
bushing at the far end of
70T Gear
the 70-tooth gear shaft.
This bushing is not a
part of the motor
assembly but is
available separately. If
the bushing has stuck to
the shaft, remove it now
and set it aside. See the
next page for a
replacement note
regarding this bushing.
Page 32

Take Apart Motor Assembly/Pickup Solenoid - 26
Retaining Ring
Key
Bushing
Retaining
Ring
Replacement Note:
The
bushing is plastic and is
keyed. When properly
installed, the bushing
nests within the Cshaped retaining ring in
the drive block. When
installing the motor
assembly, make sure
that the key is pointing
to the right, toward the
open end of the C.
Page 33

Take Apart Motor Assembly/Pickup Solenoid - 27
Pickup Solenoid
1
Note:
Perform the
following task only if
you want to remove the
pickup solenoid.
Release the two tabs,
remove the cables from
the channel, and lift out
the pickup solenoid.
Tabs
Pin
Pickup Solenoid
Replacement Note:
sure to pin the solenoid
to the boomerang-shaped
pendulum as shown.
Make
Page 34

Take Apart Feeder Rollers - 28
Feeder Rollers
Before you begin, remove
the following:
• Right cover
• Drive block
• Motor assembly
Note:
There are one
primary and two passive
feeder rollers. The passive
rollers compress against the
primary roller to form a
gripping surface. Paper
moves from the pickup
roller into the feeder
Passive
Feeder Roller
Housing
Primary
Feeder Roller
Housing
rollers, up through a
narrow opening in the upper
Page 35

Take Apart Feeder Rollers - 29
cassette tray, and into the feed mechanisms in the paper
pickup block. The passive roller assembly consists of three
orderable parts:
– Passive roller mount
– Passive roller housing
– Passive roller spring
1
Note:
The primary feeder is black, and is forward of the
two white passive rollers. The screw in the following
step is a 10 mm binding head screw.
Remove the screw located within the feeder roller
housing.
Caution:
prone to fall out once you remove the E-ring.
2 Remove the E-ring, slide the roller housing off the
flange and remove the housing from the drive block, then
remove the feeder roller off the shaft.
The dowel pin at the gear end of the shaft is
Page 36

Take Apart Feeder Rollers - 30
3
Note:
Perform the following steps only if you need to
remove the passive roller assembly. The paper weight
mentioned in the following step is the rabbit-ear shaped
part inside the pickup roller. It has an open grip-style
connection to the pickup shaft.
Grasp the paper weight and pull it off the pickup shaft.
4 Remove the screw that secures the passive roller
housing to the drive block and slide the passive roller
assembly off the spindle.
Page 37

K
Service Source
Exploded V ie w
Sheet Feeder
Page 38

Exploded View 1
Exploded View
Pickup
Roller
Feeder
Rollers
Controller Board
Motor Assembly/
Pickup Solenoid
Drive Block
Controller Block
Right Cover
 Loading...