


 Loading...
FOR CAR USE ONLY/ POUR APPLICATION AUTOMOBILE UNIQUEMENT/ NUR FÜR AUTOMOBIL GEBRAUCH/ PARA USO EN AUTOMÓVILES/ SOLO PER L’UTILIZZO IN AUTOMOBILE/ ТОЛЬКО ДЛЯ ИСПОЛЬЗОВАНИЯ В АВТОМОБИЛЯХ
Advanced Dash Cam
DVR-C320R
DVR-C320S
RVC-C320
• OWNER’S MANUAL |
• MANUAL DE OPERACIÓN |
Please read before using this equipment. |
Léalo antes de utilizar este equipo. |
• MODE D’EMPLOI |
• ISTRUZIONI PER L’USO |
Veuillez lire avant d’utiliser cet appareil. |
Si prega di leggere prima di utilizzare il attrezzatura. |
• BEDIENUNGSANLEITUNG |
• РУКОВОДСТВО ПО ЭКСПЛУАТАЦИИ |
Lesen Sie diese Bedienungsanleitung bitte vor |
Прочтите настоящее руководство перед началом |
Gebrauch des Gerätes. |
использования оборудования. |
FCC Statement
This device complies with Part 15 of the FCC Rules. Operation is subject to the following two conditions: (1) this device may not cause harmful interference, and (2) this device must accept any interference received, including interference that may cause undesired operation.
This equipment has been tested and found to comply with the limits for a Class B digital device, pursuant to Part 15 of the FCC Rules. These limits are designed to provide reasonable protection against harmful interference in a residential installation. This equipment generates, uses and can radiate radio frequency energy and, if not installed and used in accordance with the instructions, may cause harmful interference to radio communications. However, there is no guarantee that interference will not occur in a particular installation. If this equipment does cause harmful interference to radio or television reception, which can be determined by turning the equipment off and on, the user is encouraged to try to correct the interference by one or more of the following measures:
•Reorient or relocate the receiving antenna.
•Increase the separation between the equipment and receiver.
•Connect the equipment to an outlet on a circuit different from that to which the receiver is connected.
•Consult the dealer or an experienced radio/TV technician for help.
•This appliance and its antenna must not be co-located or operation in conjunction with any other antenna or transmitter.
•A minimum separation distance of 20cm must be maintained between the antenna and the person for this appliance to satisfy the RF exposure requirements.
FCC CAUTION: Any changes or modifications to the equipment not expressly approved by the party responsible for compliance could void your authority to operate the equipment.
FCC ID: 2ADTG-DVRC320R
Information to user : RSS-247
This equipment complies with IC radiation exposure limits set forth for an uncontrolled environment. This equipment should be installed and operated with minimum distance 20 cm between the radiator & your body.
This device contains licence-exempt transmitter(s)/receiver(s) that comply with Innovation, Science and Economic Development Canada’s licence-exempt RSS(s).
Please be cautioned the changes or modifications not expressly approved by the party responsible for compliance could void the user’s authority to operate the equipment.
Notice: Operation is subject to the following two conditions : (1) this device may not cause interference, and
(2) this device must accept any interference, including interference that may cause undesired operation of the device.
This Class B digital apparatus complies with Canadian ICES-003. IC: 12594A-DVRC320R

Contents
Operating Instructions |
4 |
||
1. |
Product overview |
8 |
|
1.1 |
Included items |
8 |
|
|
1.1.1 |
DVR-C320R (2 camera, USA/Canada only) 8 |
|
|
1.1.2 |
DVR-C320S (1 camera) |
9 |
|
1.1.3 RVC-C320 (Rear view only) |
9 |
|
1.2 |
Part names |
10 |
|
|
1.2.1 Front camera (main unit) - front view |
10 |
|
|
1.2.2 Front camera (main unit) - rear view |
11 |
|
|
1.2.3 Rear camera (RVC-C320) |
11 |
|
1.3 Removing and inserting the memory card |
12 |
||
1.4 |
Basic connection diagrams |
13 |
|
|
1.4.1 Connecting the product |
13 |
|
|
1.4.2 Connecting the dash cam to the Alpine |
|
|
|
|
navigation/display audio system |
14 |
|
1.4.3 Setting the auxiliary (AUX) name of the |
|
|
|
|
navigation/display audio system |
15 |
|
1.4.4 ADAS warning message |
15 |
|
2. |
Installing the product |
16 |
|
2.1 |
Installing the front camera (main unit) |
16 |
|
|
2.1.1 Selecting an installation location |
16 |
|
|
2.1.2 Securing the product |
16 |
|
2.2 Installing the rear camera |
17 |
||
|
2.2.1 Selecting an installation location |
17 |
|
|
2.2.2Securing the rear camera |
18 |
|
|
2.2.3Connecting the rear camera cable |
19 |
|
3. |
Using recording features |
20 |
|
3.1 |
Turning the product on or off |
20 |
|
3.2 Learning about file storage locations |
20 |
||
3.3 Using the continuous recording feature |
21 |
||
3.4 Recording manually |
21 |
||
3.5 Using parking mode |
22 |
||
3.6 Using the Super Night Vision |
23 |
||
3.7 Using the road safety features |
23 |
||
4. Operating on the Alpine navigation/ |
|
|
|
display audio system |
24 |
4.1 |
Screen layout |
24 |
|
4.1.1 Live view screen |
24 |
|
4.1.2 Home screen |
25 |
4.2 |
Playing videos |
26 |
|
4.2.1 Playing on the Alpine navigation/display |
|
|
audio system |
26 |
4.3 |
Managing the memory card |
28 |
5. |
Settings |
29 |
5.1 |
Setting the Camera |
29 |
5.2 |
Setting recording features |
30 |
5.3 |
Setting road safety features |
31 |
5.4 |
Configuring the system settings |
32 |
5.5 |
Viewing product information |
33 |
5.6 |
Initializing the system settings (Reset |
|
|
Settings) |
33 |
6. |
Using the mobile viewer |
34 |
6.1 Connect the product to a smartphone |
34 |
|
6.2 Viewing the mobile viewer screen layout |
34 |
|
7. |
Using the PC viewer |
35 |
7.1 |
System requirements |
35 |
7.2 Learning about the PC viewer |
35 |
|
|
7.2.1 Installing the PC viewer |
35 |
|
7.2.2PC viewer screen layout (for Windows) |
36 |
|
7.2.3Playing recorded videos on the PC |
|
|
viewer (for Windows) |
37 |
|
7.2.4PC viewer screen layout (for Mac) |
38 |
|
7.2.5Playing recorded videos on the PC |
|
|
viewer (for Mac) |
39 |
8. |
Upgrading the firmware |
40 |
9. |
Troubleshooting |
41 |
10. |
Specifications |
42 |
3
Operating Instructions
Points to Observe for Safe Usage
Read this manual carefully before using the system components. They contain instructions on how to use this product in a safe and effective manner. Alpine cannot be responsible for problems resulting from failure to observe the instructions in this manual.
This manual uses various pictorial displays to show you how to use this product safely and to alert you to potential dangers resulting from improper connections and operation. Following are the meanings of these pictorial displays. It is important to fully understand the meanings of these pictorial displays in order to use this manual and the system properly.
Safety symbols in this guide
"Warning" - This symbol means Important Instructions. Failure to heed them can result in serious injury or death.
"Caution" - This symbol means Important Instructions. Failure to heed them can result in Injury or material property damage.
"Note" - This symbol means useful information that helps users better utilize the product's features.
Safety information for proper use
Driving and product operation
• MINIMIZE DISPLAY VIEWING WHILE DRIVING. Viewing the display may distract the driver from looking ahead of the vehicle and cause an accident.
•OPERATION OF THE SYSTEM WHILE DRIVING IS DANGEROUS. Users should stop vehicle before operating the software.
•THIS SOFTWARE IS DESIGNED FOR USE EXCLUSIVELY IN THE UNIT. It cannot and may not be used in conjunction with other hardware.
4

Power supply and product installation
• DO NOT WATCH VIDEO WHILE DRIVING. Watching the video may distract the driver from looking ahead of the vehicle and cause an accident.
•DO NOT DISASSEMBLE OR ALTER. Doing so may result in an accident, fire or electric shock.
•USE ONLY IN CARS WITH A 12 VOLT NEGATIVE GROUND. (Check with your dealer if you are not sure.) Failure to do so may result in fire, etc.
•USE THE CORRECT AMPERE RATING WHEN REPLACING FUSES. Failure to do so may result in fire or electric shock.
•DO NOT BLOCK VENTS OR RADIATOR PANELS. Doing so may cause heat to build up inside and may result in fire.
•USE THIS PRODUCT FOR MOBILE 12V APPLICATIONS. Use for other than its designed application may result in fire, electric shock or other injury.
•MAKE THE CORRECT CONNECTIONS. Failure to make the proper connections may result in fire, battery drain, or product damage.
•BEFORE WIRING, DISCONNECT THE CABLE FROM THE NEGATIVE BATTERY TERMINAL. Failure to do so may result in electric shock or injury due to electrical shorts.
•DO NOT ALLOW CABLES TO BECOME ENTANGLED IN SURROUNDING OBJECTS. Arrange wiring and cables in compliance with the manual to prevent obstructions when driving. Cables or wiring that obstruct or hang up on places such as the steering wheel, gear lever, brake pedals, etc. can be extremely hazardous.
•DO NOT SPLICE INTO ELECTRICAL CABLES. Never cut away cable insulation to supply power to other equipment. Doing so will exceed the current carrying capacity of the wire and result in fire or electric shock.
•DO NOT DAMAGE PIPE OR WIRING WHEN DRILLING HOLES. When drilling holes in the chassis for installation, take precautions so as not to contact, damage or obstruct pipes, fuel lines, tanks or electrical wiring. Failure to take such precautions may result in fire.
•DO NOT USE BOLTS OR NUTS IN THE BRAKE OR STEERING SYSTEMS TO MAKE GROUND CONNECTIONS. Bolts or nuts used for the brake or steering systems (or any other safety-related system), or tanks should NEVER be used for installations or ground connections. Using such parts could disable control of the vehicle and cause fire etc.
•DO NOT INSTALL IN LOCATIONS WHICH MIGHT HINDER VEHICLE OPERATION, SUCH AS THE STEERING WHEEL OR SHIFT LEVER. Doing so may obstruct forward vision or hamper movement etc. and results in serious accident.
•DO NOT OPERATE ANY FUNCTION THAT TAKES YOUR ATTENTION AWAY FROM SAFELY DRIVING YOUR VEHICLE.
Any function that requires your prolonged attention should only be performed after coming to a complete stop. Always stop the vehicle in a safe location before performing these functions. Failure to do so may result in an accident.
Children
KEEP SMALL OBJECTS SUCH AS SCREWS OUT OF THE REACH OF CHILDREN. Swallowing them may result in serious injury. If swallowed, consult a physician immediately.
5

Other information about the product
Product management and operation
• HALT USE IMMEDIATELY IF A PROBLEM APPEARS. Failure to do so may cause personal injury or damage to the product. Return it to your authorized Alpine dealer or the nearest Alpine Service Center for repairing.
•HAVE THE WIRING AND INSTALLATION DONE BY EXPERTS. The wiring and installation of this unit requires special technical skill and experience. To ensure safety, always contact the dealer where you purchased this product to have the work done.
•USE SPECIFIED ACCESSORY PARTS AND INSTALL THEM SECURELY. Be sure to use only the specified accessory parts. Use of other than designated parts may damage this unit internally or may not securely install the unit in place. This may cause parts to become loose resulting in hazards or product failure.
•ARRANGE THE WIRING SO IT IS NOT CRIMPED OR PINCHED BY A SHARP METAL EDGE. Route the cables and wiring away from moving parts (like the seat rails) or sharp or pointed edges. This will prevent crimping and damage to the wiring. If wiring passes through a hole in metal, use a rubber grommet to prevent the wire's insulation from being cut by the metal edge of the hole.
•DO NOT INSTALL IN LOCATIONS WITH HIGH MOISTURE OR DUST. Avoid installing the unit in locations with high incidence of moisture or dust. Moisture or dust that penetrates into this unit may result in product failure.
• Use a soft dry cloth for periodic cleaning of the product. For more severe stains, please dampen the cloth with water only. Anything else has the chance of dissolving the paint or damaging the plastic.
•Be sure the temperature inside the vehicle is between +45°C (+113°F) and 0°C (+32°F) before turning your unit on.
•If you have problems, do not attempt to repair the unit yourself. Return it to your Alpine dealer or the nearest Alpine Service Station for servicing.
6

Warning and Notices
• This device should never be mounted in or to a vehicle in a way that interferes with the operations of the vehicle, including, but not limited to, airbags, lane detection systems, navigation device, and so forth.
Doing so may result violation of state or national laws, injury, or death. Always mount this device so that it does not obstruct the driver’s view. Any fines, penalties, or damages resulting from improperly or illegally operating this device are not the responsibility of Alps Alpine Co., Ltd. or any of its affiliates, subsidiaries, principals, officers, employees or shareholders.
•Do not operate or manipulate this device while driving, such as change settings, review footage, access information, change the device location or angle, or otherwise manipulate this device while driving. Do not allow this device to distract from safe driving.
•Do not mount this device where driver or passenger head impact is likely in the case of an accident, including, but not limited to areas directly in front of the driver or passengers.
•It may be a violation of state or national laws to secure this device to a dash board or windshield. It is the user’s responsibility to know and follow the applicable laws in the jurisdictions where this device is used.
•Do not use this device contrary to the instructions in this manual or contrary to national and state laws.
•It may be a violation of state or national laws to video or audio record someone with this device without their consent. This may include audio recording a passenger in your vehicle without his or her consent. It is the user’s responsibility to know and follow the applicable laws in the jurisdictions where this device is used.
•Publishing the recordings made with this device on social media or other places on the internet without consent of those in the recordings may violate state or national privacy laws. It is the user’s responsibility to know and follow the applicable laws in the jurisdictions where this device is used.
•This product uses lithium batteries. For your safety, do not overcharge this device. Do not leave this device plugged in when the vehicle is not turned off. Do not leave this device in extreme temperatures. Damaged, overcharged, or misused lithium batteries can explode or otherwise cause fire. Failure to heed these warning may result in injury or death.
7

1. Product overview
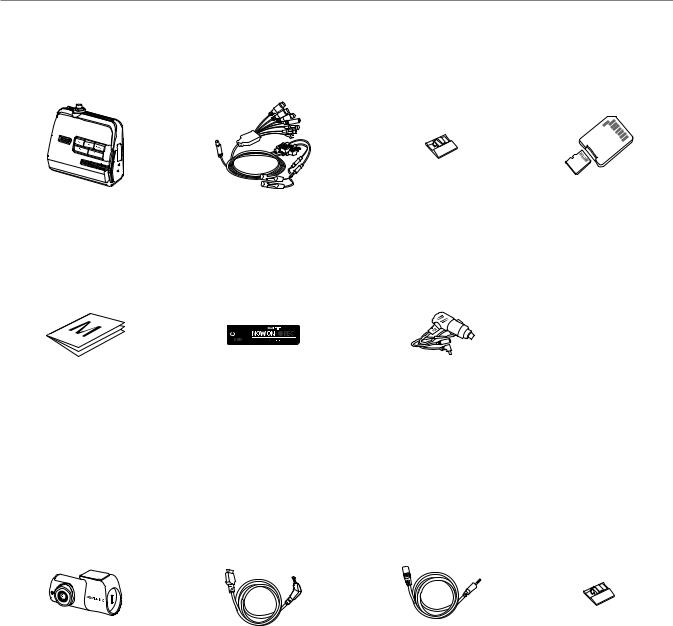
1.1 Included items
Ensure that all the items are included when you open the product box.
The standard items may change without prior notice.
1.1.1DVR-C320R (2 camera, USA/Canada only)
Front camera (main unit) |
Hardwiring cable |
Cable clamp holder |
microSD card with |
||
|
|
|
|
|
adapter (consumable) |
|
|
|
|
|
|
|
|
|
|
|
|
Quick start guide / |
Dash cam recording |
Car charger |
Rear camera |
User guide / Warranty / |
warning sticker |
|
|
Registration card |
|
|
|
(stored in the microSD card) |
|
|
|
Rear camera cable |
Rear camera extension cable |
8
Product overview
1.1.2 DVR-C320S (1 camera)
Front camera (main unit) |
Hardwiring cable |
Cable clamp holder |
microSD card with |
||
|
|
|
|
|
adapter (consumable) |
|
|
|
|
|
|
|
|
|
|
|
|
Quick start guide / |
Dash cam recording |
Car charger |
User guide |
warning sticker |
|
(stored in the microSD card) |
|
|
1.1.3 RVC-C320 (Rear view only)
Rear camera |
Rear camera cable |
Rear camera extension cable Cable clamp holder |
9

Product overview
1.2 Part names
1.2.1 Front camera (main unit) - front view
Voice recording button
Press to enable or disable voice recording.
Speaker
Outputs the voice guide and buzzer sounds to indicate the product’s status.
Manual recording button
Press to start manual recording.
Power button
Press and hold to turn off the product.
Press to turn on the product.
Wi-Fi LED
Indicates the Wi-Fi
connection status.
Format button
Press and hold to format the memory card.
Reset button
Insert the tip of a sharp object to reset the product when an error occurs.
(The settings and video files are not reset.)
Microphone
Used for voice recording.
GPS LED
Indicates the GPS connection status.
 Refer to the following table to check the status of the product using the LED indicators.
LED |
LED STATUS |
Operation description |
|
|
|
|
|
Security LED |
(flickers) |
The product is turned on. |
|
|
|
|
|
Wi-Fi LED |
(light on) |
Wi-Fi has been connected. |
|
|
|
||
(flickers) |
Wi-Fi connect enabled. |
||
|
|||
|
|
|
|
GPS LED |
(light on) |
GPS has been connected. |
|
|
|
||
|
Off |
GPS has been disconnected. |
10
Product overview
1.2.2 Front camera (main unit) - rear view
Adhesive mount
Used to fix the front camera in the vehicle.
Security LED 
Indicates that video is being recorded.


 Memory card slot
Insert a memory card to save recordings.
Front camera lens
Records the front view.
1.2.3 Rear camera (RVC-C320)
Adhesive mount
Used to fix the rear camera in the vehicle.
 Connection port
Used to connect the rear camera to the front camera using a rear camera cable.
Rear camera lens
Records the rear view.
11
Product overview
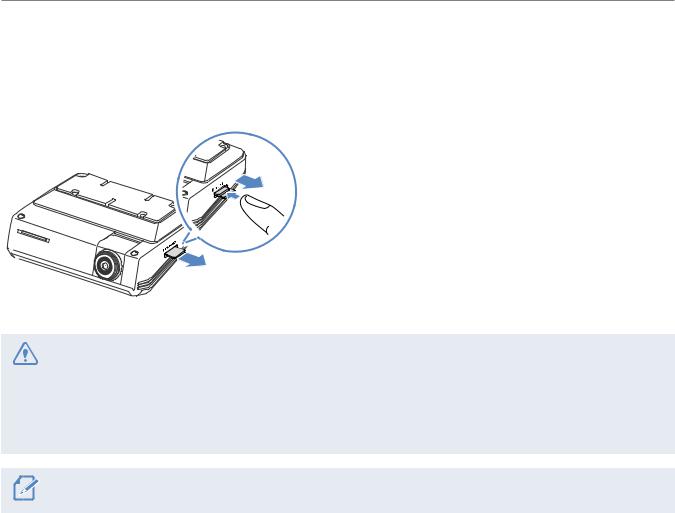
1.3 Removing and inserting the memory card
Follow the instructions to remove the memory card from the product or to insert the memory card into the product.
Before removing the memory card, ensure that the product is turned off. Gently push the bottom of the memory card with your fingernail to release it, and then remove it from the product.
To insert the memory card into the memory card slot, ensure that the metal contacts on the memory card are facing toward the product’s buttons, and insert it into the slot until you hear a click.
• Ensure that the product is turned off before removing the memory card. The recorded video files may be corrupted or lost if you remove the memory card while the product is on.
•Ensure that the memory card is in the correct direction before inserting it into the product. The memory card slot or the memory card may be damaged if it is inserted incorrectly.
•Use only authentic memory cards from Alpine. Alpine does not guarantee the compatibility and normal operation of third-party memory cards.
To prevent loss of recorded video files, periodically back up the video files on a separate storage device.
12
Product overview
1.4 Basic connection diagrams
1.4.1 Connecting the product
Configure the product correctly according to the connection diagram.
The connection diagram is for reference only. The product must be professionally installed in the vehicle by an Alpine authorized dealer/a trained specialist mechanic.
 R CAM
R CAM
Car charger cable
Hardwiring cable
BAT |
Yellow |
(1) |
ACC |
Red |
(2) |
|
GND |
Black |
(3) |
|
|
(4) |
R CAM
(5)
F CAM
LIN |
(6) |
|
Not used. |
||
CABLE |
||
(7) |
||
LIN |
||
Not used. |
||
CABLE |
||
|
||
REMOCON |
(8) |
|
|
||
IN |
|
|
REMOCON |
(8) |
|
|
||
OUT |
|
DVR-C320R
*The rear camera extension cable is only required if the cable length is insufficient.
Rear camera
Rear camera |
|
|
|
|
|
|
|
Rear camera |
||
extension cable* |
|
|
|
|
|
|
|
|
cable |
|
|
|
|
|
|
|
|
|
|
|
|
|
|
|
|
|
|
|
|
|
|
|
(1)BAT
Connect the cord that supplies battery power (12V).
(2)ACC
Connect the cord that supplies accessory power (12V).
(3)GND (ground cord)
Connect this securely to a metal part of your vehicle's body. Insufficient grounding may result in noise or malfunction.
(4)R CAM (rear camera video input terminal)
This terminal is used to input video from the rear camera.
(5)F CAM (front camera video output terminal)
This terminal is used to output a video signal.
(6)(7) Not used.
When connected to an Alpine product, some features of this product or other device may be unavailable.
(8)REMOCON IN /OUT cable
Used when the product is used in combination with Alpine navigation/display audios that support
REMOCON communication.
13

Product overview
1.4.2 Connecting the dash cam to the Alpine navigation/display audio system
Follow the connection diagram to use the Alpine navigation/display audio’s features with the dash cam.
The dash cam and other accessories which need a REMOTE IN/OUT connection cannot connect to the Alpine navigation/display audio system at the same time.
 R CAM
R CAM
Car charger cable
Hardwiring cable
BAT |
Yellow |
|
|
|
|
|
|
|
|
DVR-C320R |
|
ACC |
Red |
|
|
|
|
|
|
GND |
Black |
Rear camera |
|
|
Rear camera |
Rear camera cable |
|
|
|
extension cable |
R CAM
F CAM
LIN CABLE
LIN CABLE
REMOCON
IN
REMOCON
OUT
|
AUX INPUT |
Not used. |
sold separately |
|
CAN I/F Cable |
 Not used.
Remote Out
MON Remote
W. REMOTE Cable
14
Loading...