


 Loading...
R |
iLX-107
EN
• OWNER’S MANUAL
Please read before using this equipment.
• MODE D’EMPLOI
Veuillez lire avant d’utiliser cet appareil.
• MANUAL DE OPERACIÓN
Léalo antes de utilizar este equipo.
Thank you for purchasing this Alpine product. Please take a moment to protect your purchase by registering your product now at the following address: www.alpine-usa.com/registration.
You will be informed of product and software updates (if applicable), special promotions, news about Alpine.
Merci d’avoir acheté ce produit Alpine. Nous vous invitons à consacrer un moment à la protection de votre achat en enregistrant votre produit dès maintenant à l’adresse suivante : www.alpine-usa.com/registration.
Vous serez tenu informé des mises à jour des produits et des logiciels (le cas échéant), des promotions spéciales et de l’actualité d’Alpine.
Gracias por adquirir este producto Alpine. Con solo unos pocos pasos podrá proteger su producto, registrándolo a través de la siguiente dirección: www.alpine-usa.com/registration.
Recibirá información sobre nuevos productos y software, promociones especiales y novedades sobre Alpine.
ALPINE ELECTRONICS OF AMERICA, INC.
19145 Gramercy Place, Torrance,
California 90501, U.S.A.
Phone 1-800-ALPINE-1 (1-800-257-4631)
Designed by ALPINE Japan 68-30368Z57-A
ALPINE ELECTRONICS MARKETING, INC. |
ALPINE ELECTRONICS OF AUSTRALIA PTY. LTD. |
ALPINE ITALIA S.p.A. |
1-7, Yukigaya-Otsukamachi, Ota-ku, |
161-165 Princes Highway, |
Viale Cristoforo Colombo, 8 |
Tokyo 145-0067, JAPAN |
Hallam Victoria 3803, Australia |
20090 Trezzano sul Naviglio MI, Italy |
Phone: 03-5499-4531 |
Phone 03-8787-1200 |
Phone +39 02 484781 |
ALPINE ELECTRONICS France S.A.R.L.
184 allée des Erables CS 52016 - Villepinte 95 945 Roissy CDG cedex FRANCE
Phone : + 33(0)1 48 63 89 89
ALPINE ELECTRONICS GmbH |
ALPINE ELECTRONICS DE ESPAÑA, S.A. |
Wilhelm-Wagenfeld-Str. 1-3, 80807 München, Germany |
Portal de Gamarra 36, Pabellón, 32 |
Phone 089-32 42 640 |
01013 Vitoria (Alava)-APDO 133, Spain |
ALPINE ELECTRONICS OF U.K. LTD. |
Phone 945-283588 |
|
|
Alpine House |
|
Fletchamstead Highway, Coventry CV4 9TW, U.K. |
|
www.alpine.co.uk |
|

ENGLISH
Contents |
|
Operating |
|
Instructions |
|
WARNING |
|
WARNING ................................................. |
5 |
CAUTION .................................................. |
5 |
NOTICE ..................................................... |
5 |
Features |
|
About Apple CarPlay ....................................... |
7 |
About Home Screen ......................................... |
7 |
Getting Started |
|
Accessory List .................................................. |
8 |
Location of Controls ........................................ |
8 |
Touch Operation ............................................... |
8 |
Turning Power On or Off ................................. |
8 |
Turning the System On ..................................... |
9 |
Adjusting the Volume ....................................... |
9 |
Muting the Sound ............................................. |
9 |
Operating an Item in a List ............................... |
9 |
Using Siri ......................................................... |
9 |
About Hands-Free Phone ............................... |
10 |
Applying Alpine TuneIt App ......................... |
10 |
Adjusting the sound Settings using Alpine |
|
Tunelt App ............................................... |
10 |
Radio/RBDS |
|
Listening to the Radio .................................... |
11 |
Presetting Stations Manually .......................... |
11 |
Presetting Stations Automatically .................. |
11 |
Tuning to Preset Stations ................................ |
11 |
PTY (Program Type) Tuning |
|
(RBDS mode only) ..................................... |
11 |
Displaying Radio Text |
|
(RBDS mode only) ..................................... |
11 |
Apple CarPlay (Optional) |
|
Connecting your iPhone .................................. |
12 |
Access to Apple CarPlay ................................ |
12 |
Auxiliary Device (Optional) |
|
Operating Auxiliary Devices (Optional) ......... |
13 |
Camera Operation (Optional) |
|
Rear Camera Operation .................................. |
14 |
Displaying the rear view video while the car |
|
is in reverse ............................................... |
14 |
Display the Rear View Video Manually ...... |
14 |
Guide Display On/Off Setting ..................... |
14 |
Adjusting the Caution Display Location ..... |
14 |
Calling the Adjusted Values of the |
|
Camera ..................................................... |
14 |
About the Rear Camera Guide ........................ |
14 |
Other Camera Operation ................................. |
16 |
About the Adjustment of the Caution Display |
|
Location ................................................... |
16 |
About the Adjusted Value of Image |
|
Quality ...................................................... |
16 |
Setup |
|
Audio Setup |
|
Audio Setup Operation ................................... |
16 |
Adjusting Balance (Between Left and |
|
Right) ........................................................... |
17 |
Adjusting Fader (Between Front and Rear) .... |
17 |
Setting the Bass Level ..................................... |
17 |
Setting the Treble Level .................................. |
17 |
Setting the Subwoofer ..................................... |
17 |
Turning Subwoofer ON/OFF ....................... |
17 |
Adjusting the Subwoofer Level ................... |
17 |
Setting the Subwoofer Phase ....................... |
17 |
Setting the Bass Engine SQ ............................ |
17 |
Turning the Bass Engine SQ ON/OFF ........ |
17 |
Setting the Bass Engine SQ Type ................ |
17 |
Adjusting the Bass Engine SQ Level .......... |
18 |
Setting the Volume for Each Application ....... |
18 |
Setting the MX (Media Xpander) ................... |
18 |
Equalizer Presets (EQ Presets) ....................... |
18 |
Setting Defeat ................................................. |
18 |
3-EN

Display Setup |
|
Display Setup Operation ................................. |
19 |
Switching Display Modes ........................... |
19 |
Adjusting Brightness ................................... |
19 |
Adjusting Color of Picture .......................... |
19 |
Adjusting Image Contrast ........................... |
19 |
Adjusting Picture Quality ............................ |
19 |
Saving and calling the adjusted picture |
|
quality ...................................................... |
20 |
General Setup |
|
General Setup Operation ................................ |
20 |
Time Setting .................................................... |
20 |
Setting the Clock Display ............................ |
20 |
Setting the Time .......................................... |
20 |
Setting the Daylight Saving Time ............... |
20 |
Language Setting ............................................ |
20 |
Setting the Menu Language ........................ |
20 |
Text Scroll Setting .......................................... |
21 |
Setting the Scroll ......................................... |
21 |
Key Sound Setting .......................................... |
21 |
Adjusting the Operating Sound ................... |
21 |
Setting Mute when Reversing ......................... |
21 |
Screen/Lighting Setting .................................. |
21 |
Setting the Brightness of the |
|
Backlighting ............................................. |
21 |
Button Backlighting Adjustment ................. |
21 |
Display Backlighting Adjustment ............... |
21 |
Changing the Opening Image ...................... |
21 |
About iLX-107 ............................................... |
21 |
Displaying the Product Information ............ |
21 |
Initializing the System ................................. |
22 |
Demonstration Setup ...................................... |
22 |
Canceling the Demonstration ...................... |
22 |
Application Setup |
|
Application Setup Operation .......................... |
22 |
Camera Setting ............................................... |
22 |
Setting the Camera Input ............................. |
22 |
Setting the Camera Signal Input ................. |
22 |
Adjusting the Rear Camera Guide .............. |
23 |
Camera Interrupt Setting (Power OFF Mode) |
|
(Rear Camera Only) ................................. |
23 |
Auxiliary (AUX) Setting ................................ |
23 |
Setting the Auxiliary (AUX) Mode ............. |
23 |
Factory System Setup ..................................... |
23 |
Setting the Source Category ........................ |
23 |
Setting the Maestro Module ........................ |
23 |
Apple CarPlay Setting .................................... |
24 |
Setting the Wi-Fi ON/OFF .......................... |
24 |
Registering the Apple CarPlay Device ........ |
24 |
Steering wheel Setting ................................. |
24 |
Setting the Siri Microphone Effect .............. |
24 |
Selecting the Output Speaker ...................... |
24 |
Adjusting the Microphone Level ................. |
24 |
External Accessory Control Setup .................. |
24 |
Setting the External Accessory Control ...... |
24 |
iDataLink Operation |
|
Access to iDataLink Mode ............................. |
25 |
About Parking Sensor screen ...................... |
26 |
External Accessory Control Operation ........... |
27 |
Information |
|
Product Software Update ................................ |
28 |
In Case of Difficulty ....................................... |
28 |
If this Message Appears ................................. |
28 |
Specifications .................................................. |
29 |
Installation and |
|
Connections |
|
Warning .................................................. |
30 |
Caution ................................................... |
30 |
Precautions ............................................ |
30 |
Installation ...................................................... |
31 |
Uninstalling the original car stereo ............. |
31 |
Mounting the GPS Antenna inside the |
|
vehicle ...................................................... |
31 |
Mounting the Microphone. .......................... |
31 |
Installing the Unit ........................................ |
31 |
Fix the Cables etc. ....................................... |
32 |
Connections .................................................... |
34 |
System Example ............................................. |
36 |
LIMITED WARRANTY |
|
4-EN
Operating Instructions
WARNING
 WARNING
This symbol means important instructions. Failure to heed them can result in serious injury or death.
INSTALL THE PRODUCT CORRECTLY SO THAT THE DRIVER CANNOT WATCH TV/VIDEO UNLESS THE VEHICLE IS STOPPED AND THE EMERGENCY BRAKE IS APPLIED.
It is dangerous (and illegal in many states) for the driver to watch TV/Video while driving a vehicle. Installing this product incorrectly enables the driver to watch TV/Video while driving. This may cause a distraction, preventing the driver from looking ahead, thus causing an accident. The driver or other people could be severely injured.
DO NOT WATCH VIDEO WHILE DRIVING.
Watching the video may distract the driver from looking ahead of the vehicle and cause an accident.
DO NOT OPERATE ANY FUNCTION THAT TAKES YOUR ATTENTION AWAY FROM SAFELY DRIVING YOUR VEHICLE.
Any function that requires your prolonged attention should only be performed after coming to a complete stop. Always stop the vehicle in a safe location before performing these functions. Failure to do so may result in an accident.
KEEP THE VOLUME AT A LEVEL WHERE YOU CAN STILL HEAR OUTSIDE NOISES WHILE DRIVING.
Excessive volume levels that obscure sounds such as emergency vehicle sirens or road warning signals (train crossings, etc.) can be dangerous and may result in an accident. LISTENING AT LOUD VOLUME LEVELS IN A CAR MAY ALSO CAUSE HEARING DAMAGE.
USE THE CORRECT AMPERE RATING WHEN REPLACING FUSES.
Failure to do so may result in fire or electric shock.
DO NOT BLOCK VENTS OR RADIATOR PANELS.
Doing so may cause heat to build up inside and may result in fire.
USE THIS PRODUCT FOR MOBILE 12V APPLICATIONS.
Use for other than its designed application may result in fire, electric shock or other injury.
DO NOT PLACE HANDS, FINGERS OR FOREIGN OBJECTS IN INSERTION SLOTS OR GAPS.
Doing so may result in personal injury or damage to the product.
 CAUTION
This symbol means important instructions. Failure to heed them can result in injury or material property damage.
HALT USE IMMEDIATELY IF A PROBLEM APPEARS.
Failure to do so may cause personal injury or damage to the product. Return it to your authorized Alpine dealer or the nearest Alpine Service Center for repairing.
 NOTICE
Product Cleaning
Use a soft dry cloth for periodic cleaning of the product. For more severe stains, please dampen the cloth with water only. Anything else has the chance of dissolving the paint or damaging the plastic.
Temperature
Be sure the temperature inside the vehicle is between +45°C (+113°F) and 0°C (+32°F) before turning your unit on.
MINIMIZE DISPLAY VIEWING WHILE DRIVING.
Viewing the display may distract the driver from looking ahead of the vehicle and cause an accident.
Maintenance
If you have problems, do not attempt to repair the unit yourself. Return it to your Alpine dealer or the nearest Alpine Service Station for servicing.
DO NOT DISASSEMBLE OR ALTER.
Doing so may result in an accident, fire or electric shock.
USE ONLY IN CARS WITH A 12 VOLT NEGATIVE GROUND.
(Check with your dealer if you are not sure.) Failure to do so may result in fire, etc.
KEEP SMALL OBJECTS SUCH AS SCREWS OUT OF THE REACH OF CHILDREN.
Swallowing them may result in serious injury. If swallowed, consult a physician immediately.
Installation Location
Make sure the iLX-107 will not be installed in a location subjected to:
•Direct sun and heat
•High humidity and water
•Excessive dust
•Excessive vibrations
5-EN

Operation of some of the functions of this unit is very complex. Because of this, it was deemed necessary to place these functions into a special screen. This will restrict operation of these functions to times when the vehicle is parked. This ensures the focus of the driver’s attention will be on the road and not on the iLX-107. This has been done for the safety of the driver and passengers.
Some setup operations cannot be made if the car is moving. The car must be parked and the parking brake must be engaged for the procedure described in the Owner’s Manual to be valid. The warning “Unable to operate while driving.” will be displayed if any attempts are made to perform these operations while driving.
•The iLX-107 draws minimal current even when its power switch is turned off. If the switched power (ignition) lead of the iLX-107 is connected directly to the positive (+) post of the vehicle’s battery, the battery may be discharged.
An SPST (Single-Pole, Single-Throw) switch (sold separately) can be added to simplify this procedure. Then, you can simply place it in the OFF position when you leave the vehicle. Turn the SPST switch back ON before using the iLX-107. For connecting the SPST switch, refer to the “Connection Diagram of SPST Switch (sold separately)” (page 33). If the power (ignition) lead is unswitched, it must be disconnected from the battery post should the vehicle be left unused for an extended period of time.
Protecting the USB connector
•Only an iPhone 5 or later or Flash memory can be connected to the USB connector on this unit. Correct performance using other USB products cannot be guaranteed.
•If the USB connector is used, be sure to use only the supplied connector cable with the unit. A USB hub is not supported.
•USB Flash memory is used for data file transfer or updates only.
•This unit does not support Flash memory’s Audio/Video playback or photo browse.
 CAUTION
Alpine accepts no responsibility for lost data, etc., even if data, etc., is lost while using this product.
•iPhone, iTunes and CarPlay are trademarks of Apple Inc., registered in the U.S. and other countries.
•“Made for iPhone” means that an electronic accessory has been designed to connect specifically to iPhone, respectively, and has been certified by the developer to meet Apple performance standards. Apple is not responsible for the operation of this device or its compliance with safety and regulatory standards. Please note that the use of this accessory with iPhone may affect wireless performance.
6-EN
Features
About Apple CarPlay
Apple CarPlay allows your iPhone 5 or later to operate smoothly from this head unit.
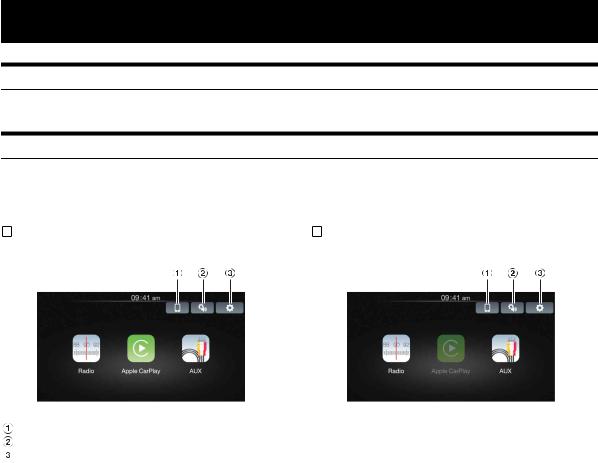
About Home Screen
The Home Screen for this unit gives direct access to those applications designed to work with Apple CarPlay. The Apple CarPlay icon will indicate whether the appropriate iPhone is connected.
• Available source differs depending on the connected device and settings.
|
When iPhone is connected |
|
When iPhone is not connected |
Touch to change to Apple CarPlay Device list screen while “Wi-Fi” is ON.
Audio Setup icon.
Setup icon.
7-EN
|
Getting Started |
|
Accessory List |
|
|
• |
iLX-107................................................................................. |
1 |
• |
Power cable......................................................................... |
1 |
• |
GPS Antenna ....................................................................... |
1 |
• |
Antenna mounting plate ...................................................... |
1 |
• |
Cable clamp for antenna ................................................ |
1set |
• |
USB extension cable ........................................................... |
1 |
• |
PRE OUT cable.................................................................... |
1 |
• |
Interface cable .................................................................... |
1 |
• |
W.REMOTE cable ................................................................ |
1 |
• Flush head screw (M5×8) ................................................... |
4 |
|
• |
Screw (M5×8) ...................................................................... |
4 |
• |
Microphone.......................................................................... |
1 |
• |
Face plate ........................................................................... |
1 |
• |
Owner’s Manual .............................................................. |
1set |
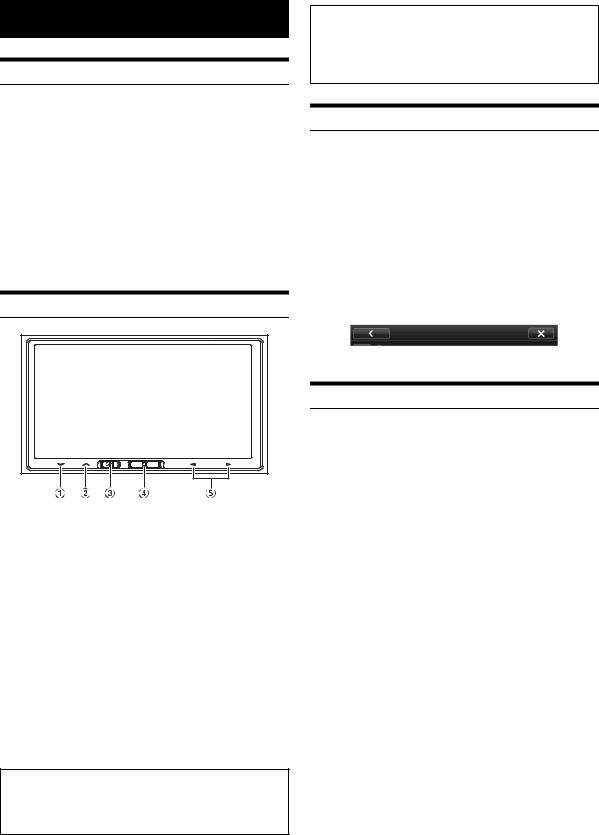
Location of Controls

 button
Touch to turn down the volume. Touch and hold for at least 2 seconds to mute.

 button
Touch to turn up the volume.
 Siri button
Press (or press and hold) to start the Siri function of the iPhone. When no iPhone is connected, press and hold for at least 2 seconds to activate Apple CarPlay Device list screen while “Wi-Fi” is ON.
 Home button
Press to call up the Home Screen.
Press and hold for at least 5 seconds to turn the power off.

 /
/ button
This action varies according to the Audio/Visual application. (Track Up/Down, Fast reverse/Fast forward, etc.)
•You can reset the unit by pressing and holding Home and Siri buttons at the same time for 10 seconds.
Steering Wheel remote interface compatible
With an optional Alpine Steering Wheel Remote Control Interface Box (not included), this unit is controllable from the vehicles steering wheel controls. For details, contact your Alpine dealer.
About the button descriptions used in this Owner’s Manual
The buttons found on the face of the unit are expressed in bold (e.g. Home). The buttons found on the touch-screen display are shown in bold within brackets, [ ] (e.g. [ ]).
]).
Touch Operation
Many of the operations for this unit are accessible through a light touch on the integrated touch panel.
•Be sure to touch the onscreen button lightly with the pad of your finger to protect the display.
•If you touch a button and there is no reaction, remove your finger from the display once, and try again.
•Onscreen buttons that cannot be operated appear dull in color.
Common onscreen buttons
[ ]: Returns to the previous screen. Depending on the function, this button may cancel the operations performed on the screen.
[ ]: Closes the window.
Turning Power On or Off
1 Turn the ignition key to the ACC or ON position.
The system turns on.
2 Press and hold the Home button for at least 5 seconds to turn the power OFF.
•The unit can be turned on by pressing Home button or Siri button.
•The iLX-107 is a precision device. Careful handling of the unit should provide you with years of trouble-free operation.
8-EN
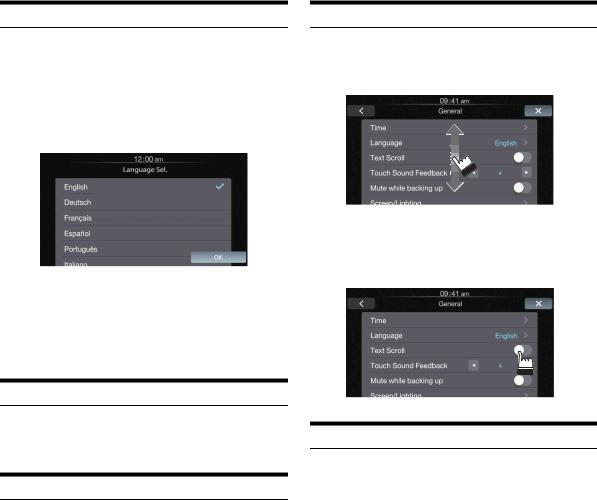
Turning the System On
With the Alpine system, when the ignition key is turned to ACC or ON, the opening screen will be automatically displayed.
1 When the system is used for the first time, the language selection menu is displayed. There are 20 languages to choose from. Touch the screen and slide your finger up or down, and then touch the desired language.
2 Touch [OK].
The radio screen is displayed.
•Some of this unit’s functions cannot be performed while the vehicle is in motion. Be sure to stop your vehicle in a safe location and apply the parking brake before attempting these operations.
Adjusting the Volume
Adjust the volume by touching  or
or  .
.
Volume increases continuously by touching and holding  . Volume: 0 - 35
Muting the Sound
Touch and hold  for at least 2 seconds to activate the MUTE mode.
Operating an Item in a List
1 To scroll through a list, touch the screen and slide your finger up or down.
The screen will scroll along with your finger movement.
•To make a selection, touch the screen at the desired item, and then lift your finger without moving the screen up or down.
2 Touch the button and slide your finger right or left to change ON/OFF.
Using Siri
You can use the Siri function of your iPhone. To use Siri from this unit, make sure that this function is enabled in your iPhone settings.
Press Siri.
9-EN

About Hands-Free Phone
When connected to this unit, your iPhone can be used as hands-free. Incoming calls are displayed with the caller’s ID when available.
•About iPhone models usable with this unit, refer to Apple CarPlay section (page 12).
•You can adjust the volume of the phone or select the speakers to be used for the call’s audio. Refer to “Apple CarPlay Setting”
(page 24).
•Avoid hands-free calls in heavy traffic or on narrow or winding roads. Keep your focus on driving to prevent an accident.
•Close the windows while calling to reduce background noise.
•When using a microphone, speak as directly as you can into the microphone to obtain the best sound quality.
Applying Alpine TuneIt App
This unit’s sound tuning is programmable from a connected iPhone. It is also possible to download specific parameters for certain vehicles from Alpine’s TuneIt database stored in the Cloud. Using the Alpine TuneIt App, customized parameters can also be uploaded for others to share and rate.
The installed Alpine TuneIt App should be launched on the iPhone before connecting to the head unit.
Alpine TuneIt App, is downloadable from Apple’s App Store. For details, consult your Alpine dealer.
•The application program and related specifications and data may be deleted or terminated without notice.
•About iPhone models usable with this unit, refer to Apple CarPlay section (page 12).
Adjusting the sound Settings using Alpine Tunelt App
After completing the procedure above, your iPhone can be used to make audio adjustments for this unit.
1 Make sure the unit is powered on.
2 Launch the Alpine TuneIt App on the iPhone. Adjust the unit’s sound accordingly on the iPhone.
•Volume level cannot be adjusted via the iPhone.
•The setting cannot be done on both the iPhone and this unit at the same time.
•When the unit is powered off , sound setting cannot be done via the iPhone.
•Please obey all local traffic laws while using this function.
Radio/RBDS
The RBDS (Radio Broadcast Data System) is a radio information system. This system allows you to receive a variety of information such as traffic information, station names.
• RBDS mode is only available during FM broadcast reception.
Display example for Radio main screen
Band display
Preset No. indicator display
Audio Setup button (see “Audio Setup Operation” on page 16)
Info area Preset button
10-EN
Listening to the Radio
1 Press the Home button.
The Home screen is displayed.
2 Touch [Radio].
The radio mode is activated and the display changes to the Radio mode screen.
3 Touch [  ] to select the desired radio band.
Each touch changes the bands as follows:
FM-1  FM-2
FM-2  AM
AM  FM-1
FM-1
4 Touch [Tune] to select the tuning mode.
DX Seek |
Local Seek |
Manual |
• There are two modes you can select for auto tuning, DX and Local:
-DX (Distance) mode;
Both strong and weak stations will be tuned in.
-Local mode;
Only strong stations will be tuned in. The initial setting is DX.
•If “Preset” or “PTY” appears, touch [Tune] repeatedly until a tuning mode is displayed.
5 Touch [  ], [
], [ 
 ] or [
 ], [
], [ ] to change the radio frequency up or down respectively.
In manual mode, touch and hold to change the frequency continuously.
Presetting Stations Manually
1 Tune in a desired radio station you wish to store in the preset memory by manual or automatic seek tuning.
2 Touch and hold any one of the preset buttons for at least 2 seconds.
The selected station is stored.
3 Repeat the procedure to store up to 5 other stations onto the same band.
To use this procedure for other bands, simply select the desired band and repeat the procedure.
A total of 18 stations can be stored in the preset memory (6 stations for each band; FM-1, FM-2 or AM).
•If a preset memory has already been set in the same preset number, it will be cleared and the new station will be memorized.
Presetting Stations Automatically
The tuner can automatically seek and store 6 strong stations in the selected band in order of frequency from low to high.
After selecting the desired band, touch and hold [A.Memo] for at least 2 seconds.
The tuner automatically seeks and stores 6 strong stations into the preset buttons in order of frequency from low to high.
When automatic storing has completed, the station stored in the preset 1 is selected.
•If no stations are stored, the tuner will return to the original station you were listening to before the automatic storing procedure began.
•You can cancel this process by touching [A.Memo] while the tuner is automatically seeking stations. Cancelling will return the tuner preset to the previous setting.
Tuning to Preset Stations
Select the desired preset in any band to tune to the station stored in that preset number.
1 Touch [  ] repeatedly until the desired band is displayed.
2 Touch any one of the preset buttons that has a station stored to it.
The preset station is received.
PTY (Program Type) Tuning (RBDS mode only)
1 Touch [PTY Search].
The Select PTY list screen is displayed.
2 Touch the selected program type to start searching for a station of that type.
If no PTY station is found, “No PTY.” will be displayed.
3 To select the station in PTY, touch [Tune] repeatedly during reception of a PTY station to display “PTY.” And then, touch [ ], [
], [ ].
].
Displaying Radio Text (RBDS mode only)
Text messages from a radio station can be displayed.
1 Tune in a radio station that transmits text messages.
2 Touch the Info area ( ) (page 10) in FM radio mode repeatedly to switch to the desired display.
Song Info Mode (PS/PTY/Title Name/Artist Name/Album
Name)
Radio Text Mode (Radio Text)
11-EN

Apple CarPlay (Optional)
Apple CarPlay is a smarter, safer way to use your iPhone in the car. Apple CarPlay takes the things you want to do with your iPhone while driving and puts them right on iLX-107. You can get directions, make calls, send and receive messages, and listen to music, all in a way that allows you to stay focused on the road. Just plug in or wirelessly connect your iPhone via Wi-Fi to iLX-107 and go.
•Before using this function, plug in your iPhone using Lighting to USB Cable (Supplied with iPhone) and make USB connection or wirelessly connect your iPhone via Wi-Fi to iLX-107. For details, refer to “Connecting your iPhone” (page 12).
•Some functions may not be available while driving.
About iPhone models usable with this unit
• The following devices have been tested and shown to work with this unit. Correct function of earlier versions cannot be guaranteed.
iPhone SE: Ver.9.3 iPhone 6s Plus: Ver.9.1 iPhone 6s: Ver.9.1 iPhone 6 Plus: Ver.9.1 iPhone 6: Ver.9.1 iPhone 5s: Ver.9.1 iPhone 5c: Ver.9.1 iPhone 5: Ver.9.1
Connecting your iPhone
You can connect your iPhone to this unit via USB connection or Wi-Fi by your prefer.
By USB
Just plug in your iPhone using Lighting to USB Cable (Supplied with iPhone) to iLX-107. If an iPhone has been connected to this unit via WiFi, you should switch connection on Apple CarPlay Device list screen.
By Wi-Fi
Make sure to turn on Wi-Fi on your iPhone and iLX-107. Also turn on Bluetooth on your iPhone before making this connection.
1 Select the “Alpine iLX-107” from the Bluetooth pairing list of your iPhone for pairing.
Make sure the unit is on Apple CarPlay devices screen for paring.
2 Touch [pair] or [OK] after the same 6 character Passkey appears on your iPhone and this unit.
3 If the connection was successful, the Apple CarPlay screen is displayed.
•In order to use Apple CarPlay over Wi-Fi, the vehicle’s Bluetooth must be turned off. Please do not pair to the vehicle’s Bluetooth connection to enable Apple CarPlay.
•You can also connect your iPhone from this unit. For details, refer to “Registering the Apple CarPlay Device” (page 24).
•When you disconnect a registered iPhone from USB connection on Apple CarPlay screen, it will change to Wi-Fi connection automatically.
Access to Apple CarPlay
1 Press the Home button.
The Home screen is displayed.
2 Touch [Apple CarPlay].
The Apple CarPlay mode is activated.
Touch the desired App icon on iLX-107, or use Siri function by pressing Siri button.
•The App must be Apple CarPlay compatible in order to appear in the Home screen.
12-EN

Auxiliary Device (Optional)
Operating Auxiliary Devices (Optional)
To operate devices connected to the AUX terminals of iLX-107, follow the procedure described below.
•Turn on the “AUX In”. Refer to “Setting the Auxiliary (AUX) Mode” (page 23).
 WARNING
It is dangerous (and illegal in many states) for the driver to watch TV/video while driving the vehicle. The driver may be distracted from looking ahead and an accident could occur.
Install the iLX-107 correctly so that the driver cannot watch TV/video unless the vehicle is stopped and the emergency brake is applied.
If the iLX-107 is not installed correctly, the driver will be able to watch TV/video while driving the vehicle and may be distracted from looking ahead and cause an accident. The driver or other people could be severely injured.
• The video is disabled while driving.
1 Press the Home button.
The Home screen is displayed.
2 Touch [AUX].
The Auxiliary (AUX) mode screen is displayed.
AUX Operation Screen Display During Video File
Playback
Touch the screen.
The Auxiliary (AUX) operation screen is displayed.
Example for AUX main screen
[ |
] |
Calls up the Display Setup screen. (See “Display Setup Operation” on page 19)
•The operation screen changes to the visual screen in the Auxiliary (AUX) mode for 5 seconds after an operation has been performed.
Touch the display panel to display the operation screen again.
[ ]
]
Calls up the Audio Setup screen. (See “Audio Setup Operation” on page 16)
13-EN
Loading...