


CDM-7892R
EN
DE
FR
ES
IT
SE
R
ALPINE ELECTRONICS, INC.
Tokyo office: 1-1-8 Nishi Gotanda,
Shinagawa-ku,
Tokyo 141-8501, Japan
Tel.: (03) 3494-1101
ALPINE ELECTRONICS OF AMERICA, INC.
19145 Gramercy Place, Torrance,
California 90501, U.S.A.
Tel.: 1-800-ALPINE-1 (1-800-257-4631)
ALPINE ELECTRONICS OF CANADA, INC.
7300 Warden Ave., Suite 203, Markham,
Ontario L3R 9Z6, Canada
Tel.: 1-800-ALPINE-1 (1-800-257-4631)
ALPINE ELECTRONICS FRANCE S.A.R.L.
(RCS PONTOISE B 338 101 280)
98, Rue de la Belle Etoile, Z.I. Paris Nord Il,
B.P. 50016, 95945 Roissy Charles de Gaulle
Cedex, France
Tel.: 01-48 63 89 89
ALPINE ELECTRONICS OF U.K., LTD.
13 Tanners Drive, Blakelands, Milton Keynes
MK14 5BU, U.K.
Tel.: 01908-61 15 56
ALPINE ELECTRONICS DE ESPAÑA, S.A.
Portal de Gamarra 36, Pabellón, 32
01013 Vitoria (Alava)-APDO 133, Spain
Tel.: 945-283588
ALPINE ELECTRONICS OF AUSTRALIA PTY. LTD.
6-8 Fiveways Boulevarde Keysborough,
Victoria 3173, Australia
Tel.: (03) 9769-0000
ALPINE ELECTRONICS GmbH
Kreuzerkamp 7, 40878 Ratingen, Germany
Tel.: 02102-45 50
ALPINE ITALIA S.p.A.
Viale C. Colombo 8, 20090 Trezzano Sul
Naviglio (MI), Italy
Tel.: 02-48 47 81
CDM-7892R
Designed by ALPINE Japan
Printed in China (Y)
68P01434K94-B
• OWNER'S MANUAL
Please read before using this equipment.
• BEDIENUNGSANLEITUNG
Lesen Sie diese Bedienungsanleitung bitte vor
Gebrauch des Gerätes.
• MODE D'EMPLOI
Veuillez lire avant d’utiliser cet appareil.
• MANUAL DE OPERACIÓN
Léalo antes de utilizar este equipo.
• ISTRUZIONI PER L’USO
Si prega di leggere prima di utilizzare il
attrezzatura.
• ANVÄNDARHANDLEDNING
Innan du använder utrustningen bör du läsa
igenom denna användarhandledning.
FM/MW/LW/RDS CD Receiver
Meiyi Printing Factory, Dalian, China
No. 28 Chang Qing Street, Xi Gang District, Dalian, China

Alpine CD Changers Give You More!
More musical selections, more versatility, more convenience.
The CHA-S634 is a high-performance 6-disc changer with a new M DAC, CD-R/RW PLAY BACK, MP3 PLAY BACK and CD TEXT.
The CHA-1214 Ai-NET model holds 12 discs, and the CHM-S630 M-Bus model is a super-compact 6-disc changer with a CD-R/RW
PLAY BACK.
NOTE
The CHA-S634 model can be connected to the M-Bus model Head Unit using the optional M-Bus/Ai-NET compatible cable. (KCA-130B)
Von Alpine CD-Wechslern haben Sie mehr!
Mehr Musikauswahl, mehr Vielseitigkeit, mehr Komfort.
Der CHA-S634 ist ein Hochleistungs-Wechsler für 6 CDs mit dem neuen M-DAC, mit CD-R/RW- und MP3-Wiedergabefunktion und
mit CD-TEXT. Der CHA-1214 ist ein Ai-NET-Modell für 12 CDs. Der M-Bus-kompatible CHM-S630 ist ein superkompakter Wechsler
für 6 CDs mit CD-R/RW-Wiedergabefunktion.
HINWEIS
Das Modell CHA-S634 kann mit einem M-Bus-/Ai-NET-kompatiblen Kabel (KCA-130B) an das zusätzlich erhältliche M-Bus-Hauptgerät
angeschlossen werden.
Changeurs de CD Alpine : vous avez le choix!
Plus de sélections musicales, plus de souplesse, plus de confort.
Le modèle CHA-S634 est un changeur 6 disques ultra performant équipé des nouvelles fonctions M DAC, CD-R/RW PLAY BACK,
MP3 PLAY BACK et CD TEXT. Le modèle CHA-1214 Ai-NET contient 12 disques. Le modèle CHM-S630 M-Bus est un changeur 6
disques super compact doté de la fonction CD-R/RW PLAY BACK.
REMARQUE
Le modèle CHA-S634 peut être raccordé à l’appareil principal du modèle M-Bus en option à l’aide du câble compatible
M-Bus/Ai-NET (KCA-130B).
¡Los cambiadores Alpine de CD le ofrecen más!
Más selecciones musicales, más versatilidad y más ventajas.
CHA-S634 es un cambiador de seis discos de alto rendimiento con nuevo M DAC, CD-R/RW PLAY BACK, MP3 PLAY BACK y CD
TEXT. El modelo CHA-1214 Ai-NET alberga 12 discos y el modelo CHM-S630 M-Bus es un cambiador de seis discos de tamaño
reducido con un CD-R/RW PLAY BACK.
NOTA
El modelo CHA-S634 se puede conectar a la unidad principal del modelo opcional M-Bus utilizando el cable compatible M-Bus/Ai-NET. (KCA-130B)
I caricatori CD Alpine danno di più!
Più scelta, più versatilità, più comodità.
Il modello CHA-S634 è un caricatore a 6 dischi ad elevate prestazioni dotato di un nuovo M DAC, CD-R/RW PLAY BACK, MP3 PLAY
BACK e CD TEXT. Il modello CHA-1214 Ai-NET è in grado di contenere 12 dischi, il modello CHM-S630 M-Bus è un caricatore a 6
dischi ultra compatto dotato di un CD-R/RW PLAY BACK.
NOTA
Il modello CHA-S634 può essere collegato all’unità principale modello M-Bus mediante il cavo M-Bus/Ai-NET compatibile (KCA-130B).
Alpines CD-växlare ger mer!
Fler musikval, mer variation, större bekvämlighet.
CHA-S634 är en växlare för 6 skivor med mycket höga prestanda och en ny M D/A-omvandlare samt uppspelning av CD-R/RW, MP3
och CD TEXT. CHA-1214 Ai-NET rymmer 12 skivor. CHM-S630 M-Bus är en mycket kompakt växlare med kapaciteten 6 skivor med
uppspelning av CD-R/RW PLAY BACK.
Obs!
CHA-S634 kan inte anslutas till M-Bus Huvudenhet (tillval) med en M-Bus/Ai-NET-kompatibel kabel. (KCA-130B)
CHM-S630
• CD changer for CDM-7892R
• CD-Wechsler für CDM-7892R
• Changeur CD pour CDM-7892R
• Cambiador de CD para
CDM-7892R
• Cambia CD per CDM-7892R
• CD-växlare för CDM-7892R
CHA-1214CHA-S634

1-EN
Contents
Operating Instructions
WARNING
WARNING.................................................. 2
CAUTION ................................................... 2
PRECAUTION ........................................... 2
Basic Operations
Detaching the Front Panel.................................. 4
Attaching the Front Panel .................................. 4
Initial System Start-Up ...................................... 4
Turning Power On and Off ................................ 5
Display Angle Adjustment ................................. 5
Adjusting Volume/Balance
(Between Left and Right)/Fader
(Between Front and Rear)/Defeat ................... 5
Audio Mute Function .........................................5
Changing the Audio Level Display ON/OFF..... 5
Setting the Bass Control ....................................6
Setting the Treble Control .................................. 6
Adjusting the built-in Crossover ........................6
About the Time Correction ................................7
Bass Focus ......................................................... 8
Time Correction .................................................9
Setting the MX Mode ........................................9
Radio Operations
Manual Tuning .................................................10
Automatic Seek Tuning ................................... 10
Manual Storing of Station Presets ...................10
Automatic Memory of Station Presets ............. 11
Tuning to Preset Stations ................................. 11
RDS Operations
Setting RDS Reception Mode and Receiving
RDS Stations ................................................ 12
Recalling Preset RDS Stations ......................... 12
Receiving RDS Regional (Local) Stations ...... 12
Receiving Traffic Information..........................13
PTY (Programme Type) Tuning ...................... 13
Receiving Traffic Information While Playing
CD or Radio .................................................. 14
Priority News ................................................... 14
CD Player Operation
Opening and Closing the Movable display ......15
Playback ...........................................................15
Music Sensor (Skip)......................................... 16
Fast Forward and Backward ............................ 16
Repeat Play ...................................................... 16
M.I.X. (Random Play) ..................................... 16
Scanning Programmes ..................................... 16
Controlling CD Changer (Optional) ................ 16
SETUP Operation
Adjusting Source Signal Levels ....................... 17
Switching the Tuner Mode...............................17
Subwoofer On and Off ..................................... 17
Setting Frequency Step .................................... 17
Setting the AUX Mode ..................................... 18
Demonstration .................................................. 18
Information
In Case of Difficulty ........................................ 19
Specifications ...................................................21
Installation and Connections
Warning ........................................................... 22
Caution ............................................................ 22
Precautions ...................................................... 22
Installation .......................................................23
Connection ...................................................... 24
ENGLISH
2-EN
WARNING
This symbol means important instructions. Failure
to heed them can result in serious injury or death.
DO NOT OPERATE ANY FUNCTION THAT TAKES YOUR
ATTENTION AWAY FROM SAFELY DRIVING YOUR
VEHICLE.
Any function that requires your prolonged attention should only
be performed after coming to a complete stop. Always stop the
vehicle in a safe location before performing these functions.
Failure to do so may result in an accident.
KEEP THE VOLUME AT A LEVEL WHERE YOU CAN STILL
HEAR OUTSIDE NOISE WHILE DRIVING.
Failure to do so may result in an accident.
DO NOT DISASSEMBLE OR ALTER.
Doing so may result in an accident, fire or electric shock.
USE ONLY IN CARS WITH A 12 VOLT NEGATIVE GROUND.
(Check with your dealer if you are not sure.) Failure to do so may
result in fire, etc.
KEEP SMALL OBJECTS SUCH AS BATTERIES OUT OF THE
REACH OF CHILDREN.
Swallowing them may result in serious injury. If swallowed,
consult a physician immediately.
USE THE CORRECT AMPERE RATING WHEN REPLACING
FUSES.
Failure to do so may result in fire or electric shock.
DO NOT BLOCK VENTS OR RADIATOR PANELS.
Doing so may cause heat to build up inside and may result in fire.
USE THIS PRODUCT FOR MOBILE 12V APPLICATIONS.
Use for other than its designed application may result in fire,
electric shock or other injury.
DO NOT PLACE HANDS, FINGERS OR FOREIGN OBJECTS
IN INSERTION SLOTS OR GAPS.
Doing so may result in personal injury or damage to the product.
WARNING
CAUTION
This symbol means important instructions. Failure
to heed them can result in injury or material
property damage.
HALT USE IMMEDIATELY IF A PROBLEM APPEARS.
Failure to do so may cause personal injury or damage to the
product. Return it to your authorized Alpine dealer or the nearest
Alpine Service Centre for repairing.
PRECAUTIONS
Temperature
Be sure the temperature inside the vehicle is between +60°C
(+140°F) and –10°C (+14°F) before turning your unit on.
Moisture Condensation
You may notice the CD playback sound wavering due to
condensation. If this happens, remove the disc from the player
and wait about an hour for the moisture to evaporate.
Damaged Disc
Do not attempt to play cracked, warped, or damaged discs.
Playing a bad disc could severely damage the playback
mechanism.
Maintenance
If you have problems, do not attempt to repair the unit yourself.
Return it to your Alpine dealer or the nearest Alpine Service
Station for servicing.
3-EN
Never Attempt the Following
Do not grip or pull out the disc while it is being pulled back into
the player by the automatic reloading mechanism.
Do not attempt to insert a disc into the unit when the unit power
is off.
Inserting Discs
Your player accepts only one disc at a time for playback. Do not
attempt to load more than one disc.
Make sure the label side is facing up when you insert the disc.
Your player will automatically eject any disc that is inserted
incorrectly. If the player continues to eject a correctly inserted
disc, push the Reset switch with a pointed object such as a
ballpoint pen.
Playing a disc while driving on a very bumpy road may result in
skips, but this will not scratch the disc or damage the player.
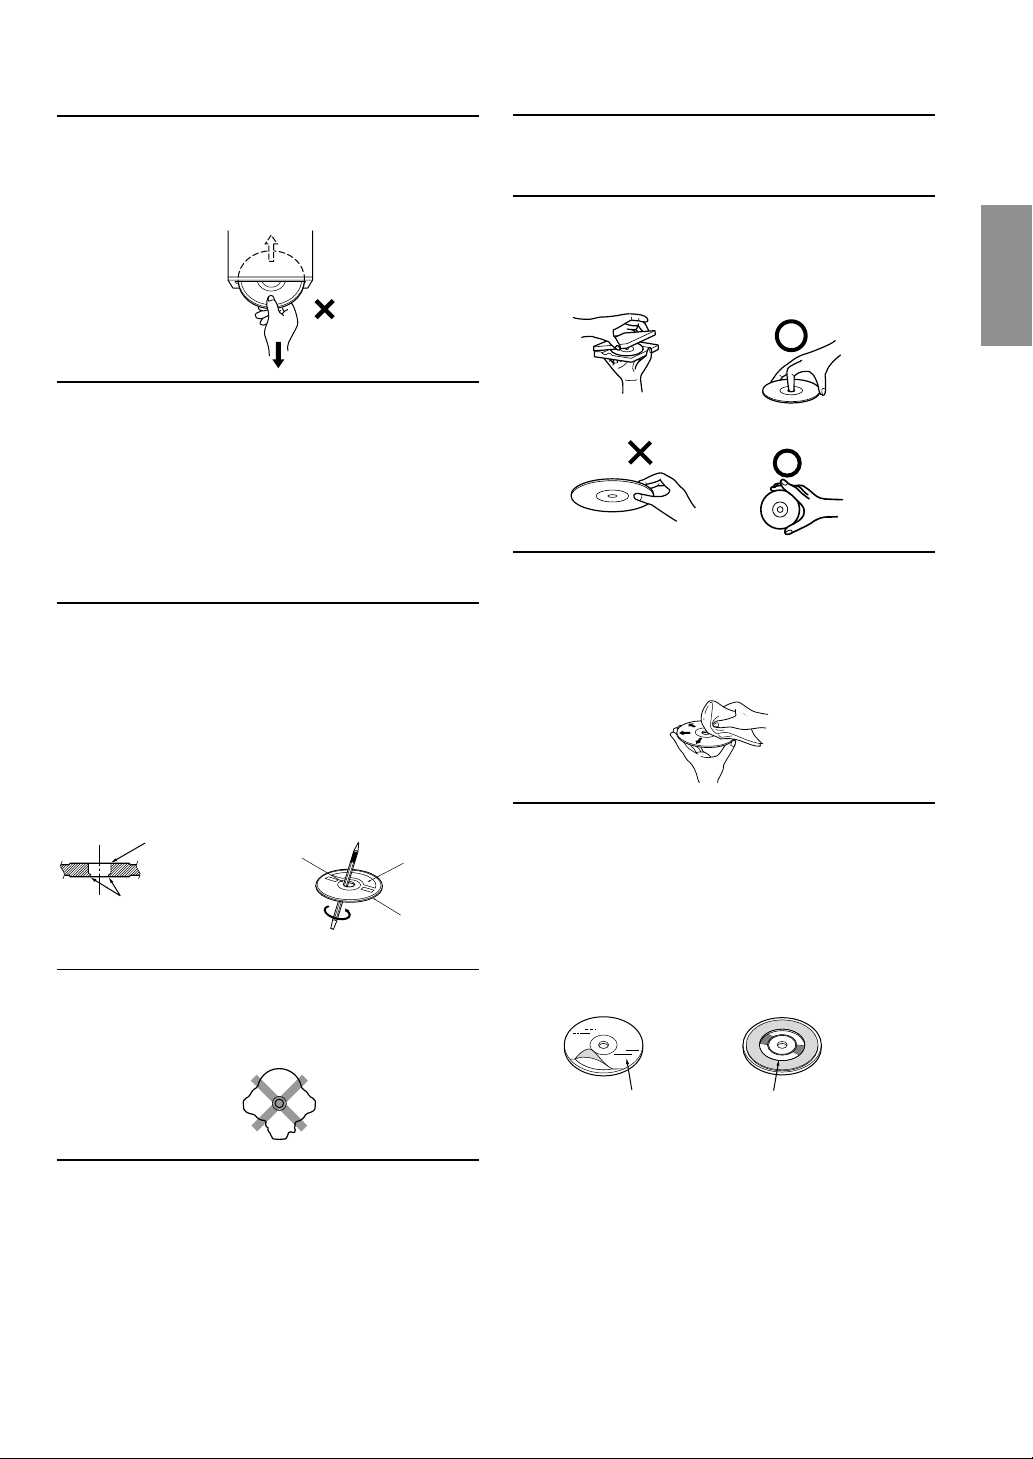
New Discs
As a protective measure to prevent the CD from jamming, the CD
player will automatically eject discs with irregular surfaces or
inserted incorrectly. When a new disc is inserted into the player
and ejected after initial loading, using your finger, feel around the
inside of the centre hole and outside edge of the disc. If you feel
any small bumps or irregularities, this could inhibit proper
loading of the disc. To remove the bumps, rub the inside edge of
the hole and outside edge of the disc with a ballpoint pen or other
such instrument, then insert the disc again.
Irregular Shaped Discs
Be sure to use round shape discs only for this unit and never use
any special shape discs.
Use of special shape discs may cause damage to the mechanism.
Installation Location
Make sure the CDM-7892R will not be installed in a location
subjected to:
• Direct sun and heat
• High humidity and water
• Excessive dust
• Excessive vibrations
Handling the Detachable Front Panel
• Do not expose to rain or water.
• Do not drop or apply shock.
Correct Handling
Do not drop the disc while handling. Hold the disc by its edge so
that no fingerprints are left on the surface. Do not affix tape,
paper, or gummed labels to the disc. Do not write on the disc.
Disc Cleaning
Fingerprints, dust, or soil on the surface of the disc could cause
the CD player to skip. For routine cleaning, wipe the playing
surface with a clean, soft cloth from the centre of the disc to the
outer edge. If the surface is heavily soiled, dampen a clean, soft
cloth in a solution of mild neutral detergent before cleaning the
disc.
Disc Accessories
There are various accessories available on the market for
protecting the disc surface and improving sound quality.
However, most of them will influence the thickness and/or
diameter of the disc. Using such accessories can cause the disc to
be out of standard specifications and may create operational
problems. We recommend not using these accessories on discs
played in Alpine CD players.
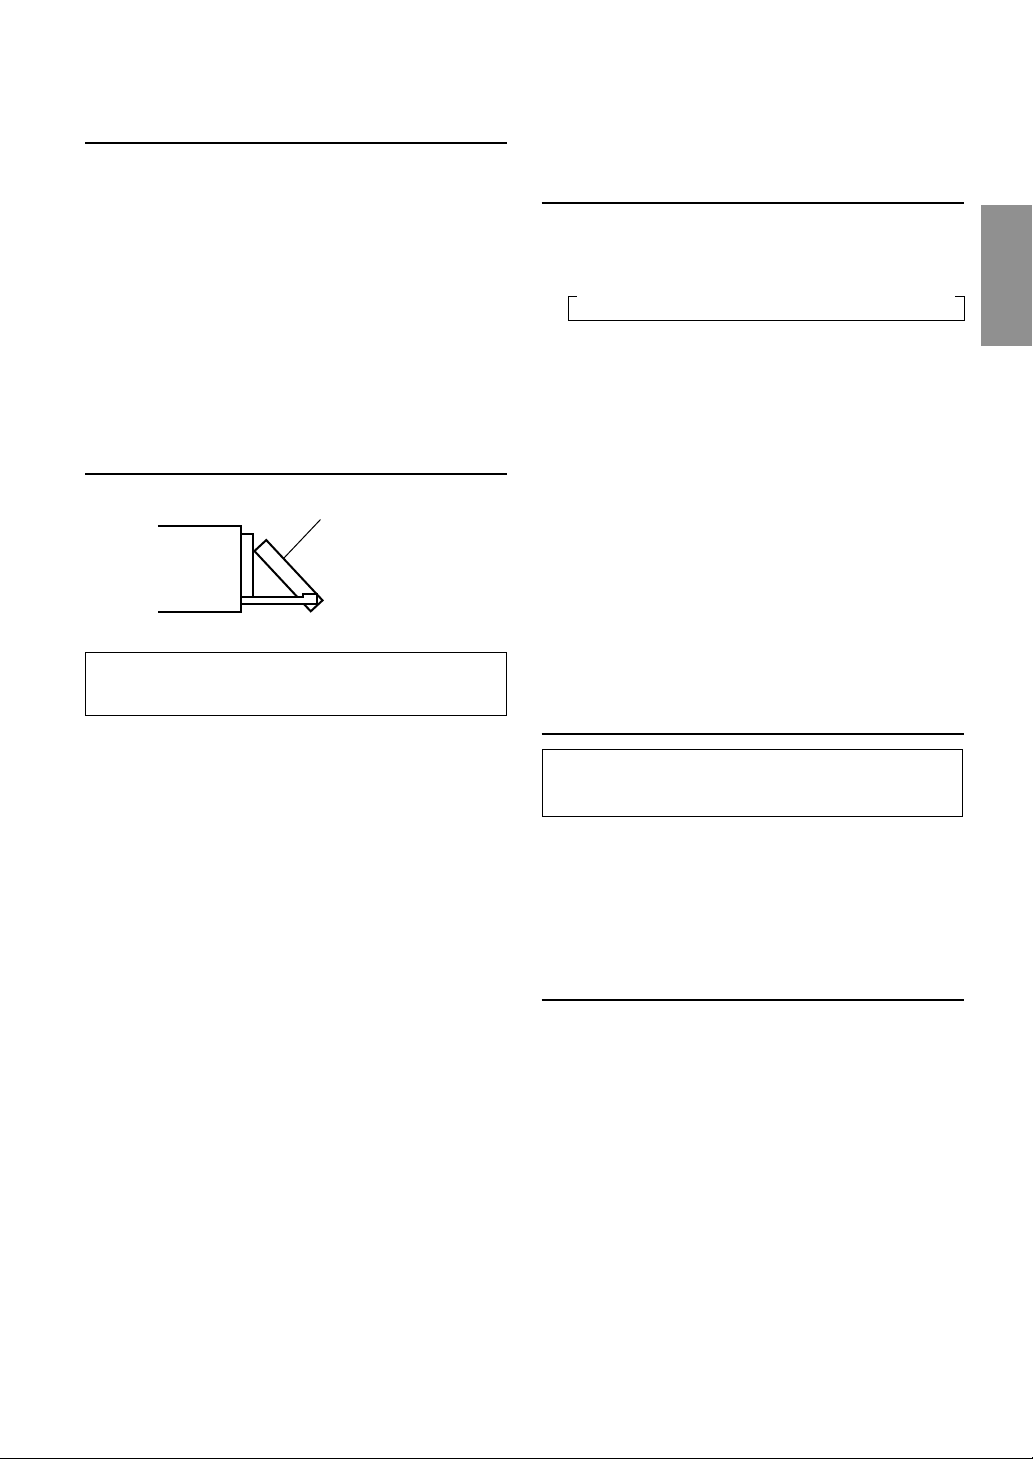
Centre Hole
Bumps
Centre Hole
Transparent Sheet
Disc Stabilizer
CORRECT
INCORRECT
CORRECT
New Disc
Outside
(Bumps)
4-EN
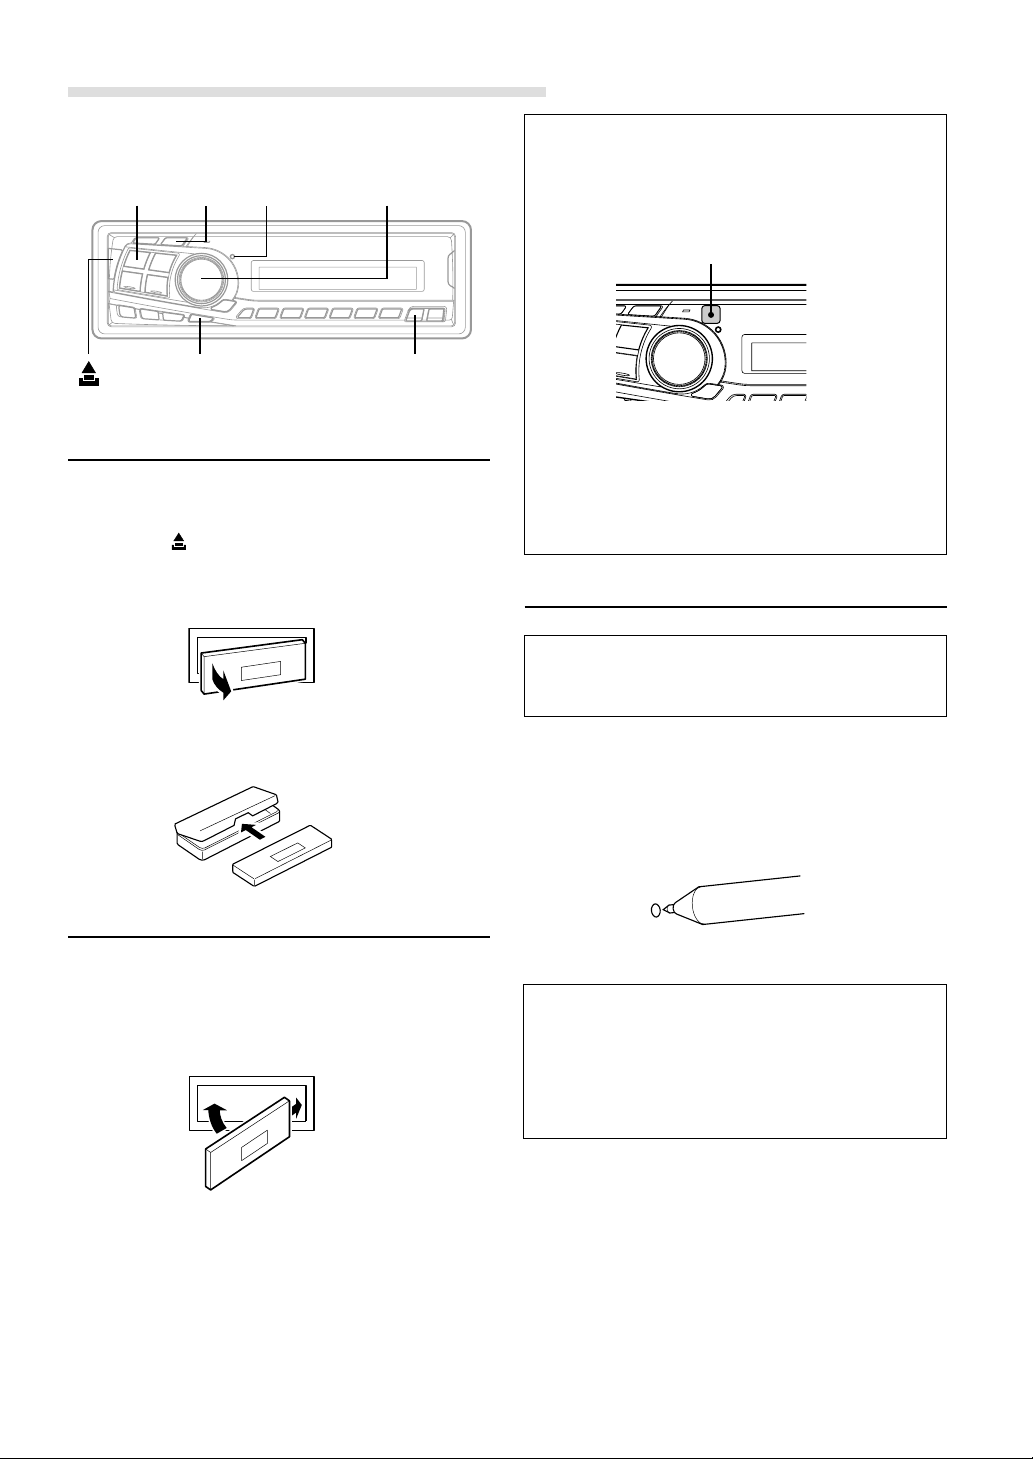
Detaching the Front Panel
1 Press and hold the POWER button for at least 3
seconds to turn off the power.
2 Press the (Release) button at left side until the front
panel pops out.
3 Grasp the left side of the front panel and pull it out.
NOTES
• The front panel may become hot in normal usage (especially
the connector terminals), this is not a malfunction.
• To protect the front panel, place it in the supplied carrying
case.
Attaching the Front Panel
1 First, insert the right side of the front panel into the
main unit. Align the groove on the front panel with the
projection on the main unit.
2 Push the left side of the front panel until it locks firmly
into the main unit.
NOTES
• Before attaching the front panel, make sure that there is no
dirt or dust on the connector terminals and no foreign
object between the front panel and the main unit.
• Attaching the front panel carefully, holding the sides of the
front panel to avoid pushing buttons by mistake.
• Controllable With Remote Control
This unit can be controlled with an optional Alpine
remote control. For details, consult your Alpine dealer.
Point the optional remote control transmitter at the
remote control sensor.
• Connectable to Remote Control Interface Box
You can operate this unit from the vehicle's control
unit when an Alpine Remote Control Interface Box
(optional) is connected. For details, contact your
Alpine dealer.
Initial System Start-Up
Be sure to press the RESET switch when using the
unit for the first time, after installing the CD changer,
etc., or after changing the car battery.
1 Make sure that the power of the unit is off. If the power
is on, press and hold the POWER button for at least 3
seconds to turn off the unit.
2 Press the RESET switch with a ballpoint pen, or any
other pointed object.
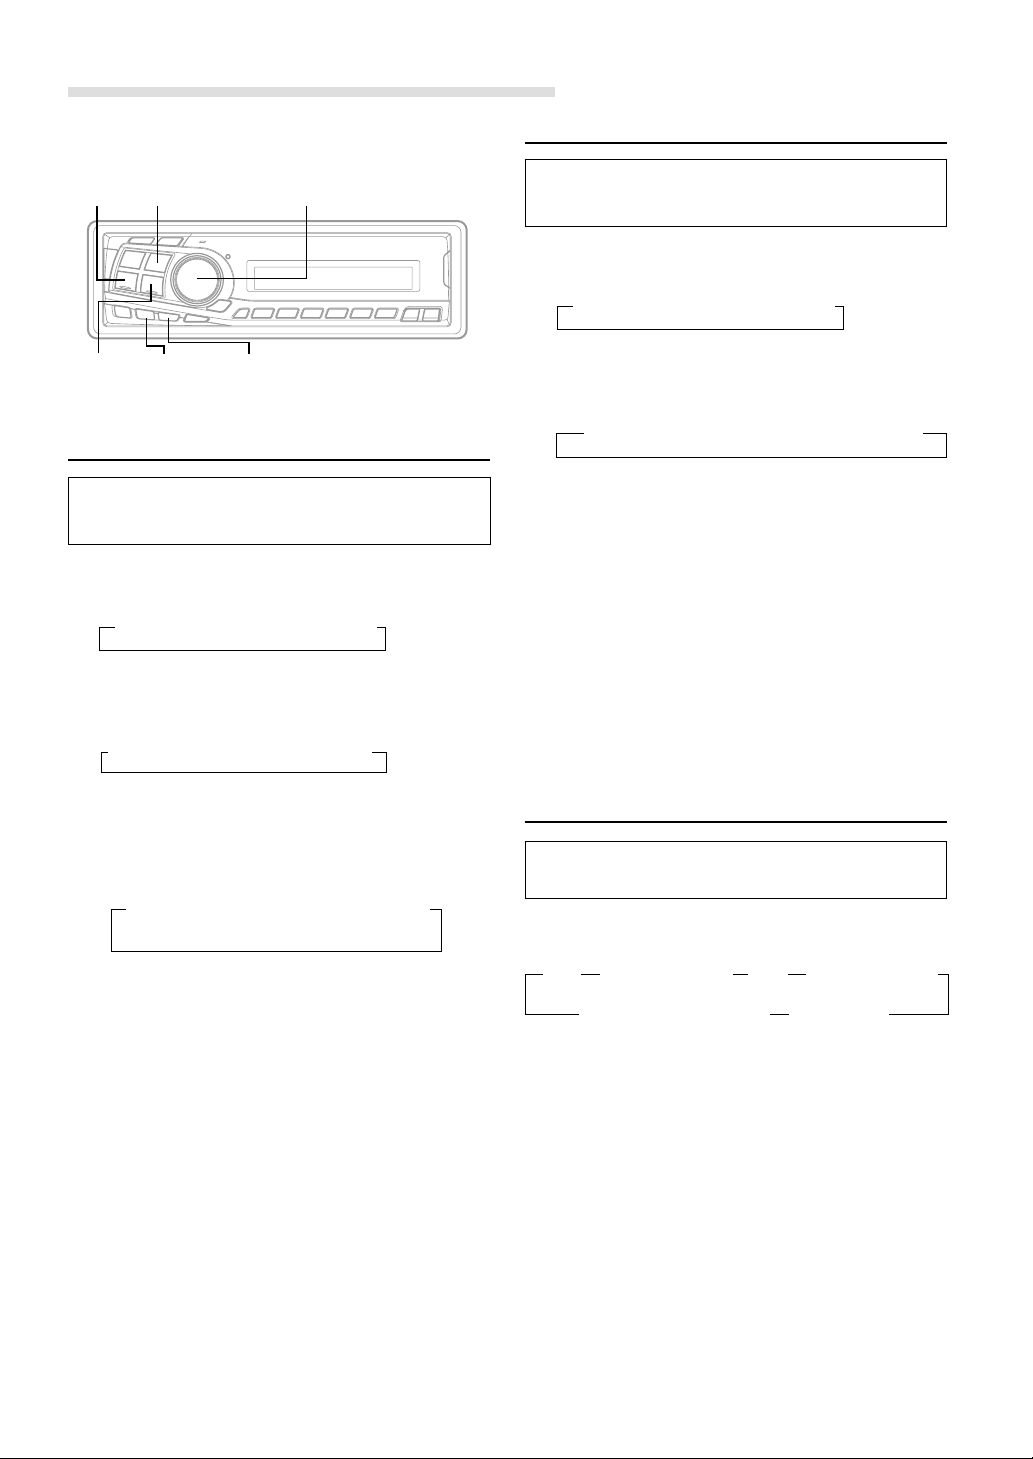
Basic Operations
2
1
1
MODE(Rotary encoder)POWER
Remote control sensor
MUTE
About Demonstration
This unit is equipped a Demonstration function.
Soon after resetting the unit or after turning the unit on
the first time, the demonstration starts automatically.
To cancel the demonstration, refer to “Demonstration”
on page 18.
DISP
ANGLE89
RESET
5-EN
Adjusting Volume/Balance (Between
Left and Right)/Fader (Between Front
and Rear)/Defeat
1 Press the MODE (Rotary encoder) button repeatedly
to choose the desired mode.
Each press changes the modes as follows:
Volume :0~35
Balance :L15~R15
Fader :R15~F15
Subwoofer : 0~+15
NOTES
• If the Rotary encoder is not turned in 5 seconds after
selecting the BALANCE, FADER, DEFEAT and
SUBWOOFER modes, the unit automatically sets in the
VOLUME mode.
•∗ When the subwoofer is set to OFF, the level of the subwoofer
cannot be adjusted.
2 Turn the Rotary encoder until the desired sound is
obtained in each mode.
By setting Defeat ON, previously adjusted setting of
Bass, Treble will return to the factory defaults, but MX
will be turned off.
Audio Mute Function
Activating this function will instantly lower the volume
level by 20 dB.
1 Press the MUTE button fto activate the MUTE mode.
The audio level will decrease by about 20 dB.
Pressing the MUTE button again will bring the audio
back to its previous level.
Changing the Audio Level Display
ON/OFF
1 Press DISP button to change the Audio Level display
ON/OFF.
Movable display
Turning Power On and Off
1 Press the POWER button to turn on the unit.
NOTE
The unit can be turned on by pressing any other button except
the eject c button.
The volume level gradually increases to the previous
level you were listening to before the unit was turned
off.
Press and hold the POWER button again for at least 3
seconds.
NOTE
The very first time the power is turned on, the volume will start
from level 12.
Display Angle Adjustment
The movable display may be adjusted to 3 different
angles depending upon user preference.
1 Press the ANGLE 89 button to adjust the angle of the
movable display.
NOTES
• The display will close a half minute after the ignition key is
turned to the OFF position.
• The adjusted angle of the display is stored in memory. There
is no need to re-adjust the angle when the power is turned
back on.
CAUTION
Keep hands (or any other object) away from the display while
it is opening or closing to avoid damage or injury. The back of
the movable display will get very warm under normal
operating conditions. This is not a malfunction. Do not touch.
→ Volume → Subwoofer
∗
→ Balance → Fader → Defeat
6-EN
Basic Operation
g DN
f UP X-OVER CENTER f
Rotary encoder
Setting the Bass Control
You can change the Bass Frequency emphasis to
create your own tonal preference.
1 Press the CENTER f button to select the BASS (bass
Centre frequency) control mode.
2-1
Setting the bass Centre frequency:
Press the g DN or f UP button to select the
desired bass centre frequency.
Emphasizes the displayed Bass frequency ranges.
2-2
Setting the bass Band Width (Q-Factor):
Press the BAND button to select the desired bass
Band Width.
Changes the bass boost band width to narrow or wide.
A wide setting will boost a wide range of frequencies
above and below the centre frequency. A narrower
setting will boost only frequencies near the centre
frequency.
2-3
Setting the bass Level:
Turn the Rotary encoder to select the desired bass
Level (-7~+7).
You can emphasize or weaken the bass frequency.
NOTES
• If no buttons are pressed within 15 seconds, the Bass control
setting will be turned off automatically.
• The settings of the Bass Level will be individually
memorized for each source (FM, MW (LW), CD, etc.) until
the setting is changed. Once you set Bass frequency and
Bass Band Width for one of sources (FM, MW (LW), CD,
etc.), this setting becomes effective for all those sources.
• This function is inoperable when DEFEAT is ON.
Setting the Treble Control
You can change the Treble Frequency emphasis to
create your own tonal preference.
1 Press the CENTER f button select on the TREBLE
(treble Centre frequency) control mode.
2-1
Setting the treble Centre frequency:
Press g DN or f UP button to select the desired
treble centre frequency.
Emphasizes the displayed Treble frequency ranges.
2-2
Setting the treble Level:
Turn the Rotary encoder to select the desired Treble
Level (-7~+7).
You can emphasize the treble frequency.
NOTES
• If no buttons are pressed within 15 seconds, the Treble
control setting will be turned off automatically.
• The settings of the Treble Level will be individually
memorized for each source (FM, MW (LW), CD, etc.) until
the setting is changed. Once you set Treble frequency for
one of sources (FM, MW (LW), CD, etc.), this setting
becomes effective for all those sources.
• This function is inoperable when DEFEAT is ON.
Adjusting the built-in Crossover
The High and Low Pass Filters on this unit can be
adjusted to suit your personal taste.
1 Press and hold the X-OVER button for at least 2
seconds.
∗ When the subwoofer output of this unit is turned
OFF, LPF and phase are deactivated.
2 Press the DN g or f UP button to select the
desired setting.
1. HPF (Setting the High Pass Filter):
FLAT (OFF) ←→ 80Hz ←→ 120Hz ←→ 160Hz
Outputs all frequencies higher than that selected
according to your preference.
2. LPF (Setting the Low Pass Filter):
FLAT (OFF) ←→ 80Hz ←→ 120Hz ←→ 160Hz
→ B.Width1 → B.Width2→ B.Width3 → B.Width4
(Wide)←→(Narrow)
...........................
→ 10kHz → 12.5kHz → 15kHz → 17.5kHz
→ BASS → TREBLE → normal mode
→ BASS → TREBLE → normal mode
→ 60Hz → 80Hz → 100Hz → 200Hz
BAND
→ HPF <Press momentarily>→ LPF∗ <Press momentarily>
<Press for at least 2 seconds> normal mode ←
7-EN
Outputs all frequencies lower than that selected
according to your preference.
(Only available when using the subwoofer output from
this unit.)
NOTES
• If you turn the battery power OFF, all settings return to
factory default.
• If HPF, LPF, Bass Control and Treble Control are all set to
ON, depending on the Bass Control and Treble Control
settings, you may not be able to reinforce the sound effect.
• Except when the HPF and LPF is turned OFF, the
subwoofer is in monaural mode.
• When the subwoofer is set to OFF, LPF mode and change of
phase does not work.
• If no buttons are pressed within 15 seconds, the display for
setup menu disappears while an ordinary menu appears on
the display.
About the Time Correction
The distance between the listener and the speakers in a
car vary widely due to the special conditions of the mobile
environment. This difference in the distances from the
speakers to the listener creates a shift in the sounds image
and frequency characteristics. This is caused by the time
delay between the sound reaching the listener’s right
versus the left ear.
To correct this, the CDM-7892R is able to delay the audio
signal to the speakers closest to the listener. This effectively
creates a perception of increased distance for those
speakers. The listener can be placed at an equal distance
between the left and right speakers for optimum staging.
The adjustment will be made for each speaker in a step of
0.1 ms.
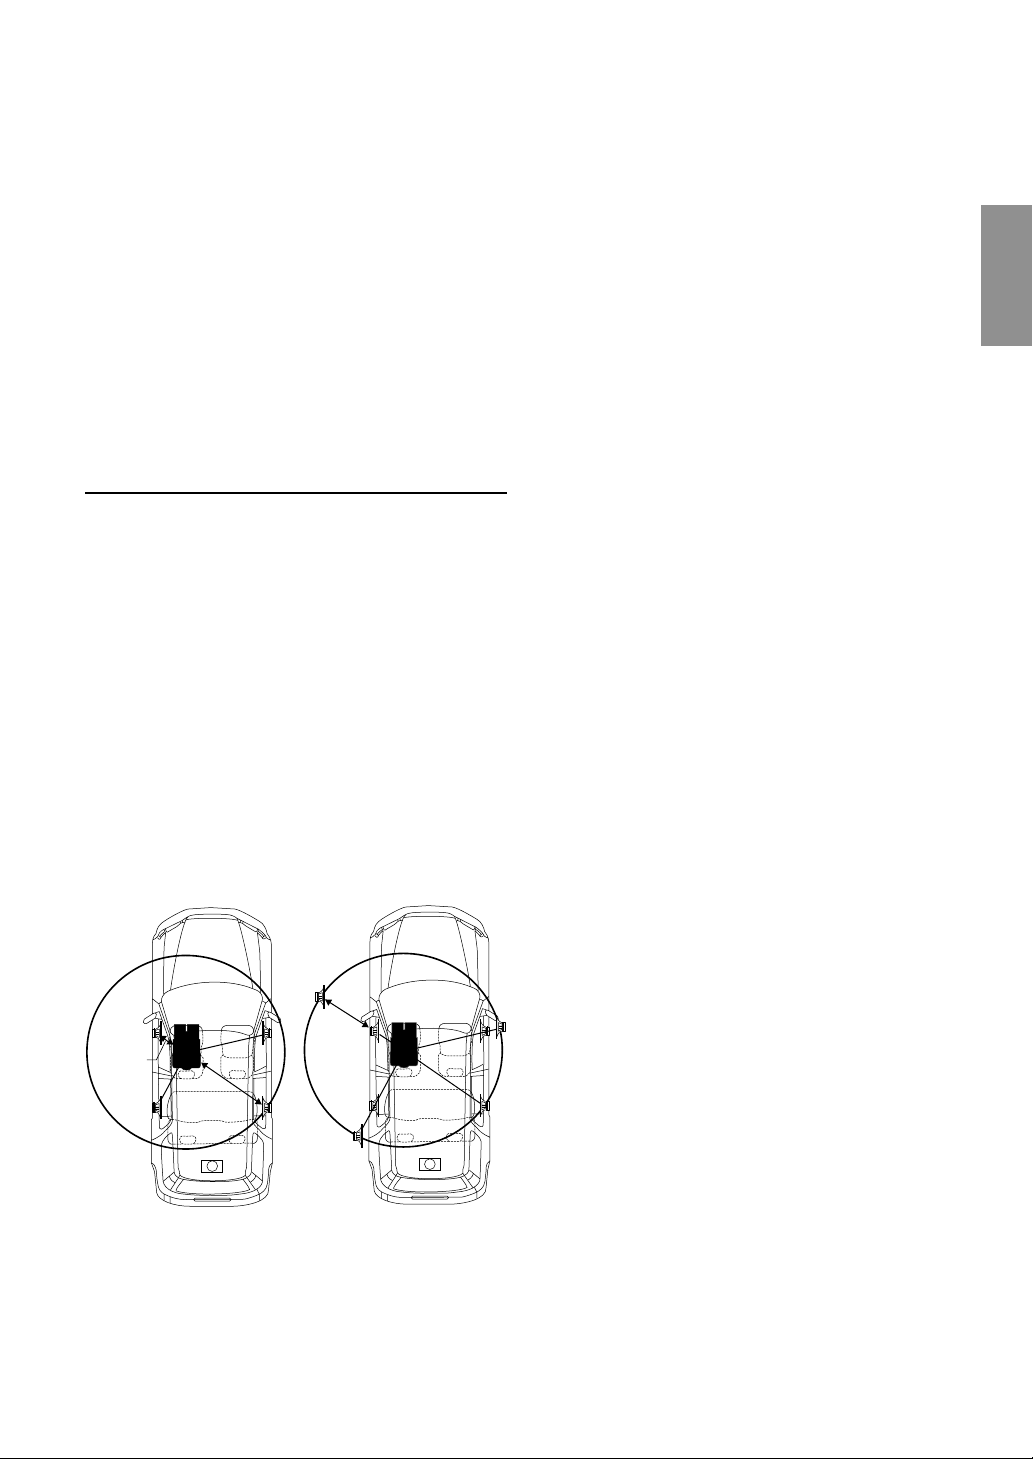
Example 1. Listening Position: Front Left Seat
Adjust the time correction level of the front left speaker to a
high value and the rear right to zero or a low value.
Here we calculate the time correction value for the front left
speaker in the diagram at the left.
Conditions:
Farthest Speaker – listening position: 2.25 m (88-9/16")
Front left speaker – listening position: 0.5 m (19-11/16")
Calculation: L = 2.25 m – 0.5 m = 1.75 m (68-7/8")
Time correction = 1.75 ÷ 343
*
× 1000 = 5.1 (ms)
*Speed of sound: 343 m/s (765 mph) at 20˚C
In other words, giving the front left speaker a time
correction value of 5.1 ms makes it seem as if the distance
to the front left speaker is the same as the distance to the
farthest speaker.
The sound is not balanced because the distance between
the listening position and the various speakers is different.
The difference in distance between the front left speaker
and the rear right speaker is 1.75 m (68-7/8").
Time correction eliminates the differences in the time
required for the sound to reach the listening position.
The time of the front left speaker is corrected by 5.1 ms so
that its sound reaches the listening position at the same
time as the sound of other speakers.
Example 2. Listening Position: All Seats
Adjust the time correction level of each speaker to almost
the same level.
1 Sit in the listening position (driver’s seat, etc.) and
measure the distance (in meters) between your head
and the various speakers.
2 Calculate the difference between the distance to the
farthest speaker and the other speakers.
L = (distance to farthest speaker) – (distance to other
speakers)
3 Divide the distances calculated for the speakers by the
speed of sound (343 m/s (765 mph) at 20˚C).
These values are the time correction values for the
different speakers.
Tips
* Subwoofer speaker.
You cannot change the Time Correction value for the
subwoofer, but you can set the subwoofer's apparent position
to the front by adjusting the Time Correction value of the
front and rear speakers.
For details, refer to the "Tips" on page 8.
2.25m
0.5m
∗
5.1ms
∗
 Loading...