


Copyright Information
Copyright © 2006 by Oki Data. All Rights Reserved
Document Information ________________________________
Microline 8480FB User’s Guide
P/N 59380401, Revision 1.1 September, 2006
Disclaimer__________________________________________
Every effort has been made to ensure that the information in this document is complete, accurate, and up-to-date. The manufacturer assumes no responsibility for the results of errors beyond its control. The manufacturer also cannot guarantee that changes in software and equipment made by other manufacturers and referred to in this guide will not affect the applicability of the information in it. Mention of software products manufactured by other companies does not necessarily constitute endorsement by the manufacturer .
While all reasonable efforts have been made to make this document as accurate and helpful as possible, we make no warranty of any kind, expressed or implied, as to the accuracy or completeness of the information contained herein.
The most up-to-date drivers and manuals are available from the web site: http://www.okiprintingsolutions.com
Trademark Information _______________________________
Oki and Microline are registered trademarks of Oki Electric Industry Company Ltd. Apple, Macintosh and Mac OS are registered trademarks of Apple Computers Inc.
ENERGY STAR is a trademark of the United States Environmental Protection Agency.
Hewlett-Packard, HP, and LaserJet are registered trademarks of Hewlett-Packard Company.
Microsoft, MS-DOS and Windows are either registered trademarks or trademarks of Microsoft Corporation in the United States and/or other countries.
Other product names and brand names are registered trademarks or trademarks of their proprietors.
Regulatory Information _______________________________
As an ENERGY STAR® Program Participant, the manufacturer has determined that this product meets the ENERGY STAR guidelines for energy efficiency.
This product complies with the requirements of the Council Directives 89/336/EEC (EMC), 73/23/EEC (LVD) and 1999/5/EC (R&TTE), as amended where applicable, on the approximation of the laws of the member states relating to Electromagnetic Compatibility, Low Voltage and Radio & Telecommunications Terminal Equipment.
Microline 8480FB User’s Guide
2
Contents
Copyright Information . . . . . . . . . . . . . . . . . . . . . . . . . 2
Document Information. . . . . . . . . . . . . . . . . . . . . . . . . . . . . . 2
Disclaimer . . . . . . . . . . . . . . . . . . . . . . . . . . . . . . . . . . . . . . 2
Trademark Information . . . . . . . . . . . . . . . . . . . . . . . . . . . . . 2
Regulatory Information . . . . . . . . . . . . . . . . . . . . . . . . . . . . . 2
Introduction . . . . . . . . . . . . . . . . . . . . . . . . . . . . . . . . . 5
Features . . . . . . . . . . . . . . . . . . . . . . . . . . . . . . . . . . . . . . . |
5 |
Front View, Outside . . . . . . . . . . . . . . . . . . . . . . . . . . . . . . . |
6 |
Front View, Inside (1) . . . . . . . . . . . . . . . . . . . . . . . . . . . . . |
7 |
Front View, Inside (2) . . . . . . . . . . . . . . . . . . . . . . . . . . . . . |
7 |
Rear View . . . . . . . . . . . . . . . . . . . . . . . . . . . . . . . . . . . . . |
8 |
Control Panel . . . . . . . . . . . . . . . . . . . . . . . . . . . . . . |
9 |
Quick Reference: Control Panel Functions . . . . . . . . . . . . . . . 14
Print Modes . . . . . . . . . . . . . . . . . . . . . . . . . . . . . . . . . 15
Normal Print Mode . . . . . . . . . . . . . . . . . . . . . . . . . . . . . . . 15 High Speed Print Mode . . . . . . . . . . . . . . . . . . . . . . . . . . . . 15 High Impact Print Mode . . . . . . . . . . . . . . . . . . . . . . . . . . . . 15 Change Print Mode . . . . . . . . . . . . . . . . . . . . . . . . . . . . . . . 16
Loading Print Media . . . . . . . . . . . . . . . . . . . . . . . . . . 17
Individual Sheets/Forms (“MANUAL”) . . . . . . . . . . . . . . . . . . 17 Continuous Forms (“FRONT”) . . . . . . . . . . . . . . . . . . . . . . . . 19 Switching Between Normal and High Impact Mode . . . . . . . . . 22 Switch between Single Sheets and Continuous Forms . . . . . . . 23
Function Setting Menu . . . . . . . . . . . . . . . . . . . . . . . . 24
Print the Menu . . . . . . . . . . . . . . . . . . . . . . . . . . . . . . . . . . 24 Navigating the Menu . . . . . . . . . . . . . . . . . . . . . . . . . . . . . . 25 Reset to Factory Defaults . . . . . . . . . . . . . . . . . . . . . . . . . . . 28 Print the Menu . . . . . . . . . . . . . . . . . . . . . . . . . . . . . . . . . . 29 Menu Summary . . . . . . . . . . . . . . . . . . . . . . . . . . . . . . . . . 32 Explanation of Menu Items. . . . . . . . . . . . . . . . . . . . . . . . . . 40
Auto Align . . . . . . . . . . . . . . . . . . . . . . . . . . . . . . . . . . 54
Disabling Auto Align . . . . . . . . . . . . . . . . . . . . . . . . . . . . . . 54
ML8480 User’s Guide
Contents • 3
Set Top of Form (TOF). . . . . . . . . . . . . . . . . . . . . . . . . 56
General Information . . . . . . . . . . . . . . . . . . . . . . . . . . . . . . 56 Use the Printer Menu. . . . . . . . . . . . . . . . . . . . . . . . . . . . . . 56 Use 1Chr Set Pos . . . . . . . . . . . . . . . . . . . . . . . . . . . . . . . . 58 Temporary TOF. . . . . . . . . . . . . . . . . . . . . . . . . . . . . . . . . . 60
Form Tear Off . . . . . . . . . . . . . . . . . . . . . . . . . . . . . . . 61
Turn On Forms Tear Off . . . . . . . . . . . . . . . . . . . . . . . . . . . . 61 Move Continuous Forms Up for Tear Off. . . . . . . . . . . . . . . . . 62
Tests . . . . . . . . . . . . . . . . . . . . . . . . . . . . . . . . . . . . . . 63
Rolling ASCII Test . . . . . . . . . . . . . . . . . . . . . . . . . . . . . . . . 63 Font Sample Test . . . . . . . . . . . . . . . . . . . . . . . . . . . . . . . . 63 Hex Dump Mode . . . . . . . . . . . . . . . . . . . . . . . . . . . . . . . . . 64
Setting the Printhead Gap. . . . . . . . . . . . . . . . . . . . . . 65
General Information . . . . . . . . . . . . . . . . . . . . . . . . . . . . . . 65 Printhead Gap Settings . . . . . . . . . . . . . . . . . . . . . . . . . . . . 66 Change to a Manual Printhead Gap Setting . . . . . . . . . . . . . . 67
Troubleshooting . . . . . . . . . . . . . . . . . . . . . . . . . . . . . 69
Paper Jams: Single Sheet . . . . . . . . . . . . . . . . . . . . . . . . . . 69 Paper Jams: Continuous Forms. . . . . . . . . . . . . . . . . . . . . . . 70 Paper Jams: Correcting Repetitive Jams . . . . . . . . . . . . . . . . 71 Error Messages . . . . . . . . . . . . . . . . . . . . . . . . . . . . . . . . . . 74
Maintenance . . . . . . . . . . . . . . . . . . . . . . . . . . . . . . . . 76
Replace the Ribbon . . . . . . . . . . . . . . . . . . . . . . . . . . . . . . . 76 Clean the Housing. . . . . . . . . . . . . . . . . . . . . . . . . . . . . . . . 81
Control Codes . . . . . . . . . . . . . . . . . . . . . . . . . . . . . . . 83
In Sequence by ASCII Code . . . . . . . . . . . . . . . . . . . . . . . . |
83 |
In Sequence by Function . . . . . . . . . . . . . . . . . . . . . . . . . . . |
90 |
Specifications . . . . . . . . . . . . . . . . . . . . . . . . . . . . . . . 97
ML8480 User’s Guide
Contents • 4
Introduction
Features
•Precise registration control for printing complicated forms
•Flexible handling of multi-part forms
–Individual or continuous feed
–Maximum = original + 7
–Up to 0.02-inch (0.48 mm) thick
•Automatic alignment when feeding individual forms/sheets.
•Fast through-put
•Reliable, durable operation
•Automatic adjustment for paper thickness
•Paper Park
•Form Tear Off
•Choice of Print Modes: Normal, High Speed (for printing drafts), or High Impact (for use with thick multi-part forms)
Microline 8480FB User’s Guide
Introduction • 5

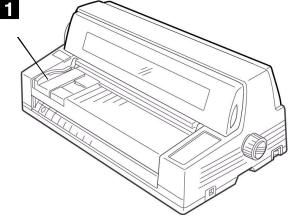
Front View, Outside
1 Sheet Guide
2 Cover
3 Platform for Manual Feed
4 Display Panel
5 On/Off Switch
6 Platen Knob
7 Control Panel
8 Sheet Supports
Microline 8480FB User’s Guide
Introduction • 6

Front View, Inside (1)
1 Cover
2 Ribbon Cartridge
3 LCD Display Panel
4 Printhead
Front View, Inside (2)
1 Tractors
Microline 8480FB User’s Guide
Introduction • 7
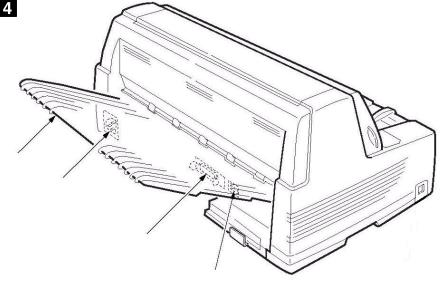
Rear View
•1 Stacker
•2 Power Cord Connector
•3 Parallel Port
•4 USB Port
Microline 8480FB User’s Guide
Introduction • 8

Control Panel
Individual Switches
Switch |
Printer On Line |
Printer Off Line (Deselected) |
|
|
|
|
Press to place the |
Press to place the printer on line. |
|
printer off line. |
Function Setting Menu Mode |
|
|
|
|
|
• Scrolls backwards through available |
|
|
settings for an item. |
|
|
|
|
Engages the High |
Used to switch back and forth between |
|
Impact print mode. |
Manual Feed (single forms fed from the |
|
|
platform) and Front Feed (continuous |
|
|
forms). See page 23. |
|
|
Function Setting Menu Mode |
|
|
• Scrolls forward through available settings |
|
|
for an item. |
|
|
|
Microline 8480FB User’s Guide
Control Panel • 9

Individual Switches
Switch |
Printer On Line |
Printer Off Line (Deselected) |
|
|
|
|
Engages the High |
Continuous Forms |
|
Speed Print mode. |
• In the print position: form feeds to next |
|
|
TOF position. |
|
|
• Loaded on the tractors, but not in the |
|
|
print position: the paper advances to the |
|
|
print position. |
|
|
Single Forms |
|
|
• If a form is loaded into the printer, it is |
|
|
ejected. |
|
|
Function Setting Menu Mode |
|
|
• Scrolls forward through available items |
|
|
within a group. |
|
|
|
|
Engages the |
Advances forms one line at a time. Press |
|
Normal Print mode. |
and hold for repetitive line feeds. |
|
|
Function Setting Menu Mode |
|
|
• Scrolls backward through available items |
|
|
within a group. |
|
|
|
|
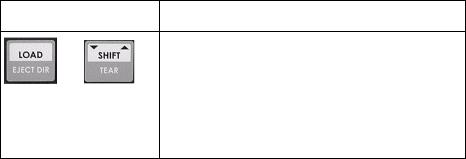
Toggles the eject |
Continuous Forms |
|
direction for single |
• In the print position: parks the paper |
|
sheets between |
(moves it out of the print path, back to |
|
the front and back |
the tractors). |
|
of the printer. |
• Loaded on the tractors, but not in the |
|
|
print position: the paper advances to the |
|
|
print position. |
|
|
Single Forms |
|
|
• If a form is loaded into the printer, it is |
|
|
ejected. |
|
|
Function Setting Menu Mode |
|
|
• Saves any changes made in the menu |
|
|
and exits the Menu Mode, placing the |
|
|
printer back on line. |
|
|
|
|
Moves continuous |
Used with other switches to change their |
|
forms forward to |
function (see table below). |
|
the tear position. |
|
|
|
|
Microline 8480FB User’s Guide
Control Panel • 10
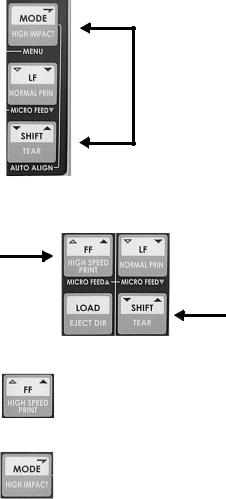
Combined Switches
With the Printer Powered Up and Off Line
Switches |
Task Performed |
Select Align 1, Align 2, Align 3, or Align 4:
+Press and hold the MODE switch, then press the SHIFT switch repeatedly to select Align 1, Align 2, Align 3, or Align 4 as the setting for Auto Align (see page 41).
•Auto Align (POW) [see page 42] must be set to SelectAutoALign (the default).
•The setting made using these switches is stored in Memory Auto Align (see page 47) unless it has been changed to Invalid.
Enter the Function Setting Menu:
Press both the MODE and the SHIFT switches simultaneously to place the printer in the Function Settings Menu mode.
Simultaneously press and hold the SHIFT and SEL
+switches to move continuous forms up to the tear off position (see page 61).
Note: Form Tear Off must be engaged. The factory default is Off.
Press and hold SHIFT, then press FF repeatedly to
+move loaded paper (single sheets or continuous forms) forward 1/180-inch at a time.
If you press and hold SHIFT, then press and hold LF, the paper will advance in rapid-fire 1/180-inch increments.
Press and hold SHIFT, then press LF repeatedly to
+move loaded paper (single sheets or continuous forms) backward 1/180-inch at a time. Maximum allowed backward movement is 1/3-inch (8.5 mm).
If you press and hold SHIFT, then press and hold LF, the paper will advance backward in rapid-fire 1/180-inch increments.
Microline 8480FB User’s Guide
Control Panel • 11
Combined Switches
With the Printer Powered Up and Off Line
Switches |
Task Performed |
Press and hold both the LOAD and the SHIFT
+switches to change the printhead gap setting. The factory default is Auto Gap in which the required printhead gap is sensed automatically by the printer. Use these switches to change the setting to a manual head gap setting if you are not getting good print results with AutoGap. See “Gap Control” on page 44 for more information.
Control Panel Lights
Light |
On |
Off |
Blinkinga |
|
|
|
|
|
|
POWER |
Printer is turned |
Printer is turned |
N.A. |
|
|
on. |
off. |
|
|
|
|
|
|
|
AUTO GAP |
Auto Gap mode is |
A Manual Gap |
Manual Gap setting |
|
|
selected (the |
setting is engaged. |
alarm. |
|
|
default). |
|
|
|
|
|
|
|
|
ALARM |
• Paper is out. |
Printer operation is |
• |
Awaiting removal of |
|
• A paper jam has |
normal. |
|
single sheet/form. |
|
occurred. |
|
• |
Media switch is |
|
See |
|
|
taking place. |
|
“Troubleshooting” |
|
• If both the ALARM |
|
|
on page 69 for |
|
|
and SEL lights are |
|
more information |
|
|
blinking, the cover |
|
|
|
|
is open. |
|
|
|
• If both the ALARM |
|
|
|
|
|
and AUTO ALIGN |
|
|
|
|
lights are blinking, |
|
|
|
|
there is an |
|
|
|
|
unrecoverable |
|
|
|
|
error. Try turning |
|
|
|
|
the printer off, then |
|
|
|
|
on again. IF this |
|
|
|
|
doesn‘t clear the |
|
|
|
|
problem call your |
|
|
|
|
service dealer |
|
|
|
|
|
Microline 8480FB User’s Guide
Control Panel • 12
Control Panel Lights
Light |
On |
Off |
Blinkinga |
|
AUTO ALIGN |
The printer is set |
Auto Align is |
If both AUTO ALIGN |
|
|
to automatically |
disabled |
and ALARM are |
|
|
align single |
|
blinking, it indicates |
|
|
sheets/ forms. |
|
an unrecoverable |
|
|
|
|
error. Try shutting the |
|
|
|
|
printer off and turning |
|
|
|
|
it on again. If this |
|
|
|
|
doesn’t work, call your |
|
|
|
|
service dealer. |
|
|
|
|
|
|
HIGH SPEED |
The printer is in |
The printer is not |
N.A. |
|
|
the High Speed |
in the High Speed |
|
|
|
(draft) print mode. |
(draft) print mode. |
|
|
|
|
|
|
|
HIGH IMPACT |
The printer is in |
The printer is not |
N.A. |
|
|
the High Impact |
in the High Impact |
|
|
|
print mode. |
mode. |
|
|
|
|
|
|
|
SEL |
The printer is on |
The printer is off |
• |
Menu Mode: |
|
line. |
line. |
|
indicates the menu |
|
|
|
|
is being set up. |
|
|
|
• |
With ALARM light: |
|
|
|
|
cover open alarm. |
|
|
|
|
|
EJECT |
Paper is being |
Paper is being |
N.A. |
|
DIRECTION |
ejected to the |
ejected to the |
|
|
|
platform. |
stacker. |
|
|
|
|
|
|
|
a. N.A. = Not Applicable.
Microline 8480FB User’s Guide
Control Panel • 13

Quick Reference: Control Panel Functions
Note Unless otherwise specified, these instructions assume that the printer is selected (on line).
Enter the Menu
1.Press SEL.
2.Press both the MODE and the SHIFT switches simultaneously.
Print the Menu
1.With the printer in the Manual Mode, turn it off.
2.Press and hold SELECT and MODE while turning the printer on.
3.When prompted, load a sheet of paper (minimum letter or A4) on the platform.
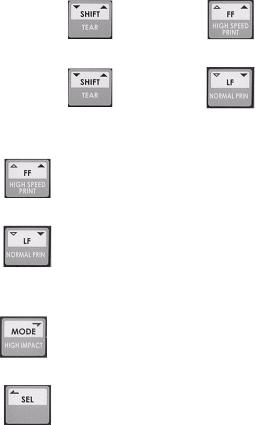
Change Print Modes
With the printer on line:
1.Press LF to engage the Normal Print Mode.
2.Press MODE to engage the High Impact Print Mode.
3.Press FF to engage the High Speed (Draft) Print Mode.
Change the Printhead
Gap
1.Press SEL.
2.Press and hold the SHIFT switch, then press the LOAD switch repeatedly to scroll through the various settings for the printhead gap.
3.Press SEL
Change Paper Paths
1.Press SEL.
2.Press MODE repeatedly to change the paper path.
The printer automatically reinitializes in the new path.
Move Continuous Forms
to the Print Position
1.Press SEL.
2.Press FF.
Park Continuous Forms
1.Press SEL.
2.Press LOAD.
Move Continuous Forms to the Tear Off Position
Note Form Tear Off must be activated (see page 61).
1.Press SEL.
2.Press and hold the SHIFT and SEL switches to move continuous forms up to the tear off position.
Change Align x Setting
1.Press SEL.
2.Press and hold the MODE switch, then press the SHIFT switch repeatedly to select Align 1, Align 2, Align 3, or Align 4
Microline 8480FB User’s Guide
Control Panel • 14
Print Modes
Your printer has three print modes:
•Normal: for letter-quality printing
•High Speed: for printing drafts
•High Impact: for printing multipart forms
Normal Print Mode
Use for every day, letter-quality printing.
High Speed Print Mode
Use for high speed draft printing.
When this mode is selected, the print appears lighter than in the Normal print mode.
High Impact Print Mode
In High Impact print mode, each character is printed twice.
This mode is used to print thick multi-part forms or multipart forms with a thick first page and thin second (or more) pages.
Caution!
High Impact print mode can cause the paper to tear:
•if the paper is too thin
•if you print horizontal lines
High Impact Print Mode reduces ribbon life expectancy.
•If you consistently use High Impact Print Mode, ribbon life can be cut in half.
If you have a new ribbon and use High Impact Print Mode to print high-density characters or graphics, the paper may be smudged.
Microline 8480FB User’s Guide
Print Modes • 15

Change Print Mode
Change to Normal
Note If you change the print mode while printing, the printer immediately switches to the new print mode.
1.Make sure the printer is turned on and that the SEL light is on.
2.Press LF/Normal PRIN.
3.The HIGH SPEED or HIGH IMPACT light goes out.
Change to High Speed
Note If you change the print mode while printing, the printer immediately switches to the new print mode.
1.Make sure the printer is turned on and that the SEL light is on.
2.Press FF/High Speed Print.
3.The HIGH SPEED light goes on.
Change to High Impact
Note If you change the print mode while printing, the printer immediately switches to the new print mode.
1.Make sure the printer is turned on and that the SEL light is on.
2.Press MODE/High Impact.
The HIGH IMPACT light goes on.
Microline 8480FB User’s Guide
Print Modes • 16
Loading Print Media
Individual Sheets/Forms (“MANUAL”)
The printer is set at the factory for
•single sheets/forms
•Auto Align mode
•Normal print mode
•automatic printhead gap
Specifications
Individual Sheets/Forms, for Use with Auto Align Mode
Note Printing envelopes requires use of the sheet guide (1) instead of the Auto Align mode. See page 54 for information on disabling Auto Align.
Minimum Print Margins
• 1/4-inch (6.4 mm) on all sides
Individual Sheets
Size
•Minimum Width x Length: 3.9” (100 mm) x 2.75” (70 mm)
•Maximum Width x Length: 14.3” (364 mm) x 16.5” (420 mm)
Weight Range
•14 lb. to 56 lb. US Bond (52 to 210 g/m2)
Microline 8480FB User’s Guide
Loading Print Media • 17
Individual Multipart Forms
Size
•Minimum Width x Length: 3.9” (100 mm) x 2.75” (70 mm)
•Maximum Width x Length: 14.3” (364 mm) x 14.3” (364 mm)
Normal Print Mode (the factory default)
•Up to 6-part forms (original + 5)
•Maximum Thickness: 0.0142” (0.36 mm)
High Impact Mode
•Up to 8-part forms (original + 7)
•Maximum Thickness: 0.0189” (0.48 mm)
Load Individual Sheets/Forms
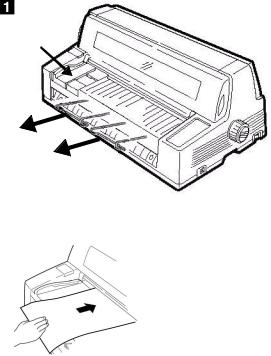
1.If you are using longer paper, pull out the sheet supports (1).
2.Move the sheet guide (2) to the right as far as it will go. This ensures that the single sheet/form is within the “Paper range when Auto Align is ON” area on the platform.
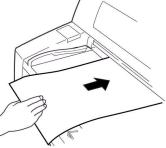
3.Place a letter size or larger sheet of paper on the platform anywhere within the “Paper range when Auto Align is ON” area.
The sheet loads in to the print position, automatically aligning so that it is square with the print path.
Microline 8480FB User’s Guide
Loading Print Media • 18

Continuous Forms (“FRONT”)
Specifications
Width
• Minimum: 4” (102 mm)
•Maximum: 16” (406 mm)
Single Thickness Forms
•Weight range: 14 to 34 lb. US Bond (52 to 128 g/m2)
Multi-part Forms
Normal Print Mode (the printer default)
•up to 6-part forms (original + 5)
•Maximum Thickness: 0.0142” (0.36 mm)
High Impact Mode
•up to 8-part forms (original + 7)
•Maximum Thickness: 0.0189” (0.48 mm)
To switch between Normal and High Impact mode, see page 22.
Load Continuous Forms
1. Push the sheet supports in and lift the sheet feed platform.
Microline 8480FB User’s Guide
Loading Print Media • 19
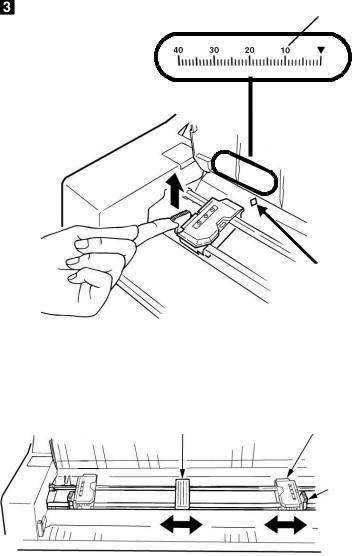
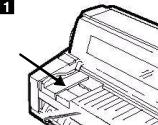
2.Lift the lock lever on the left tractor, then move the left tractor to set the desired left margin for printing.
•The ▼ mark on the gauge (1)—or the center of the diamond shaped hole (2)—represents the location of the center of the first character printed.
•For printing forms, move the left tractor to the right as far as it will go (the movement of the left tractor is limited to ensure that the paper covers the paper out sensor).
3.Push the lock lever down to lock the left tractor in place.
4.Lift the lock lever (1) on the right tractor (2) and move the tractor over to correspond to the width of the continuous forms you are using. Center the paper support (3) between the two tractors.
Microline 8480FB User’s Guide
Loading Print Media • 20
5.Open both tractor covers and place the first three holes in the continuous forms paper over the pins.
Important!
Make sure that an equal number of paper holes are engaged on each tractor. If not, the paper will jam.
6.Close the tractor covers and fine tune the position of the right tractor until the holes in the paper are centered on the pins, then push back the right tractor lock lever.
7. Lower the platform.
Microline 8480FB User’s Guide
Loading Print Media • 21
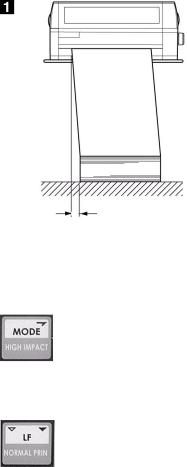
8.Position the continuous forms stack below the printer with no more than about 1 inch (3 cm) offset (1).
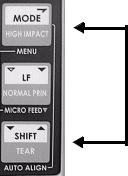
Switching Between Normal and High Impact Mode
Normal to High Impact Print Mode
Press MODE/HIGH IMPACT.
The LED beside HIGH IMPACT comes on and H-IMPCT appears at the end of the first line of the display.
High Impact to Normal Print Mode
Press LF/NORMAL PRIN.
The LED beside HIGH IMPACT goes out and NORMAL appears at the end of the first line of the display.
Microline 8480FB User’s Guide
Loading Print Media • 22

Switch between Single Sheets and Continuous Forms
Single Sheets to Continuous Forms
Manual Feed to Front Feed
1.With the printer turned on, press SEL to place the printer off line.
2.If there is a single sheet loaded into the printer, press LOAD to eject it.
3.Press MODE once or twice until you see FRONT on the second line of the display.
The printer switches paths and returns to the on-line state.
4.If there are continuous forms in the parked position, the printer automatically pulls them into the print position.
5.If continuous forms are not loaded, the display prompts you to INSERT PAPER. Load continuous forms on the tractors (see page 19) and press LOAD to advance them to the print position.
Continuous Forms to Single Sheets
Front Feed to Manual Feed
1.Press SEL to place the printer off line.
2.Press LOAD to park the continuous forms.
The continuous forms retract back to the tractors.
3.Press MODE once or twice until you see MANUAL on the second line of the display.
The printer switches paths and returns to the on-line state.
4.Load a sheet or form on the platform.
Microline 8480FB User’s Guide
Loading Print Media • 23
Function Setting Menu
Make changes in the menu settings using the front panel keys. The changes are automatically saved when you exit the Function Setting Menu and are retained, even when you turn the printer off.
Note Always print the Function Setting Menu before you reset or change the settings. This is the only way to have a record of the settings.
Print the Menu
For more information, see “Print the Menu” on page 29.
1.Make sure the printer is in the manual mode.
2.Turn the printer off.
3.Press and hold SELECT and MODE while turning the printer on.
4.When "RELEASE SW" displays, release the switches.
5.When prompted, load a sheet of paper (minimum letter or A4) on the platform.
The menu prints.
Microline 8480FB User’s Guide
Function Setting Menu • 24
Navigating the Menu
Groups, Items, and Settings
Each Group includes multiple Items, each of which has selectable Settings:
Group 1 |
Item 1 |
Setting 1 |
|
|
… |
|
|
Setting X |
|
|
|
|
… |
Setting 1 |
|
|
… |
|
|
Setting X |
|
|
|
|
Item X |
Setting 1 |
|
|
… |
|
|
Setting X |
|
|
|
Access the Menu
1.With the printer turned on and on line, press SEL.
OFFLINE displays.
2.Simultaneously press the SHIFT and MODE switches.
PRINTER CONTROL displays.
Microline 8480FB User’s Guide
Function Setting Menu • 25
Scrolling Through Groups, Items and Settings
Groups
Press and hold |
, then press |
to scroll forward. |
Press and hold |
, then press |
to scroll backwards. |
Items |
|
|
Press |
to scroll forward. |
|
Press |
to scroll backwards. |
|
Settings |
|
|
Press |
to scroll forward. |
|
Press |
to scroll backwards. |
|
Exit the Menu
Press  .
.
Microline 8480FB User’s Guide
Function Setting Menu • 26
Example: Turn on Proportional Spacing and Form Tear-Off
1.Turn on the printer.
2.Press SEL.
The printer goes off-line.
3.Simultaneously press SHIFT and MODE.
4.Press and hold SHIFT, then press FF repeatedly until FONT displays.
5.Press FF repeatedly until PROP. SPACING displays.
6.Press MODE.
The setting changes to YES.
Microline 8480FB User’s Guide
Function Setting Menu • 27

7.Press and hold SHIFT, then press FF repeatedly until FRONT FEED displays.
8.Press FF repeatedly until FORM TEAR-OFF displays.
9.Press MODE.
The setting changes to ON.
10.Press LOAD: this saves your setting and exits the menu mode.
Reset to Factory Defaults
Note Always print the Function Setting Menu (see page 29) before you reset or change the settings. Printing the Function Setting Menu is the only way to have a record of the settings.
1.Turn the printer off.
2.Press and hold SEL and SHIFT while turning the printer on.
MENU INITIALIZE FNC. MENU
displays.
Microline 8480FB User’s Guide
Function Setting Menu • 28
Print the Menu
Note Always print the Function Settings Menu before you reset or change the settings. Printing the Function Settings Menu is the only way to have a record of the settings.
Single Sheet (Manual Feed)
Before Starting
1.Have a sheet of letter size or larger paper ready to print the menu.
2.Slide the sheet guide (1) to the right as far as it will go.
3.Make sure the Page Length (see page 35) set in the menu matches the paper you are using to print the menu.
4.Make sure manual feed is selected.
If continuous forms feed is selected, FRONT appears on the second line of the display.To switch to manual feed:
a.Press SEL to place the printer off-line.
b.Press MODE. The display changes to PATH CHANGE
FRONT
c.Press the MODE switch one or two times until MANUAL appears on the second line of the display.
The printer automatically switches to the manual path and returns on line.
Microline 8480FB User’s Guide
Function Setting Menu • 29

Print the Menu on Single Sheets
1.Turn the printer off.
2.Press and hold SELECT and MODE while turning the printer on.
3.When "RELEASE SW" displays, release the switches.
4.Load the paper on the platform.
5. The menu prints.
Continuous Forms (Front Feed)
Before Starting
1. Make sure continuous forms are loaded.
2.Make sure front feed is selected. If manual feed is selected, the second line of the display reads ALIGN1 (the default, or whatever alignment method you have selected).
Microline 8480FB User’s Guide
Function Setting Menu • 30
 Loading...