


 Loading...
® |
|
A Division of Cisco Systems, Inc. |
|
IP Telephony |
User Guide |
System |
|
Voice |
|
Model No. SPA9000 |
|
VoIPon Solutions www.voipon.co.uk sales@voipon.co.uk Tel: +44 (0) 1245 600560 |
|

IP Telephony System
Copyright and Trademarks
Specifications are subject to change without notice. Linksys is a registered trademark or trademark of Cisco Systems, Inc. and/or its affiliates in the U.S. and certain other countries. Copyright © 2006 Cisco Systems, Inc. All rights reserved. Other brands and product names are trademarks or registered trademarks of their respective holders.
WARNING: This product contains chemicals, including lead, known to the State of California to cause cancer, and birth defects or other reproductive harm. Wash hands after handling.
How to Use this Guide
The guide to the IP Telephony System has been designed to make understanding networking with the IP Telephony System easier than ever. Look for the following items when reading this User Guide:
This checkmark means there is a note of interest and is something you should pay special attention to while using the IP Telephony System.
This exclamation point means there is a caution or warning and is something that could damage your property or the IP Telephony System.
This question mark provides you with a reminder about something you might need to do while using the IP Telephony System.
In addition to these symbols, there are definitions for technical terms that are presented like this:
word: definition.
Also, each figure (diagram, screenshot, or other image) is provided with a figure number and description, like this:
Figure numbers and descriptions can also be found in the “List of Figures” section.
SPA9000-UG-60303B JL
VoIPon Solutions www.voipon.co.uk sales@voipon.co.uk Tel: +44 (0) 1245 600560
IP Telephony System
Table of Contents
Chapter 1: Introduction |
1 |
Welcome |
1 |
What’s in this Guide? |
2 |
Chapter 2: Applications for the IP Telephony System |
4 |
How Does the IP Telephony System Fit into My Business or Home? |
4 |
What Does the IP Telephony System Do? |
4 |
A Typical Scenario |
4 |
Which Call Management Features Does the IP Telephony System Offer? |
5 |
Chapter 3: Getting to Know the IP Telephony System |
6 |
The Back Panel |
6 |
The Front Panel |
7 |
Chapter 4: Getting Started |
8 |
Overview |
8 |
Before You Begin |
8 |
Instructions for Installing the IP Telephony System |
9 |
Receiving and Handling External Phone Calls |
13 |
Configuring the Auto-Attendant |
13 |
Chapter 5: Using the Interactive Voice Response Menu |
14 |
Overview |
14 |
Accessing the Interactive Voice Response Menu |
14 |
Using the Interactive Voice Response Menu |
14 |
Entering a Password |
19 |
Configuring the Settings for Your Internet Phone Service |
19 |
Configuring the Auto-Attendant Messages |
20 |
Chapter 6: Using the Web-based Utility |
22 |
Overview |
22 |
How to Access the Web-based Utility |
23 |
The PBX Status Screen |
23 |
The Router Tab |
25 |
The Voice Tab |
31 |
VoIPon Solutions www.voipon.co.uk sales@voipon.co.uk Tel: +44 (0) 1245 600560
IP Telephony System
Appendix A: Troubleshooting |
70 |
Common Problems and Solutions |
70 |
Frequently Asked Questions |
80 |
Appendix B: Configuring the Nighttime Auto-Attendant |
83 |
Description of the Auto-Attendant |
83 |
Instructions for Setting Up the Nighttime Auto-Attendant |
83 |
Appendix C: Dial Plan and Auto-Attendant Scripting for Advanced Users |
87 |
Overview |
87 |
Configuring Dial Plans |
87 |
Configuring Dial Plans for the Auto-Attendant |
89 |
Configuring the Auto-Attendant |
89 |
Appendix D: New Music for the Music-on-Hold Feature |
99 |
Overview |
99 |
Before You Begin |
99 |
Instructions for Converting the Music File |
100 |
Instructions for Configuring the IP Telephony System |
100 |
Appendix E: Finding the MAC Address and IP Address for Your |
|
Ethernet Adapter |
102 |
Windows 98 or Me Instructions |
102 |
Windows 2000 or XP Instructions |
102 |
For the Router’s Web-based Utility |
103 |
Appendix F: Windows Help |
104 |
Appendix G: Glossary |
105 |
Appendix H: Specifications |
110 |
Appendix I: Warranty Information |
114 |
Appendix J: Regulatory Information |
115 |
Appendix K: Contact Information |
121 |
Internet Telephony Service Provider (ITSP) |
121 |
Linksys |
121 |
VoIPon Solutions www.voipon.co.uk sales@voipon.co.uk Tel: +44 (0) 1245 600560
IP Telephony System
List of Figures
Figure 2-1: A Scenario for the IP Telephony System |
4 |
Figure 3-1: Back Panel |
6 |
Figure 3-2: Front Panel |
7 |
Figure 4-1: A Typical Scenario for the IP Telephony System |
8 |
Figure 4-2: Connect to the Phone 1 Port |
9 |
Figure 4-3: Connect to the Internet Port |
9 |
Figure 4-4: Connect to the Ethernet Port |
9 |
Figure 4-5: Connect to Power |
9 |
Figure 4-6: Voice - SIP Screen - PBX Parameters |
10 |
Figure 4-7: Router - WAN Setup Screen |
10 |
Figure 4-8: Voice - Line 1 Screen |
12 |
Figure 5-1: Auto-Attendant Options |
18 |
Figure 5-2: Auto-Attendant Message Options |
21 |
Figure 6-1: PBX Screen - Parking Lot |
24 |
Figure 6-2: PBX Screen - Inbound Call |
24 |
Figure 6-3: PBX Screen - Outbound Call |
24 |
Figure 6-4: Router - Status Screen |
25 |
Figure 6-5: Router - WAN Setup Screen |
27 |
Figure 6-6: Router - LAN Setup Screen |
29 |
Figure 6-7: Router - Application Screen |
30 |
Figure 6-8: Voice - Info Screen - Product Information |
31 |
Figure 6-9: Voice - Info Screen - System Status |
31 |
Figure 6-10: Voice - Info Screen - FXS Status |
32 |
Figure 6-11: Voice - Info Screen - Line Status |
33 |
Figure 6-12: Voice - Info Screen - Auto Attendant Prompt Status |
33 |
Figure 6-13: Voice - System Screen |
34 |
Figure 6-14: Voice - SIP Screen - SIP Parameters |
35 |
Figure 6-15: Voice - SIP Screen - SIP Timer Values |
36 |
VoIPon Solutions www.voipon.co.uk sales@voipon.co.uk Tel: +44 (0) 1245 600560
IP Telephony System |
|
Figure 6-16: Voice - SIP Screen - Response Status Code Handling |
37 |
Figure 6-17: Voice - SIP Screen - RTP Parameters |
37 |
Figure 6-18: Voice - SIP Screen - SDP Payload Types |
37 |
Figure 6-19: Voice - SIP Screen - NAT Support Parameters |
38 |
Figure 6-20: Voice - SIP Screen - PBX Parameters |
39 |
Figure 6-21: Voice - SIP Screen - Auto Attendant Parameters |
42 |
Figure 6-22: Voice - SIP Screen - PBX Phone Parameters |
44 |
Figure 6-23: Voice - Provisioning Screen - Configuration Profile |
45 |
Figure 6-24: Voice - Provisioning Screen - Firmware Upgrade |
46 |
Figure 6-25: Voice - Provisioning Screen - General Purpose Parameters |
47 |
Figure 6-26: Voice - Regional Screen - Call Progress Tones |
48 |
Figure 6-27: Voice - Regional Screen - Distinctive Ring Patterns |
49 |
Figure 6-28: Voice - Regional Screen - Distinctive Call Waiting Tone Patterns |
50 |
Figure 6-29: Voice - Regional Screen - Distinctive Ring/CWT Pattern Names |
50 |
Figure 6-30: Voice - Regional Screen - Ring and Call Waiting Tone Spec |
51 |
Figure 6-31: Voice - Regional Screen - Control Timer Values |
51 |
Figure 6-32: Voice - Regional Screen - Vertical Service Activation Codes |
52 |
Figure 6-33: Voice - Regional Screen - Vertical Service Announcement Codes 55 |
|
Figure 6-34: Voice - Regional Screen - Outbound Call Codec Selection Codes |
55 |
Figure 6-35: Voice - Regional Screen - Miscellaneous |
56 |
Figure 6-36: Voice - FXS 1 Screen - Network Settings |
59 |
Figure 6-37: Voice - FXS 1 Screen - SIP Settings |
59 |
Figure 6-38: Voice - FXS 1 Screen - Subscriber Information |
60 |
Figure 6-39: Voice - FXS 1 Screen - Dial Plan |
61 |
Figure 6-40: Voice - FXS 1 Screen - Streaming Audio Server |
61 |
Figure 6-41: Voice - FXS 1 Screen - Call Feature Settings |
61 |
Figure 6-42: Voice - FXS 1 Screen - Audio Configuration |
62 |
Figure 6-43: Voice - FXS 1 Screen - FXS Port Polarity Configuration |
64 |
Figure 6-44: Voice - Line 1 Screen - Network Settings |
65 |
Figure 6-45: Voice - Line 1 Screen - SIP Settings |
65 |
VoIPon Solutions www.voipon.co.uk sales@voipon.co.uk Tel: +44 (0) 1245 600560
IP Telephony System |
|
|
Figure 6-46: Voice - Line 1 Screen - Subscriber Information |
66 |
|
Figure 6-47: Voice - Line 1 |
Screen - Dial Plan |
68 |
Figure 6-48: Voice - Line 1 |
Screen - NAT Settings |
68 |
Figure 6-49: Voice - Line 1 |
Screen - Proxy and Registration |
68 |
Figure B-1: Auto-Attendant Message Options |
84 |
|
Figure B-2: Voice - SIP Screen - Auto Attendant Parameters |
85 |
|
Figure E-1: IP Configuration Screen |
102 |
|
Figure E-2: MAC Address/Adapter Address |
102 |
|
Figure E-3: MAC Address/Physical Address |
103 |
|
Figure E-4: MAC Address Clone |
103 |
|
VoIPon Solutions www.voipon.co.uk sales@voipon.co.uk Tel: +44 (0) 1245 600560

IP Telephony System
Chapter 1: Introduction
Welcome
Thank you for choosing the Linksys IP Telephony System. The System combines the rich feature set of legacy PBX (Private Branch eXchange) telephone systems with the convenience and cost advantages of Internet telephony. It supports common key system features such as an auto-attendant, music-on-hold, call forwarding, three-way call conferencing, and more.
The System is so easy to configure that a fully working system can be set up in minutes. New Linksys SPA-family Internet telephones are automatically detected and registered when they are connected to the System. While the System will work with any SIP-compatible Internet telephone, it is the ideal host for Linksys business telephones, including model number: SPA941. The System supports the advanced features of these phones, such as shared line appearances, hunt groups, call transfer, call park, and group paging. Plus, with its two FXS ports, the System can support traditional analog devices such as telephones, fax machines, answering machines, media adapters.
How does the System do all of this? By connecting your analog phones or fax machines to the System and connecting the System and Internet phones to your router, then the System can direct voice communications for your network.
But what does all of this mean?
Networks are useful tools for sharing Internet access and computer resources. Multiple computers can share Internet access, so you don’t need more than one high-speed Internet connection. With Internet phone service, your Internet access can now be shared by your Internet phones as well. You will be able to make phone calls using your Internet phone service account, even while another colleague is web browsing. Plus, you can access one printer from different computers and access data located on another computer’s hard drive (with the right permissions).
PCs on a wired network create a LAN, or Local Area Network. They are connected with Ethernet cables, which is why the network is called “wired”. The System takes your wired network and lets you integrate Internet phones and Internet phone service.
When you first install the System, Linksys strongly recommends that you use the Setup Wizard, which you can download from www.linksys.com. If you do not wish to run the Setup Wizard, then use the instructions in the Quick Installation or this User Guide to help you. These instructions should be all you need to get the most out of the IP Telephony System.
Chapter 1: Introduction
Welcome
NOTE: Some of these features are set up from the Internet phones.
network: a series of computers or devices connected for the purpose of data sharing, storage, and/or transmission between users.
lan (local area network): the computers and networking products that make up the network in your home or office.
ethernet: an IEEE standard network protocol that specifies how data is placed on and retrieved from a common transmission medium.
1
VoIPon Solutions www.voipon.co.uk sales@voipon.co.uk Tel: +44 (0) 1245 600560
IP Telephony System
What’s in this Guide?
This user guide covers the steps for setting up a network with the System. Most users will only need to use “Chapter 4: Getting Started.” When you’re finished, then you are ready to make calls within your system as well as calls to the outside world.
You also have other chapter available for reference:
•Chapter 1: Introduction
This chapter describes the System and this User Guide.
•Chapter 2: Applications
This chapter discusses the most common scenarios for the System.
•Chapter 3: Getting to Know the IP Telephony System
This chapter describes the physical features of the System.
•Chapter 5: Using the Interactive Voice Response Menu
This chapter explains how to configure the System’s network settings when you access its Interactive Voice Response Menu.
•Chapter 6: Using the Web-based Utility
This chapter explains how to configure the settings of the System through the Web-based Utility.
•Appendix A: Troubleshooting
This appendix describes some possible problems and solutions, as well as frequently asked questions, regarding installation and use of the System.
•Appendix B: Configuring the Nighttime Auto-Attendant
This appendix explains how to set up the auto-attendant for nighttime (non-business) hours.
•Appendix C: Dial Plan and Auto-Attendant Scripting for Advanced Users
This appendix explains how to define the dial plan and auto-attendant instructions. (These instructions are for advanced users only.)
•Appendix D: New Music for the Music-on-Hold Feature
This appendix explains how to replace the System’s default music file with your own music file.
•Appendix E: Finding the MAC Address and IP Address for Your Ethernet Adapter
This appendix instructs you on how to find the MAC address or Ethernet address of your PC’s Ethernet network adapter.
Chapter 1: Introduction |
2 |
What’s in this Guide? |
|
VoIPon Solutions www.voipon.co.uk sales@voipon.co.uk Tel: +44 (0) 1245 600560
IP Telephony System
•Appendix F: Windows Help
This appendix describes how you can use Windows Help for instructions about networking, such as installing the TCP/IP protocol.
•Appendix G: Glossary
This appendix gives a brief glossary of terms frequently used in networking.
•Appendix H: Specifications
This appendix provides the technical specifications for the System.
•Appendix I: Warranty Information
This appendix supplies the warranty information for the System.
•Appendix J: Regulatory Information
This appendix supplies the regulatory information regarding the System.
•Appendix K: Contact Information
This appendix provides contact information for a variety of Linksys resources, including Technical Support.
Chapter 1: Introduction |
3 |
What’s in this Guide? |
|
VoIPon Solutions www.voipon.co.uk sales@voipon.co.uk Tel: +44 (0) 1245 600560
IP Telephony System
Chapter 2: Applications for the IP Telephony System
How Does the IP Telephony System Fit into My Business or Home?
High-speed Internet access is a valuable resource. When you have more than one computer, chances are you want to share that Internet access with all of your computers. That’s when you create a network, a collection of devices connected to each other. A device called a router connects computers and other devices, so they can share a high-speed Internet connection and other resources, including data and printers.
One of the biggest benefits of the Internet is data communications, either e-mail or web browsing, whether you send a file to a client or download the latest software upgrade. With the System, you also get voice communications.
What Does the IP Telephony System Do?
The System connects multiple Internet phones to an Internet phone service. The System manages and routes all calls. Incoming calls go to the auto-attendant, an automated greeting system, or correct internal extension (each phone has its own extension number). Outgoing calls go to the correct external phone number (you can have more than one external phone number).
You can have not only more than one external phone number, but also up to four Internet Telephony Service Providers (ITSPs) for maximum flexibility.
NOTE: The basic configuration of the System lets you connect up to four Internet phones and use up to four ITSPs. To expand the basic configuration, contact your primary ITSP for more information.
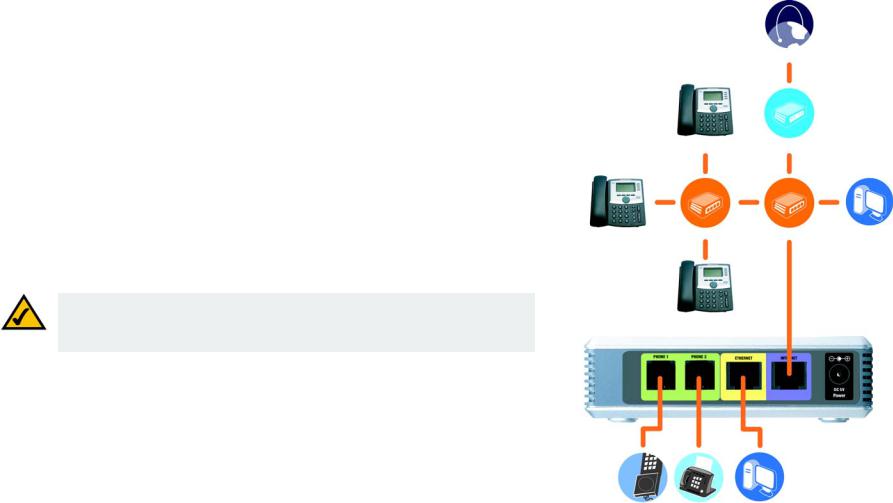
A Typical Scenario
Typically, you connect the Internet port of the System to a local network port of your router. Then connect a switch to another local network port of your router. Use this switch to connect Internet phones, computers, and other devices. Then connect an administration computer to the Ethernet port of the System.
If you have analog telephones or fax machines, you can connect them to the Phone ports, so you can also use those phones to make Internet phone or fax calls. (More details are available in “Chapter 4: Getting Started.”)
Chapter 2: Applications for the IP Telephony System
How Does the IP Telephony System Fit into My Business or Home?
Internet
SPA941 Cable/DSL Modem
SPA941 |
Switch |
Router |
Desktop |
|
|
|
Computer |
SPA941
Analog |
Fax |
Administration |
Phone |
|
Computer |
Figure 2-1: A Scenario for the IP Telephony System
4
VoIPon Solutions www.voipon.co.uk sales@voipon.co.uk Tel: +44 (0) 1245 600560

IP Telephony System
What Kind of Router Should I Use?
For your network, get the highest-performance router possible. For best results, use a QoS (Quality of Service) router, so it can assign top priority to voice traffic.
What Kind of Switch Should I Use?
Again, performance is key. For best results, use a switch that offers QoS (Quality of Service) and full wire-speed switching. QoS enables the switch to give top priority to voice traffic, while full wire-speed switching lets it forward packets as fast as your network can deliver them. The next best choice is a switch featuring QoS (Quality of Service).
What if I Keep My Traditional Phone Service?
Traditional phone service, also known as Plain Old Telephone Service (POTS), runs on a network called the Public Switched Telephone Network (PSTN). If you decide to keep traditional phone service, then connect the Analog Telephone Adapter (model number: SPA3000) to the switch. (For more information, refer to the SPA3000 documentation.)
Which Call Management Features Does the IP Telephony System Offer?
Beyond basic call routing, the System offers several powerful and sophisticated features:
•Auto-Attendant. An automated system guides each caller to the appropriate contact.
•Music-on-Hold. You can combine the auto-attendant feature with the musicor information-on-hold feature, so the caller has a richer experience with your call system.
•Call Hunt. You can designate which Internet phones receive outside calls. You can even have calls ring multiple phones, either simultaneously or one at a time.
•Paging. When you want to page all of the Internet phones, you can use the System.
•Dial Plans. When you have more than one dial plan, you can route outgoing calls to take advantage of the best rates available for the different types of calls.
After setup of the System, you will have dynamic and feature-rich Internet voice communications for your business or home.
Chapter 2: Applications for the IP Telephony System
Which Call Management Features Does the IP Telephony System Offer?
NOTE: If your ITSP configured the System for you, then these features may already be set up. Check with your ITSP for more information.
(To set up these features yourself, refer to “Chapter 6: Using the Web-based Utility.”)
5
VoIPon Solutions www.voipon.co.uk sales@voipon.co.uk Tel: +44 (0) 1245 600560
IP Telephony System
Chapter 3: Getting to Know the IP Telephony System
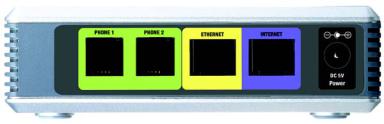
The Back Panel
The System’s ports are located on its back panel.
|
Figure 3-1: Back Panel |
PHONE 1/2 |
The PHONE 1/2 ports allow you to connect analog telephones (or fax machines) to the System |
|
using RJ-11 telephone cables (not included). |
ETHERNET |
The ETHERNET port connects to an administration computer, so you can access the System’s |
|
Web-based Utility for configuration. |
INTERNET |
This INTERNET port connects to either a router or broadband modem. |
Power |
The Power port is where you will connect the power adapter. |
Chapter 3: Getting to Know the IP Telephony System |
6 |
The Back Panel |
|
VoIPon Solutions www.voipon.co.uk sales@voipon.co.uk Tel: +44 (0) 1245 600560
IP Telephony System
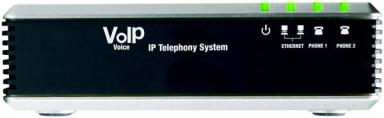
The Front Panel
The System’s LEDs are located on its front panel.
|
Figure 3-2: Front Panel |
Power |
Green. The power LED is solidly lit when the System is powered on and connected to the |
|
Internet. It flashes when there is no Internet connection. |
ETHERNET |
Green. The ETHERNET LED is solidly lit when there is an Internet connection. It flashes when |
|
there is network activity. |
PHONE 1/2 |
Green. The PHONE 1/2 LED is solidly lit when the phone is on-hook and registered. (The |
|
connection is registered if your Internet phone service account is active.) The LED is not lit |
|
when the phone is on-hook and not registered. It flashes when the phone is off-hook. |
Chapter 3: Getting to Know the IP Telephony System |
7 |
The Front Panel |
|
VoIPon Solutions www.voipon.co.uk sales@voipon.co.uk Tel: +44 (0) 1245 600560
IP Telephony System
Chapter 4: Getting Started
Overview
For first-time installation of the System, Linksys strongly recommends using the Setup Wizard, which you can download from www.linksys.com. For advanced users, you may follow the instructions in this chapter, and then use the Web-based Utility for additional configuration (refer to “Chapter 6: Using the Web-based Utility”). To use the Interactive Voice Response Menu, proceed to “Chapter 5: Using the Interactive Voice Response Menu.”
Before You Begin
Make sure you have the following:
•IP Telephony System (model number: SPA9000)
•One or more Internet phones (for example, Linksys SPA-family IP Phones, model number: SPA941)
•A router and cable/DSL modem (or gateway)
•One or more Ethernet network switches (so you can connect Internet phones or computers)
NOTE: For best results, use a switch that offers QoS (Quality of Service) and full wire-speed switching. QoS enables the switch to give top priority to voice traffic, while full wire-speed switching lets it forward packets as fast as your network can deliver them. The next best choice is a QoS (Quality of Service) switch.
•At least one active Internet phone service account and its settings if you want to make external calls
•An active Internet connection if you want to make external calls
•At least one computer for configuration of the System and Internet phones
•Two or more Ethernet network cables
•Analog telephones or fax machines (optional)
Chapter 4: Getting Started
Overview
Internet
SPA941 Cable/DSL Modem
SPA941 |
Switch |
Router |
Desktop |
|
|
|
Computer |
SPA941
Analog |
Fax |
Administration |
Phone |
|
Computer |
Figure 4-1: A Typical Scenario for the IP Telephony System
8
VoIPon Solutions www.voipon.co.uk sales@voipon.co.uk Tel: +44 (0) 1245 600560

IP Telephony System
Instructions for Installing the IP Telephony System
Internal Calls
To install the System for internal calls, you will do the following:
•connect and configure the System
•connect the Internet phones
Connect and Configure the System
1.(optional) Plug an analog telephone into the Phone 1 port of the System.
2.(optional) If you have a second analog telephone or fax machine, plug it into the Phone 2 port of the System.
IMPORTANT: Do not connect the Phone port to a telephone wall jack. Make sure you only connect a telephone or fax machine to the Phone port. Otherwise, the System or the telephone wiring in your home or office may be damaged.
3.Connect an Ethernet network cable to the Internet port of the System. Then connect the other end of the cable to one of the Ethernet ports on your router.
4.Connect a different Ethernet network cable to the Ethernet port of the System. Then connect the other end to the computer you will use to manage the System (this will be called the administration computer).
5.Connect the included power adapter to the Power port of the System, and then plug the power adapter into an electrical outlet.
6.Launch the web browser on the administration computer.
7.Enter 192.168.0.1/admin/voice/advanced in the Address field (192.168.0.1 is the default local IP address of the System). Then press the Enter key.
Chapter 4: Getting Started
Instructions for Installing the IP Telephony System
ip (internet protocol): a protocol used to send data over a network.
ip address: the address used to identify a computer or device on a network.
Figure 4-2: Connect to the Phone 1 Port
Figure 4-3: Connect to the Internet Port
Figure 4-4: Connect to the Ethernet Port
Figure 4-5: Connect to Power
9
VoIPon Solutions www.voipon.co.uk sales@voipon.co.uk Tel: +44 (0) 1245 600560

IP Telephony System
8.The Voice - Info screen will appear. Click the SIP tab.
9.In the PBX Parameters section, select WAN from the Proxy Network Interface drop-down menu.
10.Click the Submit All Changes button.
11.The Voice - Info screen will appear. Click the Router tab.
12.Click the WAN Setup tab.
13.From the Connection Type drop-down menu, select Static IP.
14.In the Static IP Settings section, complete the Static IP, NetMask, and Gateway fields.
Static IP. Enter a static IP address appropriate for your network. Write this down; you will use it later.
NOTE: Make sure your router will not assign the System’s static IP address to any other network device. For example, you can assign a static IP address outside of your router’s DHCP IP address range; however, it must be within the router’s subnet range.
For more information about IP addressing, refer to the router’s documentation.
NetMask. Enter the subnet mask of your network router.
Gateway. Enter the local IP address of your network router or gateway.
15.In the Optional Settings section, complete the Primary DNS field.
Primary DNS. Enter the DNS IP address of your network router.
16.In the Remote Management section, select yes from the Enable WAN Web Server drop-down menu.
17.Click the Submit All Changes button.
Chapter 4: Getting Started
Instructions for Installing the IP Telephony System
Figure 4-6: Voice - SIP Screen - PBX Parameters
Figure 4-7: Router - WAN Setup Screen
10
VoIPon Solutions www.voipon.co.uk sales@voipon.co.uk Tel: +44 (0) 1245 600560

IP Telephony System
18.The Router - Status screen will appear. Verify that the following settings match your entries:
•WAN Connection Type - Static IP
•Current IP
•Current Netmask
•Current Gateway
•Primary DNS
Proceed to the next section, “Connect the Internet Phones.”
Connect the Internet Phones
1.Connect an Ethernet network cable to one of the Ethernet ports on your router. Then connect the other end of the cable to an Ethernet port on a network switch.
2.Connect the switch’s power adapter to its power port, and then plug the power adapter into an electrical outlet.
3.Connect an Ethernet network cable to an Internet phone. Then connect the other end to one of the Ethernet ports on the switch.
(If the Internet phone has been used before, reset it to its factory default settings first. Refer to its documentation for more information.)
4.Connect the Internet phone’s power adapter to its power port, and then plug the power adapter into an electrical outlet.
5.The Internet phone will reboot two to three times (each reboot may take up to one minute). The System will automatically assign an extension number to the Internet phone. When the Internet phone displays it extension number, then it is ready for use.
NOTE: The System automatically registers Linksys SPA-family Internet phones (including model number SPA941). If you connect a different SIP-compatible phone, then registration will be manual. Refer to the documentation for your phone.
6. Repeat steps 3-5 until you have installed all of your Internet phones.
Congratulations! Now you can make calls from one Internet phone to another by dialing an extension number.
Continue to the next section to configure the System for external calls.
Chapter 4: Getting Started
Instructions for Installing the IP Telephony System
NOTE: The default SIP port of the System is 6060.
11
VoIPon Solutions www.voipon.co.uk sales@voipon.co.uk Tel: +44 (0) 1245 600560
IP Telephony System
External Calls
For external calls, make sure you have an active Internet connection. Then configure the settings for your Internet phone service account on the System.
1.Launch the web browser on the administration computer.
2.Enter <IP address of the System>/admin/voice/advanced in the Address field (use the static IP address you previously assigned to the System). Then press the Enter key.
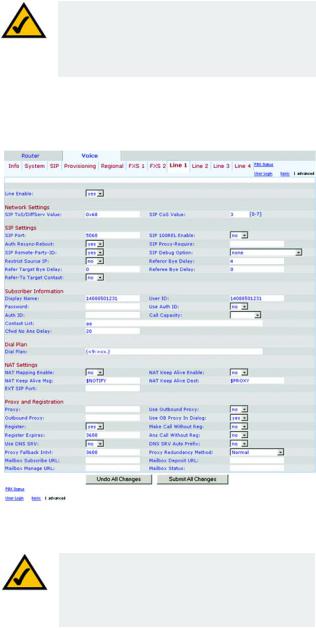
3.The Voice - Info screen will appear. Click the Line 1 tab.
4.On the Line 1 screen, enter the settings for your Internet phone service account.
Subscriber Information
User ID. Enter the user ID (also called the account number) supplied by your ITSP. Do not use any hyphens, spaces, or other punctuation.
Password. Enter the case-sensitive password supplied by your ITSP.
Proxy and Registration
Proxy. Enter the proxy address supplied by your ITSP.
If your ITSP supplied additional settings, enter those as well. Refer to the instructions your ITSP gave you.
5.Click the Submit All Changes button to save your new settings.
6.The System will reboot itself. Then the Internet phones will reboot themselves.
7.The Voice - Info screen will appear. In the Line 1 Status section, make sure that the Registration Status says, “Registered.”
You are now ready to make your first external call. Use any phone connected to the System, and dial 9 first when you make an external call with the default US dial plan.
You can use analog telephones to make external calls; however, you cannot receive calls on any analog telephones unless you configure the appropriate settings. Refer to the Voice - FXS 1 section of “Chapter 6: Using the Web-based Utility” for instructions.
Congratulations! Now you can make external calls using the System.
Chapter 4: Getting Started
Instructions for Installing the IP Telephony System
NOTE: If your Internet Telephony Service Provider (ITSP) supplied the System, then it may be pre-configured for you, and you do not need to change any settings. Refer to the instructions supplied by your ITSP for more information.
Figure 4-8: Voice - Line 1 Screen
NOTE: If you cannot make calls with the default US dial plan, visit www.linksys.com/kb for additional dial plans, or refer to “Appendix C: Dial Plan and Auto-Attendant Scripting for Advanced Users” to write your own script.
12
VoIPon Solutions www.voipon.co.uk sales@voipon.co.uk Tel: +44 (0) 1245 600560

IP Telephony System
Receiving and Handling External Phone Calls
To receive external phone calls, you need to know the Direct Inward Dialing (DID) number assigned to you by your ITSP. Usually this is the same as your user ID, but it can be a different number. Check with your ITSP to find out what your DID number is.
Then decide which Internet phones will ring when an outside caller calls your DID number. The default is aa, which stands for auto-attendant, an automated system that picks up external calls and plays pre-recorded voice messages. If you want only the auto-attendant to receive a call, keep the default setting. When the auto-attendant receives a call, it will prompt the caller to dial the appropriate extension.
If you want specific Internet phones to ring when your DID number is called, then refer to “Chapter 6: Using the
Web-based Utility” for instructions about the Contact List setting.
NOTE: If you decide to keep traditional phone service, which is also known as Plain Old Telephone Service (POTS), then you will use the Linksys Analog Telephone Adapter (model number: SPA3000). For details, refer to the Analog Telephone Adapter’s documentation.
Configuring the Auto-Attendant
By default, the daytime auto-attendant is enabled, so the first message it plays (“If you know your party’s extension, you may enter it now”) is suitable for business hours. If you want a caller to hear a different greeting during nighttime (non-business) hours, then refer to “Appendix B: Configuring the Nighttime Auto-Attendant.”
To use the Web-based Utility for additional configuration, refer to “Chapter 6: Using the Web-based
Utility.” To use the Interactive Voice Response Menu, proceed to “Chapter 5: Using the Voice Interactive
Response Menu.”
Chapter 4: Getting Started |
13 |
Receiving and Handling External Phone Calls |
|
VoIPon Solutions www.voipon.co.uk sales@voipon.co.uk Tel: +44 (0) 1245 600560
IP Telephony System
Chapter 5: Using the Interactive Voice Response Menu
Overview
You may need to manually configure the System by entering the settings provided by your Internet Telephony Service Provider (ITSP). This chapter explains how to use the Interactive Voice Response Menu to configure the System’s network settings and record auto-attendant messages. You will use the telephone’s keypad to enter your commands and select choices, and the System will use voice responses.
For more advanced configuration, refer to “Chapter 6: Using the Web-based Utility.”
NOTE: If your ITSP sent you the System, then it may be pre-configured for you, and you do not need to change any settings. Refer to the instructions supplied by your ITSP for more information.
Accessing the Interactive Voice Response Menu
1.Use a telephone connected to the Phone 1 or Phone 2 port of the System. (You can only access the Interactive Voice Response Menu through an analog telephone, not any of the Internet phones.)
2.Press **** (in other words, press the star key four times).
3.Wait until you hear “Linksys configuration menu. Please enter the option followed by the # (pound) key or hang up to exit.”
4.Refer to the following table that lists actions, commands, menu choices, and descriptions. After you select an option, press the # (pound) key. To exit the menu, hang up the telephone.
Using the Interactive Voice Response Menu
While entering a value, such as an IP address, you may exit without entering any changes. Press the * (star) key twice within half a second. Otherwise, the * will be treated as a decimal point or dot.
After entering a value, such as an IP address, press the # (pound) key to indicate you have finished your selection. To save the new setting, press 1. To review the new setting, press 2. To re-enter the new setting, press 3. To cancel your entry and return to the main menu, press * (star).
Chapter 5: Using the Interactive Voice Response Menu |
14 |
Overview |
|
VoIPon Solutions www.voipon.co.uk sales@voipon.co.uk Tel: +44 (0) 1245 600560
IP Telephony System
For example, to enter the IP address 191.168.1.105 by keypad, press these keys: 191*168*1*105. Press the # (pound) key to indicate that you have finished entering the IP address. Then press 1 to save the IP address or press the * (star) key to cancel your entry and return to the main menu.
If the menu is inactive for more than one minute, the System will time out. You will need to re-enter the menu by pressing ****.
The settings you have saved will take effect after you have hung up the telephone. The System may reboot at this time.
Interactive Voice Response Menu
Action |
Command |
Choices |
Description |
|
(press these |
|
|
|
keys on the |
|
|
|
telephone) |
|
|
|
|
|
|
Enter Interactive Voice |
**** |
|
Use this command to enter the |
Response Menu |
|
|
Interactive Voice Response Menu. Do |
|
|
|
not press any other keys until you |
|
|
|
hear, “Linksys configuration menu. |
|
|
|
Please enter the option followed by |
|
|
|
the # (pound) key or hang up to exit.” |
|
|
|
|
Check Internet |
100 |
|
Hear the Internet connection type of |
Connection Type |
|
|
the System. |
|
|
|
|
Check Internet IP |
110 |
|
Hear the IP address assigned to the |
Address |
|
|
System’s Internet (external) interface. |
|
|
|
|
Check Network Mask |
120 |
|
Hear the network or subnet mask |
(or Subnet Mask) |
|
|
assigned to the System. |
|
|
|
|
Check Gateway IP |
130 |
|
Hear the IP address of the gateway |
Address |
|
|
(usually the network router). |
|
|
|
|
Check MAC Address |
140 |
|
Hear the MAC address of the System |
|
|
|
in hexadecimal string format. |
|
|
|
|
Check Firmware |
150 |
|
Hear the version number of the |
Version |
|
|
firmware currently running on the |
|
|
|
System. |
|
|
|
|
Chapter 5: Using the Interactive Voice Response Menu
Using the Interactive Voice Response Menu
ip (internet protocol): a protocol used to send data over a network.
ip address: the address used to identify a computer or device on a network.
subnet mask: an address code that determines the size of the network.
gateway: a device that forwards Internet traffic from your local area network.
mac address: the unique address that a manufacturer assigns to each networking device.
firmware: the programming code that runs a networking device.
15
VoIPon Solutions www.voipon.co.uk sales@voipon.co.uk Tel: +44 (0) 1245 600560
IP Telephony System
Interactive Voice Response Menu
Action |
Command |
Choices |
Description |
|
(press these |
|
|
|
keys on the |
|
|
|
telephone) |
|
|
|
|
|
|
Check Primary DNS |
160 |
|
Hear the IP address of the primary |
Server IP Address |
|
|
DNS (Domain Name Service) server. |
|
|
|
|
Check Internet Web |
170 |
|
Hear the port number of the Internet |
Server Port |
|
|
Web server used for the Web-based |
|
|
|
Utility. |
|
|
|
|
Check Local IP |
210 |
|
Hear the local IP address of the |
Address |
|
|
System. |
|
|
|
|
Set Internet |
101 |
Press 0 to use DHCP. |
Select the type of Internet connection |
Connection Type |
|
Press 1 to use a static IP |
you are using. Refer to the |
|
|
address. |
documentation supplied by your |
|
|
Press 2 to use PPPoE. |
Internet service provider. |
|
|
|
|
Set Static IP Address |
111 |
Enter the IP address |
First, set the Internet Connection Type |
|
|
using numbers on the |
to static IP address; otherwise, you |
|
|
telephone keypad. Use |
will hear, “Invalid Option,” if you try to |
|
|
the * (star) key when |
set the static IP address. |
|
|
entering a decimal point. |
|
|
|
|
|
Set Network (or |
121 |
Enter the network or |
First, set the Internet Connection Type |
Subnet) Mask |
|
subnet mask using |
to static IP address; otherwise, you |
|
|
numbers on the |
will hear, “Invalid Option,” if you try to |
|
|
telephone keypad. Use |
set the network or subnet mask. |
|
|
the * (star) key when |
|
|
|
entering a decimal point. |
|
|
|
|
|
Set Gateway IP |
131 |
Enter the IP address |
First, set the Internet Connection Type |
Address |
|
using numbers on the |
to static IP address; otherwise, you |
|
|
telephone keypad. Use |
will hear, “Invalid Option,” if you try to |
|
|
the * (star) key when |
set the gateway IP address. |
|
|
entering a decimal point. |
|
|
|
|
|
Chapter 5: Using the Interactive Voice Response Menu
Using the Interactive Voice Response Menu
dhcp (dynamic host configuration protocol): a protocol that lets one device on a local network, known as a DHCP server, assign temporary IP addresses to the other network devices, typically computers.
static ip address: a fixed address assigned to a computer or device that is connected to a network.
pppoe: a type of broadband connection that provides authentication (username and password) in addition to data transport.
16
VoIPon Solutions www.voipon.co.uk sales@voipon.co.uk Tel: +44 (0) 1245 600560

IP Telephony System
Interactive Voice Response Menu
Action |
Command |
Choices |
Description |
|
(press these |
|
|
|
keys on the |
|
|
|
telephone) |
|
|
|
|
|
|
Set Primary DNS |
161 |
Enter the IP address |
First, set the Internet Connection Type |
Server IP Address |
|
using numbers on the |
to static IP address; otherwise, you |
|
|
telephone keypad. Use |
will hear, “Invalid Option,” if you try to |
|
|
the * (star) key when |
set the IP address of the primary DNS |
|
|
entering a decimal point. |
server. |
|
|
|
|
Set the Mode |
201 |
Press 0 to select the |
Use the router/NAT mode when the |
|
|
router/NAT mode. |
Internet phones are on the Local Area |
|
|
Press 1 to select the |
Network (LAN) side. |
|
|
bridge/switch mode. |
|
|
|
|
Use the bridge/switch mode when the |
|
|
|
Internet phones are on the Wide Area |
|
|
|
Network (WAN) side. |
|
|
|
|
Configure |
72255 |
|
Refer to the “Configuring the |
Auto-Attendant |
|
|
Auto-Attendant Messages” section at |
Messages |
|
|
the end of this chapter. |
|
|
|
|
Enable/Disable WAN |
7932 |
Press 1 to enable. |
Use this setting to enable or disable |
Access to the |
|
Press 0 to disable. |
WAN access to the Web-based Utility. |
Web-based Utility |
|
|
(This Utility lets you configure the |
|
|
|
System.) |
|
|
|
|
Manual Reboot |
732668 |
|
After you hear, “Option successful,” |
|
|
|
hang up the phone. The System will |
|
|
|
automatically reboot. |
|
|
|
|
Factory Reset |
73738 |
Press 1 to confirm. |
If necessary, enter the password. The |
|
|
Press * (star) to cancel. |
System will request confirmation; |
|
|
|
enter 1 to confirm. You will hear, |
|
|
|
“Option successful.” Hang up the |
|
|
|
phone. The System will reboot, and all |
|
|
|
settings will be reset to their factory |
|
|
|
default settings. |
|
|
|
|
Chapter 5: Using the Interactive Voice Response Menu
Using the Interactive Voice Response Menu
NOTE: This feature may be protected by a password available only from your ITSP.
If you need to enter a password, refer to the following section, “Entering a Password.”
17
VoIPon Solutions www.voipon.co.uk sales@voipon.co.uk Tel: +44 (0) 1245 600560
IP Telephony System
Interactive Voice Response Menu
Action |
Command |
Choices |
Description |
|
(press these |
|
|
|
keys on the |
|
|
|
telephone) |
|
|
|
|
|
|
Change |
79228 |
Press 0 to use the |
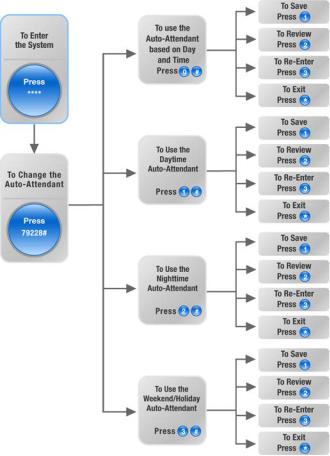
Use this setting to select the |
Auto-Attendant |
|
auto-attendant based on |
auto-attendant you want to use. You |
|
|
day and time. |
can have the auto-attendant change |
|
|
Press 1 to use the |
depending on the day and time, or you |
|
|
Daytime Auto-Attendant. |
can use one auto-attendant for all |
|
|
Press 2 to use the |
days and hours. (Make sure the |
|
|
Nighttime |
auto-attendant you select has been |
|
|
Auto-Attendant. |
enabled through the Web-based |
|
|
Press 3 to use the |
Utility; otherwise, the auto-attendant |
|
|
Weekend/Holiday |
feature will not work.) |
|
|
Auto-Attendant. |
|
|
|
|
For more information, refer to |
|
|
|
“Chapter 6: Using the Web-based |
|
|
|
Utility.” |
|
|
|
|
User Factory Reset |
877778 |
Press 1 to confirm. |
The System will request confirmation; |
|
|
Press * (star) to cancel. |
enter 1 to confirm. You will hear, |
|
|
|
“Option successful.” Hang up the |
|
|
|
phone. The System will reboot and all |
|
|
|
user-configurable settings will be |
|
|
|
reset to their factory default settings. |
|
|
|
|
Figure 5-1: Auto-Attendant Options
Chapter 5: Using the Interactive Voice Response Menu |
18 |
Using the Interactive Voice Response Menu |
|
VoIPon Solutions www.voipon.co.uk sales@voipon.co.uk Tel: +44 (0) 1245 600560

IP Telephony System
Entering a Password
You may be prompted to enter a password when you want to reset the System to its factory default settings. To enter the password, use the phone’s keypad, and follow the appropriate instructions.
•To enter A, B, C, a, b, or c — press 2.
•To enter D, E, F, d, e, or f — press 3.
•To enter G, H, I, g, h, or i — press 4.
•To enter J, K, L, j, k, or l — press 5.
•To enter M, N, O, m, n, or o — press 6.
•To enter P, Q, R, S, o, q, r, or s — press 7.
•To enter T, U, V, t, u, or v — press 8.
•To enter W, X, Y, Z, w, x, y, or z — press 9.
•To enter all other characters, press 0.
NOTE: These bulleted instructions only apply when you are entering a password. At all other times, pressing a number only selects a number, not a letter or punctuation mark.
For example, to enter the password phone@321 by keypad, press these keys: 746630321. Then press the # (pound) key to indicate that you have finished entering the password. To cancel your entry and return to the main menu, press * (star).
Configuring the Settings for Your Internet Phone Service
If you want to change the settings for your Internet phone service, refer to the instructions provided by your ITSP and “Chapter 6: Using the Web-based Utility.”
Chapter 5: Using the Interactive Voice Response Menu |
19 |
Entering a Password |
|
VoIPon Solutions www.voipon.co.uk sales@voipon.co.uk Tel: +44 (0) 1245 600560
IP Telephony System
Configuring the Auto-Attendant Messages
The System provides a feature called the auto-attendant, which automatically answers incoming calls with greetings or directory messages. It can handle up to 10 incoming calls and uses the default user ID aa.
Auto-Attendant Messages
You can save up to 10 customized greetings. The first four have default messages, which can be changed through the Interactive Voice Response Menu.
Prompt ID |
Default Audio Message |
|
|
1 |
“If you know your party’s extension, you may enter it now.” |
|
|
2 |
“Your call has been forwarded.” |
|
|
3 |
“Not a valid extension, please try again.” |
|
|
4 |
“Goodbye.” |
|
|
The recorded messages will be encoded with G711U and saved in flash memory. These messages will be erased whenever you reset the System to its factory default settings. The maximum length of any message is one minute. You can record up to 94.5 seconds of audio, excluding the default messages. When there is not enough memory left, the Interactive Voice Response Menu will automatically end the recording.
You can access the auto-attendant prompt settings through the Interactive Voice Response Menu.
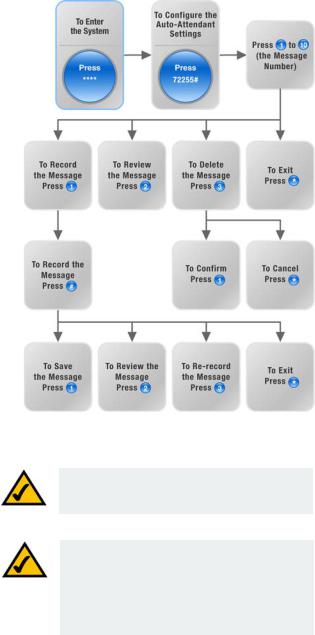
1.Using one of the analog telephones connected to the System, press **** (in other words, press the star key four times).
2.Wait until you hear “Linksys configuration menu. Please enter the option followed by the # (pound) key or hang up to exit.”
3.Press 72255# to access the auto-attendant message settings.
4.You will hear, “Please enter the message number followed by the # (pound) key.” Enter the number of the message you wish to record, review, or delete.
5.The Interactive Voice Response Menu will say, “Enter 1 to record. Enter 2 to review. Enter 3 to delete. Enter * to exit.” Follow the instructions for your selection.
Chapter 5: Using the Interactive Voice Response Menu |
20 |
Configuring the Auto-Attendant Messages |
|
VoIPon Solutions www.voipon.co.uk sales@voipon.co.uk Tel: +44 (0) 1245 600560
IP Telephony System
1 to Record
a.If you entered 1, you will hear, “You may record your message after the tone. When finished, press #.”
b.After you record the message, you will hear, “To save, enter 1. To review, enter 2. To re-record, enter 3. To exit, enter *.”
c.Follow the instructions for the entry you have selected.
If you entered 1, the new message will be saved. You will be returned to the menu described in step 5. If you entered 2, you will hear the message played. You will be returned to the menu described in step b. If you entered 3, you will be returned to the menu in step a.
If you entered *, you will be returned to the menu in step 5.
2 to Review
If you entered 2, you will hear the message played. You will be returned to the menu described in step 5.
3 to Delete
a.If you entered 3, you will hear, “Enter 1 to confirm; enter * to exit.”
b.If you entered 1, the message will be erased. You will be returned to the menu described in step 5.
If you entered *, you will be returned to the previous menu described in step 5.
* to Exit
If you entered *, you will be returned to the previous menu in step 4.
Through the Web-based Utility, you can configure the auto-attendant to answer calls in a specific number of seconds. By default, the auto-attendant answer delay is set to 12 seconds for the daytime hours, while it is set to 0 seconds for nighttime hours and weekends.
For status information about the auto-attendant messages or to configure additional settings, such as the auto-attendant answer delay, refer to “Chapter 6: Using the Web-based Utility.”
Chapter 5: Using the Interactive Voice Response Menu
Configuring the Auto-Attendant Messages
Figure 5-2: Auto-Attendant Message Options
NOTE: If there is not enough memory left to record a new message, then you will hear, “Option failed” and be returned to step 4.
NOTE: If the message you want to save is longer than 15 seconds, then you will hear, “One moment, please.” This indicates that it will take several seconds to save the message. After the message has been saved, you can continue to use the Interactive Voice Response Menu.
21
VoIPon Solutions www.voipon.co.uk sales@voipon.co.uk Tel: +44 (0) 1245 600560

IP Telephony System
Chapter 6: Using the Web-based Utility
Overview
When you first install the System, Linksys strongly recommends that you use the Setup Wizard, which you can download from www.linksys.com. If you do not wish to run the Setup Wizard, you can use the Web-based Utility to configure the System.
The System may have been pre-configured by your Internet Telephony Service Provider (ITSP), so you may not have to make any changes. If you do wish to make changes, follow the instructions in this chapter.
The Web-based Utility offers two levels of access: user and admin (administrator). Your level of access depends on your service provider’s policies. Also, access to some settings may be protected or blocked, so that service settings cannot be accidentally changed. For more information, contact your ITSP.
This chapter will describe each web page of the Web-based Utility and each page’s key functions. The Internet connection settings are configured on the Router - WAN Setup screen, while some of the most popular features: auto-attendant, music-on-hold, and call hunt are configured on the Voice - SIP screen. The Utility can be accessed via your web browser through use of a computer on your network.
There are two main tabs: Router and Voice. Additional tabs will be available after you click one of the main tabs.
Router
•Status. This screen displays routing information about the System.
•WAN Setup. Use this screen to configure the Internet connection, MAC clone, remote management, QoS, VLAN, and optional settings.
•LAN Setup. Use this screen to configure the local network, dynamic DHCP, and static DHCP lease settings.
•Application. On this screen, configure port forwarding, DMZ, and reserved ports range settings.
Voice
•Info. This screen displays voice-related information about the System.
•System. Use this screen to configure system settings. In most cases, you should not change these settings unless instructed to do by your ITSP.
Chapter 6: Using the Web-based Utility
Overview
NOTE: If you are not sure how to configure the settings, then keep the default settings.
22
VoIPon Solutions www.voipon.co.uk sales@voipon.co.uk Tel: +44 (0) 1245 600560

IP Telephony System
•SIP. Configure service, music-on-hold, group paging, call hunt, and auto-attendant settings on this screen. In most cases, do not change service settings unless instructed to do so by your ITSP.
•Provisioning. Use this screen to configure service provisioning settings. In most cases, you should not change these settings unless instructed to do by your ITSP.
•Regional. Use this screen to configure call settings. In most cases, you should not change these settings unless instructed to do by your ITSP.
•FXS 1/2. Use the appropriate screen to configure settings for each FXS (Phone) port on the System.
•Line 1/2/3/4. Use the appropriate screen to configure settings for each external Internet phone line.
How to Access the Web-based Utility
To access the Web-based Utility of the System, launch Internet Explorer or Netscape Navigator on the administration computer connected to the System’s Ethernet port. If the System uses its default address, then enter 192.168.0.1 in the Address field. If you have assigned a static IP address to the System, then enter <IP address of the System> in the Address field. Press the Enter key.
Enter your user name and password. The default user name for administrative access is admin, and the default user name for user access is user. (These user names cannot be changed.) Then enter the password supplied by your ITSP. (By default, there is no password, so if you were not given a password, then leave this field blank.)
To view the status information for the phones and their calls, click PBX Status. To switch to a different login, click User Login or Admin Login. Enter the appropriate login information. Two views of the Web-based Utility are available. Click basic to view basic settings, or click advanced to view advanced settings.
When you have finished making changes on a screen, click the Submit All Changes button to save the changes, or click the Undo All Changes button to undo your changes. When changes are saved, the System may reboot.
The PBX Status Screen
This screen shows status information for the phones and their calls.
Registration
This section shows the registration information for the phones.
Registration. To remove a phone’s registration, click its checkbox. Then click the Delete button.
Chapter 6: Using the Web-based Utility
How to Access the Web-based Utility
NOTE: If your ITSP supplied the System, then it may be pre-configured for you, and you do not need to change any settings. Refer to the instructions supplied by your ITSP for more information.
23
VoIPon Solutions www.voipon.co.uk sales@voipon.co.uk Tel: +44 (0) 1245 600560
Loading...